
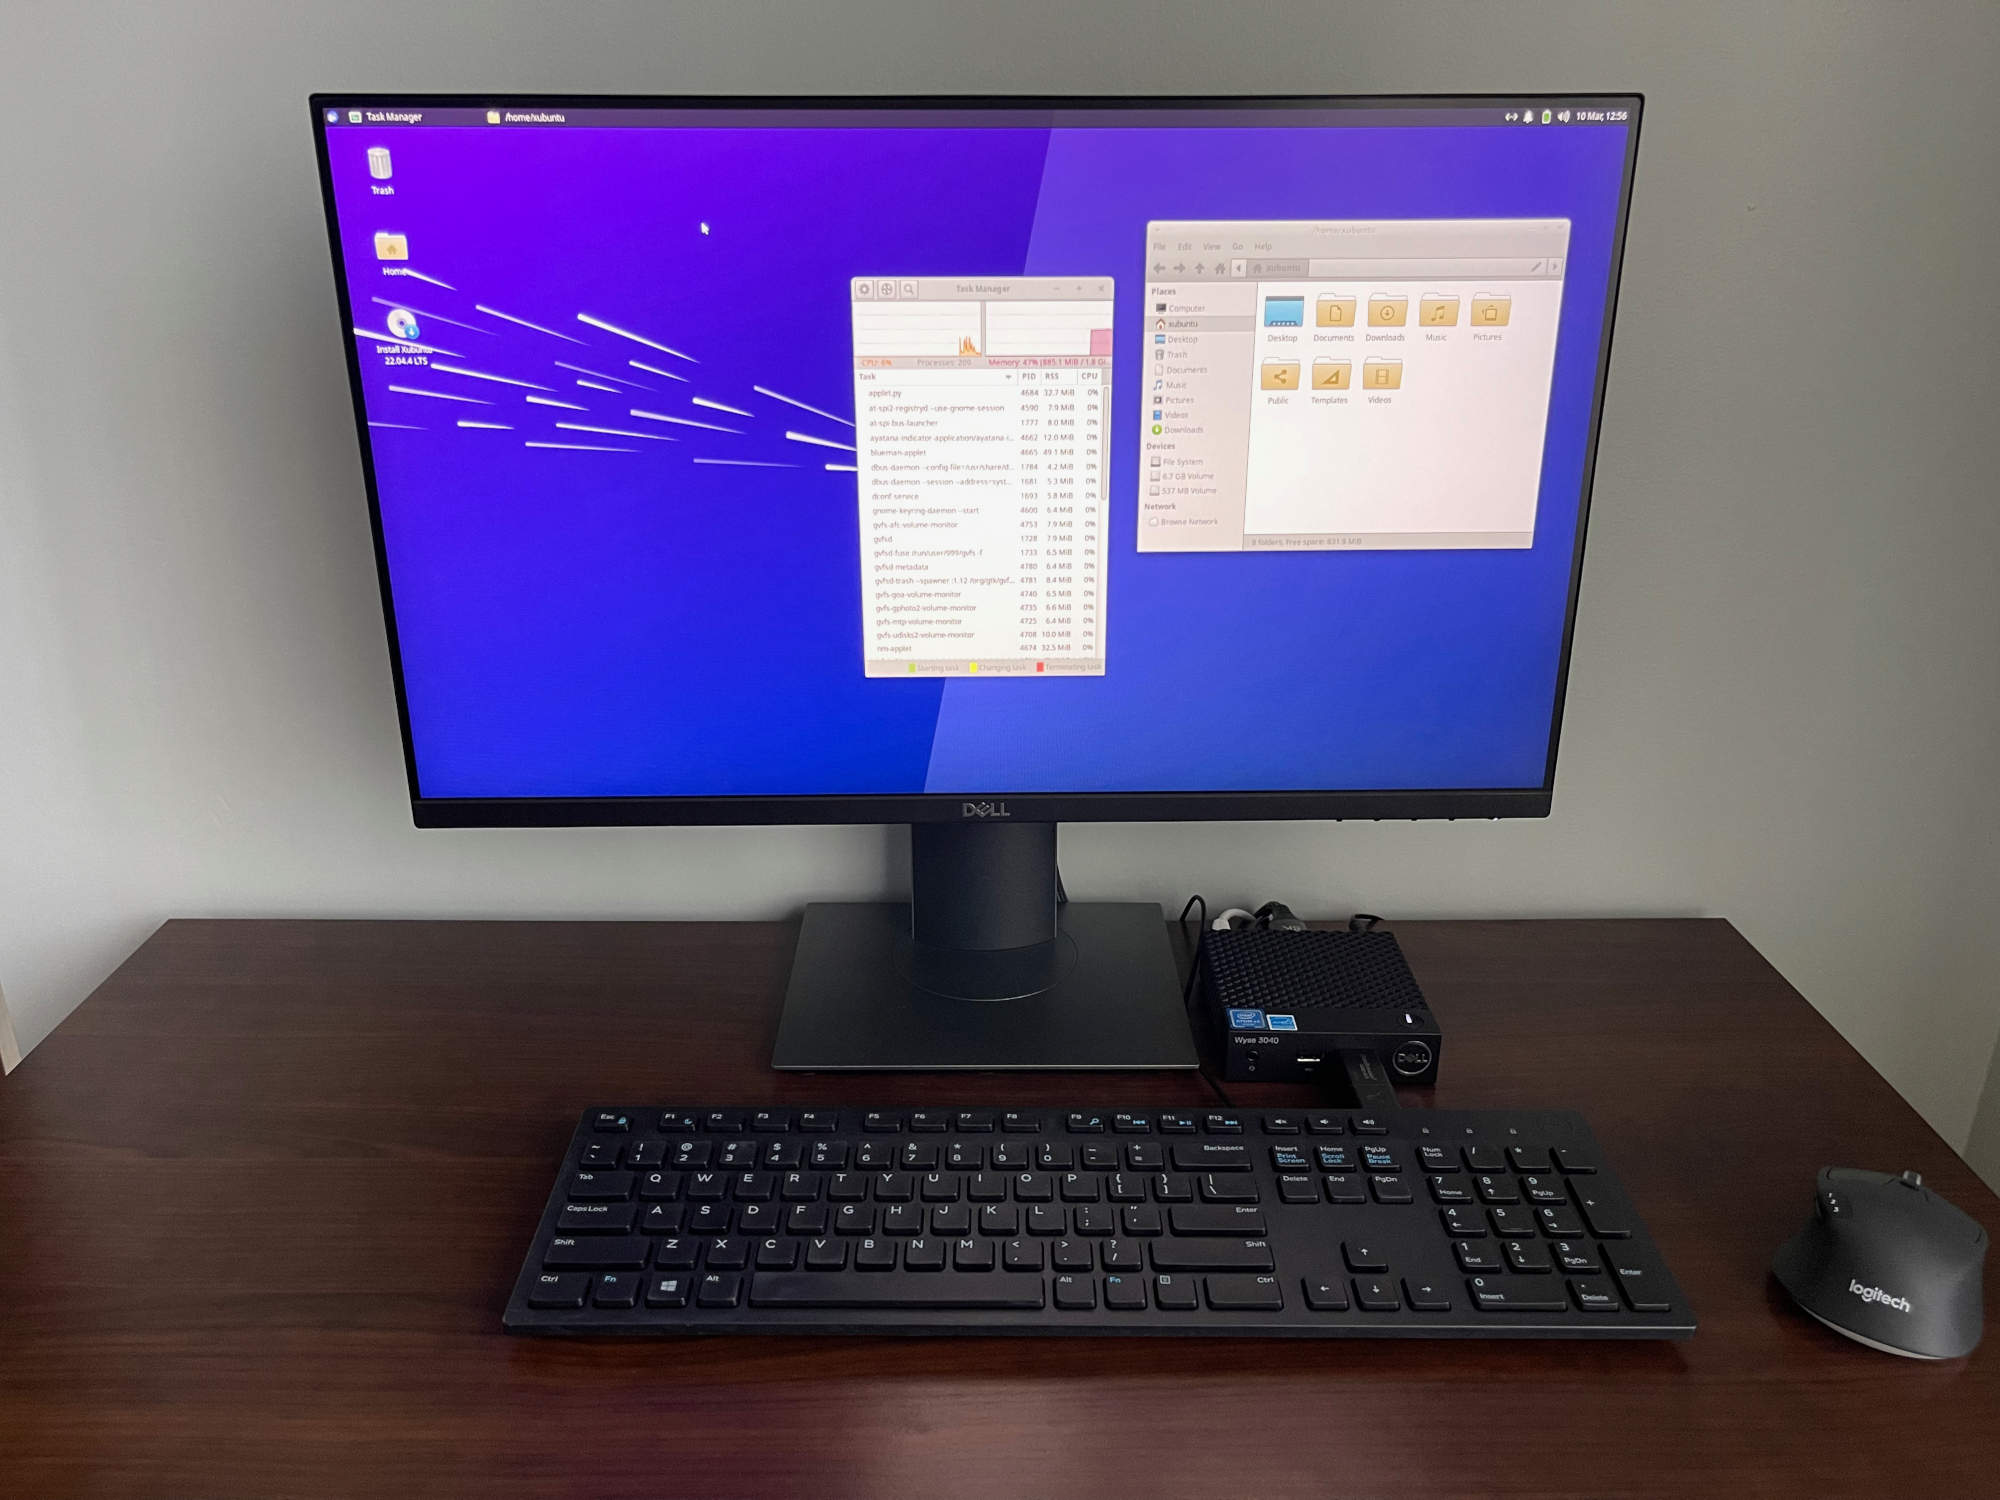
Several years ago, I acquired a Dell Wyse 3040 Thin Client while I was doing some contract work. The company that I was working for was getting rid of several dozen of them and offered me one if I was interested. Right after that happened, I moved and it ended up in storage, and I only just recently rediscovered that I even had it. This turned out to be quote convenient because I was using a Raspberry Pi as a Pi-hole server on my network, and I needed to repurpose that device for something else, so I decided to use this system to replace it. Even though it is an old system that is end-of-life, it is still useful.
Out of curiosity I checked eBay for prices on these things and they are not expensive. You can probably get one for around $50 with shipping, and I found someone selling a batch of 1000 of them for $2100 ($2 per unit).
I am not exactly sure how it happened, but I seem to be down to my last Raspberry Pi 4. At one point I had three of them, one I was using for Pi-hole, and the other two were for emulating old game systems. I need the one that I am currently using for my Pi-hole server for another project, and I don’t want to cannibalize the other two for this purpose, so I wanted to find something to put Pi-hole on.
The first task I wanted to do was boot it up to see if it worked and to make sure it didn’t have any old admin passwords locking it down. Fortunately, it was restored to factory default before it was given to me, so that made getting it setup considerably easier.
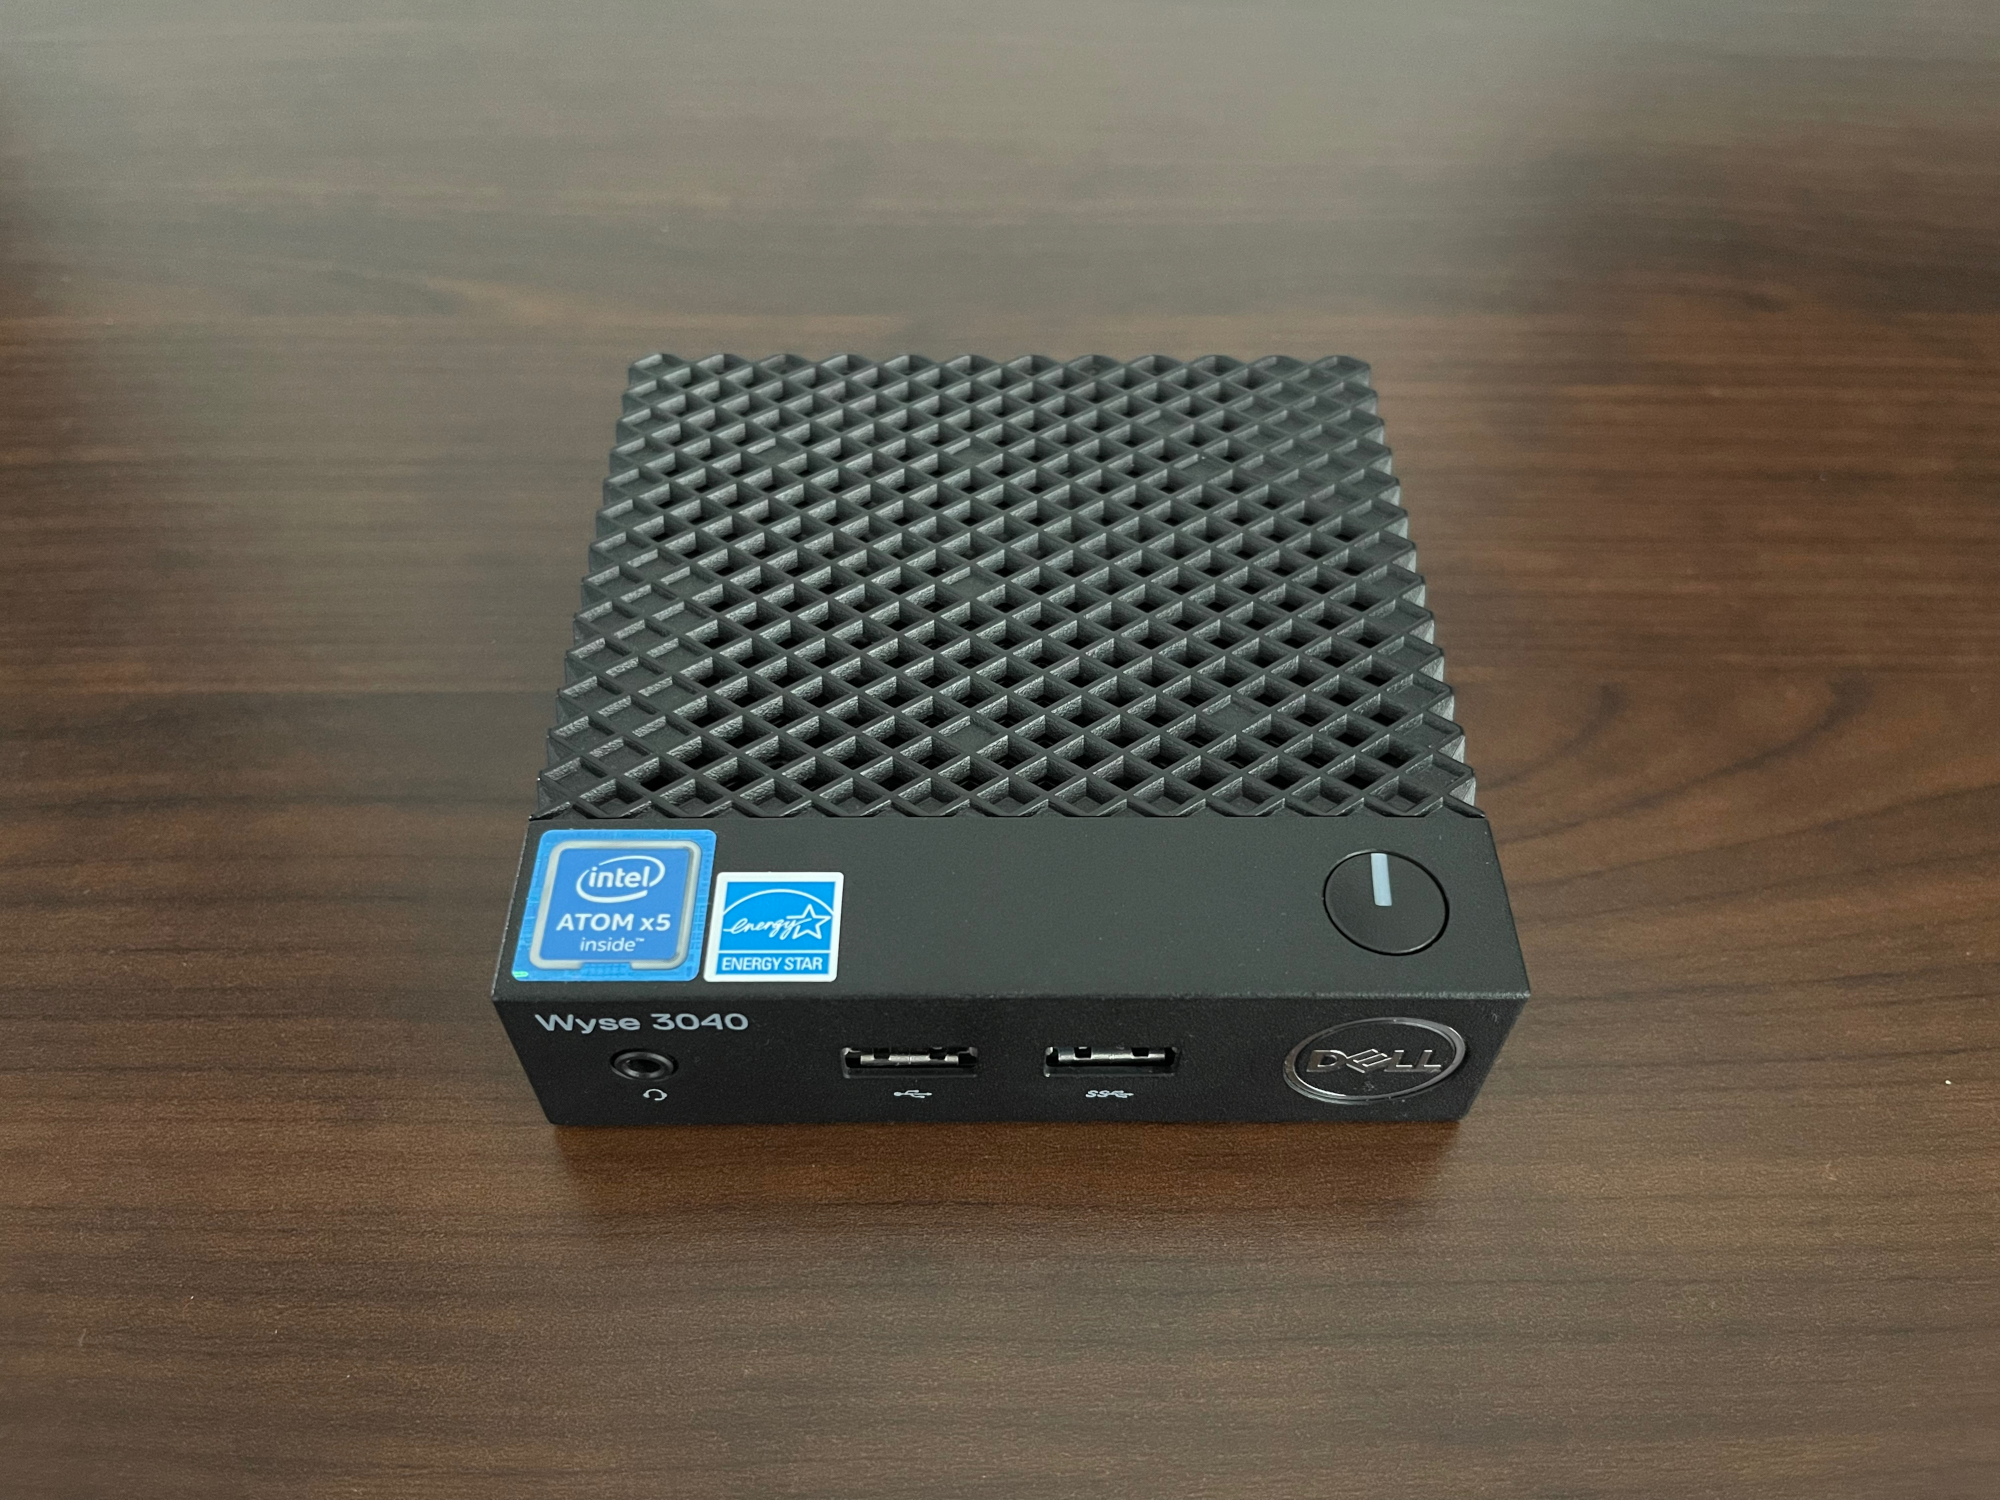
Dell Wyse 3040 Thin Client
Hardware Specifications
The hardware for the Dell Wyse 3040 Thin Client platform is basic, but it is more than sufficient for its primary purpose of functioning as a thin client:
| Component | Hardware |
|---|---|
| Processor | Intel Atom x5-Z8350 (Quad Core) @ 1.44 GHz |
| Graphics | Integrated Graphics (supports dual display up to 2560×1600 @ 60 Hz) |
| Memory | 2 GB DDR3L SDRAM @ 1600 MHz (non-upgradeable) |
| Storage | 8 GB or 16 GB eMMC Flash Storage (non-upgradeable) |
| Operating System | ThinOS, ThinLinux, Windows IoT, Linux |
| LAN | Realtek 10/100/1000 Ethernet (RJ45 port) |
| WLAN | Optional 802.11 a/b/g/n/ac wireless |
| Bluetooth | Optional Bluetooth 4.0 |
| Audio | Realtek ALC5670 Audio |
| Connectors |
|
| Power | External 24-watt power adapter |
| Dimensions | 101.6 mm x 101.6 mm x 27.94 mm / 4″ x 4″ x 1.1″ |
| Weight | 0.24 kg / 0.53 lbs |
| Colour | Black |
The Dell Wyse 3040 model that I have is limited to only 8 GB of storage and it is not easily upgradeable. I have read a few tutorials on replacing the soldered-on eMMC with something that has a larger capacity, but I don’t think it is necessary. I have no issues with doing surface mounted soldering (although it is not my favourite thing to do), but since I paid nothing for this system, I didn’t want to spend money replacing the eMMC. For the purposes of what I want to use the Dell Wyse 3040 for, 8 GB is perfectly fine and there are ways around the limited storage in most cases. If I am really struggling with log file storage, I will just attach a USB drive for additional storage or point it to my NAS if the log files are really that important (they probably aren’t).
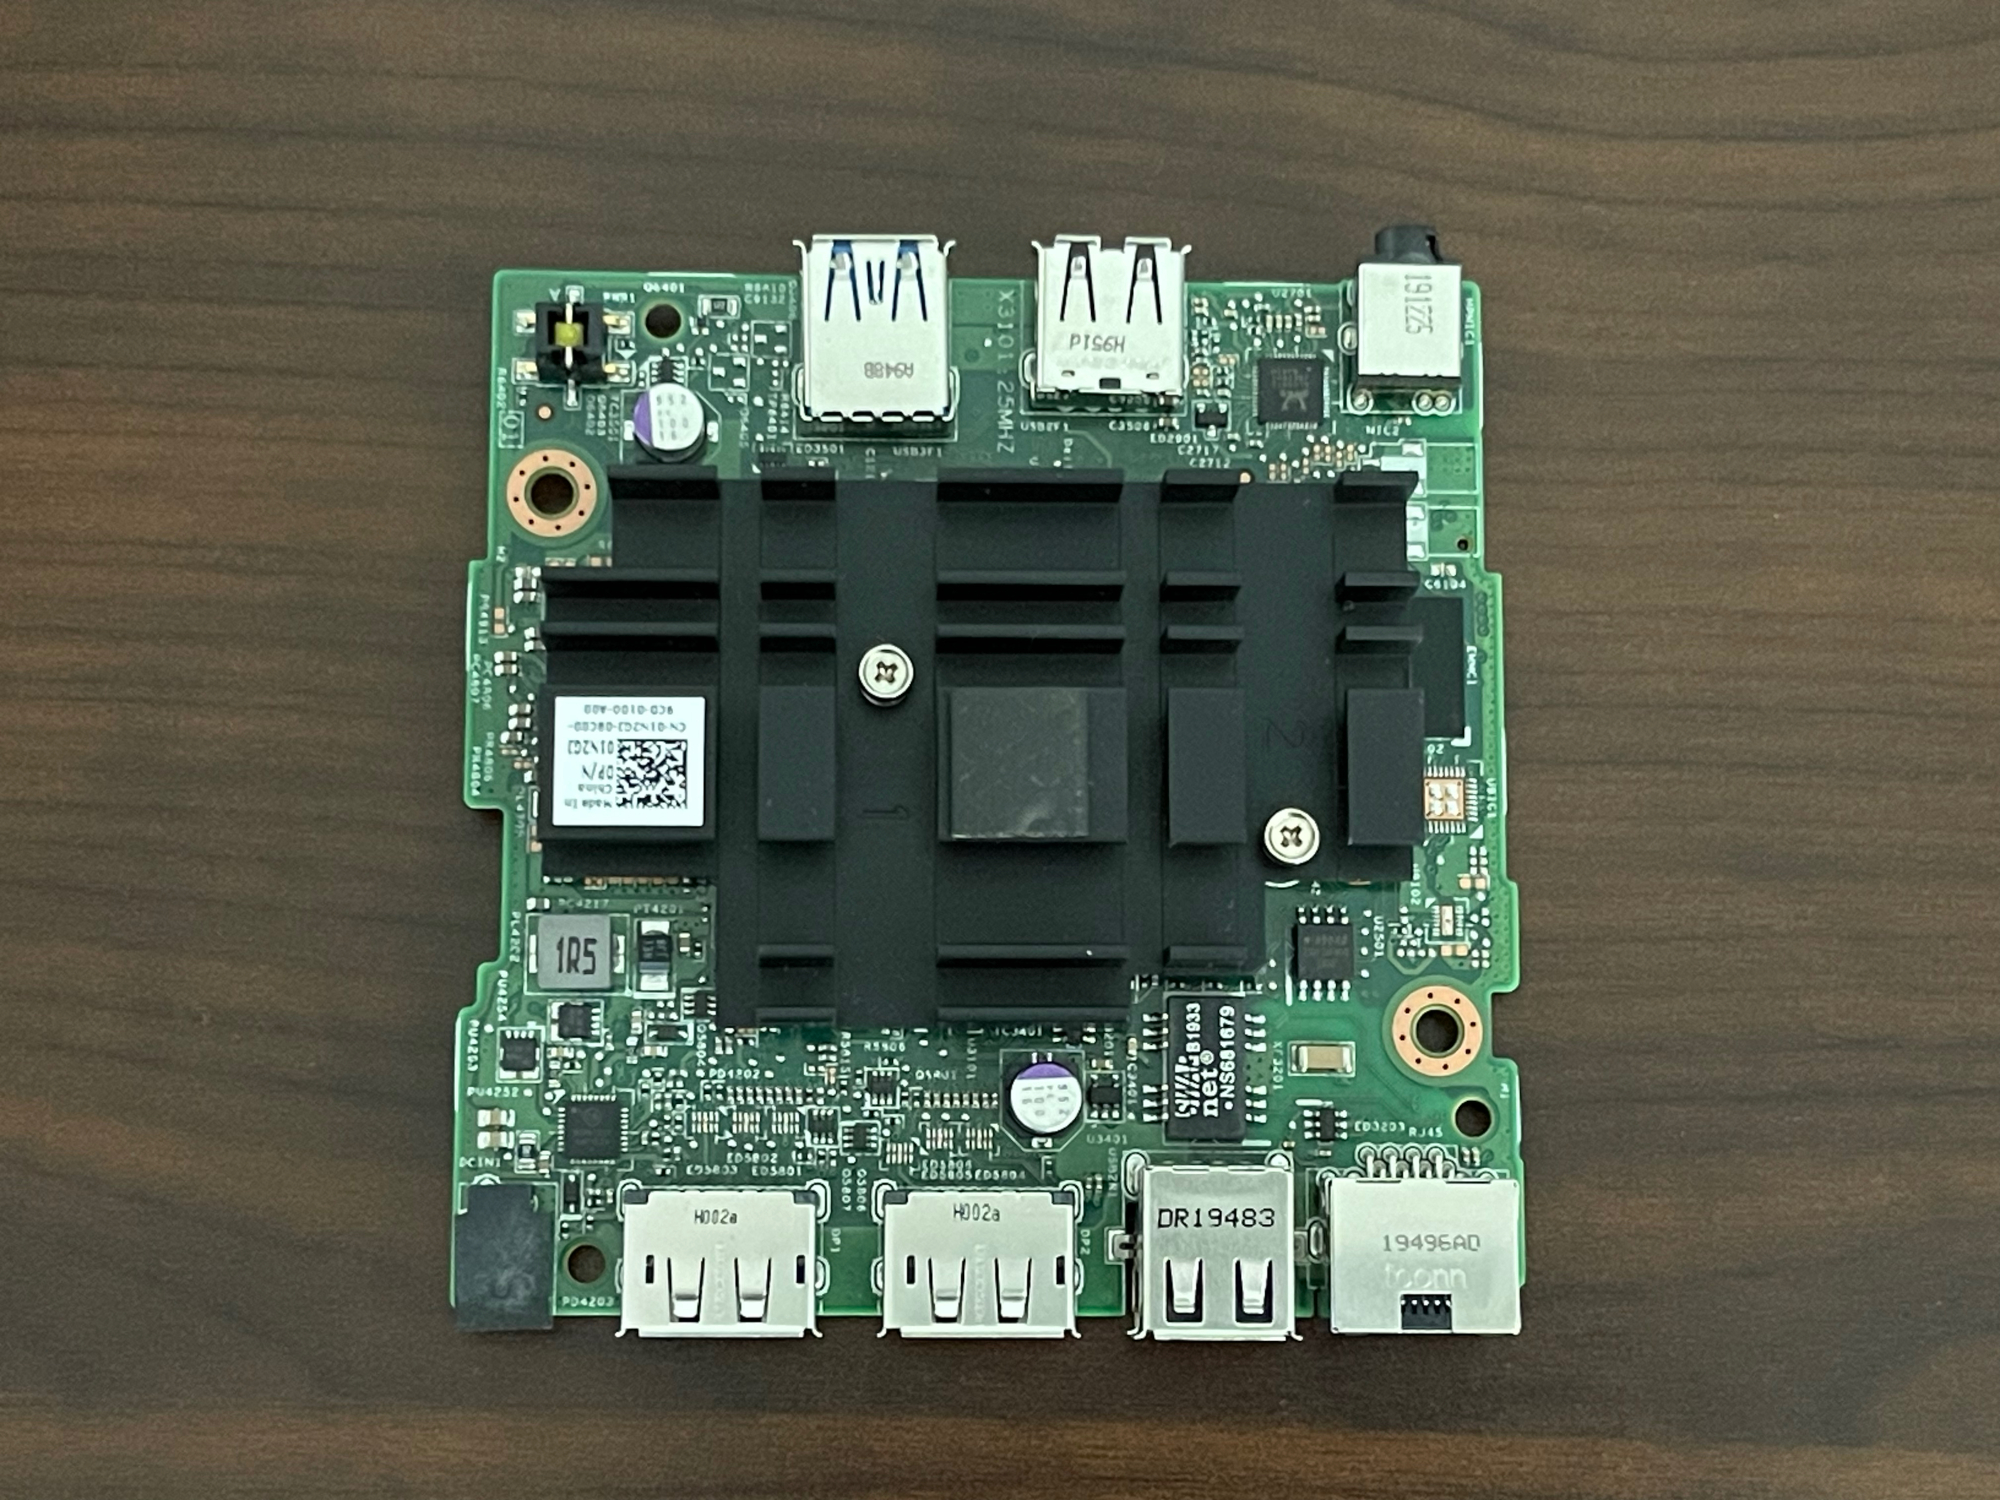
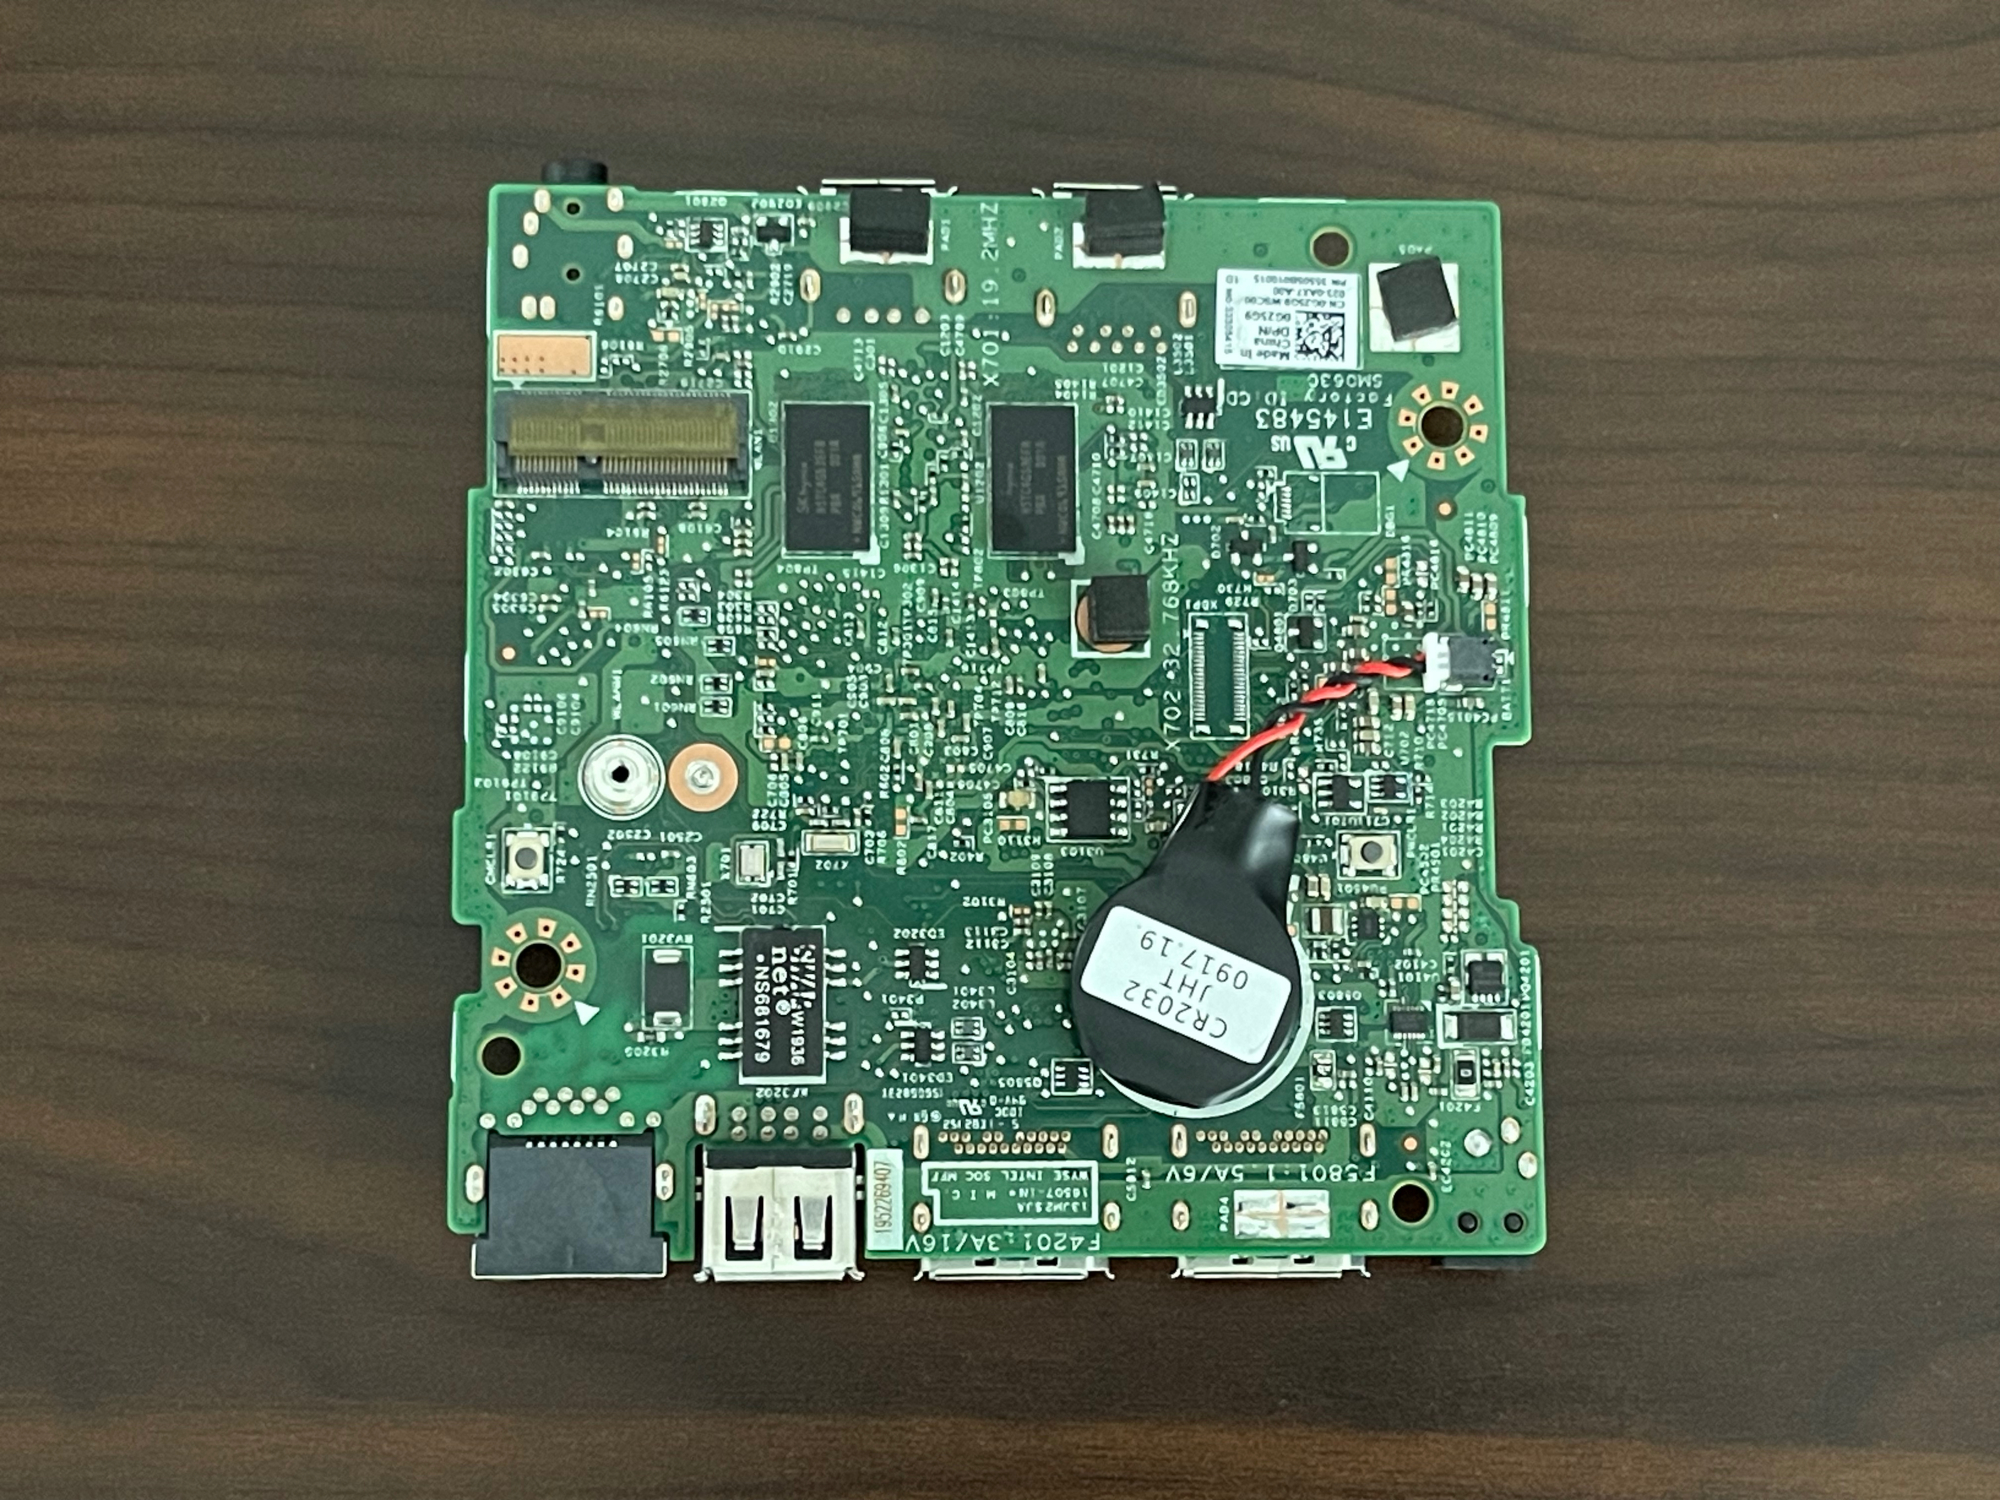
The Dell Wyse 3040 supports Wifi and Bluetooth with an optional M.2 module that is present on the motherboard, and that is the Azurewave AW-CM389MA card. There are no external interfaces for connecting an antenna, they are internal only. Opening the system is extremely easy, and only requires a flat head screwdriver to remove the bottom of the case. There are only two screws total holding the motherboard to the case.
The Intel Atom x5-Z8350 processor is somewhat interesting for this system. It is technically a mobile processor, and it is somewhat constrained by the fact that it only supports 2 GB of memory, despite being a 64-bit processor. The processor supports several advanced features such as Intel 64, Intel VT-x, and Secure Boot. The virtualization features are not especially useful for this system, but is present, nonetheless.
There are no fans on the Dell Wyse 3040, it uses passive cooling. This isn’t an issue, and after running the system for a few days the average temperature of the CPU is around 52°C, which is well within the
I wanted to run a BIOS update to bring the Dell Wyse 3040 to the latest version, but it ended up not being necessary because the one that I have already has BIOS version 1.2.5. This is the currently the latest version of the BIOS, and it shipped on September 10, 2018. Since the Dell Wyse 3040 is end-of-life as of December 2021, this is the last version of the BIOS to be shipped for it.
Hardware Overview
The Dell Wyse 3040 Thin Client is unremarkable, the most notable feature about it is how small the device is:
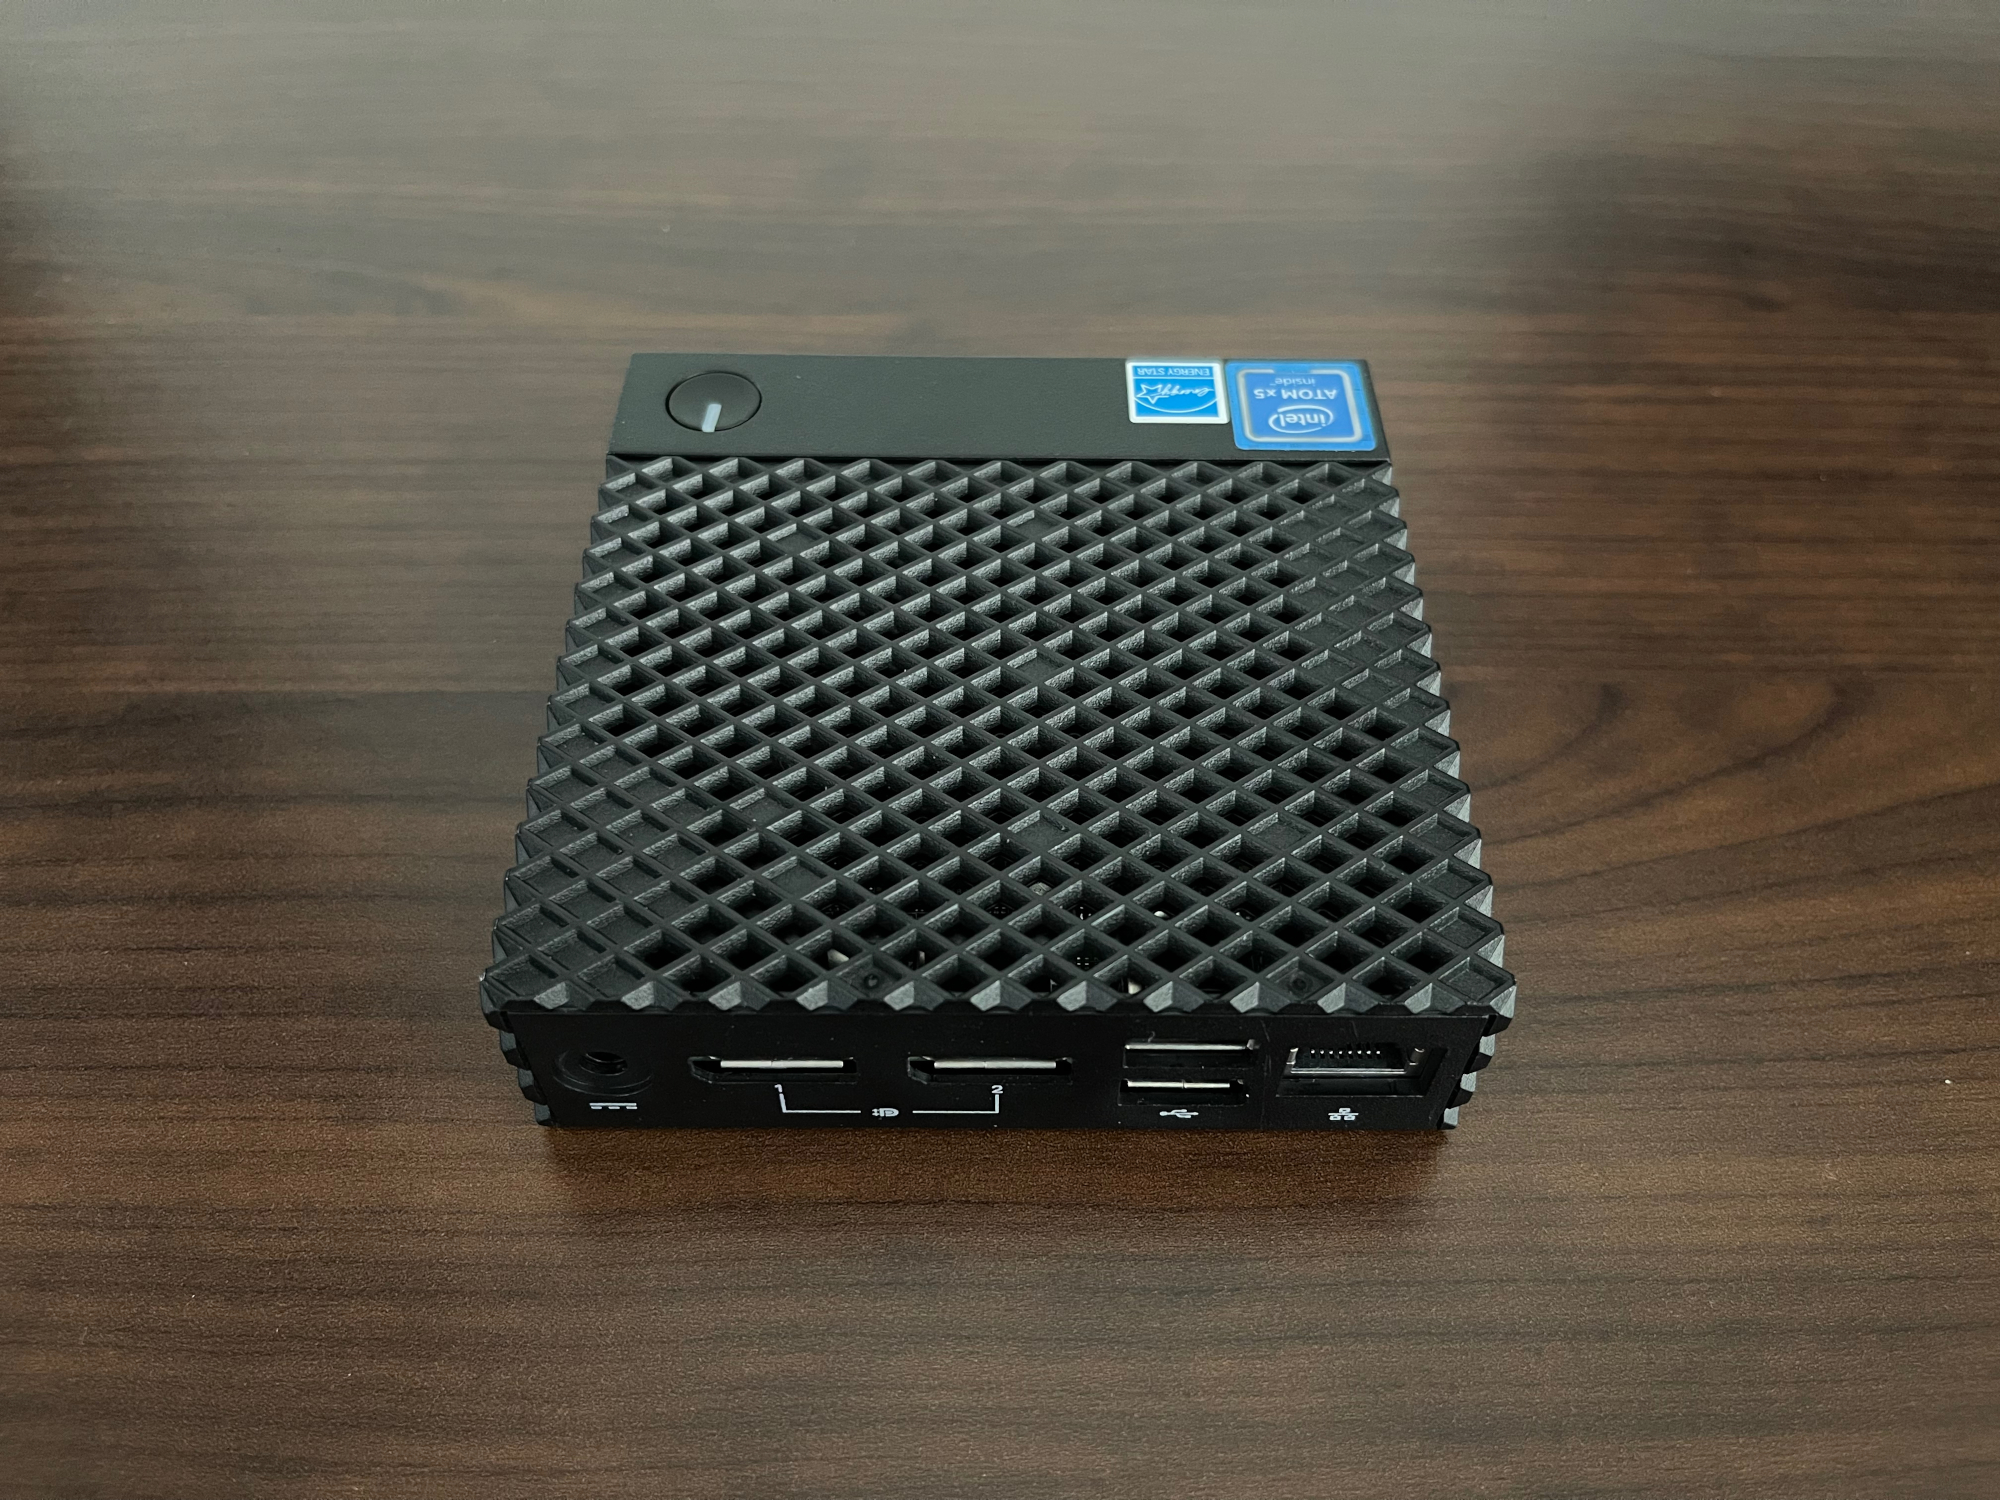
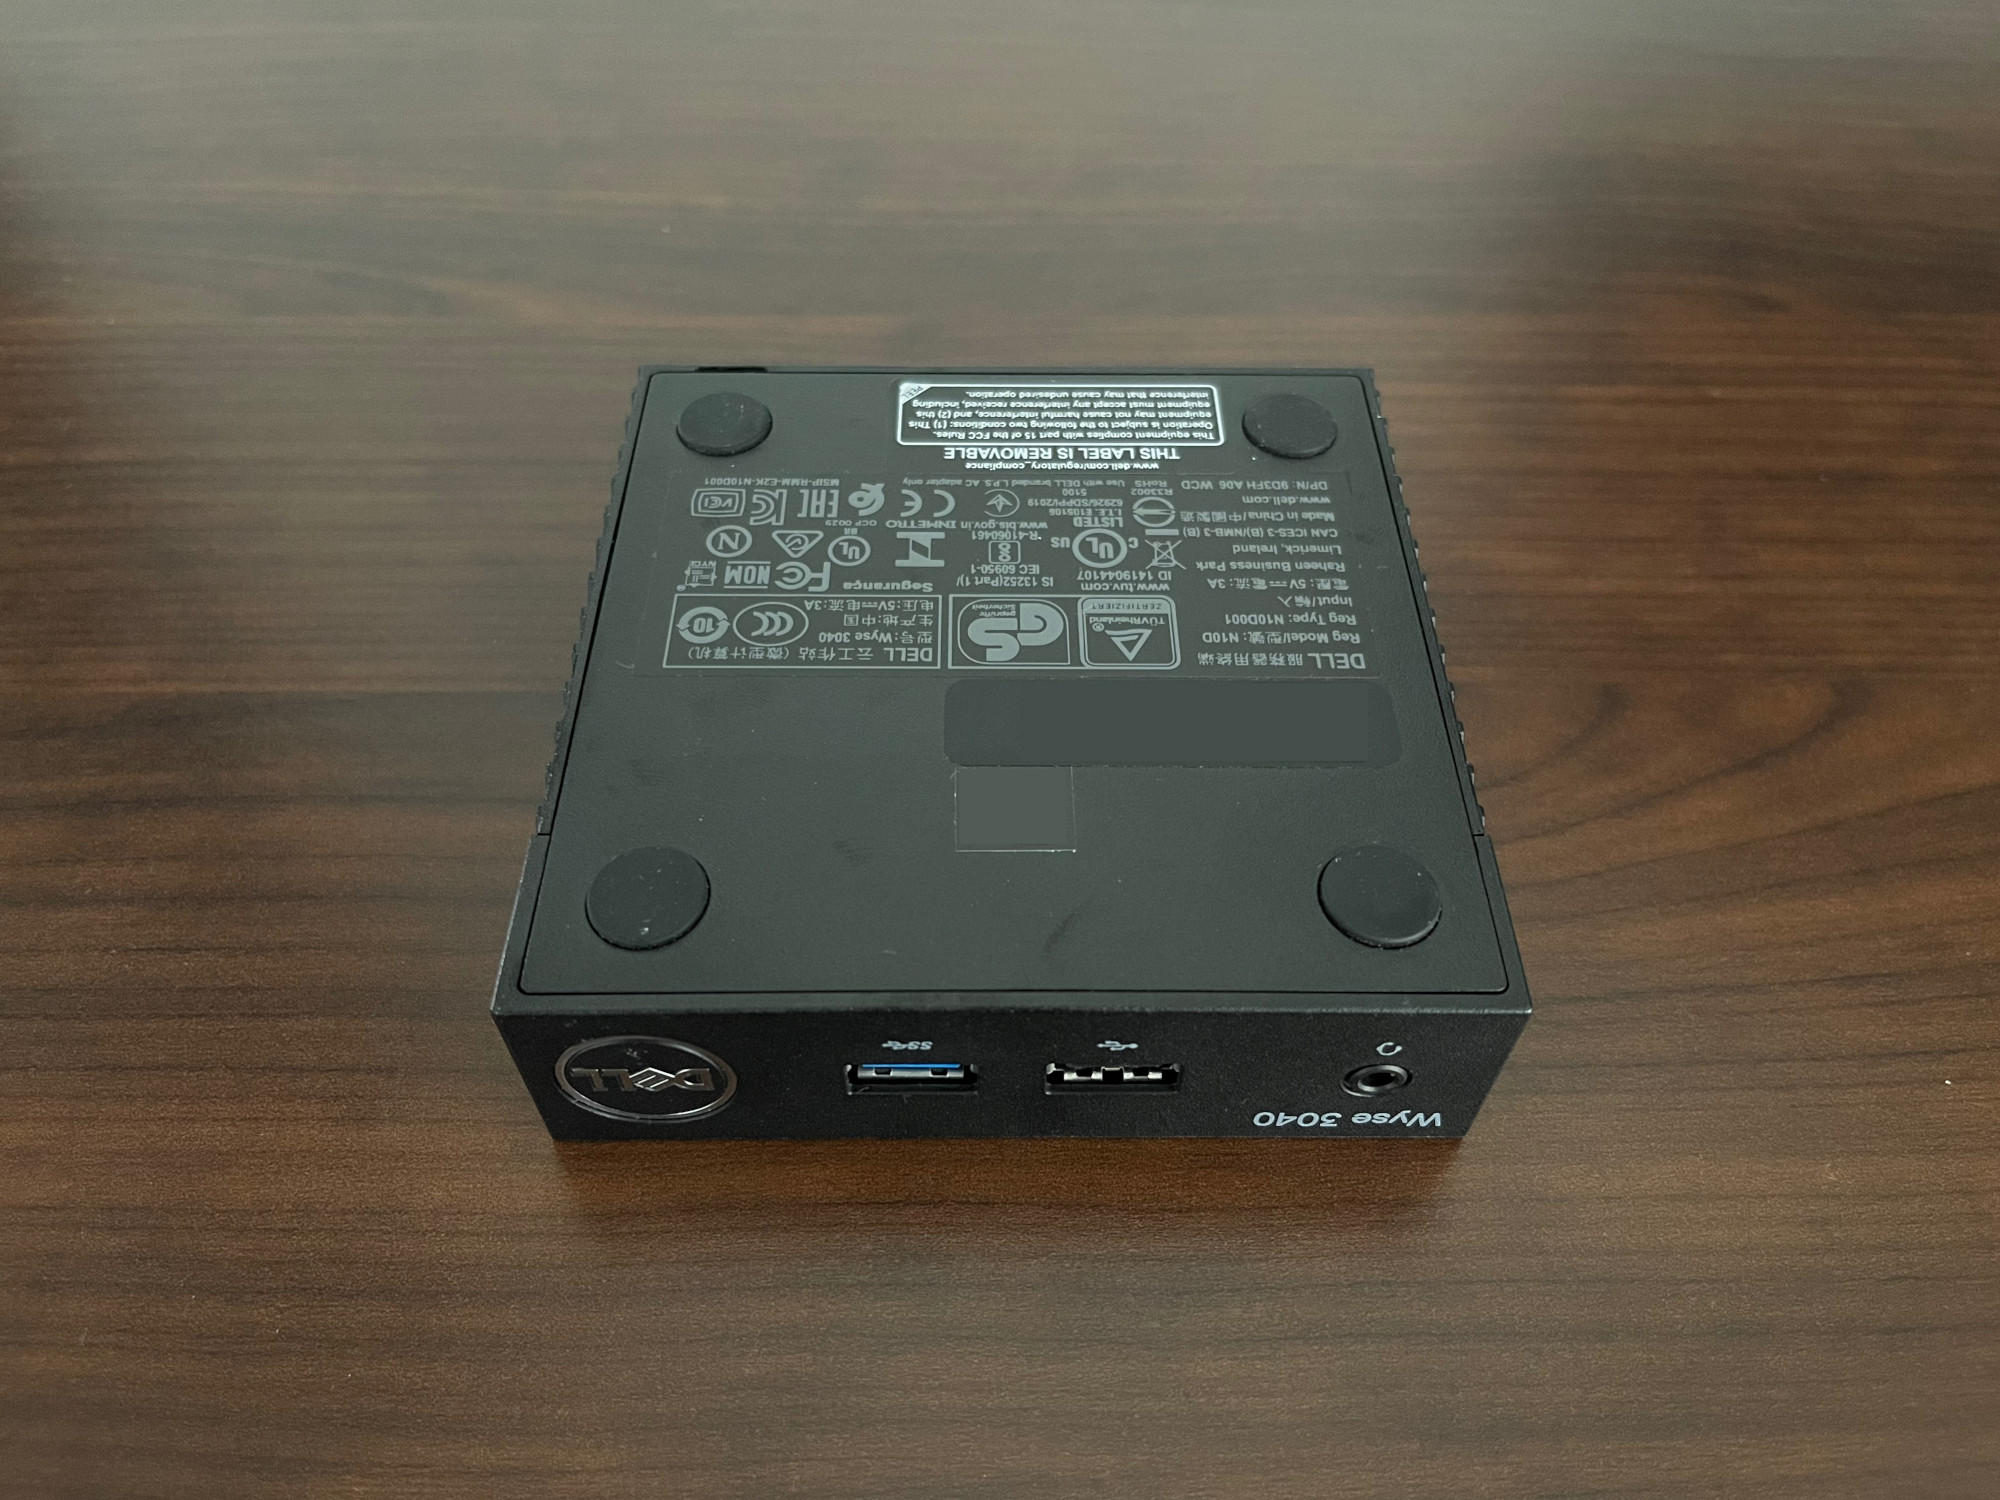
Normally I don’t disassemble computers to take photos like this, but since it is so simple to take the Dell Wyse 3040 apart, I decided to take a closer look at it:
lscpu
Architecture:            x86_64
  CPU op-mode(s):        32-bit, 64-bit
  Address sizes:         36 bits physical, 48 bits virtual
  Byte Order:            Little Endian
CPU(s):                  4
  On-line CPU(s) list:   0-3
Vendor ID:               GenuineIntel
  Model name:            Intel(R) Atom(TM) x5-Z8350  CPU @ 1.44GHz
    CPU family:          6
    Model:               76
    Thread(s) per core:  1
    Core(s) per socket:  4
    Socket(s):           1
    Stepping:            4
    CPU max MHz:         1920.0000
    CPU min MHz:         480.0000
    BogoMIPS:            2880.00
    Flags:               fpu vme de pse tsc msr pae mce cx8 apic sep mtrr pge mca cmov pat pse36 clflush dts acpi mmx fxsr sse sse2 ss ht tm pbe syscall nx rdtscp lm constant_tsc arch_perfmon pebs bts rep_good nopl xtopology tsc_reliable no
                         nstop_tsc cpuid aperfmperf tsc_known_freq pni pclmulqdq dtes64 monitor ds_cpl vmx est tm2 ssse3 cx16 xtpr pdcm sse4_1 sse4_2 movbe popcnt tsc_deadline_timer aes rdrand lahf_lm 3dnowprefetch epb pti ibrs ibpb stibp t
                         pr_shadow vnmi flexpriority ept vpid tsc_adjust smep erms dtherm ida arat md_clear
Virtualization features:
  Virtualization:        VT-x
Caches (sum of all):
  L1d:                   96 KiB (4 instances)
  L1i:                   128 KiB (4 instances)
  L2:                    2 MiB (2 instances)
NUMA:
  NUMA node(s):          1
  NUMA node0 CPU(s):     0-3
Vulnerabilities:
  Gather data sampling:  Not affected
  Itlb multihit:         Not affected
  L1tf:                  Not affected
  Mds:                   Mitigation; Clear CPU buffers; SMT disabled
  Meltdown:              Mitigation; PTI
  Mmio stale data:       Unknown: No mitigations
  Retbleed:              Not affected
  Spec rstack overflow:  Not affected
  Spec store bypass:     Not affected
  Spectre v1:            Mitigation; usercopy/swapgs barriers and __user pointer sanitization
  Spectre v2:            Mitigation; Retpolines, IBPB conditional, IBRS_FW, STIBP disabled, RSB filling, PBRSB-eIBRS Not affected
  Srbds:                 Not affected
  Tsx async abort:       Not affected
lspci
00:00.0 Host bridge: Intel Corporation Atom/Celeron/Pentium Processor x5-E8000/J3xxx/N3xxx Series SoC Transaction Register (rev 36)
00:02.0 VGA compatible controller: Intel Corporation Atom/Celeron/Pentium Processor x5-E8000/J3xxx/N3xxx Integrated Graphics Controller (rev 36)
00:0b.0 Signal processing controller: Intel Corporation Atom/Celeron/Pentium Processor x5-E8000/J3xxx/N3xxx Series Power Management Controller (rev 36)
00:11.0 SD Host controller: Intel Corporation Atom/Celeron/Pentium Processor x5-E8000/J3xxx/N3xxx Series SDIO Controller (rev 36)
00:14.0 USB controller: Intel Corporation Atom/Celeron/Pentium Processor x5-E8000/J3xxx/N3xxx Series USB xHCI Controller (rev 36)
00:1a.0 Encryption controller: Intel Corporation Atom/Celeron/Pentium Processor x5-E8000/J3xxx/N3xxx Series Trusted Execution Engine (rev 36)
00:1c.0 PCI bridge: Intel Corporation Atom/Celeron/Pentium Processor x5-E8000/J3xxx/N3xxx Series PCI Express Port #1 (rev 36)
00:1f.0 ISA bridge: Intel Corporation Atom/Celeron/Pentium Processor x5-E8000/J3xxx/N3xxx Series PCU (rev 36)
01:00.0 Ethernet controller: Realtek Semiconductor Co., Ltd. RTL8111/8168/8411 PCI Express Gigabit Ethernet Controller (rev 15)
lshw
H/W path                 Device            Class          Description
=====================================================================
                                           system         Wyse 3040 Thin Client (07C1)
/0                                         bus            0FRCPP
/0/0                                       memory         64KiB BIOS
/0/b                                       memory         2GiB System Memory
/0/b/0                                     memory         2GiB Row of chips DDR3 1600 MHz (0.6 ns)
/0/12                                      memory         224KiB L1 cache
/0/13                                      memory         2MiB L2 cache
/0/14                                      processor      Intel(R) Atom(TM) x5-Z8350  CPU @ 1.44GHz
/0/100                                     bridge         Atom/Celeron/Pentium Processor x5-E8000/J3xxx/N3xxx Series SoC Transaction Register
/0/100/2                 card0             display        Atom/Celeron/Pentium Processor x5-E8000/J3xxx/N3xxx Integrated Graphics Controller
/0/100/b                                   generic        Atom/Celeron/Pentium Processor x5-E8000/J3xxx/N3xxx Series Power Management Controller
/0/100/11                mmc1              bus            Atom/Celeron/Pentium Processor x5-E8000/J3xxx/N3xxx Series SDIO Controller
/0/100/14                                  bus            Atom/Celeron/Pentium Processor x5-E8000/J3xxx/N3xxx Series USB xHCI Controller
/0/100/14/0              usb1              bus            xHCI Host Controller
/0/100/14/1              usb2              bus            xHCI Host Controller
/0/100/1a                                  generic        Atom/Celeron/Pentium Processor x5-E8000/J3xxx/N3xxx Series Trusted Execution Engine
/0/100/1c                                  bridge         Atom/Celeron/Pentium Processor x5-E8000/J3xxx/N3xxx Series PCI Express Port #1
/0/100/1c/0              enp1s0            network        RTL8111/8168/8411 PCI Express Gigabit Ethernet Controller
/0/100/1f                                  bridge         Atom/Celeron/Pentium Processor x5-E8000/J3xxx/N3xxx Series PCU
/0/100/1f/0                                system         PnP device PNP0c02
/0/100/1f/1                                communication  PnP device PNP0501
/0/100/1f/2                                system         PnP device PNP0c02
/0/100/1f/3                                system         PnP device PNP0c02
/0/100/1f/4                                system         PnP device PNP0b00
/1                       mmc0              bus            MMC Host
/1/1                                       generic        H8G4a
/1/1/1                   /dev/mmcblk0rpmb  generic
/1/1/2                   /dev/mmcblk0      generic
/1/1/2/1                                   volume         537MiB Windows FAT volume
/1/1/2/2                 /dev/mmcblk0p2    volume         512MiB EXT4 volume
/1/1/2/3                 /dev/mmcblk0p3    volume         6404MiB EXT4 volume
/2                       card1             multimedia     rt5672
/3                       input0            input          Power Button
/4                       input1            input          Power Button
/5                       input2            input          Video Bus
/6                       input3            input          Intel HDMI/DP LPE Audio HDMI/DP,pcm=0
/7                       input4            input          Intel HDMI/DP LPE Audio HDMI/DP,pcm=1
/8                       input5            input          Intel HDMI/DP LPE Audio HDMI/DP,pcm=2
/9                       input6            input          chtdc_ti_pwrbtn
/a                       input7            input          Dell WMI hotkeys
/b                       input8            input          sof-bytcht rt5672 Headset
Operating Systems
Windows IoT
I heard that you could install Windows 10 IoT on the Dell Wyes 3040, but since the model that I have only has 8 GB of storage, I wasn’t able to try it. Windows 10 requires a minimum of 16 GB of storage, and I wasn’t interested in trying it out on external storage. I read some information about Windows 10 on this device, and apparently it is so slow that it is practically unusable.
ThinOS
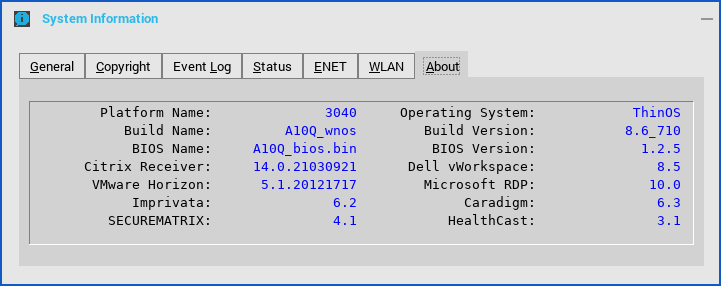
The Dell Wyse 3040 had Dell ThinOS 8.6.710 installed on it when I got it. Normally whenever I used one of these devices, they would be centrally managed and it would automatically connect to RDP or VDI, so I never actually used the desktop component. It is extremely basic, and only allows for a configuring a few options, connecting to remote resources, and managing the configuration:
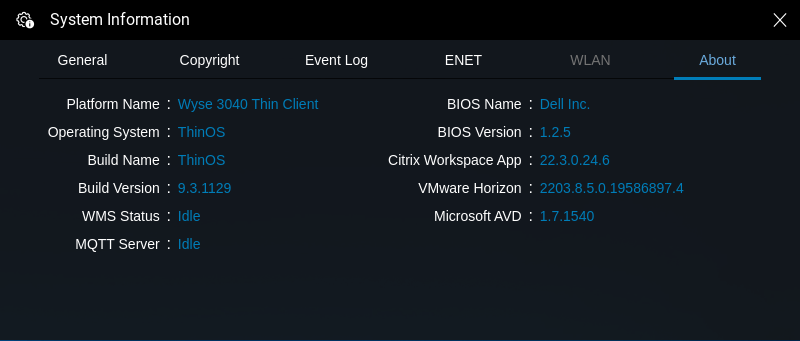
In the process of testing the Dell Wyse 3040, I also installed the latest version of ThinOS that was available for the system, ThinOS 9.3.1129. From a functional perspective it is very similar to earlier versions, but it does have an improved appearance:

Ubuntu Server
I won’t get into the specifics of installing Ubuntu Server on the Dell Wyse 3040, but it is straightforward and can be completed in less than 20 minutes. I installed Ubuntu Server 22.04.4 LTS and chose the option for a minimized installation. The only packages I added after the installation were network related, and eventually Pi-hole which also installed the associated packages that it required.
Since this Dell Wyse 3040 has only 8 GB of storage, there isn’t a whole lot of ways to really partition the storage, I just wanted the maximum available storage:
| Mount Point | Space | Filesystem |
|---|---|---|
| / | 6.1 GB | ext4 |
| /boot | 512 MB | ext4 |
| /boot/efi | 512 MB | fat32 |
After the installation of Ubuntu has completed, there is around 2 GB of free space available for usage:
Filesystem      Size  Used Avail Use% Mounted on
tmpfs           188M  1.5M  187M   1% /run
/dev/mmcblk0p3  6.1G  3.8G  2.0G  66% /
tmpfs           939M  1.5M  937M   1% /dev/shm
tmpfs           5.0M     0  5.0M   0% /run/lock
/dev/mmcblk0p2  488M  130M  322M  29% /boot
/dev/mmcblk0p1  537M  6.1M  531M   2% /boot/efi
tmpfs           188M  4.0K  188M   1% /run/user/1000
The eMMC storage shows up on the system as /dev/mmcblk0. Since EFI is required, there is no way to use less than 512 MB for the /boot and /boot/efi partitions if you are partitioning the storage using the Ubuntu installer.
As a test I tried a live USB of Xubuntu 22.04.4 to see how well it worked and I didn’t encounter any issues except for the slowness of it:
All the hardware on the system appears to work correctly. I had read some reports that audio was an issue with this system, but it appears to work without any issues.
Pi-hole
I won’t get into the specifics of using Pi-hole and what it is, but if you are not familiar with it, it is a DNS Sinkhole solution that is primarily used for blocking ads on a network. By using a device running Pi-hole as a DNS provider, it is capable of blocking ads to users without any actions being required on their part. The easiest way to deploy it is to add it to the DHCP settings for your network so that it is automatically assigned to users.
Pi-hole is very trivial to install, the maintainers of the project make it extremely easy to install with a single command:
sudo curl -sSL https://install.pi-hole.net | bash
Once the script installs all necessary components, the Pi-hole service can be configured.
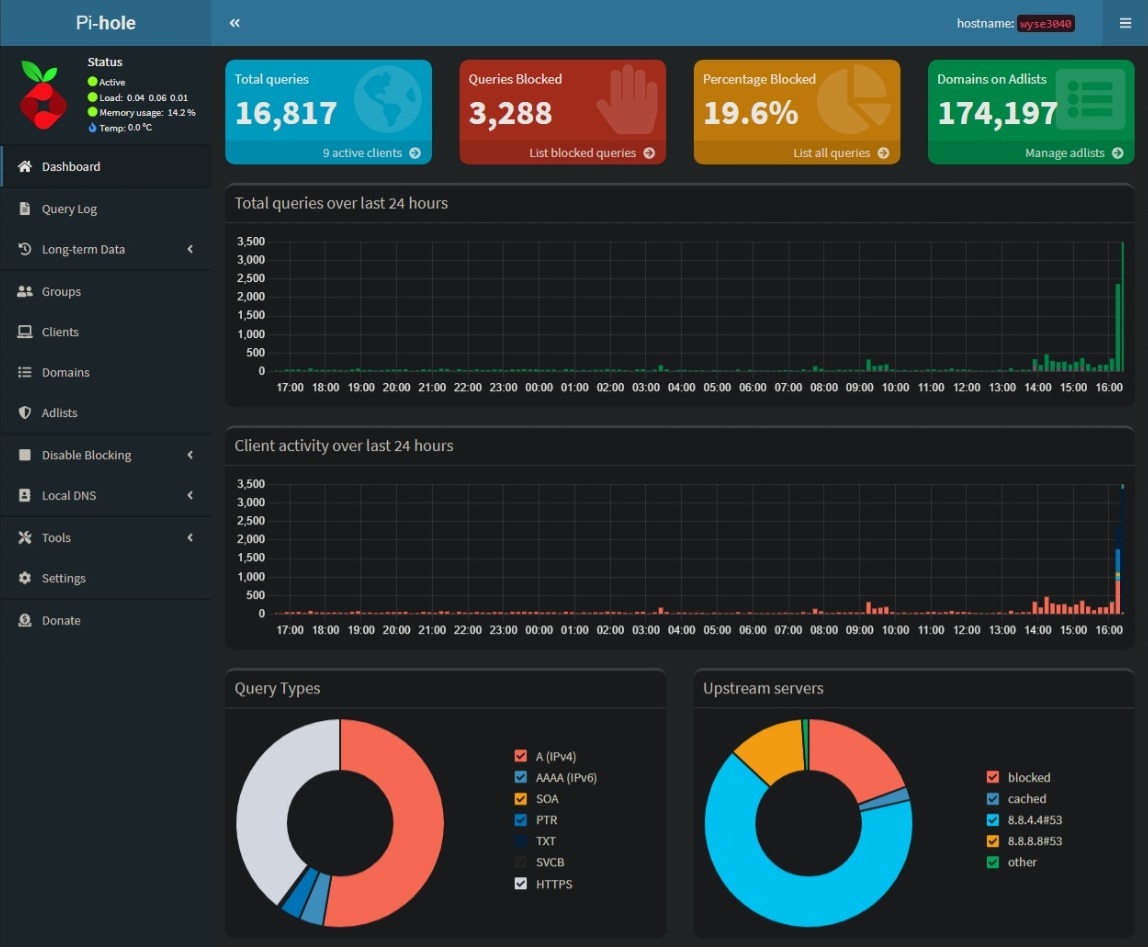
I decided not to bring over my existing configuration from my old Pi-hole server, except for the additional Adlists that I had configured aside from the default ones that are provided by the maintainers.
Issues
I didn’t run into too many issues with the Dell Wyse 3040 Thin Client, but there were two issues that I felt I should talk about should other people encounter them as well.
Power Issues with Linux
With the hardware limitations of the Dell Wyse 3040 aside, I did notice one particularly odd issue while I was testing it. While I had it hooked up to an external monitor and had a keyboard connected to it, there was no way to reliably shutdown or restart the system when it was running Ubuntu Server from the local storage. I noticed this issue the first time that I powered it down so that I could move it, and the system would just hang with the power LED still on, but it wasn’t fully powered off. The issue also occurred whenever I restarted the system and it never actually restarted, it would just hang. The only way to fix the issue was to disconnect the power to turn the system completely off.
This is a major issue for me since the ability to reliably restart the system remotely is something that I would need to do, since I don’t want to have to physically disconnect the power every time I run updates.
The workaround that I found was that if the DisplayPort cable was disconnected the system would always shutdown or restart correctly. I tested this by restarting and shutting down the system around a dozen times and it always worked without the DisplayPort cable connected.
This isn’t an issue since the device will never have a monitor connected to it, but it is something to be aware of. I am sure that I could mess around and find out what the actual issue is, but since I never intend to use the system with a monitor attached, the fix is perfectly fine for my needs.
Dell Wyse USB Imaging Tool
In the processing of testing various versions of ThinOS, I had to create a few USB drives to install the software. I ran into an odd issue when using the Dell Wyse USB Imaging Tool. For some reason when I was using the latest version of the software (version 3.5.0), the tool would always throw an error that it couldn’t write to the USB drive. I tried multiple USB drives, and I kept encountering the exact same issue. To resolve the issue, I ended up downgrading to the previous version (3.4.0) and it resolved the issue.
Links
- Dell ThinOS
- Dell Wyse 3040 Datasheet
- Dell Wyse 3040 Executive Summary
- Dell Wyse 3040 User Guide
- How to Use the Dell Wyse USB Imaging Tool to Update Firmware
- Pi-hole
Dell Wyze 3040
Note
This guide is out of date. @boerni667 reported that 23.05.3 works (for the most part) fine on these units.
See: #3
This is mainly about building and installing OpenWRT on the Wyse 3040. I have included as much additional information as possible.
I suspect this will work for any Intel Atom based processors, though I have not tested it. I don’t think the standard images are compiled with Atom support. There’s a special flag to toggle in kernel_menuconfig to enable Atom specifically.
TOC
- Dell Wyze 3040
- Notes
- Hardware
- Boot Options
- BIOS
- Operating Systems
- OpenWRT
- Building
- My Unofficial Builds
- Installing
- ThinLinux
- Mint
- antiX Linux
- VyOS
- Windows
- OpenWRT
- Images
- Device
- OpenWRT
- antiX
Notes
Dell Pages
dell pages
Articles
articles
Hardware
hardware
Boot Options
- F2 — Boots BIOS
- Default BIOS password is Fireport.
- F12 — Boot Menu
BIOS
Updates
bios update
Setup
- Enter BIOS with F12
- System Configuration -> USB Configuration, then check Enable USB Boot Support
- Secure Boot -> Secure Boot Enaable, set to Disabled
- Power Management -> AC Recovery, set to Power On
- Save Settings
Operating Systems
OpenWRT
The current build of OpenWRT does not install on the Wyze. From what I understand, this is due to the default build outputting to Serial. I built my own version specifiying the Atom processor with no serial output and had some good luck.
Building
I’m not an expert on building OpenWRT, this is the first custom build I’ve done. I may be missing some stuff or could be wrong about any amount of this. Feel free to drop a comment/bug/pull request.
Requirements:
binutils bzip2 diff find flex gawk gcc-6+ getopt grep
install libc-dev libz-dev make4.1+ perl python3.6+ rsync
subversion unzip which
Build:
I used directions from OpenWRT Build System Usage.
git clone git@github.com:openwrt/openwrt.git
cd openwrt
# list tags
git tag
# I'm using the latest rc as of today
git checkout tags/v22.03.2

# Update/install the feeds
./scripts/feeds update -a
./scripts/feeds install -a

# Optional: Download my config
# wget "https://raw.githubusercontent.com/pjobson/dell-wyse-3040-openwrt/main/config/config" -O .config

# Otherwise make your own
# Make your config
make menuconfig -j$(nproc)

# Select options:
#   Target System -> x86
#   Subtarget -> x86_64
#   Target Profile -> Generic x86/64
#   Target Images -> (uncheck) Use Console Terminal (in addition to Serial)
#   Target Images -> (clear out) Serial port device
#   Target Images -> (uncheck) GZip images
#   LuCI -> Collections -> luci
#   Select whatever else you want/don't want
# Save/Exit

# Make your kernel config
make kernel_menuconfig -j$(nproc)

# Select Options:
#   Processor type and features -> Processor family -> Intel Atom
# Save/Exit

# Disable DHCP server on LAN
# If you do not do this, it'll try to serve DHCP from the LAN port which can clobber stuff on your network.
sed -i "s/config dhcp lan/config dhcp lan\n\toption ignore '1'/" package/network/services/dnsmasq/files/dhcp.conf

# Do the build, it'll take like an hour.
# It will prompt you several times for several questions
# I use defaults for all.
make defconfig download clean world -j $(nproc) V=sc

# You can find the builds in: openwrt/bin/
# This includes all the packages.
find . -name "openwrt-x86-64-generic-ext4-combined-efi.img"
My Unofficial Builds
- openwrt.atom.v22.03.2.img.gz
Installing
- You need two USB sticks, one you should put some linux distribution on, the other you should format. I formatted mine to ext4, but it probably doesn’t matter.
- Download the image from above or do your build.
gunzip openwrt.atom.v22.03.2.img.gz- Copy
openwrt.atom.v22.03.2.imgto your second USB stick. - Put your Linux boot stick into one of the USB2.0 slots.
- Put the stick with the OpenWRT image on it in the USB3.1 slot.
- Boot the unit hitting F12 to get to the boot menu, then select the linux boot stick.
- Open a terminal.
- Find your EMMC with:
sudo fdisk -l - Both of mine were:
/dev/mmcblk0 - Find your img file, if you’re using mint it’ll be in media:
ls -laR /media/mint/ - Write the image using
dd. sudo dd if=/path/to/openwrt.atom.build.img of=/dev/mmcblk0 bs=512 status=progress- Wait for awhile.
- Reboot the device removing all USB sticks. I just power cycle it, because I don’t care.
- Setup your network as I desribe in this gist: OpenWRT on x86_64 — First Boot
- You can now open LUCI in your browser by going to whatever IP you set the unit to.
- Resize your partition.
- Reboot back to your LiveUSB
- Open gparted and resize the ext4 partition.
- NOTE: DO NOT resize it to the full 8GB or it will not boot, keep slightly under 8GB. I have no clue why. I left 100MB at the end of my drive and it worked fine.
ThinLinux
Dell has their own linux distributino for the Wyze 3040 called ThinLinux. You can download it from their Support Site. The file is 2.2.0.00_3040_16GB_merlin.exe which you can extract the img files from with 7zip, like: 7z x 2.2.0.00_3040_16GB_merlin.exe. I have not tested this and I probably won’t.
Mint
Linux Mint will boot off the USB stick and I have used the Live USB stick to mess around with the device. The minimum system requirements for Mint are 2GB of RAM and 20GB of disk space. The installer will crash shortly after selecting keyboard type.
antiX Linux
antiX is probably a better option as the minimum system requirements are 256MB RAM and 5GB HDD. This seems to install and run fine, you will need to write the ISO to a USB with live-usb-maker as the default antiX distribution ISO is legacy boot only.
VyOS
This person has done some work with VyOS. https://blog.kroy.io/2020/01/17/the-baby-wyse-the-dell-3040/
Windows
Requirements are:
- 1GHz CPU
- 1GB RAM
- 16GB HDD
Unless you have the 16GB version of the 3040, it probably won’t work. There’s an edition of Win10 called Tiny10, which you may get lucky with.
Images
images
Тонкий клиент Dell 210-ALEK/003 Wyse 3040 8GB FLASH/2GB RAM обладает всеми функциями беспроводной связи и проводными сетевыми подключениями, двумя разъемами DisplayPort, 4 портами USB, в том числе 1 портом USB 3.0.
Благодаря высокой производительности, достигаемой с помощью четырехъядерных процессоров Intel, обеспечивает высочайшее качество работы виртуальных настольных систем в своем классе.
| Артикул | 212098 |
| Гарантия | 12 месяцев. |
| Страна производства | Китай |
| Инструкция | В комплекте. |
| Сертификат | Посмотреть |
| Производитель | Dell |
| Партнамбер | 210-ALEK/003 |
Технические характеристики:
- Модель Wyse 3040
- Цвет Чёрный
- Тип компьютера Тонкий клиент
- Форм-фактор компьютера Mini PC
- Область применения для работы
- Процессоров установлено 1
- Производитель процессора Intel
- Тип процессора Intel Atom
- Индекс процессора Z8350
- Частота процессора 1440МГц
- Тип памяти On board DDR3
- Установлено памяти всего 2ГБ
- Установлено дисков 1
- Тип диска SSD
- Объём диска SSD 8GB
- Привод noDVD
- Графический контроллер Интегрированный
- Тип графического контроллера Intel HD Graphics
- Сеть Gigabit Ethernet
- Портов USB2.0 Type A 3
- Портов USB3.0 Type A 1
- Портов DP 2
- Портов RJ45 1
- Мощность БП 15Вт
- Установленная ОС Wyse ThinOS
- Габариты (мм) 27.94 x 101.6 x 101.6
- Вес 0.9кг
* Информация о технических характеристиках, комплекте поставки, стране изготовления, внешнем виде и цвете товара в
интернет-магазине Борн носит справочный характер и основывается на последних доступных к моменту публикации сведениях.
Ваши преимущества при покупке в интернет-магазине Борн:
- официальная гарантия на обслуживание в сервисных центрах производителей;
- персональный подход на оптовые запросы, конкурсы, тендеры и проекты;
- выгодная цена от официального партнера на все товары из каталога;
- возможность купить Dell 210-ALEK/003 по низкой цене с доставкой по всей России;
- документы для юридических лиц с НДС 20% — счета, накладные, счет-фактуры.
The Dell Wyse 3040 is an ultra low power, fanless thin PC.

Sporting an Intel Atom x5-8350 CPU, 2/4GB of RAM, and 8/16GB of storage, this thin PC is never going to win any performance awards. But what it lacks in raw performance, it makes up for in size. Barely larger than a Raspberry Pi, the 3040 features 2 DisplayPort outputs, gigabit ethernet, 4x USB ports (2x front, 2x rear, one of which is USB 3), and an internal hardware clock.

Overview of a Dell Wyse 3040
Check out our video overview of the Dell Wyse 3040.
►

This one can be powered using 5V – a USB to 4 x 1.7mm centre positive barrel jack cable allows it to be powered using a USB charger. While the device is rated at 3A, in practice, even under full load it remains at around 1.5A. There is a second variant that takes 12V – be sure to check the bottom of your device before plugging it in.
A major difference between this and other similarly sized devices is the CPU architecture. Like other Intel CPUs, this Cherry View Atom is x86-64 based, meaning it can theoretically run any software that will run on a fully-fledged PC, with decent driver support to boot. Boards such as the Raspberry Pi are ARM based, which has more limited software support.
If you’re interested in a more detailed comparison with a Raspberry Pi 4, check out our comparison article.

Comparing a Dell Wyse 3040 with a Raspberry Pi 4
Check out our article comparing the Dell Wyse 3040 with the Raspberry Pi 4.
►
Out of the factory, the only operating systems available were ThinOS and ThinLinux, both very basic and providing only what is required to use the device as a thin client.
It is possible, however, to install a fully fledged Linux OS on these machines. Let’s take a look at how it’s done.
Configuring the BIOS
The first step is to boot the device into the BIOS. To do this, press the F2 key once you’ve powered the device on.

The tree structure on the left-hand side houses all of the available menus.
Unlocking the BIOS
Before we can change any settings, the BIOS needs to be unlocked. Click on the ‘Unlock’ button at the bottom of the screen. If your BIOS does not have a password lock, you can skip to the next section.
If you’re unsure, check the buttons along the bottom right of the screen – if you see an ‘Unlock’ button, with a padlock above it, your BIOS is password protected.

In the box that pops up, type the system password. By default, the password is Fireport.
Once the system is unlocked, we can remove the password completely, so we will not have to unlock the device in future. Note that this is optional; if you’d rather keep the current password, this step can be skipped.
The option to change this can be found under Security >> Admin Password.

Enter the current password in the top box, and leave the other two blank. Click ‘OK’ to save, and the password will now be removed.
Alternatively, you can enter an alternative password in the lower two boxes, to set a new password. If you do this, you’ll still need to unlock the BIOS each time if you want to change any settings.
Enabling USB Boot
To install a new OS, we’ll need to make sure USB boot is enabled.
The setting for this can be found under System Configuration >> USB Configuration.

With the box for USB support checked, we will now be able to boot from a USB device.
The USB device used must support UEFI – if you need to set this up, I recommend taking a look at Ventoy. Once the USB is configured with Ventoy, adding bootable OS’s is as simple as copying the ISO file to the drive.
Installing an OS
Once booted from an external drive, the device is (for the most part) just like any other. Whichever Linux distro you’ve chosen, you should follow the installation instructions for that distro.
Just bear in mind, the 3040 doesn’t use a typical storage device – while a typical PC will use /dev/nvme* (PCIe) or /dev/sd* (SATA) mount points, as this device uses eMMC, the storage mount point is /dev/mmcblk0.
One issue you could encounter is a crash during the install process. This will usually occur early on in the process, for example, after selecting ‘Install’ on a LiveCD. It can also occur when doing anything drive/partition related through the live session. If you manage to extract the error log, you might see a message similar to the one below.
UnicodeDecodeError: 'utf-8' codec can't decode byte 0x92 in position 83: invalid start byteThis is a known issue, caused by the hardware device name used by the Wyse for the eMMC. The name MMC H8G4a\x92 contains a non-unicode character, which causes issues for software trying to read the device name, and prevents installation from progressing.
If you encounter this issue, make sure you’re using the most up to date version of your chosen distro, as this bug has since been fixed. If this is not possible, check out the potential fix given in this GitHub bug report.
UPDATE (March 2024): As per the comment by reader mmarrk, this bug is still present in the latest version of the Ubiquity installer, used by popular distributions such as Ubuntu. We no longer encountered the error as we were using Ubuntu Server for testing, which does not use Ubiquity, hence wrongly assuming the bug was fixed.
mmarrk has also offered an alternative solution, which we have quoted (with minor tweaks for brevity) below.
Install Ubuntu from a Live USB flash drive on to a second USB flash drive, but “Try…” the Ubuntu Desktop flavour first and run…
sudo rm /dev/mmcblk0…to obscure the problematically-named onboard flash device before launching the installer. You can then install to the second USB flash drive without hitting the error.
Once Ubuntu is installed on to the separate USB drive and you boot from it,
udevwill rediscover the onboard 8GB flash storage device and you can then format and use it if you want.
If you’re using a more ‘user-friendly’ Linux distro, such as Ubuntu or Fedora, you shouldn’t encounter any further issues. However, if you’ve opted for Debian or a more exotic distro such as Arch or Gentoo, you’ll want to consider the point(s) below when configuring your system.
UEFI Shenanigans
Despite the BIOS allowing custom UEFI boot locations, it turns out that the 3040 requires the UEFI fallback location (\EFI\BOOT\BOOTX64.EFI) to be populated.
In testing, distros such as Ubuntu handle the system well, and boot without any additional setup – presumably, this is down to the use of the GRUB bootloader. Arch, Gentoo and (surprisingly) Debian on the other hand, do not. In the case of Debian, this is down to a design choice – they intentionally opt not to cater for broken UEFI implementations like the one in the 3040.
If this file doesn’t exist, the system will not only fail to boot, but all boot entry paths are set to the fallback location – the one it’s realised doesn’t exist. Odd behaviour to say the least.
Unfortunately, this took me while to notice – only to find, this issue has already been documented. If you’re using GRUB, the command mentioned over there works fine – the --removable part of the command forces GRUB to use the fallback location, rather than its default.
In practice, this means you must have a file at \EFI\BOOT\BOOTX64.EFI. It doesn’t matter what the file is – I tried creating an empty file using
touch /boot/EFI/BOOT/BOOTX64.EFIand the UEFI happily booted without wrecking my other entries. That file simply has to exist. The command you need to run might be slightly different – check the section below to find the correct location to create this file.
Dell clearly wanted to alert users in the strongest possible way if their UEFI fallback wasn’t set. Thanks Dell. :/
I jest of course, as we must remember that these devices were never designed to take anything other than the operating systems Dell supplied them with. We are fortunate that this functionality was included at all.
Finding the Correct EFI System Partition Location
Now, if you’re trying this for yourself, you’ll need to make note of the location your EFI system partition is located to create the file in the right place. An easy way to do this is to run
fdisk -land find a result with the type EFI System.
Device          Start       End   Sectors   Size Type
/dev/mmcblk0p1   2048    264191    262144   128M EFI System
Check if this is already mounted by running
df -hIf it’s mounted, you’ll find an entry in this list with the filesystem matching the device field from the fdisk output.
/dev/mmcblk0p1 127M 112M 15M 89% /bootMake note of the path at the end of the entry, which specifies the mount point. In this case, mount point is /boot.
If it is not present, create a new folder somewhere on the device. It doesn’t matter where, or what it is called, but we’ll use /esp in this example.
mkdir /espMount the EFI system partition identified using fdisk to this new folder.
mount /dev/mmcblk0p1 /espMake note of /esp, or your chosen path if you used something different.
Now, to actually create the blank file needed. Run the following command, appending the path you noted in place of /x.
touch /x/EFI/BOOT/BOOTX64.EFIYou’ll note in my previous example, I replaced /x with /boot, as I identified /boot as the location the EFI system partition was mounted to.
In my case, I chose to leave an old kernel in the fallback location, and use \EFI\gentoo\gentoo.efi for new kernels. Because having a fallback is good. That’s definitely why. It’s absolutely not because I’m stubborn and want to use my own EFI path thank you very much Dell.
File System Sheninigans
Having faffed around with the UEFI for a while, I encountered repeated issues getting the system to boot Gentoo, my OS of choice. I did also have the same problem with Arch, but did no further testing as it wasn’t the OS I intended to keep.
Now I’m certainly no expert when it comes to compiling kernels, but I have set up several machines using a mixture of EFI stub and GRUB, with a variety of hardware. So at the very least, I know how to stumble my way around the important bits.
Despite being fairly confident in my kernel configuration, I consistently came across the same kernel panic:
Kernel Panic - not syncing: VFS: Unable to mount root fs on unknown-block(0,0)The message is pretty clear – the kernel can’t load the root file system. Without which, there is no system. Excellent. Sometimes you’ll see hints alongside this message, a driver name that failed to load, a root path suggestion. But I got nothing.
A fix for this turned out to be something I’d never had to set up before – an initramfs. An initramfs, or initial ramdisk, is loaded straight after the kernel, but before the kernel mounts the system root. It contains additional drivers, microcode updates etc – things that are needed to boot the system, but would be otherwise inaccessible until after the device has booted.
It turns out it’s actually rather simple. I used dracut to create it.
dracut --kver=5.16.8-gentooJust replace with your kernel version, and you’re away. Just don’t forget to update your booting method to include the new file.
My hunch is that the eMMC driver is not available early enough to mount the root filesystem. Though it could be another driver, a kernel config error, or some other form of user error on my part.
UPDATE (March 2024):
It turned out this hunch was correct, and an alternative solution is to ensure the eMMC driver is built in to your kernel. For a while now, we have maintained a working kernel config file for the 3040, which includes the driver required to boot from the internal storage. You can find this on GitHub using the link below.
Wyse 3040 Linux Kernel Config File
Basic Linux kernel config for a Dell Wyse 3040 thin client.
►
The README included in the GitHub repository gives a more detailed description of what is included in the default configuration, as well as explaining a few settings you might want to change.
Benchmarks & Conclusion
Below are a few benchmarks of the Wyse, compared to a Lenovo Thinkcentre M93p (i5 4570T), and a fanless IGEL M430C (AMD GX412).

The results are scaled relative to the i5 machine, which is given a score of 100 for each test.
Unsurprisingly, the i5 wins all but one benchmark. The Wyse holds its own against the similarly fanless GX412, but with a much smaller footprint and lower power consumption.
While the Wyse 3040 won’t win any performance awards, it can make a decent silent home server. If you can pick one up cheaply, it would make a good Raspberry Pi alternative for basic computing tasks.
Other Wyse 3040 Content
To round out the post, we’ll leave links to a few other articles we have created on the Wyse 3040, as well as our YouTube videos and links to our GitHub projects you might be interested in.
Comparing a Dell Wyse 3040 with a Raspberry Pi 4
Check out our article comparing the Dell Wyse 3040 with the Raspberry Pi 4.
►
Adding Internal Storage to a Dell Wyse 3040
Check out our article showing how you can add additional internal storage to a Dell Wyse 3040.
►
Dell Wyse 3040 Vesa Mount 3D Models
3D models of VESA compatible mounts for the Dell Wyse 3040, suitable for 3D printing.
►
Overview of a Dell Wyse 3040
Check out our video overview of the Dell Wyse 3040.
►
Go to Dell
r/Dell
r/Dell
The unofficial subreddit for Dell Technologies
Members
Online
•
devicemodder2
My dell Wyse 3040 running windows 10 natively. Runs well.
Other

imgur.com
Top Posts
-
Reddit
reReddit: Top posts of October 2, 2019
-
Reddit
reReddit: Top posts of October 2019
-
Reddit
reReddit: Top posts of 2019
Reddit Rules
Privacy Policy
User Agreement
Reddit, Inc. © 2025. All rights reserved.