
Скачать
Скачать DELL Drivers Update Utility 5.7
Скачать с сервера Freesoft
DELL Drivers Update Utility 5.7
x32/x64
ShareWare
Скачать
Все файлы предоставленные на сайте — оригинальные, мы не переупаковываем и не изменяем файлы.
Dell Tools System Software CD-ROM
by Dell Computer Corporation
For Reinstalling Dell Tools System Software
For Dell Dimension 2200, 2300, 2350, 2400, 2400C, 4300S, 4500, 4500S, 4550, 4590T, 4600, 4600C, 4700, 8200, 8250, 8300, 8300N, 8400, XPS, XPS Gen 2, XPS Gen 3
For Inspiron 1100, 1150, 2600, 2650, 300m, 4100, 4150, 500m, 510m, 5100, 5150, 600m, 8200, 8500, 8600, 9100, i600m
Dell SmartPC 300D, 400D, 350D, 450D
Dell SmartStep/SmartPC 200N, 250N
(Possibly more…)
«The software is already installed on your computer. Only use this CD to reinstall the software.»
Contents:
Antivirus Software
Support Software
Multimedia Software
Internet Software
Numbers On Disk
CD:
P/N X3678 Rev. A00
Case:
D/PN 0X3678
US-0X3678-53590-3CI-1084
Rev A00
(from version.txt)
Dell Tools CD ver: B68849.1 Created: 10/29/2003
INFO:
OS: Windows 2000/XP (98?,ME?)
Format: .BIN/.CUE
Volume Label: TOOLS_CD
The disc is bootable.
You must have a Dell system to use this CD.
-
Home
-
News
- What Is Dell Update Utility? How to Download It for Windows?
By Daisy | Follow |
Last Updated
All drivers will be updated automatically if you have the Dell Update Utility installed. How to get Dell Update Utility? How to use Dell Update Utility? This post from MiniTool provides full details about Dell Update Utility.
What Is Dell Update Utility
What is Dell Update utility? The Dell Update utility is a program developed by Dell Technologies. It runs in the background and checks for needed updates. This update includes important fixes and driver updates. If it finds any updates, it will automatically apply them to your Dell computer without going online in your web browser.
The app has built-in support for multiple Dell PC products including Inspiron, XPS, Precision, Vostro, Latitude, OptiPlex, and more laptop series. It supports Windows 7, Windows 8.1, and Windows 10.
The biggest benefit of using the Dell Update utility is that it provides simplified access to the latest versions of the drivers and system fixes your PC needs. You can focus on your work and leave hardware configuration and software maintenance to the automation service, which will do its job in the background and notify in any new systray popup that the update is ready to be deployed.
How to Download Dell Update Utility
While some Dell PCs have this application pre-installed on their systems, many users also want to manually download and install this application on their Dell PC or laptop. You can download the Dell Update Utility from the official Dell website. The following are the detailed stepe:
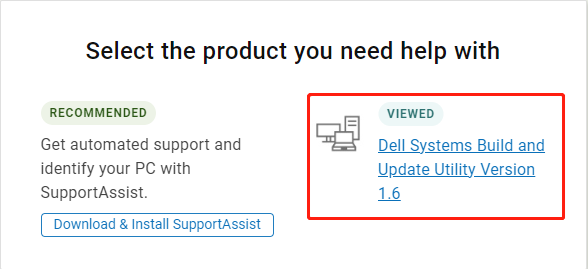
Step 1: Go to the Dell Support page. Under Select the product you need help with, click Dell Systems Build and Update Utility Version 1.6.
Step 2: Select your operating system and click Submit.
Step 3: Then, follow the on-screen instructions to download the Dell Update utility.
How to Install and Uninstall Dell Update Utility
After downloading it, you can start to install it. Follow the guide below:
1. Double-click the .exe file downloaded. Click Install.
2. On the Welcome screen, click Next.
3. On the License Agreement screen, select I accept the terms in the license agreement and then click Next.
4. On the Begin Install screen, click Install.
5. On the Installation Complete screen, click Finish and OK.
If you don’t want to use it anymore, you can choose to uninstall it. Here is how to that:
1. On the Start menu (for Windows 8, right-click the screen’s bottom-left corner), click Control Panel, and then, under Programs, do one of the following:
- Windows Vista/7/8/10: Click Uninstall a Program.
- Windows XP: Click Add or Remove Programs.
2. When you find the program Dell Update, click it, and then do one of the following:
- Windows Vista/7/8/10: Click Uninstall.
- Windows XP: Click the Remove or Change/Remove tab (to the right of the program).
3. Follow the prompts. A progress bar shows you how long it will take to remove Dell Update.
Final Words
Here is all the information about Dell Update Utility. You can know what Dell Update Utility is and how to install it on Windows 11/10. I hope that this post can be helpful to you.
About The Author
Position: Columnist
Having been an editor at MiniTool since graduating college as an English major, Daisy specializes in writing about data backups, disk cloning, and file syncing as well as general computer knowledge and issues. In her free time, Daisy enjoys running and going with friends to the amusement park.
Dell hardware diagnostics are software tools used to test and troubleshoot Dell computers and devices. These diagnostics help identify hardware issues like memory failures, bad sectors on a hard drive, faulty components, driver conflicts, and more. Running Dell hardware diagnostics can help users determine if hardware problems are the cause of issues like blue screens, crashes, sluggish performance, abnormal noises, etc. Diagnosing hardware issues quickly allows users to take corrective action like replacing a faulty component or updating drivers. Dell provides several diagnostic tools to test various components and functions of Dell devices. Knowing how to access and utilize these tools enables users to self-diagnose and resolve many common hardware problems.
Prerequisites
Before running Dell diagnostics, there are a few requirements and preparations to make:
- Compatible Dell computer model – Dell diagnostics are designed to work with Dell desktops, laptops, notebooks, and tablets. Older models may have limited support.
- Supported operating system – Most Dell diagnostics run on Windows 10, Windows 8, and Windows 7. Some tools support Linux and the pre-boot diagnostics run outside the OS.
- Latest version of diagnostics – Download the latest Dell diagnostic tools for your specific computer model from the Dell support site to get all the latest fixes and features.1
- Sufficient battery/power – Diagnostics can take over an hour to complete, especially extended tests. Plug in the laptop or desktop to avoid power loss.
- External devices disconnected – For best results, remove any external devices, printers, scanners, cameras, or USB devices.
- Applications closed – Close any open apps, browsers, or programs to avoid conflicts with diagnostics.
- Latest drivers installed – Install the latest drivers from Dell for critical components like the GPU, monitor, audio drivers, etc.
- BIOS updated – Check the Dell support site for and install any BIOS updates before running diagnostics.
- Sufficient hard drive space – At least 500MB free space is required for the full Dell diagnostics suite.
Accessing Diagnostics
There are a few methods to access the Dell diagnostics interface depending on your computer model and configuration. The most common ways are:
- Restart your computer and press F12 when the Dell logo appears to access the one-time boot menu. Then select “Diagnostics” from the menu.
- For newer Dell models, restart and press F12, then choose “Advanced Diagnostics” from the menu.
- If Diagnostics is installed on your computer’s hard drive, restart and press F2 or F12 when the Dell logo shows up to enter the system setup. Go to the “General” tab and enable “Extended Diagnostics” under “Startup Options.”
- With Windows running, click the Start button and search for “Dell SupportAssist.” Open the app and click “Troubleshooting” then “Advanced Diagnostics.”
The key is accessing the boot menu before Windows loads by pressing F12 or F2 during restart. This launches the standalone Dell diagnostics environment separate from the operating system. If Diagnostics is installed on the hard drive, you can also run it from within Windows. Refer to your specific Dell computer’s manual for the exact diagnostics access key.
Source: https://robots.net/tech/how-to-run-dell-diagnostics/
Quick Test
The Quick Test option in Dell Diagnostics provides a quick check of the hardware components and common issues. According to Dell, this test takes about 5-10 minutes and checks the essential components and functionality. The Quick Test scans major systems like the hard drive, memory, processor, motherboard, video card, and more.
The Quick Test is useful for identifying any obvious hardware failures or faults. It can detect issues like bad RAM, a failed hard drive, overheating processors, and problems with booting into the operating system. The Quick Test provides a high-level overview of system health. However, for more comprehensive testing, the Extended Test is recommended.
Extended Test
The Extended Test is a more comprehensive diagnostic test that runs longer and performs additional checks compared to the Quick Test. According to the Dell Support article How to Run a Preboot Diagnostic Test on a Dell Computer, the Extended Test can take over an hour to complete. It runs extensive tests on key hardware components like the CPU, memory, hard drive, network interface, USB ports, and more.
Whereas the Quick Test provides a quick overview of the system’s health, the Extended Test is recommended when you need a more thorough examination, such as when troubleshooting complex or intermittent issues. The Extended Test logs any errors encountered during testing for later review. According to the Dell Diagnostics and Tools page, the Extended Test is useful for identifying potential hardware failures before they develop into actual faults.
Custom Test
The Custom Test option allows you to test specific hardware components in your Dell device. To access Custom Test:
- On the Diagnostics main menu, use the arrow keys to highlight Custom Test and press Enter.
- You will see a list of all testable components. Use the arrow keys to highlight the component you want to test and press Enter.
- Available components include the battery, RAM, hard drive, optical drive, video card, and more.
Selecting a component will start the dedicated test for that hardware part. Custom Test provides more targeted and in-depth testing than the Quick and Extended options. It’s useful when you suspect issues with a specific component like the hard drive or battery.
Custom Test gives you full control to test just the components you need. Run standalone tests on individual parts without testing the entire system. The targeted testing can help identify faults and reduce unnecessary testing time.
Test Controls
Once the diagnostics test is running, you have several controls and options available to you (source):
- To pause a test, press Esc. The test will pause on the current test. Press Esc again to resume testing.
- To view help for a test, press F1. Press Esc to exit Help and resume testing.
- To change the boot order, press F2. This will take you to the boot order screen, where you can select which device to boot from.
- To repeat the last test, press F5. This restarts the previously run test.
- To run a test until error, press F6. This runs a test repeatedly until an error occurs.
- To increase cooling fan speed during a test, press F7. This increases fans to 100% during testing.
- To select language, press F8. This allows you to change the language of the diagnostics tests.
- To run extensive tests, press F10. This executes more extensive testing and optional tests.
- To view test errors, press F11. This shows any errors encountered during testing.
Knowing what these controls do allows you to better navigate the diagnostics process and hone in on any potential hardware issues.
Interpreting Results
It’s important to understand what the various test result messages mean in order to properly troubleshoot any identified issues. The Quick Test and Extended Test will display one of the following results:
Pass – No issues were detected during the test. This indicates the component tested is likely functioning properly.
Fail – The test detected an issue with the component tested. This points to a likely hardware failure that will require replacement of that component.
Error – The test was unable to complete properly due to an error. This could indicate a problem with the diagnostic software, drivers, or a hardware failure.
Aborted – The test was manually stopped before completion. Results are inconclusive.
Not Applicable – The component tested does not exist in your system. The result is irrelevant.
The Custom Test allows viewing more detailed results for storage drives and memory modules, which could display Raw Read Error Rate failures, Reallocation Event Count failures, or Runtime Bad Block failures, etc. These point to specific faults within the hardware that give clues about the failure.
It’s a good idea to run tests multiple times to rule out transient errors and confirm consistent results. Check the Dell support site referenced below for more details on interpreting specific error codes and failure messages for your Dell system model.
Reference: https://www.dell.com/support/kbdoc/en-us/000127927/a-reference-guide-for-latitude-notebook-and-tablet-diagnostic-indicators
Troubleshooting
If you encounter any failures or errors while running Dell Diagnostics, there are some steps you can take to troubleshoot:
Double check all connections to make sure devices are properly connected. Reseat RAM modules, cables, drives, and expansion cards.
Try running the test again. Intermittent failures can occur due to loose connections.
If a specific device or component continuously fails, that device likely needs replaced. Consult the service manual for your specific Dell model for instructions on replacing hardware components.
Update all drivers for your system, as out of date drivers can sometimes cause conflicts and failures.
Check the Dell Support Site for technical bulletins about any known issues with your hardware model that may explain the failures.
If you continue to experience issues, contact Dell Technical Support for further assistance in diagnosing and repairing the problem.
Conclusion
Dell Diagnostics is a useful built-in tool for troubleshooting hardware issues on Dell computers. Key points to remember are:
- Access Diagnostics by pressing F12 during boot, from within Windows recovery options, or from the Support site.
- Quick Test provides a high-level overview while Extended Test is more comprehensive.
- Pay attention to error codes and recommended actions provided.
- Diagnostics can help identify faulty hardware needing replacement.
- Run Diagnostics if experiencing unexplained crashes, freezes, overheating issues, etc.
Dell Diagnostics is especially helpful when hardware issues are suspected but not yet confirmed. The tool provides definitive testing to pinpoint problems before attempting repairs or replacements.
Readers help support Windows Report. We may get a commission if you buy through our links.
Read our disclosure page to find out how can you help Windows Report sustain the editorial team. Read more
Many want to know if is it possible to download Dell SupportAssist for Windows 7. In today’s guide, we’re going to answer this and all other questions related to SupportAssist.
How can I download Dell SupportAssist for Windows 7?
If you’re looking to download Dell SupportAssistant for Windows 7 64-bit, we have some bad news. According to the Dell support page, SupportAssist requires Microsoft Windows 10 version 1809 or later.

This is likely because support for Windows 7 has been dropped in 2020, so maintaining software for a legacy operating system isn’t a viable option for Dell.
Where to download Dell Support Assist?
If you want to use this software, you can download Dell SupportAsssist from the official website. Keep in mind that you need to have a compatible OS to install it.
We have a special guide linked above that will help you install Dell SupportAsssit, so don’t miss it.
- Advanced System Settings on Windows 7: How to View Them
- What is wltrysvc.exe & How to Fix its Errors
Is there a Dell SupportAssist offline installer?
The offline installer isn’t available for download, however it does exist. If you want to use an offline installer, it might be best to contact Dell support so they can provide you with a download link.
Is it OK to disable Dell SupportAssist?
Yes, it’s okay to disable or even uninstall Dell SupportAssist. The software is only useful if you need help from Dell, and in most cases, you don’t even need it on your PC.
As you can see, there’s no Dell SupportAssist for Windows 7 since Windows 7 has been discontinued for a while now. However, there are Dell SupportAssist alternatives that might work on it, so don’t hesitate to check them out.
Milan Stanojevic
Windows Toubleshooting Expert
Milan has been enthusiastic about technology ever since his childhood days, and this led him to take interest in all PC-related technologies. He’s a PC enthusiast and he spends most of his time learning about computers and technology.
Before joining WindowsReport, he worked as a front-end web developer. Now, he’s one of the Troubleshooting experts in our worldwide team, specializing in Windows errors & software issues.