
- IT
- Компьютеры
- Cancel

Основные выводы
Подсистема Windows для Linux (WSL) позволяет запускать дистрибутивы Linux в виртуальной среде на вашем ПК. Удалить его не так просто; необходимо удалить дистрибутивы, сопутствующие приложения и функции Windows. Вот как я удалил WSL со своего ПК.
Удалите все установленные дистрибутивы Linux на Windows
Этот шаг может быть не актуален для всех, но если вы установили несколько дистрибутивов Linux, вам следует сначала их удалить. Это поможет гарантировать, что никаких файлов, связанных с установками Linux, не останется на вашем компьютере при удалении WSL.
Удалите компоненты WSL
Когда все версии Linux удалены, вы можете удалить приложение WSL и его связанные компоненты. Как и на предыдущем шаге, вы можете удалить WSL так же, как любое другое приложение в Windows 11 или 10.
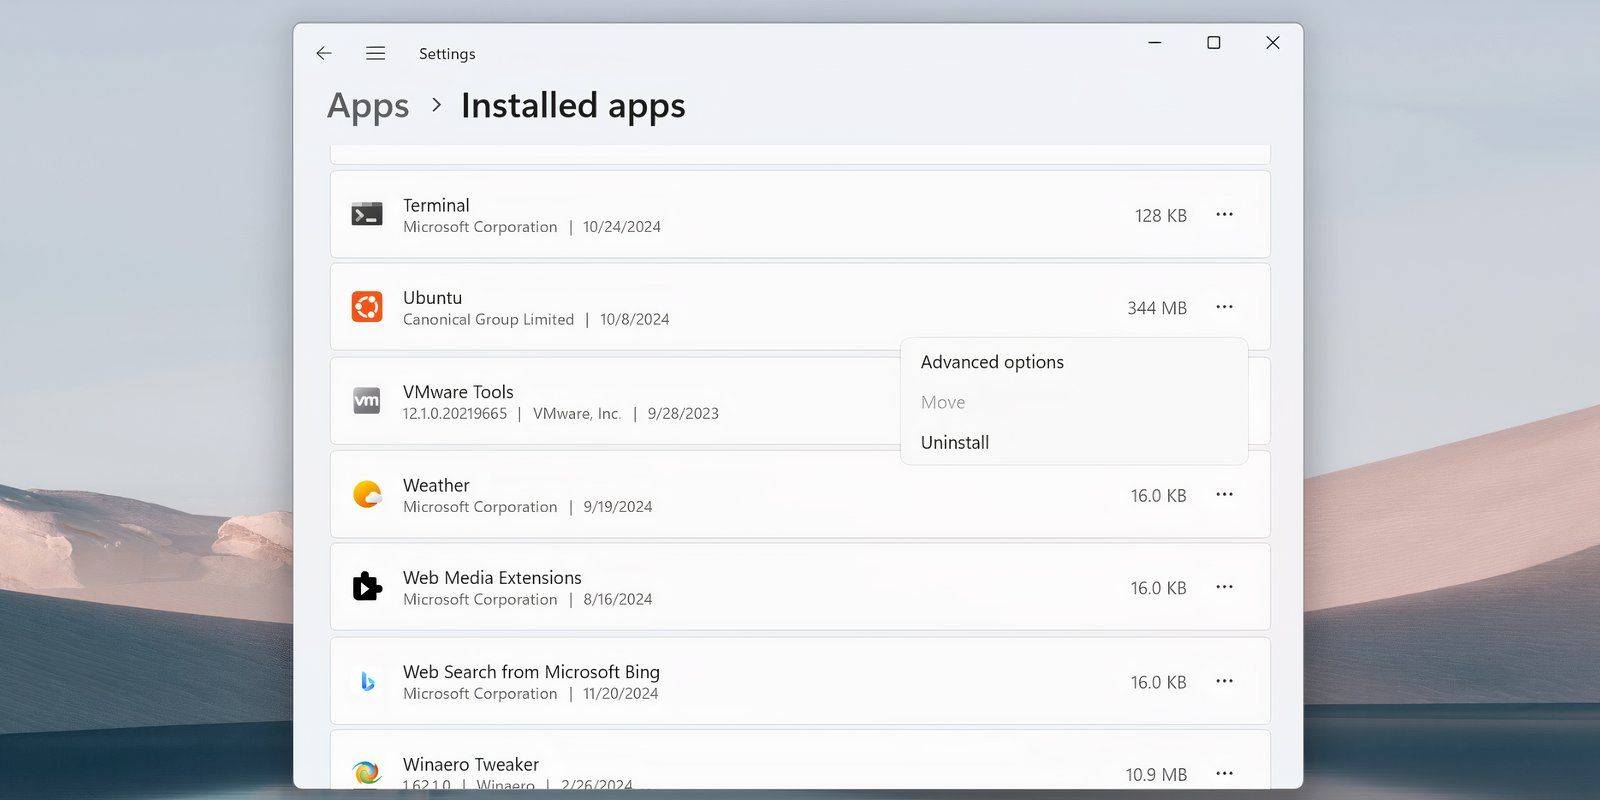
Перейдите в Настройки > Приложения > Приложения и возможности и прокрутите вниз до конца списка приложений, чтобы найти Подсистему Windows для Linux. Нажмите кнопку Дополнительно и выберите Удалить. В Windows 10 нажмите на имя приложения, а затем выберите Удалить.
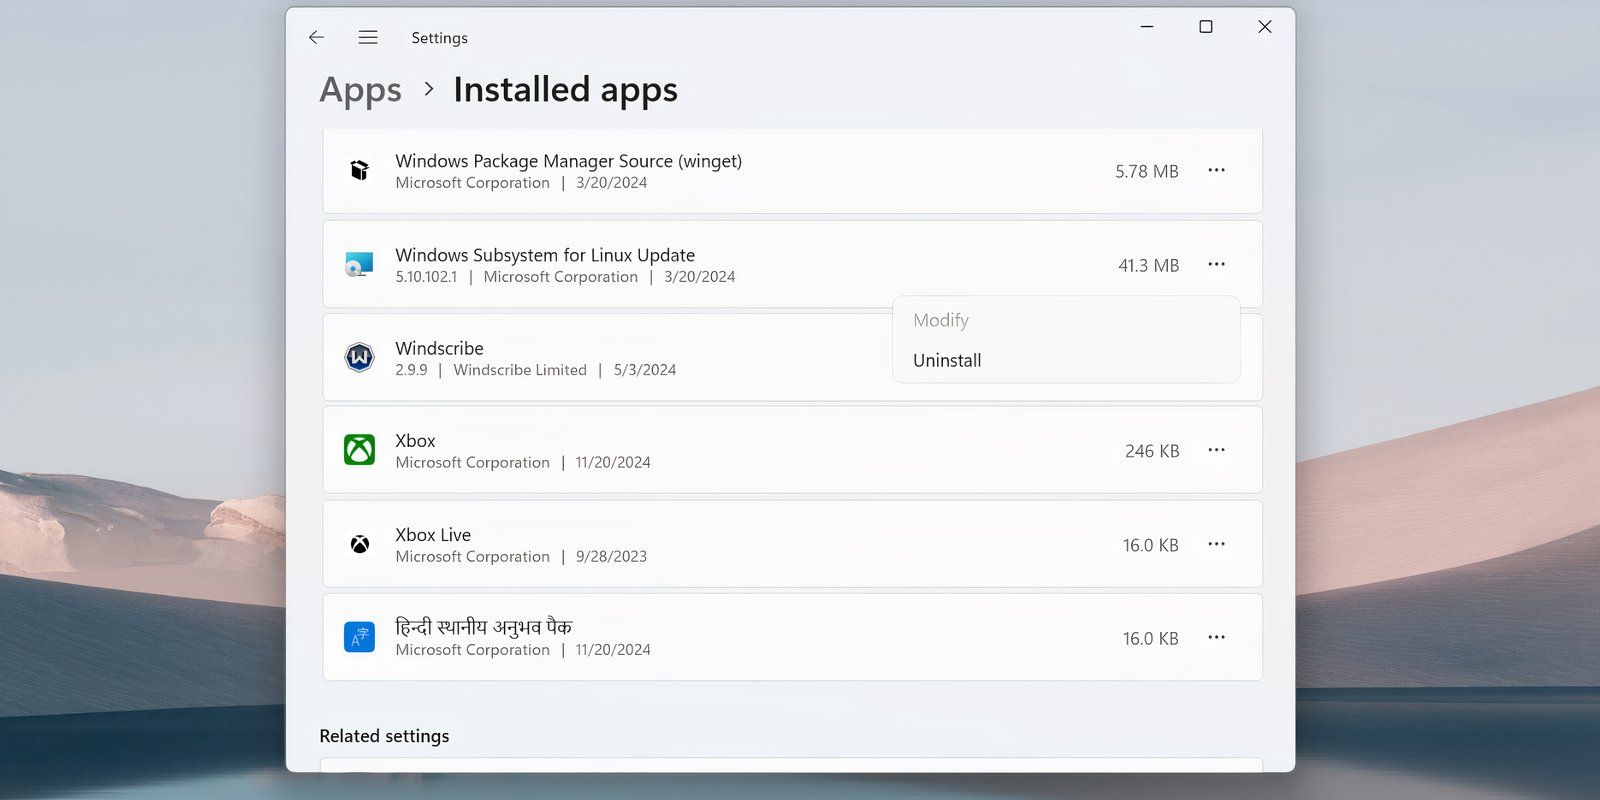
Если вы видите какие-либо дополнительные компоненты WSL, такие как обновление WSL или WSLg Preview, удалите их тем же образом.
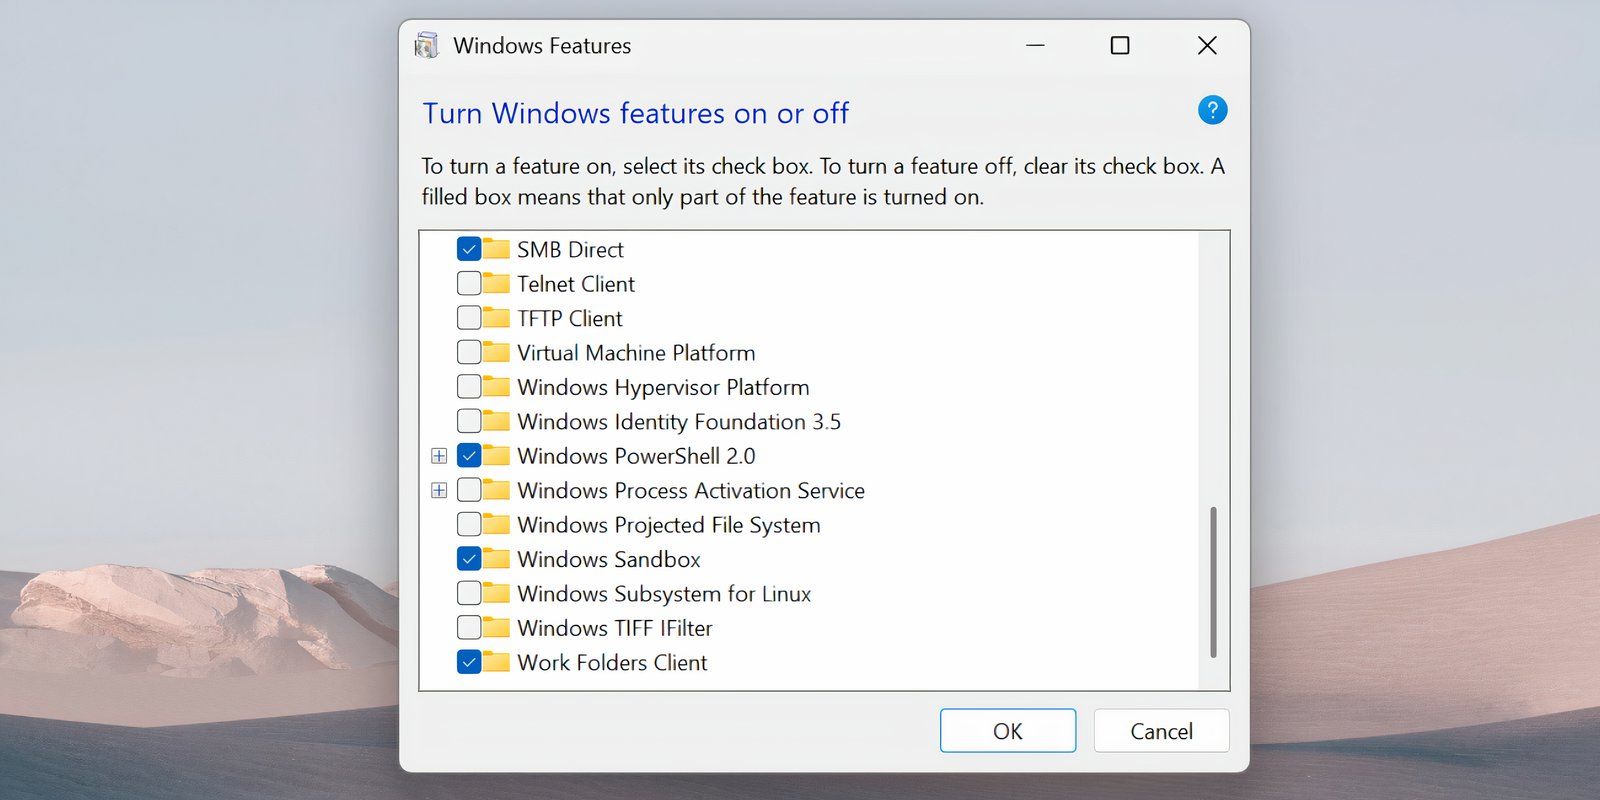
Удалите WSL и платформу виртуальных машин
Последний этап процесса — удалить основные файлы WSL и отключить опцию в панели Дополнительных возможностей Windows.
Теперь WSL должен быть полностью удален с вашего компьютера. Он не будет получать автоматические обновления, и вы не сможете взаимодействовать с ним. Если он понадобится вам в будущем, вот как установить WSL через Microsoft Store на ПК с Windows.
Если вам понравилась эта статья, подпишитесь, чтобы не пропустить еще много полезных статей!
Вы также можете читать меня в:
- Telegram: https://t.me/gergenshin
- Яндекс Дзен: https://dzen.ru/gergen
- Официальный сайт: https://www-genshin.ru
Background
I’ve been using wsl (version 2) with genie mod for years without issue, but one day, Windows 10 finally catch up on wsl Windows 11 features and gives us a way to use systemD natively.
I wanted to use the new «right way» to enable systemD on Windows Subsystem for Linux (without genie), and I also had a (probably related) infinite Windows RemoteApp error poping in.
Fixing it
A — Uninstall wsl and related stuff
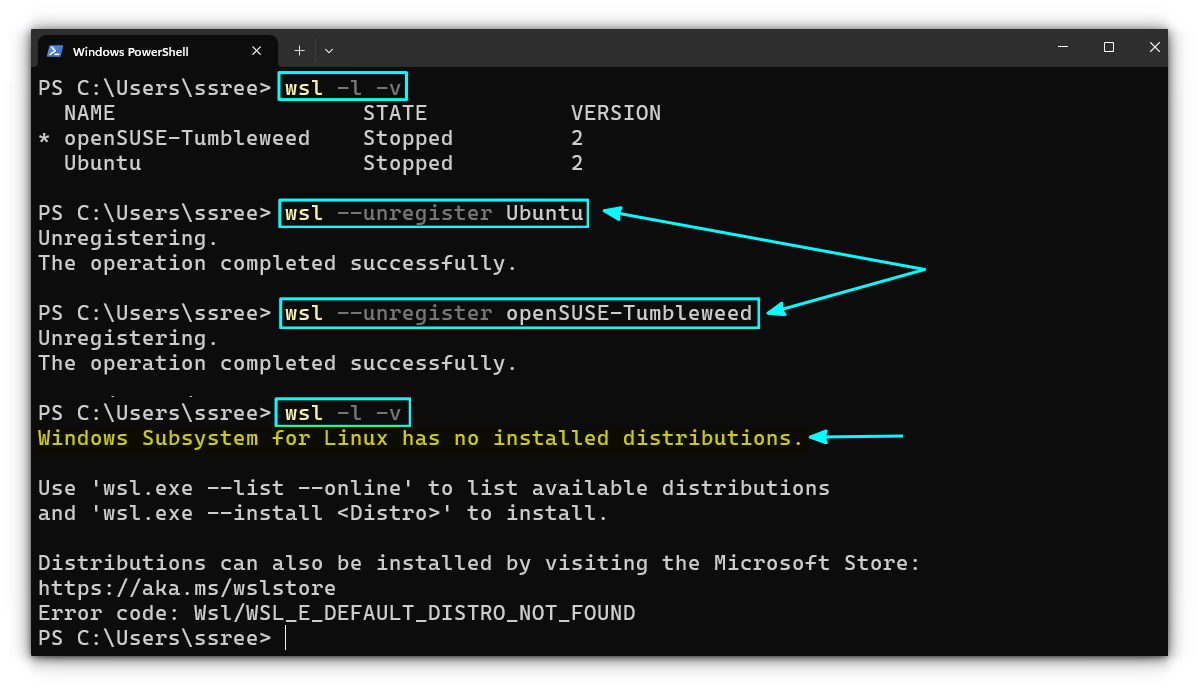
- In powershell (as admin)
# list all installed distros
wsl -l -v

# destroy distros
wsl --unregister Ubuntu
wsl --unregister Debian # and so on
- In Settings > Apps > Apps & Features
- search for
Ubuntu(thenDebian, etc), and if something is found, click on uninstall - search for
Linux, and if something is found, click on uninstall on all results
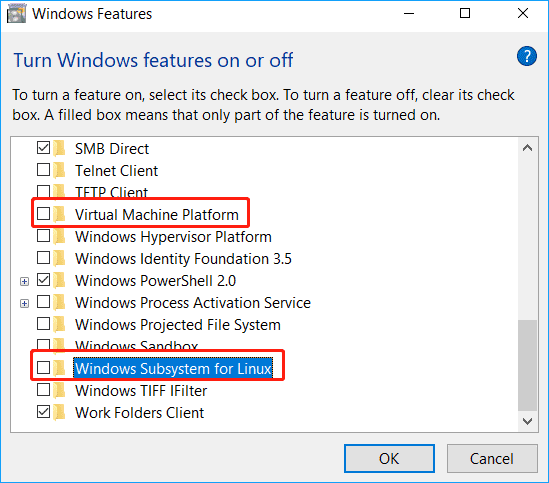
- In Start Menu > Turn Windows Features on or off
- Untick
Virtual Machine Platformcheckbox - Untick
Windows Subsystem for Linuxcheckbox
- Reboot
- I might have reboot between step 2) and 3) as well.
B — Re-install and configure wsl to use systemD
The process of installing wsl have become super straightforward.
- Installing wsl — In powershell (as admin)
# install wsl
wsl --install
Then reboot and wait for the Ubundu installation to complete and ask for username (it might takes some time).
- Optional: Changing distribution — In powershell (as admin)
# list available distributions
wsl --list --online

# install favorite distro
wsl --install -d Debian

# set Debian as default
wsl --set-default Debian
NB: wsl --set-default-version 2 is not needed anymore.
- Enabling systemD support — Inside wsl
- Launch your distribution
- Edit
/etc/wsl.conf(or create the file if it doesn’t exist)
[boot]
systemd=true

# Optional: remove windows from PATH (autocompletion)
[interop]
appendWindowsPath = false
- Clean rebooting — In powershell (as admin)
# clean shutdown
wsl --shutdown
Great success! 🎉 You have now enabled systemD in wsl natively. You can test it with sudo systemctl status time-sync.target (inside your Linux distribution).
NB: System wide configuration file .wslconfig will not be deleted/reseted, you would have to do it manually.
Let me know if I missed anything, I’ll be glad to update this gist.
-
Home
-
News
- How to Uninstall WSL on Windows 11 & Windows 10? See a Guide!
How to Uninstall WSL on Windows 11 & Windows 10? See a Guide!
By Vera | Follow |
Last Updated
If you need to uninstall Windows Subsystem for Linux, you can do this task on Windows 10/11. It is not simple as program uninstallation. Refer to this post from MiniTool and find the guide on how to uninstall WSL easily.
About WSL
Windows Subsystem for Linux, also known as WSL, is a feature in Windows operating system that is primarily designed for developers, especially web developers. WSL enables you to run a Linux system with Linux command-line tools and GUI apps on Windows 11/10. This won’t break anything important on your PC.
In the earlier time, Microsoft released the first version – Windows Subsystem for Linux (WSL) that supports a direct translation between Linux and Windows. While WSL2 uses a lightweight virtual machine to integrate it into your Windows workflow. Any Linux distribution can run on either the WSL 1 or WSL 2 architecture, which depends on their configuration.
To run a Linux system on Windows 10/11, you need to install WSL and here a related post is helpful – How to Install Windows Subsystem for Linux (WSL) on Windows 11.
When anything goes wrong or you no longer need to use this platform, you may want to uninstall WSL. Well then, can you uninstall WSL from your computer? It is possible and just follow the guide below now.
Tips:
Experience a faster system with MiniTool System Booster – your solution to effortless program uninstallation.
MiniTool System Booster TrialClick to Download100%Clean & Safe
How to Uninstall WSL on Windows 10/11
How to uninstall WSL on Windows 11/10? It is not easy to completely remove WSL from your PC since this isn’t similar to uninstalling a program. You need to do three steps – delete the Linux distro, uninstall other components and disable this platform. Do the operations about WSL uninstall Ubuntu in order:
Step 1: Uninstall Linux Distro
1. In Windows 11/10, press Win + I at the same time to open Settings.
2. Go to Apps > Apps & features.
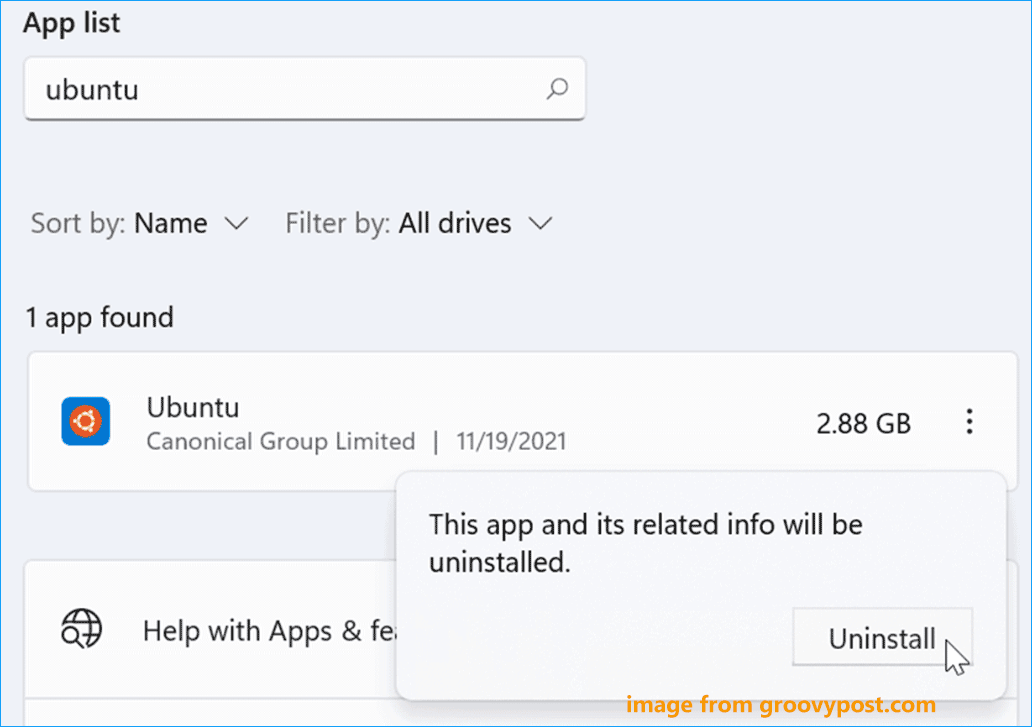
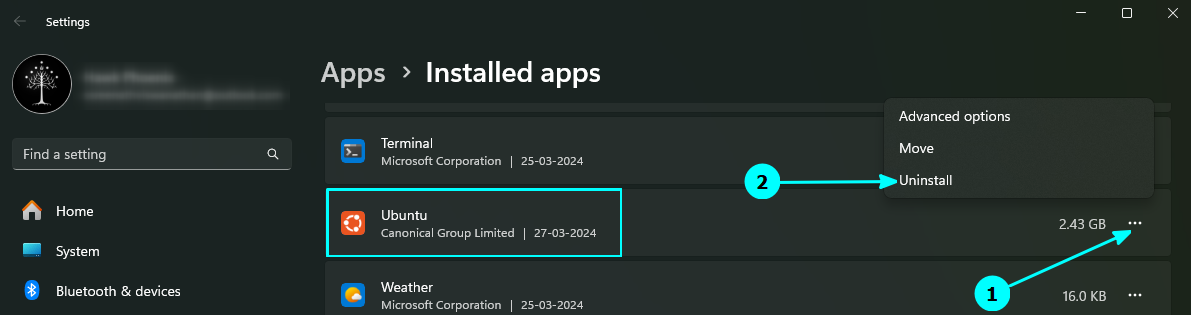
3. Choose a Linux distribution like Ubuntu and click Uninstall (Windows 10). For Windows 11, click the three dots and click Uninstall. Then, click Uninstall again to confirm the operation.
Tips:
You can type the Linux distribution like Ubuntu into the text of App list to find your installation.
Step 2: Delete Windows Subsystem for Linux Components
After uninstalling the Linux distribution from Windows 11/10, other elements of the Windows Subsystem for Linux functionality should be also removed.
1. In the Settings window, go to App > Apps & features.
2. Choose Windows Subsystem for Linux WSLg Preview and click Uninstall > Uninstall. In Windows 11, you need to click three dots and click Uninstall.
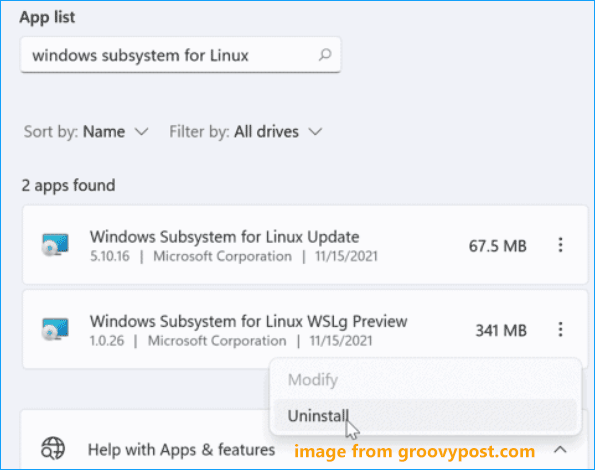
3. Find Windows Subsystem for Linux Update and uninstall it.
Step 3: Disable Windows Subsystem for Linux
This is the last step you should do and see what you should do:
1. In Windows 11/10, click System > Optional features and click More Windows features under the Related settings section to open Windows Features.
Tips:
Alternatively, you can type windows features into the search box and click Turn Windows features on or off.
2. In the Windows Features interface, locate Virtual Machine Platform and Windows Subsystem for Linux, then uncheck the boxes of these two options.
3. Click OK to save the changes and restart your computer.
After the restart, you completely uninstall WSL on Windows 11/10. If you change your mind and want to run a Linux distribution like Ubuntu, you can still reinstall WSL on your computer.
About The Author
Position: Columnist
Vera is an editor of the MiniTool Team since 2016 who has more than 7 years’ writing experiences in the field of technical articles. Her articles mainly focus on disk & partition management, PC data recovery, video conversion, as well as PC backup & restore, helping users to solve some errors and issues when using their computers. In her spare times, she likes shopping, playing games and reading some articles.

So, you have used Linux inside Windows using WSL. Your goal is achieved. You learned Linux or completed your project and you don’t need WSL anymore.
It is only logical to get rid of unnecessary applications. This frees up disk space and keeps the system clean.
So, we end this WSL series by discussing the removal of WSL from Windows. Let’s see the steps.
Step 1: Uninstall all the Linux distributions
Before uninstalling WSL from your system, you should uninstall all the Linux distributions that you have installed using WSL. This can be done in two steps:
- Unregister the distribution
- Uninstall the application.
First, unregister a WSL distribution by using this command in Windows command line:
wsl --unregister <distribution_name>
🚧
Here, the distribution_name should be exactly the same as the name shown while listing the WSL distributions using wsl -l -v
Repeat the step for all the distributions you have installed.
Once all the distributions are unregistered, you can uninstall the apps, just like any other app on Windows.
📋
WSL distributions installed directly from the Microsoft Store will leave the app on your system once unregistered through the terminal. That’s why you need to uninstall them separately. Distributions installed from outside the store do not need to be uninstalled separately. This is the case for distributions that you have imported from an exported distribution tar file.
Search for the “Add or Remove Programs” in the start menu.
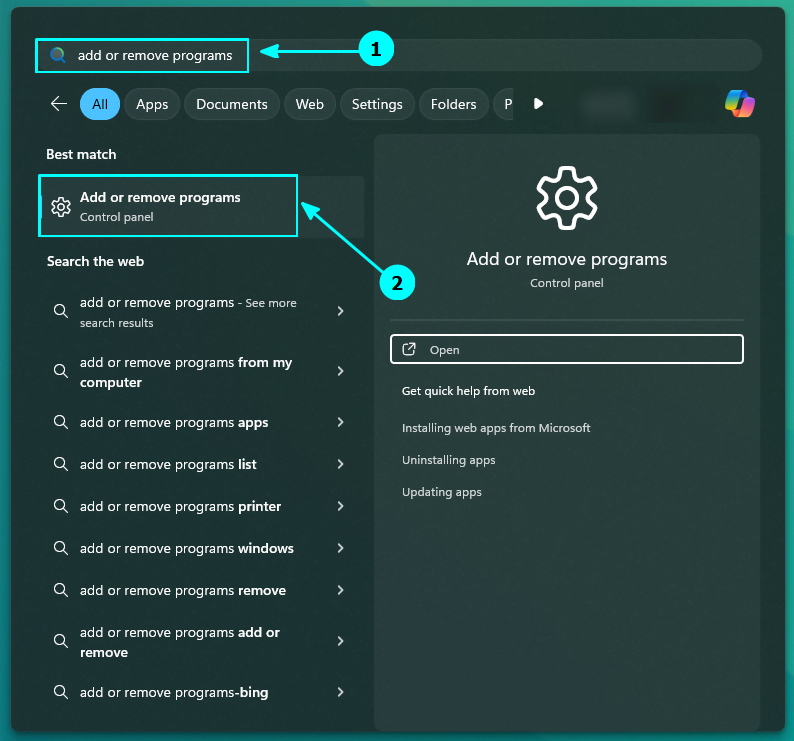
Inside this window, scroll down and go to the distribution name. Click on the three-dots button adjacent to it. You will see an “Uninstall” option. Use it.
Repeat the steps for the rest of the distributions.
Step 2: Uninstall WSL from the system
Once you have removed all the installed WSL distributions, it’s time to uninstall the WSL app.
It can be done the same you installed it in the first place.
If you installed Windows Subsystem for Linux App from the Microsoft Store, you can uninstall the app from the Microsoft Store itself. Open the “Add or Remove programs” window. Inside that, remove components that are related to WSL, like the Windows Subsystem for Linux app, other updates and previews, etc. if installed.
If you installed WSL as a Windows feature, you can turn off the respective feature.
Search for “features” in the Windows Start menu and open it.
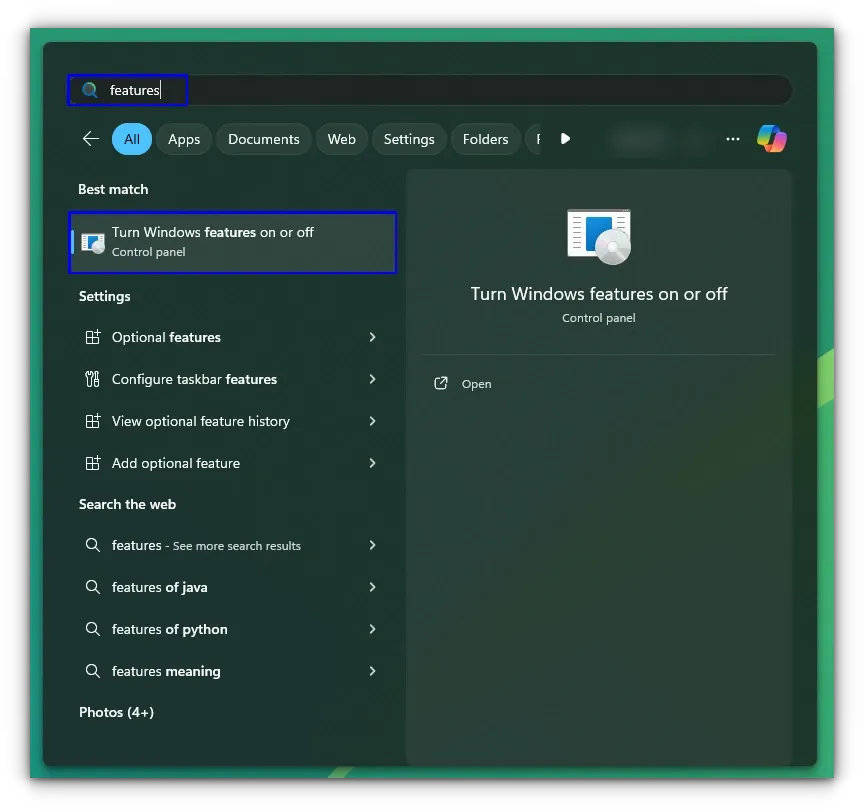
Inside the features window, turn off the «Windows Subsystem for Linux» feature by unchecking the box.
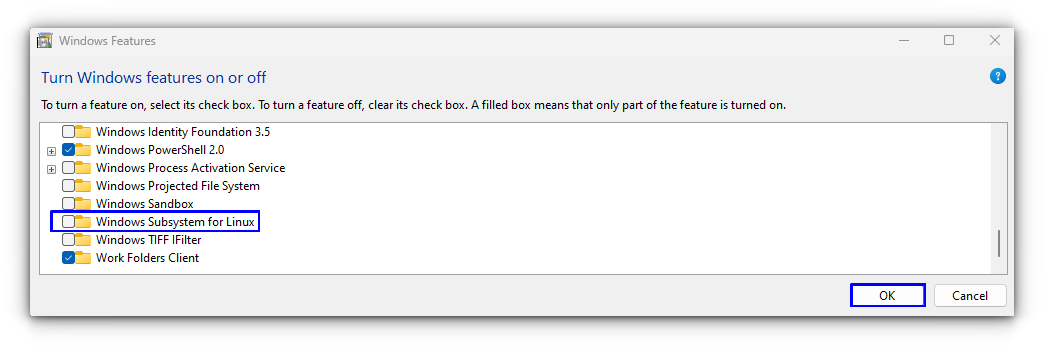
If you are not planning to use Virtual machine setups in the future, you may also turn off the Virtual Machine Platform feature. Although I’ll suggest keeping it. You never know when you are in the mood for a VM.
You should reboot your system when prompted. That’s it. You have successfully removed WSL from Windows.
I hope you found this WSL series helpful in your Linux journey.
About the author
Sreenath
Linux tinkerer by day, Lord of the Rings fanatic by night. When I’m not busy conquering the command line, you can find me kicking back and watching some football while quoting JRR Tolkien
Uninstalling WSL (Windows Subsystem for Linux) in Windows 10 is easier than you might think. Just follow a few simple steps: open the Control Panel, go to Programs and Features, and then disable the Windows Subsystem for Linux. This will remove WSL from your system. Let’s get into the details to make sure you nail it.
In this section, we’ll walk you through the steps to uninstall WSL from your Windows 10 machine. By the end of these steps, you’ll have completely removed WSL, freeing up system resources and clearing out any Linux distributions you no longer need.
Step 1: Open the Control Panel
Open the Control Panel by typing «Control Panel» in the Windows search bar and hitting Enter.
The Control Panel is your one-stop-shop for making major system changes, and finding it is as simple as using the search bar. Once you open it, you’ll have access to various system settings and features.
Step 2: Go to Programs and Features
Inside the Control Panel, click on «Programs,» then click on «Programs and Features.»
This is where you can uninstall or modify installed programs. It’s like the app manager on your phone but for your computer. You’ll see a list of all the software installed on your machine.
Step 3: Turn Windows Features On or Off
On the left sidebar, you’ll see an option that says «Turn Windows features on or off.» Click on it.
This option allows you to enable or disable various Windows features, including WSL. This is crucial because WSL isn’t just another app; it’s a subsystem integrated into Windows.
Step 4: Locate and Uncheck Windows Subsystem for Linux
Scroll down until you see «Windows Subsystem for Linux.» Uncheck the box next to it.
By unchecking this box, you’re telling Windows to deactivate WSL. This action won’t take effect until you reboot your system, so don’t be alarmed if nothing seems to happen immediately.
Step 5: Reboot Your System
Finally, restart your computer to apply the changes.
A reboot is necessary to complete the uninstallation process. Once your system restarts, WSL will be fully removed from your machine.
After completing these steps, WSL will be removed from your system. Your computer will no longer support running Linux distributions natively through WSL, and the associated files will be deleted.
Tips for Uninstalling WSL in Windows 10
- Always back up your data before uninstalling any software.
- Ensure no Linux distributions are running when you begin the uninstallation process.
- Check for any dependencies that might rely on WSL before removing it.
- Update your Windows 10 system to the latest version for a smoother uninstallation process.
- If you plan to reinstall WSL later, make a note of any custom settings you have configured.
Frequently Asked Questions
What happens to my Linux files after uninstalling WSL?
Your Linux files will be deleted when you uninstall WSL. Be sure to back up any important data before starting the process.
Can I reinstall WSL later?
Yes, you can. Simply go through the installation process again via the Control Panel or Windows Features.
Do I need administrative privileges to uninstall WSL?
Yes, you need administrative privileges to access and change system features like WSL.
Will uninstalling WSL affect my Windows performance?
Uninstalling WSL may free up some system resources, but it won’t significantly impact overall performance.
Are there alternatives to WSL if I need a Linux environment?
Yes, you can use virtual machines like VirtualBox or VMware, or even dual-boot your system with Linux.
Summary
- Open the Control Panel.
- Go to Programs and Features.
- Click «Turn Windows features on or off.»
- Uncheck Windows Subsystem for Linux.
- Reboot your system.
Conclusion
Uninstalling WSL in Windows 10 is a straightforward process that can be done in just a few steps. By following the steps outlined above, you can efficiently remove WSL and free up system resources. Remember to back up your data and check for any dependencies before proceeding.
If you’re considering alternatives to WSL, options like virtual machines or dual-boot setups are worth exploring. They provide different levels of integration and performance suited to various needs. Whether you’re cleaning up your system or switching to a different Linux environment, understanding how to manage these subsystems is crucial.
For further reading, you might want to explore articles on optimizing Windows performance and managing different operating systems efficiently. And if you ever find the need to reinstall WSL, it’s as simple as reversing the steps outlined in this guide.
So, now that you know how to uninstall WSL in Windows 10, why not give it a try? Your system might just thank you for the extra breathing room!
Matt Jacobs has been working as an IT consultant for small businesses since receiving his Master’s degree in 2003. While he still does some consulting work, his primary focus now is on creating technology support content for SupportYourTech.com.
His work can be found on many websites and focuses on topics such as Microsoft Office, Apple devices, Android devices, Photoshop, and more.