
Contents
- Before you Start
- OS-Uninstaller Graphical Tool
-
Alternative: via gParted and GRUB update
- Boot the Disc
- Run GParted and Locate Windows
- Deleting the Windows Partition
- Use the Newly Freed Space
- Further Operations
- Reboot
- Other Resources
Before you Start
Before you start fiddling with your partitions, you should make sure that you have ALL IMPORTANT data backed up, preferably on a secondary hard drive (internal or external), a USB flash drive, or a CD-R or DVD-R. Although it is not common for problems to happen during the partitioning process, it is still possible. Actually, the primary cause of data loss is you! Users sometimes get confused and end up deleting the wrong partition, or just forget to backup their family photos and favorite music before they delete partitions. If at any point during this process you get confused or concerned, STOP and ask for help. The best place for this is the Ubuntu Forums.
This guide is designed primarily for users who have a dual boot that now want to fully escape Windows and go purely Ubuntu.
A simple way to remove Windows (or any OS) is to use this little graphical tool: OS-Uninstaller.
Alternative: via gParted and GRUB update
There are other partition editors available, but GParted is this documentor’s favorite and is already available to you if you have an Ubuntu LiveCD. You can also use the GParted LiveCD.
Please note that although you can install GParted inside your Ubuntu installation, you will be unable to resize your root partition without a LiveCD since you cannot change a partition that is mounted.
Boot the Disc
Place the LiveCD into your CD/DVD drive, and reboot the computer. Each computer is different, but you may need to change your BIOS to have the system boot from the CD drive before the hard disk. Refer to your computer manufacturer’s documentation for this.
Run GParted and Locate Windows
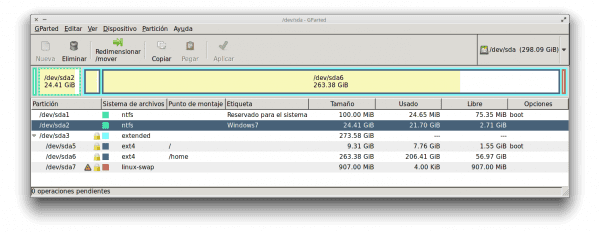
On the Ubuntu LiveCD, go to System -> Administration -> Partition Editor. If you have more than one hard drive on your computer, choose the correct device from the drop down box in the upper right hand corner of the window. Your windows partition will most likely be formatted as NTFS and have a boot flag, which makes it easy to locate. Again, if you are unsure, don’t delete it!
For more details on partitioning, see HowtoPartition and its subpages.
Deleting the Windows Partition
Select the correct partition, either from the bar graph representation of your disk, or from the list, and press the Delete button at the top with the trash can icon, or right-click the partition from the list and choose Delete. Note that a Windows installation might use more than one partition; for example, Windows preinstalled on an Acer desktop might have a «hidden» (but not to GParted) recovery partition, a partition named «SYSTEM RESERVED», and one named «eMachines». In this case, you’ll have to select them all for deletion. Now if you are sure that you want to proceed, click the Edit -> Apply button to start the pending deletion operations.
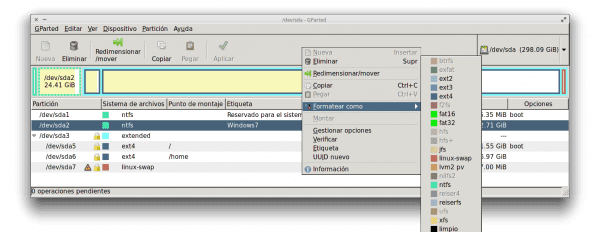
Use the Newly Freed Space
After the deletion operation completes, you’ll have a section of unallocated space. Now, you can either format it as the filesystem type of your choice to use as a data partition (or something else), or you can resize an adjacent partition to use this space.
Resizing an Existing Partition
Right-click the partition that you want to expand into the empty space and select Resize/Move. You can use either the number sizing, or you can graphically drag the arrows on the visualization into the empty space (the numbers will adjust automatically). When you are finished, click the Resize/Move button, then Edit -> Apply in the GParted window. Again, read the prompt and click Edit -> Apply. The operation may take awhile, depending on the size of the partition, but DO NOT interrupt this process, or you risk losing everything on the partition you are resizing.
If your Linux installation lives on the extended partition (see HowtoPartition/OperatingSystemsAndPartitions), you will not be able to expand the main Linux partition into the space created by deleting the Windows partition. One solution is to
- create a new partition using the space left by the deleted primary partition (see Creating a New Partition below),
- if the new partition is smaller than the main Linux partition, resize the latter to fit the former (but only if the latter is not so full that data would be lost),
-
copy the data of the old partition to the new one (click on the old partition; Ctrl-C; click on the new partition; Ctrl-V; click Edit -> Apply) (had it been possible, resizing the old partition would also have involved copying and would have taken just as long),
-
reinstall GRUB2 to the new partition (see Grub2#Reinstalling GRUB2), and
- boot into the new partition (see Reboot below) and make sure everything works as normal.
Once you’re satisfied that this operation succeeded, use GParted again to delete the old partition and to create a new one in its place, or to expand the new main partition, or to just leave the unused disk space as it is, to be used later.
Creating a New Partition
If you choose to simply use the newly freed space as a new partition, select the unallocated space and click the New button (or right-click). Choose which filesystem you want, then click Add, then Apply, and Apply again.
Since you are not using Windows on this system anymore, ext4 is probably the best choice for your new filesystem. If you plan on sharing this drive with Windows (maybe you have Windows on another drive on this computer), NTFS or FAT32 would be better choices.
Further Operations
Edit GRUB
Once back in your install, you will probably want to remove Windows from your GRUB2 menu. Using root privileges and your favorite text editor, open /boot/grub/grub.cfg
In Ubuntu, run:
gksudo gedit /boot/grub/grub.cfg
In Kubuntu, run:
kdesu kate /boot/grub/grub.cfg
Or for a terminal interface, run:
sudo nano /boot/grub/grub.cfg
Now scroll down into the file to where it says something similar to
### END DEBIAN AUTOMAGIC KERNELS LIST

# This is a divider, added to separate the menu items below from the Debian
# ones.
title           Other operating systems:
root


# This entry automatically added by the Debian installer for a non-linux OS
# on /dev/sda1
title           Microsoft Windows XP Professional
root            (hd0,0)
savedefault
makeactive
chainloader     +1
You can place a # in front of each line to «comment out» these entries. If you are comfortable with deleting the entries, you can also do that. After you you save and close, these entries will no longer be available at the GRUB menu.
Edit /etc/fstab
If you made a data partition, you can have it automatically mount by adding the correct entry to fstab, which you can edit using root privileges.
In Ubuntu, run:
gksudo gedit /etc/fstab
In Kubuntu, run:
kdesu kate /etc/fstab
Or for a terminal interface, run:
sudo nano /etc/fstab
You may also need to change UUIDs in your fstab file if they changed (perhaps due to partition resizing). To see the UUIDs for your partitions, run one of these two commands:
sudo blkid
sudo ls -l /dev/disk/by-uuid
For more information regarding fstab, see Fstab.
Reboot
You can now reboot your system — go to System -> Quit -> Restart. Don’t forget to take out the LiveCD at the beginning of the boot sequence since you can’t remove it while the disc is being used and you don’t want to reload Ubuntu from it.
Other Resources
-
Fstab
-
Grub2
-
HowtoPartition
-
LiveCD
If you want to remove Windows and replace it with Ubuntu, choose Erase disk and install Ubuntu. All of the files on the disk will be deleted before Ubuntu is put on it, so make sure you have backup copies of anything you wanted to keep. For more complicated disk layouts, choose Something Else.
How do I completely remove Windows and install Linux?
Here is what you have to do :
- Backup your data ! All of your data will be wiped with your Windows installation so do not miss this step.
- Create a bootable USB Ubuntu installation.
- Boot the Ubuntu installation USB drive and choose Install Ubuntu.
- Follow the installation process.
How do I remove Windows 10 and keep Ubuntu?
Select your Windows partition (it will be of type NTFS and will probably have a pale green border). Delete it ( Partition > Delete ). Optionally, resize your Ubuntu partition to take up the freed space. You may be able to do this by selecting it (it’s of type ext4 ) and using Partition > Resize/Move .
How do I remove Windows 7 and install Ubuntu?
If you want to replace Windows 7 with Ubuntu, you will need to:
- Format your C: drive (with the Linux Ext4 filesystem) as part of the Ubuntu setup. This will delete all your data on that particular hard disk or partition, so you must have a data backup in place first.
- Install Ubuntu on the newly formatted partition.
Will installing Ubuntu erase Windows?
Yes, It will. If you don’t care during installation of Ubuntu, or if you make any mistake during partition in Ubuntu then it will corrupt or erase your current OS. But if you take little care then It will not erase your current OS and you are able to set up dual boot OS.
How do I remove Windows and install Ubuntu without losing data?
To do so, open GParted in live mode or if you select graphical install, after a couple of steps it will show a menu asking you to do the required partitioning. Select your Windows partition and then select the delete option. This will delete all your data only in your Windows partition.
How do I completely replace Windows with Ubuntu?
Download Ubuntu, create a bootable CD/DVD or a bootable USB flash drive. Boot form whichever one you create, and once you get to the installation type screen, choose replace Windows with Ubuntu.
5 Answers
- Install Ubuntu alongside your existing Operating System(s)
- Erase disk and install Ubuntu.
- Something else.
How do I go back to Windows 10 after installing Ubuntu?
Replies (3)
- Create a bootable media and boot the PC using the media.
- On the Install Windows screen, select Next > Repair your computer.
- On the System Recovery Options screen, select Troubleshoot> Advanced options > Command Prompt.
- Now type in the commands and hit enter: BOOTREC /FIXMBR. BOOTREC /FIXBOOT.
- Restart the PC.
How do I remove Windows boot manager after installing Ubuntu?
1 Answer
- Type sudo efibootmgr to see a list of what’s available.
- Identify the Windows boot manager in the list.
- Delete the Windows boot manager entry with efibootmgr ‘s -b #### and -B options, as in sudo efibootmgr -b 0003 -B to delete Boot0003 .
It is mostly under EFI/distro_name . Remove that directory and its contents by (PLEASE MAKE SURE YOU ARE DELETING THE CORRECT DIRECTORY) sudo rm -r ubuntu .
How do I remove Ubuntu from dual boot?
Just boot into Windows and head to Control Panel > Programs and Features. Find Ubuntu in the list of installed programs, and then uninstall it like you would any other program. The uninstaller automatically removes the Ubuntu files and boot loader entry from your computer.
How do I remove a Linux partition from Windows?
Deleting the Windows Partition
Select the correct partition, either from the bar graph representation of your disk, or from the list, and press the Delete button at the top with the trash can icon, or right-click the partition from the list and choose Delete.
Can I remove Windows from dual boot?
How to Uninstall Windows 8 From a Dual-Booting PC
- Boot into Windows 7.
- Launch Msconfig by hitting Windows + R to get the run box, typing msconfig and clicking Ok.
- Select the Boot tab.
- Select Windows 8 and click Delete.
- Click OK to exit msconfig.
Can I use both Windows and Ubuntu?
The short answer is, yes you can run both Windows and Ubuntu at the same time.Then you will install a program in Windows, such as Virtualbox, or VMPlayer (call it VM). When you launch this program you will be able to install another OS, say Ubuntu, inside the VM as a guest.
Is Ubuntu better than Windows?
Generally, developers and Tester prefer Ubuntu because it’s very robust, secure and fast for programming, while normal users who want to play games and they have work with MS office and Photoshop they will prefer Windows 10.
Can I install Ubuntu and Windows in same drive?
If you choose to install it to the same drive as Windows 10, Ubuntu will allow you to shrink that pre-existing Windows partition and make room for the new operating system.You can drag the divider left and right to choose how you want to divide your hard drive space between the two operating systems.
How do I install Ubuntu without formatting another drive?
You just have to select the manual partitioning method and tell the installer not to format any partition you want to use. However you’ll have to create at least an empty ext3 / ext4 partition where to install Ubuntu (you can choose also to create another empty partition of about 2Gb to be used as swapspace ).
How do I replace Windows without Linux data?
The steps are as follows:
- Download the Live environment ISO of your favorite Linux distribution, and burn it to a CD/DVD or write it to a USB drive.
- Boot into your newly-created media.
- Use the same tool to create a new ext4 partition in the empty space created by resizing the first partition.
How do I remove Windows and install Ubuntu without USB?
To install Ubuntu without CD/DVD or USB pendrive, follow these steps:
- Download Unetbootin from here.
- Run Unetbootin.
- Now, from the drop-down menu under Type: select Hard Disk.
- Next select the Diskimage.
- Press OK.
- Next when you reboot, you will get a menu like this:
How do I boot Ubuntu after installation?
The graphical way
- Insert your Ubuntu CD, reboot your computer and set it to boot from CD in the BIOS and boot into a live session. You can also use a LiveUSB if you have created one in the past.
- Install and run Boot-Repair.
- Click “Recommended Repair”.
- Now reboot your system. The usual GRUB boot menu should appear.
Will I lose my Windows 10 license if I install Ubuntu?
Short answer no. You can again install Windows 10 whenever you like and it will be auto activated for you. Your License key is stored in your bios.
In this step-by-step guide, we will walk you through the process of removing the Windows operating system from your computer and installing Ubuntu instead. Whether you’re looking for a change of software or want to explore the benefits of open-source operating systems, this article will provide you with all the necessary instructions to smoothly transition to Ubuntu and enjoy its user-friendly interface and versatile features. Follow along to make the switch to Ubuntu hassle-free!
Preparing For The Installation Process
Preparing for the installation process is a crucial step when removing Windows and installing Ubuntu on your computer. This subheading outlines the necessary preparations you should make before proceeding with the installation.
In this section, you will learn how to gather important information such as your computer’s specifications, including the processor, RAM, and hard drive space. This information helps ensure that your system meets Ubuntu’s minimum requirements for a smooth installation.
Additionally, you will find guidance on creating a list of essential software and applications you currently use on Windows. It is important to identify alternatives or Linux-compatible versions of these applications to install on Ubuntu later. This subheading further emphasizes the significance of taking the time to research and understand the Ubuntu environment to avoid any surprises during the transition.
Furthermore, this section highlights the importance of backing up your important files and documents, which will be covered in more detail later in the article. Overall, preparing thoroughly for the installation process will set the foundation for a successful transition from Windows to Ubuntu.
Backing Up Your Windows Data
Before you remove Windows and install Ubuntu, it is crucial to back up all your important data. This ensures that you don’t lose any files or documents that are essential to you during the transition. To begin, identify the data you need to backup, such as personal documents, photos, videos, or any other files you can’t afford to lose.
There are several ways you can back up your Windows data. You can use an external hard drive, cloud storage services like Google Drive or Dropbox, or even burn your data onto DVDs. Choose the backup method that is most convenient for you and ensure that you have enough storage space available.
Once you’ve decided on the backup method, start copying all your important data to the designated location. Make sure to double-check that all the files have been successfully copied and are accessible. It’s always a good idea to verify the integrity of your backed-up data before proceeding with the Windows removal process.
Remember, taking the time to back up your Windows data will give you peace of mind and protect you from losing any valuable information throughout the installation and setup of Ubuntu.
Creating An Ubuntu Installation Media
In this step, you will learn how to create an Ubuntu installation media, such as a USB drive or DVD, which you will use to install Ubuntu on your computer.
To create an Ubuntu installation media, you will first need to download the Ubuntu ISO file from the official Ubuntu website. Make sure to choose the appropriate version for your computer, whether it is 32-bit or 64-bit.
Once you have downloaded the ISO file, you can use various tools to create a bootable USB drive or burn it onto a DVD. One popular tool for creating a bootable USB drive is Rufus, which is available for free. Simply open Rufus, select the USB drive, browse for the downloaded ISO file, and click on the “Start” button to begin the process.
If you prefer to burn the ISO file onto a DVD, you can use software like ImgBurn or Nero Burning ROM. Open the chosen software, select the ISO file, insert a blank DVD into your computer’s optical drive, and start the burning process.
By following these instructions, you will successfully create an Ubuntu installation media, allowing you to proceed to the next step of the installation process.
Booting From The Installation Media
When it comes to installing Ubuntu, the first step is to boot your computer from the installation media. This can be done by changing the boot order in your computer’s BIOS settings.
To begin, insert the Ubuntu installation media (typically a USB drive or DVD) into your computer. Then restart your computer and access the BIOS settings by pressing the designated key during startup, which is usually one of the function keys or the “Delete” key.
Once you’re in the BIOS settings, navigate to the “Boot” menu. Here, you’ll find a list of boot devices. Adjust the boot order so that the installation media (USB or DVD) is at the top of the list.
Save the changes and exit the BIOS settings. Your computer will now boot from the Ubuntu installation media. It may take a moment to load, and you’ll eventually be greeted with the Ubuntu installation wizard.
By successfully booting from the installation media, you’re now ready to proceed with the Ubuntu installation process.
Choosing The Installation Type
When installing Ubuntu on your computer, it is crucial to choose the right installation type that suits your needs. This decision will determine how Ubuntu will coexist with your existing Windows setup, or whether it will replace it entirely.
Ubuntu offers two primary installation options – dual-boot and overwriting Windows with Ubuntu.
Dual-boot allows you to keep both Windows and Ubuntu on your system, giving you the flexibility to choose the operating system you want to use each time you start your computer. This option is ideal if you want to transition to Ubuntu gradually or still rely on specific Windows software.
On the other hand, the option to overwrite Windows with Ubuntu means completely removing Windows from your system and replacing it with Ubuntu. This option is suitable if you have already made the decision to switch to Ubuntu permanently and no longer require Windows.
Consider your computing requirements, future plans, and the disk space available before making your choice. Both options have their advantages and considerations, so weigh them carefully to make the right decision for your needs.
Once you have finalized your installation type, you are ready to proceed with the installation process and embark on your Ubuntu journey.
Installing Ubuntu Alongside Windows (dual-boot)
Installing Ubuntu alongside Windows allows you to have both operating systems on your computer and choose which one to use each time you start your device. This is a great option if you still need to access certain Windows applications or files, while exploring the benefits of Ubuntu.
To install Ubuntu alongside Windows, follow these steps:
1. Prepare your computer: Ensure your Windows operating system is up to date, and create a backup of all your important files.
2. Create an Ubuntu installation media: Use a USB drive or DVD to create a bootable Ubuntu installation media.
3. Boot from the installation media: Restart your computer and access the boot menu to select the Ubuntu installation media as the primary boot device.
4. Choose the installation type: Select “Install Ubuntu alongside Windows” during the installation process.
5. Allocate disk space: Use the slider to allocate the desired amount of disk space for your Ubuntu installation.
6. Configure the installation: Set your location, keyboard layout, and create a username and password for your Ubuntu account.
7. Begin the installation: Click “Install Now” and let the installation process begin.
8. Complete the installation: Once the installation is complete, restart your computer and choose between Ubuntu and Windows from the boot menu.
By following these steps, you can successfully set up a dual-boot system with Ubuntu alongside Windows, giving you the best of both worlds.
Overwriting Windows With Ubuntu (entirely)
This section will guide you through the process of removing Windows from your system and performing a clean installation of Ubuntu. Please note that this method will erase all your existing data on your hard drive, so make sure to back up any important files before proceeding.
To begin, insert the Ubuntu installation media (USB or DVD) into your computer and restart it. Press the appropriate key (usually F12 or Del) to access the boot menu and select the installation media as the boot device.
Once the Ubuntu installation menu appears, choose the “Install Ubuntu” option. The installer will then guide you through the process, including selecting your language, time zone, and keyboard layout.
When you reach the installation type screen, select the “Erase disk and install Ubuntu” option. This will remove Windows and all its partitions, replacing them with Ubuntu.
Next, choose the desired target disk and select “Install Now” to start the installation process. Follow the on-screen prompts to configure user settings, such as your username and password.
Finally, click on “Restart Now” to complete the installation. Your computer will reboot, and you will be greeted with the Ubuntu login screen. Congratulations, you have successfully removed Windows and installed Ubuntu as your operating system.
Completing The Installation And Initial Set-Up
After successfully installing Ubuntu on your computer, you need to go through a few final steps to complete the installation and set up your new operating system.
First, remove the installation media (USB or DVD) from your computer and restart it. You should see the GRUB bootloader screen, which allows you to choose between Ubuntu and any other installed operating systems. Select Ubuntu to continue.
Once Ubuntu has booted up, you will be prompted to enter your username and password. Choose a strong password to ensure the security of your system.
Next, Ubuntu will prompt you to connect to a Wi-Fi network if one is available. Select your network and enter the necessary login information if required. If you prefer a wired connection, you can skip this step.
After connecting to the internet, Ubuntu will check for updates and prompt you to install them. It is crucial to keep your system up to date to ensure security and stability. Allow Ubuntu to install the updates.
Finally, you will be presented with the Ubuntu desktop environment. Take some time to familiarize yourself with the user interface and explore the installed applications and features.
Congratulations! You have successfully removed Windows and installed Ubuntu on your computer. Enjoy your new Linux-based operating system and the freedom it provides. Remember to install any additional software or configure settings to personalize your Ubuntu experience.
FAQs
1. Can I remove Windows completely and install Ubuntu as the sole operating system on my computer?
Yes, it is possible to remove Windows entirely from your computer and install Ubuntu as the sole operating system. However, it is important to backup any important files before proceeding with the installation process, as all data on the Windows partition will be erased.
2. What are the system requirements for installing Ubuntu?
To install Ubuntu, your computer should meet the minimum system requirements. Typically, these requirements include a 2 GHz dual-core processor or higher, at least 4 GB of RAM, and a minimum of 25 GB of free hard drive space. It is also recommended to have a stable internet connection for downloading updates and additional software during the installation.
3. Is it possible to dual-boot Ubuntu and Windows on the same computer?
Yes, it is possible to set up a dual-boot system with Ubuntu and Windows on the same computer. This allows you to choose between the two operating systems each time you start your computer. During the installation process, you will be prompted to select the option to install Ubuntu alongside Windows. It is important to follow the instructions carefully to ensure a successful dual-boot setup.
Final Thoughts
In conclusion, this article provided a detailed step-by-step guide on how to remove Windows and install Ubuntu. The process involved backing up important files, creating a bootable USB drive, and partitioning the hard drive. It also covered the installation process and important tips for a successful setup. By following these instructions, users can seamlessly transition from Windows to Ubuntu and enjoy the benefits of this open-source operating system.
Некоторое время назад знакомый сказал мне, что купил новый ноутбук через Доска бесплатных объявлений OLX, он живет в Коста-Рике. Он не принес Windows 8, но он пришел с Windows 7, поскольку он не один из последних, которые продаются. Он сказал мне, что он, очевидно, разбил жесткий диск и установил Linux, оставив на компьютере двойную загрузку (Windows и Linux). Прошли дни, и он снова написал мне, задаваясь вопросом как удалить винду с компьютера.
Здесь я покажу вам как полностью удалить Windows с компьютера с помощью GParted, редактор разделов, похожий на Windows Partition Magic, вам не нужно переустанавливать Linux, вам не нужно делать ничего сложного.
Установка GParted
1. Сначала мы должны установить gparted, если он не установлен, для этого найдите и установите пакет gparted из вашего репозитория.
В таких дистрибутивах, как Debian, Ubuntu и производных, это будет:
sudo apt-get install gparted
В ArchLinux и подобных:
sudo pacman -S gparted
Удалить Windows с помощью GParted
2. Потом открываем, они могут найти и открыть GParted через меню приложений или просто откройте его с помощью терминала:
sudo gparted
Если он показывает ошибку и не открывается, читать здесь возможное решение.
3. После открытия он покажет вам что-то вроде этого:
Удалить Windows с помощью GParted
Как видите, здесь показаны разделы на вашем жестком диске, либо графически с использованием прямоугольников, либо с текстом чуть ниже.
4. Им просто нужно щелкнуть правой кнопкой мыши раздел Windows и выбрать опцию Форматировать как NTFS (или ext4, в зависимости от того, что вам больше нравится):
Удалить Windows с помощью GParted
5. Тогда они должны сделать нажмите кнопку Применить который находится на главной панели параметров.
6. Готово, теперь вы должны подождать несколько секунд, пока раздел будет отформатирован.
Охлаждение личинки
Grub — это то приложение, которое показывает нам параметры, операционные системы, которые мы установили на компьютер, и позволяет нам, когда мы включаем его, получать доступ к той или другой. Мы должны сказать ему, что Windows больше не существует, что это больше не вариант, чтобы перечитать список доступных операционных систем.
Для этого выполняем следующую команду:
sudo update-grub
Если система сообщает вам, что не может найти эту команду, что она не распознает ее, тогда решение состоит в том, чтобы выполнить другую команду:
sudo grub-mkconfig -o /boot/grub/grub.cfg
Готов!
Осталось только перезапустить и заметить, что Windows больше нет, что теперь эти ГБ можно использовать в качестве хранилища или по нашему усмотрению.
How do I remove Windows 10 and install Linux? Select you keyboard Layout. Normal Installation. Here select Erase disk and install Ubuntu. this option will delete Windows 10 and install Ubuntu. Continue to confirm. Select your timezone. Here enter your login information. Done!! that simple.
How do I replace Windows with Linux?
How to Make the Switch From Windows to Linux Choose Your Distribution. Unlike Windows and macOS, there isn’t just one version of Linux. Create Your Installation Drive. Head to Mint’s download page and choose the 64-bit “Cinnamon” version. Install Linux on Your PC. How to Install and Uninstall Apps.
How do I remove Windows from Linux?
Keep Linux and Remove Windows Insert a live CD or USB for your Linux distribution and start up its partition manager (like Gparted). Right-click on that Windows partition and choose “Delete” from the menu.
How do I remove Windows 10 and install Ubuntu?
This Part 3 covers that wiping and installation process. Step 1: Back up your data from your PC and keep a note of your Windows 10 activation key. Step 2: Make a bootable DVD or USB drive for Ubuntu 18.04 LTS. Step 2a: Make a bootable USB flash drive with Ubuntu 18.04 ISO image.
Should I erase disk and install Ubuntu?
If you choose “Erase disk and install Ubuntu” your whole hard drive will be formatted. “Erase disk and install Ubuntu” means you are authorizing the setup to erase your hard drive completely. It is good to create a partition while you are on Windows OS, and then make use of it through the “Something else” option.
Can I replace Windows 10 with Ubuntu?
So, while Ubuntu may have not been a proper replacement for Windows in the past, you can easily use Ubuntu as a replacement now. With Ubuntu, you can! All in all, Ubuntu can replace Windows 10, and very well. You may even find out that it’s better in many ways.
Should I replace Windows with Linux?
Linux is an open-source operating system that’s completely free to use. Replacing your Windows 7 with Linux is one of your smartest options yet. Almost any computer running Linux will operate faster and be more secure than the same computer running Windows.
Should I switch to Linux from Windows?
It is secured. If you’re looking for another reason to switch from Windows to Linux, another reason is because of its security and privacy. There’s a lesser chance for you to experience virus attacks, malware, and ransomware with Linux by design.
Which Linux can run Windows programs?
Wine is a way to run Windows software on Linux, but with no Windows required. Wine is an open-source “Windows compatibility layer” that can run Windows programs directly on your Linux desktop.
Can I remove Windows after installing Ubuntu?
After selecting the Hard drive, select the Partition you want to delete. Depending on the Disks version, you can right click the partition and choose DELETE, click on the Minus sign below the partition selection, click on a Cog above the partitions and choose DELETE.
How do I remove Linux OS from my laptop?
To remove Linux from your computer and install Windows: Remove native, swap, and boot partitions used by Linux: Start your computer with the Linux setup floppy disk, type fdisk at the command prompt, and then press ENTER. NOTE: For help using the Fdisk tool, type m at the command prompt, and then press ENTER.
Does Ubuntu run faster than Windows?
Ubuntu is an open-source operating system, while Windows is a paid and licensed operating system. It is a very reliable operating system in comparison to Windows 10. In Ubuntu, Browsing is faster than Windows 10. Updates are very easy in Ubuntu while in Windows 10 for the update every time you have to install the Java.
Can we install Ubuntu without USB?
You can use UNetbootin to install Ubuntu 15.04 from Windows 7 into a dual boot system without the use of a cd/dvd or a USB drive.
Which is better Ubuntu or Windows 10?
Ubuntu is as easy to use as Windows and in some ways, Ubuntu is better than Windows 10! Windows 10 is a great operating system. As the latest version of Microsoft’s flagship product, it is the most popular operating system globally, across home and business users.
How do I replace Windows with Linux and Ubuntu?
Download Ubuntu, create a bootable CD/DVD or a bootable USB flash drive. Boot form whichever one you create, and once you get to the installation type screen, choose replace Windows with Ubuntu.5 Answers Install Ubuntu alongside your existing Operating System(s) Erase disk and install Ubuntu. Something else.
How do I erase everything on Ubuntu?
To install wipe on Debian/Ubuntu type: apt install wipe -y. The wipe command is useful to remove files, directories partitions or disk. wipe filename. To report on progress type: wipe -i filename. To wipe a directory type: wipe -r directoryname. wipe -q /dev/sdx. apt install secure-delete. srm filename. srm -r directory.
Will installing Linux delete my files?
The installation you’re about to do will give you full control to completely erase your hard drive, or be very specific about partitions and where to put Ubuntu. If you have an extra SSD or hard drive installed and want to dedicate that to Ubuntu, things will be more straightforward.
Should I replace Windows with Ubuntu?
YES! Ubuntu CAN replace windows. It’s very good operating system that supports pretty much all hardware Windows OS does (unless the device is very specific and drivers were only ever made for Windows, see below).
What can Windows do that Linux can t?
What Can Linux Do that Windows Can’t? Linux will never harass you relentlessly to update. Linux is feature-rich without the bloat. Linux can run on almost any hardware. Linux changed the world — for the better. Linux operates on most supercomputers. To be fair to Microsoft, Linux can’t do everything.
How do I wipe a Windows computer and install Ubuntu?
If you want to remove Windows and replace it with Ubuntu, choose Erase disk and install Ubuntu. All of the files on the disk will be deleted before Ubuntu is put on it, so make sure you have backup copies of anything you wanted to keep.