
How to delete downloaded Windows 10 Update files Correctly
17
Remove or delete Windows 10/11 update files to free up system drive space and speed up your PC. When you update Windows, the update files are cached on your Windows system drive. You can manually delete Windows 10/11 update files or use a third-party application. The built-in Disk Cleanup feature in Windows is great for deleting Windows temporary files. However, to delete Windows 10/11 update files, you can use the Windows 10/11 Installed Updates section.
Related Articles:
- How to Delete Windows 10/11 Temporary Files?
- Official Windows 10/11 Keyboard Shortcuts
This is the most common problem users ask us about. We have explained how to fix it for previous Windows versions, such as Windows 8.1 and Windows 7. Fortunately, the same solution works for all Windows versions. So try cleaning up your system temporary files to speed up your computer’s performance, especially Windows 10.
Delete Windows 10/11 Update Files
There are two ways to delete Windows 10/11 update files.
- The first way is to delete an installed update file from Windows Update. This is sometimes necessary if an update is causing problems. To do this, open Windows Update and go to the “View installed updates” section. From there, you can right-click on the update that you want to delete and select “Uninstall”.
- The second way is to delete the update cached files in Windows 10/11 using Disk Cleanup. This will remove all of the temporary files that were created during the update process. To do this, open Disk Cleanup and select the “Windows Update Cleanup” option. Then, click on the “Clean up system files” button.
Delete Windows 10/11 update files and temporarily cached files:
- Check Windows 10/11 Update files.
- Delete an installed update file.
- Remove Windows 10/11 temporary files.
- Cleanup Windows 10/11 with Disk Cleanup
Follow the below step-by-step guide to delete Windows 10 update files, temporary files, and other cached files. Let’s begin with uninstalling an update file.
1. Press Windows+R to open the Run and type “appwiz.cpl” on the Windows Run to open Program and Features. On the programs and feature page, select View installed updates.
2. To delete an installed update, select and right-click the installed update you want to uninstall, then click Uninstall.
Note: Some Windows updates are not removable, you can’t simply uninstall them with Windows Programs and Features section.
Remove Windows Update Files and Cached Data
This is the second method to delete Windows update files and other cached data or temporary files. Just follow up on the below guide.
1. Open your File Explorer (This PC or My Computer). Right-click the Windows system drive and click Properties to open the Local Disk (x) Properties. The system drive is where your Windows 10 has been installed currently.
2. On the Properties of the system drive, click Disk Cleanup to open Disk Cleanup for the drive (C:). Then select all from Download Program files to Thumbnail files under Files to delete. When you have selected all of them, click Clean up system files.
3. Now on the Disk Cleanup tab, select all options again, then click OK to delete all Windows 10 update files and temporary files.
If you want to delete System Restore and Shadow Copies, select the More Options tab and click Clean up to remove system restore and shadow copies.
Remember: This action will remove all system restore points, you will not be able to restore to the preview point unless the system will create a new restore point.
4. Just click Delete Files to make sure that all files will remove successfully. Until it will not finish, don’t close the process window or shut down your system.
5. Now all Windows 10 update files and other cached files must be deleted. Close the System Properties window.
That’s it, easy and simple.
To do the same task or need to more about deleting system-cached files or removing Windows update files, I recommend you to read the below articles.
- Delete System Restore and Shadow Copies to Get Free Disk Space
How to delete downloaded Windows Update files
This is the manual task you can do to delete downloaded Windows update files. It is easy to delete all cached update files. This works on all supported versions of Windows, including Windows 7, Windows 8.1, and Windows 10.
- Open the Run.
- Type services.msc.
- Right-click on the result, and select “run as administrator” from the context menu.
- Locate the Service Windows Update. The services listing is sorted alphabetically by default. Click on the name to revert the order so that you don’t need to scroll as much.
- Right-click on the service Windows Update and select Stop from the menu.
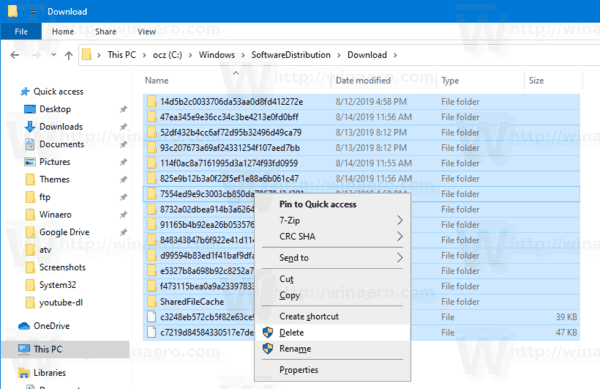
- Go to C:\WINDOWS\SoftwareDistribution\Download using Explorer or any third-party file browser. If you navigate to the folder manually, you may need to enable the showing of hidden files first.
- Do so with a click on File > Change folder and search options.
- Go to View, and scroll down until you find “Hidden files and folders” listed.
- Select “Show hidden files, folders, and drives”.
- Remove the checkmark from “Hide protected operating system files (Recommended)”.
- Click Apply, then OK.
- Select all files in the folder. The easiest way to do that is to use Ctrl-A while the folder is active.
- Hit the Delete key on the computer keyboard.
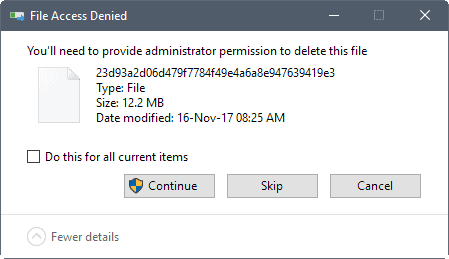
- Windows may need administrator privileges to delete certain files. Select “Do this for all current items” and click Continues to grant the permissions.
- Go back to the Services window.
- Right-click on the Windows Update service, and select Start from the list of options.
Cleanup Windows 10 with third-party Software
PC Scan & Repair by Reimage software is also a good tool to completely scan and repair your computer. Download and install it then start scanning. The below screenshot is the scan results of my Laptop.
Also, there are more third-party apps that will do this for you, but doing Windows tasks with a built-in Windows app is better and free. It will let you discover your computer features and functions more.
Related Queries:
- Delete Windows 11 update cache
- Delete Windows update files Windows 11
- Delete Windows update files Windows 10/11
- Delete downloaded Windows 10/11 updates
- Windows update cache location Windows 10/11
- Windows 10 update files location
- How to delete downloaded but not installed Windows updates in Windows 10
- Clear Windows update cache and fix Windows updates
How to Delete Downloaded Windows Update Files in Windows 10
If you are running into issues with Updates, you can try to delete downloaded Windows Update files. When an update package is damaged or fails to install, Windows 10 may keep the corrupted file on the drive, so it will further cause issues with updates. Here is how to delete the downloaded Windows Update files that Windows 10 doesn’t delete itself.
Windows 10 checks for updates automatically unless you disable this feature manually. The operating system comes with the Windows Update service, which automatically downloads and installs the updates from Microsoft. The downloaded update files are stored on your system drive in the C:\Windows folder.
There are certain reasons for having corrupted Windows Update files. It can be an improper shutdown, OS crash, power failure, or something gone wrong with your Registry. After that, Windows Update may fail to do its job properly. The OS may fail to check for updates, or fail to install them. Sometimes, the Windows Update page in Settings cannot be opened!
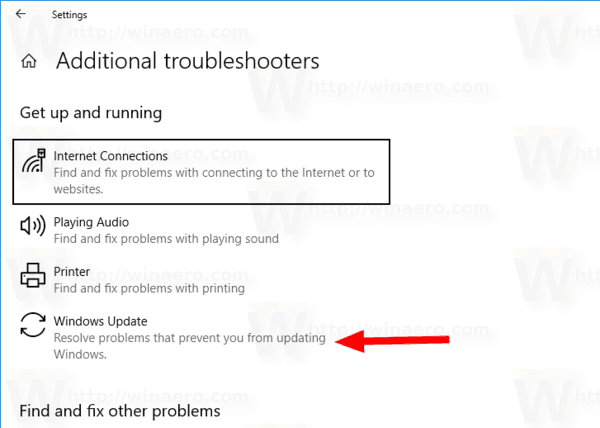
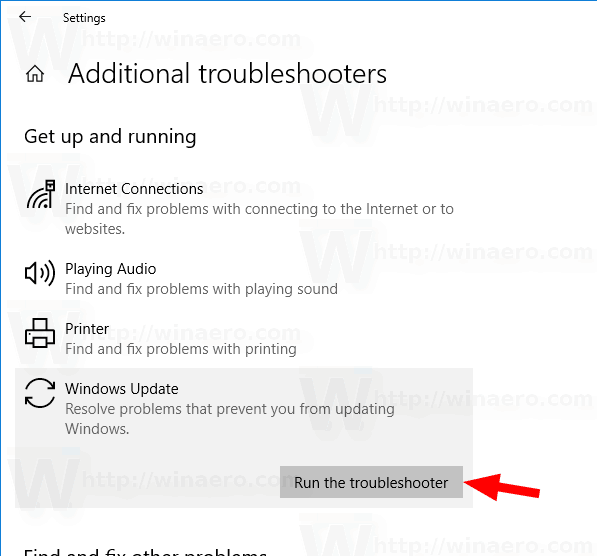
To fix most of the Windows Update issues in Windows 10, usually it is enough to run the built-in Windows Update troubleshooter.
Run the built-in Windows Update troubleshooter.
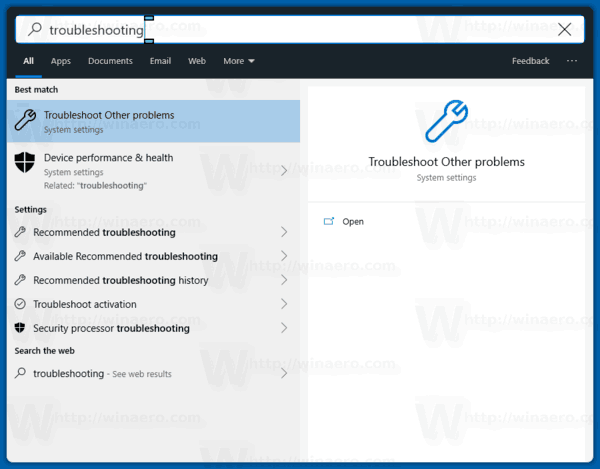
- Open the Start menu and type: troubleshooting and press Enter.

- Click «Windows Update».

- Click «Run as administrator» in the Troubleshooter’s dialog and complete the Windows Update troubleshooter. See if Windows Update works properly.

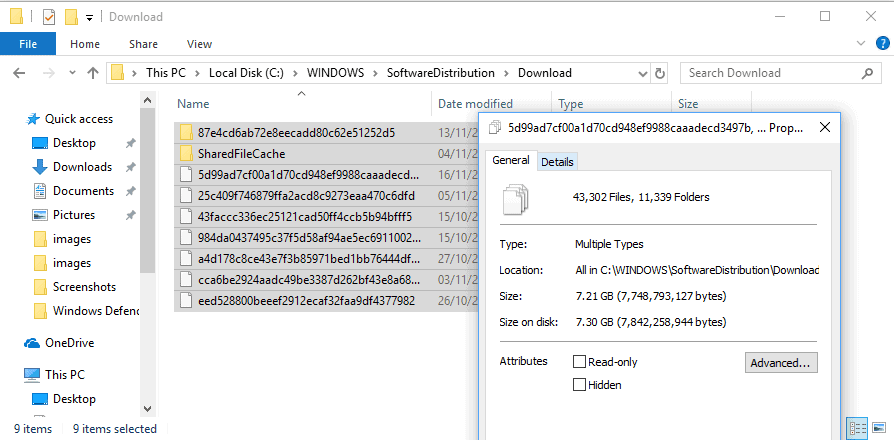
When you run into issues though with updates, you may spend hours or even days figuring out what is going wrong. In such case, you can try to delete downloaded Windows Update files to start over. The SoftwareDistribution folder contains files related to updates obtained via Windows Update, it is present on all versions of Windows. It could have a couple of hundreds megabytes of size. But if this folder is much larger, this indicates that some updates are corrupted.
- Press Win + R on the keyboard and type
services.mscin the Run box. - Stop the service named Windows Update.
- Open File Explorer.
- Go to C:\WINDOWS\SoftwareDistribution\Download. Copy-paste this path to the explorer’s address bar.
- Select all files of the folder(press the Ctrl-A keys).
- Press the
Deletekey on the keyboard.
- Windows may request for administrator privileges to delete those files. Turn on the option «Do this for all current items» in the dialog and click on Continue.
Restart Windows 10 and check for updates. See if this fixed your issues.
Alternatively, you can create a batch file to automate the process.
Delete Downloaded Windows Update Files with a Batch File
- Open Notepad.
- Paste the following text:
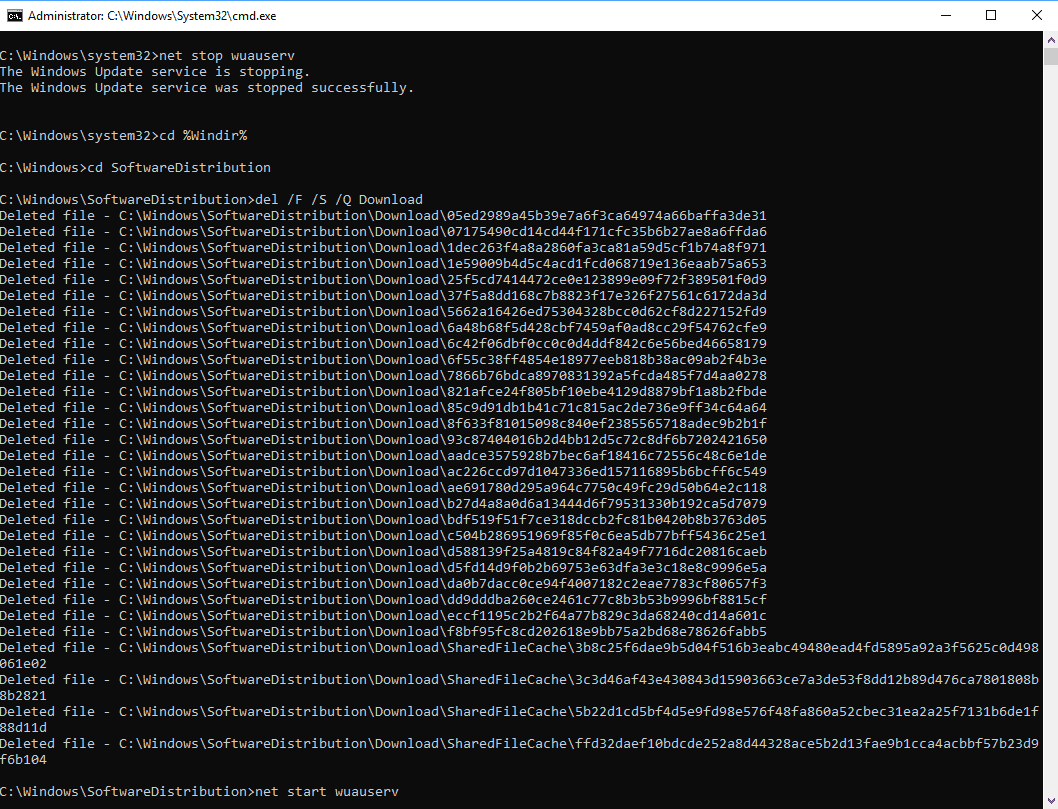
net stop wuauserv
cd /d %SystemRoot%\SoftwareDistribution
del /s /q /f Download
net start wuauserv - Save it to a file with a *.cmd extension. You can place it on the Desktop.

- Right-click the file you have created and start it as Administrator from the context menu.
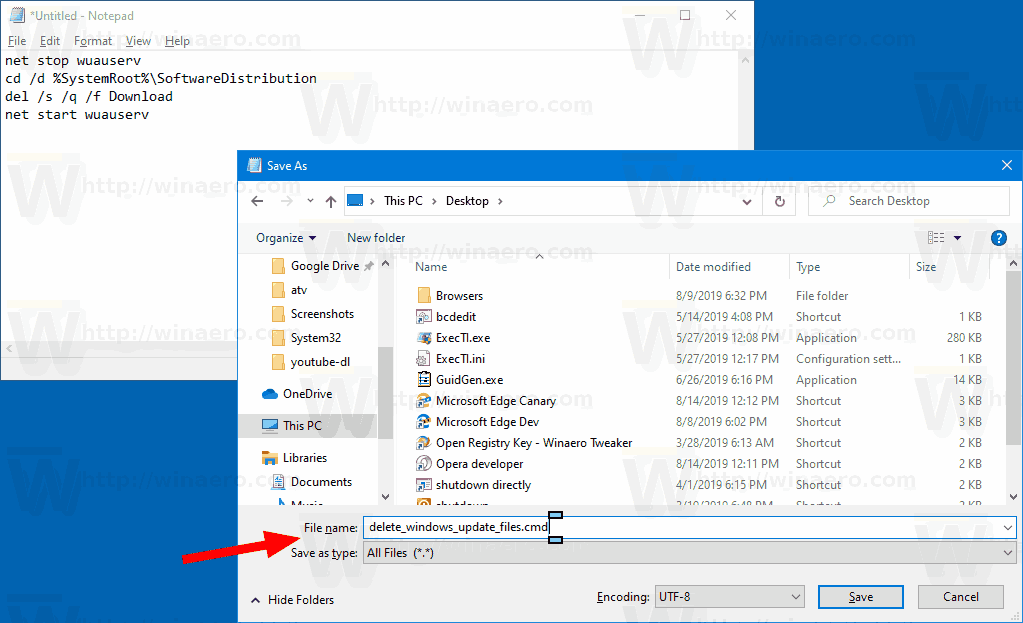
You are done. Now restart the PC and check for available updates.
Here’s how does it work
The command net stop wuauserv stops the Windows Update service. Next, the cd command switches the current folder to C:\Windows\SoftwareDistribution. The del command erases the contents of the Download folder and its subfolders. Finally, the last command, net start wuauserv, starts the Windows Update service again.
To save your time, you can download this ready-to-use batch file.
Download the file
That’s it!
Articles of interest:
- Windows Update Error Codes in Windows 10
- How to Create Windows Update Shortcut in Windows 10
- Clear Windows Update History in Windows 10
- Limit Windows Update Bandwidth in Windows 10
- Fix Windows Update issues in Windows 10 by resetting its options and files
Support us
Winaero greatly relies on your support. You can help the site keep bringing you interesting and useful content and software by using these options:
If you like this article, please share it using the buttons below. It won’t take a lot from you, but it will help us grow. Thanks for your support!
Applies ToWindows 11 Windows 10
If you’ve recently installed a Windows Update and the update is causing your device to have errors or other issues, uninstall the update to try to resolve the issue.
Uninstall an update from Settings
-
Select Start > Settings > Windows Update . Under Related settings, select Update history> Uninstall updates or use the following shortcut:View update history
Note: In Windows 10, you can access from Update & Security > Windows Update > View your update history > Uninstall updates
-
From the list, select update you want to remove, and then select Uninstall.
Note: Some updates cannot be uninstalled.
Uninstall an update from Windows RE
If you can’t access Windows and you want to uninstall an update, you can do so from Windows RE. Here are the steps:
-
Access the Windows Recovery Environment.
-
Once in Windows RE, select Troubleshoot > Advanced options > Uninstall Updates.
-
Select either Uninstall latest quality update or Uninstall latest quality update.
Need more help?
Want more options?
Explore subscription benefits, browse training courses, learn how to secure your device, and more.
Windows Update works for the most part pretty reliable. It is an automated system of Microsoft’s Windows operating system that handles the downloading and installing of updates for the operating system.
At best, it is a silent service that runs in the background; it may ask you to restart the PC every now and then though as that is still required for many updates, and it sometimes may do so without user interaction.
When you run into issues though with updates, you may spend hours or even days figuring out what is going wrong.
I cannot update one of my PCs to the Windows 10 Fall Creators Update for instance because of a bluescreen that I get whenever I try to do so.
One of the things that you can try when it comes to updates, is to delete downloaded Windows Update files to start over.
If you suspect that something is wrong with the files, or if you want Windows Update to run a new check for updates to download new versions of updates that were released by Microsoft, then you may find the following tip useful for that.
If you run Windows Insider builds on a PC for instance, you may skip an already downloaded update to a new build to download a newer build and avoid having to update the system multiple times.
How to delete downloaded Windows Update files
It is thankfully pretty easy to delete all cached update files. This works on all supported versions of Windows, including Windows 7, Windows 8.1 and Windows 10.
- Open the Start Menu (tap on the Windows-key or click on it).
- Type services.msc.
- Right-click on the result, and select «run as administrator» from the context menu.
- Locate the Service Windows Update. The services listing is sorted alphabetically by default. Click on name to revert the order so that you don’t need to scroll as much.
- Right-click on the service Windows Update and select Stop from the menu.
- Go to C:\WINDOWS\SoftwareDistribution\Download using Explorer or any third-party file browser. If you navigate to the folder manually, you may need to enable the showing of hidden files first.
- Do so with a click on File > Change folder and search options.
- Go to View, and scroll down until you find «Hidden files and folders» listed.
- Select «Show hidden files, folders and drives».
- Remove the checkmark from «Hide protected operating system files (Recommended)».
- Click Apply, then OK.
- Select all files of the folder. The easiest way to do that is to use Ctrl-A while the folder is active.
- Hit the Delete-key on the computer keyboard.
- Windows may need administrator privileges to delete certain files. Select «do this for all current items» and click continue to grant the permissions.
- Go back to the Services window.
- Right-click on the Windows Update service, and select Start from the list of options.
You can re-run a check for updates once all files have been deleted. Please note that Windows Update will download all updates anew when you clear the update cache. This can lead to Gigabyte large downloads.
Clear the Windows Update cache from the command line
You may purge the Windows Update cache from the command line as well. While you can type the following commands on an elevated command prompt manually, you may create a small batch file as well toautomate the process.
Here is what you need to do:
- Tap on the Windows-key to bring up the Start Menu.
- Type cmd.exe.
- Hold down the Shift-key and the Ctrl-Key before you select the cmd.exe result. This opens an elevated command prompt.
- Accept the UAC prompt that Windows displays.
- Run the following commands and hit enter after each line:
- net stop wuauserv
- cd %Windir%\SoftwareDistribution
- del /f /s /q Download
- net start wuauserv
The commands explained:
- net stop wuauserv — This stops the Windows Update service.
- cd %Windir%\SoftwareDistribution — Switches to the SoftwareDistribution directory of the Windows installation.
- del /f /s /q Download — Deletes the Download folder of the SoftwareDistribution directory with
- /f — force the removal of read-only files.
- /s — include files in subdirectories.
- /q — in quiet mode to surpress prompts.
- net start wuauserv — Starts the Windows Update service.
We have uploaded a batch file to our own server which you may run to execute the commands automatically. You need to right-click on the file and select «run as administrator» as it requires administrative privileges.
You can download the file with a click on the following link: (Download Removed)
Note that it is supplied as an archive that you do need to extract before you may run it.
Tip: Check out these Windows Update related articles and guides
- Latest Windows Updates and Service Packs overview
- Fix Windows Update errors with new Windows 10 repair tool
- Quickly analyze Windows Update errors
- How to find out more about Windows updates before you install them
Summary
Article Name
How to delete downloaded Windows Update files
Description
Find out how to delete downloaded (cached) Windows Update files on all supported versions of the Microsoft Windows operating system.
Author
Martin Brinkmann
Publisher
Ghacks Technology News
Logo
Advertisement
Quick Tips
- Deleting old Windows update files conveniently frees up storage space without removing your data.
- Delete old Windows update files only if your computer is functioning smoothly, and you don’t plan to revert to the previous version.
- The easiest way to remove old Windows update files is through the Settings app.
Method 1: Delete Old Windows Update Files via Settings
The Storage section of the Settings app provides a detailed breakdown of all temporary files on your PC, including old Windows update files. Here’s how to access it to delete old copies of Windows updates.
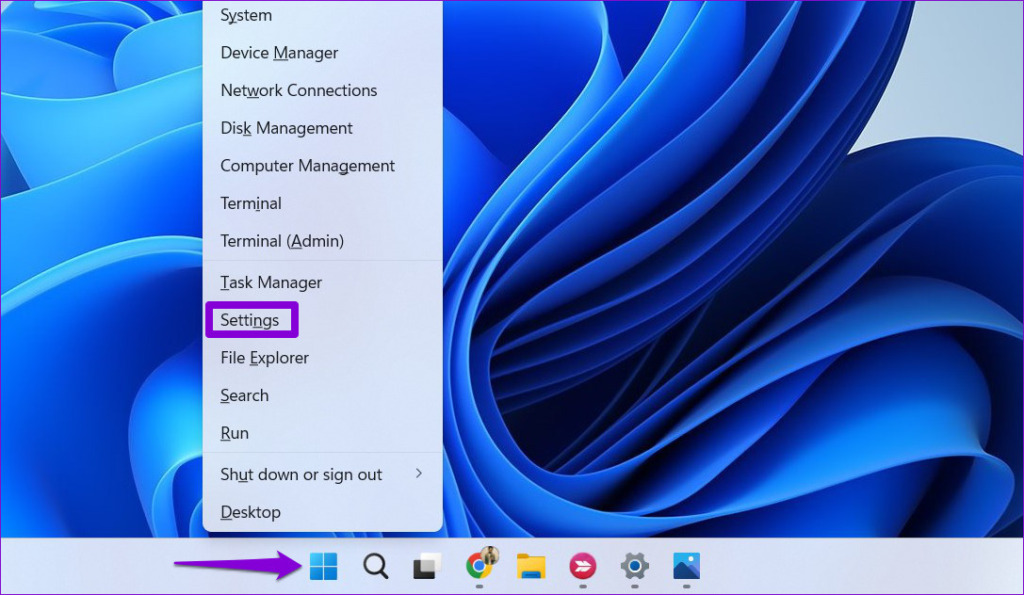
Step 1: Right-click on the Start icon and select Settings from the list.
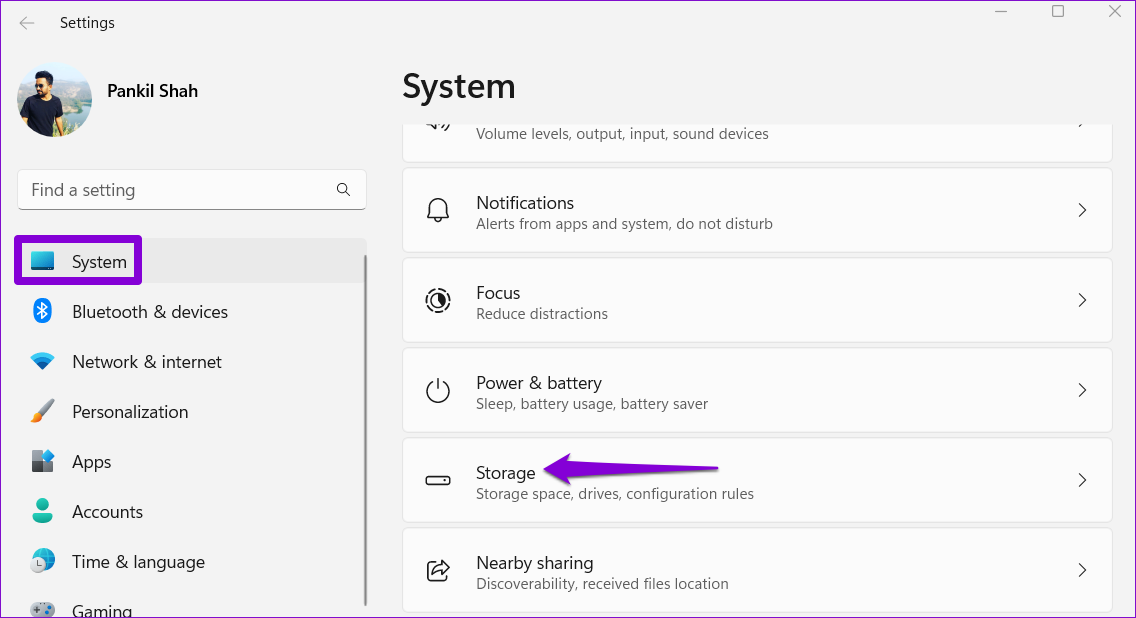
Step 2: Head to System > Storage.
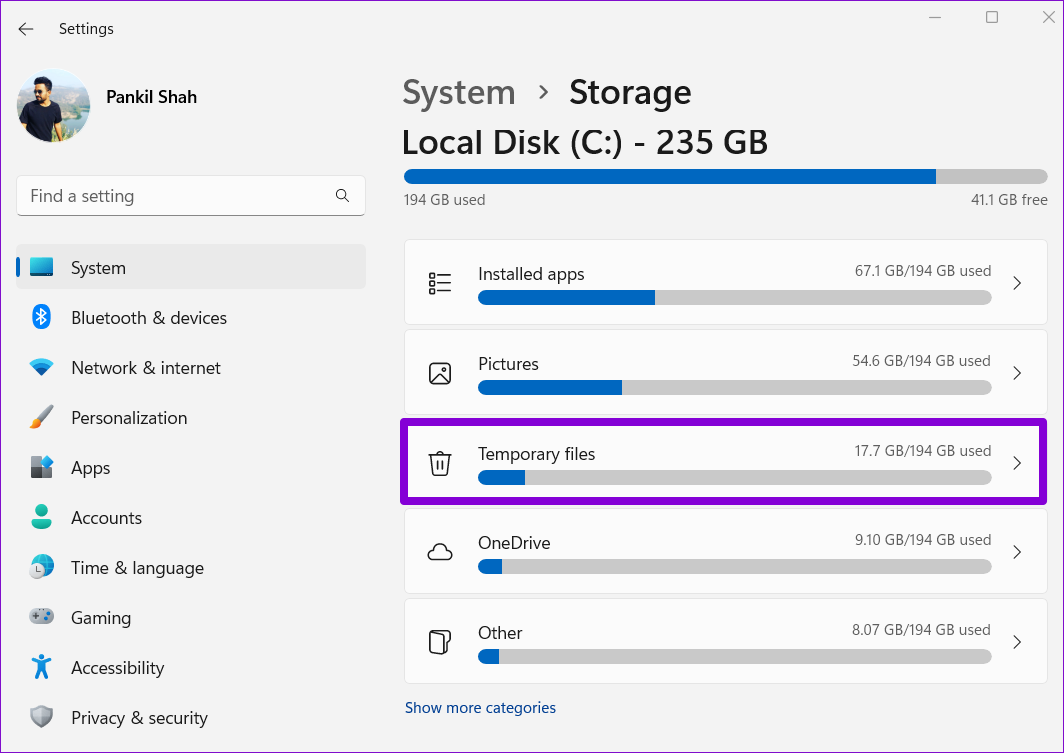
Step 3: Click on Temporary files.
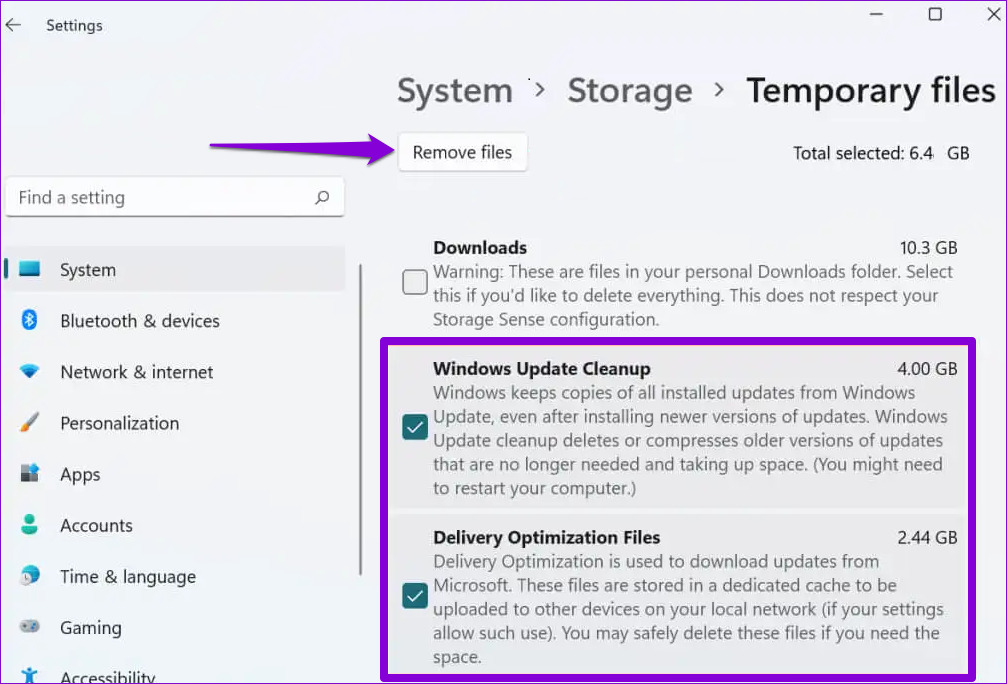
Step 4: Check the boxes for Windows Update Cleanup and Delivery Optimization Files. Uncheck everything else.
Step 5: Once done, click the Remove files button at the top.
Wait for Windows to delete the selected files and free up the storage space.
Method 2: Delete Old Windows Update Files With Disk Cleanup
Disk Cleanup is a handy Windows tool that allows you to free up valuable storage space on your PC by deleting unnecessary files. You can also use it to delete old Windows update files. Here’s how.
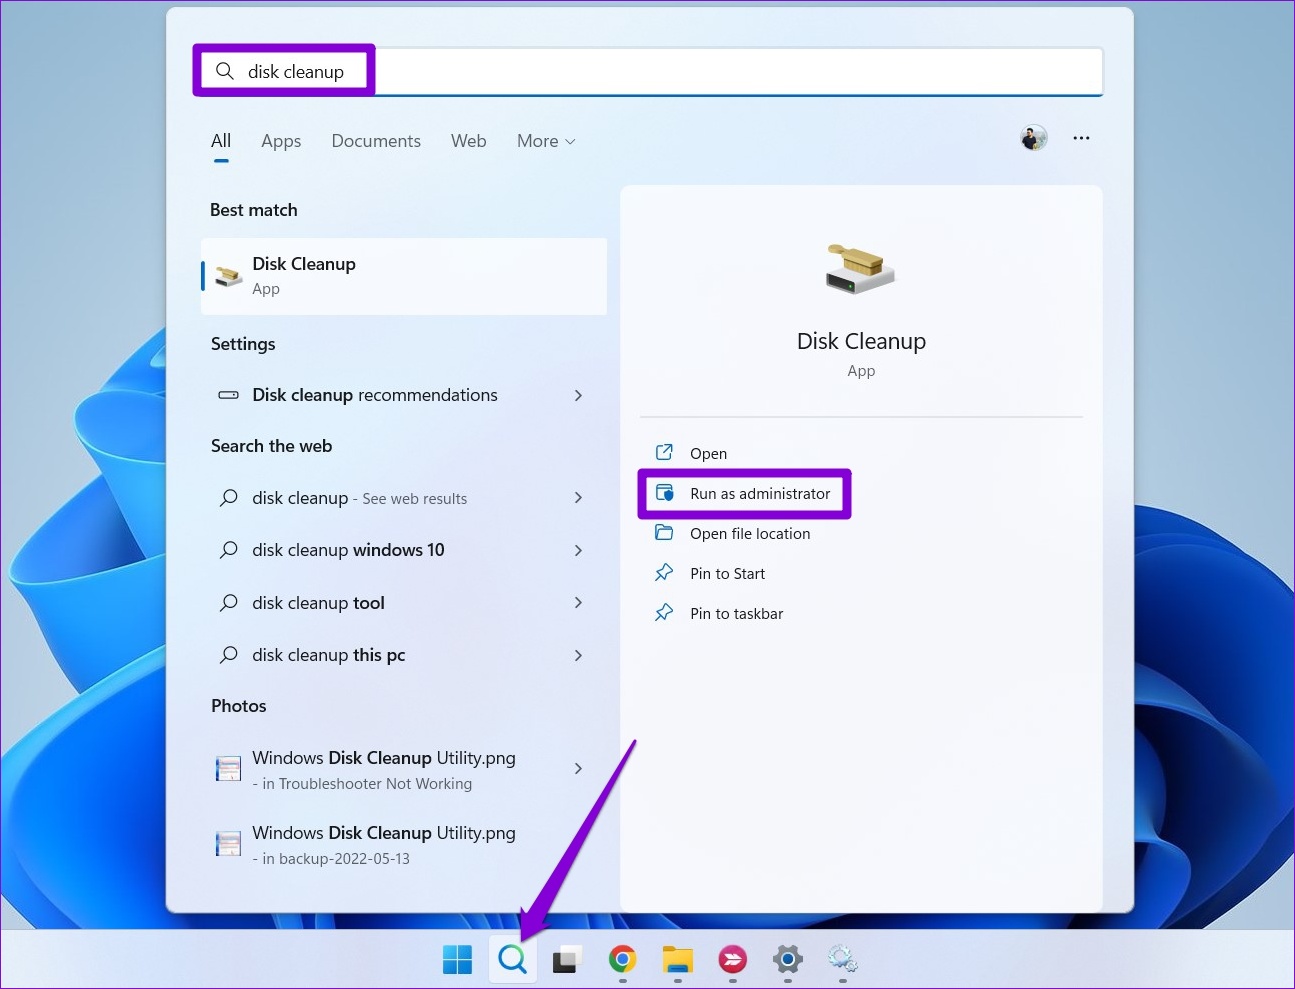
Step 1: Click on the search icon on the taskbar, type disk cleanup, and select Run as administrator.
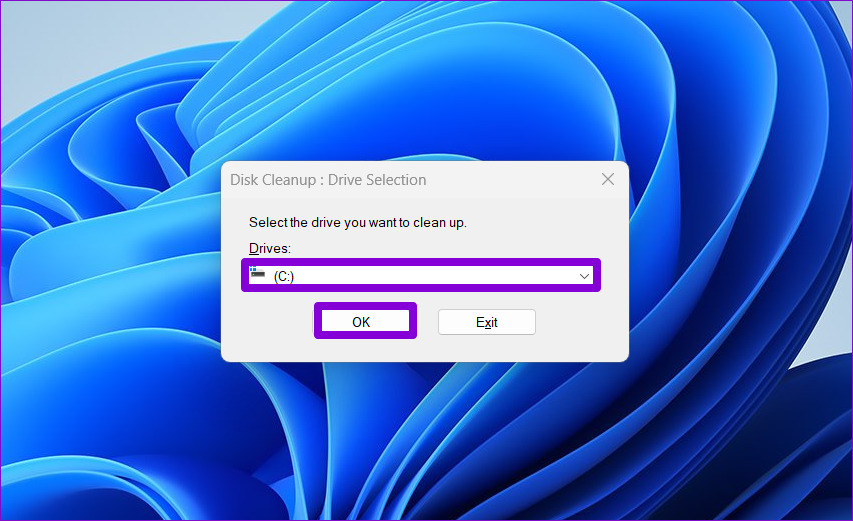
Step 2: Use the drop-down menu to select your primary drive and click OK.
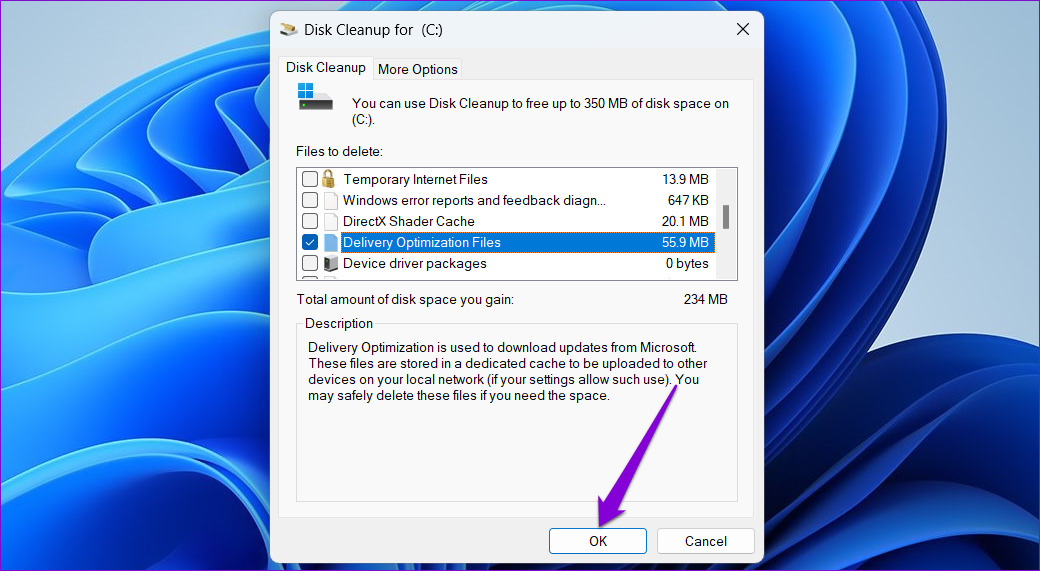
Step 3: Check the boxes for Windows Update Cleanup and Delivery Optimization Files. Then, click OK.
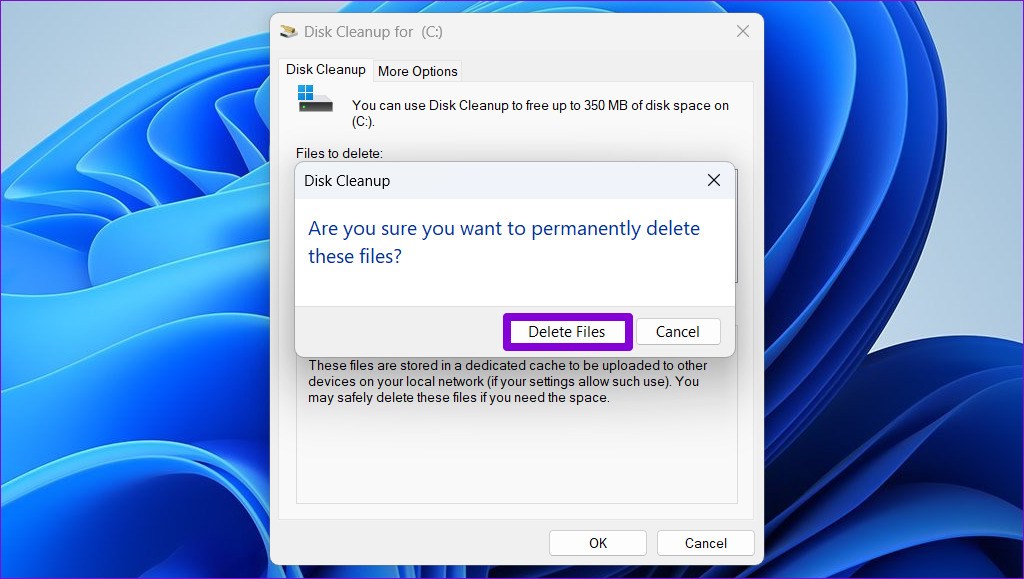
Step 4: Choose Delete Files to confirm.
Method 3: Delete Old Windows Update Files From SoftwareDistribution Folder
Windows stores all the downloaded update files in the SoftwareDistribution folder. Occasionally, these files remain when the Windows Update process gets stuck or fails to complete. After Windows installs the updates, you can safely delete the files from the SoftwareDistribution folder to free up storage space.
To do this, first stop the Windows Update service by following the steps below.
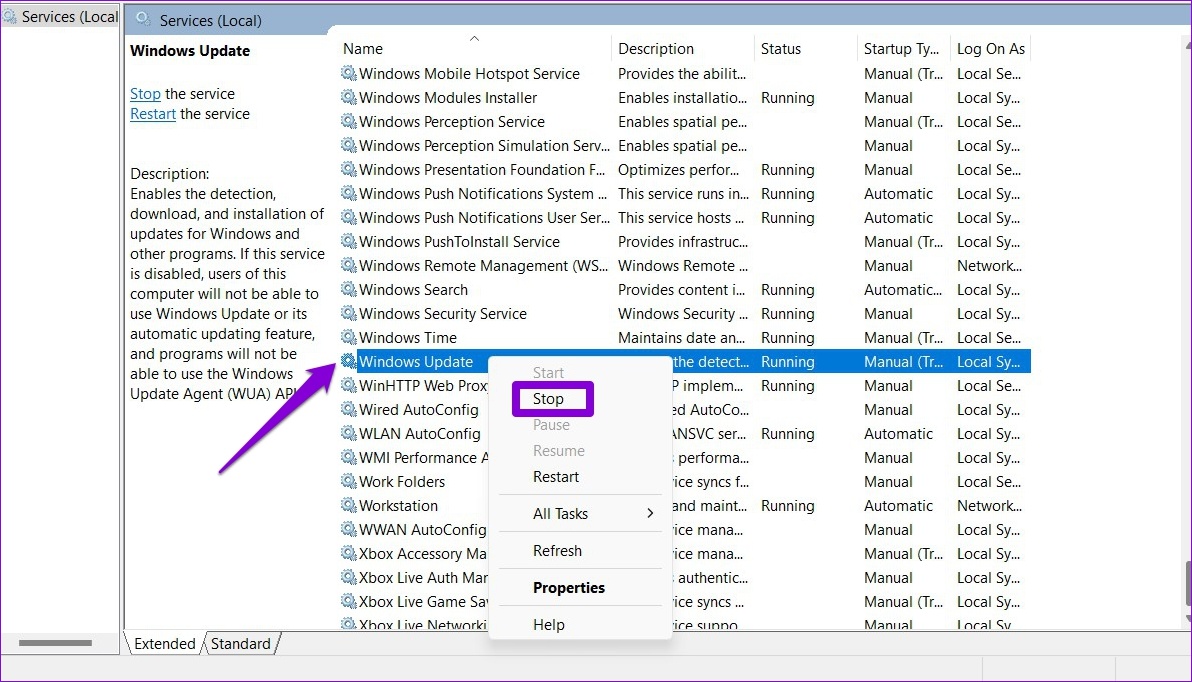
Step 1: Click the search icon on the taskbar, type services in the box, and press Enter.

Step 2: Scroll down to locate Windows Update service, right-click on it, and select Stop.
After the Windows Update service stops, you can use the following steps to delete old Windows update files from the SoftwareDistribution folder.
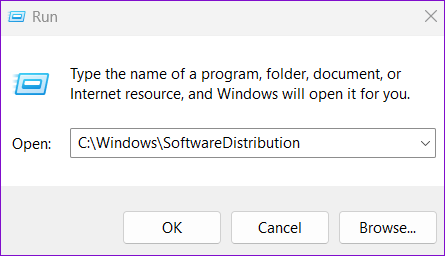
Step 1: Press the Windows key + R to open the Run dialog box.
Step 2: Type C:\Windows\SoftwareDistribution in the text field and press Enter.
Step 3: Select all files in the SoftwareDistribution folder and click on the trash icon at the top to delete them.
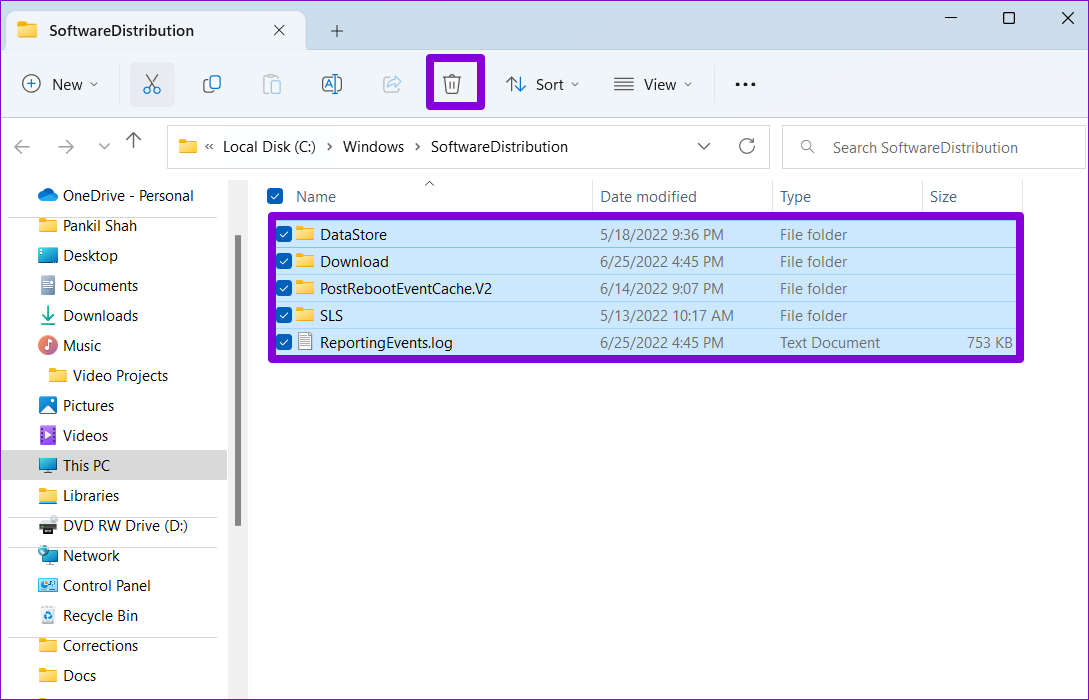
After you delete the folder, open the Services window again (check the steps above) and start the Windows Update service.

Was this helpful?
Thanks for your feedback!
The article above may contain affiliate links which help support Guiding Tech. The content remains unbiased and authentic and will never affect our editorial integrity.