
Many people have reported this error: Windows host process (Rundll32) has stopped working. And this error occurs every time the system starts. It’s annoying, but don’t worry. We’ll help you fix your error and get your computer back on track.
Why does the error happen?
Rundll32 is a Windows component that is responsible for 32-bit Dynamic Link Library (DLL) files. This program should be working properly in your computer to maintain other programs function correctly. So if the Rundll32 is missing or corrupted, it stops working and you’ll have the “Windows host process (Rundll32) has stopped working” error.
Try these solutions:
- Change Folder Options settings
- Restore to the previous state
- Update the graphics card driver
- Check for virus and malware
Note: the screenshots below come from Windows 10, and the fixes apply to Windows 8 and Windows 7.
Solution 1: Change Folder Options settings
With Folder Options (or File Explorer Options) in your computer, you can manage the settings for your files and folders, for example, you can change how your files and folders display in File Explorer. This is an effective way to resolve your problem.
To do so:
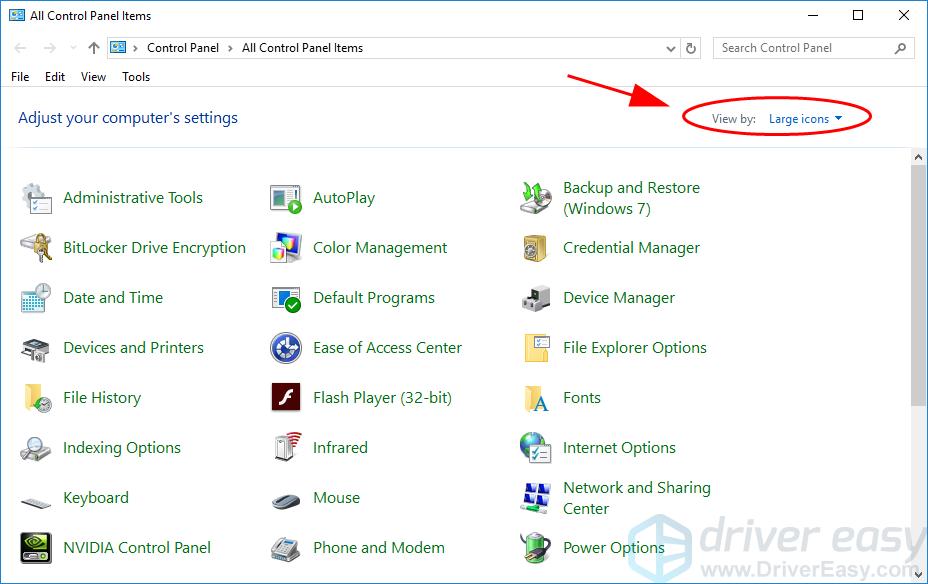
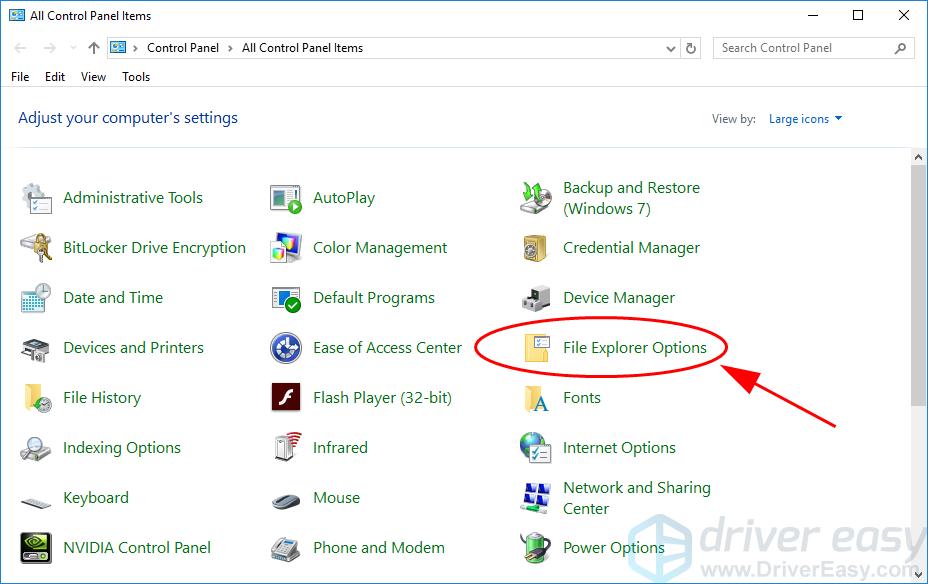
- Open Control Panel on your computer, and make sure to view Control Panel item by small icons or large icons.

- Click Folder Options. If you can find Folder Options, click File Explorer Options.
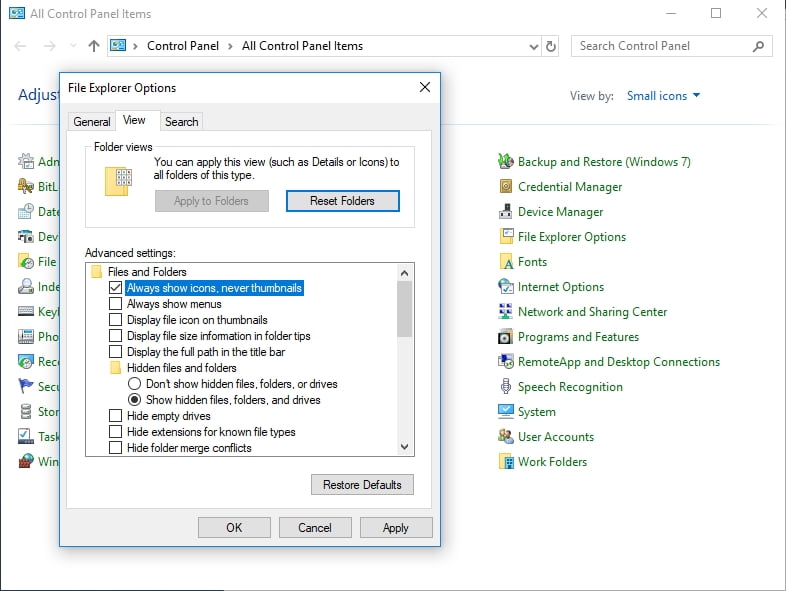
- In the new popup pane, click the View tab, and check the box next to Always show icons, never thumbnails.
- Click Apply and OK to save it.
Restart your computer and see if it fixes the error.
If the problem still persists, don’t worry. There are other solutions to try.
Solution 2: Restore to the previous state
It’s likely that you’ve updated your driver, or you’ve installed some programs, and that may cause “Windows host process (Rundll32) has stopped working”. Many people reported that installing software like QuickSet, Realtek audio driver, or Sound Blaster will result in this issue. So you should roll back to the previous state to fix the problem.
If you’ve installed programs, try uninstalling:
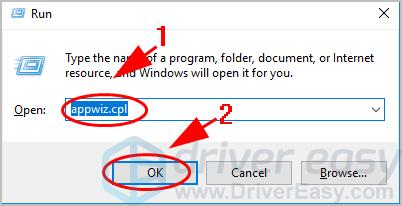
- On your keyboard, press the Windows logo key
and R at the same time to invoke the Run box.
- Type appwiz.cpl and click OK.

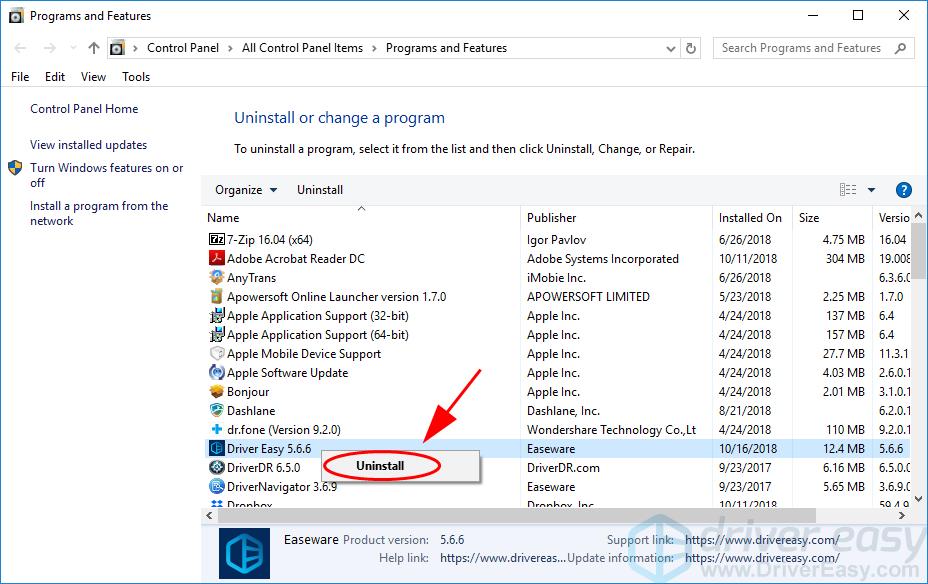
- In the program list, select the program that you recently installed, and uninstall it from your computer.
- Restart your computer.
If you’ve updated device drivers, try restoring:
- On your keyboard, press the Windows logo key and R at the same time to invoke the Run box.
- Type devmgmt.msc and click OK.
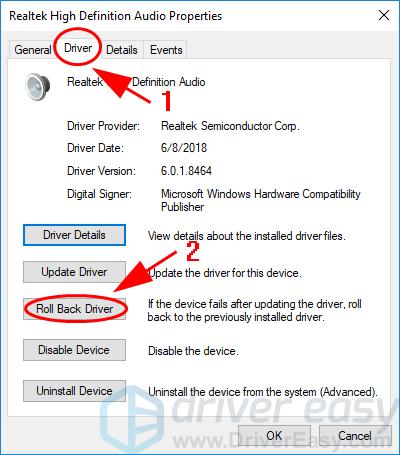
- Double click on the device that you just updated its driver.
- Click the Driver tab, and click Roll Back Driver.

- Follow the on-screen instructions to finish the process.
Restart your computer and see if it works.
Solution 3: Update the graphics card driver
A missing or outdated graphics card driver can also result in the “Windows host process (Rundll32) has stopped working” error. So you can update the driver for your computer.
There are two ways to update the graphics driver: manually and automatically.
Manually update driver – You can go to the manufacturer’s website for your video card, find the latest correct driver for it, then download and install into your computer. Be sure to download the one that is compatible with Windows OS in your computer.
Automatically update driver – If you don’t have time or patience, you can do it automatically with Driver Easy.
Driver Easy will automatically recognize your system and find the correct drivers for it. You don’t need to know exactly what system your computer is running, you don’t need to risk downloading and installing the wrong driver, and you don’t need to worry about making a mistake when installing.
You can update your drivers automatically with either the FREE or the Pro version of Driver Easy. But with the Pro version it takes just 2 clicks (and you get full support and a 30-day money back guarantee):
- Download and install Driver Easy.
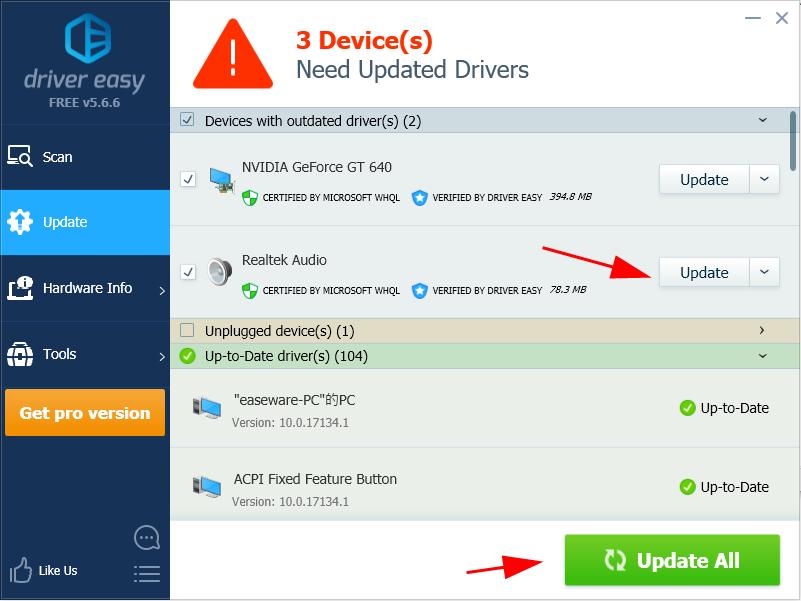
- Run Driver Easy and click Scan Now. Driver Easy will then scan your computer and detect any problem drivers.

- Click the Update button next to the flagged graphics card to automatically download the correct version of their driver (you can do this with the FREE version), then install it in your computer.
Or click Update All to automatically download and install the correct version of all the drivers that are missing or out of date on your system (this requires the Pro version – you’ll be prompted to upgrade when you click Update All).

- Restart your computer to take effect.

Check if the error has been removed.
Solution 4: Check for virus and malware
The “Windows host process (Rundll32) has stopped working” error message may appear if a virus on your computer is preventing the host process from being detected. The virus may even be generating the error itself.
So run a virus scan across your entire Windows system. Yes, it will take some time to complete, but it’s worth it. Unfortunately, Windows Defender may not detect it, so it’s worth trying another antivirus application such as Avira and Panda.
If any malware has been detected, follow the instructions provided by the antivirus program to fix it.
Then restart your computer and try to launch your program again to see if it works.
So there you have it – four easy and effective methods to fix “Windows host process (Rundll32) has stopped working” error in your Windows computer.
Free free to leave a comment and let us know which method helps. If you have any questions, feel free to list it out and we’ll see what more we can do.
4
4 people found this helpful
Table of contents
- What is Rundll32?
- Method 1: Changing the Settings for the Folder Options
- Method 2: Restoring your Drivers to the Previous Versions
- Method 3: Updating your Graphics Card Driver
- Method 4: Checking for Viruses and Malware
It can be frustrating when you are welcomed by an error every time your operating system boots. This is probably how users felt when they encountered this error: Windows host process (Rundll32) has stopped working.
If you encounter this issue, do not worry because there are ways to get rid of it. In this article, we are going to teach you how to fix the ‘Rundll32 has stopped’ error on Windows 10. However, before we do that, let us take a closer look at the problem to understand why it occurs.
What is Rundll32?
A component of Windows, Rundll32 is responsible for 32-bit Dynamic Link Library (DLL7) files. It is directly involved in ensuring that programs in your computer are functioning correctly. However, when the Rundll32 is missing or it gets corrupted, it will stop working properly. Consequently, you will see the ‘Windows host process (Rundll32) has stopped working’ error. If you encounter this problem, make sure you try one of our solutions below.
Method 1: Changing the Settings for the Folder Options
You will be able to manage the settings of your folders and files via the Folder Options. To fix the ‘Windows Host Process (Rundll32) has stopped working’ error, we recommend tweaking some items in the Folder Options. Here are the steps:
- Click the Search icon on your taskbar.
- Type “control panel” (no quotes), then press Enter.
- Once Control Panel is up, click the drop-down list beside View By, then select Small Icons or Large Icons.
- Select Folder Options or File Explorer Options.
- A new window will pop up. Go to the View tab, then select the box beside the ‘Always show icons, never thumbnails’ option.

- Save the changes by clicking Apply and OK.
Restart your PC, then check if the issue has been resolved.
Method 2: Restoring your Drivers to the Previous Versions
One of the ways to fix the ‘Windows Host Process (Rundll32) has stopped working’ error is to roll back your drivers to their previous versions. After all, many users reported that the problem occurred after they had updated their sound drivers. So, we recommend restoring your drivers to their previous versions. On the other hand, some users mentioned that the error happened after they installed some programs.
If you recently installed programs, try removing them:
- Open the Run dialog box by pressing Windows Key+R on your keyboard.
- Now, type “appwiz.cpl” (no quotes), then click OK.
- Look for the program you recently added and right-click it.
- Select Uninstall from the options.
- Restart your PC.
If you recently updated your device drivers, follow the steps below:
- Press Windows Key+R on your keyboard to bring up the Run dialog box.
- Type “devmgmt.msc” (no quotes), then click OK.
- Look for the device you recently updated, then double-click it.
- Go to the Driver tab, then click the Roll Back Driver button.
- Complete the process by following the on-screen instructions.
Method 3: Updating your Graphics Card Driver
It is possible that your graphics card driver is missing or outdated, causing the ‘Windows host process (Rundll32) has stopped working’ error to appear. In this case, we recommend updating your drivers. You can do this manually and go to the manufacturer’s website to look for the right drivers. However, this option can be time-consuming, complicated, and even risky. If you install the wrong drivers, you might end up causing system instability issues on your PC.
As such, we suggest that you opt for a more reliable and convenient option— Auslogics Driver Updater. Once you’ve activated this tool, it will automatically identify your system and look for problematic drivers. With one click of a button, you will be able to update all your drivers to their latest, manufacturer-recommended versions. So, you would not need to worry about installing the wrong drivers or spending so much time looking for the right versions.
Method 4: Checking for Viruses and Malware
Some computer viruses can keep the system from detecting the host process, prompting the ‘Windows host process (Rundll32) has stopped working’ error to show up. So, we recommend performing a deep scan of your entire Windows system. It may take a while for the process to complete, but every second you spend doing it will be worthwhile. You can use Windows Defender for this job, but it is always best to opt for a more comprehensive and powerful tool like Auslogics Anti-Malware. After all, this program can detect threats and viruses that your main security software may miss.
Tell us how you fixed the error!
Start the discussion in the comments section now!
System errors, such as ‘Windows host process rundll32 has stopped running,’ may stop you from accessing several apps/programs and their data. It can even lead to the system malfunctioning or crashing. Multiple users have reported this error and are finding ways to resolve it. In this blog, we’ve collated all the information to help you understand the error, the causes behind it, and the best solutions for the same. Let’s start with the term Rundll32.
What is Rundll32?
Rundll32 is responsible for loading and running 32-bit dynamic-link libraries. It is also a software component of Microsoft Windows. Being a normal Windows user, you won’t directly come into the contact pf rundll32.exe file. There are no configurable settings for Rundll32. The rundll32 command should only be run from the Command prompt running as administrator.
What does Rundll32.exe Do?
Rundll32.exe is an executable file that allows applications to load their library code to run smoothly. No application can load the library code without this file. It acts as a gateway for all the apps to access libraries that allow them to perform multiple functions, including
- Showing Windows and its objects for GUI
- Storing data in system memory
- Playing sounds using the system’s audio device and driver
- Accessing accessories connected to the system and more
What does the Windows host process Rundll32 Error mean?
‘Windows host process (rundll32) has stopped working’ error occurs whenever you try to access any program, such as while viewing the file properties or editing accounts from Mail options under Program and features. Some users have also reported that they encountered this error while printing the documents.
The error usually occurs due to a missing or corrupted Rundll32.exe file, improperly configured settings, or conflicting software. Even malware on your system may also cause the problem by using the same file name and disguising itself as Rundll32.
How do I Fix the Rundll32 Error?
Certainly, Windows host process rundll32 is a problematic error that may occur without any warning. However, some fixes we’ve discussed here can help you remove this error. You can try them out and see which works best for you. Let’s start!
#1 Disable Thumbnails in Folder Option Settings
If you get to see the error on accessing File properties, you can change the folder settings and disable thumbnails in the folder option/file explorer settings. Follow the given steps:
- Press Windows + S to access Windows Search and open the Control Panel from there.
- There, click the Folder option or File Explorer Options.
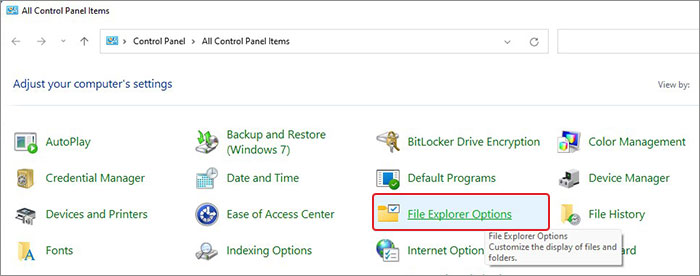
- On the File Explorer Options window, go to the View tab and then select Always show icons, never thumbnails > Apply > OK.
- Once done, reboot your system and re-try to access File properties to see if the error persists.
#2 Run File and Folder Troubleshooter
If you keep getting the Rundll error while accessing files and folders despite disabling thumbnail options, you can run File and Folder Troubleshooter with the following steps:
- Download File and Folder Troubleshooter from Microsoft’s official site.
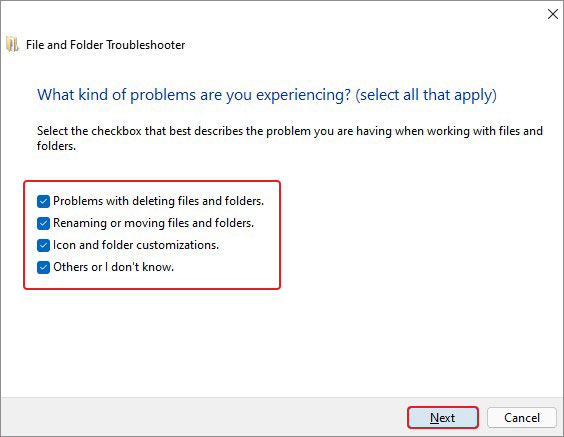
- Open the file and select Advanced on the troubleshooting window.
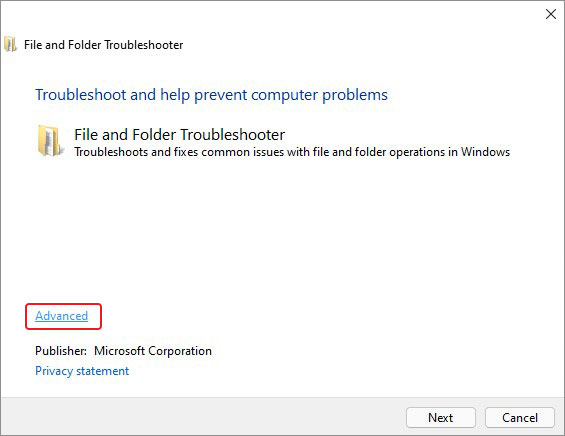
- ON selecting Advanced, it will show Apply repairs automatically. Click Next to proceed.
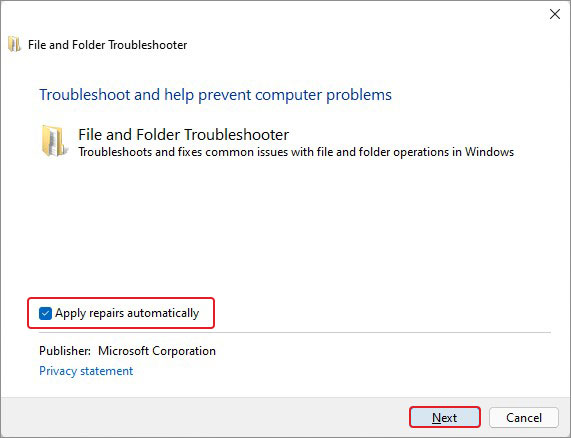
- On the next prompt, either select the relevant option for you or select all and click Next.
- The troubleshooting utility will start resolving the problem.
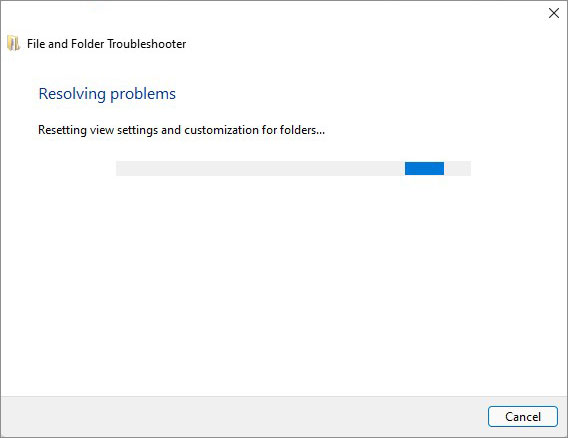
- Follow the on-screen instructions to complete the process. Apply the fixes it suggests and close the window. Finally, restart the system to see if the rundll32 not responding is solved.
#3 Perform Clean Boot
If you’re having issues with some third-party app/programs or service, you can try to boot your system in clean boot. The Clean Boot environment is where Windows starts with a minimal set of drivers, and startup apps/programs/software so you can pinpoint which background program or service is indeed causing issues. To perform a clean boot, you can follow the given steps:
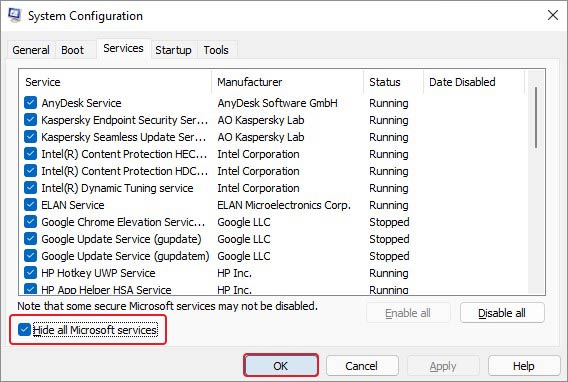
- Go to Windows Search by pressing Windows + S and then open System Configurations from there.
- Next, move to the Services tab and then click Hide all Microsoft services > Apply > OK.
- Now, go to the Startup tab and click Open Task Manager.
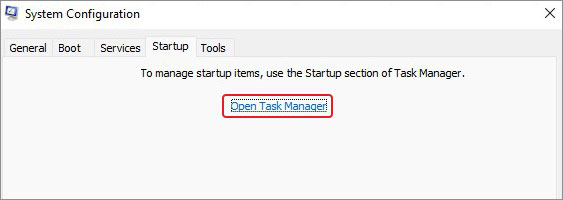
- Select the third-party startup services/programs and click Disable.
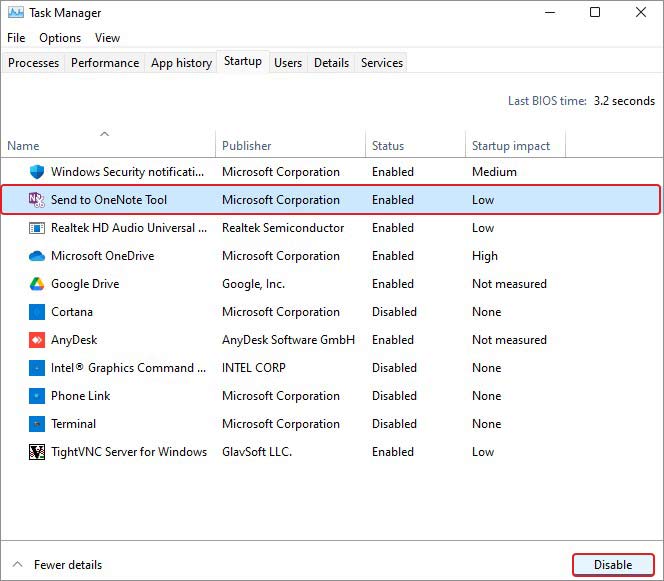
- Now, close Task Manager and click OK on the Startup tab to complete the process.
- Now, reboot your system and see if the error occurs. You can also uninstall the software/service from your system if you seldom use it.
#4 Run SFC Scan
Corrupted, missing, or damaged system files, such as Rundll32.exe can cause this error. You can take the help of the System File Checker utility. It is a Windows built-in troubleshooting utility to remove the corrupted or damaged versions of system files and replace them with the correct ones, thus solving the issue. To do so, follow the below steps:
- Open and run Command Prompt as administrator from Windows Search.
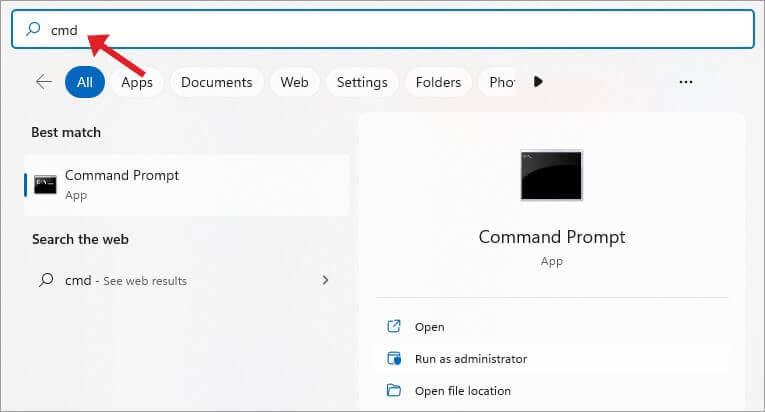
- In the elevated cmd Window, type sfc/scannow and hit Enter.
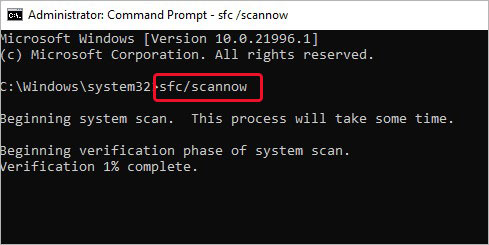
- The process will take a few minutes to complete. Wait until it’s done. Once completed, see if there are any further instructions to follow.
Finally, reboot the system and check if the problem has been resolved.
#5 Turn off Data Execution Prevention (DEP)
If you have DEP (Data Execution Prevention) running in the background, you may encounter the error. DEP is Windows XP SP 2 and Vista version’s feature that stops programs from running if it finds there could be an issue with the program. Turn off the DEP with the following steps:
- In the start menu, type CMD and press Enter.
- Run Command Prompt as administrator and type bcdedit.exe /set {current} nx AlwaysOff.
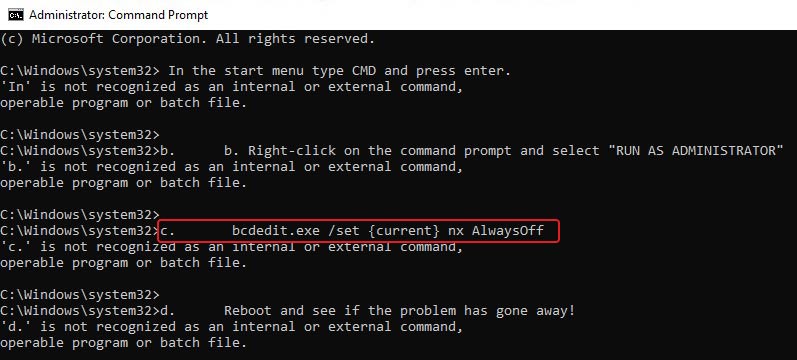
- As suggested in the window, reboot the system, and see if the error has gone.
- Next, once you’re done checking the issue status, turn DEP on again with the bcdedit.exe /set {current} nx AlwaysOn command.
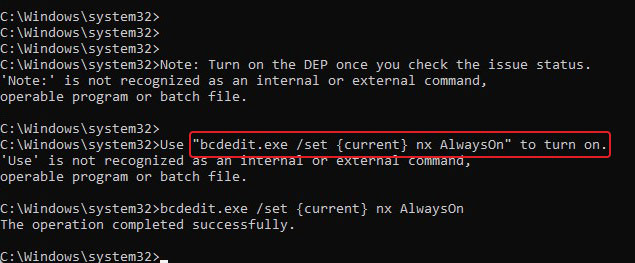
- Close the window once you’re done.
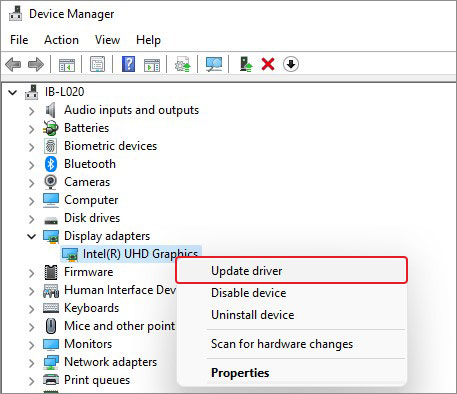
#6 Update Drivers to the Latest Versions
If you’ve outdated or corrupted graphic drivers installed on your system, you may encounter this error. Try updating the drivers and installing the latest compatible ones to resolve the issue.
- Go to Device Manager from Start by pressing Windows + X.
- Expand the Display adapters category, right-click on the driver, and select Update driver from the given options.
- Next, click Search automatically for drivers.
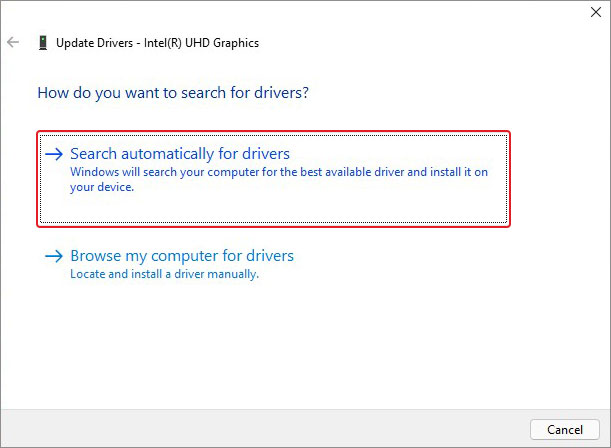
- Windows will start looking for the latest driver software available. Once it appears, download it and restart your system to check if the error is gone now.
- If it doesn’t show you any result, download pending updates from Settings > Update & Security > Windows Update > Install now.
#7 Roll Back the Drivers
If you’ve started facing the problem after updating the drivers, try rolling them back to their older state. Follow the given steps:
- Open Device Manager and go to Display adapters.
- Expand this category, right-click on the driver, and click Properties.
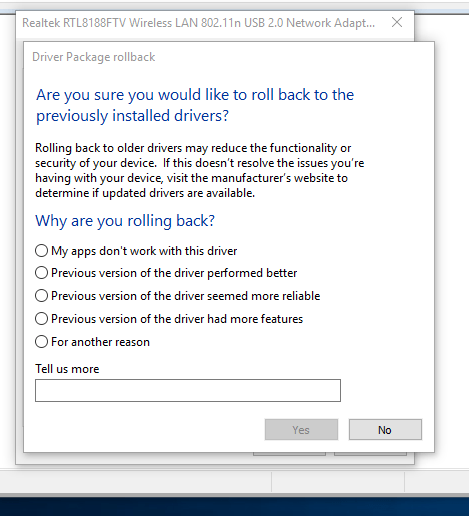
- Next, move to the Driver tab and click Roll Back Driver.
- Provide the reason to roll back the driver version and click Yes to proceed.
- Once done, close the tab and reboot your system to check if the error is solved.
#8 Scan PC for Malware
A malware infection can also cause app crashes, system malfunction, and system errors like blue screen or black screen of death, system freezing, and more. Rundll32 not responding is also one such error. Hence, we’d suggest you scan your system for malware. You can run the Windows Defender Antimalware program that detects viruses and malware on your system. If enabled, it tracks the malicious sites and prevents them from accessing your system’s vulnerabilities and device data in real-time unless a non-Microsoft antivirus is active. Follow the given steps:
- Open Settings by pressing Windows + I and then follow Update & Security > Windows Security > Virus and threat protection.
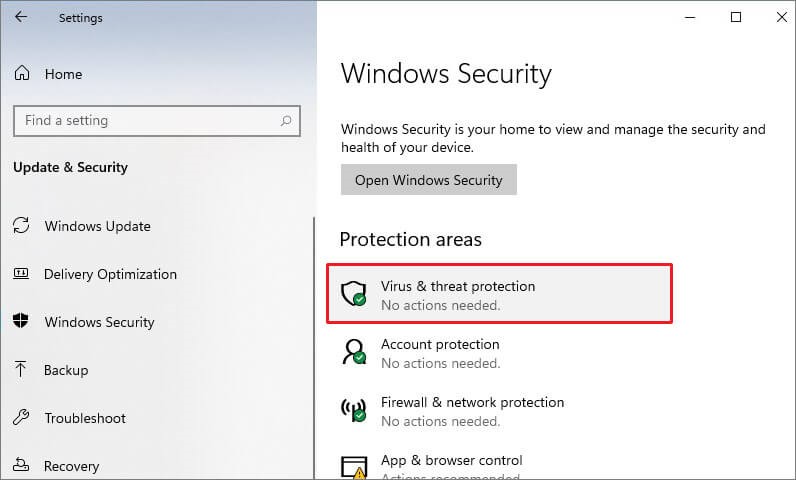
- On the next prompt, click Scan options under Quick Scan.
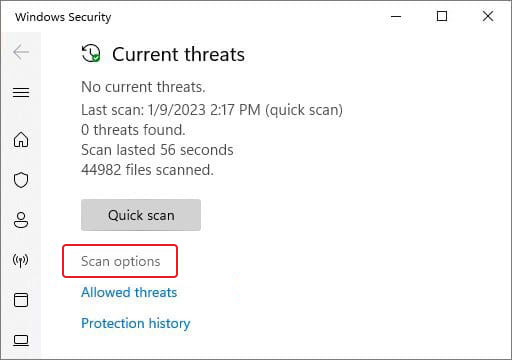
- Afterward, you’ll see four options, out of which, select Microsoft Defender Offline scan > Scan now.
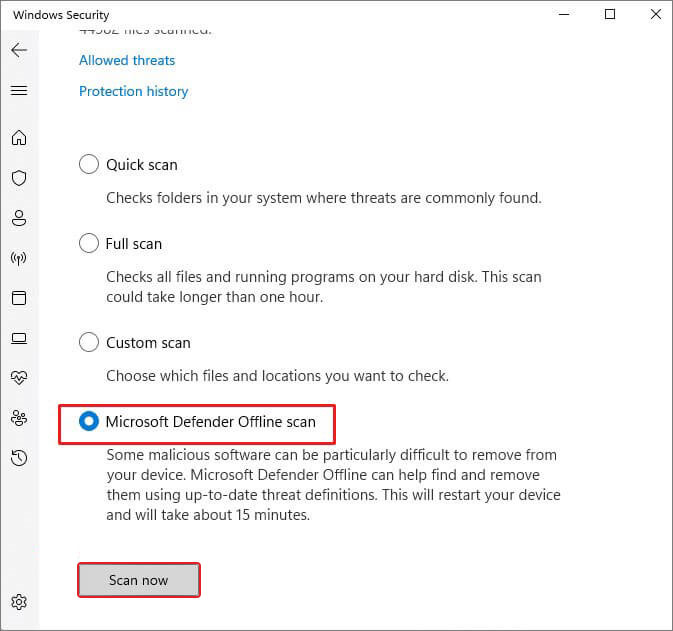
Let the scan complete and then see if there are any further instructions to follow. Once the process is finished, restart the system and try opening programs/apps to check if the problem is resolved.
All the methods mentioned here have proven records of helping multiple Windows users solve the error. You can follow them in order or try the one you find most suiting your situation. And, a rare thing possible, if the error doesn’t get solved, you can reset Windows to restore your system to its functioning state. However, make sure your system data is backed up before resetting Windows.
FAQ
1. Why is Windows host process rundll32 not responding when adding a printer?
It may occur due to a corrupted, missing, or outdated device driver. Hence, try updating or reinstalling the compatible device driver and then check if the error is gone.
2. Is it safe to delete Rundll32?
Rundll32 is not a culprit when you encounter a DLL error, hence you shouldn’t delete or uninstall it from your system. It is indeed a critical Windows system component and disabling or deleting it will make your system run into problems such as boot-up errors, system malfunctioning, etc.
3. What is the difference between svchost and rundll32?
Rundll32 and Svchost are important Windows components. A few users mistakenly assume them a virus or malware file exists on their system. However, Rundll32 is a legitimate Windows DLL file whereas Svchost is a service that runs in the background of your OS.
4. How do I recover data after resetting Windows?
If you have factory reset your Windows, you can recover your data in two ways – (i) using your backup and (ii) Windows data recovery software. If the backup is available, be it a cloud or a local one on your hard drive, you just need to access it on your system and copy-paste it. Else, you can try data recovery software, such as Stellar Data Recovery for Windows to get back your files, folders, and more in a few minutes.
Was this article helpful?
YES1
NO
Все способы:
- Способ 1: Перезапуск операционной системы
- Способ 2: Извлечение образа диска
- Способ 3: Активация безопасного режима
- Способ 4: Предоставление прав доступа
- Способ 5: Вход в учетную запись Администратора
- Способ 6: Использование инструментов среды восстановления
- Способ 7: Проверка системы на наличие вирусов
- Способ 8: Откат операционной системы до точки восстановления
- Вопросы и ответы: 0
Способ 1: Перезапуск операционной системы
Когда при попытке произвести над файлом какую-либо манипуляцию появляется ошибка с текстом «Действие не может быть выполнено, так как этот файл открыт в «System»», для ее устранения необходимо предварительно закрыть соответствующую программу в операционной системе. Но прежде чем выполнять поиск нужного приложения, рекомендуется попробовать перезапустить компьютер. Возможно, после этого влияющая на объект программа будет отключена и вы сможете взаимодействовать с ним в штатном режиме.

Тем, у кого включена функция быстрого запуска в Windows, особенно важно именно перезагрузить систему, а не выключить и включить ее.
Способ 2: Извлечение образа диска
Частой причиной появления ошибки «Действие не может быть выполнено, так как этот файл открыт в «System»» является наличие в операционной системе подключенного образа в качестве виртуального дисковода. В таком случае его необходимо извлечь перед тем, как пытаться что-либо сделать в незакрытым файлом. Откройте «Проводник» любым доступным способом, а затем на боковой панели слева перейдите в раздел «Этот компьютер». После этого кликните по виртуальному приводу правой кнопкой мыши и выберите из появившегося контекстного меню пункт «Извлечь».

Читайте также: Как открыть «Проводник» в Windows 10
Сразу после выполнения описанных действий над целевым файлом можно будет произвести любые манипуляции без риска повторного появления окна с ошибкой.
Важно! Ошибка с текстом «Действие не может быть выполнено, так как этот файл открыт в «System»» может возникать и в том случае, если образ смонтирован в виртуальной машине. Притом проблема будет наблюдаться даже при отключенной программе VirtualBox, VMWare и т. п. Чтобы устранить неисправность (на примере ВиртуалБокс), потребуется запустить виртуальную машину и на верхней панели развернуть меню «Устройства», после чего выбрать из списка опций «Оптические диски» → «Изъять диск из привода».

Способ 3: Активация безопасного режима
Если перезагрузка компьютера не помогла в решении проблемы, тогда можно попробовать запустить его в безопасном режиме. Вследствие этого множество служб и программ от сторонних разработчиков не будут инициализированы, соответственно, не смогут влиять на работу операционной системы.
Чтобы войти в безопасный режим в Windows 10, понадобится воспользоваться специальным системным меню, вызываемым командой msconfig. Но есть и альтернативные варианты входа в этот режим, о которых вы можете прочитать в другой статье на нашем сайте.
Подробнее: Как войти в безопасный режим в Windows 10

После того как вы войдете в безопасный режим, перейдите в целевую директорию и произведите запланированные манипуляции с файлом. В этот раз ошибки «Действие не может быть выполнено, так как этот файл открыт в «System»» быть не должно. В завершение снова перезапустите компьютер, чтобы выйти из безопасного режима.
Способ 4: Предоставление прав доступа
Есть вероятность, что ошибка с текстом «Действие не может быть выполнено, так как этот файл открыт в «System»» появляется из-за отсутствия достаточного уровня прав пользователя на выполнение определенных действий с файлом. В таком случае можно попробовать предоставить их себе для устранения неисправности.
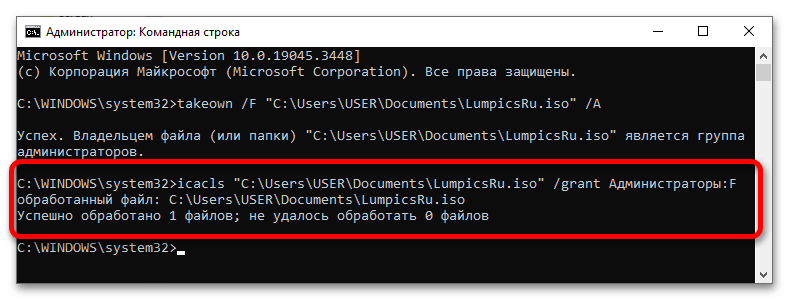
- Делается это через «Командную строку», запущенную от имени администратора. Воспользуйтесь поиском по системе: установите курсор в соответствующее поле на панели задач, введите запрос «Командная строка», а затем кликните по пункту «Запуск от имени администратора».
- Когда окно консоли появится на рабочем столе, следует выполнить несколько команд, чтобы повысить свои права доступа к целевому файлу. Сперва смените его владельца, введя представленную ниже строку. Не забудьте нажать потом клавишу Enter для ее выполнения.
takeown /F <путь_к_файлу> /A - Теперь внесите изменения в списки управления доступом файла, указав в качестве основной группу «Администраторы». Для этого воспользуйтесь консольной утилитой
icacls. Ее синтаксис в этот раз будет следующим:icacls <путь_к_файлу> /grant Администраторы:F - После этого переходите непосредственно к манипуляциям, связанным с файлом. Сделать это можно через «Проводник» в штатном режиме или посредством выполнения специальных команд в консоли. Например, если вам нужно удалить объект, тогда воспользуйтесь командой
del, указав в качестве аргумента путь к файлу.del <путь_к_файлу>


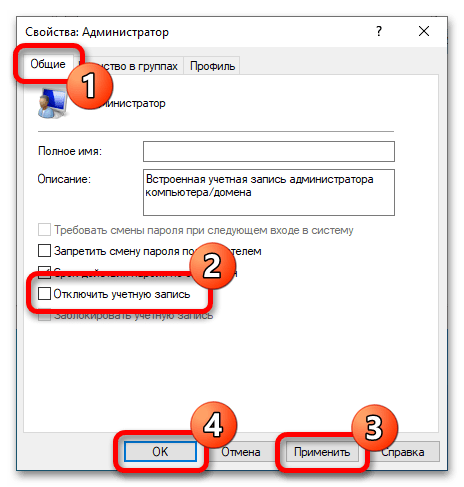
Способ 5: Вход в учетную запись Администратора
При условии, что предыдущий способ вам не помог получить права доступа, попробуйте авторизоваться в аккаунте Администратора, чтобы иметь наивысшие привилегии в операционной системе. Для выполнения поставленной задачи понадобится предварительно активировать соответствующую учетную запись в «Параметрах» Windows 10, после чего совершить переход. Об этом детальнее рассказывается в другой статье на нашем сайте.
Подробнее: Авторизация в учетной записи Администратора в Windows 10
Способ 6: Использование инструментов среды восстановления
Ультимативным методом решения станет использование инструментов среды восстановления. Первостепенно в нее необходимо перейти. Сделать это можно по-разному, и все инструкции есть в другом нашем материале.
Подробнее: Как запустить среду восстановления в Windows 10
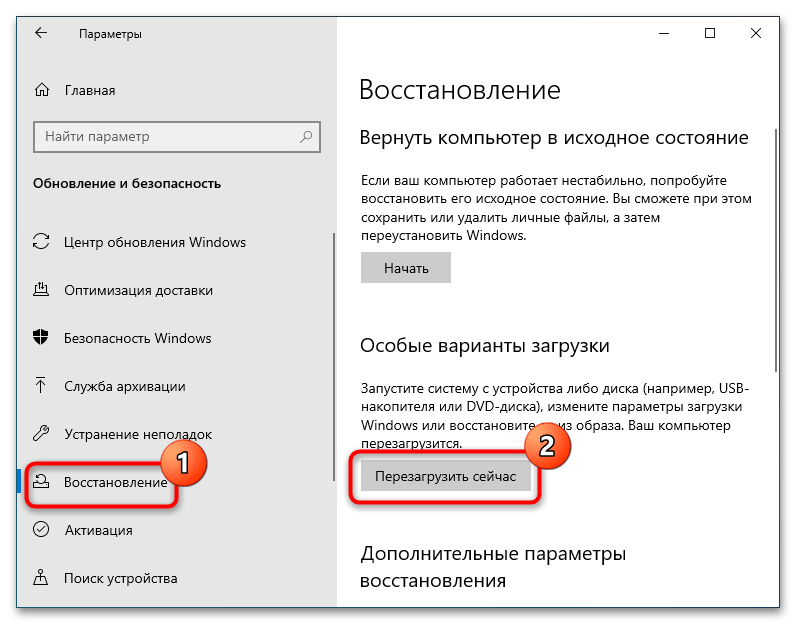
После того как вы войдете в среду восстановления, проделайте следующие действия, чтобы произвести манипуляции с целевым файлом:
- Находясь на начальной заставке, перейдите в раздел «Поиск и устранение неисправностей».
- Затем проследуйте в меню «Дополнительные параметры».
- Выберите пункт «Командная строка».
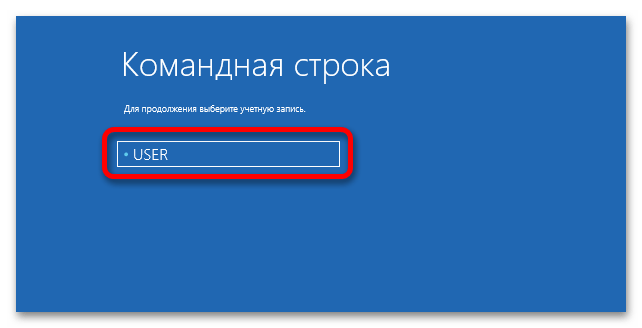
- После недолгого ожидания выберите в списке пользователя, от имени которого вы хотите выполнять команды в консоли. Важно знать пароль от его учетной записи, в противном случае авторизоваться не получится.
- Введите пароль от выбранного аккаунта и кликните по кнопке «Продолжить». Если пароль на учетную запись не был установлен, просто нажмите «Продолжить», оставив поле пустым.
- После авторизации в профиле на экране появится окно «Командной строки». Через нее вам необходимо определить букву системного диска. Проблема заключается в том, что она может отличаться от той, которая отображается непосредственно в операционной системе. Поэтому рекомендуется поочередно переходить по разделам и проверять их корневой каталог на наличие системных папок по типу «Program Files» и «Windows».
Чтобы перейти на новый диск, нужно просто указать его букву со знаком двоеточия. А чтобы проверить содержание корневой директории — ввести команду
dir. Как видно на изображении ниже, был совершен переход на диск «F» посредством командыF:, а затем осуществлена проверка содержащихся там файлов и папок посредством командыdir. В результате был обнаружен нужный диск. - Находясь в нужном разделе, перейдите в директорию с проблемным объектом, который до этого вызывал ошибку «Действие не может быть выполнено, так как этот файл открыт в «System»». Сделать это можно с помощью команды
cd, указав в качестве аргумента путь к целевому каталогу.cd <путь_к_директории>Чтобы убедиться в том, что вы попали в нужную папку, воспользуйтесь уже знакомой командой
dir, которая отображает список содержимого текущего каталога. - Теперь выполните с проблемным файлом то, что хотели. Ввиду того, что вы находитесь в среде восстановления, ошибка «Действие не может быть выполнено, так как этот файл открыт в «System»» не появится, поскольку «system» сейчас сам не задействован. Например, если вам нужно удалить объект, введите команду следующего формата:
del <название_файла>
Для выполнения других действий, перейдите в отдельную статью, размещенную на нашем сайте. В ней автор перечисляет множество полезных консольных команд. Особое внимание уделите разделу «Настройка и использование оборудования» — именно там вы найдете команды для работы с файлами.
Подробнее: Полезные команды для «Командной строки» в Windows 10
- Когда запланированные действия будут произведены, перезапустите компьютер, чтобы выйти из среды восстановления и вернуться на рабочий стол операционной системы.


Способ 7: Проверка системы на наличие вирусов
Не исключено, что ошибка «Действие не может быть выполнено, так как этот файл открыт в «System»» появляется из-за влияния вредоносного кода в операционной системе. В таком случае необходимо выполнить проверку на наличие вирусов и при обнаружении удалить их. Сделать это можно с помощью специального программного обеспечения. Развернуто об этом рассказывается в другой статье на нашем сайте.
Подробнее: Как проверить Windows 10 на вирусы и другие угрозы

Способ 8: Откат операционной системы до точки восстановления
При относительно недавнем появлении ошибки «Действие не может быть выполнено, так как этот файл открыт в «System»» есть вероятность, что откат системы с помощью точки восстановления устранит неисправность. В этом случае важно, чтобы она была сделана до возникновения проблемы. Перейдите по ссылке ниже для ознакомления с инструкцией, в которой рассказывается, как произвести такое восстановление Windows 10.
Подробнее: Как откатить Windows 10 до точки восстановления

Наша группа в TelegramПолезные советы и помощь
Иногда при попытке удалить, переименовать или переместить какой-то файл в Windows вы можете получить сообщение, что файл занят/заблокирован/используется) другим процессом. Чаще всего имя программы, которая держит файл открытым указывается прямо в окне сообщения File Explorer. Чтобы снять блокировку файла достаточно просто закрыть эту программу. Но бывает ситуации, когда какой-то файл и библиотека используется неизвестным или системным процессом. В этом случае снять блокировку с файла немного сложнее.
Многие приложения открывают файлы в монопольном (эксклюзивном) режиме. При этом файл блокируется файловой системой от операций ввода вывода других приложений. Если вы закрываете приложение, блокировка с файла снимается.
Сообщение о блокировке файла может выглядеть по-разному. Например в следующем примере указан тип файла и с каким приложением он ассоциирован:
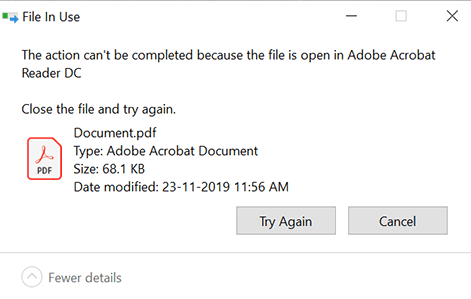
File/Folder in Use. The action can’t be completed because the file is open in another program. Close the folder or file and try again.
Файл уже используется. Операция не может быть завершена, так как файл или папка открыта в другой программе. Закройте файл и повторите попытку.
В этом случае вы можете легко понять какое приложение заблокировало файл и закрыть его.
Однако иногда можно увидеть более интересное сообщение, о том, что файл заблокирован неизвестным или системным процессом Windows. Это может быть, как процесс самой ОС Windows, так и другие процессе, работающий с правами System, например, антивирус, агент резервного копирования, база данных mssql и т.д.):
The action can’t be completed because the file is open in SYSTEM.
Файл уже используется. Действие не может быть выполнено, так как этот файл открыт в System.
Попробуем разобраться, как понять какой программой, службой или системным процессом Windows занят файл, как разблокировать файл и можно ли разблокировать файл не закрывая родительский процесс.
Самый простой вариант разблокировать файл – завершить процесс, которые его заблокировал. Но это не всегда возможно, особенно на серверах.
Чаще всего для поиска процесса, который заблокировал файл рекомендуют использовать утилиту Unlocker. Лично я
Unlocker
не использую, т.к. она не позволяет получить подробную информацию о процессе или цепочке процессов, которые заблокировали файл. Также нельзя освободить конкретный файл, занятый процессом – приходится завершать приложение целиком.
Кроме того, это сторонняя утилита, при установке которой нужно быть внимательным, т.к. в процессе она предлагает установить пачку ненужные программы в нагрузку.
Когда процесс в Windows открывает файл, этому потоку ввода/вывода назначается файловый дескриптор (handler). Процесс и его дочерние процессы получают доступ к файлу по этому дескриптору. Через Window API вы можете послать сигнал файловой системе на освобождение данного дескриптора и снятие блокировки с файла.
Принудительное закрытие файловых дескрипторов может вызвать нестабильную работу приложения или компьютера. Если вы не знаете, к чему приведет закрытие дескриптора файла для конкретного приложения, то не пытайтесь выполнить это на продуктивном сервере без предварительного теста.
Как разблокировать файл с помощью Process Explorer?
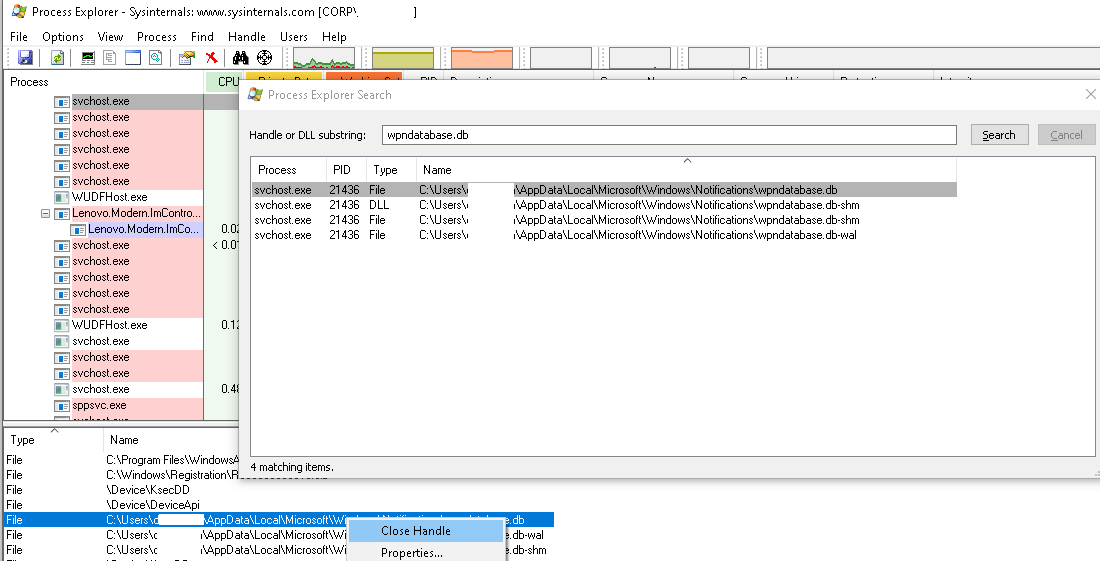
ProcessExplorer это бесплатная утилита из набора системных утилит Sysinternals, которую можно скачать на сайте Microsoft (https://docs.microsoft.com/en-us/sysinternals/downloads/process-explorer). Попробуем с помощью Process Explorer найти, какой процесс заблокировал определенный файл и освободить этот файл, сбросив файловый дескриптор процесса.
- ProcessExplorer не требует установки, просто скачайте распакуйте и запустите с правами администратора
procexp.exe
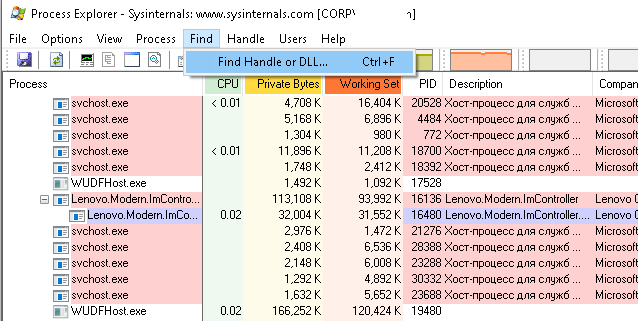
; - Выберите меню Find -> Find Handle or DLL (или нажмите
Ctrl-F
);
- Укажите имя файла, который нужно разблокировать и нажмите Search;
- Выберите нужный файл. Процесс, который открыл файлы будет выделен в дереве процессов. Можно завершить этот процесс, щелкнув по нему правой кнопкой и выбрав Kill Process Tree. Но можно попробовать закрыть дескриптор файла, не завершая процесс целиком. Дескриптор файла, который вы искали, автоматически выделяется в нижней панели Process Explorer. Щелкните по дескриптору правой кнопкой и выберите Close handle. Подтвердите закрытие файла.
Если у вас в Process Explorer не отображается нижняя панель со списком открытых дескрипторов процесса, включите пункт меню View -> Lower Pane View -> Handles
Итак, вы закрыли дескриптор файла, не завершая родительский процесс. Теперь вы можете спокойно удалить или переименовать файл.
Сброс дескриптора файла с помощью утилиты Handle
Handle – это еще одна утилита командной строки из комплекта инструментов Sysinternals (доступна для скачивания на сайте Microsoft (https://docs.microsoft.com/en-us/sysinternals/downloads/handle. Она позволяет найти процесс, который заблокировал ваш файл и снять блокировку, освободив дескриптор.
- Скачайте и распакуйте архив с утилитой Handle;
- Запустите командную строку с правами администратора и выполните команду:
handle64.exe > listproc.txt
Данная команда сохранит список открытых дескрипторов в файл. Можно вывести дескрипторы для каталога, в котором находится файл, который вы хотите изменить:
Handle64.exe -a C:\Some\Path
или конкретного процесса:
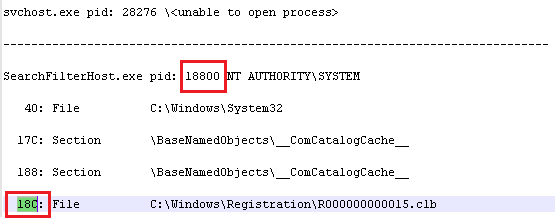
handle64.exe -p winword.exe - Откройте файл listproc.txt в любом текстовом редакторе и найдите строку, в которой указано имя заблокированного файла. Скопируйте ID дескриптора файла (значение в hex формате). Затем поднимитесь немного выше к разделу, в котором указан процесс, являющийся владельцем данного дескриптора и запишите его ID. Для процесса запущенного от имени системы скорее всего будет PID 4.
Для некоторых системных процессов handle.exe вернет следующий текст:
wininit.exe pid: 732 \<unable to open process>
. Это означает, что вы не может получить информацию об этих системных процессах (даже с правами администратора). Для получения дескрипторов файлов, открытых такими процессами, запустите командную строку с правами System и попробуйте получить список дескрипторов еще раз. - Теперь вернитесь в командную строку и сбросьте дескриптор файла по полученным HandleID и ProcessID. Формат команды следующий:
handl64e.exe -c HandleID -p ProcessID
Например:
handl64e.exe -c 18C -p 18800
- Утилита запросит подтвердить закрытие файла для указанного процесса. Подтвердите, нажав y -> enter

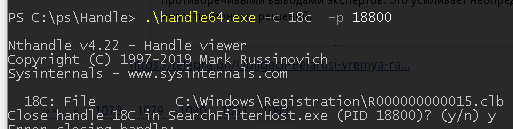
Если система отреагирует на закрытие файла корректно, вы разблокируете ваш файл без необходимости завершать процесс или перезагружать сервер/компьютер.