
In order to accelerate slow hard drive performance and keep your disk optimized, Windows 10, like Windows 8.1/8/7 and previous version, includes a built-in tool to defragment all fragmented files and help your PC stay at top speeds.
But what if you found that you are unable to run the Windows 10 defragmenter utility or you get error prompt like Disk defragmenter could not start or Failed to initialize or
Disk defragmenter service is missing in Windows 10? No worries, we have solutions for that issue covered in this post.
Part 1: Possible Reasons for Windows 10 Defrag Not Working Issue
This issue appears because of the corrupted installation of third party defragmenter, or the defragmenter is incompatible with Windows 10. To have this issue solved, you can try some of the following solutions.
Part 2: How to Fix Unable to Run Windows 10 Defragmenter
Below are some solutions to fix “unable to run Windows 10 defragmenter” available for your reference, let’s take a look at it.
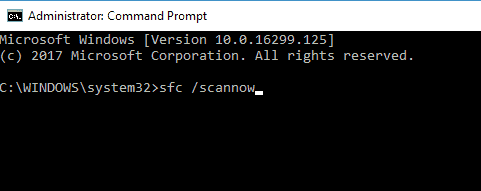
Solution 1: Perform sfc/scannow
The first solution you can try to get the issue fixed is using the Sfc/scannow command. This command will scan all protected system files as well as provide solution to solve the defragmentation problem. Here’s how:
Click on Start, then go to Search menu bar, type cmd in the search box. After that, right click on the result and select Run as administrator.
At the command prompt, type the following line and hit Enter: sfc/scannow, then it will start examining all your protected system files and replace corrupted files.
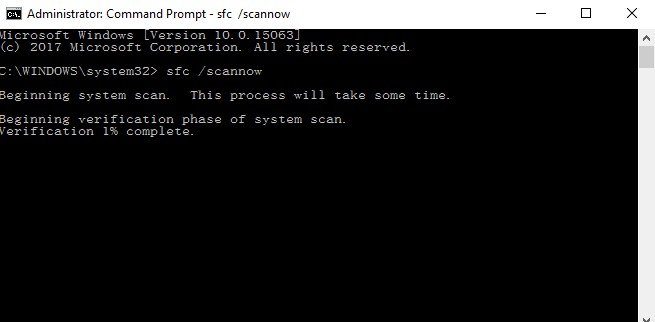
After the process done, if the System File Checker have found an error, it will provide solutions for you (if available). If not, you can try out other solution we listed below.
Solution 2: Check if Disk Defragmenter service is running properly
This issue can also be led to by not running properly Disk Defragmenter service. Just follow these steps to make sure that the Disk Defragmenter service is running properly:
Firstly, open Search box from the Start, then type services.msc in Start search and hit Enter button.
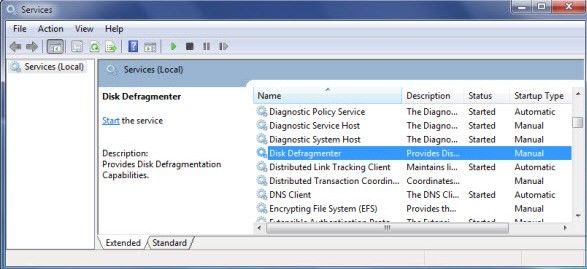
Please note that the Disk Defragmenter serviceon your Windows 10 computer must be enabled and set to Manual.
In the meantime, you have to make sure that 3 services listed below is running and set to Automatic:
Remote Procedure Call (RPC)
DCOM Server Process Launcher
RPC Endpoint Mapper
Part 3: Best Alternative Defrag Tool—Windows Care Genius
If nothing helps above, then you may need a third-party software to help you perform defrag on Windows 10, I believe Windows Care Genius is what you really need. It is a versatile Windows 10/8.1/8/7 system care tool offering 22 powerful features to keep things in order by constantly cleaning junk files, removing leftovers, fixing registry entries, running system defrag, and enhancing privacy. Below is how it works.
To get started, please free download Window Care Genius on your computer, then launch it.
After that, we suggest you to make a checkup for your computer. Once done, select “System Tuneup” from the menu bar located at the top of the main interface.
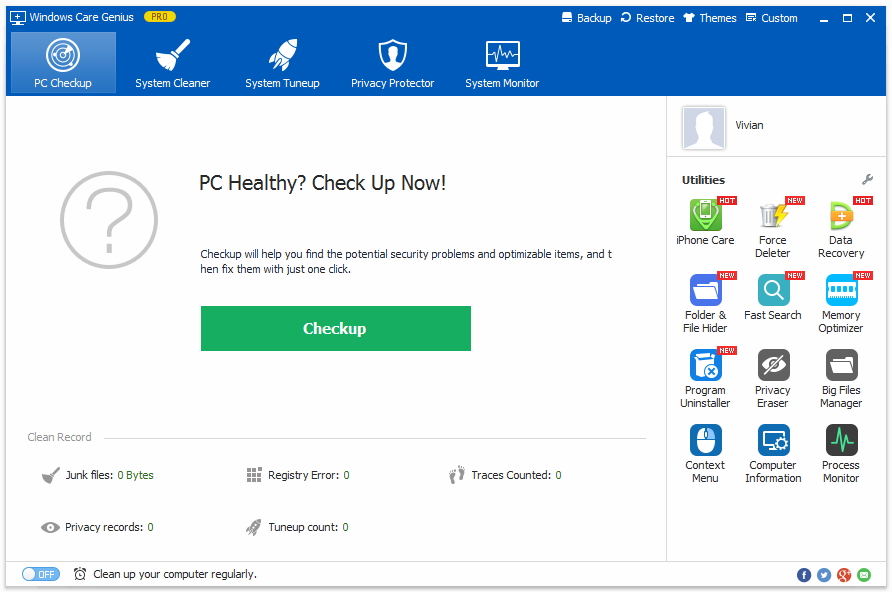
Then choose “Disk Defrag” from the left pane.
Next, check the disk you want to perform defrag and hit “Defragment” to start defrag.
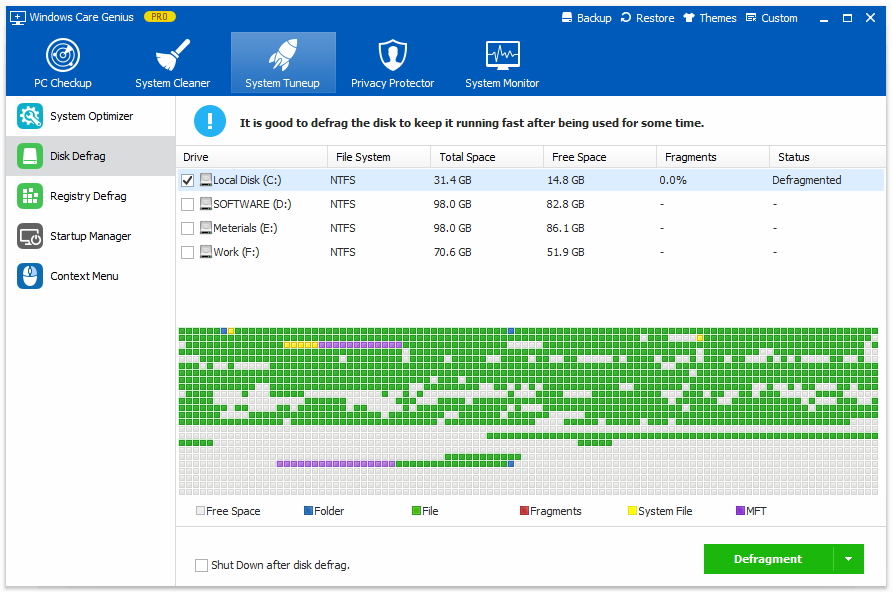
Now only 3 steps with this program, you can defragment your Windows computer to perfect instead of Windows built-in defrag tool.
I hope at least one of these solutions helped you fix Windows 10 disk defrag not working. If you have any comments suggestions, or maybe other solutions, please share it with us in the comments below.
Is the Disk Defragmenter not working on your computer? If the Disk Defragmenter stopped functioning properly on your Windows 11 or 10, we have some solutions for you. Why should you be worried if the disk defragmenter won’t run on your Windows 11/10 PC. Disk Defragmentation or defragging is the process of reorganizing scattered data pieces. Disk Defragmenting once in a while helps improve the performance of your PC and its resident hard disks.
During this process, fragmented chunks of data are gathered and stored sequentially, and in the contiguous space which is available. If you are new to defragmenting hard drives, you can check this post out.
Why Is Windows Defragment Option not Working On My Windows 11/10 PC?
There could several reasons why the Windows defrag service is refusing to work on your Windows PC. Let’s quickly have a look at a few of them –
- Background apps are interfering and they won’t let disk defragmenter service run on your Windows 11/10 computer.
- There are corrupt files on your computer.
- Your existing Antivirus is meddling with your Windows Disk Defragmenter.
- There are hard drive issues because of which the issue at hand has taken place.
- The Disk Defragmenter service is not properly set up.
What To Do If Disk Defragmenter Won’t Run On My Windows 11/10 PC
1. Perform SFC Scan
If your Windows Defrag is not working, it could be that there are some issues that are interfering with the functionality of your PC. An SFC Scan is the best way to search for errors that are interfering with the functionality of your PC. To run an SFC Scan, here are the steps –
1.In the Windows search bar, type cmd
2.From the right-hand pane, select Run as administrator

3.When the Command Prompt window opens, type SFC /Scannow and press Enter

Wait for the scan to get over and now try running the disk defragmenter service.
2. Check If The Disk Defragmenter Service Is Functioning Properly
One of the reasons why Disk Defragments and Optimize drives are not opening could be because the related service is not properly set up. Here is how you can properly set it up –
1. Open the Run dialog box by pressing Windows + r key combination
2. When the dialog box appears, type mscand press Enter

3. Locate the Disk Defragmenter service and make sure that it is set to Manual
4. Alongside, ensure that the following services are set to automatic –
- Remote Procedure Call (RPC)
- DCOM Server Process Launcher
- RPC Endpoint Mapper
Now, head back and check if the Disk Defragmenter is running on your Windows 11/10 PC or not.
3. Use A Third-Party Utility
If you can’t find a way to fix “Defrag not working on Windows 11/10”, you might as well get the task of removing fragments from your hard disks done with the help of a third-party utility. Advanced System Optimizer, for instance, is one of the best utilities with the help of which you can defragment your computer in an error-free manner.
Why Advanced System Optimizer?
Here are a few of the many reasons why Advanced System Optimizer is a must-have tool for Windows 11/10 PC –
-A one-stop solution for a variety of hard disk-related problems.
-Potent RAM and junk cleaner for Windows PC.
-Doubles up as an efficient Windows optimizer.
-Cleans and optimize your registry in an error-free manner.
-Comes packed with various tools to safeguard your PC’s security and privacy.
-Remove common PC issues which would otherwise take hours to deal with.
-It’s Windows 11 ready!
Also Read: Want to know more about this wonderful tool, do check out its inside-out review.
How To Use Advanced System optimizer?
1. Download and run Advanced System optimizer
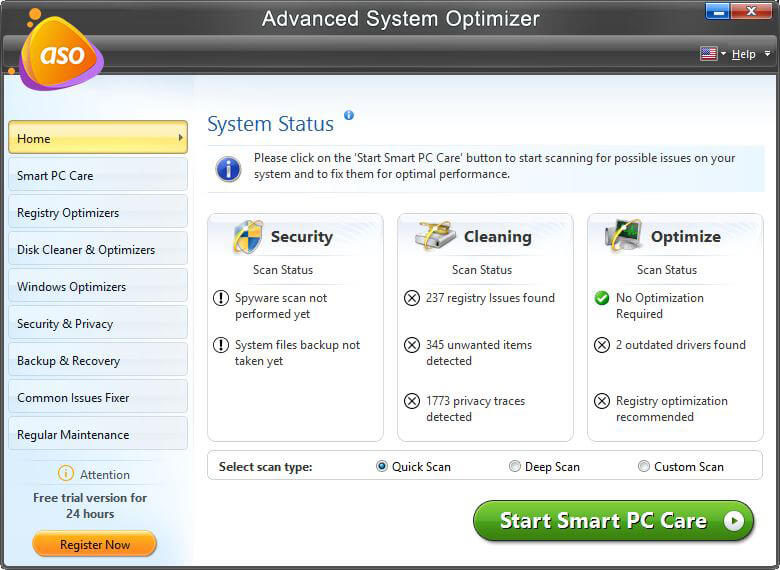
2. From the left-hand pane, click on Disk Cleaner & Optimizers.

3. From the right-hand side, click on Disk Optimizer.
4. Select the drive that you want to defragment.

5. Click on the blue-colored Start Scan Now
6. If there are fragments on the disk, click on the Defrag button and follow the on-screen instructions.

That’s it! Your hard disk is now free of fragments.
4. Try and Use Disk Defragmenter in Safe Mode
Unable to open the “Defragment and Optimize Drives” function in normal mode? Instead, head to the Safe Mode and then try opening it. If it opens there, chances are there are some system issues with your computer that again, you can resolve with the help of Advanced System Optimizer, the tool we talked about just above. Also, make sure that you check your computer for malware as malicious threats are notoriously known for interfering with the normal functionalities of your computer.
5. Create A New User Profile
In case Disk Defragmenter won’t run on your Windows 11/10 PC i.e. your current user profile, you can go ahead, create a new user profile and then try running the Defragment and Optimize Drive service. For this –
1. Open Settings by pressing the Windows + I key combination
2. From the left-hand side,click on Accounts
3. From the right-hand side,click on Family & other users
4. Under Other users, click on the Add accountbutton and then follow the on-screen instructions

6. Use The CHKDSK Command
Another simple yet effective command that can help resolve a variety of errors on your hard drive is the CHKDSK command. Here are the steps to use the same –
1. In the Windows search bar, typecmd
2. From the right-hand pane, select Run as administrator

3. When the Command Promptwindow opens type chkdsk d: /f and press Enter

Note: Here the letter d:/ represents the drive letter that you want to repair.
7. Close All The Other Applications
With too many applications, the Defragment and Optimize Drives feature may not open, simply, because they might be interfering with it. The simplest way is to close all applications with the help of the Task Manager and here’s how –
1. Press the ctrl + shift + esckeys
2. When the Task Manager opens
3. Select the application and then hit the End Task button located at the bottom right.

Now, try running the Defragment and Optimize drives
Wrapping Up
Hope you are now able to run the Defragment and Optimize Drives option and can defragment hard disks on your PC. If yes, do let us know which of the above workarounds helped you fix the issue. For more such content, keep reading WeTheGeek blogs. Follow us on social media – Facebook, Instagram and YouTube.
Последнее обновление: 11/24/2024
[Необходимое время для чтения: ~4–6 мин.]
Файлы Fragmentation Tool, такие как Defrag.exe, считаются разновидностью файла Win32 EXE (Исполняемое приложение). Они соотносятся с расширением EXE, разработанным компанией BullGuard для Defrag.
Файл Defrag.exe впервые был выпущен для ОС Windows Vista 11/08/2006 с Windows Vista.
Самый последний выпуск для BullGuard Internet Security 2013 состоялся 09/10/2012 [версия 1.4.0.0].
Файл Defrag.exe входит в состав BullGuard Internet Security 2013, Windows 10 и Windows 8.1.
В этой статье приведены подробные сведения о Defrag.exe, руководство по устранению неполадок с файлом EXE и список версий, доступных для бесплатной загрузки.
Что такое сообщения об ошибках Defrag.exe?
Defrag.exe — ошибки выполнения
Ошибки выполнения — это ошибки BullGuard Internet Security, возникающие во время «выполнения». Термин «выполнение» говорит сам за себя; имеется в виду, что данные ошибки EXE возникают в момент, когда происходит попытка загрузки файла Defrag.exe — либо при запуске приложения BullGuard Internet Security, либо, в некоторых случаях, во время его работы. Ошибки выполнения являются наиболее распространенной разновидностью ошибки EXE, которая встречается при использовании приложения BullGuard Internet Security.
In most cases, Defrag.exe runtime errors occurring while the program is running will result in the program terminating abnormally. Most of these Defrag.exe error messages mean that BullGuard Internet Security was either unable to locate this file on startup, or the file is corrupt, resulting in a prematurely-aborted startup process. Generally, BullGuard Internet Security will be unable to start without resolving these errors.
Таким образом, крайне важно, чтобы антивирус постоянно поддерживался в актуальном состоянии и регулярно проводил сканирование системы.
Поиск причины ошибки Defrag.exe является ключом к правильному разрешению таких ошибок. Несмотря на то что большинство этих ошибок EXE, влияющих на Defrag.exe, происходят во время запуска, иногда ошибка выполнения возникает при использовании Defrag. Причиной этого может быть недостаточное качество программного кода со стороны Marius Negrutiu, конфликты с другими приложениями, сторонние плагины или поврежденное и устаревшее оборудование. Кроме того, эти типы ошибок Defrag.exe могут возникать в тех случаях, если файл был случайно перемещен, удален или поврежден вредоносным программным обеспечением. Таким образом, крайне важно, чтобы антивирус постоянно поддерживался в актуальном состоянии и регулярно проводил сканирование системы.
Как исправить ошибки Defrag.exe — 3-шаговое руководство (время выполнения: ~5-15 мин.)
Если вы столкнулись с одним из вышеуказанных сообщений об ошибке, выполните следующие действия по устранению неполадок, чтобы решить проблему Defrag.exe. Эти шаги по устранению неполадок перечислены в рекомендуемом порядке выполнения.
Шаг 1. Восстановите компьютер до последней точки восстановления, «моментального снимка» или образа резервной копии, которые предшествуют появлению ошибки.
Чтобы начать восстановление системы (Windows XP, Vista, 7, 8 и 10):
- Нажмите кнопку «Пуск» в Windows
- В поле поиска введите «Восстановление системы» и нажмите ENTER.
- В результатах поиска найдите и нажмите «Восстановление системы»
- Введите пароль администратора (при необходимости).
- Следуйте инструкциям мастера восстановления системы, чтобы выбрать соответствующую точку восстановления.
- Восстановите компьютер к этому образу резервной копии.
Если на этапе 1 не удается устранить ошибку Defrag.exe, перейдите к шагу 2 ниже.

Шаг 2. Если вы недавно установили приложение BullGuard Internet Security (или схожее программное обеспечение), удалите его, затем попробуйте переустановить BullGuard Internet Security.
Чтобы удалить программное обеспечение BullGuard Internet Security, выполните следующие инструкции (Windows XP, Vista, 7, 8 и 10):
- Нажмите кнопку «Пуск» в Windows
- В поле поиска введите «Удалить» и нажмите ENTER.
- В результатах поиска найдите и нажмите «Установка и удаление программ»
- Найдите запись для BullGuard Internet Security 2013 и нажмите «Удалить»
- Следуйте указаниям по удалению.
После полного удаления приложения следует перезагрузить ПК и заново установить BullGuard Internet Security.
Если на этапе 2 также не удается устранить ошибку Defrag.exe, перейдите к шагу 3 ниже.
BullGuard Internet Security 2013
BullGuard
Шаг 3. Выполните обновление Windows.
Когда первые два шага не устранили проблему, целесообразно запустить Центр обновления Windows. Во многих случаях возникновение сообщений об ошибках Defrag.exe может быть вызвано устаревшей операционной системой Windows. Чтобы запустить Центр обновления Windows, выполните следующие простые шаги:
- Нажмите кнопку «Пуск» в Windows
- В поле поиска введите «Обновить» и нажмите ENTER.
- В диалоговом окне Центра обновления Windows нажмите «Проверить наличие обновлений» (или аналогичную кнопку в зависимости от версии Windows)
- Если обновления доступны для загрузки, нажмите «Установить обновления».
- После завершения обновления следует перезагрузить ПК.
Если Центр обновления Windows не смог устранить сообщение об ошибке Defrag.exe, перейдите к следующему шагу. Обратите внимание, что этот последний шаг рекомендуется только для продвинутых пользователей ПК.

Если эти шаги не принесут результата: скачайте и замените файл Defrag.exe (внимание: для опытных пользователей)
Если ни один из предыдущих трех шагов по устранению неполадок не разрешил проблему, можно попробовать более агрессивный подход (примечание: не рекомендуется пользователям ПК начального уровня), загрузив и заменив соответствующую версию файла Defrag.exe. Мы храним полную базу данных файлов Defrag.exe со 100%-ной гарантией отсутствия вредоносного программного обеспечения для любой применимой версии BullGuard Internet Security . Чтобы загрузить и правильно заменить файл, выполните следующие действия:
- Найдите версию операционной системы Windows в нижеприведенном списке «Загрузить файлы Defrag.exe».
- Нажмите соответствующую кнопку «Скачать», чтобы скачать версию файла Windows.
- Скопируйте этот файл в соответствующее расположение папки BullGuard Internet Security:
Windows XP: C:\WINDOWS\system32\dllcache\
Windows XP: C:\Windows\System32\
Windows Vista: C:\Windows\System32\
Windows 7: C:\Windows\System32\
Windows 8: C:\Windows\System32\Показать на 3 каталогов больше +
Windows 8.1: C:\Windows\System32\
Windows 10: C:\Program Files\BullGuard Ltd\BullGuard\
Windows 10: C:\Windows\System32\ - Перезагрузите компьютер.
Если этот последний шаг оказался безрезультативным и ошибка по-прежнему не устранена, единственно возможным вариантом остается выполнение чистой установки Windows 10.
СОВЕТ ОТ СПЕЦИАЛИСТА: Мы должны подчеркнуть, что переустановка Windows является достаточно длительной и сложной задачей для решения проблем, связанных с Defrag.exe. Во избежание потери данных следует убедиться, что перед началом процесса вы создали резервные копии всех важных документов, изображений, установщиков программного обеспечения и других персональных данных. Если вы в настоящее время не создаете резервных копий своих данных, вам необходимо сделать это немедленно.
Скачать файлы Defrag.exe (проверено на наличие вредоносного ПО — отсутствие 100 %)
ВНИМАНИЕ! Мы настоятельно не рекомендуем загружать и копировать Defrag.exe в соответствующий системный каталог Windows. BullGuard, как правило, не выпускает файлы BullGuard Internet Security EXE для загрузки, поскольку они входят в состав установщика программного обеспечения. Задача установщика заключается в том, чтобы обеспечить выполнение всех надлежащих проверок перед установкой и размещением Defrag.exe и всех других файлов EXE для BullGuard Internet Security. Неправильно установленный файл EXE может нарушить стабильность работы системы и привести к тому, что программа или операционная система полностью перестанут работать. Действовать с осторожностью.
Файлы, относящиеся к Defrag.exe
Файлы EXE, относящиеся к Defrag.exe
| Имя файла | Описание | Программное обеспечение (версия) | Размер файла (в байтах) | Расположение файла |
|---|---|---|---|---|
| BackupShellTransfer.exe | BullGuard Backup | BullGuard (20.0.0.0) | 372584 | C:\Windows\System32\winevt\Logs\ |
| BgCertUtil32.exe | BullGuard Certificate Utility | BullGuard (20.0.0.0) | 165736 | C:\Windows\System32\winevt\Logs\ |
| BullGuardFileScanner.exe | On-Access Scan Service | BullGuard (19.0.0.0) | 828776 | C:\Windows\System32\winevt\Logs\ |
| BackupRun.exe | BullGuard Backup | BullGuard (19.0.0.0) | 352616 | C:\Windows\System32\winevt\Logs\ |
| BgDirSize.exe | BgDirSize | BullGuard (19.0.0.0) | 369000 | C:\Windows\System32\winevt\Logs\ |
Другие файлы, связанные с Defrag.exe
| Имя файла | Описание | Программное обеспечение (версия) | Размер файла (в байтах) | Расположение файла |
|---|---|---|---|---|
| CBS.log | Log | BullGuard Internet Security 2013 | 977745 | C:\Windows\Logs\CBS\ |
| setupact.log | Log | BullGuard Internet Security 2013 | 28282 | C:\Windows\System32\Sysprep\Panther\ |
| SA.DAT | Game Data | BullGuard Internet Security 2013 | 6 | C:\WINDOWS\Tasks\ |
| volsnap.PNF | Precompiled INF | BullGuard Internet Security 2013 | 5164 | C:\Windows\inf\ |
| EtwRTDiagLog.etl | Microsoft Event Trace Log | BullGuard Internet Security 2013 | 1696 | C:\Windows\System32\LogFiles\WMI\RtBackup\ |
Performing disk defragmentation is always helpful, especially in Windows 10 Technical Preview. Because you get new updates almost every day, you should use disk defragmentation to keep your disk optimized.
However, several user reports claim that disk defrag is not working for them on their Windows 10/11 PCs.
If the disk defrag does not work, it becomes hard for you to optimize your disk, and it also fills the gap in the disk by bringing all parts of a file together.
Thankfully, this guide has listed many solutions to help you fix the disk defrag not working issue on Windows 10 and 11. So let us check it out.
Why is my Disk Defragmenter not working?
Well, the first thing you should know about is the common reasons that would trigger the issue. In our case, let us check out the most common reasons responsible for the Disk Defragmenter not working in Windows 10/11.
- The disk defrag service is disabled
- Some third-party applications are conflicting with the service
- The antivirus tool is blocking the service
- Corrupt system files can also cause the service to malfunction
- Your hard drive might have some errors
Does defragging speed up the computer?
If your PC loads from a hard drive, disk defragging will help speed up the PC. Also, you will witness a noticeable difference in speed if you haven’t performed the disk defragment process in quite a while.
However, it shouldn’t be done daily since that won’t help speed up your PC. When you defrag your hard disk, it arranges all the parts of a file in one place, thus speeding up your PC.
How do I fix a Disk Defragmenter that won’t run on Windows 10?
Many users frequently defragment their drive to achieve maximum performance; however, issues with Disk Defragmenter can sometimes occur.
Speaking of issues, these are some of the most common problems with Disk Defragmenter:
- Disk Defragmenter service missing Windows 10 – Many users reported that the Disk Defragmenter service is missing on Windows 10. If that’s the case, try running Disk Defragmenter from Safe Mode or a different user account.
- Windows 10 defrag optimization not available – This is another problem that can appear on Windows 10. However, you should be able to fix it using one solution.
- Windows Disk Defragmenter is not working – Many users reported that Disk Defragmenter isn’t working. This can be due to corrupted files, but you can fix that with SFC or DISM scan.
- Defrag won’t run in Safe Mode – Several users reported that they couldn’t defrag their drive in Safe Mode. This usually happens if your installation is corrupted. If SFC or DISM scan can fix this problem, you might have to reinstall Windows 10.
- Defrag won’t launch, work, open – There are various problems with defrag tool that can occur on your PC, and if you’re having any of these problems, you should be able to fix them using one of our solutions.
This issue might occur because of the corrupt installation of a third-party defragmenter or because the defragmenter isn’t compatible with Windows 10. To solve this problem, try the following solutions from this article.
1. Disable your antivirus
If your Disk Defragmenter won’t run on your PC, the problem might be your antivirus. Some antivirus tools can interfere with Windows components and prevent applications such as Disk Defragmenter from running.
To fix this problem, it’s advised to check your antivirus configuration and try disabling features that might interfere with Disk Defragmenter.
If that doesn’t work, you might want to try disabling your antivirus software entirely. Finally, in the last case scenario, you can try removing your antivirus and check if that resolves the problem.
If removing the antivirus fixes the issue, you might consider switching to a different antivirus solution.
There are many options available, and some of the best antivirus software offer full-featured free trials, so you can try out a few if you are unsure what to pick.
2. Use third-party tools
If you still can’t run Disk Defragmenter on Windows 10/11, you might want to consider using a third-party tool. Disk Defragmenter is a solid application but offers limited features compared to other tools.
If you need access to advanced features, you might want to consider using a third-party solution.
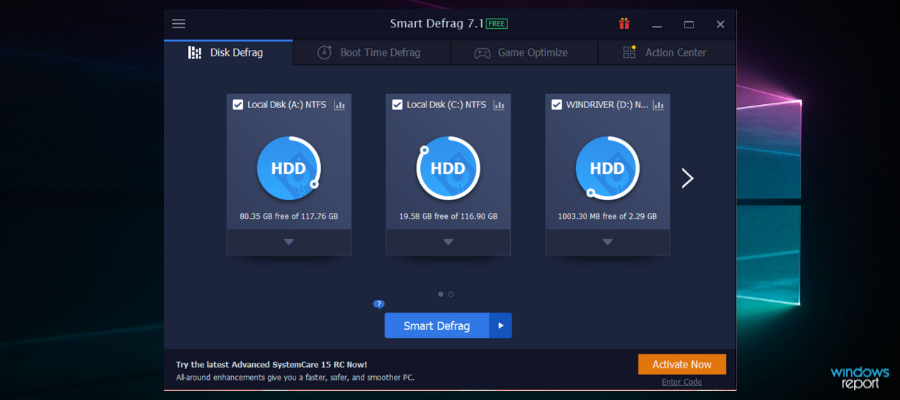
One great example of such a tool is IObit Smart Defrag 6, a dedicated tool made to rearrange the memory on your PC to improve its speed and responsiveness.
It boasts a simplistic UI, familiar with Windows 10/11’s native defrag tool, but with plenty of other features.
If none of these solutions work, you could try to change your defrag tool. Maybe our list of top five defrag tools for Windows 10/11 can help you.
Over time, your PC becomes clogged with unnecessary files and folders. Get rid of them with IObit Smart Defrag 6 to speed up your PC, reduce boot times and boost gaming performance.
IObit Smart Defrag
A doctor for your PC to make it run smoother than ever.
3. Perform SFC Scan
- Open the Start menu.
- Type Command Prompt and open it as an administrator.

- Type the below and press Enter to run it.
sfc /scannow

- SFC scan will now start. The scan can take up to 15 minutes, sometimes more, so don’t interrupt it.
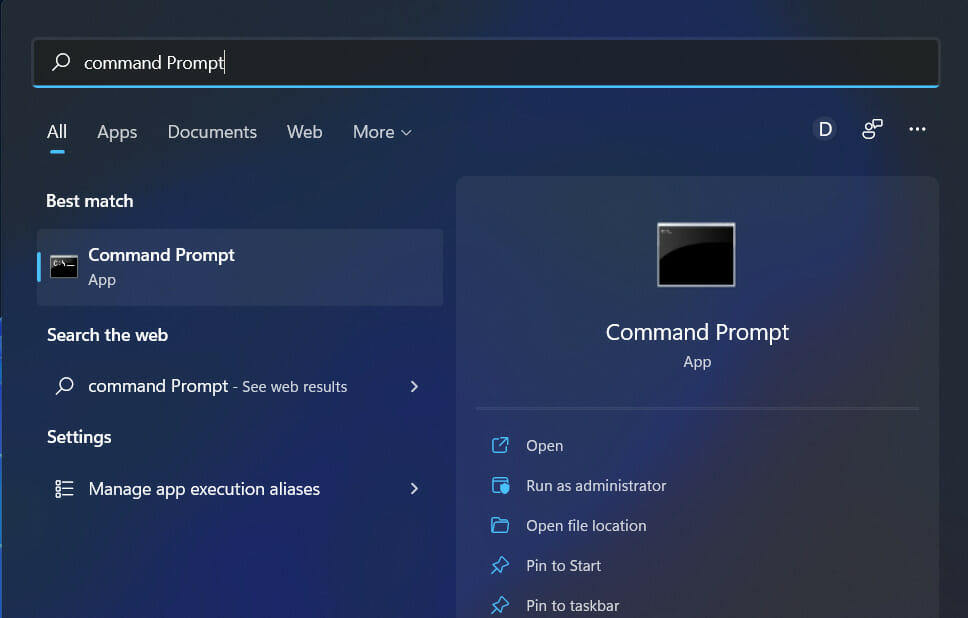
Once the SFC scan is finished, check if the issue persists. If you could not run the SFC scan or if the SFC scan didn’t fix the problem, you need to run the DISM scan.
To do that, follow these steps:
- Start Command Prompt as administrator.
- Type the below, and then press Enter to run it:
DISM /Online /Cleanup-Image /RestoreHealth

- DISM scan will now start. Remember that this scan can take up to 20 minutes or more, so don’t cancel it.

Once the DISM scan is finished, check if the problem persists.
If the issue is still present or you could not run an SFC scan before, try re-running it. Once the SFC scan is finished, the problem should be resolved.
Several users reported that the DISM scan fixed the problem on their PC, so feel free to try it out.
4. Check if the Disk Defragmenter service is running properly
- Open the Start menu.
- Type services.msc and hit Enter.
- Make sure that the Disk Defragmenter service is set to Manual.
- Also, make sure that the following services are set to Automatic:
- Remote Procedure Call (RPC)
- DCOM Server Process Launcher
- RPC Endpoint Mapper
Maybe your Disk Defragmenter service is not running properly. This service is required for performing disk defragmentation; if it’s disabled, you won’t be able to run a defrag tool.
After making these changes, check if the problem is resolved.
5. Try using Safe Mode
- Open the Start Menu.
- Click the Power button, hold the Shift key and choose Restart from the menu.
- When your computer restarts, choose Troubleshoot.

- Then click on Advanced options.

- Select Startup Settings and click Restart.

- Press F5 to select Safe Mode with Networking when your computer restarts again.


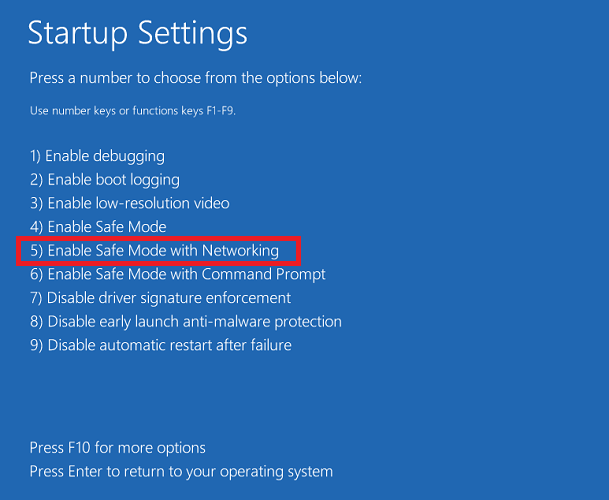
If Disk Defragmenter doesn’t run on Windows 10, you might be able to fix the issue by running it from Safe Mode.
If you’re unfamiliar, Safe Mode is a segment of Windows that runs with default settings and drivers, so it’s perfect for troubleshooting.
Sometimes specific applications, such as Disk Defragmenter, won’t work because your settings or third-party applications interfere with it. You need to start Windows 10 in Safe Mode to circumvent the problem.
Once you enter the Safe Mode, start Disk Defragmenter again; it should work without any problems.
Keep in mind that this is just a workaround, and if Disk Defragmenter doesn’t work on Windows 10, you’ll always have to start it using this method.
6. Make sure that other applications aren’t running
- Press Ctrl + Shift + Esc to start Task Manager.
- Go to the Processes tab, and locate the application you want to close.
- Right-click it and choose End task from the menu.
- Repeat the previous step for all running applications.
If you cannot run Disk Defragmenter, the problem might be other applications running in the background. In addition, many applications can interfere with Disk Defragmenter causing specific issues to appear.
To prevent any potential problems, it’s advised that you disable all third-party applications that can interfere with Disk Defragmenter.
You can manually close these applications, but if you want to do it faster, you can try using Task Manager.
After that, try running Disk Defragmenter and check if it works properly.
7. Create a new user profile
- Press Win + I to open the Settings app.
- When Settings opens, navigate to the Accounts section.

- In the left pane, select Family & other people. In the right pane, choose to Add someone else to this PC.

- Select I don’t have this person’s sign-in information.

- Choose Add a user without a Microsoft account.

- Enter the desired user name and click Next.


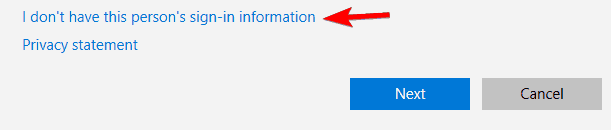


After creating a new user account, switch to it and check if Disk Defragmenter works. If it works on a new profile, the issue is caused by your old profile.
8. Use CHKDSK utility
- Open command prompt as an administrator.
- Type the below command and press Enter.
chkdsk /f X:- Remember that you need to replace X with the letter representing your drive.
- If you choose to scan the C drive, press Y to schedule a restart and restart your PC.

- The CHKDSK scan should now start.
- Keep in mind that a CHKDSK scan can take 20 minutes or more, depending on your partition size.

If you can’t run Disk Defragmenter, the issue might be caused by corrupted files on your hard drive. To fix that problem, first, you need to try to repair those files.
This is relatively simple, and you can do it using the CHKDSK command. After the process is finished scanning your drive, try to defragment that drive again.
What can I do if defrag is not working on Windows 11?
There could be several reasons why the disk defrags are not working for your Windows 11 PC—however, some of the common reasons behind this issue, which are troubling users, are mentioned below.
- Disable or close all background apps: Some third-party or background app/process is interfering with the disk defragmenter service on your PC.
- Fix corrupt system files: There are some underlying corrupt system files on your Windows PC.
- Disable antivirus: Your antivirus or firewall is blocking the disk defrag service.
- Sort out hard drive issues: The presence of hard drive issues can also trigger the problem.
- Enable the service: You haven’t enabled the disk defrag service in the first place.
- Disable all third-party apps: A third-party program has disabled the service.
Does Windows 10 need defragging?
Every iteration of the OS, including Windows 10, needs defragging, but that isn’t what’s of concern here. The primary aspect you should identify before considering defragging is whether you are using an HDD (Hard Disk Drive) or SSD (Solid State Drive).
The HDDs require regular defragging, some recommend a minimum of once a month or if the fragmentation is higher than 10%. SSDs, on the other hand, do not require defragging. Moreover, defragging an SSD can cause unnecessary wear and tear.
How do I force defrag?
- Open the Start menu.
- Search for Command Prompt and open it as an administrator.
- Execute the below command and press Enter.
defrag C:
- This will force your system to start the disk defrag process.

As you can see, there are plenty of options for solving this issue once and for all, so try them out individually.
If you have any suggestions, contact us by using the comment section below this guide.
There are many reasons why hard-drives might start to respond less efficiently and one of the most common reasons for this is the presence of fragments on your hard disk. In simple terms, when over time, data gets scattered across your hard drive, fragments take place. To resolve the issue, Windows 10 offers ways to defragment your hard disk. But, imagine if Windows 10 defrag is not working. How would you then resolve this issue?
How To Defragment Your Windows 10 PC
If you are new to the concept of defragmenting Windows 10. Here is how you defragment your Windows 10 PC –
- In the Windows search bar, type Defragment and optimize hard drives
- Click on open from the right-hand pane
- Click on the drive where you see some percentage of fragmentation in the Current Status section

- Click Optimize

However, what if you find that defrag is not working on your Windows 10 PC? Let’s first see what can be some of the common reasons because of which this problem may occur.
Reasons Why Defrag is Not Working on Your Windows 10 PC?
- Defrag service is not properly set up
- Your antivirus is interfering with “Defragment and optimize hard drives” functionality
- Applications running in the background and not letting the Disk Defragmenter open
- Presence of corrupt files
Ways To Make Disk Defrag Work on Windows 10 Again
1. Check if Disk Defragmenter Service is Running The Way It Should
If the disk defragmenter service is not set properly, it will not run properly or not run at all. Here is how you can check or set up defrag service in Windows using the services –
- Press Windows + R and open the Run dialog box
- Type msc and press Enter
- Scroll down and locate Optimize Drives

- Check in the Startup Type if it is set to manual (check the Startup Type tab)
- Also, the below-mentioned services should be set to automatic (check the Startup Type tab)

- Remote Procedure Call (RPC)
- DCOM Server Process Launcher
- RPC Endpoint Mapper
This procedure should help you get back your Disk Defragmenter back on track.
2. Perform System File Checker
System File Checker or SFC is a Windows 10 command which scans and identifies any impending errors and then delivers appropriate solutions. In case, the defrag facility is not working on your Windows 10 PC due to an error, the SFC command will scan for the error and help resolve it.
- In the Windows search bar, type cmd

- Choose Run as administrator from the right-hand side
- When the command prompt window opens, type sfc /scannow

- Wait for the process to complete


You can now try and relaunch the Disk Defragmenter and check if it has started to function again.
3. Check if Your Antivirus is Causing Hindrance
If the Disk Defragmenter refuses to run on your PC, chances are that your antivirus software is to be blamed. Some antivirus programs are known to interfere with Windows’ components. When that happens, applications cease to function properly. One such application is Disk Defragmenter. This situation can be evident if you have recently installed an antivirus program and are not able to run defrag on Windows 10. You can try disabling the antivirus in the first place. If the defragmenter works soon after you have disabled your antivirus, you can try switching over to a different option.
4. Close All Background Applications
Apart from your Antivirus, there might be some other application running in the background because of which defrag might not work on your Windows 10 PC. You can try and close all these background applications. For this –
- Press Shift + Ctrl + Esc
- This will open the Task Manager

- Select applications one by one and then click on the End Task button present at the bottom right of the Task Manager’s window

5. Run Defrag In Safe Mode
If there are any nonessential components that are causing interference with the defrag functionality, you can try restarting your computer in safe mode. Running disk defragmenter in safe mode will most preferably help, you run it without any hassles. Here’s how you can run Windows 10 in Safe Mode.
6. Use An Alternative Tool
If you are unable to operate the disk defragmenter on your Windows 10 computer, you can instead try an alternative third-party software. One such software is Disk Speedup. It is a powerful maintenance tool for Windows 10 that can help you remove fragments from your hard drive, clear every ounce of junk, and even repair any file system issues that are hampering the performance of your computer. To get a comprehensive insight on its features and why it is the best disk defragmenter tool for Windows PC, read this post.
How Disk Speedup Works?
Click Here to Download Disk Speedup
- Download and install Disk Speedup

- Click on the Scan option from the left-hand side

- Select the drive you want to scan and then click on Start Scan Now
- Once the scanning is complete, you can initiate the defragmentation process by checking the Direct Defrag


Wrapping Up
Defragmentation is the way to reorganize those scattered pieces of data and improve your computer’s efficiency. In that regard, we hope that we were able to resolve the issue and is defrag working now on your Windows 10 PC? If yes, do let us know in the comments section below. For more such content keep reading Tweak Library.