
Applies ToWindows 11 Windows 10
There are two different modes in Windows for setting a default printer:
-
Manually set the default printer.
-
Set the last printer used as the default printer.
Select the desired mode from the following list:
To manually choose a default printer:
-
In the Bluetooth & devices > Printers & scanners window, under Printer preferences, make sure Let Windows manage my default printer is switched Off.
-
In the list of installed printers at the top of the Bluetooth & devices > Printers & scanners window, select the desired printer to be set as the default.
-
In the Bluetooth & devices > Printers & scanners > <Printer> window, next to the printer’s name, select the Set as default button. The Printer status: under the printer’s name changes to Default.
Note: If the Set as default button isn’t visible next to the printer’s name, make sure the setting Let Windows manage my default printer from one of the previous steps is switched Off.
To set the last printer used as the default printer:
-
In the Bluetooth & devices > Printers & scanners window, under Printer preferences, make sure Let Windows manage my default printer is switched On.
Note: For mobile Windows devices, when the option Let Windows manage my default printer is switched On and the location of the Windows device changes, the default printer might change to the last printer used at the new location.
Related articles
Troubleshooting offline printer problems in Windows.
Fix printer connection and printing problems in Windows.
Need more help?
Want more options?
Explore subscription benefits, browse training courses, learn how to secure your device, and more.
Microsoft изменила порядок назначения принтера по умолчанию в Windows 10 и 11. Теперь принтером по умолчанию всегда назначается принтер, на котором пользователь успешно печатал в последний раз в текущем местоположении. Таким образом, принтер по-умолчанию в этих версиях Windows может постоянно меняться, если вы иногда печатаете на разных принтерах в разных локациях. В этой статье мы рассмотрим, как назначить принтер по-умолчанию из графического интерфейса Windows, командной строки или через групповые политики.
Содержание:
- Выбрать принтер по-умолчанию из панели управления Windows
- Назначить принтер по умолчанию из командной строки PowerShell
- Как задать принтер по-умолчанию через GPO?
Выбрать принтер по-умолчанию из панели управления Windows
Изменить принтер по-умолчанию в Windows можно через панель Параметры.
- Перейдите в Settings -> Printers and Scanners
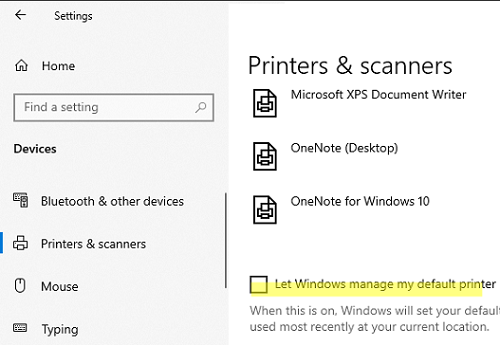
- Чтобы запретить Windows автоматически менять принтер по умолчанию, отключите опцию Let Windows manage my default printer

- Затем выберите в списке принтер, который хотите назначить по умолчанию -> Manage
- Выберите опцию Set as default
Таже можно выбрать принтер по умолчанию из классической панели управления Windows. Перейдите в Control Panel -> Device and Printer (или выполните команду
shell:PrintersFolder
). Щелкните по принтеру и выберите Set as default printer.
Назначить принтер по умолчанию из командной строки PowerShell
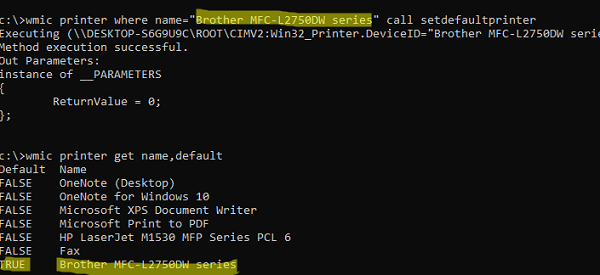
Вы можете назначить принтер по умолчанию из командной строки с помощью утилиты wmic. Вывести список принтеров:
wmic printer get name,default
У принтера по умолчанию включен атрибут Default=True.
Изменить принтер по-умолчанию:
wmic printer where name="Имяпринтера" call setdefaultprinter
Также можно использовать PowerShell для управления принтерами.
Вывести список принтеров:
Get-CimInstance -ClassName CIM_Printer |select name,default
Изменить принтер по-умолчанию:
$Printer = Get-CimInstance -Class Win32_Printer -Filter "Name='HP LaserJet M1530 MFP Series PCL 6'"
Invoke-CimMethod -InputObject $Printer -MethodName SetDefaultPrinter
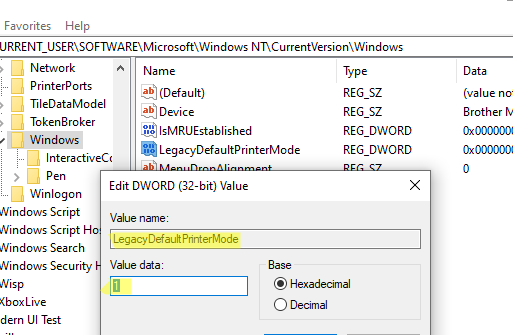
Чтобы запретить Windows автоматически переназначать принтер по умолчанию, нужно затем изменить значение параметра реестра LegacyDefaultPrinterMode:
REG ADD "HKCU\SOFTWARE\Microsoft\Windows NT\CurrentVersion\Windows" -v LegacyDefaultPrinterMode /t REG_DWORD /d 1 /f
Как задать принтер по-умолчанию через GPO?
Если вам нужно централизованно задать принтер по умолчанию для нескольких пользователей в домене Active Directory, можно использовать GPO.
Если вы создаете подключение к принтеру на компьютерах пользователей через Group Policy Preferences (User Configuration -> Preferences -> Control Panel Setting -> Printer), включите в настройках принтера в GPO опцию Set this printer as the default printer.
Если принтер у пользователей уже создан, лучше задать принтер по умолчанию через реестр. Настройки принтера по-умолчанию у пользователя хранятся в параметре Device в ветке реестра HKEY_CURRENT_USER\Software\Microsoft\Windows NT\CurrentVersion\Windows в виде примерно такой строки:
Brother MFC-L2750DW series,winspool,FILE:
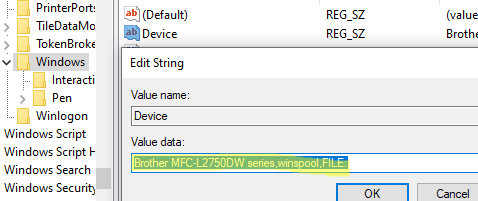
Нужно через групповые политики создать этот параметр реестра на компьютерах целевых пользователей. Это изменит принтер по-умолчанию в профиле пользователя. Создайте доменную GPO, перейдите в раздел User Configuration -> Preferences -> Windows Settings -> Registry и создайте параметр с настройками:
- Hive:
HKCU - Key Path:
SOFTWARE\Microsoft\Windows NT\CurrentVersion\Windows - Value Name:
Device - Value Type:
REG_SZ - Value Data:
Brother MFC-L2750DW series,winspool,FILE:
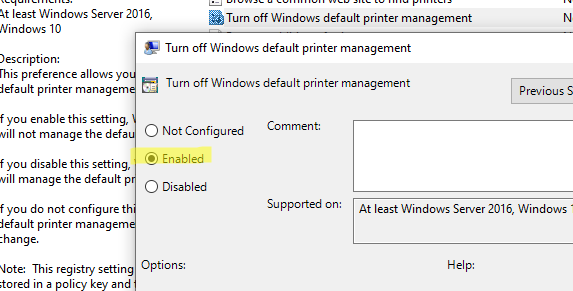
После этого запретите Windows переназначать принтеры автоматически с помощью GPO опции Turn off Windows default printer management (User Configuration -> Administrative Templates -> Control Panel -> Printers).
При печати документов, если не выбирать вручную принтер, печать будет выполнена на принтере, установленном в Windows по умолчанию и это не всегда то устройство, которое требуется, а иногда и вовсе не принтер, а виртуальное устройство (например, для печати в PDF).
В этой инструкции способы выбрать принтер по умолчанию в Windows 11 и Windows 10 в Параметрах, Панели управления, окне печати и не только.
Как установить принтер по умолчанию в Параметрах Windows 11
Для изменения принтера по умолчанию в Windows 11 вы можете использовать интерфейс «Параметры». Необходимые шаги:
- Откройте «Параметры», сделать это можно с помощью сочетания клавиш Win+I, перейдите в раздел «Bluetooth и устройства», а затем откройте «Принтеры и сканеры».

- В следующем окне в разделе «Параметры принтера» отключите пункт «Разрешить Windows управлять принтером, используемым по умолчанию». Если эта опция включена, то по умолчанию будет выбран последний использованный принтер.

- В этом же окне в списке вверху нажмите по принтеру, который вы хотите использовать в качестве принтера по умолчанию.
- Нажмите кнопку «Использовать по умолчанию».


Если вы не видите кнопку «Использовать по умолчанию» на 4-м шаге, это означает, что не был выполнен 2-й шаг и управление принтером по умолчанию выполняет Windows.
После этого выбранный вами принтер будет автоматически выбран при запуске печати документов.
В Параметрах Windows 10
Процесс настройки принтера по умолчанию в Параметрах Windows 10 почти тот же, что и в более новой системе:
- Откройте «Параметры», а затем — пункт «Устройства».
- Откройте раздел «Принтеры и сканеры», а затем снимите отметку «Разрешить Windows управлять принтером, используемым по умолчанию».

- Нажмите по имени принтера, который вы хотите выбрать и нажмите кнопку «Управление».

- Нажмите «Использовать по умолчанию».


Готово, принтер по умолчанию в Windows 10 установлен.
Как изменить принтер по умолчанию в Панели управления
Как и в предыдущих версиях системы, изменение принтера по умолчанию доступно в панели управления Windows 11 и Windows 10.
- Откройте панель управления. Как открыть панель управления Windows 11, Как открыть панель управления Windows 10.
- Откройте пункт «Устройства и принтеры» или «Просмотр устройств и принтеров», в зависимости от выбранного вида панели управления.

- В списке принтеров нажмите правой кнопкой мыши по принтеру, который вы хотите использовать по умолчанию и выберите соответствующий пункт в контекстном меню.


При применении настроек вы увидите предупреждение: «Установить этот принтер в качестве принтера по умолчанию означает, что Windows прекратит управление вашим принтером по умолчанию» — нажмите Ок, это повлияет лишь на то, что Windows не будет устанавливать последний использованный принтер в качестве принтера по умолчанию, а будет полагаться на сделанные вами настройки.
Выбор принтера по умолчанию в диалоговом окне «Печать»
Есть возможность изменить принтер по умолчанию прямо в системном окне печати:
- В окне печати в списке «Выберите принтер» нажмите по нужному принтеру правой кнопкой мыши.
- Выберите пункт «Использовать по умолчанию».

- Подтвердите действие, если появится предупреждение о том, что Windows прекратит управление принтером по умолчанию.

Установка принтера по умолчанию в командной строке или терминале Windows
Не знаю, пригодится ли эта возможность кому-либо, но вы можете запустить командную строку от имени администратора (Терминал Windows также подойдет) и использовать следующую команду:
rundll32 printui.dll,PrintUIEntry /y /n "имя принтера"
После выполнения команды принтер с указанным именем будет выбран в качестве используемого по умолчанию.
Anything set as “default” is automatically selected in a Windows operating system, may it be an app or a printer. Unless you specify a printer manually, all your print jobs will be sent to the default printer.
If you are using either Windows 11 or Windows 10, there’s a high chance that the OS is managing your default printer for you. This is the default Windows setting unless you have changed it.
We have already discussed how to add a printer to a Windows PC. In this article, we are going to show you how to check and set your default printer so that you don’t have to select it each time sending a print command.
Table of Contents
Check Default Printer
Before we begin to set a default printer, let us show you 3 ways to check which printer is currently set as your default printer.
Note: The screenshots and the steps described in this post are for Windows 11, but are also applicable to Windows 10.
From Settings App
-
Navigate to:
Settings app >> Bluetooth & devices >> Printers and scanners
-
Here, you will find “Default” written under the printer that is set as the default printer.

Check default printer from Settings app

From Devices and Printers
-
Open the Devices and Printers applet by pasting “shell:::{A8A91A66-3A7D-4424-8D24-04E180695C7A}” in the Run Command box, and hit Enter.
Open Devices and Printers applet -
Under the “Printers” section, the default printer will be marked with a green check mark.

Check default printer from Devices and Printers applet

Using Command Prompt
You can also check the default printer using the Command Prompt.
-
Launch the Command Prompt.
-
Run the following cmdlet:
wmic printer get name,default -
The default printer will have “TRUE” written under the Default column.

Check default printer from Command Prompt

These are all the methods to check which printer is set as your default printer.
If you want to change your default printer, adopt any one of the following methods.
How to Set Default Printer
From Settings App
As we mentioned earlier, your Windows OS is managing your default printer for you. Therefore, this setting needs to be disabled before setting your default printer manually.
The following steps include changing this setting and then setting your own default printer.
Note: A printer does not need to be online (connected and functional) when setting it as default.
-
Navigate to the following:
Settings app >> Bluetooth & devices >> Printers & scanners
-
Scroll down and disable “Let Windows manage my default printer.”
Disable Windows from managing your default printer -
Now scroll up and click on the printer that you want to set as your default printer.
Select the printer to set as default -
Click “Set as default.”
Set printer as default from Settings app


From Command Prompt
-
Launch an elevated Command Prompt.
-
Use the following cmdlet to set the default printer while replacing [PrinterName] with the name of the printer that you want to set as default:
rundll32 PRINTUI.dll,PrintUIEntry /y /n "[PrinterName]"

Set printer as default using Command Prompt

Your selected printer will now be the default printer. You can confirm this by checking it using any one of the 3 methods given above.
From Devices and Printers
-
Open the Devices and Printers applet by pasting “shell:::{A8A91A66-3A7D-4424-8D24-04E180695C7A}” in the Run Command box, and hit Enter.
Open Devices and Printers applet -
Under the “Printers” section, right-click on the printer you want to set as default, then click “Set as default printer.”
Set printer as default from Devices and Printers

Closing Words
When you have multiple printers added to your PC, you must have a default printer selected. If you do not select one yourself, the Windows OS will do it for you.
It is advised that you set the default printer which you regularly use, or is close to your workstation for easy access.
Of course, even after selecting a default printer, you can always change your printer temporarily while sending a print command from the print menu (CTRL + P).
Download Windows Speedup Tool to fix errors and make PC run faster
When using a laptop for both Office and home, we often have to switch printers. Windows 11/10 doesn’t offer an easy way to switch printers, as it will make sure there is a default printer. It has happened to me so many times that I had put something to print only to realize it went to my Office printer instead of one at home. So how do you set a default printer in Windows 11/10? That is what we will look into today.

The following steps will help Windows 11 users set the default printer:
- Press Win + I keys to launch the Settings app.
- In the Settings app, select Bluetooth & Devices from the left side.
- Now, click on the Printers & Scanners tab on the right side.
- On the Printers & Scanners page, you will see a list of all the printers added to your computer. Select the printer that you want to set as default and click on the Set as default button.
Windows 11 also has a feature to select the default printer automatically based on the most recently used printer at a specific location. Turning this feature on will save your time in selecting the default printer at different locations manually.

To enable this option on Windows 11, go to “Settings > Bluetooth & Devices > Printers & Scanners.” Scroll down on the Printers & Scanners page and turn on the button that says Let Windows manage my default printer. You will find this option in the Printer preferences section.
Do note that, after turning on this feature, you will not be able to set a printer as default manually. To do so, you have to turn off this option.
How to set the Default Printer in Windows 10
To set the default printer on your Windows 10 PC, do the following:
- Open Windows 10 Device Settings (Win + I) > Devices
- Switch to Printers and scanners
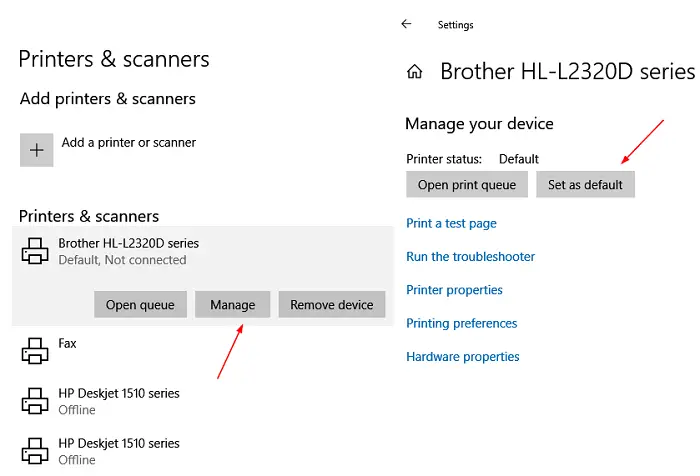
- Click on the printer you want to set as default, and then click on Manage
- Then click on Set as default button to set the printer as default.
Once you do that, the printer will appear as the selected printer when you go ahead to print anything. Also, the printer will have status as Default in the printer list.
Automatically switch default printer based on location
While it is easy to change the default printer, it doesn’t help. If the default printer can change automatically based on the location of the computer. So if I go home, the default printer is my home printer, and the office printer when I go to work.
Read: Set as default printer Context Menu item is missing.
Let Windows manage my default printer
Under Printers and scanners, check the box which says “Let Windows manage my default printer.” When this is turned on, Windows will set your default printer to be the one you used most recently at your current location.

It has one drawback though in certain use cases. If you keep switching printers at the office, then the default printer will be the recently used printer at that location.
I hope the guide was useful for you and that you were able to set the default printer for Windows 11/10.
There is no Network-based option to change the default printer like in Windows 7, so you must let Windows manage the default printer.
How do I stop Windows 11 from changing my default printer?
In Windows 11/10, there is a setting named Let Windows manage my default printer. When this setting is enabled, Windows automatically selects your default printer according to the most recently used printer at a particular location. This feature is useful if you use the same laptop with different printers at different places like in your home, office, etc. You have to disable this setting to stop Windows 11/10 from changing your default printer. We have explained the steps to do so above in this article.
If you want, you can permanently disable this feature by using Group Policy Editor and Registry Editor.
Should I let Windows manage my default printer?
The answer to this question depends on you. If you use the same laptop in your office and your home and you have to change the default printer daily, you can leave this task for Windows.
PS: See this post if the Default Printer keeps changing in Windows.
Anand Khanse is the Admin of TheWindowsClub.com, a 10-year Microsoft MVP (2006-16) & a Windows Insider MVP (2016-2022). Please read the entire post & the comments first, create a System Restore Point before making any changes to your system & be careful about any 3rd-party offers while installing freeware.