
Уровень сложностиСредний
Время на прочтение12 мин
Количество просмотров10K
Помимо дизассемблирования, существует и другой способ исследования программ — отладка. Изначально под отладкой понималось пошаговое исполнение кода, также называемое трассировкой. Сегодня же программы распухли настолько, что трассировать их бессмысленно — мы моментально утонем в омуте вложенных процедур, так и не поняв, что они, собственно, делают. Отладчик не лучшее средство изучения алгоритма программы — с этим эффективнее справляется интерактивный дизассемблер (например, IDA).
Пятнадцать лет назад эпический труд Криса Касперски «Фундаментальные основы хакерства» был настольной книгой каждого начинающего исследователя в области компьютерной безопасности. Однако время идет, и знания, опубликованные Крисом, теряют актуальность. Редакторы «Хакера» обновляют этот объемный труд, чтобы перенести его из времен Windows 2000 и Visual Studio 6.0 во времена Windows 10 и Visual Studio 2019.
Результатом стал цикл статей «Фундаментальные основы хакерства». Перед тобой уже во второй раз обновленная вторая статья из этого цикла (на «Хакере» также доступна первая в новой редакции).
Весь цикл с учетом всех обновлений вышел в виде книги «Фундаментальные основы хакерства. Анализ программ в среде Win64». Купить ее можно на сайте «Солон-пресс».

Способности отладчиков
Первым делом надо разобраться в перечне основных функциональных возможностей типовых отладчиков (без этого невозможно их осмысленное применение):
-
отслеживание обращений на запись, чтение и исполнение к заданной ячейке (региону) памяти, далее по тексту именуемое бряком (брейком);
-
отслеживание обращений на запись и чтение к портам ввода-вывода (уже неактуально для современных операционных систем, запрещающих пользовательским приложениям проделывать такие трюки, — это теперь прерогатива драйверов, а на уровне драйверов реализованы очень немногие защиты);
-
отслеживание загрузки DLL и вызова из них таких-то функций, включая системные компоненты (как мы увидим далее, это основное оружие современного взломщика);
-
отслеживание вызова программных и аппаратных прерываний (большей частью уже неактуально — не так много защит балуется с прерываниями);
-
отслеживание сообщений, посылаемых приложением окну;
-
и, разумеется, контекстный поиск в памяти.
Как именно это делает отладчик, пока знать необязательно, достаточно знать, что он это умеет, и все. Куда актуальнее вопрос, какой отладчик умеет это делать.
Герои прошлого
В прошлом в качестве отладчика хакеры использовали широко известный SoftICE. Это был действительно мощный инструмент, и даже по прошествии многих лет лучше него ничего не было изобретено. Неоспоримым его преимуществом была возможность отладки ядра Windows с помощью одного компьютера. Между тем, не без давления Microsoft, в 2006 году его разработка была прекращена. А поскольку SoftICE очень сильно зависел от операционной системы Windows, в более поздних ее версиях он просто не работает. Последней версией Windows, в которой можно пользоваться SoftICE, была Windows XP SP 2. В SP 3 он уже не функционировал, а в Vista и Windows 7 и подавно.

Хакеры, конечно, приуныли, но не стали посыпать голову пеплом, а начали изобретать альтернативные отладчики. Последовала эпоха расцвета новых отладчиков. Но какая картина на этом поле сейчас? Нет ни одного нового хорошего отладчика! Передовым среди всех был коммерческий Syser китайских разработчиков. Ему пророчили светлое будущее, возможность заменить SoftICE, но где он сейчас? Может быть, пара копий сохранилась где-то на файловых свалках, но он давно не развивается.

Сейчас по большому счету у хакера есть выбор только из двух по-настоящему годных отладчиков: WinDbg и x64dbg. Последний годится лишь для исследования приложений пользовательского режима, тогда как с помощью WinDbg можно заниматься и ядерной отладкой Windows. Но в этом случае придется использовать два компьютера, объединенных проводом или по локальной сети.
Современный инструмент кодокопателя
Когда-то хакеры пренебрегали WinDbg, но со временем он вырос и стал действительно мощным и полезным инструментом исследования кода. Не стоит забывать, что именно он используется командой разработки Windows. Для него можно изготавливать расширения путем подключаемых DLL. Начиная с Windows XP, движок отладки включен непосредственно в операционную систему. Он состоит из двух DLL: dbgeng.dll и dbghelp.dll. Кроме непосредственно средств отладки, в число которых входит сам WinDbg, его движок используется в том числе «Доктором Ватсоном» (drwtsn32.exe).
Средство отладки для Windows состоит из четырех приложений, использующих dbgeng.dll:
-
cdb и ntsd — отладчики пользовательского режима с консольным интерфейсом. Они различаются только одним: при запуске из существующего консольного окна ntsd открывает новое консольное окно, a cdb этого не делает;
-
kd — отладчик режима ядра с консольным интерфейсом;
-
WinDbg может использоваться как отладчик пользовательского режима либо режима ядра, но не одновременно. У WinDbg есть графический интерфейс.
Следовательно, WinDbg представляет собой только оболочку для отладки с помощью движка.
Вспомогательный файл dbghelp.dll используется внешними тулзами для исследования внутренностей Windows, например отладчиком OllyDbg, программой Process Explorer за авторством Марка Руссиновича и прочими.
У WinDbg есть две версии: классическая и UWP. Первая устанавливается вместе с набором тулз Debugging Tools for Windows. Этот набор содержит две версии WinDbg. Одна предназначена для отладки 32-разрядных приложений, другая — 64-разрядных. Версию UWP можно скачать из Windows Store, она имеет только 32-битную версию. Обе 32-разрядные версии абсолютно равноценны, не считая того, что в UWP продвинутый пользовательский интерфейс Windows 10. Кстати, весьма удобный при работе на большом экране.
Для наших экспериментов я буду применять UWP-версию. Разницы в их использовании практически нет, могут разве что немного различаться команды в пользовательском интерфейсе, именно надписи на элементах интерфейса, но не команды встроенного языка.
Способ 0. Бряк на оригинальный пароль
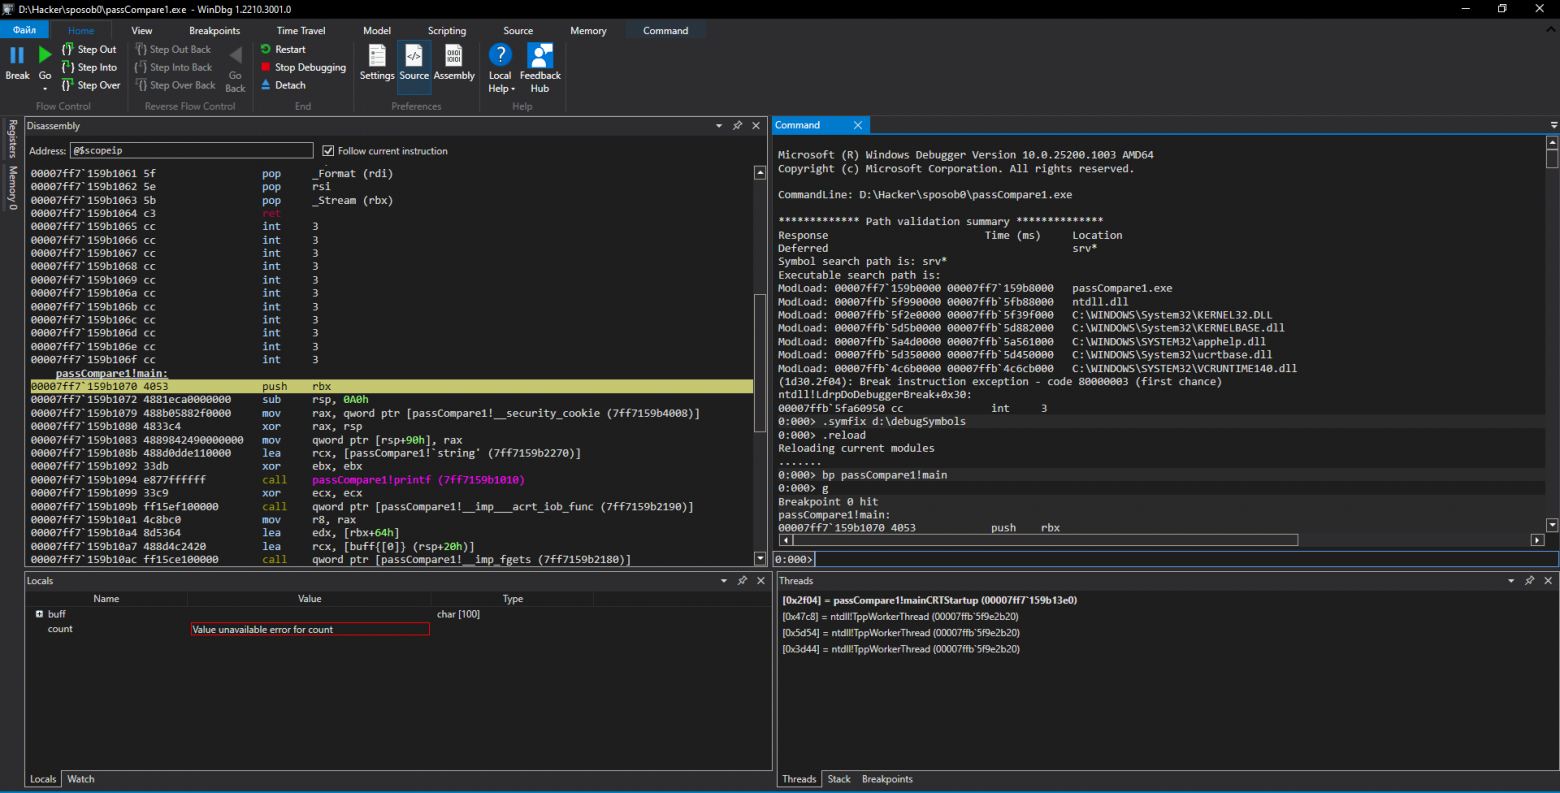
С помощью WinDbg загрузим ломаемый нами файл — passCompare1.exe — через пункт меню Launch Executable или Open Executable в классическом приложении. В дальнейшем я не буду приводить аналоги команд.
Файлы с примерами можно скачать с GitHub.
Сразу после открытия исполняемого файла WinDbg загрузит приложение, в окне Disassembly отладчика появятся дизассемблированные команды, а в окне Command отобразятся результаты их выполнения.
После создания окна приложения еще до вывода каких-либо данных выполнение тут же прерывается на инструкции int 3 — это программная точка останова. Часто новички считают, что выполнение программы начинается с функции main или WinMain. Этому их учат в школе, либо они сами черпают такие сведения из учебников по C/C++. Конечно, это неправда.
Прежде чем попасть в функцию main конкретного приложения, процессор зарывается в дебри системного кода загрузчика образов, выполняет горы инструкций инициализации приложения внутри Windows, подключения библиотек и прочего. Поэтому произошедший бряк не означает вход в main нашей программы. Если взглянуть в окошко дизассемблера, мы увидим, что прерывание произошло в системной функции LdrpDoDebuggerBreak модуля ntdll.
Первым делом загрузим отладочную информацию для компонентов операционной системы. Для этого в командную строку введем
.symfix d:\debugSymbolsЭта команда определяет папку, указанную в параметре, куда отладчик при необходимости загрузит отладочные символы для подсистем Windows. Затем надо отправить команду для загрузки или обновления файлов:
.reloadПосле этого WinDbg загрузит нужные данные с серверов Microsoft.
Кроме того, можно воспользоваться уже имеющейся отладочной информацией, для этого существует команда .sympath+ <путь к директории>. Если файл с отладочными символами находится в одной папке с исполняемым файлом, он подхватится автоматически. Еще можно использовать файлы исходного кода, но в таком случае проще воспользоваться отладчиком, входящим в среду разработки.
Давай попробуем натравить отладчик на дебажную версию passCompare1 и при достижении первой точки останова поставим бряк на функцию main:
bp passCompare1!mainТеперь продолжим выполнение командой g. Когда отладчик достигнет поставленной точки останова (начало функции main), в окне дизассемблера увидим, что листинг разделен на сегменты, в заголовке которых находятся имена функций, в частности main.
В релизной версии исполняемого файла этого не будет. Если же мы поставим точку останова по адресу начала модуля и прибавим адрес точки входа, то мы попадем не в начало функции main, а в системный загрузчик — функцию mainCRTStartup, подготовленную компилятором.
Кроме Microsoft, мало кто предоставляет отладочные символы, не будем привыкать к легкой жизни, тем более WinDbg специально предназначен для отладки программ без отладочной информации и исходного кода. Будем применять его по назначению! Между тем, если приглядеться к окошку дизассемблера повнимательнее, можно заметить, что в отличие от дизассемблера dumpbin, который мы использовали в прошлой статье, WinDbg распознает имена системных функций, чем существенно упрощает анализ.
Точки останова могут быть двух типов: программные и аппаратные. С первыми мы уже встречались. В программе их может быть любое количество. Для своей работы они модифицируют память исполняемого процесса, то есть в том месте, где должен стоять бряк, отладчик запоминает ассемблерную инструкцию и заменяет ее int 3. Из-за того что программная точка останова изменяет память, ее можно установить не везде. В этом заключается ее основной недостаток. Главной командой для установки программной точки останова является bp. Для получения списка установленных точек служит команда bl, а для удаления — команда bc, параметром которой является индекс точки останова. Звездочка в качестве параметра удаляет все бряки. Команды be и bd, соответственно, включают и выключают брейк-пойнты.
Количество аппаратных точек останова, независимо от разрядности процессора, всегда четыре. Хотя в процессоре присутствуют восемь регистров отладки (DR-0 — DR-7), только первые четыре могут быть использованы для хранения адресов точек останова. Аппаратные бряки могут ставиться в любое место памяти процесса. Таким образом, они лишены недостатка программных бряков. Остальные регистры предназначены для хранения условий доступа — срабатывания точек останова, например чтение, запись, исполнение. Малое количество — основной недостаток аппаратных бряков. Для установки аппаратной точки останова используется команда ba с тремя параметрами: тип доступа, размер и адрес.
Итак, мы рассмотрели небольшой список команд внутреннего языка отладчика WinDbg. Наверняка ты обратил внимание на их запись. В языке отладчика присутствуют три вида команд:
-
встроенные команды служат для отладки процесса и записываются без лидирующего символа, к таким командам относятся
g,bp,bd; -
метакоманды управляют работой отладчика, перед ними ставится символ точки, например:
.reload,.symfix,.cls; -
команды-расширения, загружаемые из внешних DLL, имеют в начале символ восклицательного знака, например:
!heap,!dh.
Поиск адреса
Давай попробуем наскоро найти защитный механизм и, не вникая в подробности его функционирования, напрочь отрубить защиту. Вспомним, по какому адресу расположен в памяти оригинальный пароль. Заглянем в дамп секции .rdata, где хранится пароль. Исходный пароль myGOODpassword находится по смещению 0x140002280. Попробуем вывести находящиеся по этому адресу в памяти данные:
dc 0x140002280Существует большое количество команд для отображения содержимого памяти: da, db, dd и прочие. Мы использовали dc, потому что она показывает значения двойных слов и ASCII-символы. Что мы видим? Неинициализированные данные.
Раньше (до Windows Vista) кодокопателям было проще. Windows загружала образы в виртуальную память по определенному при компиляции адресу. В этом легко убедиться: запустим приложение в Windows XP, затем при помощи того же SoftICE узнаем адреса секций (команда mod -u) и выпишем их. После перезагрузки системы и повторного запуска приложения увидим, что они останутся неизменными.
Начиная с Windows Vista, программы после перезапуска системы получают случайные адреса, а не те, что определены при компиляции. Поэтому нам придется самим искать секцию .rdata уже не на диске, а в памяти. Легко сказать, но сделать еще проще!
Найдем, по какому адресу расположен наш модуль в памяти. Для этого в отладчике введем lmf m passcompare1. Второй параметр — имя модуля, адрес которого надо определить. В результате на своем компе я получил:
start             end                 module name
00007ff7`159b0000 00007ff7`159b8000   passCompare1 passCompare1.exe
Отсюда следует, что начало модуля находится по адресу 0x7ff7159b0000. После каждой перезагрузки системы модуль конкретного приложения проецируется в различные адреса. Теперь выведем карту памяти нашего модуля и получим сведения обо всех секциях PE-файла:
!dh passCompare1 Вывод команды довольно объемный. !dh — в некотором роде аналог команды map32 из SoftICE, при этом первая предоставляет больше сведений. Найдем в выводе описание целевой секции .rdata:
SECTION HEADER #2
  .rdata name
    101C virtual size
    2000 virtual address
    1200 size of raw data
    1400 file pointer to raw data
       0 file pointer to relocation table
       0 file pointer to line numbers
       0 number of relocations
       0 number of line numbers
40000040 flags
         Initialized Data
         (no align specified)
         Read Only
Здесь нас интересует четвертая строчка — виртуальный адрес. Следом можно найти, где в памяти располагается .rdata, для этого надо сложить начальный адрес модуля и виртуальный адрес секции. Посмотрим, что там находится:
dc 0x7ff7159b0000 + 2000 Уже теплее, читаемые символы. Пройдем глубже в секцию и распечатаем диапазон адресов:
dc 0x7ff7159b2000 0x7ff7159b2300А вот и наш пароль по адресу 0x7ff7159b2280! Дамп памяти процесса:
00007ff7`159b2250  159b4040 00007ff7 159b40e0 00007ff7  @@.......@......
00007ff7`159b2260  ffffffff ffffffff ffffffff ffffffff  ................
00007ff7`159b2270  65746e45 61702072 6f777373 003a6472  Enter password:.
00007ff7`159b2280  4f47796d 6170444f 6f777373 000a6472  myGOODpassword..
00007ff7`159b2290  6e6f7257 61702067 6f777373 000a6472  Wrong password..
00007ff7`159b22a0  73736150 64726f77 0a4b4f20 00000000  Password OK.....
00007ff7`159b22b0  00000140 00000000 00000000 00000000  @...............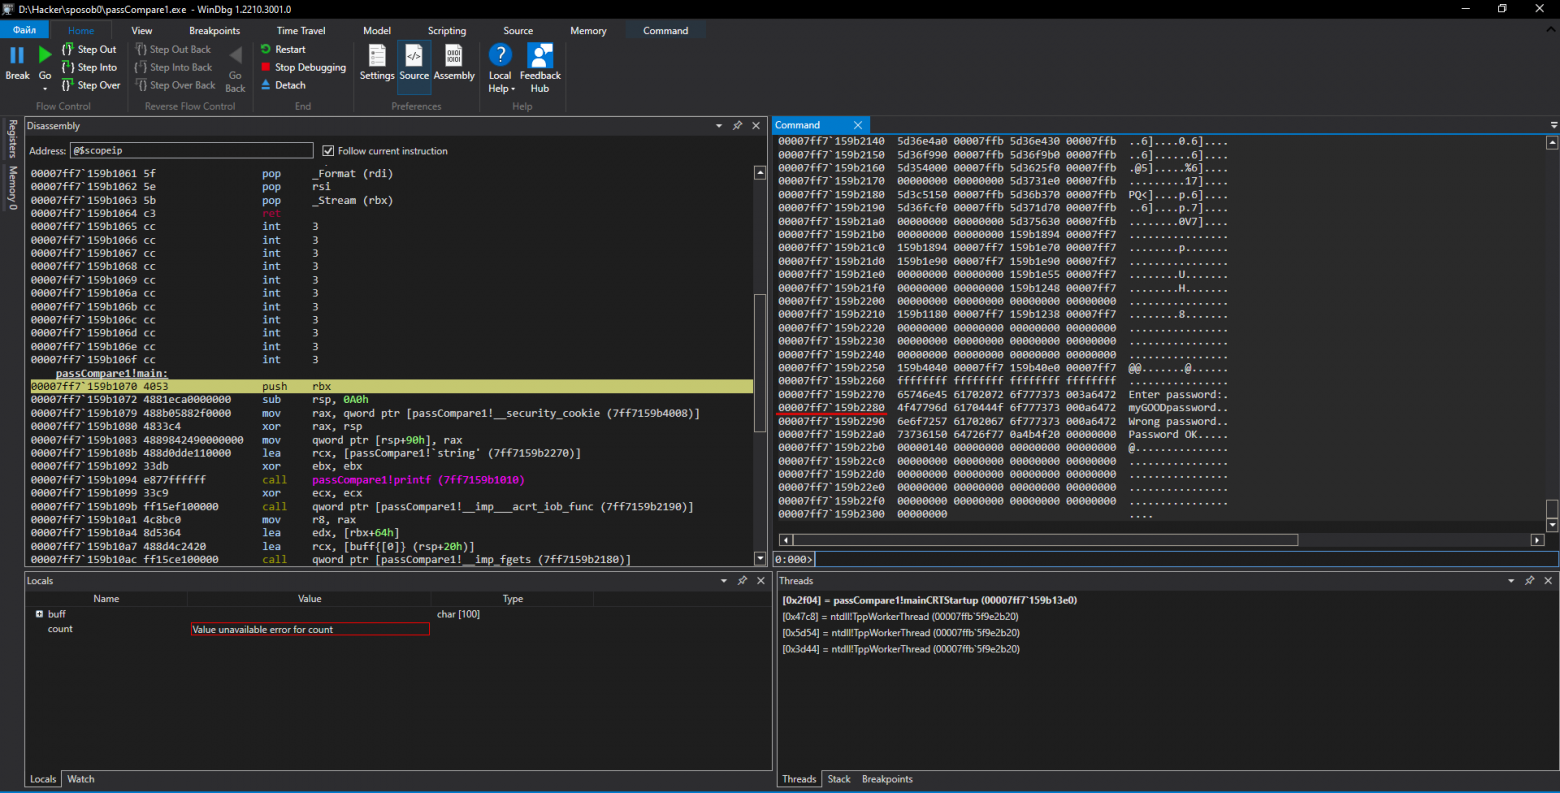
Есть контакт! Задумаемся еще раз. Чтобы проверить корректность введенного пользователем пароля, защита, очевидно, должна сравнить его с оригинальным. А раз так, установив точку останова на чтении памяти по адресу 0x7ff7159b2280, мы поймаем за хвост сравнивающий механизм. Сказано — сделано.
Поставим аппаратный бряк, он же бряк по доступу (break on access), так как при программном будет ошибка доступа к памяти, возникающая по причине попытки записи в секцию, доступную только для чтения, какой .rdata и является. А программному бряку надо модифицировать память.
ba r4 0x7ff7159b2280Первый параметр — тип доступа: r — чтение; второй параметр — количество байтов, подвергаемых операции; последний параметр — адрес.
По команде g продолжим отладку и введем любой пришедший на ум пароль, например KPNC++. Отладчик незамедлительно «всплывет» в библиотечной функции сравнения строк strcmp:
00007ffb`5d375670 488b01               mov     rax, qword ptr [rcx]
00007ffb`5d375673 483b040a             cmp     rax, qword ptr [rdx+rcx]
00007ffb`5d375677 75bf                 jne     ucrtbase!strcmp+0x8 (7ffb5d375638)
00007ffb`5d375679 4e8d0c10             lea     r9, [rax+r10]
00007ffb`5d37567d 48f7d0               not     rax
В силу архитектурных особенностей процессоров Intel бряк срабатывает после инструкции, выполнившей «поползновение», то есть RIP указывают на следующую выполняемую команду. В нашем случае (выделенная строка) — jne ucrtbase!strcmp+0x8, а к памяти, стало быть, обратилась инструкция cmp rax, qword ptr [rdx+rcx]. А что находится в RAX? Поднимаем взгляд еще строкой выше — mov rax, qword ptr [rcx]. Можно предположить, что RCX содержит указатель на строку оригинального пароля (поскольку он вызвал всплытие отладчика), но не будем спешить с выводами, в сравнении еще присутствует указатель [rdx+rcx]. Куда указывает он? Проверить это в отладчике проще простого. Сначала проверим, куда указывает RCX:
0:000> dc rcx
00000093`bf5cfbd0  434e504b 000a2b2b 00000000 00000000  KPNC++..........
Оказывается, RCX указывает на введенный пользователем пароль! А куда указывает второй указатель?
0:000> dc [rdx+rcx]
00007ff7`159b2280  4f47796d 6170444f 6f777373 000a6472  myGOODpassword..
Здесь как раз притаился оригинальный пароль! Картина начинает приобретать очертания.
Теперь вопрос: а как это заломить? Вот, скажем, JNE можно поменять на JE. Или еще оригинальнее — заменить RCX [RDX+RCX]. Тогда оригинальный пароль будет сравниваться сам с собой!
Выйдем из текущей функции, для этого надо два раза нажать кнопку Step Out в отладчике. В результате мы окажемся в функции main, сразу после сравнения строк:
0007ff7`159b10b2 488d15c7110000     lea     rdx, [passCompare1!`string' (7ff7159b2280)]
00007ff7`159b10b9 488d4c2420        lea     rcx, [buff{[0]} (rsp+20h)]
00007ff7`159b10be e88c0d0000        call    passCompare1!strcmp (7ff7159b1e4f)
00007ff7`159b10c3 85c0              test    eax, eax
00007ff7`159b10c5 7458              je      passCompare1!main+0xaf (7ff7159b111f)
В первой строчке приведенного листинга в регистр RDX записывается указатель на эталонный пароль. Чтобы проверить это, выполни команду dc 7ff7159b2280. Во второй строчке в регистр RCX помещается указатель на содержимое строкового буфера, в который записывается введенный пользователем пароль. После вызова strcmp следует test, проверяющий на ноль регистр EAX. Знакомые места! Помнишь, мы посещали их дизассемблером? Далее следует JE, совершающий прыжок на основе предыдущего условия.
Алгоритм действий прежний — запоминаем адрес команды TEST для последующей замены ее на XOR или записываем последовательность байтов.
Погоди! Не стоит так спешить! Можно ли быть уверенным, что эти байтики по этим самым адресам будут находиться в исполняемом файле? В Windows XP и версиях до нее на это в подавляющем большинстве случаев можно было хотя бы надеяться, но проверка не была лишней. Хотя системный загрузчик размещал модули по заранее определенным адресам, существовали хитрые защитные механизмы, загружавшие один и тот же модуль по двум разным адресам одновременно. В Windows 10 такой трюк не прокатывает, винда видит, что это один и тот же модуль, и размещает его в памяти лишь единожды.
Тем не менее в Windows 10 мы даже не можем надеяться, что находящиеся по определенным адресам байты, найденные в памяти с помощью отладчика, будут по тем же адресам находиться в файле на диске. Когда программа выполняется, все ее секции проецируются в адресное пространство виртуальной памяти, которое кардинально отличается от начальной. В Vista и последующих системах в дело вступает механизм ASLR (Address Space Layout Randomization), который, используя MMU (Memory Management Unit), случайным образом изменяет расположение в адресном пространстве процесса важных структур данных. ASLR в некоторых случаях вполне успешно борется с переполнением буфера, возвратом в библиотеку и другими типами атак.
Авторы: Крис Касперски, Юрий Язев
I am almost ready to publish the final tutorial on using ssh tunnels from a truecrypt partition on a Windows machine. Of course I choose to go way overboard in my research and the tutorial is full of some pretty awesome windows tricks.. I will come back to this post soon and post all the other advanced tools I use for debugging windows, for now though you MUST know how to debug the kernel and use these basic debugging tools.
WINDOWS NETWORKING !!!!!
Debugging Tools for Windows
Target Computer and Host Computer
Kernel-mode debugging requires a target computer and a host computer. The target computer is used to run the kernel-mode application. The host computer is used to run the debugger.
The following diagram shows the typical Microsoft Windows setup that you can use to perform kernel debugging and diagnose system failures.
Typical Windows debugging setup
This diagram shows the typical setup. However, the current versions of KD and WinDbg (which you installed with this documentation) are flexible. KD and WinDbg can do the following
- Debug a target computer that is running Windows.
- Debug a target computer that is running on an x86-based platform, an Itanium-based platform, or an x64-based platform.
- Can be started from a host computer that is running Windows.
- Can be started from a host computer that is on an x86-based platform, an Itanium-based platform, or an x64-based platform.
The target computer and host computer do not have to use the same platform or the same version of Windows.
Kernel debugging does not require specific combinations of the free or checked builds. You can debug a free system from a free or checked system, and you can debug a checked system from a free or checked system. However, typically, there is no reason for the host computer to run the slower checked build.
Note If you are running the debuggers from an Itanium-based host computer, make sure that you are using the correct version of the binaries. For more information about which version of the debugger package to use, see Choosing a 32-bit or 64-bit Debugger Package.
Debugging Tools for Windows
List of Tools and Documentation
Microsoft Debugging Tools for Windows includes a number of debuggers and other tools. Some of them are described in this documentation, and others are described elsewhere. The following list briefly describes each tool and where its documentation can be found.
Debuggers
Debugging Tools for Windows includes the following debuggers. These are described throughout this documentation, and are referred to by their individual names or collectively as «the debugger»:
- WinDbg (Windbg.exe)
- A user-mode and kernel-mode debugger with a graphical interface.
- KD (Kd.exe)
- A kernel-mode debugger with a console interface.
- CDB (Cdb.exe)
- A user-mode debugger with a console interface.
- NTSD (Ntsd.exe)
- A user-mode debugger with a console interface. CDB and NTSD are virtually identical. In this documentation, whenever a reference is made to «CDB», it applies to both CDB and NTSD. When these two debuggers differ, it is noted. (See CDB and NTSD for details.)
Debugging Tools for Windows — Overview
Looking for updates and drivers for your personal computer?
You can use Debugging Tools for Windows to debug drivers, applications, and services on systems that are running Windows NT 4.0, Windows 2000, Windows XP, Windows Server 2003, Windows Vista, Windows Server 2008, Windows Server 2008 R2, or Windows 7. You can also use Debugging Tools for Windows to debug the operating system itself. Versions of the Debugging Tools for Windows package are available for 32-bit x86, native Intel Itanium, and native x64 platforms.
The latest release of Debugging Tools for Windows is available as part of the Windows Driver Kit (WDK).
Note: If you have a system with a 64-bit processor and you are debugging an application on it, you must use one of the native 64-bit packages.
Additional Tools and Utilities
Debugging Tools for Windows also includes the following tools and utilities:
- Logger (Logger.exe and Logexts.dll)
- A tool and an extension DLL that record the function calls and other actions of a program. Logger is described in this documentation; see Logger and LogViewer.
- LogViewer (Logviewer.exe)
- A tool that displays the logs created by Logger. LogViewer is described in this documentation; see Logger and LogViewer.
- ADPlus (Autodump+, Adplus.vbs)
- A console-based Microsoft Visual Basic script that can automatically create memory dump files and log files with debug output from one or more processes. ADPlus is described in this documentation; see ADPlus.
- DbgRpc (Dbgrpc.exe)
- A tool used to display Microsoft Remote Procedure Call (RPC) state information. DbgRpc is described in this documentation; see RPC Debugging and Using the DbgRpc Tool.
- KDbgCtrl (Kernel Debugging Control, Kdbgctrl.exe)
- A tool that controls and configures the kernel debugging connection. KDbgCtrl is described in this documentation; see Using KDbgCtrl.
- SrcSrv (Srcsrv.dll)
- A source server that can be used to deliver source files while debugging. SrcSrv is described in this documentation; see SrcSrv.
- SymSrv (Symsrv.dll)
- A symbol server that the debugger can use to connect to a symbol store. SymSrv is described in this documentation; see SymSrv.
- SymStore (Symstore.exe)
- A tool used to create a symbol store. SymSrv is described in this documentation; see Using SymStore.
- SymProxy
- A tool used to create a single HTTP symbol server on your network that all your debuggers can point to. This has the benefit of pointing to multiple symbol servers (both internal and external) with a single symbol path, handling all authentication, and increasing performance via symbol caching. SymProxy is described in this documentation; see SymProxy.
- AgeStore (Agestore.exe)
- A tool that removes old entries in the downstream store of a symbol server or a source server. AgeStore is described in this documentation; see AgeStore.
- DBH (Dbh.exe)
- A tool that displays information about the contents of a symbol file. DBH is described in this documentation; see DBH.
- PDBCopy (Pdbcopy.exe)
- A tool that removes private symbol information from a symbol file, and controls which public symbols are included in the file. PDBCopy is described in this documentation; see PDBCopy.
- DumpChk (Dump File Checking Utility, Dumpchk.exe)
- A tool used to validate a memory dump file. DumpChk is described in this documentation; see DumpChk.
- DbgSrv (Dbgsrv.exe)
- A process server used for remote debugging. DbgSrv is described in this documentation; see Process Servers (User Mode).
- KdSrv (Kdsrv.exe)
- A KD connection server used for remote debugging. KDSrv is described in this documentation; see KD Connection Servers (Kernel Mode).
- DbEngPrx (Dbengprx.exe)
- A repeater (small proxy server) used for remote debugging. DbgSrv is described in this documentation; see Repeaters.
- The Remote tool (Remote.exe)
- A remoting tool that can be used to remotely control any console program, including KD, CDB, and NTSD. The Remote tool is described in this documentation; see Remote Tool and Remote Debugging Through Remote.exe.
- GFlags (Global Flags Editor, Gflags.exe)
- A tool used to control registry keys and other settings. GFlags is described in this documentation; see GFlags.
- The Kill tool (Kill.exe)
- A tool used to terminate a process. The Kill tool is described in this documentation; see Kill Tool.
- The Breakin tool (Breakin.exe)
- A tool used to cause a user-mode break to occur in a process. Breakin.exe is not described in this documentation. Use the breakin /? command for help with this tool.
- The List tool (File List Utilit
y, List.exe)
- List.exe is not described in this documentation. Use the list /? command for help with this tool.
- TList (Task List Viewer, Tlist.exe)
- A tool used to list all running processes. TList is described in this documentation; see TList.
- RTList (Remote Task List Viewer, Rtlist.exe)
- A tool used to list running processes via a DbgSrv process server. RTList is not described in this documentation. Use the rtlist /? command for help with this tool.
- UMDH (User-Mode Dump Heap utility, Umdh.exe)
- A tool used to analyze heap allocations. UMDH is described in this documentation; see UMDH.
- USBView (Universal Serial Bus Viewer, Usbview.exe)
- A tool used to display the USB devices connected to a computer. USBView is described in this documentation; see USBView.
If you peform a custom install of Debugging Tools for Windows and select the SDK feature and all of its subfeatures, the libraries, headers, and samples used to build debugger extensions will be installed.
Documentation
- «Debugging Tools for Windows» (Debugger.chm)
- This is the documentation you are currently reading. It is the central documentation for Debugging Tools for Windows.
- «Debug Help Library» (Dbghelp.chm)
- This documentation describes the DbgHelp API and the ImageHlp API, and also explains how to create your own symbol server. This is installed when you peform a custom install of Debugging Tools for Windows and select the SDK feature and its subfeatures.
Tools Outside the Debugging Tools for Windows Package
The following related tools are not part of the Debugging Tools for Windows package:
- Dr. Watson (Drwtsn32.exe)
- A tool used for automatically creating dump files and sending error reports to Microsoft Online Crash Analysis (OCA). Dr. Watson is partially described in this documentation; see Dr. Watson. The other features of Dr. Watson are described in the help file associated with drwtsn32.exe.
- Build utility (Build.exe)
- A compiler and linker used to build debugger extensions and other programs. The Build utility and its documentation can be found in the Windows Driver Kit, and in earlier versions of the Windows DDK.
- BinPlace (Binplace.exe)
- A tool used to control symbol files for build products. BinPlace and its documentation can be found in the Windows Driver Kit, and in earlier versions of the Windows DDK.
- Application Verifier (AppVerif.exe and !avrf)
- A tool used to test user-mode applications. This tool consists of two components: the AppVerif.exe utility and the !avrf extension command. All the features of Application Verifier that are debugger-related are described in Application Verifier. The other features of Application Verifier are described in the help file associated with AppVerif.exe.
Debugging Tools for Windows
WinDbg
Microsoft Windows Debugger (WinDbg) is a powerful Windows-based debugging tool. It is capable of both user-mode and kernel-mode debugging.
WinDbg provides full source-level debugging for the Windows kernel, kernel-mode drivers, and system services, as well as user-mode applications and drivers.
WinDbg uses the Microsoft Visual Studio debug symbol formats for source-level debugging. It can access any symbol or variable from a module that has PDB symbol files, and can access any public function’s name that is exposed by modules that were compiled with COFF symbol files (such as Windows .dbg files).
WinDbg can view source code, set breakpoints, view variables (including C++ objects), stack traces, and memory. Its Debugger Command window allows the user to issue a wide variety of commands.
For kernel-mode debugging, WinDbg requires two machines (the host computer and the target computer). Kernel debugging is only supported on NT-based Windows operating systems.
WinDbg also supports various remote debugging options for both user-mode and kernel-mode targets.
WinDbg is the graphical-interface counterpart to CDB / NTSD and to KD.
Debugging Tools for Windows
KD
Microsoft Kernel Debugger (KD) is a character-based console program that enables in-depth analysis of kernel-mode activity on all NT-based operating systems.
KD can be used to debug kernel-mode programs and drivers, or to monitor the behavior of the operating system itself. KD also supports multiprocessor debugging.
Typically, the KD tool will not be run on the computer being debugged. Two machines (the host computer and the target computer) are needed for kernel-mode debugging.
Most KD commands cannot be targeted to specific processes or threads, as they can in CDB, NTSD, and WinDbg.
Debugging different target platforms
KD is capable of debugging a target computer which is running on an x86, Itanium, or x64 platform.
The debugger will automatically detect the platform on which the target is running. You do not need to specify the target on the KD command line. The older syntax (using the name I386KD or IA64KD) is obsolete.
Debugging Tools for Windows
CDB and NTSD
CDB and NTSD are console applications which can debug user-mode programs. These two debuggers are nearly identical, except in the manner in which they are launched.
This documentation will use «CDB» when referring to the capabilities of both CDB and NTSD. Except as noted, all references to CDB in this documentation apply equally to NTSD. There are a few techniques that can only work properly with CDB, or can only work properly with NTSD. These differences are documented in the appropriate sections.
CDB
Microsoft Console Debugger (CDB) is a character-based console program that enables low-level analysis of Windows user-mode memory and constructs.
CDB is extremely powerful for debugging a program that is currently running or has recently crashed («live analysis»), yet simple to set up. It can be used to investigate the behavior of a working application. In the case of a failing application, CDB can be used to obtain a stack trace or to look at the guilty parameters. It works well across a network (using a remote access server), as it is character-based.
With CDB, you can display and execute program code, set breakpoints, and examine and change values in memory. CDB can analyze binary code by «disassembling» it and displaying assembly instructions. It can also analyze source code directly.
Because CDB can access memory locations through addresses or global symbols, you can refer to data and instructions by name rather than by address, making it easy to locate and debug specific sections of code. You can also display disassembled machine code. CDB supports debugging multiple threads and processes. It is extensible, and can read and write both paged and non-paged memory.
If the target application is itself a console application, the target will share the console window with CDB. To spawn a separate console window for a target console application, use the -2 command-line option.
NTSD
There is a variation of the CDB debugger named Microsoft NT Symbolic Debugger (NTSD). It is identical to CDB in every way, except that it spawns a new text window when it is started, whereas CDB inherits the Command Prompt window from which it was invoked.
Like CDB, NTSD is fully capable of debugging both console applications and graphical Windows programs. (The name «Console Debugger» is used to indicate the fact that CDB is classified as a console application; it does not imply that the target application must be a console application.)
Since the start command can also be used to spawn a new console window, the following two constructions will give the same results:
start cdb parameters
ntsd parameters
NTSD in the System32 Directory
Whereas CDB is only available as part of the Debugging Tools for Windows package, NTSD is available both in this package and as part of the Windows system itself. It can be found in the system32 directory of Windows.
If you are planning on using the NTSD that appears in the system32 directory, there are two important facts you should be aware of:
- This version of NTSD cannot be used for Remote Debugging Through the Debugger.
- This version of NTSD may not match the version of the documentation you are currently reading.
To avoid these issues, it is recommended that you use only the version of NTSD or CDB that was installed as part of the Debugging Tools for Windows package.
Controlling CDB or NTSD from the Kernel Debugger
It is possible to redirect the input and output from CDB or NTSD so that it can be controlled from a kernel debugger (either KD or WinDbg).
If this technique is used with CDB, the CDB window will appear but will not be useable for input and output. If this is used with NTSD, no console window will appear at all.
Controlling NTSD from the kernel debugger is therefore especially useful, since it results in an extremely light-weight debugger that places almost no burden on the computer containing the target application. This combination can be used to debug system processes, shutdown, and the later stages of boot up. See Controlling the User-Mode Debugger from the Kernel Debugger for details.
CDB нативный отладчик в Windows, то есть от Microsoft.
Понятно, что он работает в Visual Studio, но его можно использовать и в Qt Creator для приложений под Windows.
Что надо понимать изначально. В поставке QtSDK 1.2.1 отладчик CDB отсутствует. Тулчейн msvc-2010 вроде бы есть, но отладчика cdb нет. Но также в QtSDK 1.2.1 нет и самого компилятора cl.exe, линковщика link.exe, и т.д.
Qt Creator 2.4.1все это как-то видит.
Устанавливаем (на Windows 10-64) Windows SDK 10.0.22621.755 , где не забываем выбрать Debugging Tools for Windows.
Тут не выбраны Visual C Compilers и еще много опций. Подсказка показывает причину: что что-то связано с отсутствием Framework 4.0. И это не понятно, т.к. вроде бы Framework есть.
Устанавливаем MS Visual Studio, где выбираем C .
Вот так должен выглядеть тулчейн при установленном компиляторе/линковщике (msvc-2010) и отладчике cdb:
То есть QtCreator как-то сам определяет, что cdb.exe установлен в ОС Windows.
Примечательно, что при первой попытке отладки программы мы в Qt Creator (2.4.1) запрос на добавление символов отладки:
Для скачивания символов отладки с сайта microsoft Qt Creator запросит место на диске и там через некоторое значительное время появится много каталогов с pdb файлов.
Вот как примерно у нас получилось:
И вот только теперь заработает отладка под отладчиком cdb.exe (тулчейн msvc-2010).
Итак где у нас в результате расположен отладчик cdb.exe.
После установки Windows SDK 10.0.22621.755 (10.x это для Windows 10) это каталог:
C:\Program Files\Debugging Tools for Windows (x64)
Обратите внимание, что это x64 отладчик, а у нас тулчейн msvc-2010 x86. И этот так именно и работает.
Примечание: с установкой исходников Qt Sources или не установкой их, вход в отладку (main.c) никак не связана.
Вот еще наш вариант : переменная окружения PATH, при котором отладка cdb работает:
C:\Program Files (x86)\Common Files\Oracle\Java\javapath;
C:\WINDOWS\system32;
C:\WINDOWS;
C:\WINDOWS\System32\Wbem;
C:\WINDOWS\System32\WindowsPowerShell\v1.0\;
C:\WINDOWS\System32\OpenSSH\;
C:\Program Files (x86)\Windows Kits\10\Windows Performance Toolkit\;
C:\Strawberry\c\bin;
C:\Strawberry\perl\site\bin;
C:\Strawberry\perl\bin;
C:\Program Files\Microsoft Windows Performance Toolkit\;
C:\Users\a\AppData\Local\Microsoft\WindowsApps;
И тут интересно, что cdb.exe по этим путям не найти. Таким образом отладчик cdb подключается не через PATH окружения Windows.
TL;DR: A high-level introduction to using the CDB
command-line debugger in the context of C++ programs
- Installing
CDB - Using CDB
- Loading the executable
- Breaking on the uncaught
exception - Printing the stack trace
- Exploring source code
- Printing local variables
- Exitting
- Summary
A good part of my daily work revolves around maintaining a
few cross-platform C++ libraries for working with JSON (such as
JSON
Toolkit and JSON BinPack)
that come with first-class support for the MSVC (Microsoft
Visual C++) compiler.
On Windows, my C++ debugging workflow historically consisted
in opening the projects generated by CMake
using the Visual Studio application, and clicking my way through
to run targets with the built-in debugger.
Whereas in other platforms, my workflow is quite terminal-heavy,
involving tools such as vim,
tmux, and LLDB.
This article is a brief introduction on how I lately adopted
a command-line-first C++ debugging workflow on Windows using the
CDB debugger. It is hopefully useful to macOS, GNU/Linux, or BSD
developers that want a more familiar debugging experience on
Windows.
Disclaimer: I’m typically not a Windows
user. If you are one and spot any mistakes, or know how I could
do things better, please let me
know! I would love to level up my Windows skills.
Installing CDB
The Microsoft
Console Debugger (CDB) is a command-line front-end to the
well-known WinDbg debugging
subsystem that ships as part of the Debugging
Tools for Windows suite. This suite is not distributed
directly, but as a component of either the Windows
Driver Kit (WDK) or the Windows
SDK (when selecting the Debugging Tools for Windows
component). Instead of setting it up directly, I personally find
it convenient to manage it as part of the Windows SDK
component during a Visual Studio installation.
Assuming you are on Windows 11 x64, the Debugging Tools
for Windows suite will install cdb.exe into
the following location:
C:\Program Files (x86)\Windows Kits\10\Debuggers\x64\cdb.exeSadly, Visual Studio does not automatically add the previous
directory to the %PATH% on neither the
Developer PowerShell or Developer Command
Prompt. For convenient, you can manually add it to the
executable path through
Settings -> System -> Advanced system settings -> Environment variables....
As a sanity check, you can confirm your CDB installation is
ready to go by printing its version as follows:
PS C:\> cdb -version
cdb version 10.0.22000.194
Using CDB
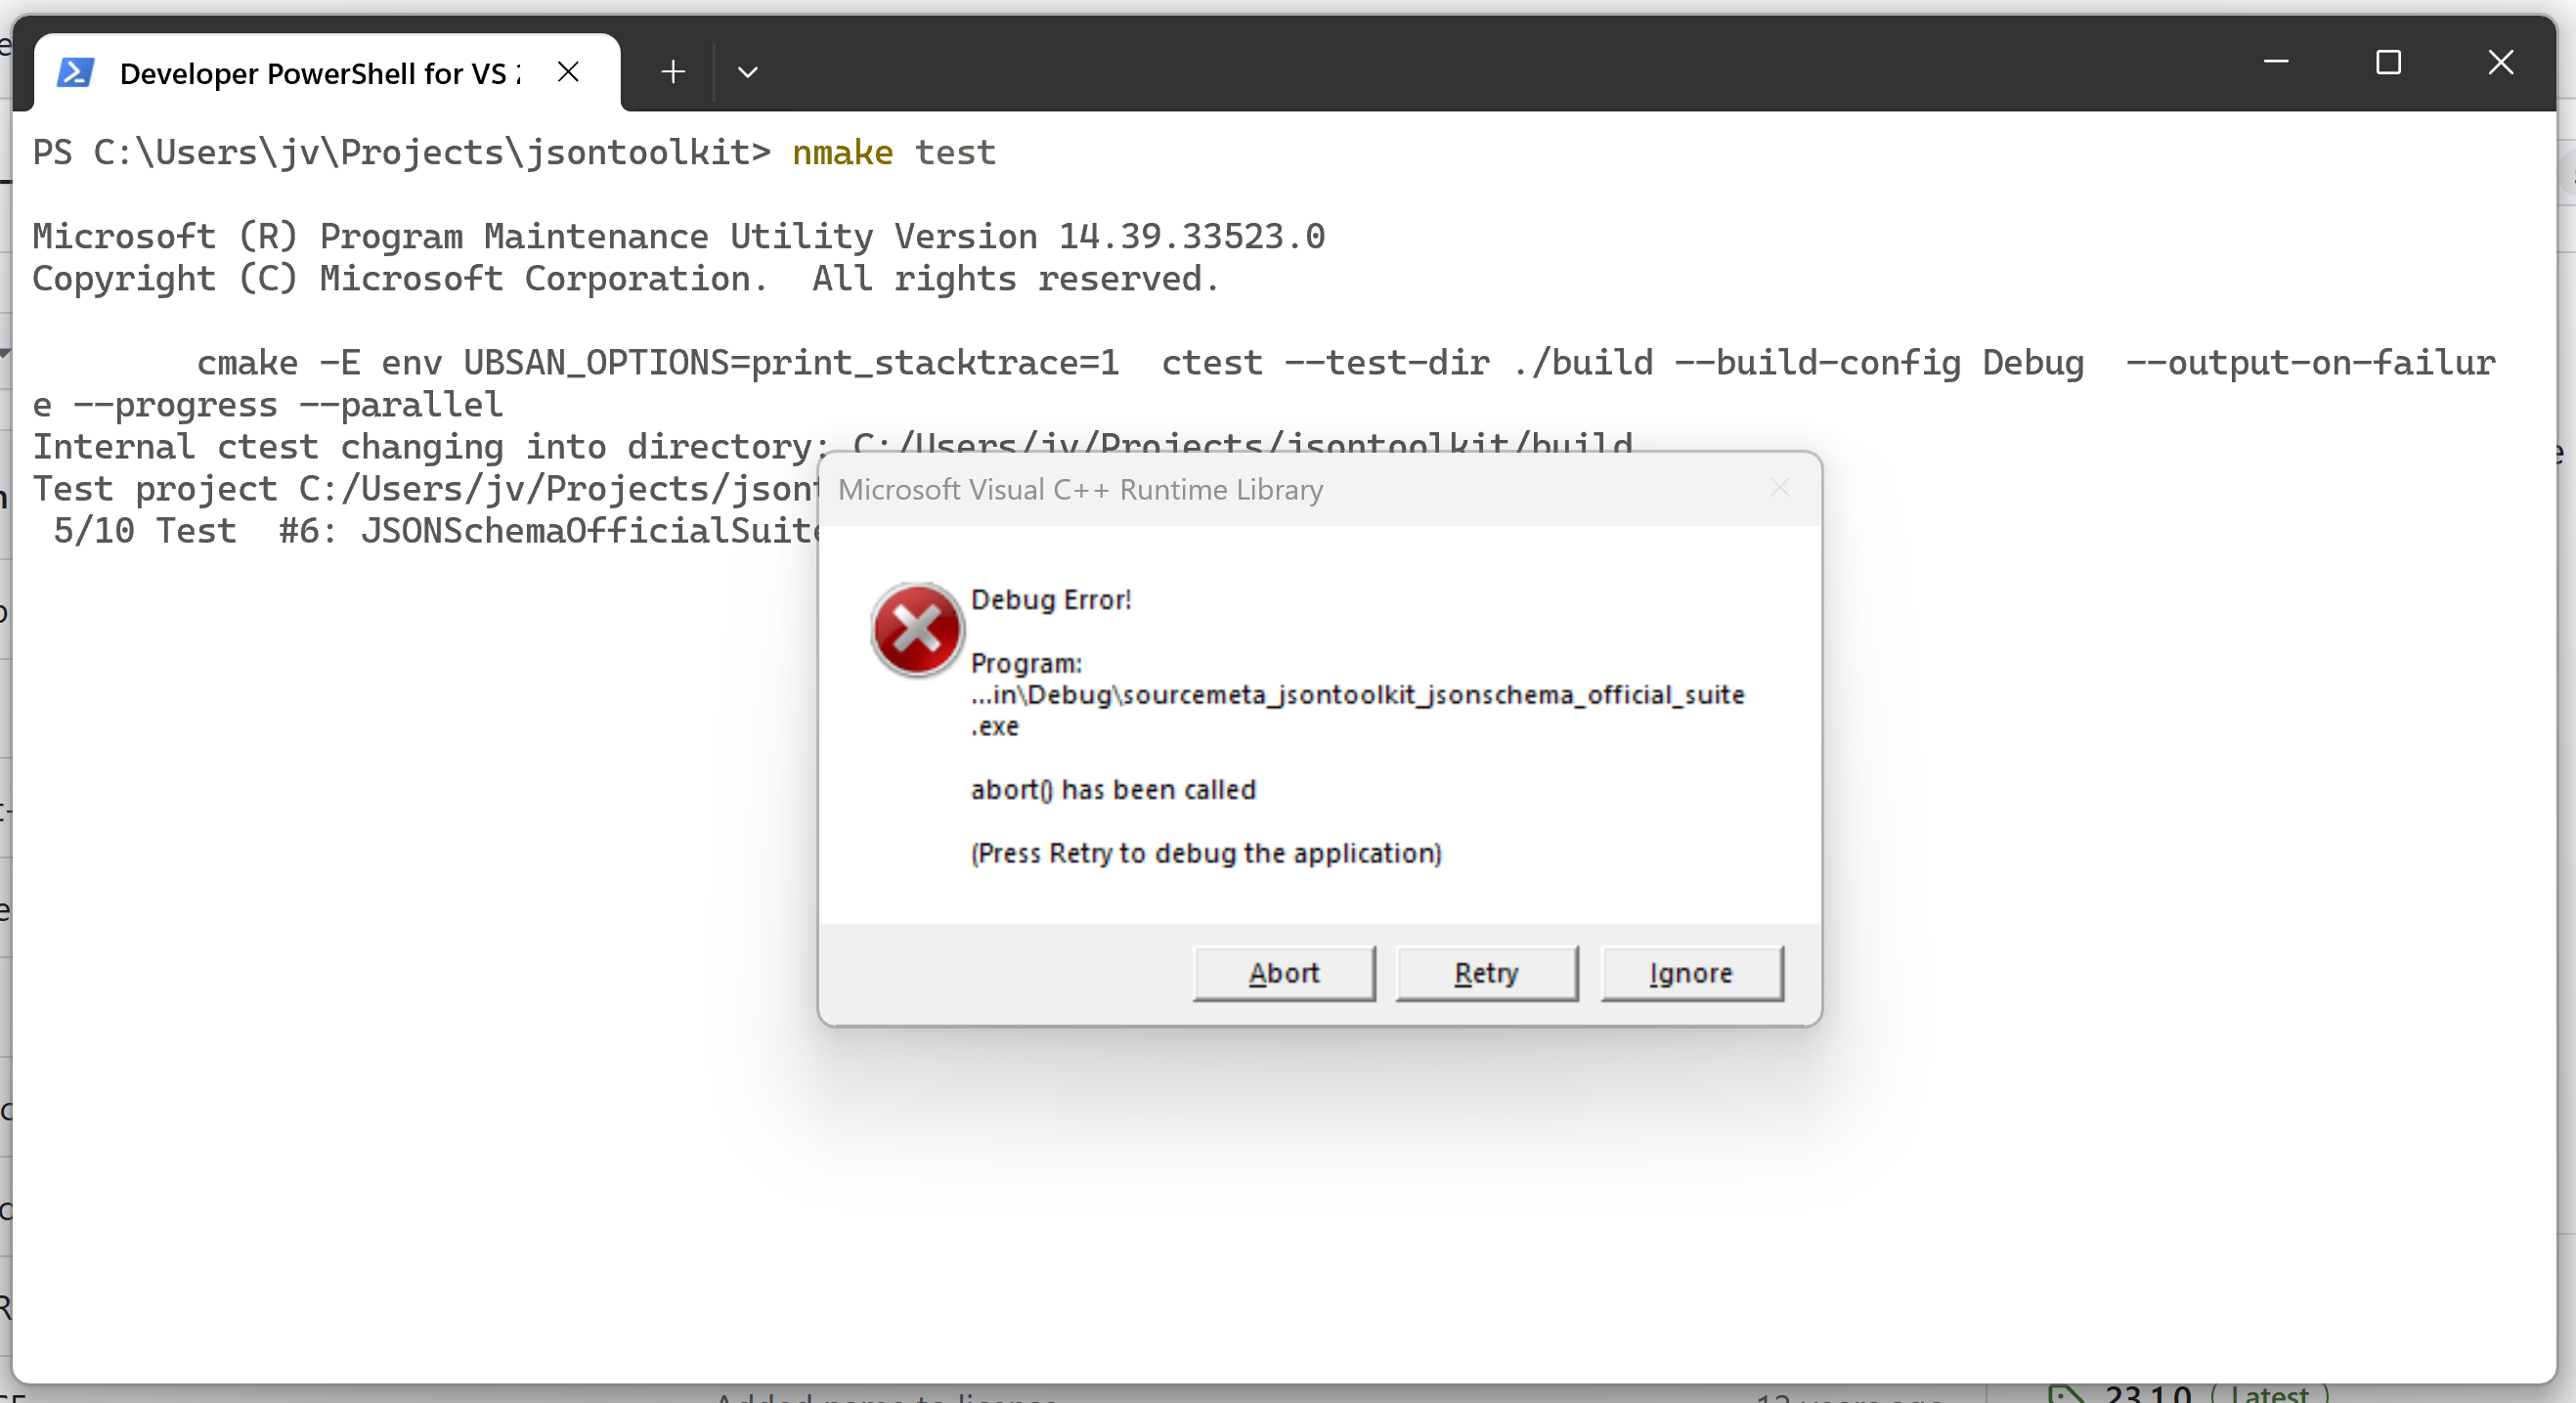
To exemplify CDB, this section will explore a crash I
recently saw in JSON
Toolkit that only affected MSVC users. The crash originated
from one of our unit tests, in which our JSON DOM implementation
attempted to parse one of the JSON documents distributed as part
of the official JSON
Schema Test Suite.
When using CTest
to run this specific test, Windows showed the usual Debug
Error! from the Microsoft Visual C++ Runtime Library as a
result of an uncaught exception, without any further information
about what the exception was or where it came from.
Loading the executable
Like LLDB and GDB, the CDB debugger takes the program
executable as an argument. In my case, the executable that runs
the JSON Schema Test Suite is
sourcemeta_jsontoolkit_jsonschema_official_suite.exe,
so I run CDB from PowerShell as follows:
PS C:\Users\jv\Projects\jsontoolkit> cdb .\build\bin\Debug\sourcemeta_jsontoolkit_jsonschema_official_suite.exe

Microsoft (R) Windows Debugger Version 10.0.22000.194 AMD64
Copyright (c) Microsoft Corporation. All rights reserved.

CommandLine: .\build\bin\Debug\sourcemeta_jsontoolkit_jsonschema_official_suite.exe

************* Path validation summary **************
Response                         Time (ms)     Location
Deferred                                       SRV*d:\Symbols*https://msdl.microsoft.com/download/symbols

************* Path validation summary **************
Response                         Time (ms)     Location
Deferred                                       SRV*d:\Symbols*https://msdl.microsoft.com/download/symbols
Symbol search path is: SRV*d:\Symbols*https://msdl.microsoft.com/download/symbols
Executable search path is:
ModLoad: 00007ff6`157d0000 00007ff6`15af2000   sourcemeta_jsontoolkit_jsonschema_official_suite.exe
ModLoad: 00007ffb`189f0000 00007ffb`18c07000   ntdll.dll
ModLoad: 00007ffb`18280000 00007ffb`18344000   C:\WINDOWS\System32\KERNEL32.DLL
ModLoad: 00007ffb`15d70000 00007ffb`16117000   C:\WINDOWS\System32\KERNELBASE.dll
ModLoad: 00007ffa`ef840000 00007ffa`ef921000   C:\WINDOWS\SYSTEM32\MSVCP140D.dll
ModLoad: 00007ffa`fb9d0000 00007ffa`fb9fe000   C:\WINDOWS\SYSTEM32\VCRUNTIME140D.dll
ModLoad: 00007ffb`15550000 00007ffb`1555f000   C:\WINDOWS\SYSTEM32\VCRUNTIME140_1D.dll
ModLoad: 00007ffa`d4880000 00007ffa`d4aa1000   C:\WINDOWS\SYSTEM32\ucrtbased.dll
ModLoad: 000001de`9b920000 000001de`9bb41000   C:\WINDOWS\SYSTEM32\ucrtbased.dll
ModLoad: 000001de`9bb50000 000001de`9bd71000   C:\WINDOWS\SYSTEM32\ucrtbased.dll
(3e30.16dc): Break instruction exception - code 80000003 (first chance)
ntdll!LdrInitShimEngineDynamic+0x344:
00007ffb`18acbd44 cc              int     3
0:000>
Once the executable is loaded, we will get a prompt to
interact the debugger. CDB supports various command-line options
that are outside of the scope of this article, so I recommend
consulting the CDB
Command-Line Options reference documentation to learn
more.
Breaking on the
uncaught exception
Luckily, CDB automatically breaks on uncaught C++ exceptions.
Therefore, we can resume program execution using the g
(Go) command and we will eventually gain back control right on
the problematic spot:
0:000> g
[... program output ...]
(3e30.16dc): C++ EH exception - code e06d7363 (first chance)
(3e30.16dc): C++ EH exception - code e06d7363 (first chance)
(3e30.16dc): C++ EH exception - code e06d7363 (!!! second chance !!!)
KERNELBASE!RaiseException+0x6c:
00007ffb`15dd543c 0f1f440000      nop     dword ptr [rax+rax]
0:000>
Printing the stack trace
For some reason, when listing frames, CDB defaults to
offset-based instruction locations instead of human-friendly
line numbers. As a consequence, we have to manually toggle
source line support using the .lines
meta-command:
0:000> .lines
Line number information will be loaded
0:000>
With line number support enabled, we can print a stack trace
using the kn
command. This command displays the stack backtrace information
along with its corresponding frame numbers for easy navigation.
In my case, it looks like this:
0:000> kn
 # Child-SP          RetAddr               Call Site
00 00000008`aeafb170 00007ffa`fb9dbbf1     KERNELBASE!RaiseException+0x6c
*** WARNING: Unable to verify checksum for sourcemeta_jsontoolkit_jsonschema_official_suite.exe
01 00000008`aeafb250 00007ff6`159e0df4     VCRUNTIME140D!CxxThrowException+0x131
02 00000008`aeafb2e0 00007ffb`15551080     sourcemeta_jsontoolkit_jsonschema_official_suite!`sourcemeta::jsontoolkit::internal::parse_number_integer<char,std::char_traits<char> >'::`1'::catch$0+0x34 [C:\Users\jv\Projects\jsontoolkit\src\json\parser.h @ 231]
03 00000008`aeafb320 00007ffb`15553aae     VCRUNTIME140_1D+0x1080
04 00000008`aeafb350 00007ffb`18a94246     VCRUNTIME140_1D!_NLG_Return2+0x295e
05 00000008`aeafb420 00007ff6`158be4f6     ntdll!RtlCaptureContext2+0x4a6
06 00000008`aeafdcf0 00007ff6`158bd816     sourcemeta_jsontoolkit_jsonschema_official_suite!sourcemeta::jsontoolkit::internal::parse_number_integer<char,std::char_traits<char> >+0x26 [C:\Users\jv\Projects\jsontoolkit\src\json\parser.h @ 229]
07 00000008`aeafdd50 00007ff6`158bd276     sourcemeta_jsontoolkit_jsonschema_official_suite!sourcemeta::jsontoolkit::internal::parse_number_any_rest<char,std::char_traits<char>,std::allocator>+0x296 [C:\Users\jv\Projects\jsontoolkit\src\json\parser.h @ 516]
08 00000008`aeafde00 00007ff6`158bbbbe     sourcemeta_jsontoolkit_jsonschema_official_suite!sourcemeta::jsontoolkit::internal::parse_number<char,std::char_traits<char>,std::allocator>+0x1b6 [C:\Users\jv\Projects\jsontoolkit\src\json\parser.h @ 579]
09 00000008`aeafdf60 00007ff6`158b4e90     sourcemeta_jsontoolkit_jsonschema_official_suite!sourcemeta::jsontoolkit::parse<char,std::char_traits<char>,std::allocator>+0x176e [C:\Users\jv\Projects\jsontoolkit\src\json\parser.h @ 932]
0a 00000008`aeafe830 00007ff6`158b5119     sourcemeta_jsontoolkit_jsonschema_official_suite!sourcemeta::jsontoolkit::parse+0x70 [C:\Users\jv\Projects\jsontoolkit\src\json\json.cc @ 27]
0b 00000008`aeafe8b0 00007ff6`157f1f2c     sourcemeta_jsontoolkit_jsonschema_official_suite!sourcemeta::jsontoolkit::from_file+0xb9 [C:\Users\jv\Projects\jsontoolkit\src\json\json.cc @ 42]
0c 00000008`aeafea40 00007ff6`157f307c     sourcemeta_jsontoolkit_jsonschema_official_suite!register_tests+0x3ac [C:\Users\jv\Projects\jsontoolkit\test\jsonschema\officialsuite.cc @ 73]
0d 00000008`aeaff4e0 00007ff6`159c2c79     sourcemeta_jsontoolkit_jsonschema_official_suite!main+0x10c [C:\Users\jv\Projects\jsontoolkit\test\jsonschema\officialsuite.cc @ 140]
0e 00000008`aeaff650 00007ff6`159c2b5e     sourcemeta_jsontoolkit_jsonschema_official_suite!invoke_main+0x39 [D:\a\_work\1\s\src\vctools\crt\vcstartup\src\startup\exe_common.inl @ 79]
0f 00000008`aeaff6a0 00007ff6`159c2a1e     sourcemeta_jsontoolkit_jsonschema_official_suite!__scrt_common_main_seh+0x12e [D:\a\_work\1\s\src\vctools\crt\vcstartup\src\startup\exe_common.inl @ 288]
10 00000008`aeaff710 00007ff6`159c2d0e     sourcemeta_jsontoolkit_jsonschema_official_suite!__scrt_common_main+0xe [D:\a\_work\1\s\src\vctools\crt\vcstartup\src\startup\exe_common.inl @ 331]
11 00000008`aeaff740 00007ffb`1829257d     sourcemeta_jsontoolkit_jsonschema_official_suite!mainCRTStartup+0xe [D:\a\_work\1\s\src\vctools\crt\vcstartup\src\startup\exe_main.cpp @ 17]
12 00000008`aeaff770 00007ffb`18a4aa48     KERNEL32!BaseThreadInitThunk+0x1d
13 00000008`aeaff7a0 00000000`00000000     ntdll!RtlUserThreadStart+0x28
0:000>
We can limit the number of frames that kn will
print by passing an integer to it. For example, we can focus on
the point of failure by printing the last 3 frames as
follows:
0:000> kn 3
 # Child-SP          RetAddr               Call Site
00 00000008`aeafb170 00007ffa`fb9dbbf1     KERNELBASE!RaiseException+0x6c
01 00000008`aeafb250 00007ff6`159e0df4     VCRUNTIME140D!CxxThrowException+0x131
02 00000008`aeafb2e0 00007ffb`15551080     sourcemeta_jsontoolkit_jsonschema_official_suite!`sourcemeta::jsontoolkit::internal::parse_number_integer<char,std::char_traits<char> >'::`1'::catch$0+0x34 [C:\Users\jv\Projects\jsontoolkit\src\json\parser.h @ 231]
0:000>
According to this stack trace, the uncaught exception
originates at line 231 of
C:\Users\jv\Projects\jsontoolkit\src\json\parser.h
on a private function called
parse_number_integer.
Exploring source code
While we can easily navigate to the point of failure using a
code editor, we can also explore source code using CDB. To do
so, we need to first select the frame we want to focus on using
the .frame
meta-command. In my case, I will go to frame 2:
0:000> .frame 2
02 00000008`aeafb2e0 00007ffb`15551080     sourcemeta_jsontoolkit_jsonschema_official_suite!`sourcemeta::jsontoolkit::internal::parse_number_integer<char,std::char_traits<char> >'::`1'::catch$0+0x34 [C:\Users\jv\Projects\jsontoolkit\src\json\parser.h @ 231]
0:000>
CDB does not automatically update the current source location
when selecting frames. Instead, we need to manually load it by
copy-pasting its path from the corresponding frame and passing
it to the lsf
command. In my case, the source location is
C:\Users\jv\Projects\jsontoolkit\src\json\parser.h:
0:000> lsf C:\Users\jv\Projects\jsontoolkit\src\json\parser.h
0:000>
According to the stack trace we saw before, the point of
failure is at line 231. To add a bit of context, let’s print 9
lines from the current source location starting at line 225
using the ls
command as follows:
0:000> ls 225, 9
   225: auto parse_number_integer(const std::uint64_t line, const std::uint64_t column,
   226:                           const std::basic_string<CharT, Traits> &string)
   227:     -> std::int64_t {
   228:   try {
   229:     return std::stol(string);
   230:   } catch (const std::out_of_range &) {
   231:     throw ParseError(line, column);
   232:   }
   233: }
0:000>
This snippet shows that the uncaught exception results from
an std::out_of_range
standard exception when executing the std::stol
function.
Printing local variables
The previous snippet reveals that the
parse_number_integer function takes as arguments
information that can more accurately tells at which
point of the JSON file the parser is experiencing the
crash, along with the actual string that the parser is
attempting to interpret as an integer.
In CDB, we can print all local variables in the current frame
using the dv
command:
0:000> dv
           line = 0x4d
         column = 0x19
         string = 0x00000008`aeafdd88 "12391239123"
0:000>
Sadly, CDB always prints integer values in hexadecimal
format, which is not human-friendly for exploring line and
column information. However, we can use the .formats
meta-command to render a number in a wide range of formats. For
example, we can convert the line number
0x4d thatdv` presented like this:
0:000> .formats 0x4d
Evaluate expression:
  Hex:     00000000`0000004d
  Decimal: 77
  Octal:   0000000000000000000115
  Binary:  00000000 00000000 00000000 00000000 00000000 00000000 00000000 01001101
  Chars:   .......M
  Time:    Wed Dec 31 20:01:17 1969
  Float:   low 1.079e-043 high 0
  Double:  3.80431e-322
By looking at the Decimal row, we can tell that
0x4d means line 77.
So far, we know the issue is an
std::out_of_range exception on
std::stol when parsing the integer
12391239123 on line 77 of a given input JSON file.
The JSON Schema Test Suite consists of dozens of JSON files, and
we still don’t know which one we are dealing with.
To answer that, we select the frame that involves the
register_tests helper that calls the sourcemeta::jsontoolkit::from_file
function (which as its name implies, performs a file read):
0:000> .frame 0c
0c 00000008`aeafea40 00007ff6`157f307c     sourcemeta_jsontoolkit_jsonschema_official_suite!register_tests+0x3ac [C:\Users\jv\Projects\jsontoolkit\test\jsonschema\officialsuite.cc @ 73]
0:000>
Running the dv command on that frame reveals the
following key local variables:
0:000> dv
           name = "multipleOf"
...
     suite_name = 0x00000008`aeaff5a8 "JSONSchemaOfficialSuite_Draft4"
default_dialect = 0x00000008`aeaff580 "http://json-schema.org/draft-04/schema#"
...
0:000>
This output tells us that the uncaught exception occurs while
parsing the multipleOf suite for the JSON Schema
Draft 4 tests. The corresponding file is tests/draft4/multipleOf.json.
As expected, line 77 contains our problematic
12391239123 integer:
75   {
76       "description": "any integer is a multiple of 1e-8",
77       "data": 12391239123,
78       "valid": true
79   }
Exitting
Finally, we can end the CDB session using the q
command and return back control to PowerShell:
0:000> q
quit:
PS C:\Users\jv\Projects\jsontoolkit>
Summary
In this article, we covered the basics of the CDB debugger to
get a MSVC debugging experience comparable to LLDB and GDB. Like
those debuggers, CDB comes with a wide range of advanced
commands and meta-commands that we did not touch on. Head over
to the official documentation if you wish to learn more:
- The
CDB official tutorial - CDB
commands - CDB
meta-commands
En
Ar
Bg
De
El
Es
Fa
Fi
Fr
Hi
Hu
It
Ja
Kn
Ko
Ms
Nl
Pl
Pt
Ru
Sq
Th
Tr
Uk
Zh
This article describes the debugging of executables built with the Microsoft Visual Studio compilers in Qt Creator.
Installation prerequisites
Qt Creator uses the cdb.exe command line debugger provided with the Debugging Tools for Windows package as part of the Windows SDK.
As of Microsoft Visual Studio 2012, the Windows Kit 8 is installed along with Visual Studio, but cdb.exe is not included unless you check the Debugging Tools for Windows component in the installer. The debuggers are typically located in C:\Program Files (x86)\Windows Kits\8.0\Debugger.
For the older Windows SDKs, such as Windows SDK 7.1, the Debugging Tools for Windows where shipped as a separate installer on the ISO-image of the SDKs. The debuggers are typically located in C:\Program Files (x86)\Debugging Tools for Windows or C:\Program Files\Debugging Tools for Windows .
After installation, the debugger should be autodetected and show up in the Kit configuration. If it does not (due to non-standard installation paths), please point the Debugger kit configuration dialog to the location.
The 32bit version of cdb.exe can only debug 32bit executables. The 64bit version can debug both 64bit and 32bit executables, however interrupting a 32bit executable with a 64bit debugger can result in a stacktrace of the Wow64 32bit emulation layer being displayed.
Qt Creator extends the command line debugger by loading an extension library into it (qtcreatorcdbext.dll). This library must be provided for the 32bit and 64bit version of the debugger, in the folders libs\qtcreatorcdbext64 or libs\qtcreatorcdbext32 respectively.
Debugging x64 on Windows 11 Arm64 host
The «Windows Software Development Kit — Windows 10.0.22000.194» which is the current Windows 11 SDK doesn’t install on a Windows 11 Arm64 host the
"%ProgramFiles(x86)%\Windows Kits\10\Debuggers\x64"
directory, wich would host the
needed for debugging
applications.
Windows 11 SDK does actually deliver the redistributable x64 installer
"%ProgramFiles(x86)%\Windows Kits\10\Debuggers\Redist\X64 Debuggers And Tools-x64_en-us.msi"
, which when executed will install and make the
available.
Note that you will have to install the above
package from a
application (e.g. Total Commander or Qt Creator itself) and not from Windows Explorer (
application).
Starting with Windows 11 22H2 you can automate the installation of the
as:
1. Uninstall the
broken installation:
%comspec% /q /c start /machine arm64 %windir%\System32\msiexec.exe /uninstall "%ProgramFiles(x86)%\Windows Kits\10\Debuggers\Redist\X64 Debuggers And Tools-x64_en-us.msi"
2. Install the correct
package:
%comspec% /q /c start /machine amd64 %windir%\System32\msiexec.exe /i "%ProgramFiles(x86)%\Windows Kits\10\Debuggers\Redist\X64 Debuggers And Tools-x64_en-us.msi"
For more details have a look at: https://bugreports.qt.io/browse/QTCREATORBUG-26934
Obtaining debugging information for operating system and compiler runtime libraries
When launching debugging for the first time, you are prompted to set up a Symbol server , which adds a special entry to the symbol path of the debugger. The Symbol Server provides debugging information for operating system and compiler runtime libraries. The initial download can be time-consuming.
Tips & Tricks
When the debugger fails to launch, please verify first that you can run the application by pressing the Run button. It can happen that the target selector chooses a non-runnable target.
2nd, take a look at the Debugger Log (choose Window/Views/Debugger log ). This usually shows errors. When reporting bugs related to debugging, please always attach the log. Note: Failing to start with error 135 reported usually means that a dependent DLL cannot be found.
In order to be able to view variables, etc, a debug build is required.
Debugging can be slowed down by out-of-date .pdb files. A clean build can help. Also, incremental linking can affect debugging (check for «Unable to verify checksum of module…» in the log).
Incremental linking can be disabled by adding the following line to the CMakeList.txt file when building with CMake:
set(CMAKE_EXE_LINKER_FLAGS "${CMAKE_EXE_LINKER_FLAGS} /INCREMENTAL:NO" )
Or the following line to the .pro file when building with qmake:
QMAKE_LFLAGS_DEBUG += /INCREMENTAL:NO