
This topic applies to both Remote Support and Mini Remote Control.
The Dameware Mini Remote Control application connects to the client agent service using a direct TCP connection from the application to the client agents. Although this method may not be as convenient as establishing a VPN or SSL connection to a LAN, for many users it provides a way of supporting customers or administrating remote computers not on a LAN.
Dameware Mini Remote Control supports the following connection methods:
| Connection Method | Description | Authentication Methods |
|---|---|---|
|
Use MRC Viewer |
Connects to the MRC agent installed on the remote Windows machine. If an agent is not installed on the remote machine, it is installed during the connection. |
Proprietary Challenge/Response: This authentication method works by having a custom proprietary User Name and Password defined in the settings of the Dameware Mini Remote Control client agent service on the remote system. The User Name and Password are stored in encrypted format in the Registry of the remote system. Windows NT Challenge/Response: This authentication method uses the integrated security of the Windows operating system to connect to a remote system. Encrypted Windows Logon: The Encrypted Windows Logon is similar to the Windows NT Challenge/Response authentication method except that it sends the User Name and Password to the remote system in an encrypted format. This authentication method is designed primarily for situations where NT Challenge/Response authentication is not possible or fails. Examples of these situations include when Domain Controllers have been configured to disallow anonymous connections, NT Challenge / Response has been disabled, or when using any of the Home versions of Windows Operating Systems. Smart Card Logon: The Smart Card Logon provides two-factor authentication that allows the Dameware Mini Remote Control user to authenticate to a remote system using a Smart Card and PIN at the local system without requiring a Smart Card reader at the remote system. This option works in conjunction with the Smart Card network implementation. |
|
Use Remote Desktop (RDP) |
Connects to the remote system using the Microsoft Remote Desktop Program. When you select this option, Dameware Mini Remote Control opens the RDP viewer within the Mini Remote Control application to connect to the remote system. |
N/A |
|
Use VNC Viewer (Linux or Mac) |
Connects to a remote VNC server using the Remote Frame Buffer (RFB) protocol. Use this option to connect to Linux or Mac hosts. For additional information about the operating systems Dameware Mini Remote Control supports for VNC connections, see Configure a Mac or Linux computer as a Dameware Remote Host. |
N/A |
← Вернуться в раздел «Программы»
Честно, уже пробывал много раз, версия проги последняя, пробывал на не одной машине, мб баг конечно в самой программе, потому что руки не с одного места и разбирался с программами более сложными, понять не могу в чём причина этой ошибки.
Автор: drocher
Дата сообщения: 06.11.2008 10:08
ребята подскажите возможно ли пользователю дать возможность подключиться на комп но только для просмотра?
есть такая функция то она почемуто только с подтверждением на стороне клиента. так не пойдет.
такое возможно вообще?
Автор: disaboard
Дата сообщения: 11.11.2008 12:42
drocher
В Remote Connect — Settings — Remote Options — галочка View Only
Автор: Ilyha58343
Дата сообщения: 13.11.2008 12:40
Ребята, а не подскажите как в дам варе можно группе компьютер включить службу телнет? Или каким нибудь другими свойствами
Автор: Devision79
Дата сообщения: 13.11.2008 12:56
Здравствуйте, не подскажете в чем проблема. При попытке подключиться к машине, сама удаленная машина уходит в перезагрузку. На других машинах все в порядке, условия везде одинаковые, порт открыт.
Автор: ANTRAMABANAKAN
Дата сообщения: 13.11.2008 15:22
Привет
А ты попробуй сначала соединится с админискими шарами …
И смотри что бы открыта была IPC$ шара
Автор: disaboard
Дата сообщения: 14.11.2008 08:31
Цитата:
Ilyha58343
Идешь в DWNTU — там где список workstation — правой кнопкой по любому компутеру — Services
Открывается окно служб, в нижнем окне Batch правой кнопкой — Add — выбираешь там свой домен/рабочую группу, тыкаешь Add
Выбираешь в списке компы которые тебе нужны, потом правой кнопкой — Batch Processing…
пишешь имя службы и что ты с ней сделать хочешь
вроде все
Автор: vitcin
Дата сообщения: 17.11.2008 08:59
Ребята, у меня такая проблема. Нужно чтобы dameware обращалась к доменному контролееру и смотрела в AD группу для разрешения доступа к компу.
ставлю в dwrcs.ini следующие параметры:
Global Group Machine 0=dc-1.domain-1.local
и
Must Be Member Of This Global Group=Yes
Global Group Name=Allow
но когда подключаться начинаю, он отказывает в авторизации мне и говорит в журнале Windows, что не смог найти такой группы на контроллерах (их несколько там). Хотя такая группа есть, и моя учетка состоит в этой группе. Использую Windows NT Challenge/Response при аутентификации.
и еще. Когда подключаюсь (без авторизации из группы AD) появляется уведомление хотя везде гаплочки сняты.
И пользователь может меня дисконнектить.
Я даже в dwrcs.ini везде вместо Yes поставил No:
Notify On New Connection=No
Notify On Disconnection=No
No Notify Sound=Yes
Notify On New Connection Timeout Value=15
Notify Dialog Caption=DameWare Mini Remote Control
Notify Dialog Text 1=MRC Notification
Notify Dialog Text 2 Remote Control=The following user has connected via remote control.
Permission Required=No
Center Permission Dialog=No
Permission Dialog Set Focus On Decline Button=No
Show SysTray Icon=No
Enable User Option Menu=No
Option Notify On New Connection=No
Option Notify On New Connection Dialog Timeout=No
Option On Disconnect Logoff Desktop=No
Option On Disconnect Logoff Desktop Force Applications Close=No
Option On Disconnect Lock Workstation=No
Option Logon At Logon Desktop Only=No
Option Logon At Logon Desktop Only Timeout=No
Option Enable File Transfer=No
Option Enable Chat=No
Option Enable Chat Allow Anyone To Initiate=No
Option Permission Required=no
Option Enable Add Client Connection Menu=no
Option Enable DisConnection Menu=no
Option Enable Email Notification=no
Option Enable Email Notification Change Email Address=no
Permission Required for non Admin=No
Permission Required for non Admin Disconnect If At Logon Desktop=No
Permission Required for non Admin Force View Only=No
On Disconnect Logoff Desktop=No
Force Applications Close=No
On Disconnect Lock Workstation=No
Logon At Logon Desktop Only=No
Logon At Logon Desktop Only Timeout=Yes
Logon At Logon Desktop Only Timeout Value=20
Enable Add Client Connection Menu=No
Enable Disconnection Menu=No
Enable Settings Menu=No
что я делаю не так?
Автор: Lovec
Дата сообщения: 20.11.2008 17:59
All
Подскажите, почему при попытке Remote Control к некоторым компам, выдает ошибку типа «Current server settings require specific authentication type to connect.»
Тип соединения стоит Encrypted Windows Logon. К 95% машин подключение с таким типом проходит нормально…
Автор: vitcin
Дата сообщения: 21.11.2008 12:11
Lovec
он тебе говорит что нужен определенный вид аутентификации при подключении к данному серверу. Получается на сервере изначально опредлен вид аутентификации, и Encrypted Windows Logon не подходит.
Поробуй переустановить remote control Server на удаленной машине. Если не поможет смотри натсройки соединения при установке.
Автор: jkrndwork
Дата сообщения: 21.11.2008 15:07
DameWare Mini Remote Control
При попытке коннектится к удалённой машине вываливается окно с запросом
Connect as:
Password:
Что вводить в эти поля, где брать данные для ввода?
Автор: vovaking
Дата сообщения: 24.11.2008 15:41
Как избавиться от того что бы не было видно
когда кликаешь на мой компьютер то видно что к тебе подключены.
Автор: disaboard
Дата сообщения: 25.11.2008 07:28
jkrndwork
вводить имя учетной записи администратора или пользователя с правами администратора и пароль от неё. Брать из головы
Автор: zvb
Дата сообщения: 26.11.2008 18:03
при отправке сообщения клиенту в строке статус появляется сообщение: «Error: 2273 — Не удалось найти псевдоним сообщений в сети.» и сообщение не доходит.
подскажите как с этим бороться?
Добавлено:
Gravip
Цитата:
Подскажите пожалуйста, как приконектиться к удаленному компьютеру, на той машине одна учетная запись без паролей, а с меня требует, или что нужно сделать на той машине ? но не хотелось бы чтобы пользователи при загрузки системы выбирали учетную запись, но это не критично
Администратору назначить пароль и соответственно под ним входить
Автор: Mars68rus
Дата сообщения: 28.11.2008 15:02
при отправке сообщения клиенту в строке статус появляется сообщение: «Error: 2273 — Не удалось найти псевдоним сообщений в сети.» и сообщение не доходит.
подскажите как с этим бороться?
Включи службу сообщений
Добавлено:
Можно-ли сделать так, чтоб при подключении к компу пользователя оставались обои на рабочем столе(на машине пользователя)?
Автор: PhoenixUA
Дата сообщения: 28.11.2008 20:57
Mars68rus
Можно. Кнопочка Settings на панели инструментов DMRC, а там кнопка типа Desktop effects, не помню точно.
Автор: vovaking
Дата сообщения: 02.12.2008 14:39
Когда кликаешь на мой компьютер то видно что к тебе подключены.
Как от этого избавиться от такого палива?
Не как не могу избавиться от этого палива. ПОМОГИТЕ мне пожалуйста.
Автор: lavren
Дата сообщения: 03.12.2008 13:38
vovaking
Сделай скриншот побольше и залей например сюда! У меня как не смотрел ничего не вижу!
Автор: bur_ref
Дата сообщения: 10.12.2008 08:20
Такая же беда на версии 6.8.0.1, когда подключаешься к удаленному хосту там выскакивает сообщение о конекте. Пробовал в ручную править dwrcs.ini на клиентской машине и выключать параметр в DMRC не помагает.
Похоже глюк самой версии, потомучто на предыдущих версиях все работало на ура.
Добавлено:
Проблема решилась после регистрации DW c помощью кенгена с варезника.
Автор: i_no_k
Дата сообщения: 10.12.2008 13:52
vovaking
Если я правильно понял по скриншоту — в свойствах конфигурации клиента на вкладке Simple File Transfer (SFT) галку сбрось с Enable.
Автор: IT_Guy
Дата сообщения: 12.12.2008 07:17
Здравствуйте, помогите решить проблему с DameWare. Стоит домен.. с рабочей станции Администратора подключаюсь при помощи миниРемоутКонтрол к машине и появляется окошко о то что нужно ожидать разрешения на подкличение.. как можно это отключить? и сразу цепляца на удалённую машину
Автор: EvgueniK
Дата сообщения: 22.12.2008 15:23
Подскажите, пожалуйста, как DW грамотно снести с рабочей станции в домене? Может скрипт какой есть?
Автор: JekaRus
Дата сообщения: 23.12.2008 14:26
Цитата:
Подскажите, пожалуйста, как DW грамотно снести с рабочей станции в домене? Может скрипт какой есть?
File -> Remove Service -> Name или
File -> Connect -> Alt+R -> Name
Автор: exMIB
Дата сообщения: 23.12.2008 18:22
Как с помощью автоматики DW прочитать по расписанию определенные ветки в реестрах рабочих станций для дальнейшего анализа, а так же узнать сущестование тех или иных файлов и папках на дисках ?
Автор: JekaRus
Дата сообщения: 24.12.2008 14:27
Цитата:
Как с помощью автоматики DW прочитать по расписанию определенные ветки в реестрах рабочих станций для дальнейшего анализа, а так же узнать сущестование тех или иных файлов и папках на дисках ?
Зачем такое делать с помощью DW. Уж проще батник написать.
Автор: cluster
Дата сообщения: 25.12.2008 10:38
как можно подключиться к своему удалённому филиалу с другим доменом?
с доменами в локальной сети проблем нет.
Автор: Gromka_rus
Дата сообщения: 28.12.2008 15:47
Скажите кде DM хранит пароли к компам на которые я уже заходил ? Подкидываю в апликейшен дейт файл со своей бд на другой комп — записи с ипами есть, а паролей нет.
Автор: Stamos
Дата сообщения: 29.12.2008 14:32
Проблема такова, не на всех компах можно переключать язык рус. и англ. Если вылезает окно то будет работать если нет то не будет!
КАК решить такую байду!
Автор: JekaRus
Дата сообщения: 01.01.2009 11:31
Stamos
Лучший способ устранить проблемы с переключением это сделать разные способы переключения у себя и на удаленной тачке. Например у себя переключение по альт-шифт, на удаленной сонтрол-шифт. При подключении всегда отвечать нет, а то может пропасть русский язык из настроек.
Автор: kazavo4ka
Дата сообщения: 01.01.2009 12:03
Stamos
23 страница
Страницы: 123456789101112131415161718192021222324252627282930313233343536373839
Предыдущая тема: Управление окнами в MyIE ?
Форум Ru-Board.club — поднят 15-09-2016 числа. Цель — сохранить наследие старого Ru-Board, истории становления российского интернета. Сделано для людей.
The work of a System Administrator or IT technician in any business usually revolves around the installation, monitoring, maintenance, and also provision of support for the various computer systems. It’s not the easiest of tasks but the development of various dedicated software has seen a significant reduction in the workload through automation. The Dameware Remote Support by SolarWinds is one such tool that will be really convenient for the system admin. It is a software that will allow you to remotely access all the servers and PCs both inside and outside your network.

If you have tried guiding a non-tech person through the process of resolving an issue on their computer through the phone then you will appreciate the need for this tool. Or if you have had to come back to the office because a server went down after you had clocked out. Also, in many setups today, it is common to have the various IT components distributed in different locations. Therefore, having a remote desktop will save you from having to take numerous trips which then translate to less time taken to resolve various issues.
What makes the Dameware Remote Support software so great is that on top of the remote access capabilities, it is integrated with a number of system management tools that make it easy for you to quickly identify the root cause of a problem. I also like that SolarWinds based their User Interface on the Microsoft Management console which many people are already familiar with from their interaction with the Windows Operating System.
The Dameware Remote Support is implemented wholly within the premise of your organization which puts you in control of every aspect of its management.
Follow along as we break down every aspect of this remote desktop software starting from its deployment all the way to its capabilities, pricing, and disadvantages of using it. And at the end of it all, we will tell you why it is perfect for you. That is assuming that it’s not already clear to you by then.
Dameware Remote Support Installation
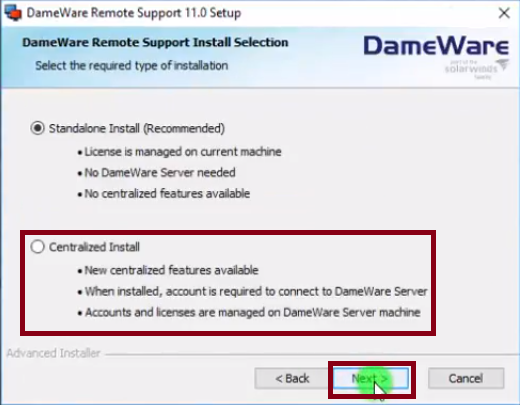
The installation process of this software will depend on the deployment model that you choose. This can either be the Stand-alone mode or the Centralized server mode. What’s the difference?
Standalone Mode
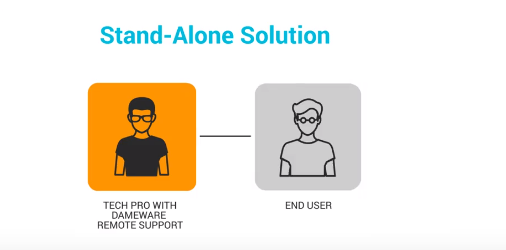
This is a deployment method where you install the software on every single machine that you will be using it on. You will still have access to all the features of the Dameware Remote Support but the licenses are managed individually on each computer. The good news is that you don’t have to worry about the installation of the Dameware client agent that is installed on the remote computer to enable the remote connection. Dameware provides you with numerous ways you can deploy the agent directly from the admin computer such as installation on demand, the use of EXE installers, or installation using MSI and MST installers.
When Would I Recommend Using the Stand-alone Mode
- When you do not have a significant number of remote computers to control.
- If all the end-users are located inside your network. The standalone mode cannot communicate outside your firewall.
- When you have a small and decentralized IT department.
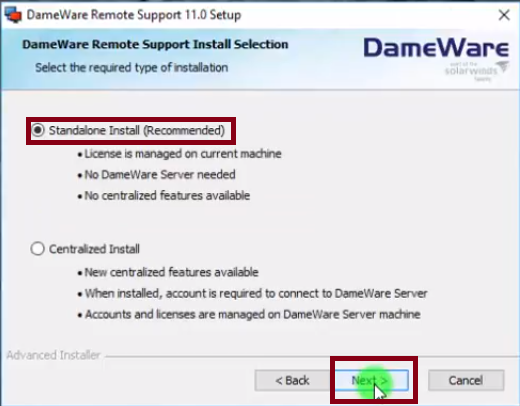
To install the Standalone Mode simply run the installation file and follow the installation wizard. Then when prompted select the Standalone Install.
Centralized Mode
This is the higher end form of deployment and comes with its benefits over the standalone installation. For starters, the central server includes the administration console which allows you to manage all the licenses and users of the software from a single interface. That is including the assignment of permission rights to the users which is all made easier by the ability to integrate Dameware with the Active Directory. From the administrative console, you can also create a global host list that will be accessible to all the Dameware users and also track the list of all the open internet sessions.
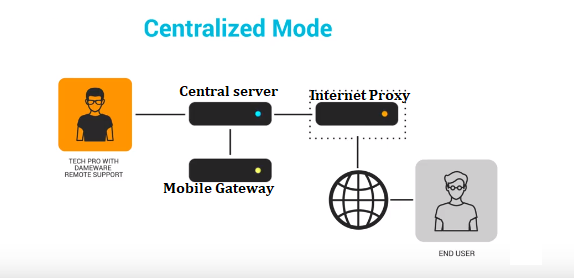
Additional Benefits of the Centralized Server over the Standalone mode
The biggest advantage of the Dameware centralized mode over the Standalone mode is the two additional server components that come bundled with it. These are the Dameware Internet proxy which facilitates remote connections with users that are outside your internal network. And the Dameware Mobile Gateway that allows technicians to use their Android and iOS devices to remotely control the host computers.
How to Implement the Centralized Server in your Organization
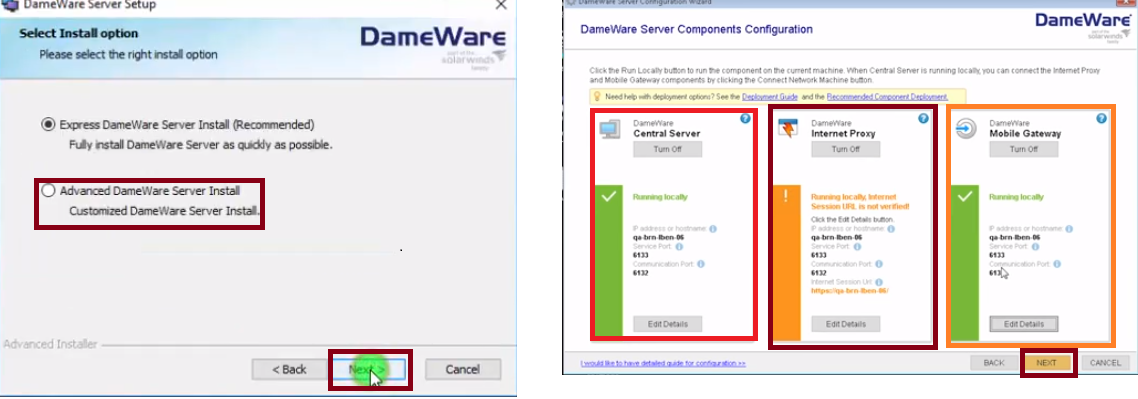
If you are a small business and you are not worried about exposing your internal network to the internet then you can install all the three components on a single server or what we call the express install. Once you launch the Dameware server installation file, follow the installation Wizard and you will come across the Express Dameware Central Server Install option.
Otherwise, we recommend using at least two servers. This way you install the Dameware server and the Mobile Gateway on one machine and then set up the second server as a DMZ where you can install the Internet proxy component. Although for maximum security as required by big enterprises and government agencies, you will have to install each of the components on its own server.
So, now when installing Dameware on different servers you will select the Advanced Dameware Central Server Install instead of the Express option. Next, select the component that you want to be installed on that specific server and then you can proceed with the installation process.
Oh and make sure to check whether the executable file has been blocked before you can begin the Dameware installation. To do this, right-click on the file and go to properties. If it is blocked you will be presented with an unblock button.
Also, if you are deploying Dameware in Centralized mode you should have some basic port forwarding skills so that you are able to open the necessary ports on your router and computer firewall. Or you could follow our guide on How to Configure Dameware ports.
Configuring Dameware on the Client Computer
Once you have set up all the components on the specific servers, you will still have to install the Dameware client on your computer so that you can be able to send the connection requests to remote computers. The process is pretty straightforward. Just run the Dameware Remote Support installation file and now instead of choosing Standalone, select the Centralized Install option. You can refer to this guide for more information.
Also, just as we did with the standalone mode you will also need to install the Dameware client agents on the remote computer to allow it to receive connection requests. Again, you can complete all this right from the remote computer using any of the methods highlighted here.
When Would I recommend the Dameware Centralized Mode
- When your business has a significant number of remote computers to control.
- There is the need to support end-users that are outside your internal network.
- If you want to be able to use your mobile device to provide remote support to end-users.
Dameware Remote Support Features Overview
So, now that we are done with the installation, I think the next step is to highlight the full capabilities of the Dameware Remote Support. And to do this we will split this section into two parts. First, we will look at the Dameware Mini Remote Control which is the core component of the Dameware Remote Support and then we will look at the additional administration tools which allow you the extra capabilities such as integration with the Active Directory.
The Dameware Mini Remote Control(DMRC)
This is the tool in SolarWinds Dameware Remote Support that enables you to connect to remote Windows, Linux, and Mac computers. It can be used to establish 5 types of connections.
MRC Viewer connection
This is the type of connection that is established between the Dameware Mini Remote Control and Windows computer.
VNC Connection
This is the connection type used to link the DMRC to Mac and Linux systems. Just select the device you want to remotely access from the DMRC interface check the VNC viewer option and proceed to connect. Mac computers do not natively accept remote connections from Windows computers and you will thus have to manually configure them. This is a detailed guide on how to remotely control Mac computers using Dameware.
Internet Connection
This is the connection type established between the DMRC and remote computers that are outside your internal network. To initiate this type of connection look for the internet session icon on the Mini Remote Control’s taskbar.
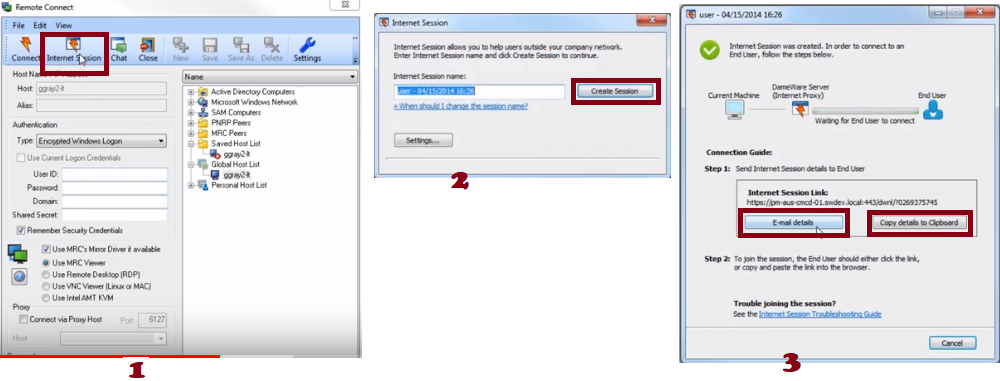
When you click on it, a setup wizard will appear and you just have to follow it to create the internet session. At the end of the setup process, you will be provided with a link that you are supposed to send to the remote desktop. If you have an email client the DMRC provides you with a direct way to email the link to the end-user. Otherwise, you will have to copy it to the clipboard and then send it via another medium. When the end-user receives the link they need to click on it and once they accept the connection you can begin controlling them remotely.
Intel vPro KVM Connection
This is the connection type between the DMRC and out of band computers. It allows you to connect to devices that are powered off, those in sleep or hibernation mode, or crashed computers. This will be particularly useful in those instances when you want to access the bios or boot menu of host computers.
Standard RDP connection
This provides the basic remote access functionality similar to the native Windows Remote Desktop. The advantage of launching this connection via the centralized DMRC interface is that you will have access to your global host list which facilitates faster connection.
Once you have established a connection with the remote computer then you can use the Dameware Mini Remote Control to perform troubleshooting and problem resolution tasks. The tool also allows you a number of functionalities that I will highlight briefly.
File Sharing – You can easily send files between the client and host computers through a simple drag and drop. This will be great for when you need to install certain software or apply patches to the remote computer.
Real-time chat – The DMRC allows the client computer to communicate with the end-user via live chat. This will allow the remote user to provide any useful insights that can help the admin determine the root cause of a problem faster and the admin can also use it as a channel to update the remote user about the status of their problem.
Multiple Sessions – The Dameware Mini Remote Control can be used to open multiple sessions concurrently where one technician connects to multiple hosts or several technicians connect to one remote computer.
Printer Sharing – The DMRC will also allow you to print documents that are located on the remote desktop directly through the printer on your local network. This will help eliminate the need to transfer the files to the client computer first.
Remote Session Recording – DMRC allows you to record the remote session for future reference or for quality control. You can also take a screenshot at any stage during the session by simply clicking the screenshot button.
Disablement of the Remote Machine Monitor – The Dameware Mini Remote Control allows you to remotely control the host computer while the user on the other end continues with their work as usual. But sometimes this can interfere with the remote process. This is why DMRC allows you to disable the host’s screen and consequently their ability to use their keyboard and mouse. You can then restore the functionality once you are done.
To save you some time the MRC keeps track of your most accessed sessions and will save the login credentials so that you can initiate connection easily.
The Dameware Mini Remote Computer can be purchased as an independent tool but it will be limited in its use. You won’t have access to the Dameware Internet Proxy or the Dameware Mobile Gateway. You also won’t have access to the additional administration tools that we are now going to look at.
Dameware System Management Tools
Apart from the centralized deployment, the other major factor that distinguishes the Dameware Remote Support from all the other Remote Desktop software are the additional management tools that are bundled within it.
First, there is the selection of Microsoft administrative tools that will allow you to perform basic troubleshooting skills without having to launch a full remote session. Through these tools, you can start/stop/restart services running on remote computers and also view and clear event logs. Additionally, they can be used for monitoring System performance, executing Wake On Lan tasks, and Editing Registries just to name a few.
The tools also extend their functionality to the AD and allow easy management of local users, shares, and other peripherals. Some of the tasks you can carry out in the AD include unlocking user accounts, resetting passwords, editing group policies and also creating new/updating existing AD objects.
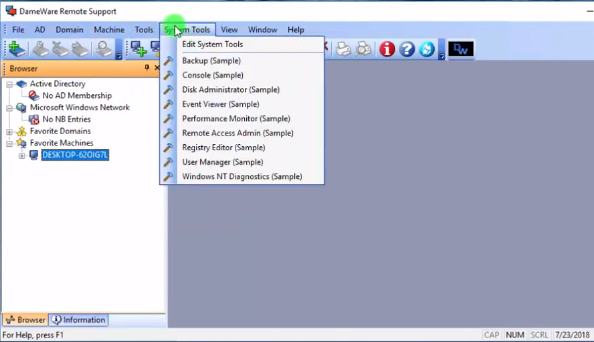
Here you will also find the Dameware Remote Support export tool which allows you to move information such as the windows configuration files from the remote computers and export them to CSV or XML external files. Some of the other administrative tools in the DRS include a Disk administrator, Performance Monitor, and a Server Manager. The various tools in DRS are available in a tree view and each one will be opened in a different tab when selected to simplify the process of switching between them.
Dameware Remote Support Security
There is no shortage of ways in which a hacker can exploit the remote access technology to gain access into your network and exfiltrate important company data. Which is why SolarWinds employs a number of security measures not only to authenticate anybody trying to send a remote connection but also to ensure that the data being sent between connections cannot be hijacked.
The Dameware Remote Support includes 4 authentication methods to choose from. The first is the proprietary challenge in which the username and password used to login to the remote session are configured on the Dameware client agent that’s installed on the host computer. Then there is the Windows NT challenge which utilizes the integrated security of the Windows Operating System. The third is the Encrypted Windows logon which is similar to the Windows NT challenge but now the username and password are sent to the remote computer in an encrypted manner. Finally, we have Smart Card Logon. Dameware Remote Support was the first remote desktop to allow authentication using this method.
Some additional security measures employed by Dameware includes the ability to define specific IPs that can initiate a connection, add another password or shared secret, or only allow connections from people with administrative permissions.
To protect active sessions from being intercepted Dameware uses multiple encryption algorithms that are implemented by the Microsoft built-in Cryptographic Service Providers and CryptoAPIs. And to tune things a little higher, it also uses RSA’s BSAFE Crypro-C ME encryption modules when it’s running in FIPS mode.
Integration with the SolarWinds Web Help Desk
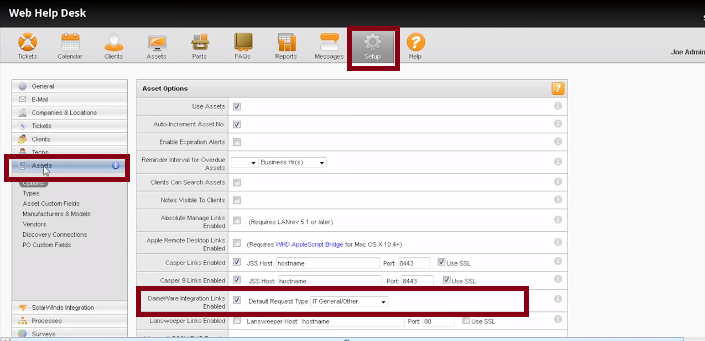
Remote Desktop Softwares are tools that help in the easy deployment of customer support. Therefore, you can see why integration with a Help Desk software can aid in value addition. You will now have a central platform where your end users can raise all their tickets and requests and then you will be at a better position to assist them by remotely accessing their computers. The Web Help Desk seamless integration with the Dameware Remote Support eliminates the need to switch between the two applications and allows you to launch into the troubleshooting and problem resolution process directly from the Help Desk interfaces.
The Downsides of Using Dameware Remote Support
Dameware is such a complete tool that it’s hard to find any fault within it. The issues I am going to address are not deal breakers but they would improve the overall experience when using the remote desktop software.
So, one of the disadvantages of using Dameware is the inability to remotely control mobile devices. It’s nice that the system admin can use their mobile phone to access workstations and servers. But, with the increased acceptance of mobile phones into business networks, it would be great if they could also be controlled remotely.
Then there is the fact that you have to open ports on the remote computer before it can accept remote internet sessions. This won’t be much of a problem to system administrators who are the actual targets of the software but for a beginner user who is not familiar with port forwarding, then it will steepen the learning curve.
Also, I think that the fact that TeamViewer offers remote support to mobile devices and does not require any special port configurations for most of its connections should be a source of concern. Dameware and TeamViewer are not what I would call direct competitors but that has not stopped people from comparing them. You can check our post on Dameware vs TeamViewer to get more insights.
Dameware Remote Support Pricing
I think the Dameware Remote Support pricing plan is quite clever and convenient. SolarWinds charge you based on the number of Technicians using the software but does not impose a limit to the number of remote computers the technician can connect to. This, therefore, allows you to use fewer administrators to support several end-users and consequently save on administration costs.
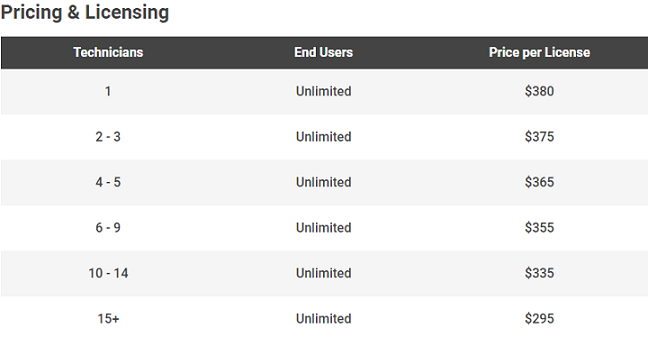
The current price for one licensed user is $380 that will need to be renewed annually if you want continued access to SolarWinds support and product updates.
System Requirements
The system requirement for the Standalone and Centralized installations differ but overall they are very minimal requirements.
Note that Dameware Remote Support only works on Windows systems. That is Windows vista up to Windows 10 for workstations and for Windows server it is compatible with Windows server 2008, 2012, and 2016 including the R2 editions.
For the Centralized Server system, you need a minimum of 1GB free hard drive space, a Quad-core CPU with a processing power of 2.0GHz and 4GB RAM. But if you are using the Standalone software you can make do with 150MB free hard disk space and a 1GHz CPU that has a 4GB RAM.
Conclusion
At this point, there is not much left to say. The SolarWinds Dameware Remote Support has all it takes to offer prompt and efficient remote services to the end-user. The tool has curved a niche for itself in the provision of IT services which is what makes it perfect for system administrators and also the reason it cannot be compared to most of the other remote desktop software.
The centralized server system makes DRS perfect for deployment in big enterprises and the Standalone mode then ensures it’s still feasible for small businesses. Not only that, I think this remote desktop software will be perfect for Managed Service Providers (MSPs). The extra management tools and the ability to integrate with the Help Desk means you will now have a complete support management system and if that does not cement the SolarWinds DRS as an industry leader, I don’t know what will.
DameWare Mini Remote Programs Control (32-bit) generally have two components, one component is installed on the Local machine and a component installed on the Remote. When used, usually the administrator needs to install, configure the components on this remote machine. DameWare Mini Remote Control (DWMRC) 7.5.5 is a program that supports the administrator can control a computer remote.
DameWare Mini Remote Control (32-bit) has a pretty good feature is supported installing components on remote machines remotely without having to sit directly in the machine. This article will guide the reader general DWMRC can select it when you want to control remote Windows machines. As well as programs for controlling Remote desktop, DWMRC includes 2 components:
– DameWare Mini Remote main program running on the Local Control – Mini Remote Control (DWRCC.EXE file is run).
– The program runs on Remote service types – Mini Remote Control Agent Service (DWRCS.EXE file is run). Agent Service must be installed and running on the Remote. The installation can be done when creating a connection, or installed manually.
– Need to have the UserID and Password on Remote Administrator group.
– “File & Printer Sharing” must be enabled on the Remote.
– Category Admin $ should be shared (share) on the Remote.
– The IP port needed for File & Printer Sharing is 137-139 / 445 should be open on all devices router / firewall between the two machines in the Local and Remote and Remote software firewall on your computer (such as firewall features XP Service Pack 2, Zone Alarm, …).
– When connected via the Internet, listen Service Agent in the default TCP port is 6129. For configuring port forwarding on the router / firewall to this port.
– Operating system support on the Local / Remote: Windows NT / 2000 / XP Pro / 2003 / Vista. On the Remote, if using XP, need to abandon the “Simple File Sharing”.
Create a connection
Once downloaded, install the program DameWare Mini Remote Control, run the program by clicking Start> Programs> DameWare Mini Remote Control> DameWare Mini Remote Control. The interface of the program as shown below:
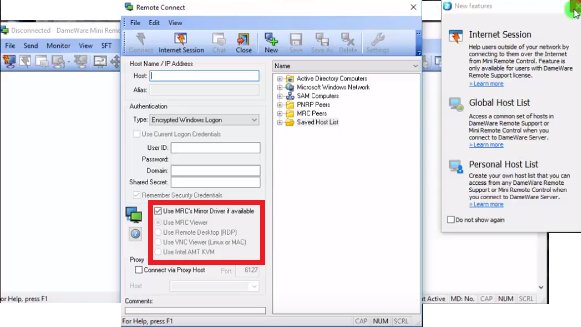
When running the program DameWare Mini Remote Control, appears the main window of the program and the Remote Connect dialog. Remote Connect dialog is used to add, edit the connection was created in the Saved Host List. To create a new connection, follow these steps:
– Enter the IP address of the Remote Host box.
– Enter User ID, Password in the appropriate boxes in the Authentication section. Note Encrypted Windows Logon is anthentication style.
– Pay attention to select the Use MRC’s Mirror Driver selected if available.
– Click the Connect button to make the connection. The first time you connect to the remote machine, if Agent Service is not installed on the Remote, DameWare Mini Remote Control will automatically install it. Notification dialog box appears as the Agent Service is not installed on the Remote and ask you if you want to install it or not.
In the above dialog box, click OK to confirm the installation. DWMRC will perform the installation to copy files to the Remote Agent Service and run it as a Service. Ending the Remote computer screen is displayed on the main window DWMRC.
On the main window of the program is the screen of the Remote. If the current mode Remote logoff, can send the corresponding commands Ctrl + Alt + Delete to log on to the system and do the job. On the main window DWMRC, noting the following features:
– Disconnect: disconnect the Remote.
– View Full Screen: Display Remote desktop computer screen all Local.
– Lock Remote Keyboard and Mouse: Mouse and keyboard lock Remote.
– View / Edit Remote Server Settings: view, edit the settings of the Remote Agent Service on the machine.
– Open the Remote Upload Folder: open default folder when SFT file transfer feature. Above are the main steps to create a connection. It is easy to implement for new users. But need to understand the following information to use the program more efficiently.
Establish Mirror Driver
On the Remote Connect dialog box, before connecting to a Remote in Saved Host List, click the Settings icon.Remote Properties dialog box that appears.
On the Properties dialog box, select the Driver tab Mirror. In this tab you can configure the color resolution of the desktop on your computer to display on the Local Remote configuration and compression level. Can change the values to be consistent with slow or fast network:
– With a local LAN, the network controller, can choose the Remote Display and Compression Level Default is 3 (default).
– When control over the Internet or via modem dial, choose the lowest level of the 8-bit Display, and Compression Force Level 6.
Note: 8-bit = 256 colors; 16-bit color = 32,000; 24-bit = 16 million colors; = 4 billion 32-bit color. When the number of bits decreases, the higher the compression ratio of the images are transmitted from Remote to Local smaller size.When control over the network that supports slow, but the image quality will be reduced.
Uncheck “Simple File Sharing” on Windows XP
By default, on Windows XP, Simple File Sharing feature is selected. Meanwhile, the installation automatically Agent Service will not be performed. To uncheck Simple File Sharing feature, run Windows Explorer. On the Windows Explorer, choose Tools -> Folder Options.
In the Folder Options dialog box, click the View tab. Teleport scroll down to the last of the Advanced settings and uncheck Use simple file sharing. Then click OK to confirm.
Local file transfer between computer and Remote
DWMRC Simple File Transfer feature allows file transfers between Local and Remote machine quickly. After connecting to the Remote, on a Local, run Windows Explorer.
On the Windows Explorer right-click the file to be transmitted to the remote machine. On the shortcut menu, choose DameWare MRC> Copy to remote host. Once the file transfer is complete, in the main window DWMRC, SFT menu> Open Remote Upload Folder. Meanwhile on the Remote will run Windows Explorer to open the folder C: \ Windows \ DWRCS Uploads default folder containing the files to be transferred to.
Install, remove Remote Agent Service on
As the first part, the automatic settings on the Remote Desktop Service Agent is made in connection first. Agent Service may install manually under 2 ways:
Option 1: – On the main program interface DWMRC, choose File> Install Service. Installation Services dialog box appears.
Service Installation dialog box, enter the machine’s IP Remote Machine Name box, then click OK to confirm. Enter User ID / Password of the account belonging to the Administrators group when asked.
Method 2: Create the installer to perform on the Remote. Click Start> Programs> DameWare Mini Remote Control> DameWare Mini Remote Control Client Agent MSI Builder. Interface appears to create the installer.
– On the DameWare Mini Remote dialog box Package Builder, select the operating system used on the Remote, then click the Build button to perform the installation package created. With Windows NT / 2000 / XP / 2003, will create DWRCS32.MSI files, with Vista, will create a file in the Output Folder DWRCSVista32.MSI. These files are quite small (about 860Kb) and you can copy to the remote machine to perform the installation on it. To remove Agent Service on the Remote, on the main interface of the program DWMRC, choose File> Remove Service. DWMRC use RDP protocol in addition to supporting the MRC’s own Mini Driver, it also supports RDP protocol to connect to Remote Desktop is available on XP, Vista or Windows Terminal Services available in 2000/2003. In the case of pre-configured Remote Remote Desktop or Terminal Services, Remote Connect dialog box can select this feature to facilitate the connection without having to install Mini Driver on Remote MRC.
Enter the credentials, and on the toolbar, click Connect. When Dameware Mini Remote Control successfully connects with the remote system, a Connected to message is displayed. If you are unable to connect to a computer, see Receive Error 5: Access Denied when connecting to a remote computer using Dameware Mini Remote Control.
Full
Answer
How do I connect to an internal computer using Dameware remote control?
To connect to an internal computer using Dameware Mini Remote Control: Launch the Dameware Mini Remote Control application. Click Connect to server. Dameware Remote Support centralized includes a copy of Dameware Mini Remote Control. In the Host field, enter a host name or IP address of the remote system.
What ports does Dameware use for remote connections?
Port 6129 (Dameware Mini Remote Control Port) – This is the port that the Dameware client agent on the host computer uses to listen for incoming remote connection requests.
What is Dameware remote support software?
To manage workstations, both Dameware remote software solutions come with advanced device inventory tools and allow connections across Windows, Mac OS X, Linux, and Android and iOS devices. Compare Dameware remote support software to learn which option is best for your needs. Do you find yourself asking… What is remote PC access software?
How does Dameware remote everywhere integrate with SolarWinds?
Additionally, Dameware Remote Everywhere integrates with SolarWinds Service Desk to provide remote support capabilities within your service desk from almost anywhere with an internet connection. Dameware includes a range of robust usability features designed to improve remote access, including:
How do I connect to a remote computer with Dameware?
Connect to an internal computer using Dameware Mini Remote…Launch the Dameware Mini Remote Control application.Click Connect to server. … In the Host field, enter a host name or IP address of the remote system. … Select an Authentication method, and a connection method.More items…
How do I configure Dameware remote support?
Launch Dameware Mini Remote Control, and select File > Connect to local or remote sessions. Enter the Host Name or IP Address and administrative credentials. Click Connect. When prompted to install the client agent service, click OK.
Can Dameware be used over the Internet?
With Dameware, remote users can connect via remote desktop over the internet while avoiding the hassle of configuring an independent proxy. With a proxy, you can establish a remote desktop connection over the internet to manage remote users from a centralized dashboard.
What is Dameware remote control?
Dameware Mini Remote Control from SolarWinds is a powerful remote control software and desktop sharing tool designed to allow IT pros to remotely access end users’ computers, laptops, and servers for remote administration and support.
How do I activate the Dameware mini remote?
Open the License Manager and click Active/Upgrade on the license you want to activate. If the computer on which you installed the Dameware product is connected to the Internet: Click I have internet access and an activation key from my customer portal license management page.
How do I access remote desktop connection?
On your local Windows PC: In the search box on the taskbar, type Remote Desktop Connection, and then select Remote Desktop Connection. In Remote Desktop Connection, type the name of the PC you want to connect to (from Step 1), and then select Connect.
How much does Dameware cost?
Your business doesn’t operate in a vacuum. Neither should you.TechniciansEnd UsersPrice per License1Unlimited294 $2 — 3Unlimited283 $4 — 5Unlimited272 $6 — 9Unlimited261 $2 more rows
What protocol does Dameware use?
SolarWinds® Dameware® Remote Support (DRS) is a desktop remote access tool built to be compatible across Windows, Mac OS X, or Linux computers. It runs with the standard remote-control protocol but offers the ability to initiate remote sessions using RDP and VNC protocols.
Which port does Dameware use?
To use Internet Session functionality, you must open port 443 in your organization’s firewall to allow the Dameware Internet Proxy to communicate with users outside of your internal network.
Is Dameware a security risk?
Dameware features a very high level of security, meeting requirements set out by the U.S. Federal government. It is compliant with Federal Information Processing Standards (FIPS) 140-2, using the BSAFE Crypto-C Micro Edition cryptography module.
How do I update my Dameware mini remote?
Upgrading is simple Click the button below to visit the SolarWinds Customer Portal. Then, download the latest version of Dameware® Remote Support and follow the setup wizard.
How do I remove Dameware service?
Manually uninstall Dameware Remote Support (DRS)Stop your Dameware Remote Support service.Delete the following folders: C:\Program Files\SolarWinds\DameWare Remote Support. … Delete the following icons: C:\ProgramData\Microsoft\Windows\Start Menu\Programs\StartUp\DRS. … Delete the Registry keys mentioned below. Note:
How do I connect to Dameware central server?
Log into the Dameware Administration ConsoleFrom your Desktop or the Start menu, launch the Dameware Administration Console.Enter the Central Server IP address or host name, and port number. The default port number is 6133.Use the following table to select an authentication method. … Click Connect to Server.
Which port does Dameware use?
To use Internet Session functionality, you must open port 443 in your organization’s firewall to allow the Dameware Internet Proxy to communicate with users outside of your internal network.
How do I transfer files using Dameware?
ContentOpen Dameware Mini Remote Control.Select View > Local Global Options.Click Simple File Transfers Options.Set the download folder path.Click Apply and Save. Admin Items. URL Name.
What protocol does Dameware use?
SolarWinds® Dameware® Remote Support (DRS) is a desktop remote access tool built to be compatible across Windows, Mac OS X, or Linux computers. It runs with the standard remote-control protocol but offers the ability to initiate remote sessions using RDP and VNC protocols.
What is Dameware remote desktop?
Dameware remote desktop software is designed with security in mind. Authentication options include Smart Card Logon, Windows NT Challenge/Response, and Encrypted Windows Logon. You can use robust RSA encryption for FIPS mode, or other encryption methods ranging from RC4 to AES-256.
How many endpoints does Dameware Remote Everywhere have?
Cloud-based Dameware Remote Everywhere allows for 500 endpoints and can be used by as many technicians as needed.
What is remote connection software?
Remote connection software is crucial for troubleshooting devices or managing products at a distance. Dameware includes the option to run local batch script in a system shell session, using PowerShell or system CMD shell. Quickly force reboot, lock a PC, and more, even on unattended devices. Technicians can more easily zero in on root causes with a unified dashboard including system health, event logs, real-time monitoring, and session history.
Why is remote administration important?
Remote administration tools can help improve operational efficiency by giving technicians the tools to view remote system issues, and rapidly respond and begin troubleshooting as needed.
How does remote access work?
From there, the remote access software will display the local client device screen on the host device for easier and more efficient access.
What is remote access?
Remote computer access solutions are built to create secure connections between client and host devices. The best remote software can allow technicians to connect even when the end-user device is off. By using a web-based remote access solution, you avoid the remote support software installation process and can begin solving issues faster.
Does remote access work on both the client and host side?
Web-based remote access software only works when there’s a viable internet connection on both the client and host side but can typically be used across different networks, so long as the proper authentication is provided when establishing the connection.
What is Dameware Remote Everywhere?
With Dameware Remote Everywhere, remote sessions use a proprietary communication protocol, with AES-256 and SSL/TLS key exchange, helping ensure security throughout the session. Remote sessions are also encrypted, and the client can set authentication requirements as needed. As the technician uses commands and file transfers, these actions are digitally signed, while the use of features like remote control and chat is logged in the detailed Session report.
How many characters are required for Dameware remote?
Dameware Remote Everywhere Password: This option will allow you to set the device’s master password. It needs to be a minimum of 8 characters and should include a mix of letters, numbers, and symbols for additional complexity.
What is DRE reporting?
Designed to improve technician efficiency, end user satisfaction, and consistency of service, DRE’s intuitive reporting tools allow you to track team performance, collect meta information about each remote session , and even distribute surveys to end users after services have been provided. This helps ensure consistent and cohesive service, while simplifying your ability to demonstrate the effectiveness of departmental operations to key stakeholders.
What is restricted privilege access management?
Restrictive privilege access management: The policy of applying the minimum amount of necessary privileges to each user account is a key part of establishing secure remote access. Proper access management practices can help to prevent internal employees and vendors from unintentional or unauthorized access to remote sessions and other sensitive company assets and resources.
What is secure remote access?
Secure remote access requires the right combination of best practices, technologies, and security solutions to ensure unexpected guests are unable to access remote sessions. Some frequently implemented solutions include:
Can a Windows account initiate remote sessions?
Windows Account: Choosing this option allows all local or domain Windows accounts to initiate remote sessions, so long as the accounts have adequate privileges and a user profile on the local device.
Is remote access security risky?
Establishing remote connections can be a risky process, as a lack of remote access security could allow hackers to gain access to privileged systems, resulting in data breaches, legal fees, and reputation loss.
How to connect to Dameware?
So, when you want to connect to a remote computer you simply enter their IP address on the Dameware client and send the connection request. The client agent on the host computer will then receive the request and you can begin the remote session. If you are connecting to computers on your network, then the process is as easy as that. However, if the remote computer is on a different network then you won’t be able to reach them until you have opened some specific ports on their routers. The Dameware client agent uses ports 6129, 6130, 6132, and 6133 to listen for incoming connection requests and these ports will most definitely be closed for most routers.
What port is used to transmit data between Dameware Mini Remote Control and the Dameware Internet proxy?
Port 6132 – This port is bi-directional and is used to transmit the internet session data between the Dameware Mini Remote control and the Dameware Internet proxy.
What port does Dameware use?
Port 6129 (Dame ware Mini Remote Control Port) – This is the port that the Dameware client agent on the host computer uses to listen for incoming remote connection requests.
What is Dameware software?
Dameware by SolarWinds is one of the most complete Remote Desktop Software you can use in your business. Especially if you are looking for something to deploy IT support and services such as software and patch installations, computer troubleshooting and problem resolution. It can even be integrated into the SolarWinds Web Help Desk which allows you to remotely address your customer tickets and requests directly from the Help Desk interface.
What is port 443?
Port 443 (HTTPS) – This is the port that the Dameware Internet Proxy uses to communicate with the Mini Remote Control and the client agent on the end-user machine. It’s the port that is used to transmit the internet session requests.
How to initiate a remote session?
To initiate a remote session, you need to install the Dameware client on your machine and then install the client agent on the remote machine. Then you also need to configure the three server components that come included in the installation package. Of course, you can choose to deploy Dameware in Standalone mode and then you wouldn’t have …
How to check router IP address?
Step 1: Log in to your router’s web interface. To do this, open your preferred browser, enter the router’s IP address on the address bar and press enter. Most routers use 192.168.0.1 or 192.168.1.1 as their IP addresses but if these two do not work for you, you can do a quick check through the command prompt.
What is Dameware client service agent?
The agent controls the communication between the technician’s computer and the end user’s computer. If the computer does not have the agent installed, you are prompted to install it when you try to connect.
What to do before connecting to a computer?
Before you connect to a computer internal to your network: Ensure that you have the host name or IP address of the computer to which you want to connect . Ensure that you know the connection and authentication method to use to connect with the computer.
How to enable non-administrator access to client agent?
On the remote computer, right-click the client agent service in the system tray, and select Settings. In the Mini Remote Control Properties dialog box, click Access. To enable non-administrator access to connect to the client agent, clear the following check boxes: Allow only administrators to connect. Permission required for these account types.
What happens when a remote user is not granted permission?
When permission is not granted, the non-administrator cannot access the remote computer. A technician or the remote user can configure the client agent to grant non-administrator access without the remote user’s permission. The client agent can also be configured to require an administrator account before a connection can be made.
What is remote desktop?
The remote desktop feature is compatible with sleep mode in the Apple, Windows 7, Windows 8, and Windows 10 operating systems. A client (desktop) computer must either be on or in sleep mode for remote access to work.
What is RDC in Windows 10?
With Remote Desktop Connection (RDC), you can sit at a computer and connect to another computer in a different location (the remote computer). For example, you can sit at your home PC and connect to your work PC, and use all of your apps, files, and network resources as if you were sitting right in front of your work PC. The remote desktop feature is compatible with sleep mode in the Apple, Windows 7, Windows 8, and Windows 10 operating systems.