
(Send feedback to Microsoft so we can help.)
What affected your experience?
Resolved my issue
Clear instructions
Easy to follow
No jargon
Pictures helped
Other
Didn’t match my screen
Incorrect instructions
Too technical
Not enough information
Not enough pictures
Other
Any additional feedback? (Optional)
By pressing submit, your feedback will be used to improve Microsoft products and services.
Your IT admin will be able to collect this data.
Privacy Statement.
How to find and use the accessibility features in Microsoft Windows 10
Accessibility Settings
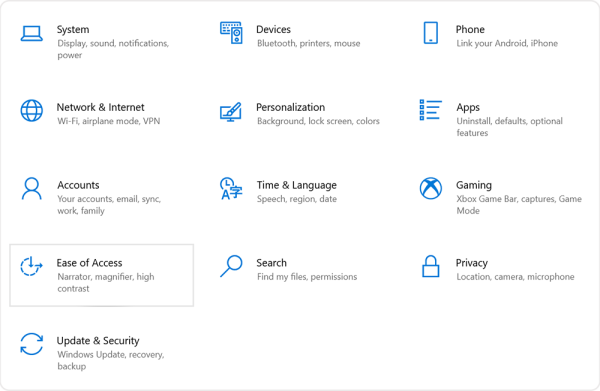
Finding the Ease of Access menu
To activate and deactivate most accessibility features, the very best place to start is the Settings menu. To access the settings menu:
- Using your mouse, click the Start Menu icon at the bottom left corner of your screen. It features the Windows logo.
- Click on the Settings icon.
- The Settings Application will open.
The Ease of Access setting is where you will find most assistive technology features on your Windows device. You will see it as an option among the other settings.
Back to the top
1. Text, Size, Colours, Contrast and Brightness
1.1. Enlarge Text
- Open Ease of Access setting.
- Search for the ‘Display’ section, under the ‘Vision’ category, on the left-hand side of the screen.
- Use the slider to enlarge the text.
- Alternatively, you can use the tab button on your keyboard to find the slider and use the left and right arrow keys to enlarge the text.
- Click ‘Apply’.
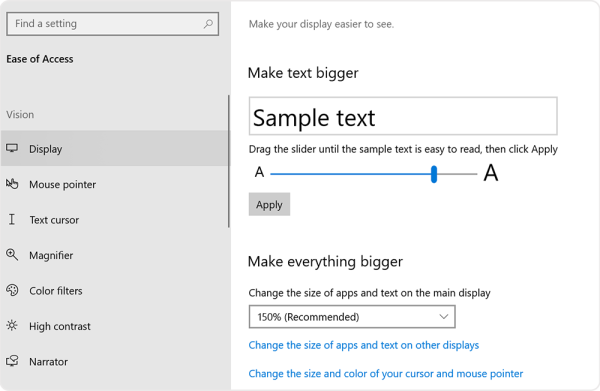
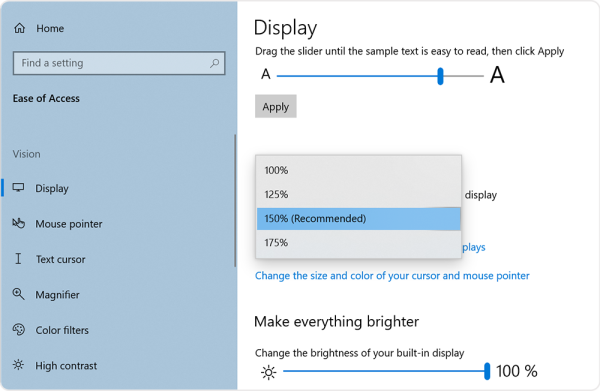
1.2. Enlarge the Size of Apps and Text on the Display
- Open Ease of Access setting.
- Search for the ‘Display’ setting, under the ‘Vision’ category, on the left-hand side of the screen.
- Open the drop-down menu.
- Alternatively, you can use the tab button on your keyboard to find the drop-down menu, press enter, and use the up and down arrow keys.
- Select the preferred option.
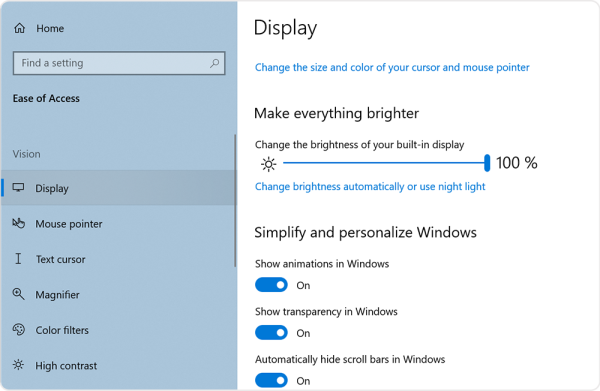
1.3. Change Brightness
- Open Ease of Access setting.
- Search for the ‘Display’ setting, under the ‘Vision’ category, on the left-hand side of the screen.
- Use the slider to increase or decrease brightness.
- Alternatively, you can use the tab button on your keyboard to find the slider and use the left and right arrow keys to change the screen brightness.
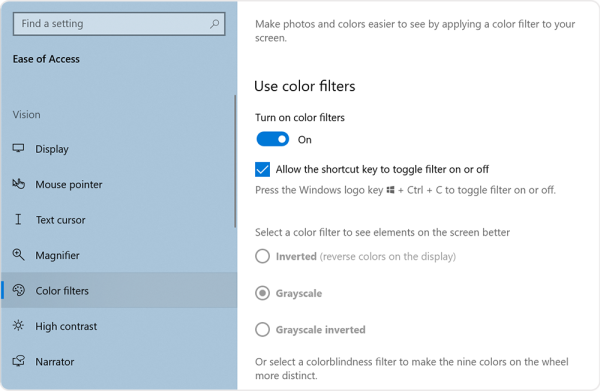
1.4. Change Colour Filters
- Open Ease of Access setting.
- Search for the ‘Colour Filters’ setting, under the ‘Vision’ category, on the left-hand side of the screen.
- Toggle the off button to on.
- For convenience, check the box beneath the switch to allow the shortcut key to toggle the filter on or off.
- Select preferred colour filters, such as greyscale, inverted or colour-blindness filter.
- To switch off, toggle switch back to off.
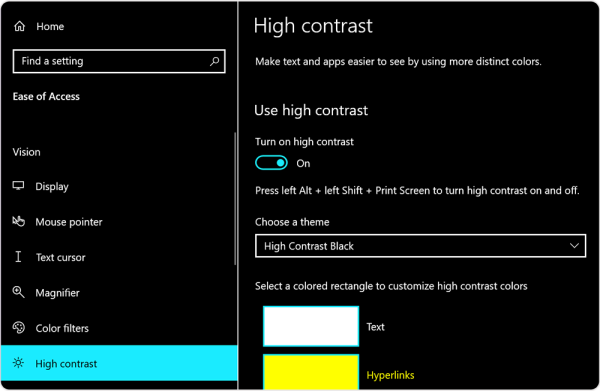
1.5. Increase Colour Contrast
- Open Ease of Access setting.
- Search for the ‘High Contrast’ setting, under the ‘Vision’ category, on the left-hand side of the screen.
- Toggle the off button to on.
- Alternatively, press: left Alt, left shift then print screen.
- Choose a preferred theme and/or customise the current theme.
- Press Apply.
- To switch off, toggle switch back to off.
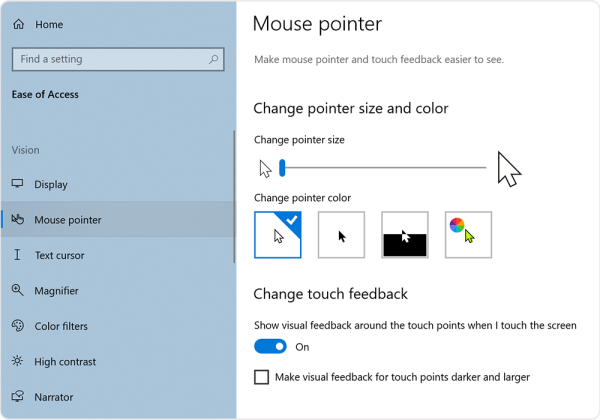
2. Mouse Visibility Options
Make your mouse pointer and touch feedback easier to see.
2.1. Change Mouse Pointer Size
- Open Ease of Access setting.
- Search for the ‘Mouse Pointer’ setting, under the ‘Vision’ category, on the left-hand side of the screen.
- Use the slider to enlarge the mouse pointer.
- Alternatively, you can use the tab button on your keyboard to find the slider and use the left and right arrow keys to enlarge the pointer.
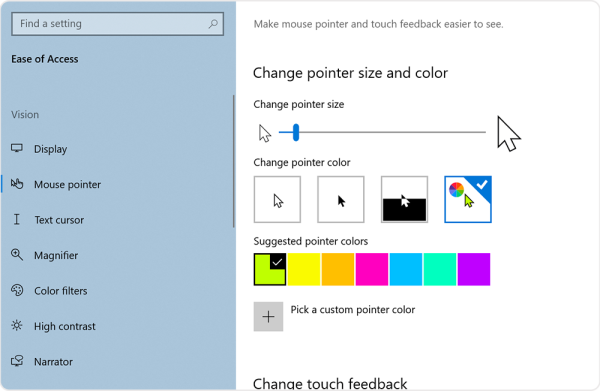
2.2. Change Mouse Pointer Colour
- Open Ease of Access setting.
- Search for the ‘Mouse Pointer’ setting, under the ‘Vision’ category, on the left-hand side of the screen.
- Select the preferred colour from the options, under ‘Change pointer colour’.
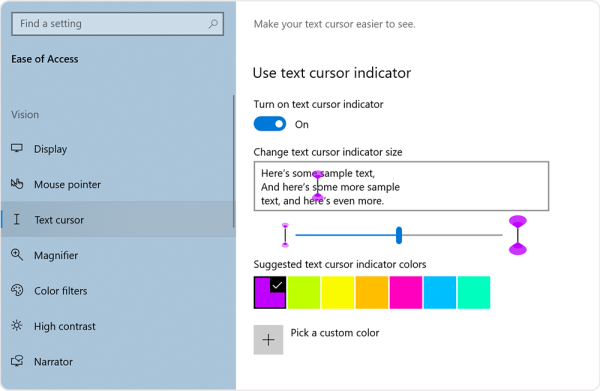
3. Enable/Disable Text Cursor
Make your text cursor easier to see.
- Open Ease of Access setting.
- Search for the ‘Text Cursor’ setting, under the ‘Vision’ category, on the left-hand side of the screen.
- Toggle the off button to on.
- Select preferred cursor indicator size, colour and thickness.
- To switch off the text cursor indicator, toggle it back to off.
4. Narrator
Narrator is a screen-reading application that describes what is on your screen, allowing you greater control as you navigate your device. It can be controlled by mouse, keyboard, and touch.
4.1. Enable/Disable Narrator
- Press the Windows key–Ctrl-Enter.
Alternatively, you can enable the feature through the system’s settings:
- Open Ease of Access setting.
- Search for the ‘Narrator’ setting on the left navigation panel, under the ‘Vision’ category.
- Toggle off switch to on. Alternatively, you can use your Tab key to select the button and press Enter on your keyboard.
- To disable, toggle switch back to off.
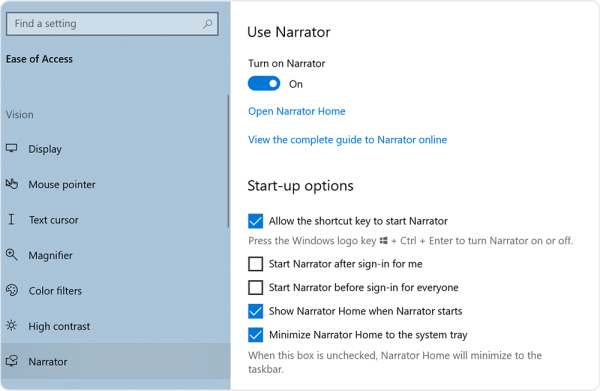
Note: Allowing the shortcut key to start Narrator is a setting that can be automatically set when you initially begin using your device. If it is not set, then you will have to manually set it by selecting the first box under Start-up Options titled ‘Allow the shortcut key to start Narrator’.
You can personalise how you would prefer the Narrator to function in the Narrator settings. For example, you can choose when you would like Narrator to start. If you’d like it to start after you sign into your computer, select the second box beneath Start-up Options titled ‘Start Narrator before sign-in for me’.
4.2. Narrator touch gestures
To explore and hear items on a screen, drag one finger around the screen. When you hear an item that you want to use, double-tap the screen with one finger to activate it. To move through items on the screen, flick left and right with one finger.
You can find more shortcuts that can help you use Narrator under the guide’s Keyboard Shortcut Reference List.
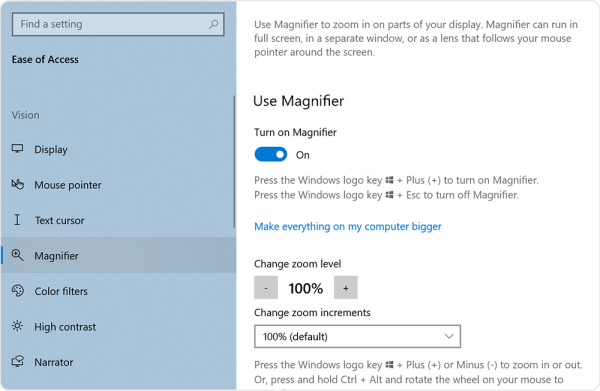
5. Magnifier
Magnifier is a feature that zooms in on parts of your computer display. Magnifier can be viewed in full screen, in a separate window or as a lens that follows your mouse pointer around your screen.
5.1. Enable/Disable Magnifier
- Press the Windows logo key + Plus Sign key (+).
Alternatively, you can enable the feature through the system’s settings:
- Open Ease of Access setting.
- Search for the Magnifier setting on the left navigation panel, under the ‘Vision’ category.
- Toggle off switch to on. Alternatively, you can use your Tab key to select the button and press Enter on your keyboard.
- To disable the feature, toggle the switch back to off.
5.2. Activate Reading
Reading enables Magnifier to read from your screen.
- Activate reading by pressing a Modifier key and Enter. The default modifier key is Ctrl and Alt. However, the key can be changed to the Caps Lock and/or Insert key in the Magnifier settings.
Once a modifier key has been chosen, you can use the following commands to have Magnifier read from your screen:- Start, pause and resume reading: Modifier Key + Enter
- Stop reading: Any key
- Reading from mouse pointer: Modifier key + Left Mouse Click
- Read previous sentence: Modifier key + H
- Read Next Sentence: Modifier key + K
- To deactivate Reading, press any key.

You can personalise Magnifier to suit your needs in the Magnifier settings. Shortcuts can be found in the Keyboard Shortcuts Reference Sheet.
When starting Magnifier, it is also important to decide when you would like Magnifier to start. For example, you can choose the option to have Magnifier automatically start after the user signs into their device.
You can personalise how you would prefer the Magnifier to function in the Magnifier settings.
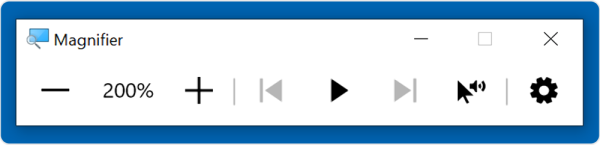
5.3. Magnifier touch gestures
Use the following gestures to work with Magnifier on a Windows touchscreen device:
- Zoom in: Press the Plus (+) button on either the top left or top right of the screen
- Zoom out: If already zoomed in, press the Minus (-) button on either the bottom left or the bottom right of the screen
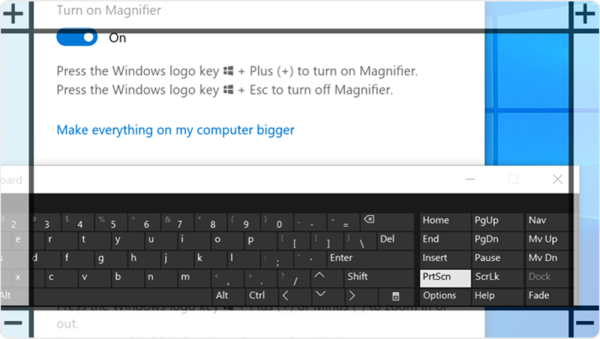
You can also use the floating bar to control the magnifier:
- Minus: Zooms out
- Plus: Zooms in
- Back: Reads previous sentence
- Play/Pause: Reads out text
- Forward: Reads the next sentence
- Pointer: Reads from where the mouse pointer is clicked
- Settings: Change the speed of the narrator and voice
Back to the top
1. Mono and Stereo Options
1.1. Increase, Decrease and Mute Device Volume: Three Methods
First Method
Search for the increase, decrease and mute volume buttons on the keyboard, which are generally located on the top row of the keyboard. The button features a little speaker.

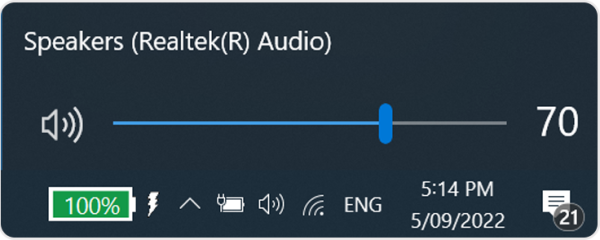
Second Method
Go to the System Tray of the computer’s taskbar at the bottom right corner of the computer screen, which contains the clock, battery life, Wi-Fi connection and volume. Click the speaker icon and adjust the volume.
Third Method
Open Ease of Access, then search for the ‘Audio’ settings on the left navigation panel, under the ‘Hearing’ category. Adjust the volume with the slider.
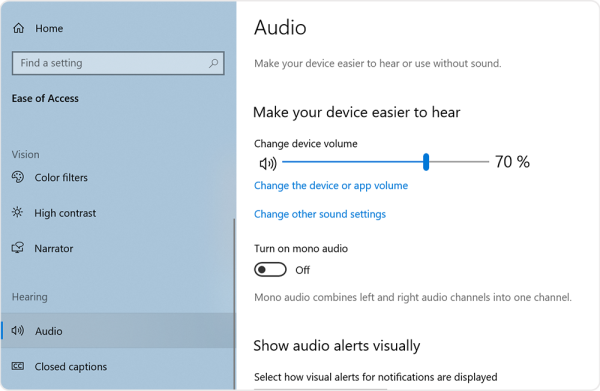
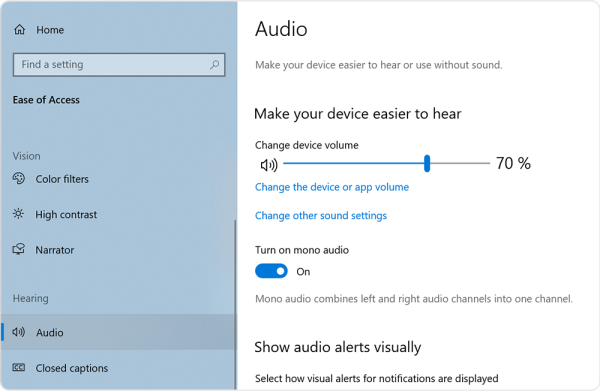
1.2. Turn on Mono Audio
Mono Audio combines the left and right audio channels into one channel.
- Open Ease of Access setting.
- Search for the ‘Audio’ settings on the left navigation panel, under the ‘Hearing’ category.
- Toggle the off button to on.
- To switch off mono audio, toggle back to off.
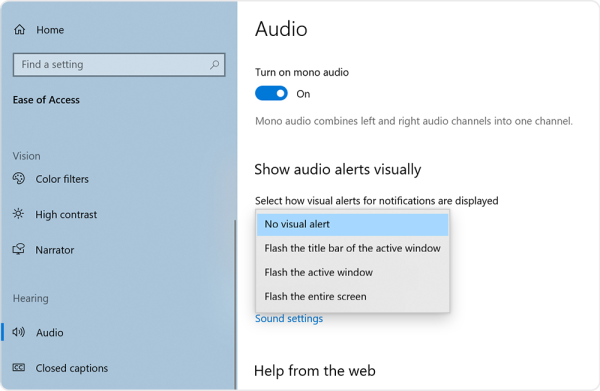
2. Enabled Visual Notifications
Select how visual alerts for notifications are displayed.
- Open Ease of Access setting.
- Search for the ‘Audio’ settings on the left navigation panel, under the ‘Hearing’ category.
- Under the header ‘Show audio alerts visually’, open the dropbox menu.
- Select the preferred option.
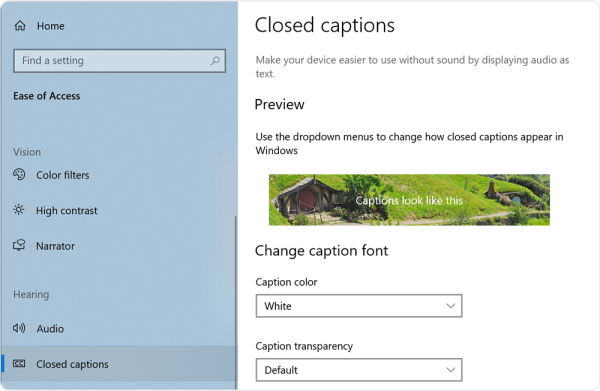
3. Closed Captions
Make your device easier to use without sound by displaying audio as text.
3.1. Personalise Closed Captions Settings
- Open Ease of Access setting.
- Search for the ‘Closed Captions’ setting on the left navigation panel, under the ‘Hearing’ category, on the left-hand side of the screen.
- Use the drop-down menu to change how closed captions appear in Windows.
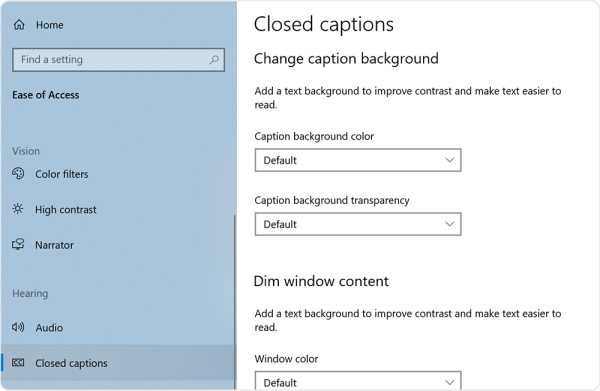
- Add a text background to improve contrast and make the text easier to read.
- Add a text background to improve contrast and make the text easier to read.
Back to the top
General and Mobility-Related
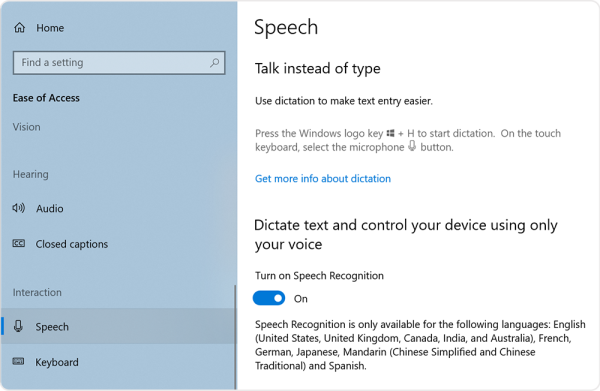
1. Speech
Convert spoken words into text on your device.
1.1 Enable/Disable Dictation
- Press the Windows logo key and H
(On touch keyboards, press the microphone button).
1.2 Enable/Disable Speech Recognition
Dictate text and control your device with only your voice.
- Press the Windows logo key-Ctrl-S
Alternatively, you can enable the feature through the system’s settings:
- Open Ease of Access setting.
- Search for the ‘Speech’ setting on the left navigation panel, under the ‘Interaction’ category.
- Under ‘Turn on Speech Recognition’, toggle switch from off to on.
- To disable, toggle switch back to off.
2. Keyboard
Make it easier to type and use keyboard shortcuts.
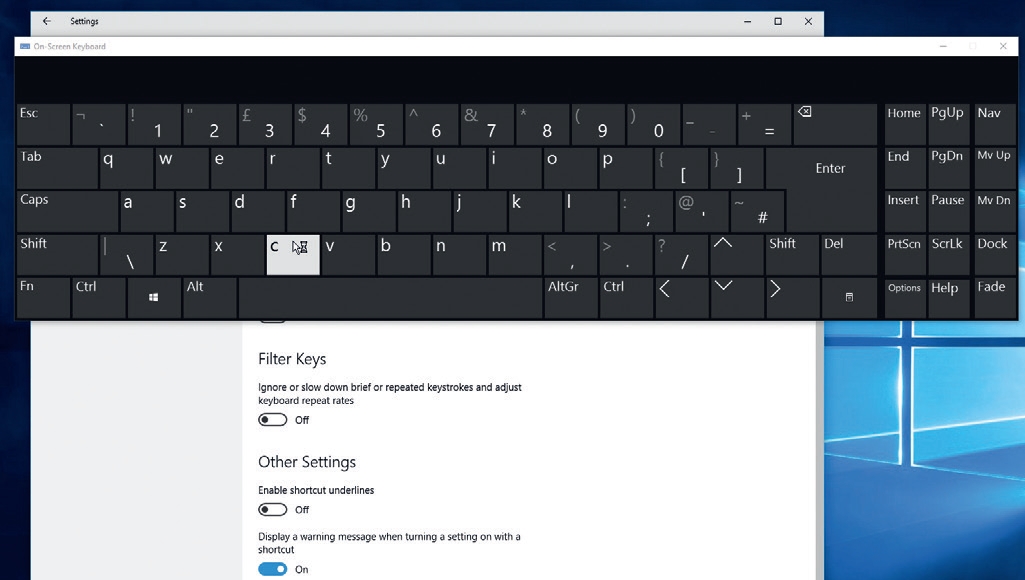
2.1. Enable/Disable On-Screen Keyboard
Display a virtual keyboard on the screen to enter input without using a physical keyboard.
- Press the Windows logo key-Ctrl-O
Alternatively, you can enable the feature through the system’s settings:
- Open Ease of Access setting.
- Search for the ‘Keyboard’ setting on the left navigation panel, under the ‘Interaction’ category.
- Under ‘Use the On-Screen Keyboard’, toggle the switch from off to on.
- To disable, toggle switch back to off.
2.2. Enable/Disable Sticky Keys
Sticky Keys allow modifier keys (like Ctrl and Shift) to remain active even after when you are no longer pressing them. This helps users who have trouble pressing two keys at the same time.
- Press the Shift key five times.
Alternatively, you can enable the feature through the system’s settings:
- Open Ease of Access setting.
- Search for the ‘Keyboard’ setting on the left navigation panel, under the ‘Interaction’ category.
- Under ‘Use Sticky Keys’, toggle the switch from off to on.
- To disable, toggle switch back to off.
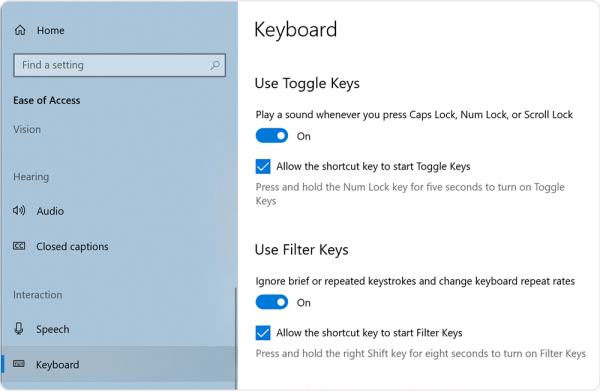
2.3. Enable/Disable Toggle Keys
Toggle Keys provide sound cues when the locking keys, such as Caps Lock, Num Lock or Scroll Lock, are pressed.
- Press and hold the Num Lock key for five seconds.
Alternatively, you can enable the feature through the system’s settings:
- Open Ease of Access setting.
- Search for the ‘Keyboard’ setting on the left navigation panel, under the ‘Interaction’ category.
- Under ‘Use Toggle Keys’, toggle switch from off to on.
- To disable, toggle switch back to off.
2.4. Enable/Disable Filter Keys
Filter Keys inform the device to ignore brief or repeated keypresses and allow the user to set the time a key is pressed before it repeats.
- Press and hold the right Shift key for eight seconds.
Alternatively, you can enable the feature through the system’s settings:
- Open Ease of Access setting.
- Search for the ‘Keyboard’ setting on the left navigation panel, under the ‘Interaction’ category.
- Under ‘Use Filter Keys’, toggle the switch from off to on.
- To disable, toggle switch back to off.
3. Mouse
Make it easier to see and control the mouse cursor.
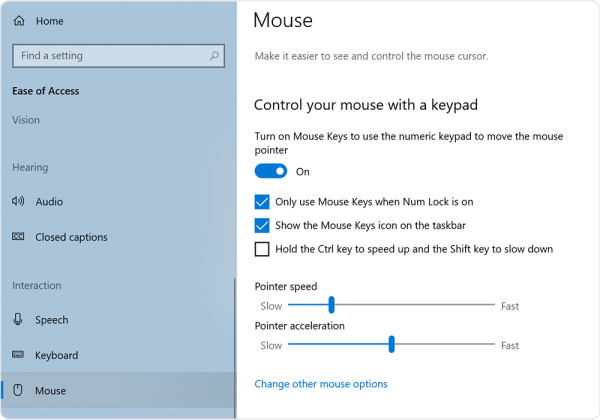
3.1. Enable/Disable Mouse Keys
Control the mouse pointer using the numeric keypad.
- Open Ease of Access setting.
- Search for the ‘Mouse’ setting on the left navigation panel, under the ‘Interaction’ category.
- Toggle switch from off to on.
- To disable, toggle switch back to off.
Back to the top
Keyboard Shortcuts
1. Visual-Related Keyboard Shortcuts
Toggle colour filter on or off: Windows logo key–Ctrl–C
Narrator
Note: The default Narrator key is the Caps Lock key. This can be changed in the Narrator settings, under ‘Select Narrator key’.
- Enable/Disable Narrator: Windows key–Ctrl–Enter
- Activate scan mode: Caps lock–spacebar (press up and down arrows to read page)
- Increase voice speed: Narrator–Plus sign (+)
- Slow voice speed: Narrator–Minus Sign (-)
- Increase voice volume: Narrator–Ctrl–Plus Sign (+)
- Decrease voice volume: Narrator–Ctrl–Minus Sign (-)
- Change how Capitalised text is read: Narrator–4
- Change how much detail Narrator provides about text and controls: Narrator–V
- Get the webpage source of a link: Narrator–Ctrl–D
- Get a webpage summary: Narrator–S
- Get the webpage summary and popular links dialog box: Narrator–S twice quickly
- Turn on or off Outlook column header reading: Narrator–H
- Give feedback on Narrator: Narrator–Alt–F
Narrator touch screen gestures
- Read what’s under your finger: Touch or drag a single finger
- Activate primary action: Double-tap or hold with one finger and then tap anywhere on the screen with a second finger
- Activate secondary action: Triple-tap or hold with one finger and then double-tap anywhere on the screen with a second finger
- Start dragging or extra key options: Hold one finger and tap once with a second and third finger
- Move to next or previous item: Flick left or right with one finger
- Change view: Flick up or down with one finger
- Stop narrator from reading: Tap once with two fingers
- Change verbosity mode: Tap once with three fingers
- Show narrator commands for the current item: Tap once with four fingers
- Show context menu: Double-tap with two fingers
- Read text attributes: Double-tap with three fingers
- Open search mode: Double-tap with four fingers
- Show all narrator commands: Tap three times with four fingers
- Scroll: Swipe in any direction with two fingers
- Tab forward or backwards: Swipe left or right with three fingers
- Read current window: Swipe up with three fingers
- Start reading on explorable text: Swipe down with three fingers
- Turn semantic zoom on or off where supported: Swipe up or down with four fingers
- Move narrator cursor to beginning or end of unit: Swipe left or right with four fingers
Magnifier
- Enable/Disable Magnifier: Windows logo key and Plus sign (+)
- Turn off Magnifier: Windows logo key and Esc
- Zoom In: Windows key and Plus Sign (+)
- Zoom Out: Windows key and Minus Sign (-)
- Zoom In and Out: Press and hold Ctrl and Alt then roll the wheel on your mouse.
- Invert Colours: Ctrl–Alt–I
Change Magnifier View
- Lens: Ctrl–Alt–L
- Full Screen: Ctrl–Alt–F
- Docked: Ctrl–Alt–D
- Cycle through the views: Ctrl–Alt–M
Reading
Note: The default Modifier key is Ctrl and Alt. This can be changed in the Magnifier settings, under ‘Choose a Modifier key’.
- Start, pause, and resume reading: Modifier key and Enter
- Stop Reading: Any Key
- Read from Mouse Pointer: Modifier key and Left Mouse Click
- Read previous sentence: Modifier key and H
- Read next sentence: Modifier key and K
2. Mobility-Related Shortcuts
- Enable Dictation: Windows logo key and H
- Enable/Disable Speech Recognition: Windows logo key–Ctrl–S
- Enable/Disable On-Screen Keyboard: Windows logo key–Ctrl–O
- Enable/Disable Sticky Keys: Press Shift key five times.
- Enable/Disable Toggle Keys: Press Num Lock key for five seconds.
- Enable/Disable Filter Keys: Press and hold the right Shift key for eight seconds.
Back to the top
Additional Resources
Additional information on the assistive technology products and services Microsoft offers on Windows 10 be found in the following link:
https://www.microsoft.com/en-us/accessibility/windows
Back to the top
Windows has always offered its users some accessibility tools. However, as computers have become more powerful, the scope and range of tools Microsoft can provide have increased. Today, the operating system is packed with accessibility features.
But what tools are available specifically? And how can you use them? In this post, I’m going to walk you through all the accessibility apps and give you a quick lesson on their usage.
Narrator
You’ll find almost the accessibility tools hidden in a new Ease of Access menu within the Windows 10 Settings app. Navigate to Start > Settings > Ease of Access to see what’s available.
The first tool on the list is Narrator. If you suffer from poor vision, it’s a vital weapon in your armory. If set up correctly and used in conjunction with some other tools I will cover later, it’ll allow you to interact with your PC without the need for a screen.
The tool can read notifications, websites, text you type, and in-app content out loud. If you really struggle with your sight, it can even recite every individual keyboard character back to you as you press it.
You can customize further settings such as reading speed, pitch, voice and more by going to Start > Settings > Ease of Access > Narrator.
Magnifier
Magnifier is another tool Microsoft have designed specifically for users with bad eyesight, though it’s useful for anyone who needs focus on a tiny fraction of their screen for any reason.
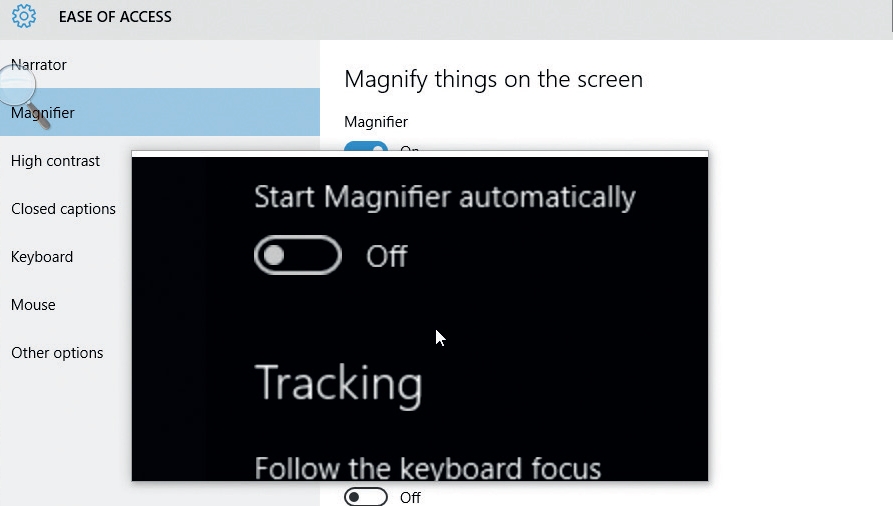
You can turn Magnifier on by navigating to Start > Settings > Ease of Access > Magnifier. You will find additional settings in this menu. For example, you can invert the colors and choose whether Magnifier should track your mouse or keyboard.
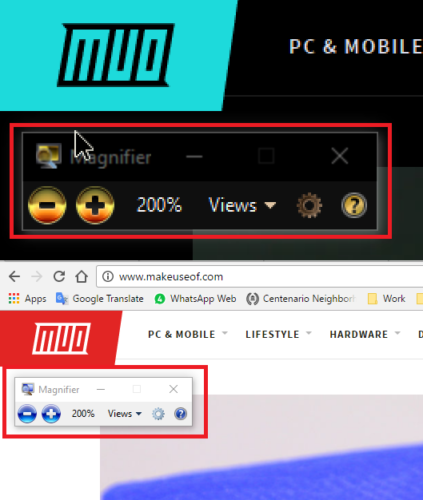
Once it’s running, you’ll see a magnifying glass on your screen — it’s the in-app settings menu. Clicking on the + or – icon will zoom further in or out, while the View menu lets you decide whether you want the app to run full-screen, docked, or in lens mode.
High Contrast
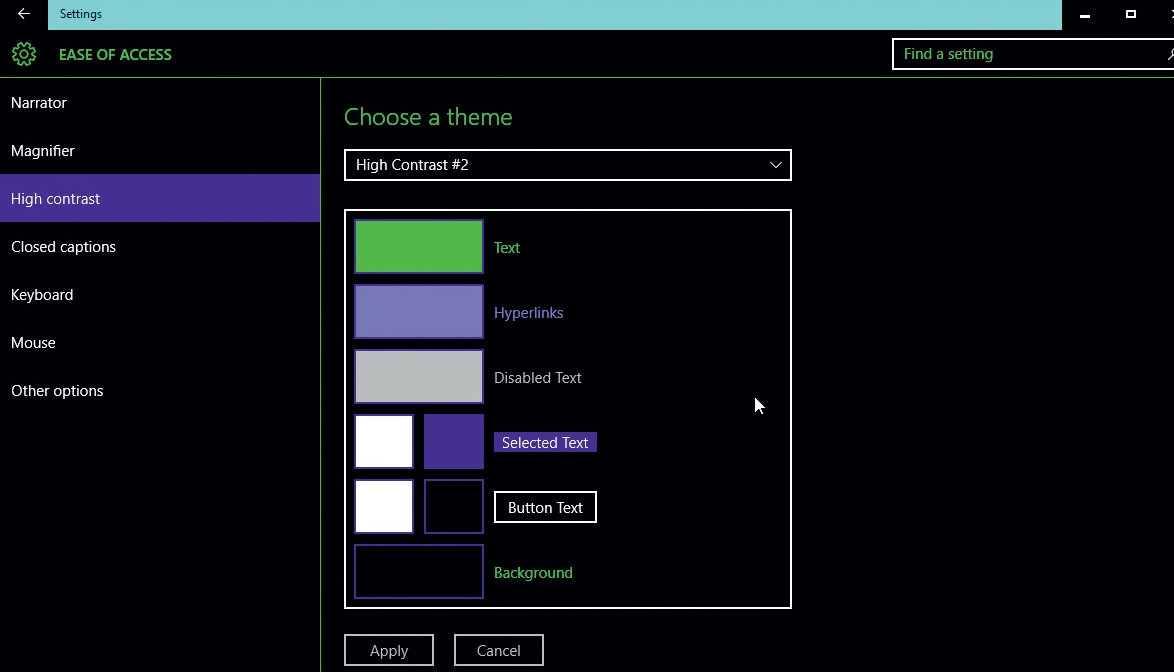
The next tool on the list is High Contrast. It lets you put specific parts of your screen into a hi-vis mode. Go to Start > Settings > Ease of Access > High Contrast to instigate the setup process.
To begin, you’ll need to activate one of the default high contrast themes. You have four to choose from; High Contrast #1, High Contrast #2, High Contrast Black, and High Contrast White.
Once you’ve selected one, you can customize the colors used. You can modify the colors for text, hyperlinks, disabled text, selected text, button text, and background.
When you’ve made your selections, click Apply. Windows will take a few seconds to update your preferences.
Here’s what High Contrast #1 looks like when used on Windows 10 Settings app:
Closed Captions
I have good eyesight, but I still find it difficult to read white subtitles on a TV show or movie, especially if the background is very light. I have nothing but sympathy for people who struggle with their eyesight.
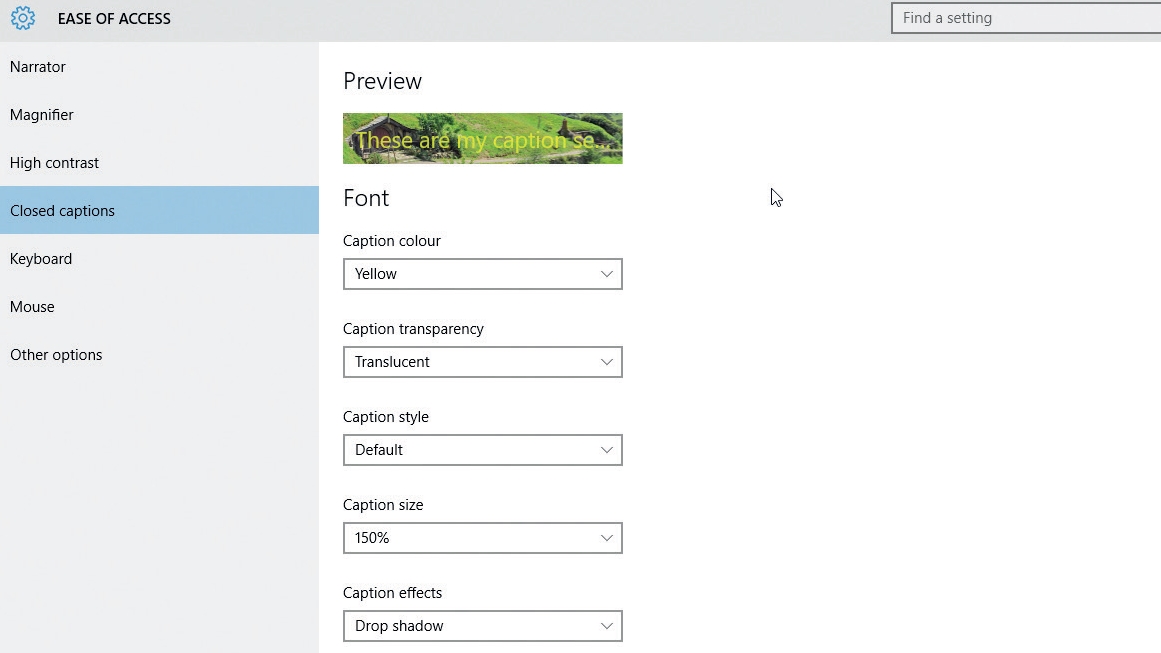
Luckily, one of Windows built-in accessibility tools — Closed Captions — lets you edit the colors and backgrounds of your subtitles. Your settings will be applied to any caption text on any supported local media player.
You can choose the caption’s color, transparency, style, size, effects; the background’s color and transparency; and the window’s color and transparency. Only eight colors (white, black, red, green, blue, yellow, magenta, cyan) are available. You can see a live preview of any changes you make in the example text at the top of the screen.
Keyboard
The Keyboard tool has four separate mini-tools within it. They are:
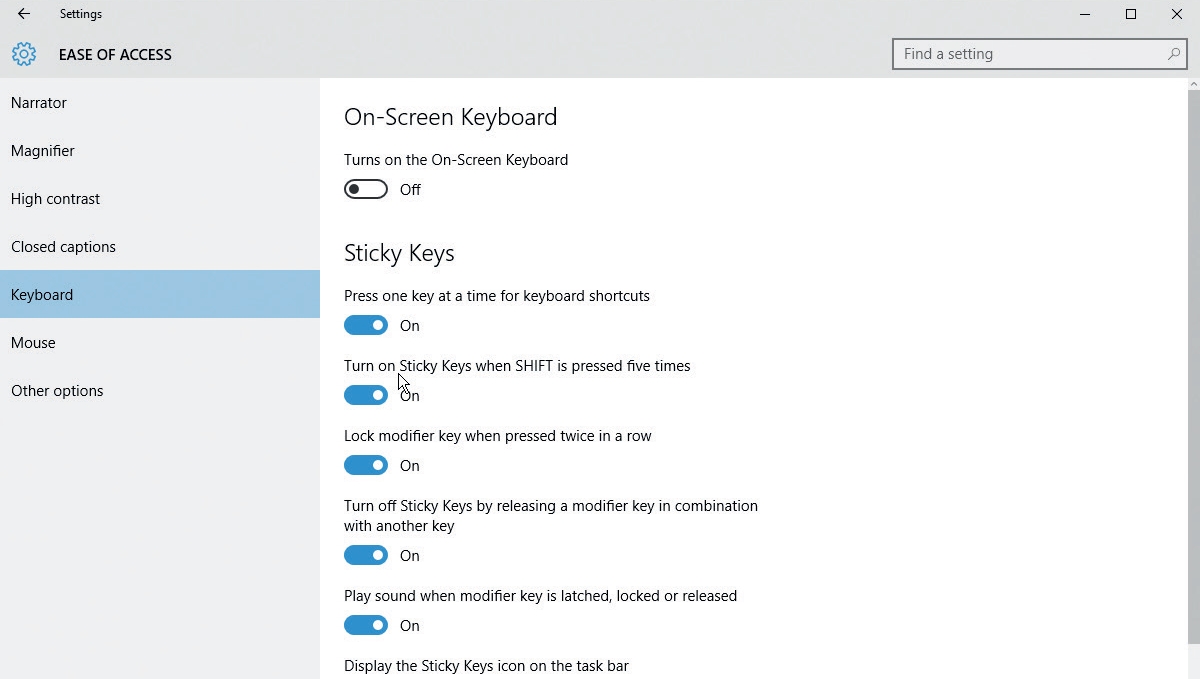
- On-Screen Keyboard — Gives you a graphical keyboard on your computer screen that you can operate using the mouse.
- Sticky Keys — Sticky keys let you press one key at a time for keyboard shortcuts rather than having to hold down multiple keys. For example, CTRL + C (copy) would become press CTRL [and release], press C [and release].
- Toggle Keys — Every time you press one of the toggle keys (caps lock, num lock, scroll lock, and on some PCs, function lock), you will hear a sound.
- Filter Keys — You can choose to prevent your keyboard from repeating keys if you tend to keep your finger pressed down too long. Enabling the setting will give you further sub-settings you can adjust.
Mouse
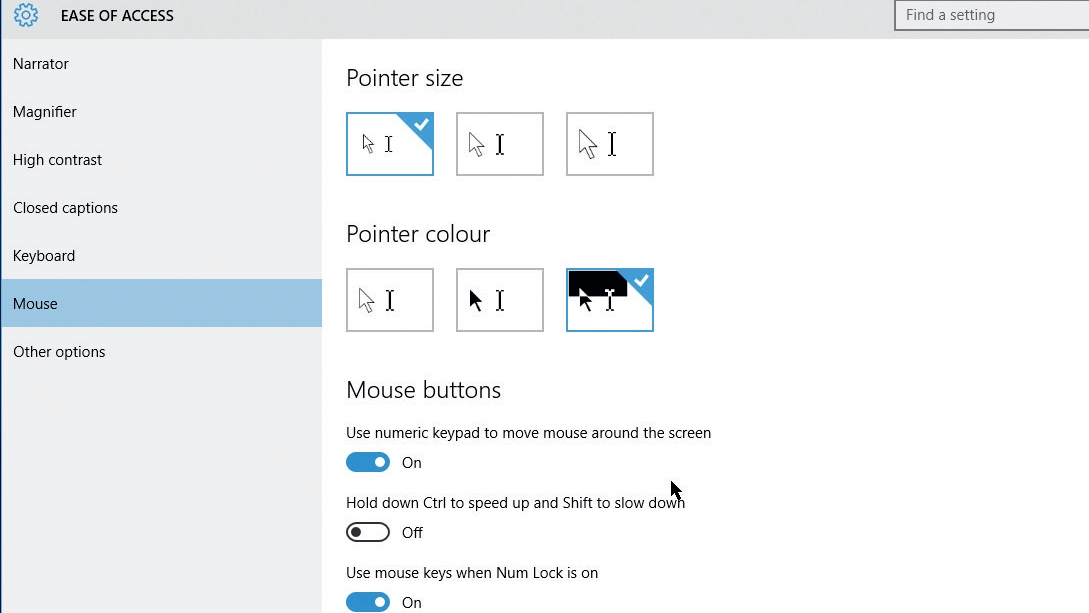
It’s fair to say the accessibility tools for the mouse are probably the weakest in the line-up. The Settings app limits you to changing the pointer size, pointer color, and a couple of usage settings such as allowing the num pad to move the mouse around the screen.
For extra mouse options, it’s wise to see what’s available in your Mouse Properties. To access the Properties menu, go to Start > Settings > Devices > Mouse and Touchpad > Related Settings > Additional Mouse Options.
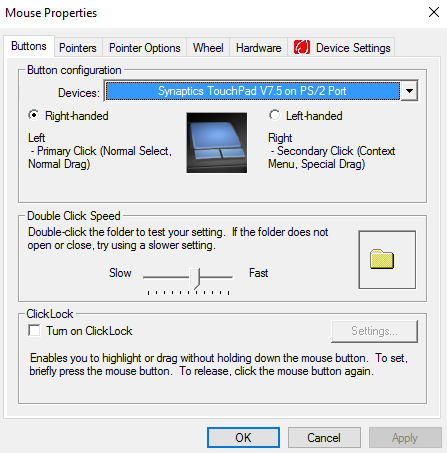
The available settings will vary from mouse to mouse, but you should see options to enable ClickLock (to make drag-and-drop easier), change the speed of the pointer, add a trail to your pointer, and adjust the double-click speed.
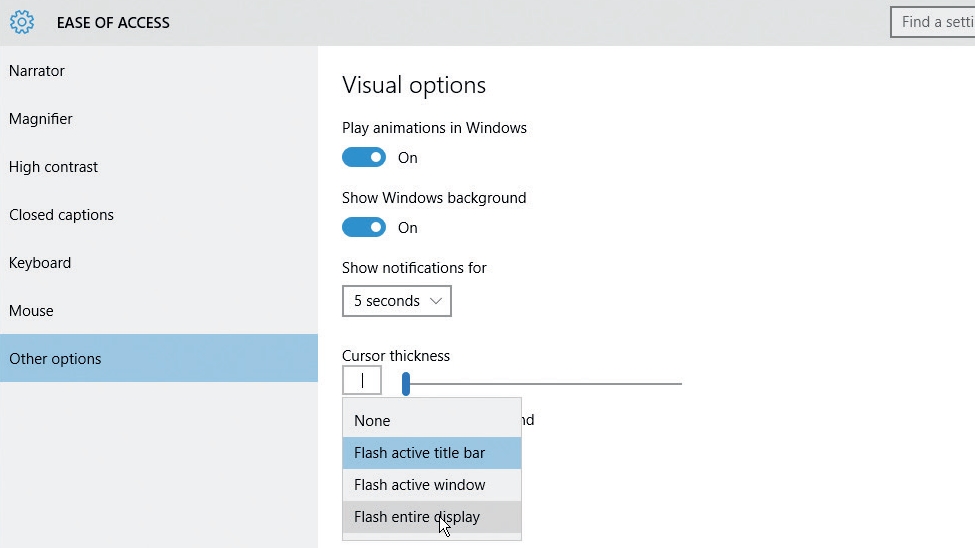
Other Options
At the bottom of the left-hand column within the Ease of Access menu, you’ll see a section titled Other Options. Within it, you’ll find a few settings that didn’t fit elsewhere.
You can toggle both the desktop background and Windows animation on or off, change the thickness of the cursor, adjust how long notification popups remain on-screen for and set a visual alert for when your computer plays a sound.
Speech Recognition
One accessibility tool is not found within the Ease of Access menu: the Speech Recognition app.
The app will listen to all your spoken words and translate them into on-screen actions. You can use it to dictate documents, navigate menus, and even surf the web.
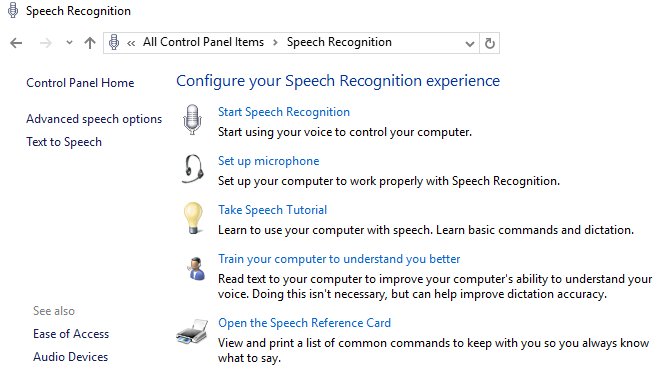
Explaining how to set up and use the app is beyond the scope of this article, but I’ve covered how to enable speech-to-text and voice control in an article elsewhere on the site.
To get started with the app, go to Control Panel > Speech Recognition.
Control Panel
At the time of writing, you can still access all the tools through the Control Panel. You might even find some settings Microsoft haven’t migrated to the new Settings app.
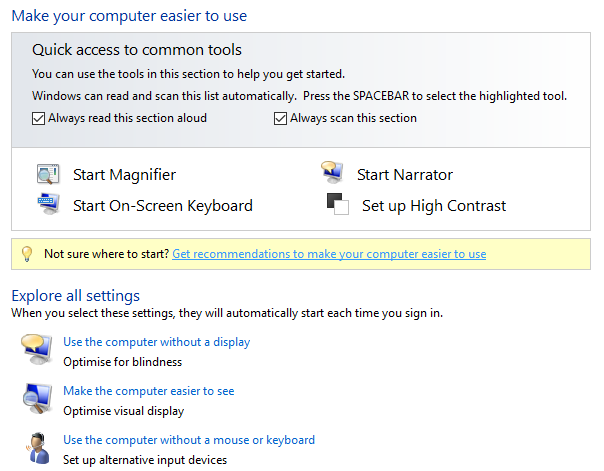
It’s fair to assume this menu will be killed in the near future, but if you’re keen to see what’s available, right-click on the Start menu and navigate to Control Panel > Ease of Access Center.
The ease-of-access tools are vital for millions of people around the world, but do they go far enough? What else should Microsoft be offering? What’s missing from their line-up?
I’d also love to hear from you if you rely on any of these tools in your daily workflow. Are they easy to use? How can Microsoft improve them?
As always, you can leave your thoughts and opinions in the comments section below.
Image Credits: wavebreakmedia/Shutterstock

Introduction
With its combination of familiar features and intuitive new additions, Windows 10 is Microsoft’s most user-friendly operating system to date.
Its accessibility doesn’t end with the new Start menu and straightforward Cortana search functions, though – Windows 10 also packs an impressive suite of extra tools to make using your PC as easy as possible.
In Windows 7, certain features (including the magnifier) were only available as part of the Aero display scheme, which put heavy demands on low-powered PCs.
Other features, including the screen reader and audio descriptions were buried five menus deep. Not ideal if you’re already having difficulty using your PC!
Thankfully, with its new focus on accessibility, Microsoft has addressed all of these concerns – and done much more besides.
- For more tutorials check out our collection of how to use Windows 10 guides

1. Read it aloud
Click Start > Settings > ‘Ease of Access’. The first option is Narrator, which is ideal if you have difficulty reading text on screen.
When activated, it reads text aloud when you move your mouse over a control, click or type text. Use the toggles below to decide which events should trigger it; turn all of them on to begin with, then deactivate any you find unnecessary.
2. Use the Magnifier tool
If you sometimes have difficulty reading small text on your PC’s screen, you might appreciate the Magnifier, which does what its name suggests.
Use the toggle switch to activate it, then tap [Win] + [+] and [Win] + [–] to zoom in and out respectively. The magnifier can also invert the colors on your screen, which can make text easier to read on colored backgrounds.
3. High contrast settings
If you’d rather make everything on screen more legible, or have trouble with colour blindness, take a look at the High Contrast setting.
There are four options here – two with white backgrounds and two with black. These color schemes make Windows itself much clearer visually, but websites and programs will be unaffected so you can choose to use the Magnifier as well.
4. Clearer captions
Closed captions are displayed in many video programs for viewers who have limited hearing. Windows 10’s Films and TV app supports closed captions (CC); while a video is playing, right-click it and you’ll see if the CC option is available.
Windows 10’s Ease of Access centre let you customise the colour and size of the captions, and add effects to make them easier to see.
5. Shorter shortcuts
The Keyboard options are worth investigating even if you don’t have any difficulty using Windows.
One of the most useful is Sticky Keys, which removes the need for finger gymnastics when performing keyboard shortcuts – activate it, and you can tap each key in turn rather than reading across the board to press them simultaneously. Try it – tap [Ctrl], followed by [Alt] and [Delete].
6. Click to type
The on-screen keyboard is useful. You might choose to use it because you find using a regular keyboard difficult, or you may find it more convenient if you have a touchscreen.
However, it isn’t effective if you’re worried about keyloggers – malicious programs that record what you type to steal your passwords and other information. An anti-virus tool is your best bet here.
- The best free anti-malware software 2017
7. Making the mouse easier to use
The default mouse pointer can often be hard to see, particularly if your monitor has a high resolution.
The Mouse settings in Ease of Access is therefore useful, letting you choose a size and color that are easier to see and use. The option to move the cursor using the numeric keypad is handy if you find a mouse tricky to use, or if the battery in your cordless mouse has gone flat.
8. Crystal clear
Perhaps the most useful accessibility tool for writers is under ‘Other options’ – the ability to change the thickness of the text cursor to make it much easier to spot in your word processor of choice.
We recommend experimenting with the other options here – particularly visual notifications for sound, which are helpful if you have limited hearing.
- Enjoyed this article? Discover how to get the most from your PC and new things to do in Windows Help & Advice. Take advantage of an exclusive offer in our sampler today.
Microsoft offers accessibility features in Windows 10 mainly for the benefit of people with disorders and impairments. So, if someone has low vision or problem while reading stuff, they can use these features. But these accessibility features can be much helpful even for normal people in many scenarios. Also if you are a new Windows 10 user, though there are very less chances fo this, easy to use accessibility tools will help you to use the computer in completely a different way.
Related: How to speedup Windows 10 computer?
Windows 10 Accessibility Features
Windows 10 offers all accessibility features under three main categories:
- Vision
- Hearing
- Interaction
Let us discuss how can you use these options.
1. Vision
Everything what you see on the screen falls under vision category. Vision includes display, cursor and pointers, magnifier, colors and its filter, a narrator, contrast, etc. In order to adjust these features to suit your need, press ‘Win + I’ keys and open Windows Settings app. Click on ‘Ease of Access’. Here, you can be able to see the vision category with a bunch of options.
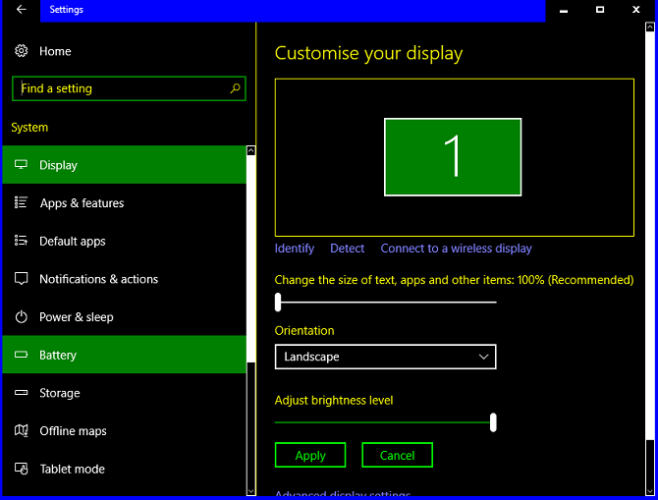
1.1. Display
The first section under ‘Vision’ is for adjusting ‘Display’ settings on your computer. If you feel difficulty in seeing the icons on the desktop or reading the text captions then you can adjust the size. Use the ‘Change the size of apps and text on the main display’ option and set the required percentage. This will adjust the display of app icons and captions.

Display Size Settings
Also you change the brightness of your current display by adjusting the brightness slider. There are also other personalizations you can do to simplify the usage of Windows 10.
- Turn ‘On/Off’ the animations in Windows.
- You can turn the transparency effects ‘On’ if you want.
- Adjust the time for notifications.
1.2. Cursor
One of the unnoticed thing you will see throughout the usage of computer is the cursor. Most of us never bother about the cursor at all, but for some this makes sense to increase the size to clearly see it. From the ‘Ease of Access’, open the ‘Cursor & pointer size’ settings.
- Adjust the cursor thickness through the given slider and check the preview in the given box.
- Change the pointer size and its color from here.

Cursor And Pointer Size
Related: How fix limited or no internet access issue in Windows 10?
1.3. Magnifier
Sometimes it is really difficult to read documents with small fonts or you may be interested in zooming out an image. In all such scenarios, use magnifier to zoom the posrtion of the computer to view the content clearly. You can open magnifier in full screen or make it as a lens following you cursor. Open the ‘Magnifier’ option from ‘Ease of Access’ panel.
- Toggle ‘On’ the ‘Magnifier’ to use the magnifier option on your screen.
- You will see a small popup to adjust the ‘Zoom level’ from the given option. You can also change the view to full screen, lens or docked.

Turning On Magnifier
- Check the option if you want to turn on the ‘Magnifier’ after sign-in or before sign-in.
- Scroll downwards a bit and you can make magnifier follow the mouse cursor, keyboard focus, text insertion point or narrator cursor.
- When magnifier follows the mouse cursor, a rectangle zoom box will trace your mouse to enable zooming. You can change the size of the zoom box size to make it convenient for you.
You may see the screen starts flickering when your computer display driver doesn’t support all magnifier options. Just press ‘Win + Esc’ keys to disable magnifier and check the problem with your manufacturer.
1.4. Color Filters
From the ‘Ease of Access’ panel, open ‘Color filters’. These color filters are very useful for those having color blindness.
- Toggle ‘On’ the option ‘Turn on color filters’ to use the filters.
- Select Grayscale, Inverted or Grayscale Inverted feature to apply the filter.
- To make more distinct for the colorblindness, select the filter and preview the nine colors wheel is convenient for your eyes.

Color Filters
1.5. High Contrast
Go to ‘Ease of access > High contrast’ and turn ‘On’ high contrast option for more distinct colors. It also allows you to choose different themes for it.

High Contrast
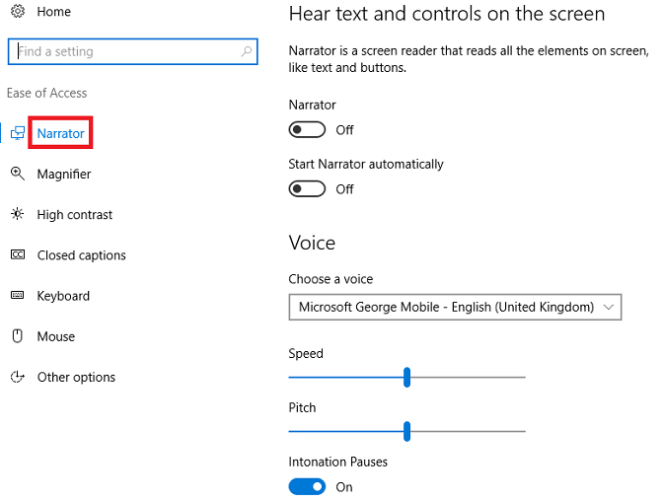
1.6. Narrator
The narrator is to control the device and navigates you with voice. It reads the words and elements on the screen when you move the mouse or move with keyboard.
- To use this, turn ‘On’ the option ‘Use narrator to read and interact with your device’.
- Choose when to start this option, after sign-in of before sign-in for everyone. Check the option you like.

Turning On Narrator Options
- Scroll down and choose the narrator’s voice you like. Change the speed of voice, voice pitch, and its volume.
- Check the content how much you want to hear like characters while typing, hear words as you type etc.
Related: How to fix intermittent WiFi connection issues in Windows 10?
2. Hearing
The second accessibility category is for those with hearing problems. Hearing options include the audio tools and closed captions.
- Navigate to the ‘Ease of Access > Audio’ in ‘Settings’ app.
- Adjust the slider to change the volume.
- Turn on mono audio if you want to combine both left and right audio channels.

Audio Options
- Go to ‘Closed captions’ and it allows you to use the device without any sound but displaying the audio as text on the screen.
- Change the caption font, color, size, transparency, effects from the given drop-down menus.
- You can also change the background of the captions, its color and transparency too.
3. Interaction
The thrid accessibility category is for interactive features. This part includes speech, keyboard, mouse interaction.
- Go to ‘Settings > Ease of Access > Speech’ and turn on the speech recognition under ‘Dictate text and control your device using only your voice’.
- Setup dictation to control your device through voice instead of typing everything.
- If you have Cortana search, use dictation to Cortana search and interact with your device.

Speech Recognition
- The ‘Keyboard’ section allows you to enable a soft keyboard without physical keyboard. Also turn on ‘Sticky keys’ option to press the shortcut keys one by one instead of holding many keys together. Make sure ‘Allow the shortcut key to start sticky keys’ is on. Enable ‘Use Toggle Keys’ option to play a sound for caps lock, num lock and scroll lock keys. Ensure to check ‘Allow the shortcut key to start Toggle Keys’ option.

On-Screen Keyboard
- Go to the ‘Mouse’ section and turn on the option ‘Control your mouse with a keypad’. This will allow you to use the numeric keys to move the mouse pointer. Adjust the pointer speed and acceleration manually by the given sliders. You can also enable ‘Hold the Ctrl key to speed up and Shift key to slow down’ option to better control the mouse pointer using keyboard keys.

Mouse Options
- The ‘Eye control’ option needs a tracking device connected with your computer to track the mouse and use text to speech options.
Conclusion
As mentioned, not all people like the default Windows 10 settings. Whether you have some impairments or not, it is not necessirary to like default Windows 10 settings. These ease of access features are really cool that helps t customize the screens, hardware and settings.