
-
Home
-
News
- How to Fix the Issue – Windows 10 Software Center Is Missing?
By Daisy | Follow |
Last Updated
Recently, many Microsoft users have complained about that their Windows 10 Software Center is missing and they can’t find it. This post will provide more details and some useful solutions to fix this issue. Browse the official website of MiniTool to get more information.
Windows 10 Software Center Is Missing
As a part of Microsoft’s System Center Configuration Manager (SCCM), Software Center provides the IT administrators with a centralized environment, which can change system policies remotely, upgrade applications or deploy applications.
SCCM is included in Microsoft System Center 2012 and SCCM allows IT administrators to deliver, manage, support and update applications and services across campus.
However, things here are usually not ideal, and the most common problem you may encounter is that Windows 10 Software Center is missing. Although it happens during other scenarios as well, it seems to be more common after you have upgraded to Windows 10.
How to launch Windows 10 Software Center? Here are two methods for you.
- The simplest method is to press Start and type Software Center to launch Software Center on Windows 10.
- Another method is that if you navigate to the Start menu, under the Microsoft System Center group, you can look for the Software Center.
If your Windows 10 Software Center is missing, it will make you feel inconvenient when you use your computer. Here are three solutions to fix that the entire Software Center is missing.
How to Fix- Windows 10 Software Center Is Missing
Solution 1: Run SFC Scanner
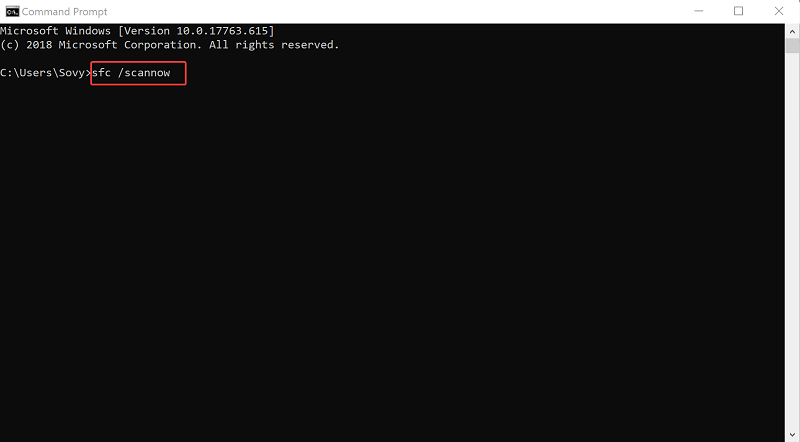
Step 1: Launch Command Prompt, type dism.exe /Online /Cleanup-image /Restorehealth and press Enter. Then there will be a message: “The operation completed successfully”.
Step 2: Type sfc /scannow and press Enter after the message appears. This process might take some time.
Step 3: The message “Verification 100% complete” will be shown after it’s done.
Step 4: At last, type Exit to close the Command Prompt window.
Solution 2: Run Windows System Restore
If your Windows 10 Software Center went missing after you have upgraded from a previous version of Windows 10 or installed an application recently. System restore will be especially useful.
Step 1: In the Cortana search box, type Control Panel and select it from the options given.
Step 2: Click System and Security and in this page, click System.
Step 3: On the left, click the System protection link.
Step 4: Click the System Restore… button when the System Properties window appears.
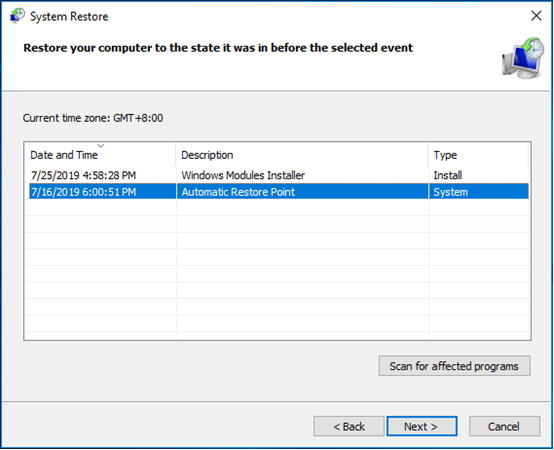
Step 5: Then select the restore point you want to use from those in the list and click Next to continue.
Step 6: After confirming the restore point, you can click the Finish button.
Solution 3: Check Window Security Center for Malware Infection
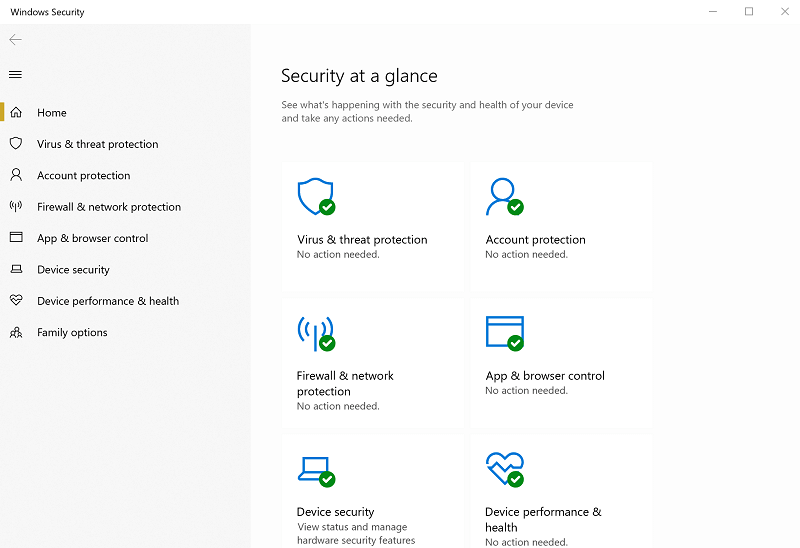
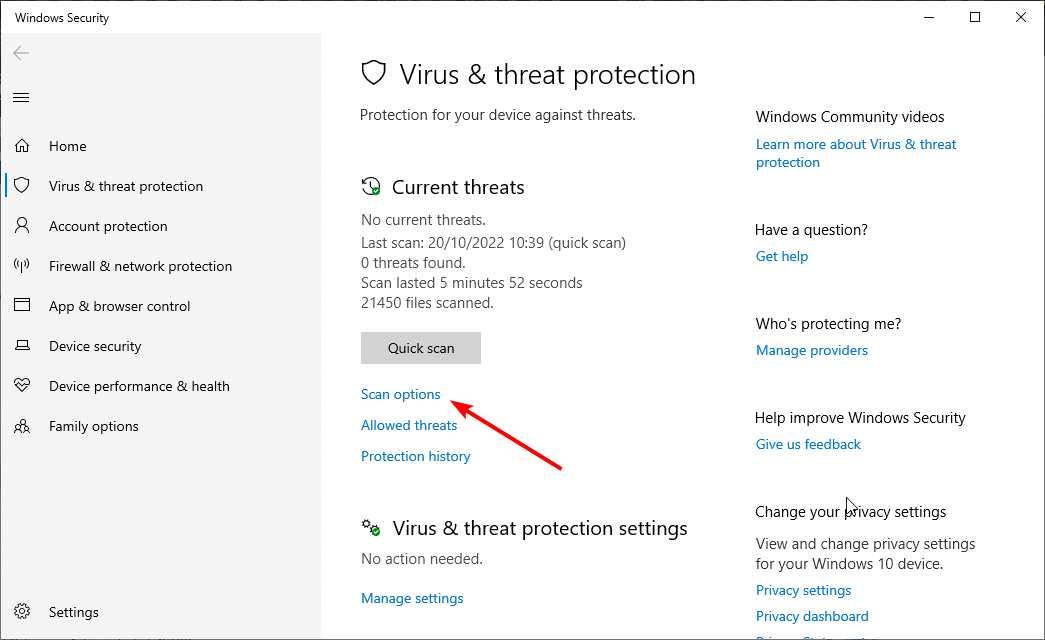
Step 1: Launch the Windows Security window from the taskbar.
Tip: If your Windows Security Center cannot be launched, read this post- 4 Solutions to Windows Security Center Service Can’t Be Started.
Step 2: You should mark out the different protection levels with a green check mark. If not, click the specific feature to do some necessary operation.
Tip: You might need to update the virus protection library and so on.
Step 3: Click Scan Now to perform a virus scan of your PC.
Final Words
When the entire Software Center is missing, don’t worry about it. The above-mentioned solutions should be enough for you to fix this issue.
About The Author
Position: Columnist
Having been an editor at MiniTool since graduating college as an English major, Daisy specializes in writing about data backups, disk cloning, and file syncing as well as general computer knowledge and issues. In her free time, Daisy enjoys running and going with friends to the amusement park.
Readers help support Windows Report. We may get a commission if you buy through our links.
Read our disclosure page to find out how can you help Windows Report sustain the editorial team. Read more
Software Center provides a centralized environment for IT administrators to deploy applications, upgrade apps, or change system policies remotely. Unfortunately, some users report missing the Software Center on their PC.
This takes away an essential remote feature. If you also face this issue, this guide will walk you through the steps to regain the tool.
Why is Software Center on Windows 10 missing?
Several factors can be responsible for the missing Software Center. Listed below are some of the prevalent causes:
- Corrupt system files: One of the significant reasons the Software Center is not loading or is stuck at 44 percent might be because of faulty or missing system files. The solution to this is to repair these files.
- Presence of malware: In some cases, this problem might be caused by the activities of viruses on your PC. You can fix this by performing a virus scan with Microsoft Defender or dedicated antivirus software.
What to do if Windows 10 Software Center is missing?
1. Repair system files
- Press the Windows key, type cmd, and select Run as administrator under Command Prompt.

- Type the command below and hit Enter to run it:
DISM.exe /Online /Cleanup-image /Restorehealth
- Now, wait for the command to finish running.
- Next, type the command below and press Enter to run it:
sfc /scannow
- Finally, wait for the command to finish running and restart your PC.


If the Software Center is missing on your PC, it might be because of broken system files. You can fix it by running the DISM and SFC scans.
You can also fix these files easily using a reliable repair tool, eliminating the stress of having to run numerous scans and repair your system files in no time.
2. Run Windows System Restore
- Press the Windows key + R, type rstrui.exe, and click OK.
- Click the Next button in the window that pops up.

- Now, choose a restore point and click Next.
- Finally, click the Finish button and follow the onscreen instructions to complete the action.


If the Software Center goes missing after installing an app or making changes to your PC, you need to perform a system restore. This will reverse the changes that might be causing the issue.
- Fix: An Error Occurred While Loading a Higher Quality Version of This Video
- iTunesMobileDevice.dll is Missing From Your Computer [Solved]
- SYNSOACC.DLL Could Not Be Located: How to Fix in Cubase
- Fix: Omen Gaming Hub Undervolting Not Working
- How to Fix Errors Related to the LibGLESv2.dll File
3. Scan for malware
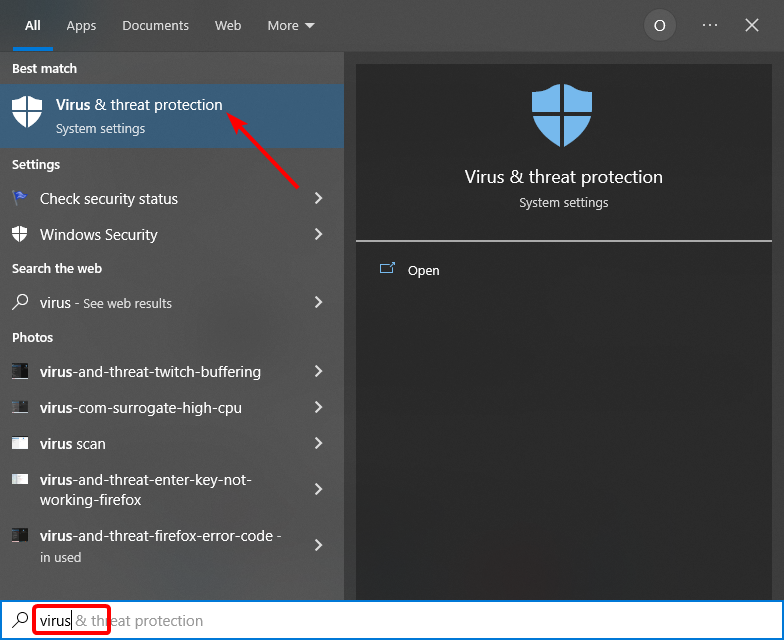
- Press the Windows key + S, type virus, and select Virus & threat protection.
- Select Scan options.

- Now, choose the Full Scan option and click Scan now.

This issue sometimes occurs if viruses are messing with your PC. You need to perform a deep virus scan to eliminate these viruses and restore normalcy on your PC.
Aside from using Windows Defender, you can also use top-notch antivirus software in ESET NOD32. This will scan all the files and apps on your PC, including the system files.
With this, it will remove the most hidden malware on your PC.
The steps mentioned above should be enough to deal with the Windows 10 Software Center missing issue. Let us know in the comments section if our solutions worked for you.
Ivan Jenic
Windows Hardware Expert
Passionate about all elements related to Windows and combined with his innate curiosity, Ivan has delved deep into understanding this operating system, with a specialization in drivers and driver troubleshooting.
When he’s not tackling diverse driver-related problems, Ivan enjoys watching good movies and spending time hiking with his family and friends.
-
Где расположен?
-
Как восстановить классический вариант?
-
Отключение
-
В службах
-
В редакторе локальных групповых политик
-
Исправление ошибок при загрузке пакетов для апдейта
-
Вывод
В последней версии ОС от Microsoft отсутствует классическое приложение Центр обновления. Некоторые юзеры не могут установить пакеты обновлений на компьютер, потому что они не знают, где расположен в Windows 10 Центр обновлений. Где находится утилита, вы прочитаете в этой статье.
Где расположен?
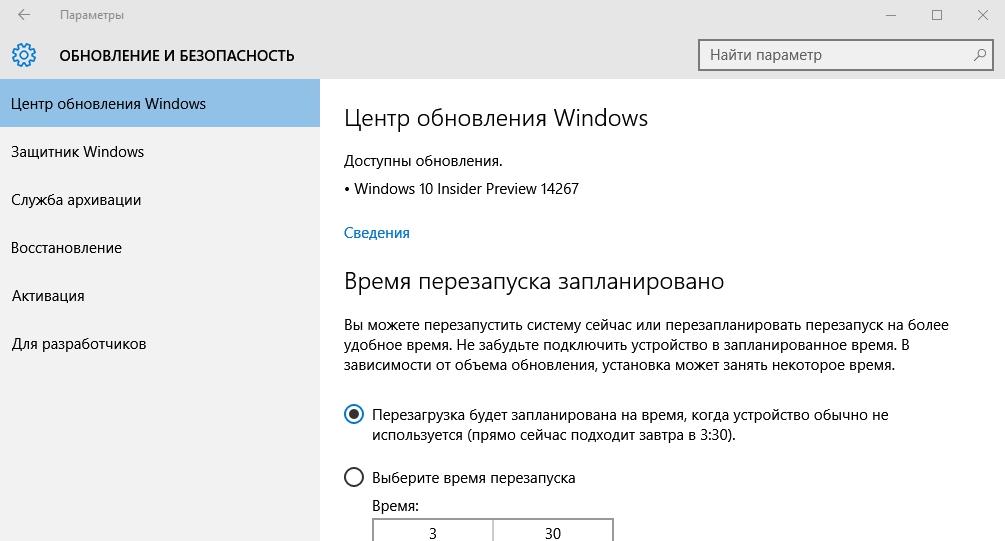
Разработчики Microsoft убрали классическое приложение Центр обновлений Windows из панели управления. Теперь он расположен в приложении Параметры.
Меню Пуск → Параметры → Обновление и безопасность → пункт «Центр обновления Windows».
Чтобы проверить обновления для компьютера, нажмите на кнопку «Проверка наличия обновлений». В основном окне почти нет настроек приложения. Вы найдете их, нажав на пункт «Дополнительные параметры» (доступен только для версий Pro, Enterprise, Education).
Как восстановить классический вариант?
Если вы привыкли использовать классическое приложение для апдейта своего компьютера, восстановите классический Центр обновлений.
Важно! Этот способ работает только в ранних сборках Windows 10.
- Окно поиска → введите «Блокнот» → ПКМ → Запустить от имени администратора.
- Вставьте в поле блокнота текст:
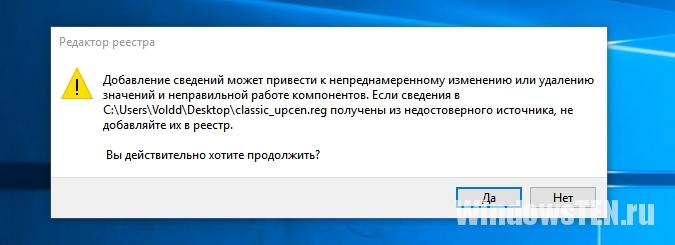
Windows Registry Editor Version 5.00
[HKEY_LOCAL_MACHINE\SOFTWARE\Microsoft\WindowsUpdate\UX]
"IsConvergedUpdateStackEnabled"=dword:00000000
[HKEY_LOCAL_MACHINE\SOFTWARE\Microsoft\WindowsUpdate\UX\Settings]
"UxOption"=dword:00000000
- Меню Файл → Сохранить как → укажите имя документа и установите для него расширение «.reg» (в строке «Тип файла» выберите все файлы).

- Запустите созданный файл → в окне предупреждения подтвердите действия → Ок.


Более подробная инструкция указана на видео.
Отключение
Отключение приложения выполняется в стандартных утилитах – Службах и редакторе локальных групповых политики. Здесь же его можно снова включить. Информацию о том, как выполнить отключение другими способами, вы найдете в статье «Отключаем автоматическую установку обновлений в Windows 10».
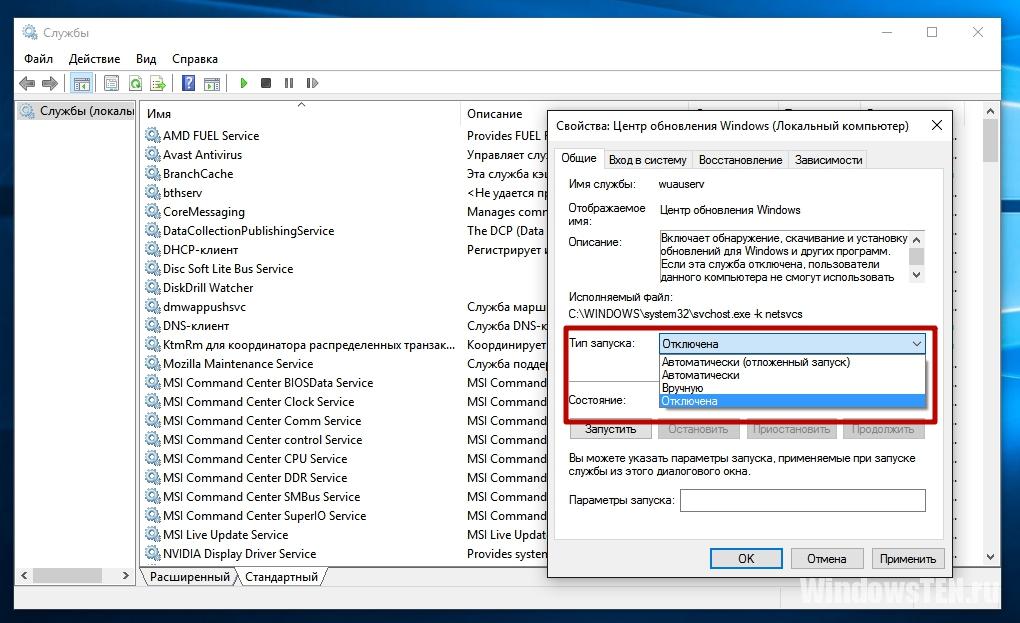
В службах
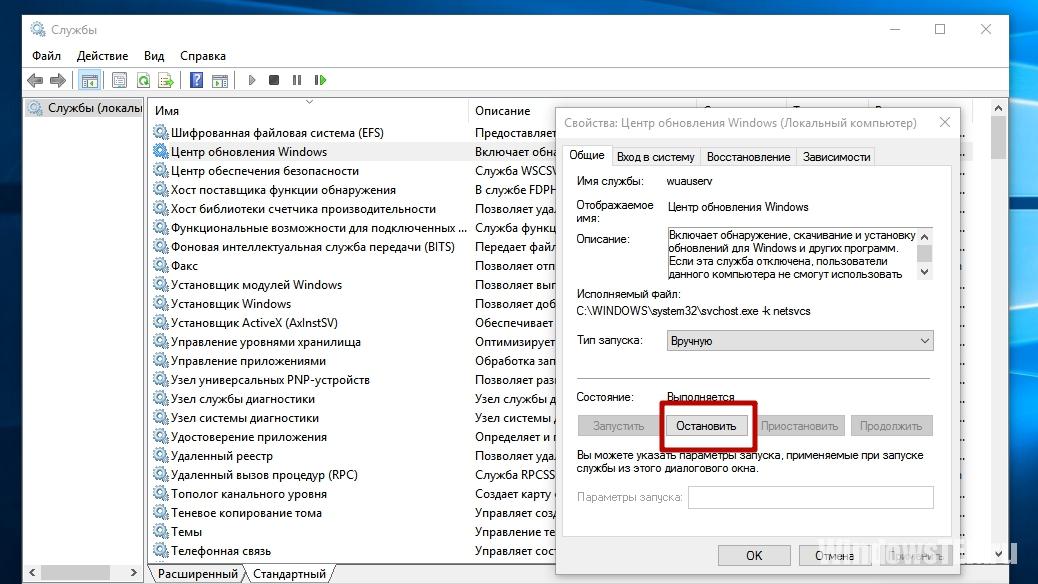
- Нажмите Win+R → введите команду: services.msc.
- Служба «Центр обновления Windows» → ПКМ → Свойства → Остановить.

- Выберите в поле «Тип запуска» → Отключена → Ок.

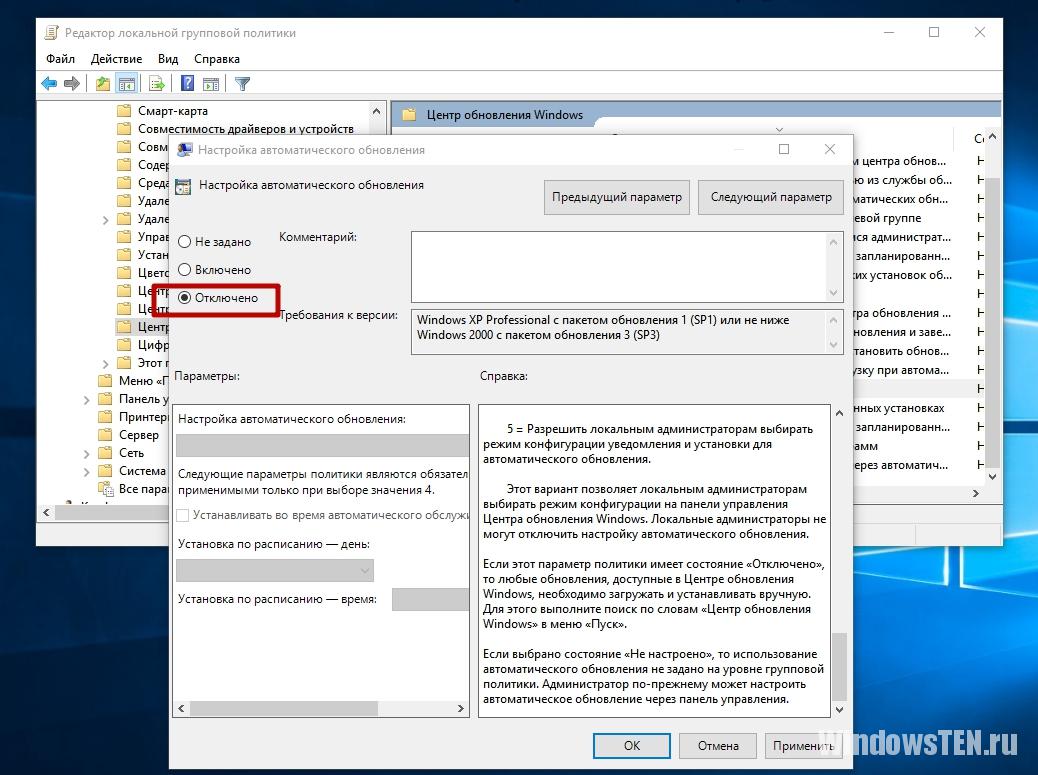
В редакторе локальных групповых политик
Важно! Этот способ доступен только в версиях Windows 10 Pro и Enterprise.
- Нажмите Win+R → введите команду: gpedit.msc.
- Конфигурация компьютера → Административные шаблоны → Компоненты Windows → Центр обновления Windows.
- В правой части окна выберите «Настройка автоматического обновления» → ПКМ → Изменить → установите «Отключено» → подтвердите изменения.

Полезно знать! После внесения изменений перейдите в параметры и проверьте наличие обновлений для компьютера. Не всегда изменения вступают в силу сразу.
На видео процесс отключения представлен наглядно.
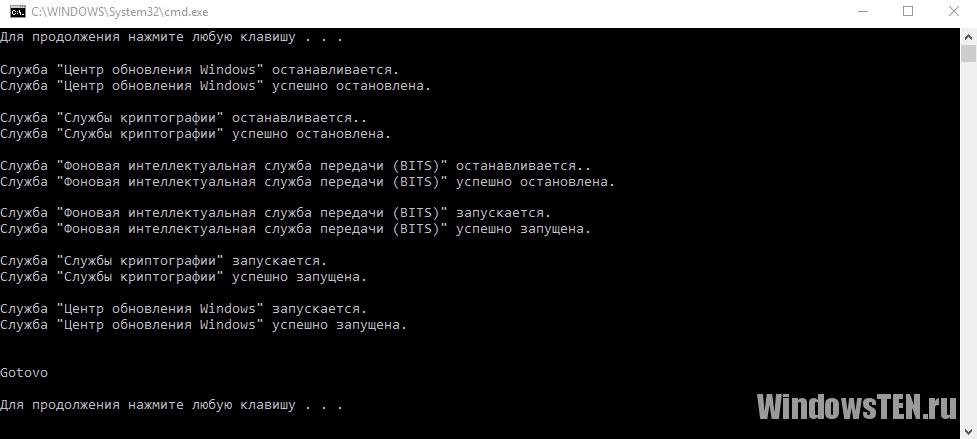
Исправление ошибок при загрузке пакетов для апдейта
Иногда во время работы Центра обновлений появляются неполадки, которые приводят к нестабильности работы компьютера или обновления перестают скачиваться с серверов Microsoft. Основной способ исправления ошибки – восстановление значений утилиты по умолчанию (также прочитайте статью «Как проверить целостность системных файлов Windows 10 и восстановить их?»).
- Окно поиска → введите «Блокнот» → ПКМ → Запустить от имени администратора.
- Вставьте текст:
@ECHO OFF
echo Sbros Windows Update
echo.
PAUSE
echo.
attrib -h -r -s %windir%\system32\catroot2
attrib -h -r -s %windir%\system32\catroot2\*.*
net stop wuauserv
net stop CryptSvc
net stop BITS
ren %windir%\system32\catroot2 catroot2.old
ren %windir%\SoftwareDistribution SoftwareDistribution.old
ren "%ALLUSERSPROFILE%\application data\Microsoft\Network\downloader" downloader.old
net Start BITS
net start CryptSvc
net start wuauserv
echo.
echo Gotovo
echo.
PAUSE
- Меню Файл → Сохранить как → укажите имя документа и установите для него расширение «.bat» (в строке «Тип файла» выберите все файлы).

- ПКМ на созданном документе → Запуск от имени администратора.

- Перезагрузите компьютер и проверьте работоспособность Центра обновлений.

Вывод
Классический Центр обновлений в новой версии ОС в панели управления отсутствует. Он находится в приложении Параметры. Восстановить стандартную утилиту можно только в ранних сборках Windows 10. Если же при загрузке пакетов для апдейта ПК возникнут проблемы, сбросьте все настройки Центра обновлений.
The Software Center is a centralized console for IT administrators, which is part of Microsoft’s System Center Configuration Manager. It offers users a centralized interface for controlling software and hardware on their machines. Unfortunately, this utility is often missing after a Windows 10 upgrade. However, you don’t need to panic. Here are three steps to help you find the Software Center in Windows 10.
Go to the Start menu and type “Software Center” to open the SoftwareCenter. It should pop up automatically if you have a managed Windows device. However, if you have multiple users signed in, the Software Center may not be visible. If this happens, you can try navigating to the Control Panel and choosing System and Security. Once there, click on Users. In the window that opens, navigate to the Software Center icon.
To launch the SoftwareCenter, you can use the shortcut key that’s assigned to the run command window in the Start menu. To do so, click on the Windows Key + R shortcut and click on the shortcut option. Next, double-click the shortcut key assigned to the Software Center. The shortcut key must be unique from other shortcut keys you have assigned to other applications. In addition, you can assign the shortcut key to a folder or directory that is easy to access.
If you are wondering how to open the Software Center in Windows 10, then you have come to the right place. You can access the Control Panel from the ‘Start’ menu or from the search bar. Once you open the Control Panel, you will see the Configuration Manager. You will find a list of large and small icons in the right pane. Click the Software Center to view available software. If you see an unrecognized software, you can press the F5 key to refresh the list.
Once you have opened the Software Center, you can click the Applications tab and choose an application. You can also select All to display all the applications available. You can also select a specific category to narrow down your selection. You can also click the Refresh button to force the Software Center to update automatically. Depending on your computer’s system settings, the Software Center may take a while to refresh. If you need to install software quickly, you can manually refresh the Software Center.
How Do I Bring up the Software Center?
How do I bring up the Software Center in your computer? Hopefully, you’ve already noticed that the Software Center is missing from your PC, but in case you don’t, here are a few methods to bring it up again. First, click the Control Panel icon on the bottom left of your screen. Next, select System and Security. Finally, click the Software Center button to view a list of installed programs.
If you’re not familiar with the Software Center, it is an essential component of the SCCM client, which is installed on Windows computers. It allows the logged-in user to install optional software. In addition, it lists upcoming software, so you can upgrade your PC with ease. Sometimes, the Software Center won’t appear as expected, but it’s okay! You can check for updates by typing the name of an application in the search box. You can also check for failed installations.
You can also create a shortcut to the Software Center in Windows 10. In this case, select the “Software Center” icon and click the “Open” button in the right pane. The shortcut is located under the Microsoft Endpoint Manager group. Alternatively, you can create a shortcut to the Software Center by typing the command softwarecenter. This shortcut will automatically launch the Software Center. When you’re done, you’ll have a list of applications installed on your PC and the status of them.
Where is My Software Center?
Where is My Software Center in Windows 10? is a frequent question from Microsoft users. The Software Center is a centralized tool for IT administrators to manage their machines’ applications, security updates, and operating systems. Using Software Center can save time when deploying software and applications. It prompts workstations to check for new updates. If you’re not a Windows administrator, you can install updates manually or schedule them through the Information Technology Services.
You can also assign the shortcut to the Software Center using the Shortcut tab. To assign the shortcut, you have to select a shortcut key and name it appropriately. If you already have shortcuts for other Windows apps, you have to be sure that it doesn’t conflict with the one you assign to Software Center. However, there are other ways to access the Software Center. Once you have defined a shortcut, you can use it to access it quickly.
After launching the Software Center, go to Control Panel. Select System and Security. In the left-hand pane, click on the Control Panel. Next, choose the category System and Security. Click on the “Software Center” option. It will bring up a list of software and applications. The list of applications will appear in a grid, which you can use to search for software applications. Once you’ve narrowed down the list, click on the one you want.
Why is Software Center Not Showing Up?
If your computer’s Software Center isn’t showing up, it might be because it isn’t being updated. Sometimes this happens due to accidental deletion or a problem with the configuration manager. If you’re experiencing this issue, follow the steps below to get it back up and running. If the problem persists, you might need to perform a system restore to get it working again. Once you have done this, open the Task Manager and click on the Users tab.
After installing applications and upgrading to Windows 10, you may experience a problem with the Software Center. To resolve this, launch Control Panel and select Recovery > System Restore. Choose a restore point to roll back to. Alternatively, you can launch the Windows Security window from the taskbar. Make sure that different protection levels have a green check mark. If they are not, you can manually activate them. Then, re-open the Software Center.
What is the Software Center Service?
The Software Center is a service provided by the University Information Technology department to make available applications that are available on campus. It is available for Windows users on both workstations and laptops. You can install a software package by navigating to the Software Center and following the instructions. You can even change the color of the Software Center and add a logo to the service. The following article will cover the various ways to change the color and logo of the Software Center.
If your computers are SU-tagged, the Software Center is the best place to download and install applications. The Software Center icon can be found under START. It will be on the list of applications. Select the S-button and find the Software Center icon. From there, you can click the “S”-button to navigate to the Software Center. Click the icon and follow the directions on the screen to download the desired application.
How Do I Reinstall Microsoft Software Center?
If you’re wondering, “How Do I reinstall Microsoft Software Center in Windows 10?” you’re not alone. The missing software control center has been a common complaint among Windows users. Microsoft’s System Center Configuration Manager is a feature in Software Center that allows IT administrators to remotely change system policy settings and deploy applications. Whether you’ve removed the program by accident or deleted it on purpose, you can reinstall it.
First, open Task Manager and select Users. Click “Microsoft Software Center” in the Users tab. Click “Install” to start the installation process. The installation will take a few minutes to complete. During the installation process, you can monitor the progress and remove applications if necessary. You can also check the status of the installed software by navigating to the Users tab in Task Manager.
If you’ve removed the Software Center, you can reinstall it using the same method you used before. First, locate the “Software Center” icon in the lower left corner of the screen. Next, click “Install Selected”. Select two or more applications and click “Install”. A window will appear displaying the current status of the installation. When the installation is complete, click “Cancel” to uninstall the application.
How Do I Restart Software Center Service?
To restart the Software Center service, open the Configuration Manager and click on the Actions tab. Select the Application Deployment Evaluation Cycle from the drop-down menu, then click on the Run Now button. When the process completes, Software Center should reboot. If it does not restart, the application is necessary or has been removed from the device. If you cannot find it, try reinstalling it.
The Software Center application is used to manage Windows updates. When an update needs to be installed, it will start automatically. However, if the update requires a reboot, you’ll receive a notification. You can snooze the notification for up to four hours or restart immediately. The update will be applied in the background, so save your files or work before restarting. To restart right away, click on the green Restart Icon in the bottom right corner of the screen. You will see the time and date the automatic restart will occur.
Another way to fix the problem is to run a Machine Policy Retrieval & Evaluation Cycle on the computer. The Machine Policy Retrieval & Evaluation Cycle (MPREC) feature will help you restart the Software Center service in Windows 10.
Learn More Here:
1.) Windows Help Center
2.) Windows – Wikipedia
3.) Windows Blog
4.) Windows Central
В Windows 10 все обновления расположены в апплете » Settings», если точнее то вменю «Обновление и восстановление» их конечно можно вернуть на прежнее место как было в версии 8.0. Как возвратить обновления в панель управления довольно подробно описано здесь.
система выбрала этот ответ лучшим
Adaly
[86.4K]
9 лет назад
Центр обновления в приложении Settings а именно в меню «Обновление и восстановление», чтобы настроить Центр обновления и вернуть его на прежнее место советую вам воспользоватся подсказками, которые дано здесь.
Strei
[21.8K]
9 лет назад
Чтобы в новой Windows 10 зайти в Центр обновления, необходимо произвести те же действия, что и в версии 8.0 То есть мышкой отведите курсор в правый нижний угол. Там выскочит окно, переходите в раздел Параметры, затем Изменение параметров и Обновление и восстановление. А дальше стандартно для любого Windows. Можно отключить автоматические обновления, можно их настроить.
Tiuno
[28.2K]
9 лет назад
Доступ к центру обновления в Windows 10 можно получить только через окно Settings. Оно находится в «Обновление и восстановление». Раньше эта функция была доступна в разделе «Панели управления». Как эту функцию вернуть в «Панель управления» подробно описано здесь.

Марле
[16.4K]
9 лет назад
«Центр обновления Windows» в 10 версии этой операционной системы находится в разделе Параметры и дальше нужно нажимать на изменение параметров. Только там «Центр обновления Windows»звучит по другому, точнее как «Обновление и восстановление».
Центр обновления в десятом Виндовсе находится в Параметры — Изменение параметров — Обновление и восстановление. Можно настроить автоматические обновления и тогда компьютер при их появлении сам будет обновлять систему. Очень удобно.
Елена Д
[364K]
9 лет назад
В десятой версии Windows «Центр обновления Windows» существует в виде «Обновления и восстановления», но, для наибольшего удобства, можно возвратить его в панель управления, предприняв несколько шагов, которые подробно описаны вот здесь — после этого можно будет распоряжаться установкой обновлений на компьютер через него, на своё усмотрение.
Лолоч
[15.5K]
9 лет назад
Центр обновлений в новой десятой версии Видовс вы сможете найти в приложении Параметры. Затем находите вкладку » Обновление и восстановление «. Как перенести все назад в панель упарвление читайте здесь. Там же вы можете установить автоматическую загрузку обновлений.
Людви
9 лет назад
Обновления находятся в приложении Settings, меню «Обновление и восстановление». Как вернуть обновления в панель управления, подробно рассказано здесь, а также здесь. Автоматические обновления можно отключать или оставлять включенными на свое усмотрение.
Sky Walke
9 лет назад
В десятой версии Виндовс центр обновлений находится в приложении Settings, там необходимо зайти в меню «Обновление и восстановление».
В настройках можно покопаться и вернуть центр обновлений в панель управления.
Как это сделать, рассказано здесь.
Перекочевал в Settings, только плиточная версия осталась.
Знаете ответ?