
This problem appears when users are unable to stop the Windows Update Service using the Services tool or Command Prompt. The reasons for trying to stop the service are numerous and many problems regarding Windows Update can be resolved simply by stopping the service and starting it once again.
This article will feature some modules which may cause this problem to occur as well as some workarounds which can be used to stop the service forcefully. Make sure you follow the instructions carefully and the problem should be resolved in no time.
What Causes the Windows Update Service to prevent being Stopped?
The causes of this problem are often unknown and this problem often needs to be circumvented rather than resolved. Nonetheless, when Windows Update service stops misbehaving, new updates are installed and they often resolve the problem. However, here are some common causes:
- Missing administrator privileges may prevent Windows Update Service from stopping and you should use an elevated Command Prompt in order to stop it.
- Something is wrong with your computer on a more serious note and you should consider an in-place upgrade or a repair installation.
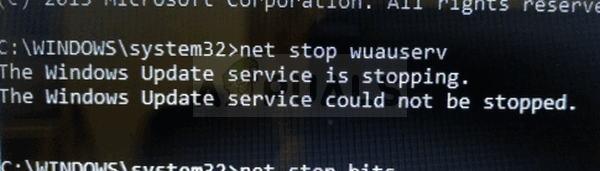
Solution 1: Stopping wuauserv Process
Command Prompt with administrative permissions can be used to circumvent this problem. The command you will use will end the process recognized by its PID and it should be stopped. Note that you will need to use the Services tool to restart the process once you stop it if you wish to use the Windows Update functionality in the future.
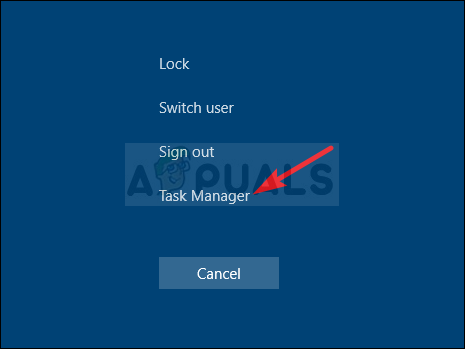
- Use the Ctrl + Shift + Esc key combination by pressing the keys at the same time to open the Task Manager utility.
- Alternatively, you can use the Ctrl + Alt + Del key combination and select Task Manager from the popup blue screen which will appear with several options. You can also search for it in the Start menu.
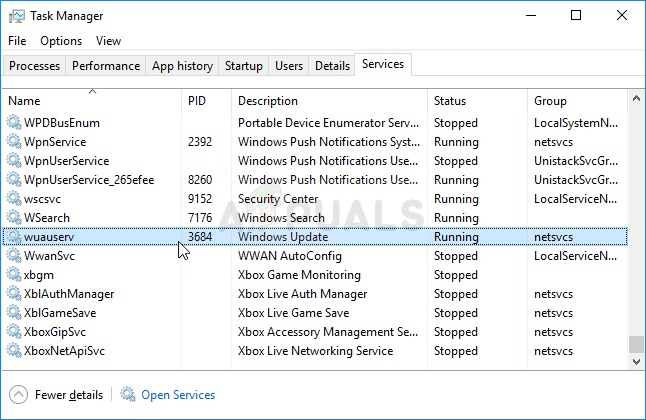
- Click on More details at the bottom left part of the window in order to expand Task Manager. Navigate to the Services tab and right-click somewhere around the names of the columns and check the box next to the PID entry in the context menu.
- Locate the Windows Update service by checking the Description column or by looking for the ‘wuauserv’ service under the Name column. Note down its PID number.
- Search for “Command Prompt” either right in the Start menu or by tapping the search button right next to it. Right-click on the first result which appears at the top and select the “Run as administrator” option.
- Users who are using an older version of Windows can use the Windows Logo Key + R key combination in order to bring up the Run dialog box. Type in “cmd” in the box and use the Ctrl + Shift + Enter key combination in order to run Command Prompt as an administrator.
- Copy and paste the command shown below and make sure you click the Enter key on your keyboard.
taskkill /f /pid [PID]
- Make sure you replace [PID] with the number you noted down regarding Windows Update Service. If the Command Prompt reports that the service was successfully stopped, your problem is resolved!
Solution 2: Clearing the Contents of Update Folder
If you want to stop the Windows Update Service because you are either resetting Windows Update components or if you are simply trying to solve a problem regarding the automatic updates, you can follow this set of commands along with deleting the contents of a folder. The method is similar to Solution 1 but the command is different.
- Search for “Command Prompt” either right in the Start menu or by tapping the search button right next to it. Right-click on the first result which appears at the top and select the “Run as administrator” option.
- Users who are using an older version of Windows can use the Windows Logo Key + R key combination in order to bring up the Run dialog box. Type in “cmd” in the box and use the Ctrl + Shift + Enter key combination in order to run Command Prompt as an administrator.
Running CMD using Run box - Copy and paste the command shown below and make sure you click the Enter key on your keyboard.
net stop wuauserv
net stop bits
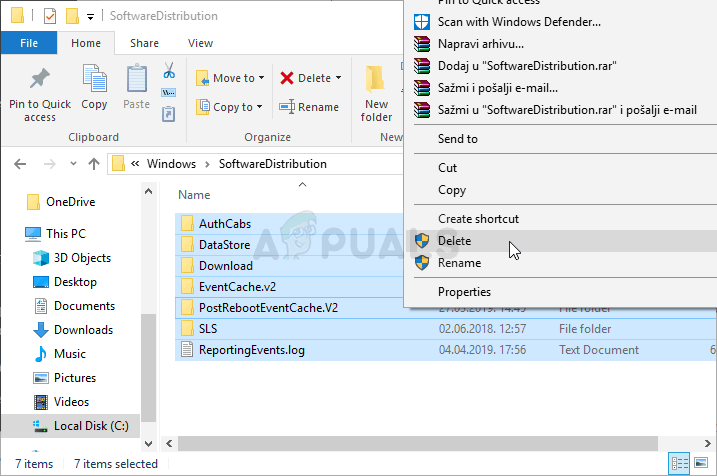
- Navigate to the following location on your computer by opening the Windows Explorer and clicking on This PC:
C:\Windows\SoftwareDistribution
- Use the Ctrl+ A key combination to select all files, right-click on one of them and choose Delete from the context menu.
- If you wish to restart both the BITS and the Windows Update service, run the following set of commands in Command Prompt:
net start wuauserv
net start bits
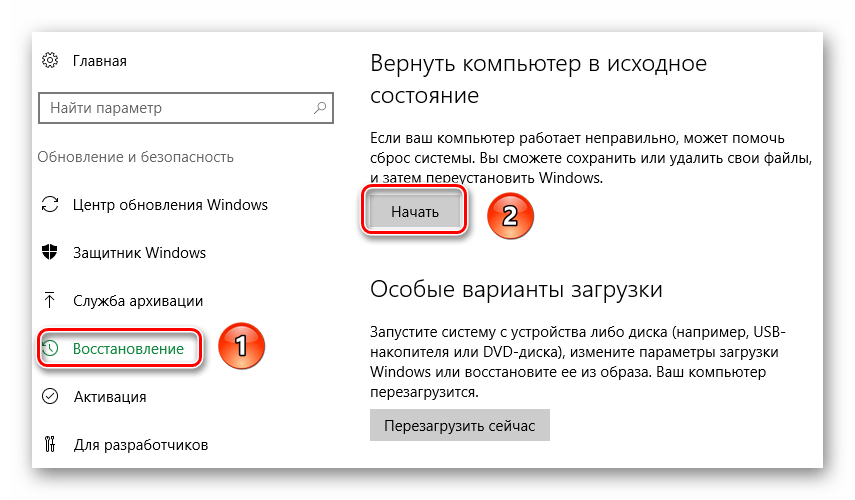
Solution 3: Perform a Repair Installation
This method might seem desperate as it includes creating a bootable Windows 10 media and actually performing a repair installation but it can help you since you won’t lose any of your personal files. This has helped plenty of users deal with the problem and you should check it out as a last resort, especially if you are trying to get Windows Update to work as this will also install the latest version of Windows.
- Download the Media Creation Tool software from Microsoft’s website. Open the downloaded file you just downloaded and accept the terms and conditions.
- Select the Create installation media (USB flash drive, DVD, or ISO file) for another PC option from the initial screen.

- The language, architecture, and other settings of the bootable drive will be chosen based on your computer’s settings, but you should uncheck the Use the recommended options for this PC in order to select the correct settings for the PC which has the password attached to it (if you are creating this on a different PC, and you probably are).
- Click Next and click on the USB drive or DVD option when prompted to choose between USB or DVD, depending on which device you want to use to store this image on.

- Click Next and choose the USB or DVD drive from the list which will show the storage media connected to your computer.
- Click Next and the Media Creation Tool will proceed to download the files necessary to install create the installation device.
Now that you probably have your recovery media, we can start actually solving the booting issue by starting the recovery drive which you should boot from.
- Insert the installation drive you own or which you have just created and boot your computer. The initial screen will differ depending on the operating system you have installed.
- Windows Setup should open prompting you to enter the preferred language and time and date settings. Enter them correctly and choose the Repair your computer option at the bottom of the window.
- The Choose an option screen will appear so navigate to Troubleshoot >> Reset this PC. This will let you keep your personal files but it will delete the apps you have installed. Follow the further set of instructions on-screen and wait for the process to finish. Check to see if the BSODs still appear in a loop!
Kevin Arrows
Kevin Arrows is a highly experienced and knowledgeable technology specialist with over a decade of industry experience. He holds a Microsoft Certified Technology Specialist (MCTS) certification and has a deep passion for staying up-to-date on the latest tech developments. Kevin has written extensively on a wide range of tech-related topics, showcasing his expertise and knowledge in areas such as software development, cybersecurity, and cloud computing. His contributions to the tech field have been widely recognized and respected by his peers, and he is highly regarded for his ability to explain complex technical concepts in a clear and concise manner.
Windows is one of the most extensively used operating systems around the globe by both home users and professionals; the system maintains its smooth functioning by relying on key updates from time to time. To assure the same seamless experience for the user’s convenience System has come up with an automated function that downloads and installs all Windows updates, regardless of their nature. Unfortunately, some users are still getting “Update service was shutting down” error.
Automated service does not always work and can become the pivotal reason for witnessing the error, “we could not complete the install because an update service was shutting down”. This can render the system obsolete for an extended period, and users may begin to notice detrimental impacts on Windows computer. However, when such automatic update fails and users have to do it manually, it may be rather unpleasant. There can be several possible causes for this, but the most common is that the Windows update service may have crashed or been deactivated. See – How to Fix Update Error Code 80072EFE in Windows (Solved!).
We could not complete the Install because an update service was shutting down
Here is how to fix Update service was shutting down” in Windows 11 or 10 –
Way-1: Windows Update Service needs to be Restarted
Main possibility behind the error We could not complete the Install because an update service was shutting down is the failure of the associated service. Go with the steps listed below to fix it:
- Press the Windows key and R simultaneously.
- Type services.msc.
- Press OK.
- Scroll down in the window to locate and double-click on Windows Update Service.
- Click the dropdown for Startup type.
- Select – Automatic
- Under Service status click on Start.
- Then, click Apply and OK.
- Once done, Restart your PC, and let the changes take effect.
Way-2: Try Using Windows Update Troubleshooter
Windows update troubleshooter can be the go-to tool as this utility scans for any possible obstacles that may be restricting your system functionalities and resolves the error. So try using these steps to run the repair:
Windows 11:
- Click on Search.
- Type troubleshoot.
- Press Enter to launch the associated Settings page.
- Select Other troubleshooters.
- Go to the Windows update section and click on Run.
Windows 10:
- Select Start followed by Settings.
- Then, go to Updates & Security.
- Select Troubleshoot and Additional troubleshooter.
- Navigate to Windows Update and then click on Run the troubleshooter.
Way-3: Temporarily Disabling Third-Party Antivirus
We could not complete the installation because an update service was shutting down, error like this is majorly caused by third-party antivirus programs. Therefore, you can try temporarily disabling the antimalware app to rescue this Windows update installation error through the steps mentioned below:
- Press Windows+S.
- Type – appwiz.cpl and press Enter.
- Select the program you want to remove, then click the Uninstall button.
- Restart your PC and check if the problem is solved.
After uninstalling the third-party antivirus suite, reboot your computer and run Windows Update again to see whether the problem has been resolved or not. If, the error persists follow the next way.
Way-4: Installing Recent Serving Stack Update
Servicing stack updates are an important component of Windows as they increase the dependability of the update process to prevent potential errors while installing the feature updates in the system. However, to fix the concerned error you can try downloading and installing the most current servicing stack update
Before downloading you must be sure of your Windows, whether it’s 32-bit or 64-bit.
First, check out, how to determine your Windows version and download the servicing stack update.
- Press Winkey+I.
- When the Settings app appears, choose System.
- Scroll down the right side to look for About (In Windows 10, About is located in the left pane).
- Note down OS build under Windows Specifications on the right panel to determine which version you are running.
- Click here to reach Microsoft Update catalog.
- Type the OS build number in the search bar and hit Enter.
- Find the servicing stack update that corresponds to your Windows version.
- Click on Download to open a separate page.
- Click on the solitary link lying there to download the standalone copy of the SSU.
- Double-click on the .MSU file and confirm the installation process by clicking Yes on the prompt.
- Then, reboot your machine and run a check for updates again to see whether the issue stating we could not complete the installation because an update service was shutting down has been resolved or not.
Way-5: Try Fixing Windows Update Database
Windows update database if corrupted or malfunctioned could hinder the upgrading process in Windows to and force the user to receive the abovementioned error. In such case, you must repair the damaged Windows update database with the following steps:
- In the Windows search field, type Command Prompt.
- Then click on Run as administrator.
- Select Yes on the User account control dialog.
- Put the following commands into the Command Line window and press Enter after each one:
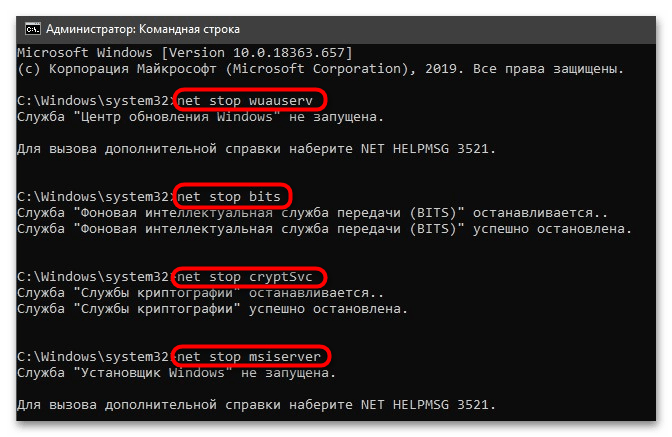
net stop wuauserv
net stop cryptSvc
net stop bits
net stop msiserver
ren c:\windows\SoftwareDistribution softwaredistribution.old
Ren C:\Windows\System32\catroot2 Catroot2.old
net start wuauserv
net start cryptSvc
net start bits
net start msiserver- Sit tight till it’s done, and then try again.
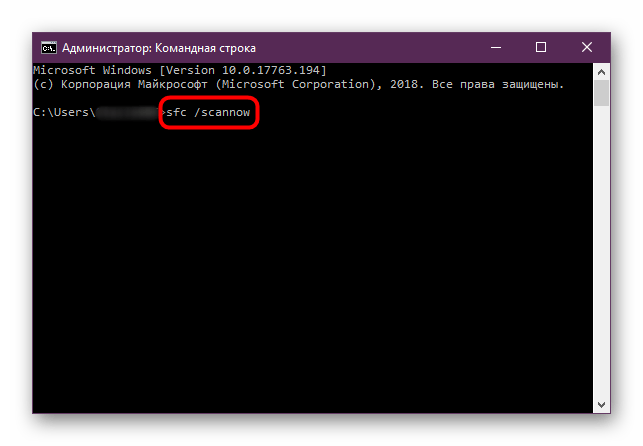
Way-6: Try Running System File Checker
To repair this error, which reads, “We could not complete the install because an update service was shutting down,” consider using the SFC utility program, which has the capability to remediate the installation problem.
- Open Command Prompt as administrator.
- Type the following command and hit Enter to proceed:
sfc /scannow.
- The tool will quickly begin verification phase of system scan.
- When an error message is displayed after running SFC, enter the following lines of command one at a time:
DISM /Online /Cleanup-Image /CheckHealth
DISM /Online /Cleanup-Image /ScanHealth
DISM /Online /Cleanup-Image /RestoreHealth
Way-7: Use In-place upgrade to fix Update service was shutting down
In-place upgrade is the method which can upgrade the Windows system to the most recent edition which includes the latest release of quality patch. In this scenario where the update issues are portraying the error message Update service was shutting down will come to end through the following steps:
- Search the keyword ‘Windows 11/10 download’ and go to the official page.
- Navigate down to the section displaying “Download Windows 11 Disk Image (ISO)”.
- Choose – Select Download.
- Click – Windows 11 (multi-edition ISO).
- Now, select – Download.
- Opt for a Language and Confirm.
- Next, download the ISO file (xx-bit) and right-click on it.
- Select – Mount.
- Once you’re in the next folder, double-click on the executable setup file.
- Select Next.
- Then the license agreement wizard will be upfront; click on – Accept.
- The program will scan the system to confirm that there is required free space on your system.
- On the “Ready to install” window, mark the option – “Keep personal files and apps”.
Select – Install. - The computer will restart multiple times and bring you forward to the lock screen where you’ll need to sign in only to get access to the desktop.
With these 7 ways, we believe that you must be able to fix this error that states we could not complete the Install because an update service was shutting down in windows.
Methods:
Way-1: Windows Update Service needs to be Restarted
Way-2: Try Using Windows Update Troubleshooter
Way-3: Temporarily Disabling Third-Party Antivirus
Way-4: Installing Recent Serving Stack Update
Way-5: Try Fixing Windows Update Database
Way-6: Try Running System File Checker
Way-7: Use In-place upgrade
That’s all!!
Некоторые пользователи, желающие отключить Центр обновления Windows 10 сталкиваются с тем, что отключение службы центра обновлений не приводит к желаемому результату: через короткое время служба автоматически включается снова (причем не помогает даже отключение заданий в планировщике в разделе Update Orchestrator). Способы блокировки серверов центра обновлений в файле hosts, брандмауэре или с помощью стороннего ПО тоже нельзя назвать лучшим вариантом.
Однако есть способ отключить Центр обновления Windows 10, а точнее доступ к нему системными средствами, причем способ работает не только в Pro или Enterprise версиях, но и в домашней версии системы (включая версии 1803 April Update и 1809 October Update). См. также дополнительные способы (в том числе, отключение установки конкретного обновления), информацию по обновлениям и их настройке в инструкции Как отключить обновления Windows 10.
Примечание: если вы не знаете, зачем отключаете обновления Windows 10, лучше этого не делать. Если причина лишь в том, что вам не нравится, что они то и дело устанавливаются — лучше оставить включенными, в большинстве случаев это лучше, чем не устанавливать обновления.
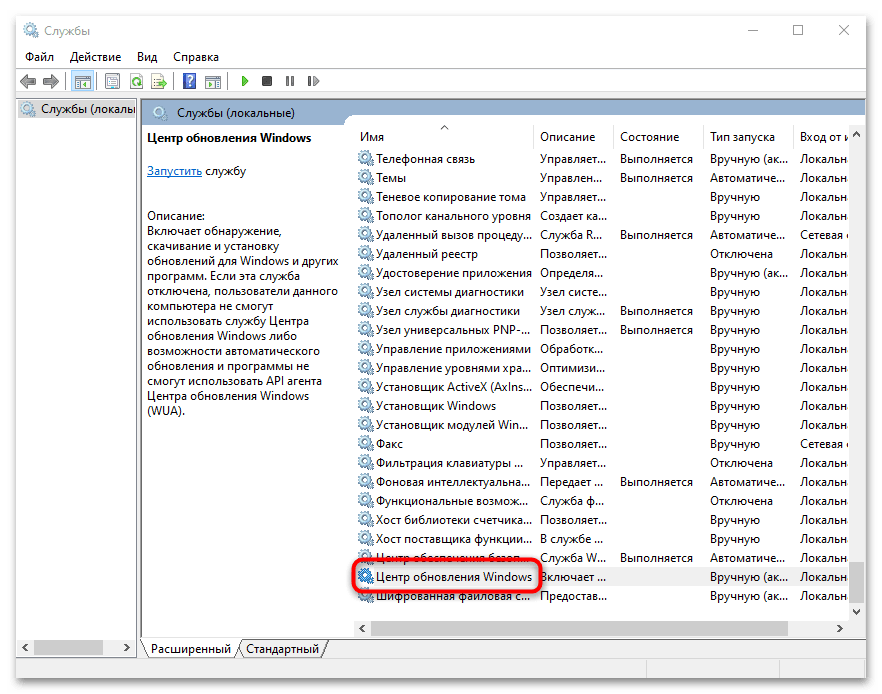
Отключение центра обновлений Windows 10 навсегда в службах
Несмотря на то, что Windows 10 сама запускает центр обновления после отключения его в службах, это можно обойти. Путь будет таким
- Нажмите клавиши Win+R на клавиатуре, введите services.msc и нажмите Enter.
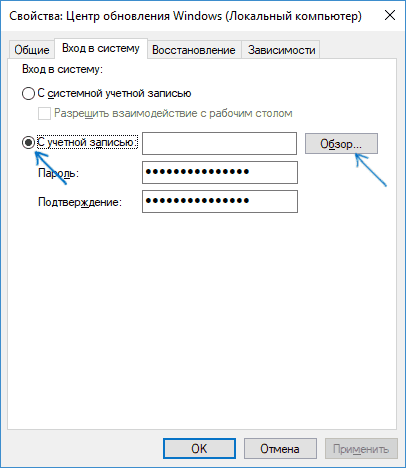
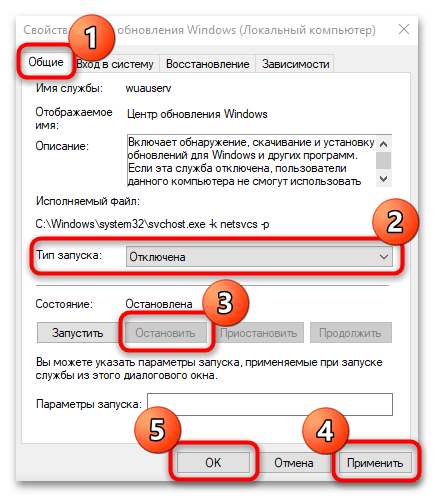
- Найдите службу Центр обновления Windows, отключите её, дважды кликните по ней, в тип запуска установите «Отключена» и нажмите кнопку «Применить».
- В этом же окне перейдите на вкладку «Вход в систему», выберите пункт «С учетной записью», нажмите «Обзор», а в следующем окне — «Дополнительно».

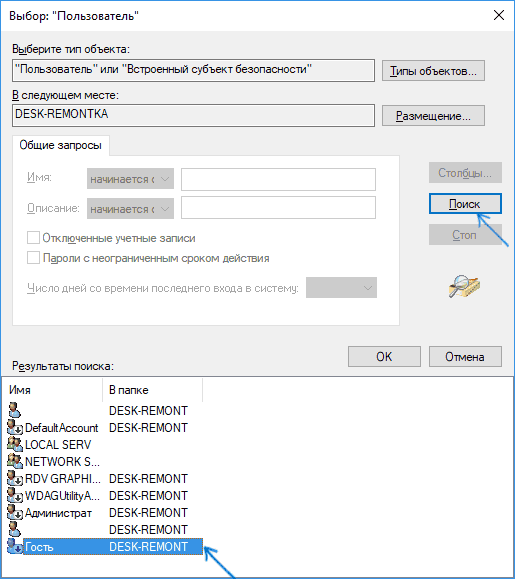
- В следующем окне нажмите «Поиск» и в списке внизу выберите учетную запись без прав, например — Гость.

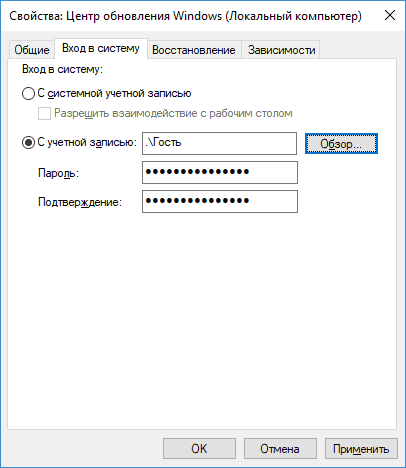
- Нажмите Ок, снова Ок, а затем укажите любой пароль и подтверждение пароля, запоминать его не нужно (несмотря на то, что у учетной записи Гость нет пароля, все равно укажите его) и подтвердите все сделанные изменения.
- После этого Центр обновления Windows 10 больше не запустится.
Если что-то осталось не до конца понятным, ниже — видео, на котором все шаги отключения центра обновления показаны наглядно (но есть ошибка касающаяся пароля — его следует указать).
Отключение доступа к Центру обновления Windows 10 в редакторе реестра
Перед тем как начать, отключите службу Центра обновлений Windows 10 обычным способом (в дальнейшем она может включиться при выполнении автоматического обслуживания системы, но доступа к обновлениям у неё уже не будет).
Для этого выполните следующие шаги:
- Нажмите клавиши Win+R на клавиатуре (где Win — клавиша с эмблемой Windows), введите services.msc и нажмите Enter.
- В списке служб найдите «Центр обновления Windows» и дважды кликните по названию службы.
- Нажмите «Остановить», а после остановки установите «Отключена» в поле «Тип запуска».

Готово, центр обновления временно отключен, следующий шаг — отключить его полностью, а точнее — заблокировать ему доступ к серверу центра обновлений.
Для этого используйте следующий путь:
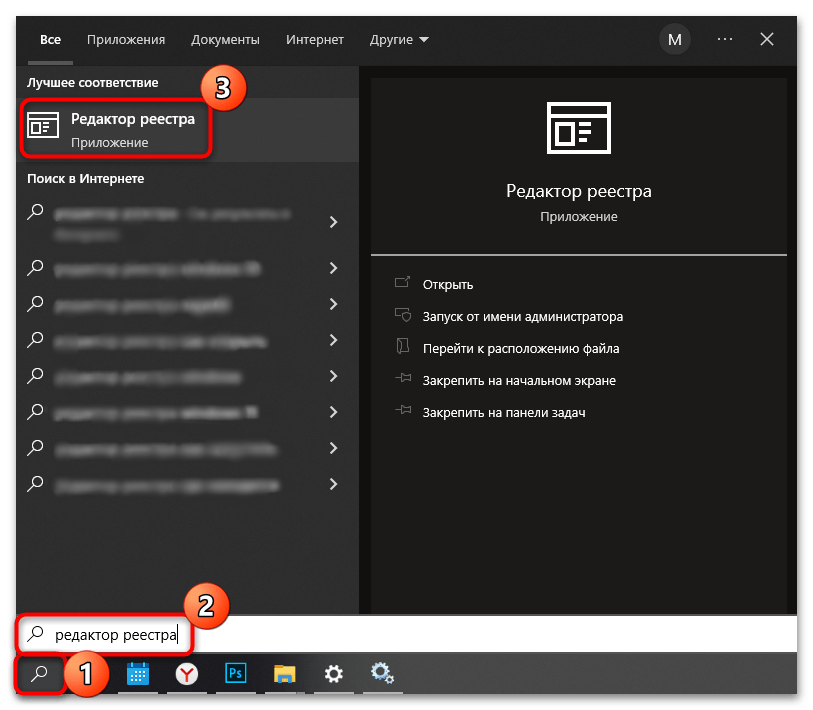
- Нажмите клавиши Win+R, введите regedit и нажмите Enter.
- В редакторе реестра перейдите к разделу HKEY_LOCAL_MACHINE\SYSTEM\ нажмите по имени раздела правой кнопкой мыши и выберите «Создать» — «Раздел». Назовите этот раздел Internet Communication Management, а внутри него создайте еще один с именем Internet Communication.

- Выбрав раздел Internet Communication, нажмите правой кнопкой мыши в правой части окна редактора реестра и выберите «Создать» — «Параметр DWORD».

- Укажите имя параметра DisableWindowsUpdateAccess, затем дважды нажмите по нему и задайте значение 1.

- Аналогичным образом создайте параметр DWORD с именем NoWindowsUpdate со значением 1 в разделе HKEY_LOCAL_MACHINE\ Software\ Microsoft\ Windows\ CurrentVersion\ Policies\ Explorer

- Также создайте параметр DWORD с именем DisableWindowsUpdateAccess и значением 1 в разделе реестра HKEY_LOCAL_MACHINE\ Software\ Policies\ Microsoft\ Windows\ WindowsUpdate (при отсутствии раздела, создайте необходимые подразделы, как это описывалось в шаге 2).

- Закройте редактор реестра и перезагрузите компьютер.


Готово, с этого момента центр обновлений не будет иметь доступа к серверам Майкрософт для загрузки и установки обновлений на компьютер.
Если вы включите службу (или она включится сама) и попробуете проверить наличие обновлений, вы увидите ошибку «С установкой обновлений возникли некоторые проблемы, но попытка будет повторена позже» с кодом 0x8024002e.

Примечание: судя по моим экспериментам, для профессиональной и корпоративной версии Windows 10 достаточно параметра в разделе Internet Communication, а на домашнюю версию этот параметр, наоборот, не оказывает воздействия.
Все способы:
- Способ 1: Устранение неполадок «Центра обновлений»
- Способ 2: Переименование папки с кешем обновлений
- Способ 3: Активация службы «Готовность приложений»
- Способ 4: Отключение автоматических обновлений
- Способ 5: Удаление дублирующих профилей
- Способ 6: Проверка целостности системных файлов
- Способ 7: Восстановление системы
- Вопросы и ответы: 2
Способ 1: Устранение неполадок «Центра обновлений»
Когда не удается завершить обновление в Windows 10, можно попробовать устранить неполадки «Центра обновлений» с помощью специального штатного инструмента:
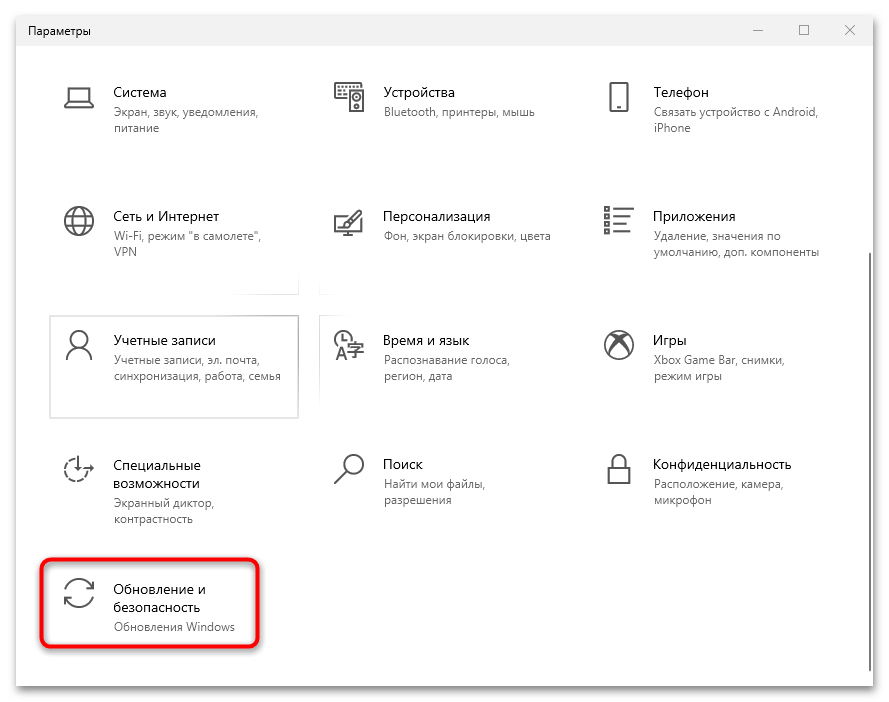
- Перейдите в «Параметры» через главное меню Windows 10.
- Выберите раздел «Обновление и безопасность».
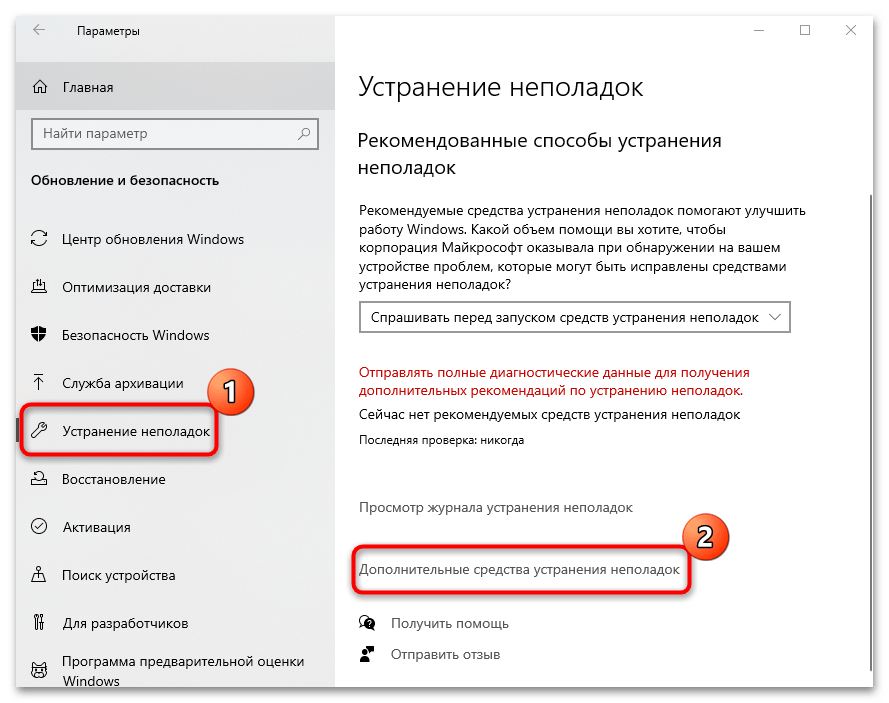
- В новом окне на панели слева нажмите на «Устранение неполадок» и кликните по строке «Дополнительные средства устранения неполадок».
- Найдите строку «Центр обновления Windows» и щелкните по ней. Появится кнопка для запуска средства устранения неполадок – нажмите на нее.

Когда средство выявит неполадки, то предложит варианты их исправления. Если все в порядке, переходите к следующему способу.
Способ 2: Переименование папки с кешем обновлений
Кеш обновлений временно хранится в специальной папке, которая позволяет, например, откатить состояние системы. Чаще всего проблема с завершением обновлений Windows 10 решается, если эту папку очистить или переименовать. Таким образом система создаст новый каталог и загрузит апдейты снова.
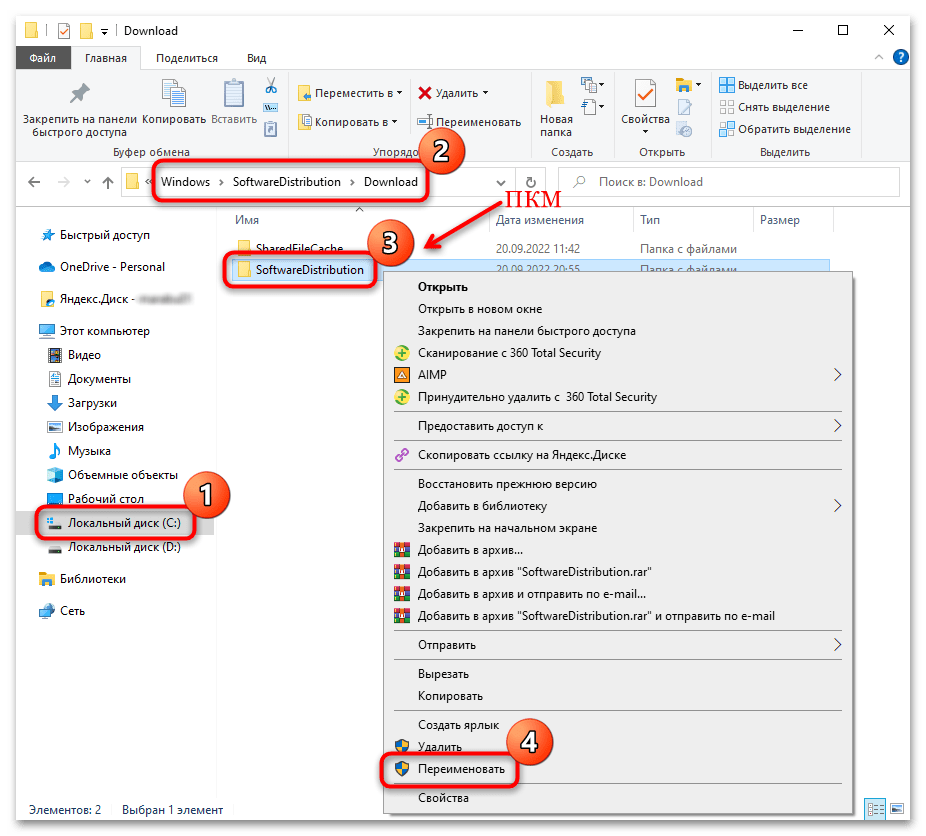
- Перейдите по следующему пути:
C:\Windows\SoftwareDistribution\Downloadи найдите папку под названием «SoftwareDistribution». Попробуйте переименовать ее, например, добавив символ, чтобы при необходимости можно было вернуть прежнее название. Вызовите контекстное меню нажатием правой кнопкой мыши и воспользуйтесь соответствующим параметром. - После этого надо еще раз зайти в «Центр обновления Windows» и посмотреть, скачивается ли обновление (или воспользоваться ручной проверкой). Зачастую после этого обновления устанавливаются корректно, поэтому вы можете зайти еще раз по указанному выше пути и удалить ту папку, которую переименовывали.
Если переименовать папку с кешем обновлений не получается и вы получаете уведомление о том, что файл занят другим процессом, потребуется отключить некоторые службы:
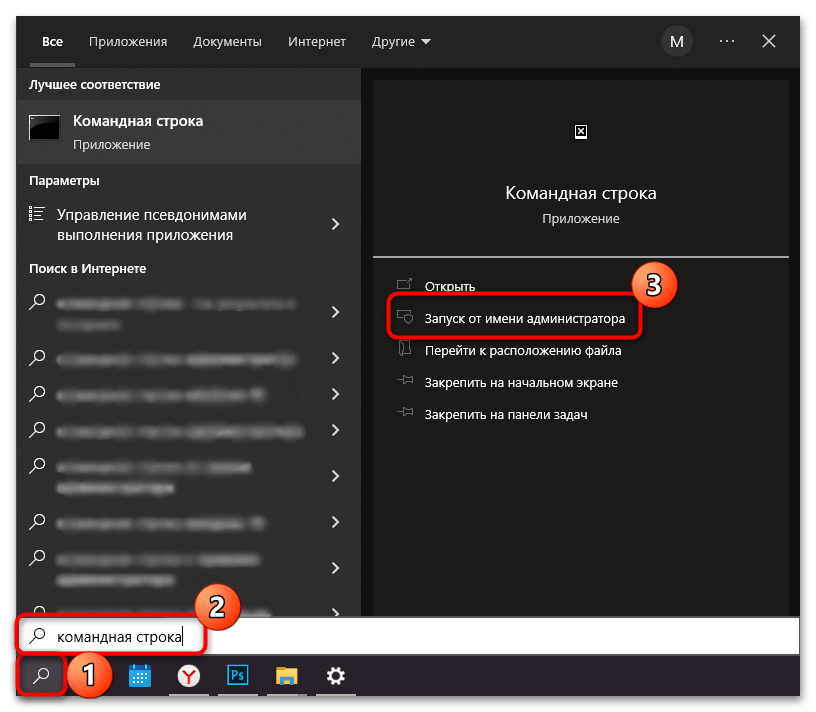
- Запустите «Командную строку» от имени администратора. Для этого можно воспользоваться системным поиском.
- Чтобы остановить службы, впишите команды
net stop wuauservnet
net stop bitnet
net stop cryptSvcnet
stop msiserver, разделяя их нажатием клавиши «Enter».
Перейдите через «Проводник» к папке с кешем обновлений и переименуйте каталог. Затем важно снова включить отключенные службы, введя в «Командную строку»:
net start wuauservnet
net start bitsnet
net start cryptSvcnet
net start msiserver, также нажимая клавишу «Enter» после каждой команды.
Перезагрузите систему, чтобы проверить, пропала ли проблема. Если ничего не изменилось, лучше вернуть папку с кешем, переименовав ее обратно.
Если система начинает циклически перезагружаться, верните все настройки назад, запустив Windows в «Безопасном режиме».
Читайте также: Безопасный режим в Windows 10
Способ 3: Активация службы «Готовность приложений»
Служба «Готовность приложений» необходима для корректной загрузки и установки апдейтов. Если она выключена, то может появиться ошибка, при которой не удается завершить обновление в Windows 10. Включите ее вручную:
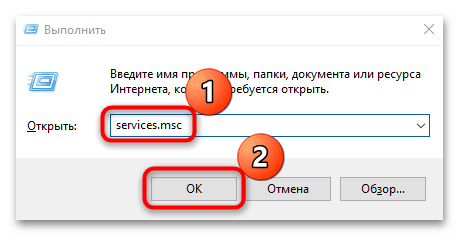
- Запустите окно «Службы» с помощью встроенного приложения «Выполнить». Одновременно зажмите «Win + R», введите
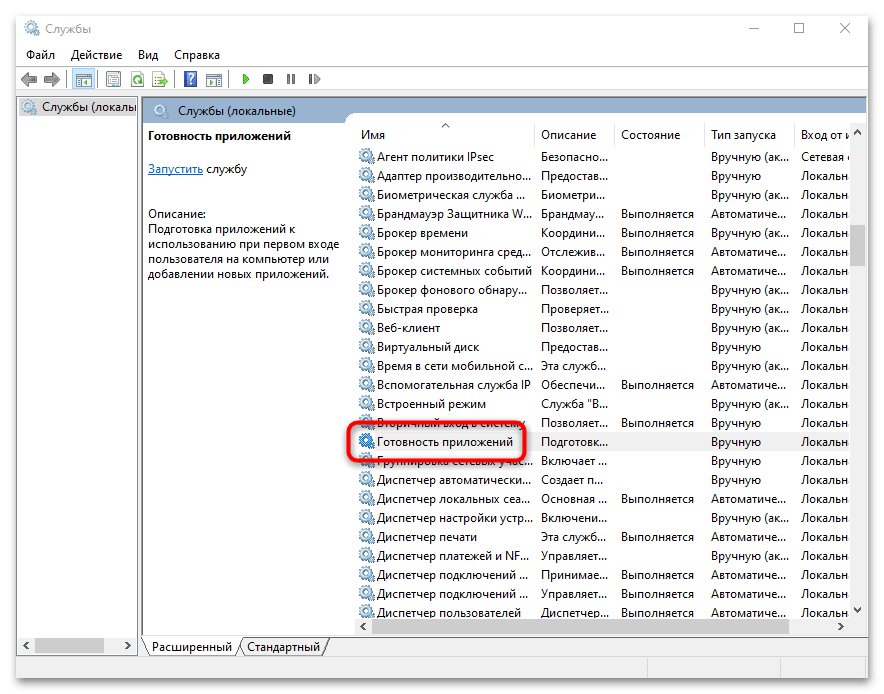
services.mscи нажмите на кнопку «ОК». - В списке отыщите строку «Готовность приложений» и дважды щелкните по ней, чтобы открыть свойства службы.
- В меню «Тип запуска» выберите «Автоматически», затем кликните по «Запустить» и нажмите на кнопку подтверждения, чтобы применить настройки.
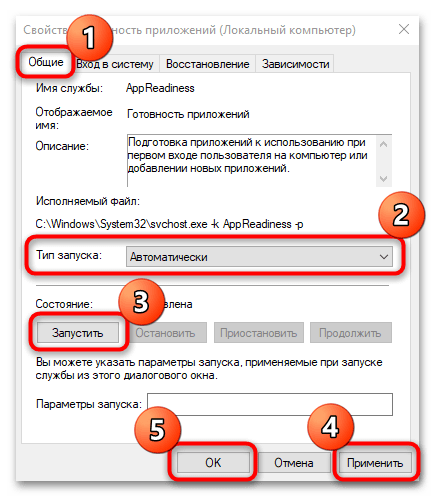
После изменения свойств служб рекомендуется перезагрузить компьютер, чтобы новые настройки вступили в силу.
Способ 4: Отключение автоматических обновлений
Можно попытаться решить проблему, отключив автоматические обновления Windows 10. Для этого потребуется деактивировать соответствующую службу:
- Запустите окно «Службы» так же, как было продемонстрировано в предыдущем способе. В списке служб найдите «Центр обновления Windows» и откройте окно ее свойств, дважды щелкнув левой кнопкой мыши по названию.
- Разверните меню у параметра «Тип запуска» и выберите «Отключено». Затем остановите работу службы, щелкнув по соответствующей кнопке. Нажмите на кнопку применения и подтвердите действие.
Перезагрузите компьютер, чтобы узнать, исчезла ли неполадка.
Способ 5: Удаление дублирующих профилей
Иногда операционная система не может правильно обновиться из-за того, что на компьютере есть дублирующие профили. В этом случае таковые нужно удалить, используя «Редактор реестра».
Способ предполагает внесение изменений в реестре Windows, и при неправильном алгоритме действий могут произойти различные ошибки, которые повлияют на работу системы. Если вы не уверены в своих действиях и у вас нет возможности создать резервную копию реестра, которую в случае чего можно будет восстановить при помощи загрузочной флешки, лучше пропустите эту инструкцию.
- Запустите «Редактор реестра». Приложение можно отыскать в списке установленного софта в главном меню.
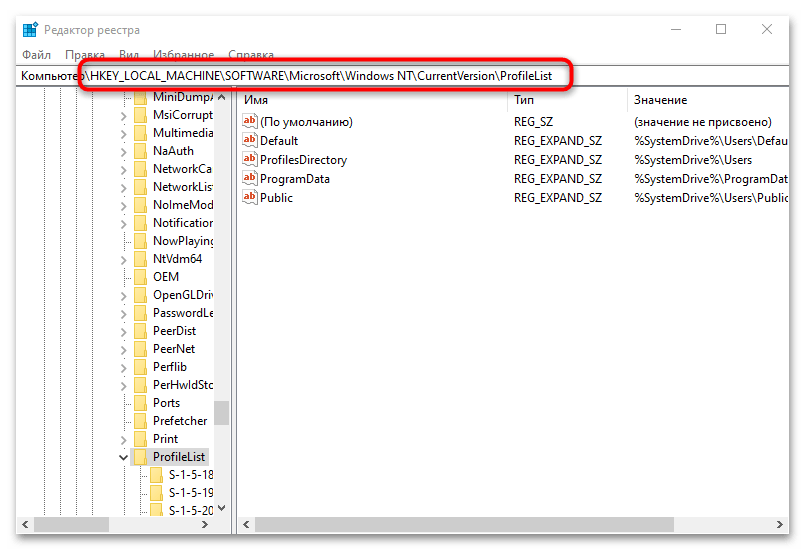
- Перейдите по пути
HKEY_LOCAL_MACHINE\SOFTWARE\Microsoft\Windows NT\CurrentVersion\ProfileList. - Внимательно просмотрите все подпапки каталога «ProfileList». Если более чем в одном разделе есть параметр «ProfileImagePath», указывающий на главную папку пользователя, то лишнее нужно удалить. В столбце «Значение» отобразится путь к ней. Выделите объект и нажмите на клавишу «Delete».

Если в разделах есть параметр «RefCount» и его значение равно «0», то его следует удалить. Так же, как и любые пункты с расширением «.bak».
В том случае, когда лишних параметров не обнаружено, то это значит, что на компьютере нет дублирующих профилей. Тогда ничего трогать не нужно, просто закройте «Редактор реестра», не внося никаких изменений.
Способ 6: Проверка целостности системных файлов
При повреждении системных файлов возникают проблемы различного характера в работе Windows. Из-за этой неполадки может быть сбой в обновлениях ОС, поэтому попробуйте проверить файлы на целостность. В системе предусмотрены специальные инструменты, которые позволяют возвращать изначальное состояние как файлов, так и хранилища компонентов. В нашем отдельном руководстве автор детально разбирал, как проделать процедуру с помощью команд SFC и DISM.
Подробнее: Использование и восстановление проверки целостности системных файлов в Windows 10
Способ 7: Восстановление системы
Компания Microsoft предусмотрела ситуации, когда вследствие различных ошибок или деятельности вредоносного ПО система выходит из строя. Тогда с помощью специальных инструментов можно восстановить ее до предыдущей сборки или первоначального состояния. Способ сработает, даже если из-за критических ошибок в обновлениях Windows 10 перестала запускаться. В нашей отдельной статье разобраны методы восстановления ОС с помощью приложения «Параметры» или загрузочного меню, а также без запуска операционки.
Подробнее:
Восстанавливаем ОС Windows 10 к исходному состоянию
Возвращаем Windows 10 к заводскому состоянию
Наша группа в TelegramПолезные советы и помощь
Ранее успешно отключал службу «Центр обновления Windows» (wuauserv) скриптами. Несколько месяцев назад обновился до сборки Windows 10 1803 и в какой-то момент обратил внимание, что скрипт отрабатывал, но служба все равно была в статусе «Запущена». Зайдя в свойства службы увидел, что кнопки «Запустить», «Остановить» и т.п. неактивны. Выпадающее меню «Тип запуска» тоже неактивно!

При попытке остановить службу в cmd или powershell я получал ошибку. В частности, в cmd ошибка:
Системная ошибка 5.
Отказано в доступе.

Трудно сказать, когда именно это случилось. Сначала я удалил недавно установленный мартовский Quality Update 2019-03 и перезагрузил компьютер, но доступ к управлению службой не появился. Тогда я решил, что Microsoft опять закручивает гайки и это нововведения Windows 10 1803.
Тем не менее, на моей виртуальной машине Windows 10 1803 Pro (10.0.17134.590 — 2019-02 Quality Update) — такой проблемы не оказалось: управление службой работало.

Судя по всему, дело не в April 2018 Update, но исправлять проблему надо. В поисках решения я полез в Google и нашел его на этом форуме (ссылка на пост с решением). На основе этих данных я выработал свой алгоритм действий:
1. На всякий случай делаем бекап текущих разрешений для службы wuauserv, для этого:
запускаем cmd от имени администратора и выполняем команду
sc sdshow wuauserv
2. Копируем результат выполнения команды в какой-нибудь тектовый файл.
В моем случае вывод такой:
D:(A;;CCDCLCSWRPWPDTLOCRSDRCWDWO;;;SY)(A;;CCLCSWLOCRRC;;;BA)(A;;CCLCSWLOCRRC;;;IU)S:(AU;FA;CCDCLCSWRPWPDTLOCRSDRCWDWO;;;WD)
3. Изменить права для службы даже с запущенной от имени администратора командной строкой у нас не получится. Будет выдано сообщение «отказано в доступе».

Нам нужно создать текстовый файл следующего содержания:
sc sdset wuauserv D:(A;;CCLCSWRPLORC;;;AU)(A;;CCDCLCSWRPWPDTLOCRSDRCWDWO;;;BA)(A;;CCDCLCSWRPWPDTLOCRSDRCWDWO;;;SY)
(права копировались с компьютера, где служба wuauserv функционировала нормально)
4. Сохраняем этот файл с расширением .cmd на локальный диск

5. Для того, чтобы у нас хватило разрешений на смену прав для службы, командный файл нужно запустить от имени учетной записи СИСТЕМА. Сделать это можно через планировщик задач.
Открываем планировщик заданий (Win+R — taskschd.msc) и создаем простую задачу для запуска сохраненного ранее файла

6. В качестве программы для запуска указываем наш пакетный файл. «Далее» — «Готово»

7. Входим в свойства созданного задания (ПКМ — Свойства) и меняем учетную запись, от имени которой происходит запуск задания, с текущего пользователя на «СИСТЕМА». Жмем «ОК».

8. Ставим галочку «Выполнить с наивысшими правами» — ОК

9. ПКМ на задании — «Выполнить»

10. Ждем несколько секунд и проверяем службу «Центр обновления Windows». Profit!

Примечание: Windows периодически самостоятельно запускает службу автоматического обновления wuauserv, а также может поменять разрешения, чтобы вновь запретить доступ учетной записи администратора к управлению службой, поэтому данное задание планировщика можно настроить на регулярный плановый запуск.
Совет: Метод также может использоваться и для других служб, доступ на управление которыми у вас отсутствует. Например, «Центр обеспечения безопасности» (wscsvc)
Материалы:
- Решение проблемы на форуме
https://www.bleepingcomputer.com/forums/t/688811/microsoft-now-blocking-commands/page-2