
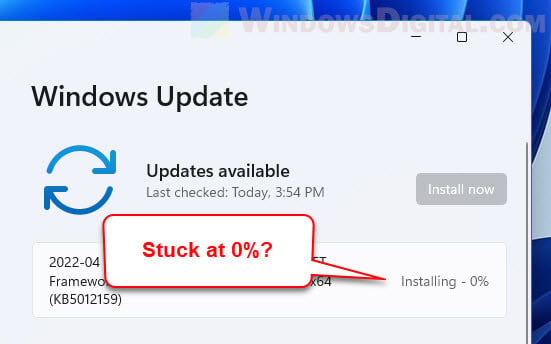
Similar to that of Windows 10, the Windows 11 update process includes checking for updates, downloading the updates and installing the updates. The downloading and installing process may sometimes stuck at certain percentage, particularly at 0% or 100% (sometimes at 99%, 94%, 88%, 91%, etc.).
In this guide, we will show you the possible causes that may trigger the Windows 11 update downloading or installing stuck at 100% or 0% problem, and how to fix the issue in order to complete the update.
Why does Windows 11 update stuck?
To correctly resolve the Windows 11 update stuck issue, you first need to figure out what could be the most possible cause of the stuck problem.
Unstable and inconsistent internet connection
If you are using an internet connection that would go on and off (disconnect) from time to time, it may cause disruption to the Windows Update process in Windows 11. Repeatedly pausing and resuming a Windows update download would cause the download to be corrupted, thus causing the downloading process to stuck at 0% or 100%, or other even more complicated issues.
Check your Ethernet, WiFi or cellular internet connection. Try to temporarily switch to a different Wi-Fi network and retry the Windows Update.
Insufficient storage space on Windows drive
Another common cause for Windows 11 update downloading to stuck at 0% or 100% is when your C: drive (or the drive where your Windows installation is) runs out of storage space, thus, causing the update to stuck because no new files can be downloaded due to insufficient storage space.
Double check your C: drive and make sure it has enough storage space for future updates. Make sure the drive has at least 5-10 GB free space for any update to be downloaded and installed.
Frequent suddenness of power outage
If your computer frequently gets forced switched off without properly shutting down due to power outage, power supply issue or habit, it may cause Windows Update downloads or downloaded files to be corrupted, which may cause the Windows 11 update installing stuck at 0% or 100% issue. To fix a corrupted Windows update download, refer to the solution below.
How to fix Windows 11 update stuck at 0% or 100%
Before you try any of the following solutions, make sure you have waited long enough for the Windows 11 Update process to complete. If the update has been stuck at the same percentage for over 2 hours, proceed with the following fixes.
Restart computer, modem and router
Before going for the more complicated solution, let’s try the basic fixes first. Most Windows Update stuck issues can be resolved by simply restarting your PC, modem and router.
To properly restart your modem and router, unplug the power from the devices. Wait for 2 to 3 minutes for the modem and router to fully power off. Then, turn them back on.
Stop services and clear Windows Update download cache
This method is the most effective solution to fix Windows 11 update stuck and other related issues. It involves first to stop the Windows Update services, delete all sub-folders in the SoftwareDistribution folder (a folder where Windows Update stores downloaded files before installing them), and then restart your computer.
If any Windows update downloaded file is corrupted, or if there is any error or conflict occurred during the Windows update processes, doing the steps below will be as if you have never downloaded the problem (stuck) update, allowing you to download and install the same updates all over again.
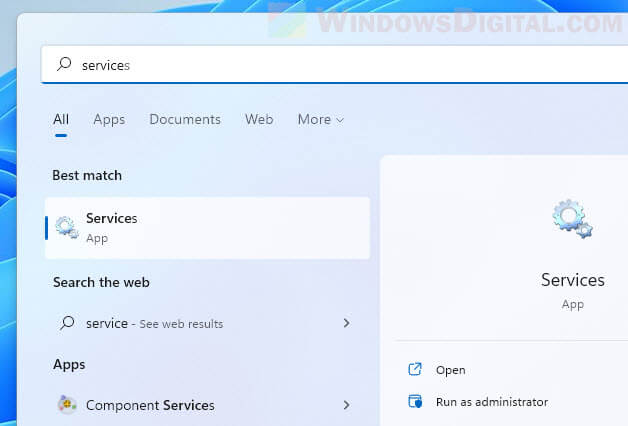
1. First, we will need to stop the Windows Update and Background Intelligence Transfer service to prevent them from interrupting until next restart. To do so, go to start, search for and open “Services“.
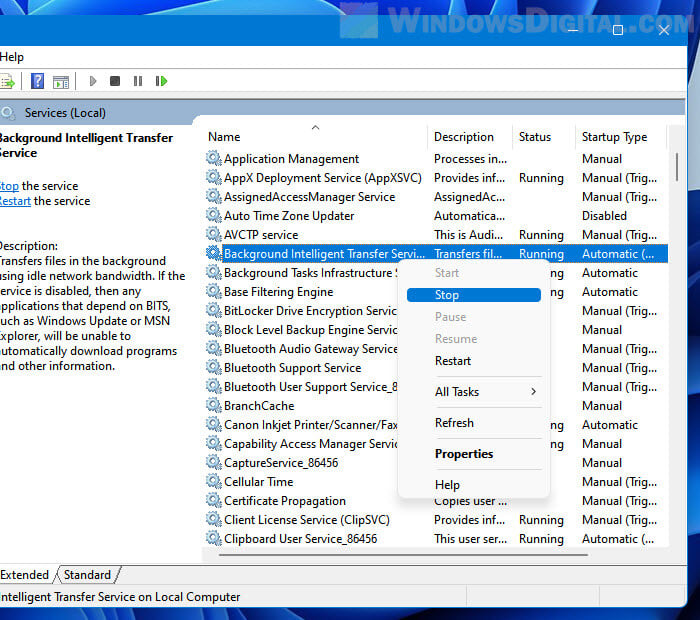
2. In the Services window, look for a service called “Background Intelligent Transfer Service“. Right-click it and select Stop to stop the service.
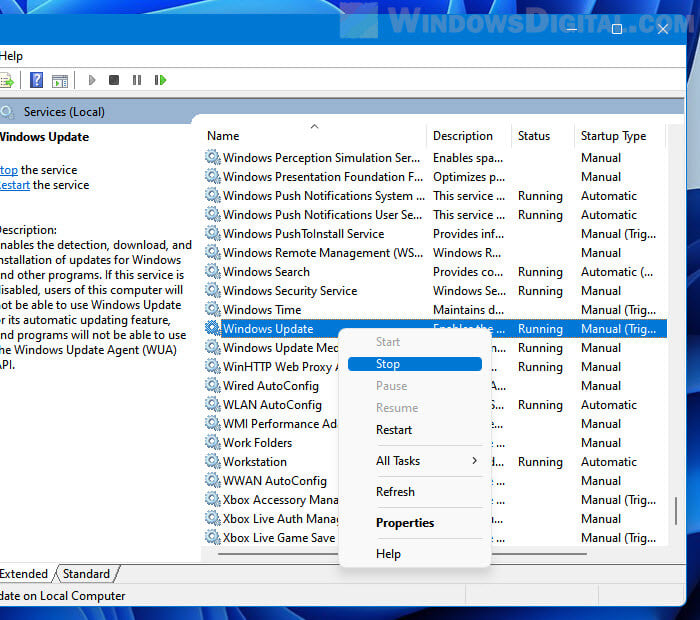
3. Next, look for “Windows Update” service, right-click it and select Stop.
4. After stopping the services, open File Explorer and navigate to C:\Windows\SoftwareDistribution folder. This folder stores files downloaded by Windows Update. Select all the folders in this directory and then Delete them.
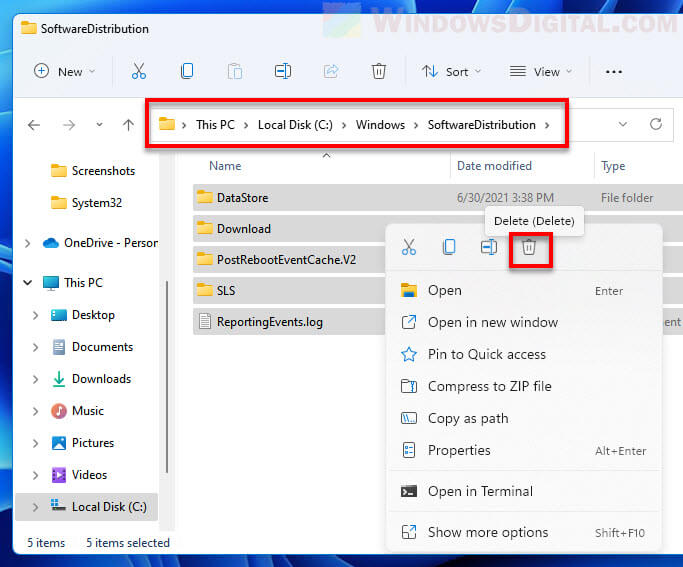
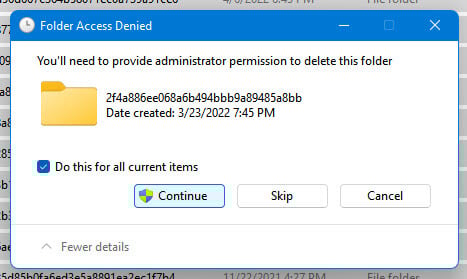
5. The deletion of these folders require administrator permission. Make sure you are signed into an administrator account in Windows 11, otherwise you will not have the privileges to delete these files. When the “Folder Access Denied” dialogue box prompts, select the “Do this for all current items” checkbox and then click Continue to proceed deleting the files.
6. Restart your computer and retry “Check for updates” in Windows Update.
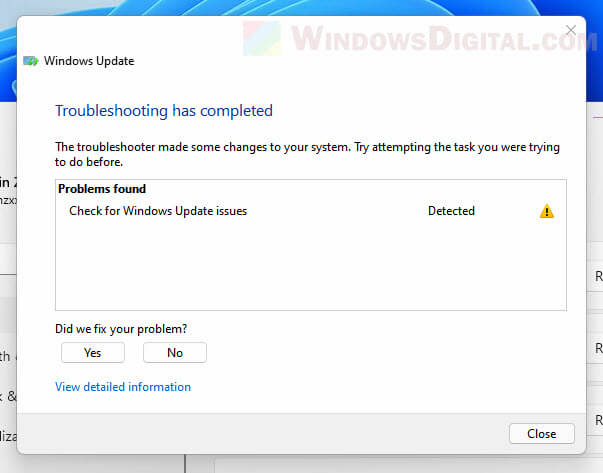
Run Windows Update troubleshooter
If the workaround above doesn’t resolve the Windows 11 update stuck issue, try to run the Windows Update troubleshooter to allow Windows to automatically troubleshoot and fix the issue. To run the Windows Update troubleshooter in Windows 11, follow the steps below.
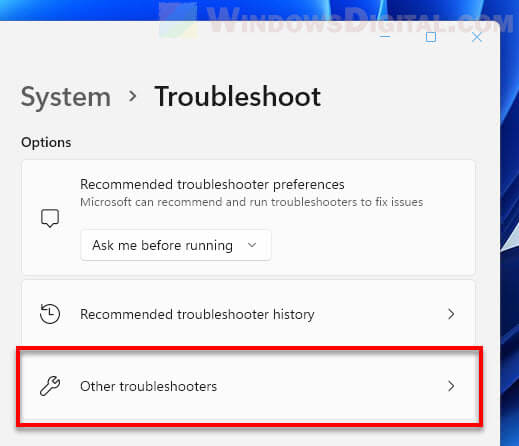
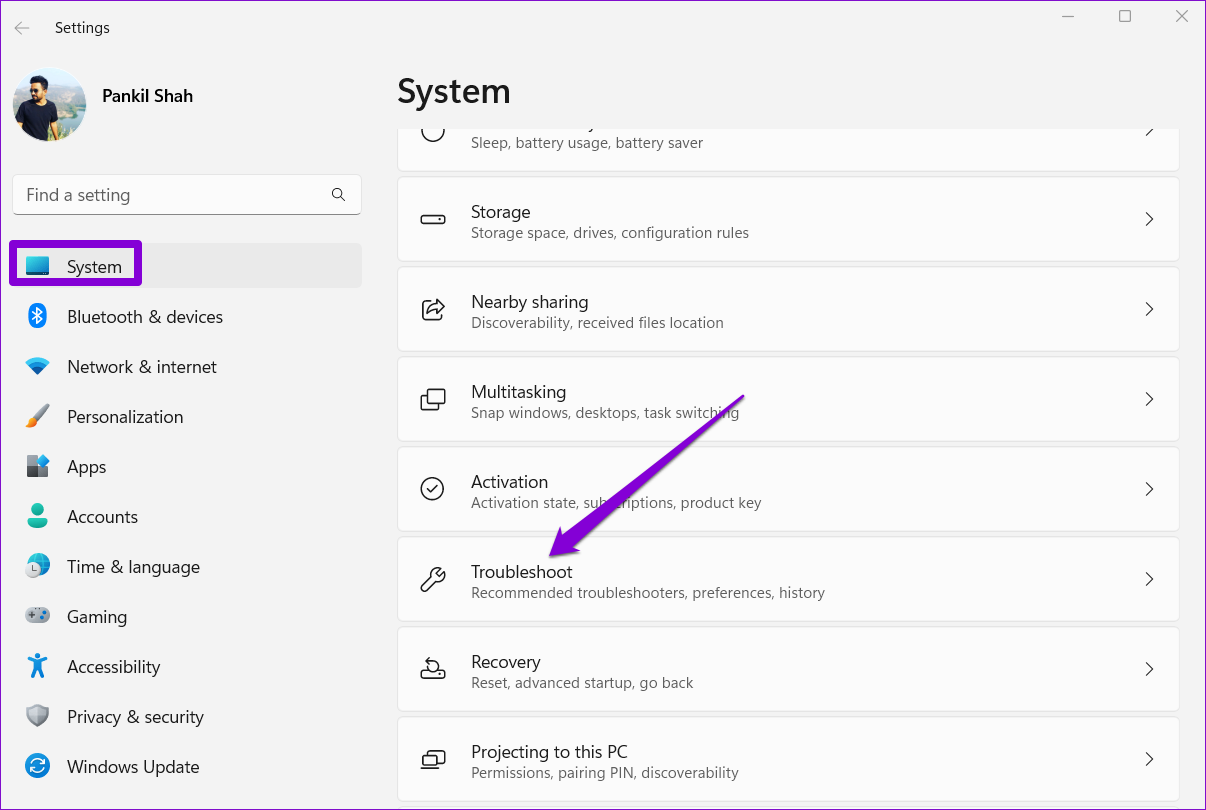
Press Win + i to open Settings and then navigate to System > Troubleshoot > Other troubleshooters.
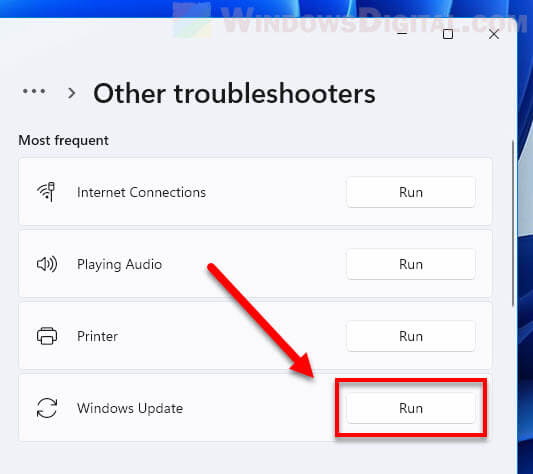
Next, look for Windows Update from the list of available troubleshooters, then click Run next to it.
The troubleshooter will then automatically start to check for any possible issue related to Windows Update. Once the troubleshooter has completed, it will show you a list of all problems found and will notify you about the changes it has made during the troubleshooting. After that, retry running Windows Update again and see if the update stuck issue is resolved.
Updated on Apr 28, 2025
View the methods to fix Windows 11 update stuck at 100%:
| Workable Solutions | Step-by-step Troubleshooting |
|---|---|
| 1️⃣Quick Tips to Fix Windows 11 Update Stuck |
Fix unstable internet connection and power supply Remove all USB external devices…More tips |
| 2️⃣Check and Clear the SoftwareDistribution Folder | Check the SoftwareDistribution folder…Full steps |
| 3️⃣Extend the System Partition with Enough Space | Extend System C drive with unallocated space…Full steps |
| 4️⃣Install Windows 11 from a Bootable USB | Launch EaseUS Partition Master and go to the Bootable Media section…Full steps |
Microsoft has released the latest version of Windows 11 23H2 for users to download and upgrade. Users who meet the minimum requirements and specifications on their PCs can run the latest operating system. However, some users have reported that when using Windows Update to update Windows 11, they are experiencing problems with Windows 11 downloads staying at 100 or getting stuck on the Windows Update screen with the message «Working on update 100% complete. «
If the Windows 11 update download process is interrupted, it may be caused by a network or power outage. Software or driver conflicts, insufficient storage space, or wrong system files can also cause Windows 11 update to be stuck at 100%. EaseUS provides a troubleshooting guide to practically solve the Windows 11 update stuck at 100% problem.
Quick Tips to Fix Windows 11 Update Stuck at 100%
Many issues cause the Windows 11 update to get stuck at 100% or Windows 11 update stuck at 0. Follow the guide in this section to fix the Windows 11 installation stuck at 100%. But please try some quick tips before the real solution:
- Fix unstable internet connection and power supply
- Remove all USB external devices
- Perform a clean boot
- Disable and enable the Windows Update service
- Run Windows Update Troubleshooting
- Reset Windows Update components
If none of these tips helped you, read on and find more reliable methods. If you found the methods in this article helpful, don’t forget to share them with more people in need.
Method 1. Check and Clear the SoftwareDistribution Folder
The operating system uses the Software Distribution folder to temporarily store files needed to install Windows 11 updates on your computer. By checking the size of the Software Distribution folder, you can find out if the Windows 11 Update files are downloading or paused at some point. If the Windows 11 Update is stuck at 100%, clear its contents to force Windows to start downloading the update again.
Stage 1. Check the SoftwareDistribution folder
Follow the steps below to check the SoftwareDistribution folder and see if there is any activity:
- Navigate to C:\Windows.
- Click on the SoftwareDistribution folder and verify the size of this folder.
If it continues to grow, Windows Update files are being downloaded. If the update hangs for an extended period, clear the SoftwareDistribution folder.
Stage 2. Clear the SoftwareDistribution folder
Follow the steps to remove the SoftwareDistribution folder safely:
Step 1. Run a command prompt as an administrator.
Step 2. Input the following commands one after the other, then hit Enter.
- net stop wuauserv (it will stop the Windows Update Service)
- net stop bits (it will stop the background Smart Transfer service)
Step 3. Navigate to C:\Windows\SoftwareDisrtibution and delete all the folders in it.
Step 4. Return to the command prompt and start the stopped Windows Update and BITS.
- net start wuauserv
- net start bits
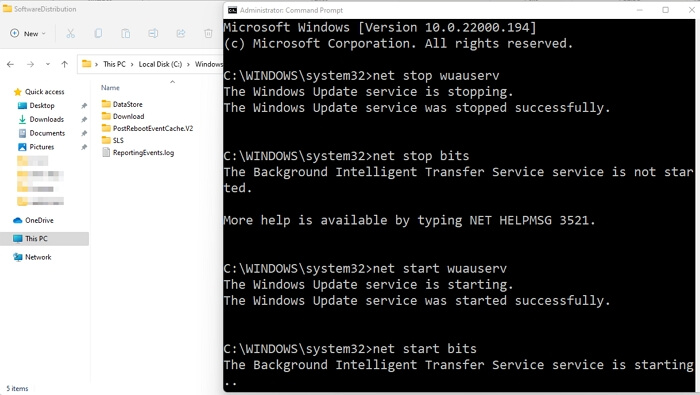
Once done, please reboot and download Windows 11 and ensure that Windows 11 Update does not get stuck at 100%.
Fixed: Windows 11 Update Assistant Stuck at 99
Don’t let your Windows 11 Update Assistant stay stuck at 99%. Follow our expert advice to troubleshoot and resolve this issue, ensuring a seamless update experience for your operating system. Read more >>
Method 2. Extend the System Partition with Enough Space
Windows 11 update may not be installed if there is insufficient space on your system partition. Ensure you have enough space on your computer to install Windows 11 update. Apart from uninstalling the application to clear the space, you can also use EaseUS Partition Master Professional to extend the C drive and continue with the Windows 11 update process.
Extend System C drive with unallocated space
- 1. Right-click on the System C: drive and select «Resize/Move».
- 2. Drag the system partition end into the unallocated space so to add it to the C: drive. And click «OK».
- 3. Click «Execute Task» and «Apply» to execute the operations and extend the C drive.
Method 3. Install Windows 11 from a Bootable USB
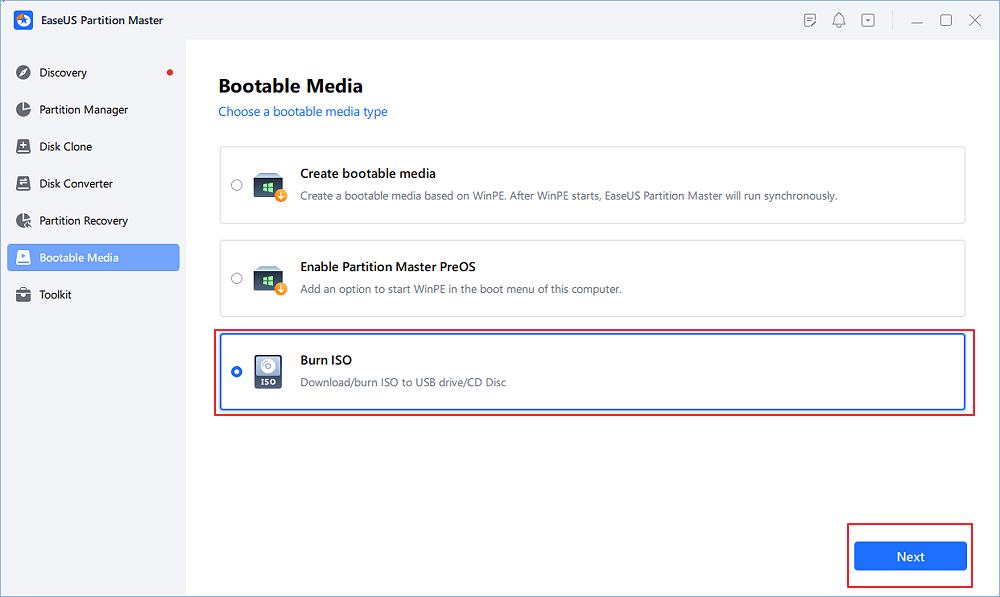
If the update solution with Windows is not working, try to install Windows 11 from a USB, but create a safe and usable installation media. EaseUS Partition Master provides Burn ISO functionality to help you easily create Windows 11 installation media and eliminate problems you may encounter during the update process. EaseUS Partition Master provides the Burn ISO feature to burn Windows 11 23H2 ISO to USB and easily create Windows 11 installation media and eliminate problems you may encounter during the update process.
Step 1. Launch EaseUS Partition Master and go to the Bootable Media section. Click «Burn ISO» and click «Next».
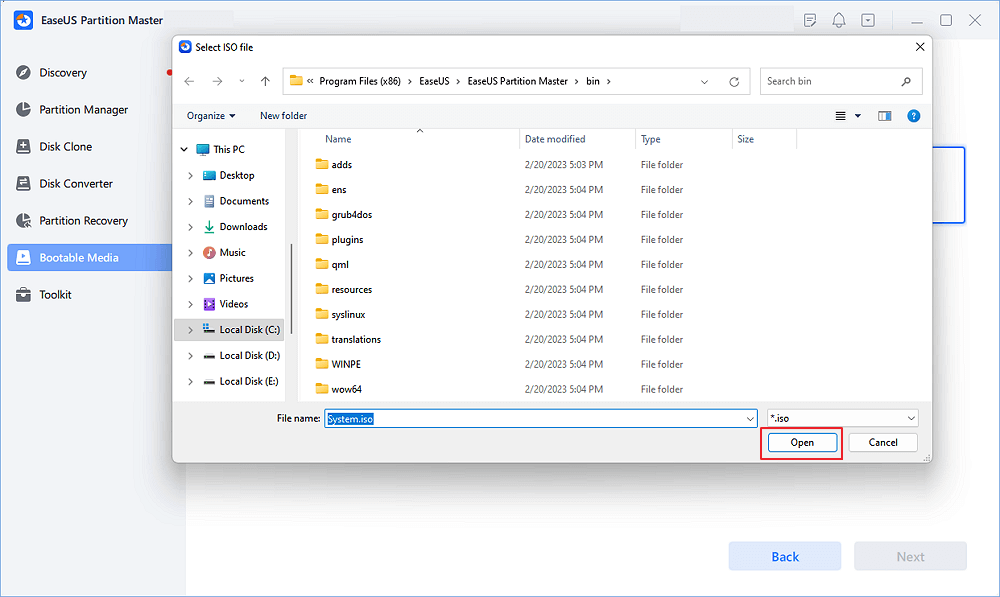
Step 2. Select the ISO image that you have downloaded on your PC, and click «Open».
Step 3. Click «Next» and select the target USB as destination and click «Burn» to execute the operation.
Once the burning is complete, please continue with the guide to installing Windows 11 from USB.
You May Also Like:
For Windows beginners, the process of installing a Windows system stuck at 100% or 99% could be difficult for them to resolve. If you prefer an efficient solution, try the manual service provided by EaseUS software here. EaseUS experts is capable of assisting you installing OS to a new disk without any issues.
EaseUS experts are available to provide you with 1-on-1 manual services (24*7) and help fix different Windows configuration issues. Our experts will offer you FREE evaluation services and efficiently diagnose and resolve Windows update errors, Windows installation, or daily OS issues using their decades of experience.
- 1. Fix Windows update errors, such as update failure, unable to upgrade Windows, etc.
- 2. Serve to download and install the latest Windows operating system on PC with success.
- 3. Provide fixes for daily Windows system errors with drivers, permission, account settings, etc., issues.
Conclusion
Hopefully, this guide will help you eliminate Windows 11 updates or installations stuck at 100%. Ensure you have a good internet connection and a stable power supply. Also, the Software Distribution folder can help with many of the issues.
If it doesn’t solve the problem, please use EaseUS Partition Master to repair corrupted system files and extended partitions or reinstall Windows 11. If you want more ways to solve the problem regarding the Windows 11 operating system, please download EaseUS Partition Master!
FAQs About Windows 11 Update Stuck on 100%
This section also provides additional questions about the Windows 11 update; please read on.
1. What should you do if the Windows 11 update is stuck?
If the Windows 11 update is stuck, remove your computer from update mode. If the computer is stuck on the update in progress screen for an extended period, try restarting the computer.
2. Why are my Windows 11 updates underway 100?
The unstable internet connection or a power outage may cause Windows 11 to get stuck at 100% download. In addition, outdated drivers and corrupted system files may also cause Windows 11 updates to fail to complete.
3. How long does it take to update Windows 11?
The process of installing Windows 11 takes about 20 minutes or so. If you encounter Windows Update issues, it may take up to 1 hour to upgrade to Windows 11.
Все способы:
- Способ 1: Средство устранения неполадок
- Способ 2: Очистка кэша
- Способ 3: Альтернативные источники
- Вариант 1: «Помощник по установке»
- Вариант 2: Каталог Microsoft
- Способ 4: Обновление драйверов
- Способ 5: Удаление конфликтного ПО
- Способ 6: Восстановительные утилиты
- Вариант 1: Проверка диска
- Вариант 2: Реконструкция системных файлов
- Вопросы и ответы: 2
Прежде чем приступать к решению проблемы, необходимо понять, действительно ли она настолько серьезна. Поэтому в первую очередь перезагрузите систему, затем убедитесь, что на компьютере стабильное интернет-соединение, а на системном диске достаточно места. Кроме того, рекомендуется отключить в этот момент все внешнее оборудование, например, жесткие диски, док-станции и т.д.
Способ 1: Средство устранения неполадок
Операционная система Windows поддерживает инструменты, которые помогают ей справляться с разного рода ошибками. Среди них есть и средство устранения неполадок в Центре обновления (ЦО), поэтому в первую очередь пробуем запустить его.
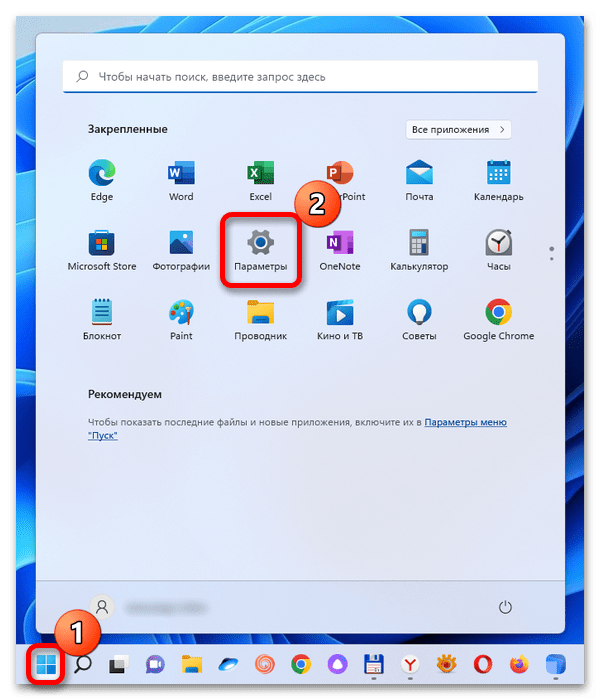
- Через меню «Пуск» вызываем «Параметры» системы.
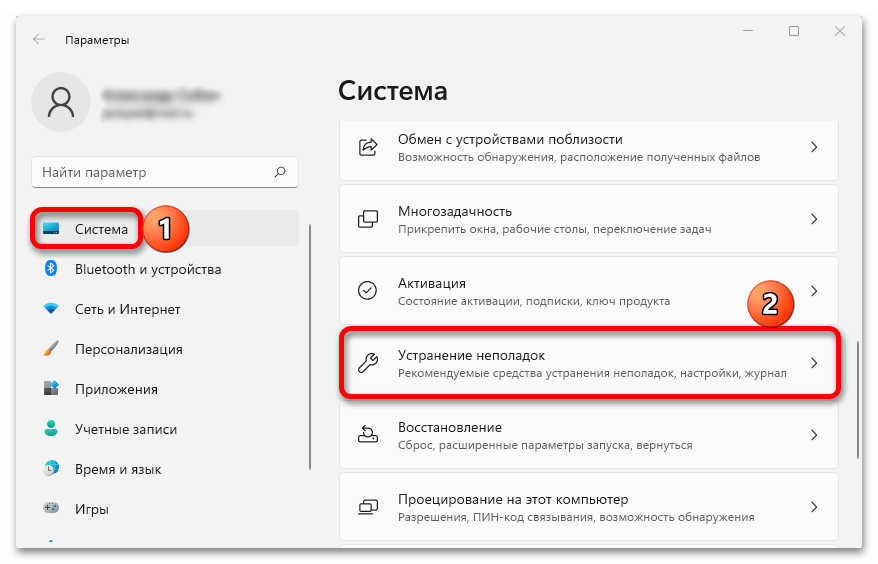
- В разделе «Система» открываем «Устранение неполадок»,

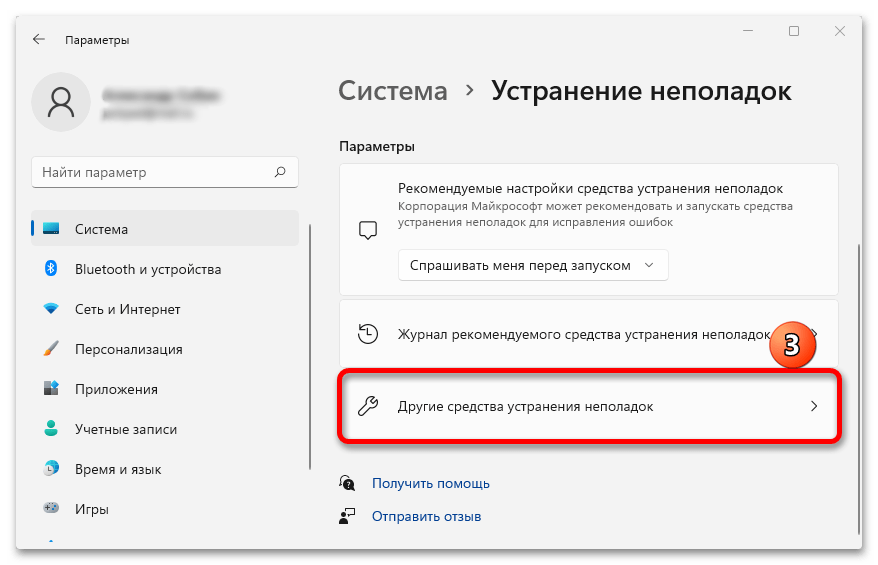
затем «Другие средства УН»,

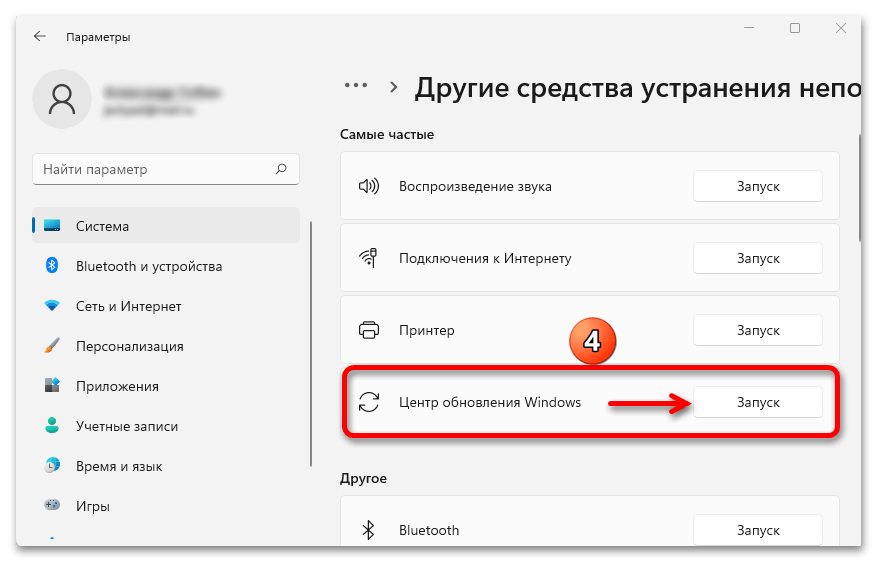
находим инструмент диагностики/восстановления ЦО Виндовс и запускаем его.
- Средство работает в автоматическом режиме, поэтому если что-то найдет, постарается внести изменения, чтобы все исправить. Нам после этого останется только перезагрузить устройство.

Способ 2: Очистка кэша
Сначала апдейты загружаются на компьютер, а уже затем устанавливаются. И если проблема возникает на этом этапе, то иногда помогает очистка накопленного кэша и пересоздание предназначенных для него папок.
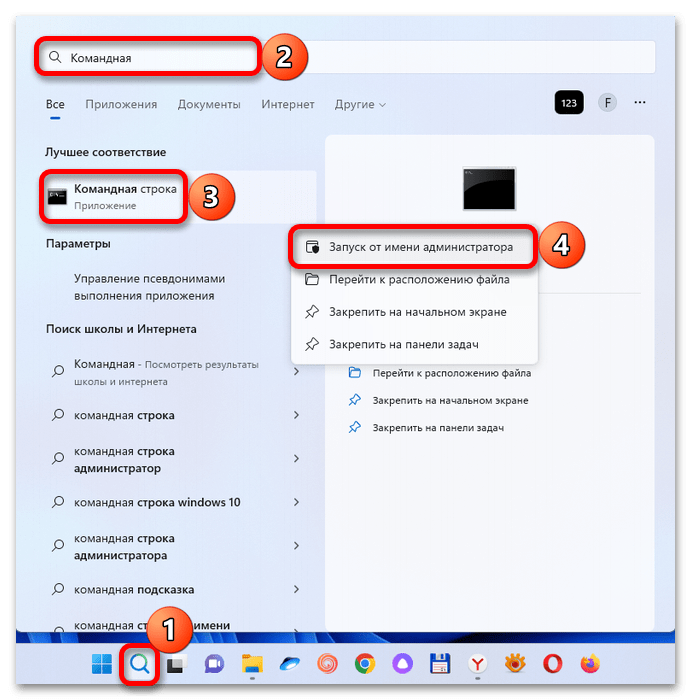
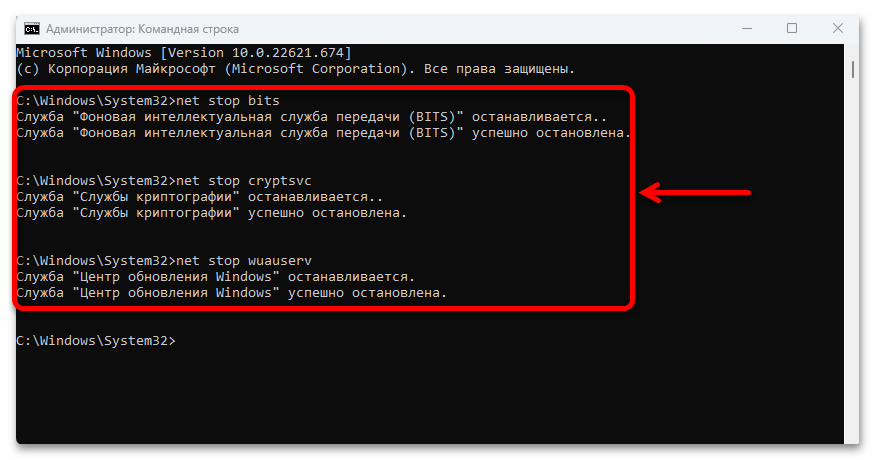
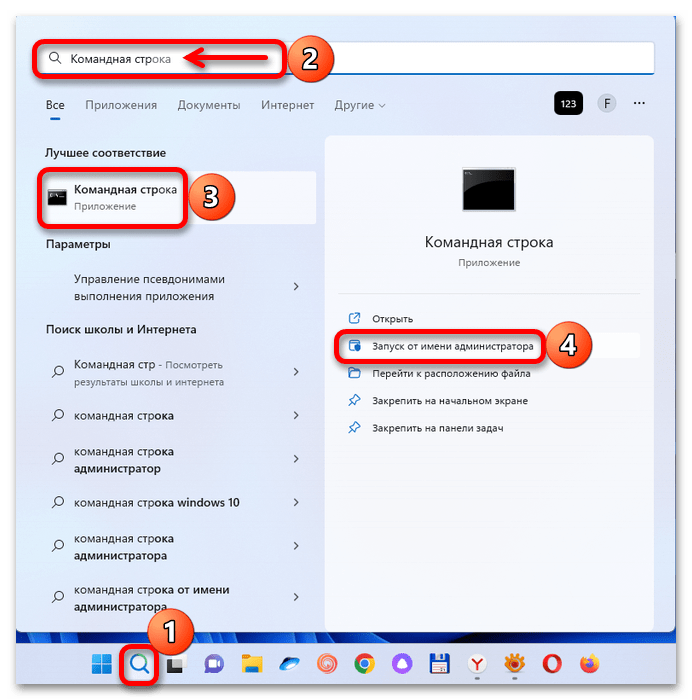
- Открываем поиск Виндовс 11, находим «Командную строку», кликаем по ней правой кнопкой мышки и открываем с повышенными правами.
- Службы, связанные с папками обновлений, могут блокировать наши действия, поэтому мы их на всякий случай отключим. Вводим по очереди следующие три команды и после каждой нажимаем «Enter».
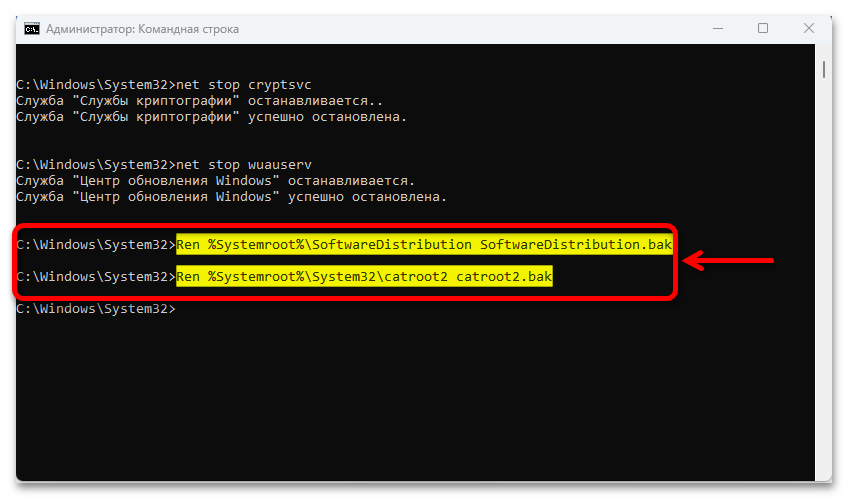
net stop bitsnet stop cryptsvcnet stop wuauserv - С помощью следующих команд переименуем два каталога на системном диске и таким образом создадим резервные копии:
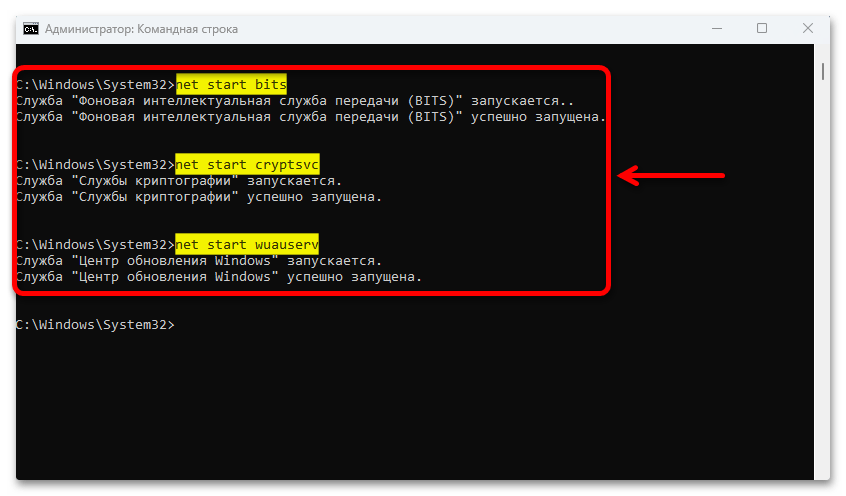
Ren %Systemroot%\SoftwareDistribution SoftwareDistribution.bakRen %Systemroot%\System32\catroot2 catroot2.bak - Снова запускаем отключенные службы.
net start bitsnet start cryptsvcnet start wuauserv
После переименования папок ЦО Виндовс 11 потеряет их, поэтому практически сразу создаст новые и начнет загружать туда обновления. Такой способ часто помогает решить нашу проблему.
Способ 3: Альтернативные источники
Если в данный момент обычным методом не получается устранить неполадки, есть еще по крайней мере два варианта обновить систему.
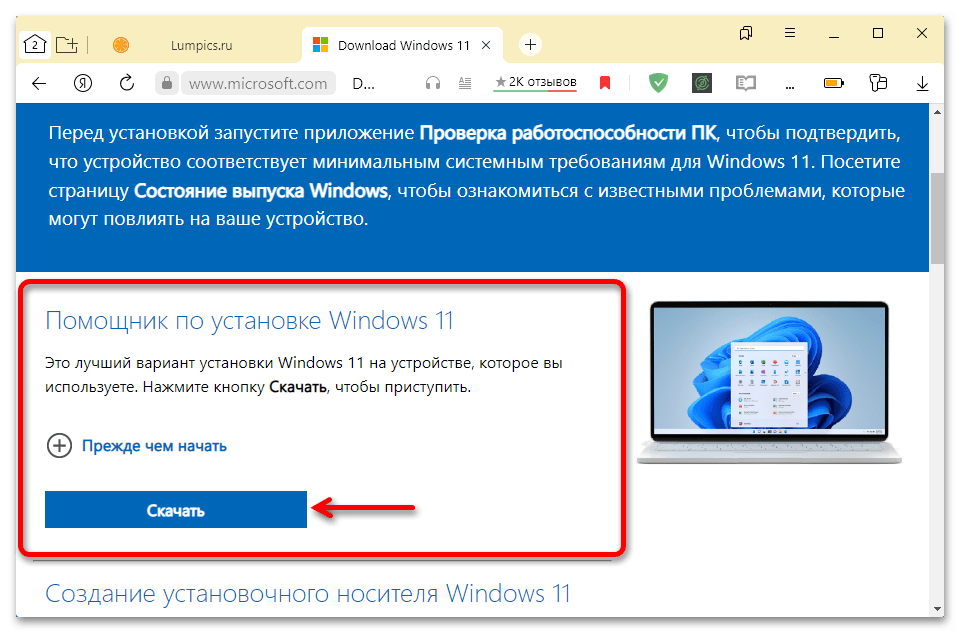
Вариант 1: «Помощник по установке»
Microsoft поддерживает «Помощник по установке», который обычно используют для перехода с одной версии операционной системы на другую или для получения крупных обновлений. Особенно он удобен, когда встроенный инструмент, Windows Update, пока ничего не предлагает или работает некорректно.
Скачать Installation Assistant с официального сайта
- Переходим по ссылке выше и загружаем на компьютер «Помощник по установке» Виндовс 11.
- Теперь просто запускам загруженный файл. Как видно, на нашем компьютере установлена последняя версия системы.
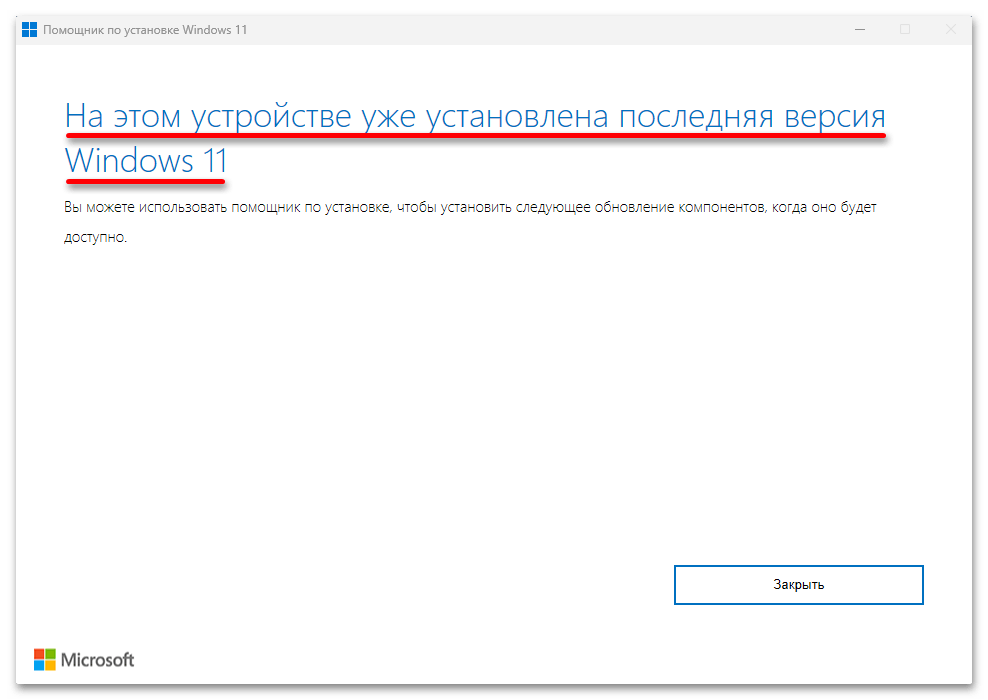
Если обновления все-таки найдутся, утилита проверит совместимость, загрузит необходимые данные и установит их автоматически без вашего участия.
Вариант 2: Каталог Microsoft
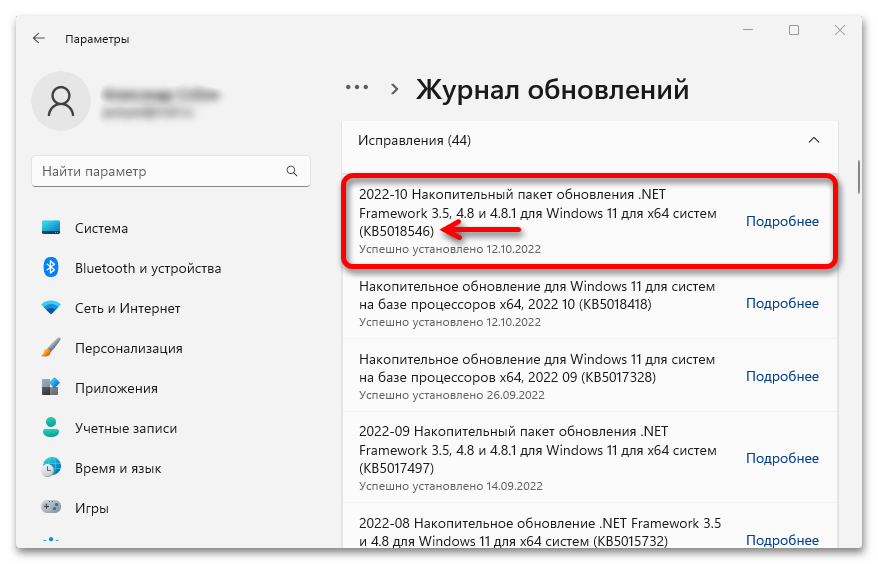
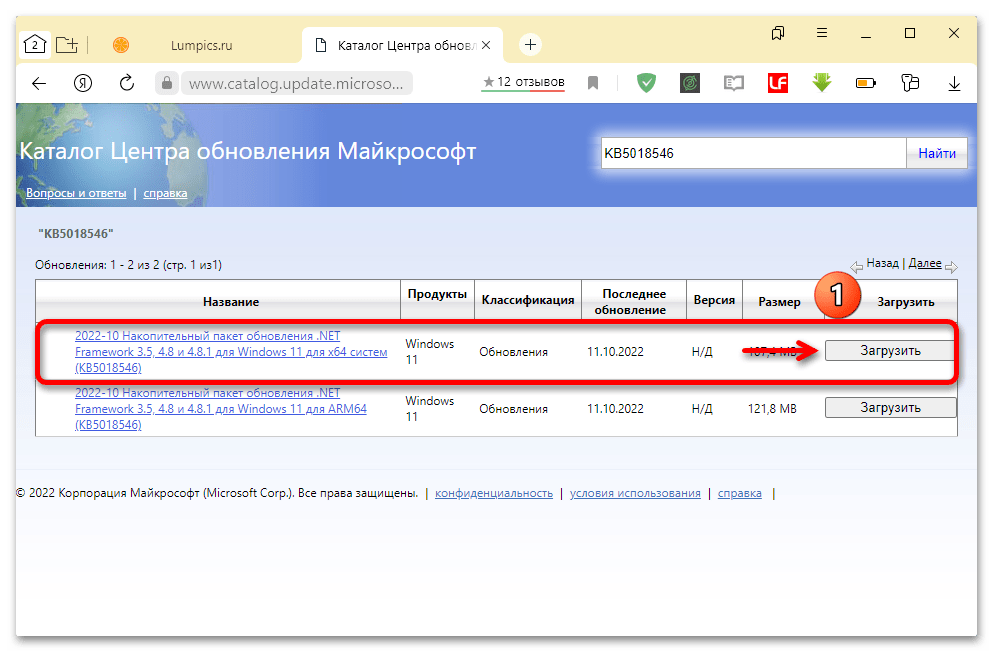
Бывает, что проблемы возникают с установкой каких-то определенных пакетов. В этом случае можно попробовать вручную загрузить их из официального хранилища.
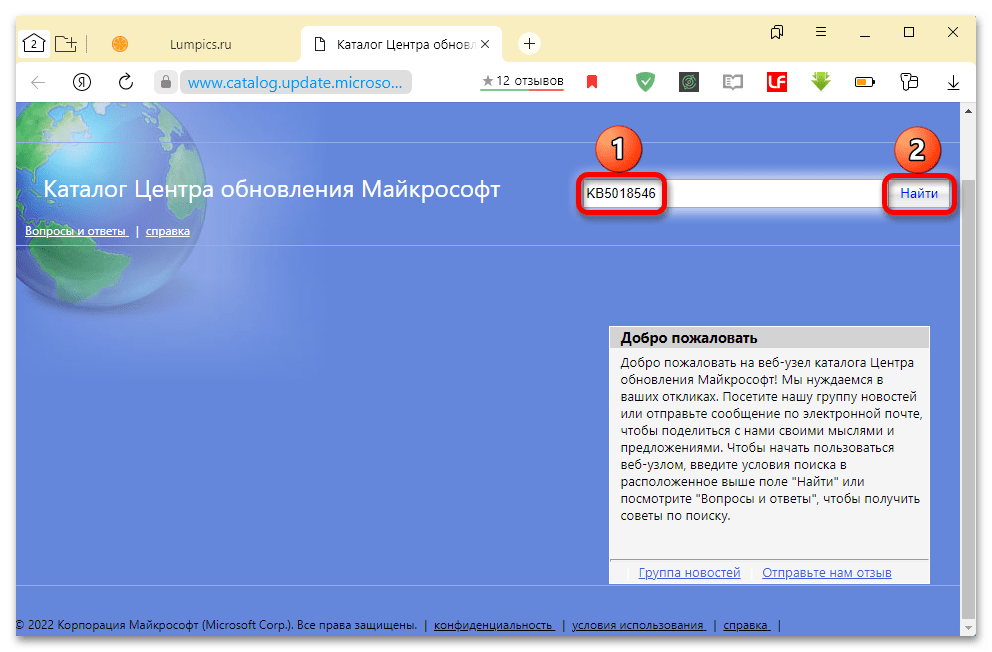
Перейти в Каталог Центра обновления Microsoft
- У каждого пакета есть свой номер, по которому его можно найти. Посмотрите, как это выглядит на скриншоте ниже. Выделенный апдейт мы и используем в качестве примера.
- Кликаем ссылку в начале инструкции, а когда загрузится главная страница каталога, в поле поиска вводим номер нашего пакета и нажимаем «Найти».
- В результатах выбираем нужную версию и жмем «Загрузить».

В данном случае предложены обновления для разных сборок Windows 11. Если первое не подойдет, можно будет попробовать установить второе. Загружаем файл, находим его на компьютере, кликаем по нему дважды и ждем завершения установки.

Способ 4: Обновление драйверов
Обязательно следует проверить наличие и актуальность всех драйверов для оборудования, установленного в компьютере. В данном случаем есть выбор – сделать это вручную через «Диспетчер устройств» или воспользоваться специальными программами. Оба варианта подробно описаны в статьях, опубликованных на нашем сайте.
Подробнее:
Установка драйверов стандартными средствами Windows
Как обновить драйвера на компьютере
Способ 5: Удаление конфликтного ПО
Понятно, что всегда существует стандартные способы устранения тех или иных неисправностей, но иногда проблемы вызывают самые неочевидные факторы. Судя по комментариям в сети, ошибки в Центре обновлений может спровоцировать установленный на компьютере софт, а если быть конкретнее, то, например, у некоторых пользователей все начинало работать после удаления программного обеспечения «Крипто Про». Поэтому просто попробуйте удалить недавно инсталлированные игры и приложения.
Если удаление программ не помогло, можно выполнить чистую перезагрузку, в результате которой система перезапускается с минимальным набором параметров и процессов. Это немного напоминает «Безопасный режим», но дает дополнительный контроль над тем, какие службы и компоненты будут после запуска выполняться.
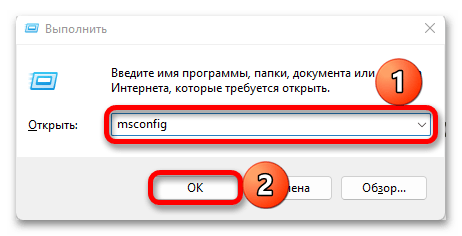
- Вызываем окно «Выполнить», используя сочетание клавиш «Windows+R», вводим команду
msconfigи подтверждаем ее. - Во вкладке «Службы» сначала запрещаем отображать службы Microsoft, затем отключаем оставшиеся,

а когда галочки рядом с ними пропадут, применяем изменения.
- Перемещаемся во вкладку «Автозагрузка» и нажимаем «Открыть Диспетчер задач».
- Мы должны отключить автозагрузку всех элементов по очереди. Для этого выделяем каждый из них и нажимаем «Отключить».

Таким образом деактивируем автозапуск каждого приложения.
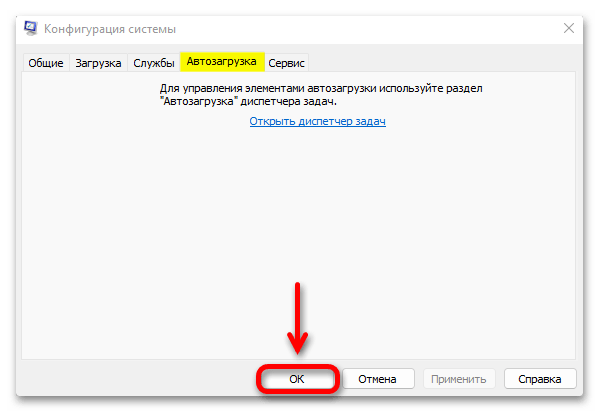
- Закрываем ДЗ, в окне «Конфигурация системы» нажимаем «OK»
и перезагружаем компьютер.
После этого Виндовс 11 загрузится только с собственными службами без фоновых процессов сторонних программ. Если ЦО начал работать, значит, один из отключенных компонентов все же вызывал конфликт и осталось только выяснить, какой. В данном случае можно действовать по-разному, например включать по одной службе и перезагружать компьютер или сразу половину, чтобы попробовать сократить время поиска.
Способ 6: Восстановительные утилиты
Если предыдущие действия не помогли, есть вероятность, что проблема связана с некорректной работой жесткого диска/SSD-накопителя или повреждением системных файлов. На этот случай операционная система поддерживает специальные «лечебные» утилиты.
Вариант 1: Проверка диска
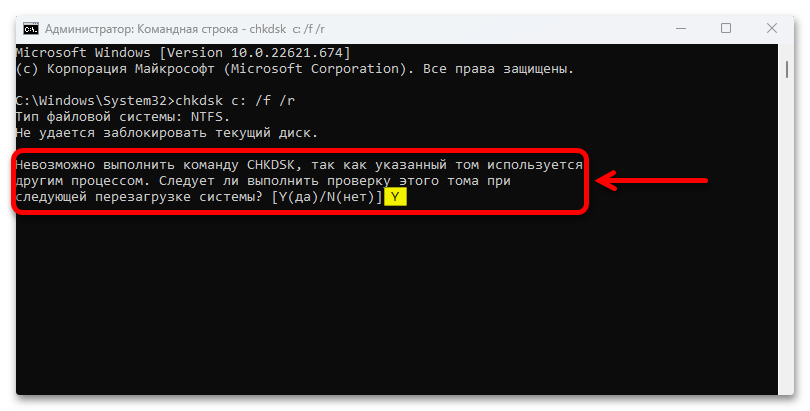
- Снова запускаем «Командную строку» с административными правами.
- Для проверки файловой системы на наличие логических и физических ошибок используется утилита «chkdsk» с дополнительными параметрами. Поэтому в область консоли вводим команду:
chkdsk c: /f /rгде С – буква логического диска, параметр «/f» исправляет все найденные ошибки, а «/r» ищет поврежденные сектора и восстанавливает удобочитаемую информацию, но для SSD-накопителей этот параметр можно не вводить, так как там поиском и переназначением битых секторов занимается контроллер. Нажимаем «Enter» для запуска команды.
- Обычно проверка начинается сразу, но в данном случае мы проверяем системный раздел, поэтому утилита запустится только после перезагрузки системы. Так что ставим значение «Y», жмем «Enter», перезагружаем компьютер и ждем, когда завершится проверка.
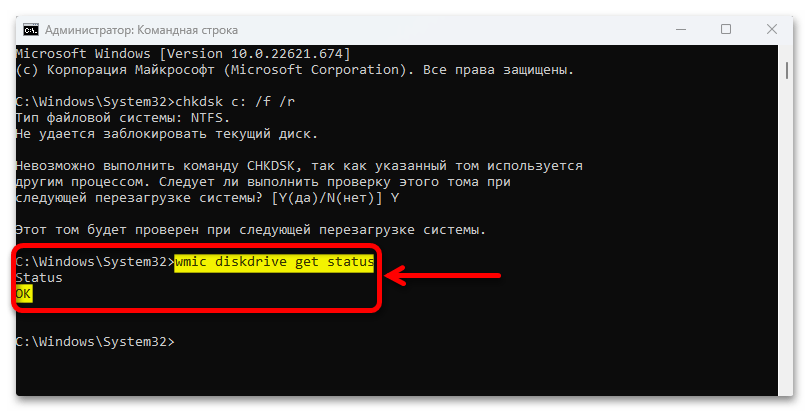
- Также можно проверить состояние накопителя на основе данных, переданных технологией S.M.A.R.T. Для этого вводим команду
wmic diskdrive get statusЕсли все в порядке, мы увидим статус «OK».

Вариант 2: Реконструкция системных файлов
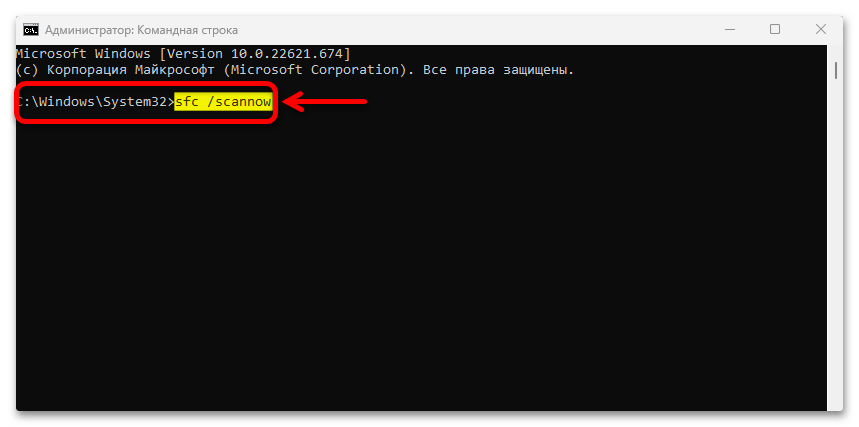
- В «Командную строку» с привилегированными правами вводим команду:
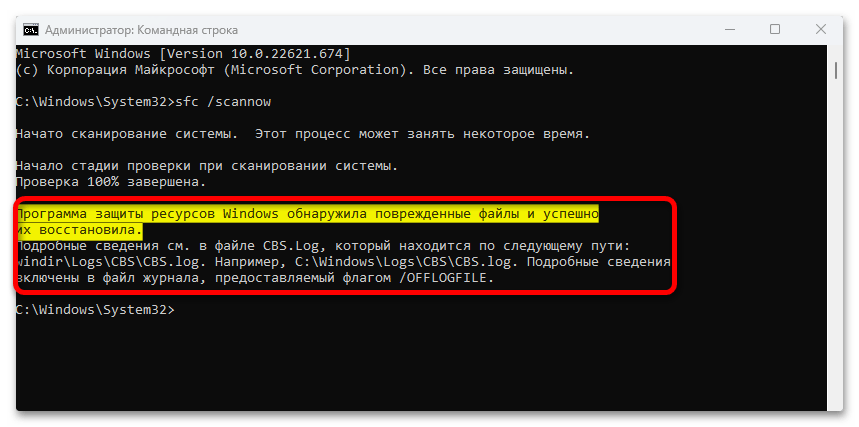
sfc /scannow
Ждем результаты сканирования. Сейчас нам повезло – программа обнаружила поврежденные файлы и сразу восстановила их.
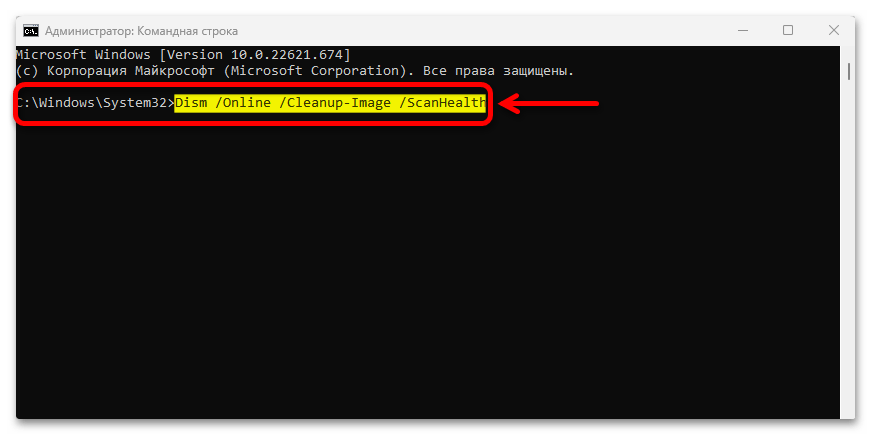
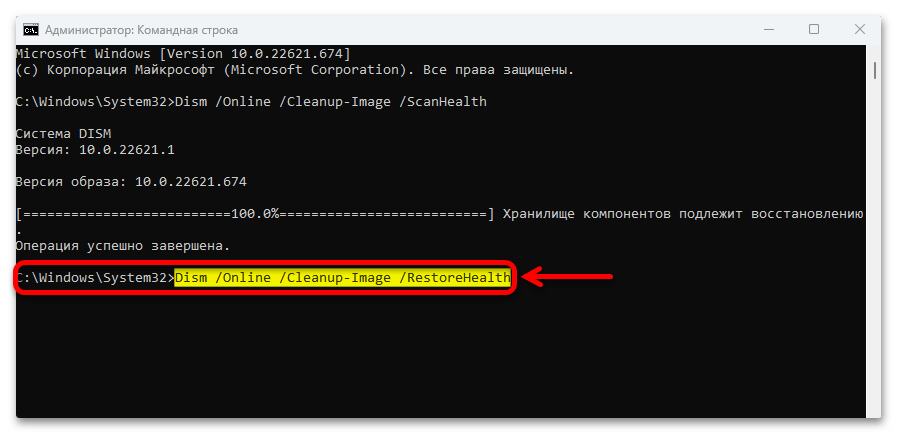
- Теперь запустим поиск повреждений хранилища компонентов Windows 11. Вводим команду:
Dism /Online /Cleanup-Image /ScanHealth
Ожидаем окончания сканирования.
- В данном случае наше хранилище подлежит восстановлению, поэтому выполняем следующую команду:
Dism /Online /Cleanup-Image /RestoreHealth
Ждем завершения процесса восстановления хранилища.


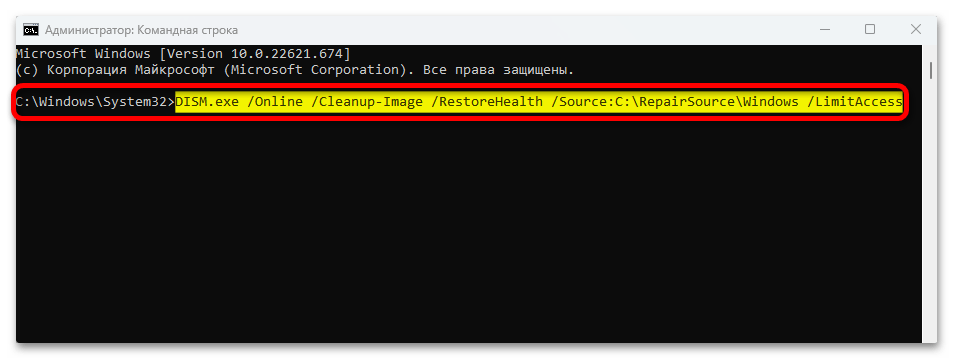
При работе с этими утилитами есть масса нюансов. Например, команда «Dism» для восстановления компонентов обращается к Центру обновления Windows, но если он тоже поврежден, придется использовать другой источник, например образ системы, загруженный на съемный носитель. Подробно о разных вариантах применения описанных выше утилит вы можете узнать в отдельной статье.
Подробнее: Использование и восстановление проверки целостности системных файлов в Windows
Наша группа в TelegramПолезные советы и помощь
Windows 11 update is a process that assists you in keeping your operating system up-to-date with the latest security patches and features. Sometimes it happens that Windows 11 gets stuck while updating or not loading at all. It may even get stuck at 99%, the remaining 1% is not ending all day. This is commonly called Troubleshooting.
If you are experiencing trouble installing the Windows 11 update on your computer, don’t worry. The problem is not a big deal and it can be easily fixed. Through this article, we will be able to get a complete idea about the causes and solutions of Windows 11 update stuck issues.
- Part 1: Overview of Windows 11 Update Stuck
- Prepare: How to Recover Lost Data Due to Windows 11 Update Stuck?HOT
- Part 2: How to Fix Windows 11 Update Stuck at 0%/99%/100%?
- FAQs about Windows 11 Update Stuck:
Part 1: Overview of Windows 11 Update Stuck
Signal of Windows 11 Update Stuck
The first step in troubleshooting a problem with your computer is usually to determine whether it’s a software or hardware issue. And if that’s a problem with Windows Update, you need to know the symptoms. With the help of those symptoms, we can easily find out what the problem is.
Few of the signs of Windows 11 Update stuck are below:
| Signals | Description |
|---|---|
| Update Stuck on 99%, 100%, 0% or Not Responding |
|
| Windows 11 Update Stuck At 100% For Hours, Not Approaching For The Next Page |
|
| Windows 11 Update Completed But Not In Result |
|
To solve the issue first, you need to know what’s going on, why all these things are happening. Then it becomes easy for you to operate the run to fix it. Some possible reasons for Windows 11 Update stuck are below.
Common Cause of Windows 11 Update Stuck
| Causes | Description |
|---|---|
| Poor Internet Connection |
|
| Interrupted Power Supply |
|
| Corrupted ISO file |
|
| Shortage of Storage |
|
Prepare: How to Recover Lost Data Due to Windows 11 Update Stuck?
People usually update the OS in the hope of new features, security or additional benefits of Windows. This upgrade process is sometimes responsible for losing PC files. So if you want to be risk free, you have to keep the backup system of the PC on. But the problem is, you have your backup turned on, but you still can’t find the necessary files after Windows Update! It’s a painful thing. But you can recover all lost data after upgrading to Windows 11 with 4DDiG Windows data recovery software which is an outstanding technology to recover any data from any device or any system.
Video Guide on How to Recover Data from Windows after Updating to Windows 11
Here are some of features of Tenorshare 4DDiG Windows data recovery software:
- Supports data recovery from any digital devices like Laptop or PC, internal or external hard drive, USB flash drive, SD card, camera, etc.
- 4DDiG can recover 2000+ file types including media files, photos, audios, videos, documents, etc.HOT
- Support recover files lost due to accidental deletion, formatting, lost partition, corruption, broken file, pc keeps crashing, virus attack, etc.
Follow below guide to get back lost files after upgrading to Windows 11:
- Firstly, launch 4DDiG on your Windows, then you will ask to choose the files types to start.
- Now, wait for the sacnning process done, then you will find all the lost files store on the choosen location will be scanned out, you can preview them one by one until you find the one you want to recover.
- After previewing, just choose the files you want to recover and click on Recover button. Then all your lost files will be back.
Part 2: How to Fix Windows 11 Update Stuck at 0%/99%/100%?
Fix 1: Wait for Windows Complete Windows 11 Update
Updates are underway windows 11 stuck for irregular power supplies or broken network connections, as already discussed. When this happens, the computer should be left alone for a few hours. Just make sure that the Operating System can do its own thing without any interruptions. The update may finish itself.
Fix 2: Check Network Status
It can be frustrating when you try to download an update or new version of Windows, but the Internet connection doesn’t seem to be working. In this case, it would appear as if the Windows 11 download is stuck while the actual problem lies with the Internet. So, if you don’t want to run into windows 11 update stuck issues, check connectivity before starting any update, or try restarting your router or modem before downloading any updates again.
Fix 3: Check Windows Update Process through SoftwareDistribution Folder
If you’re not sure whether the update process is still in progress or not, you can check the SoftwareDistribution folder on your computer. The destination of the SoftwareDistribution folder is- C:\Windows\SoftwareDistribution. After landing this folder, right-click on the white space and click on ‘Properties’ from context menu. Look at the size of this folder. If this size remain same, approach for updating.
Fix 4: Unplug Non-essential Peripherals
A PC usually has a number of external devices connected, such as a pen drive, card reader, printer, microphone, speaker, etc. All of these devices need to be unplugged during Windows updates so that they do not interfere with the operating system.
Fix 5: Use Windows Update Troubleshooter
To fix the problem that windows 11 stuck on updates are underway, it’s recommended to run one of the built-in troubleshooters in Microsoft. The steps are below:
Step 1: Pressing the ‘Windows and I’ buttons on the keyboard will take you in Settings page, then click on ‘Update & Security’.
Step 2: A navigation pane will open on the left side of the screen where there is a ‘Troubleshoot’ option, then click on Additional Troubleshooters.
Step 3: Click on ‘Windows Update’. Then, click on ‘Run The Troubleshooter’.
Mow, just go with Troubleshooter and fix your problem. It’s very common for Microsoft’s built-in troubleshooters to success, especially when it comes to fixing problems that are related to Windows updates. You just need to run a relevant troubleshooter. And obviously, you’ve many other ways to fix if it does not work.
Fix 6: Run System File Checker
Step 1: Open command prompt, then run DISM command, DISM/Online/Cleanup-Image/RestoreHealth.
Step 2: Wait till 100% then run file checker command sfc/scannow.
Step 3: Once done Restart your PC and check for any updates.
Fix 7: Pause Windows Update and Retry it Again
Step 1: Press ‘Windows + I‘ together. In Settings page, click on Update & Security.
Step 2: Click on ‘Pause updates for 7 days’, then restart your PC and go for the same run again.
Step 3: This time click on ‘Resume Updates’.
Step 4: Click on ‘Check for updates’ and get your Windows updating problem be fixed.
Fix 8: Run the BITS and Windows Update Service Again
Step 1: Press ‘Windows + R’, to open the Run command and write there services.msc and click on ‘Ok’.
Step 2: Right-click on Background Intelligent Transfer Service (BITS) and stop it through the context menu.
Step 3: Again right-click on Windows Update Service and do the same to stop. Then press ‘Windows + E’ to open File Explorer.
Step 4: Go for this location through address bar: C:\Windows\SoftwareDistribution.
Step 5: Select all and delete them from context menu.
Step 6: Come again to Service App and right-click on Background Intelligent Transfer Service (BITS) and start it through the context menu.
Step 7: Same process for Windows Update Service and do the same to start it again.
Now you can go for your Windows Update. This time, Windows 11 download should not get stuck anymore.
Fix 9: Remove Conflicting Drivers
Step 1: 1.Press ‘Windows + R’, to open the Run command and write there devmgmt.msc and click on ‘Ok’.
Step 2: It will open Device Manager page. Now, select the device you want to stop. Then right clicking on selected device will let you uninstall it to avoid error while updating Windows.
Fix 10: Reinstall Incompatible Applications
Step 1: Press ‘Windows + R’, to open the Run command and write there appwiz.cpl and click on ‘Ok’.
Step 2: It opens ‘Programs & Features’ window, after selecting the program you want to stop, do Right Click on the file and uninstall it.
Fix 11: Use Bootable USB Install Windows 11
- Keep connected your USB flash drive to computer.
- Restart your computer and press specific keys like functions key, del, Esc, etc.
- Come to Boot tab to select your USB flash drive pressing the arrow key.
- Save it, and continue to boot your computer through bootable USB flash drive.
- It will open Windows setup interface, set time, language, currency format and keyboard, then click on ‘Install Now’.
- Click on ‘I don’t have any product key’ and then select Custom to install Windows only.
- Select partition and start installing.
Fix 12: Restart your Windows in Safe Mode
Step 1: Click on Start and then Settings.
Step 2: Click on Update & Security.
Step 3: Click on Recovery, then look on the Advanced Startup section where you find Restart Now, click on it.
Step 4: After restarting the computer a ‘Choose an Option’ screen will appear, from there click on Troubleshoot and choose ‘Advanced Option’. Then click on ‘Startup Settings’.
Step 5: Finally, press F5 to restart your Windows in safe mode.
Fix 13: Run Windows System Restore
Step 1: Type ‘Recovery’ on the search bar of Windows, then ppen ‘Advanced Recovery Tools’ in Control Panel then select ‘Open System Restore’.
Step 2: Click on ‘Next’, among the results select ‘Restore Point’ and then ‘Next’. Finally, click on ‘Finish.
Fix 14: Download the Latest Update Manually
If you’re still having trouble installing the update, try downloading and installing it manually.
Step 1: Go to Microsoft Update Catalogue.
Step 2: Type KB number of the security update on the search bar that was unfinished.
Step 3: Save it and after downloading, run it as administrator.
FAQs about Windows 11 Update Stuck:
Windows 11 update: how long should it take?
On a fast PC with a high-speed SSD and little data, feature upgrades will install quickly in about 15-20 minutes. But on a slower PC with an HDD and a lot of data, these upgrades will take hours.
The upgradation process includes copying all your settings, data, and apps from your old operating system to the new one. This means that if you have a slow computer, there’s more time spent downloading files and waiting for them to transfer over the network—and more time spent waiting for those files to be copied onto the hard drive!
⛳ You May Also Like: Should I Upgrade to Windows 11 [Update in March 2025]
What’s the Meaning of Windows 11 Update Stuck at a Certain Percentage?
Here’s how you will find out what’s going on seeing percentage:
Stuck at 0%: It means your device has gone out of storage.
Stuck at 99%: It can happen for poor internet connections.
Stuck at 94%: It means all the programs, applications, games, drivers of your PC freeze the upgradation process.
Stuck at 100%: It indicates a problem with the software distribution folder.
Stuck at 88%: Hard drive and ROM are responsible for the freeze.
Stuck at 85%: It happens usually for external devices or drives connected to your PC.
How to Update to Windows 11 Correctly?
There are some common practice before starting Windows 11 upgradation process:
Step 1: Creating backup.
Step 2: Signup in a Microsoft account.
Step 3: Check stability of power and internet.
Step 4: Enough storage.
Conclusion
Here was some of the ways to fix Windows 11 update stuck. And if you’re still having trouble updating Windows, or losing files, there’s Tenorshare 4DDiG Windows data recovery software to help you most with any Windows-related recovery. It’s time to go with no problem with Windows 11 and its updates.
Quick Tips
- Windows requires at least 20GB of free storage to install updates smoothly, so ensure your PC has enough space.
- Try restarting services related to Windows Update and turning off the metered connection.
- Consider booting your PC in clean boot mode to avoid interference from third-party apps and programs.
Fix 1: Run the Windows Update Troubleshooter
Windows 11 includes a dedicated troubleshooter that can automatically scan, detect, and fix any issues with Windows Updates. It’s a good idea to run this tool before trying anything else.
Step 1: Press the Windows key + I to open the Settings app, then go to System > Troubleshoot.
Step 2: Go to Other troubleshooters.
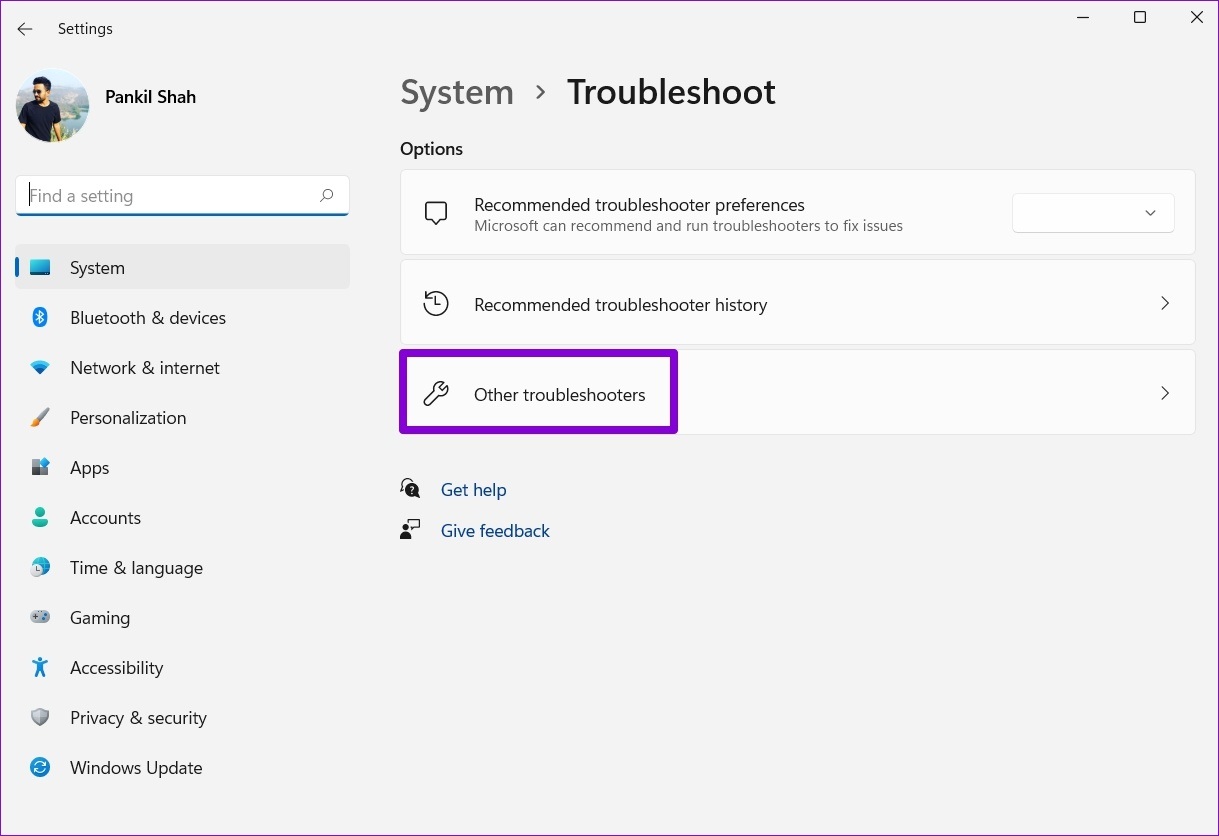
Step 3: Click the Run button next to Windows Update. The tool will start scanning your system for any problems and fix them.

Another reason Windows 11 may fail to download or install updates is if some of the services related to Windows updates are not running. Specifically, Windows Update and Background Intelligent Transfer Service (or BITS) are the two services that must run in the background for Windows updates to be applied.
Step 1: Press the Windows key + R to launch the Run dialog box, type services.msc, and press Enter.
Step 2: Locate and double-click the Windows Update service to open its properties.

Step 3: Change the Startup type to Automatic > hit Apply.

Similarly, change the startup type for Background Intelligent Transfer Service to Automatic and then restart your PC.
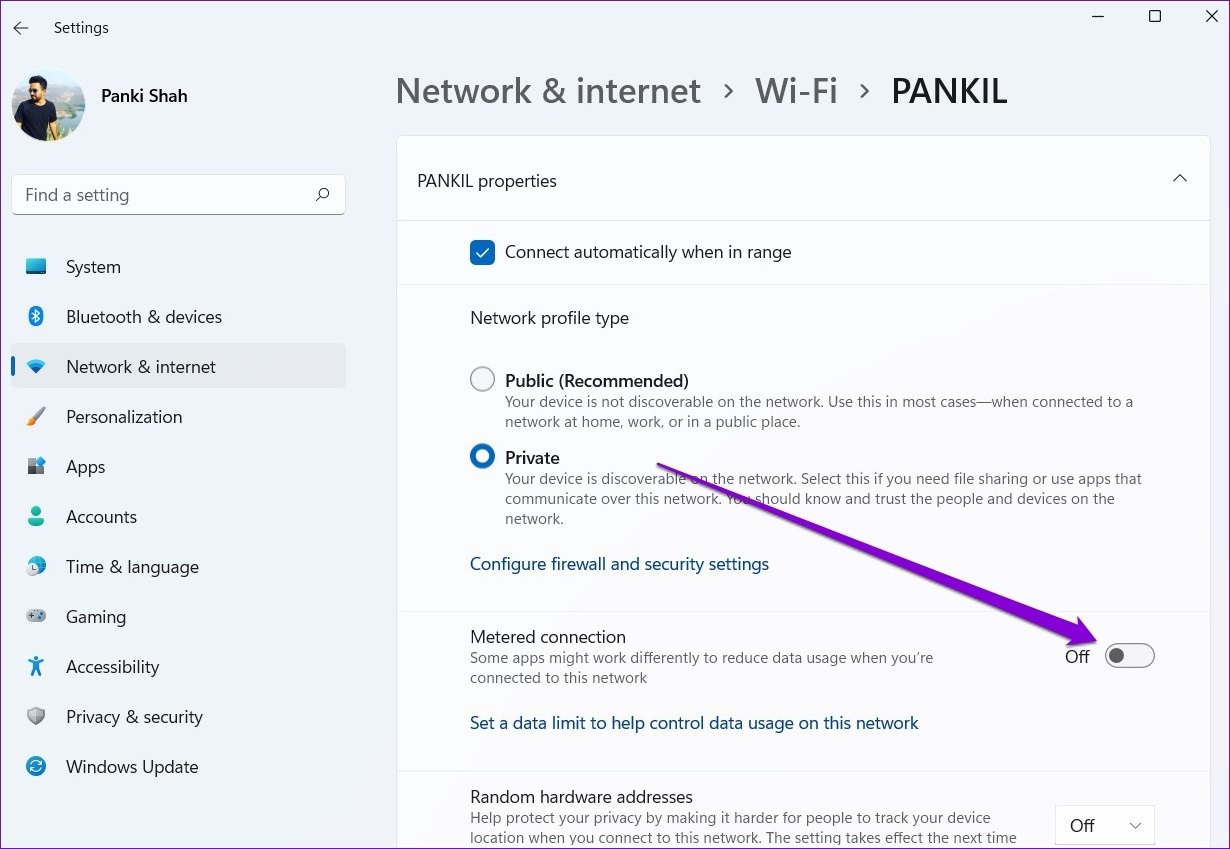
Fix 3: Disable Metered Connection
Windows may fail to download large update files if you have enabled the metered connection option. Hence, it’s best to turn it off.
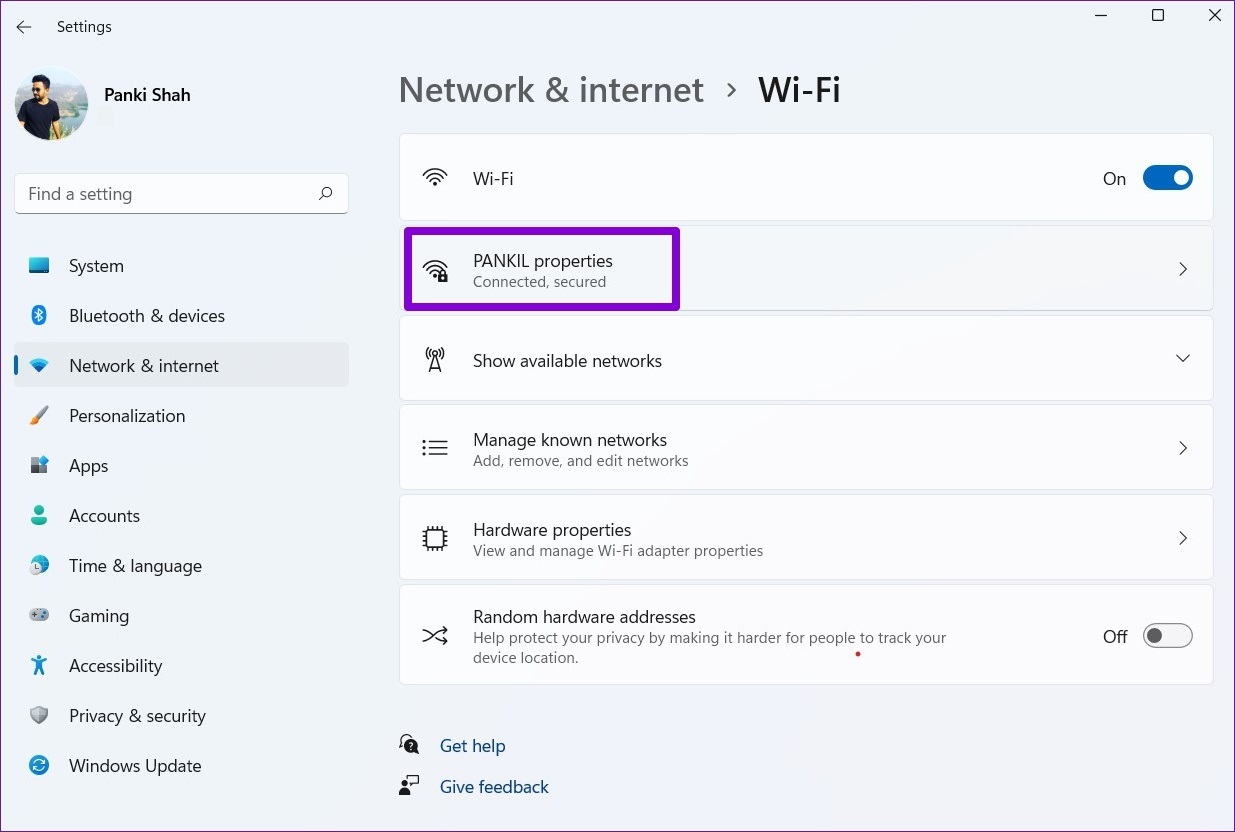
Step 1: Press the Windows key + I to launch the Settings app > go to the Network & internet tab > click on Wi-Fi.
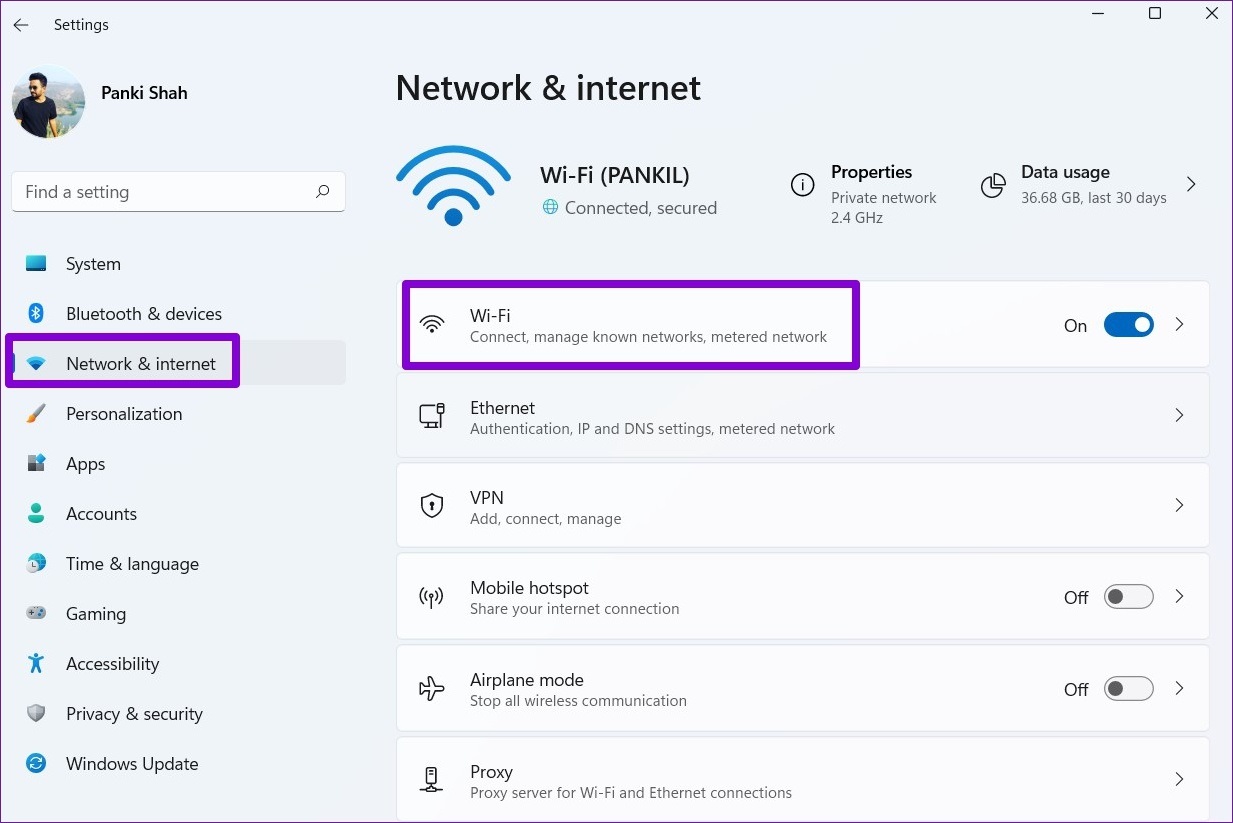
Step 2: Click on your Wi-Fi network to open its properties.
Step 3: Disable the toggle for Metered connection.
Fix 4: Delete Existing Update Files From SoftwareDistribution Folder
If the Windows 11 update appears stuck, there could be an issue with the downloaded update files. To fix it, delete the existing update files from the SoftwareDistribution folder and start over.
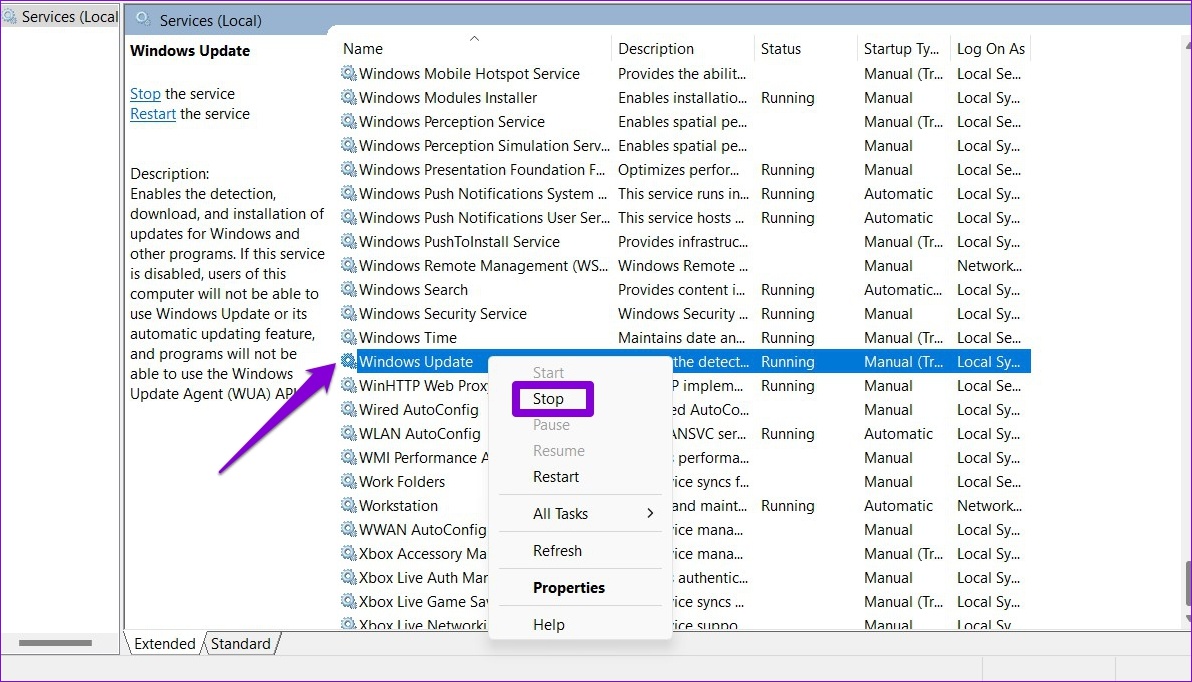
Step 1: Click on the search icon on the taskbar, type services in the box, and select the first result.

Step 2: Locate and right-click on Windows Update > select Stop.
Step 3: Press the Windows key + R to launch the Run dialog box. Type C:\Windows\SoftwareDistribution and press Enter.
Step 4: Select all files in the SoftwareDistribution folder and click the trash icon at the top to delete them.
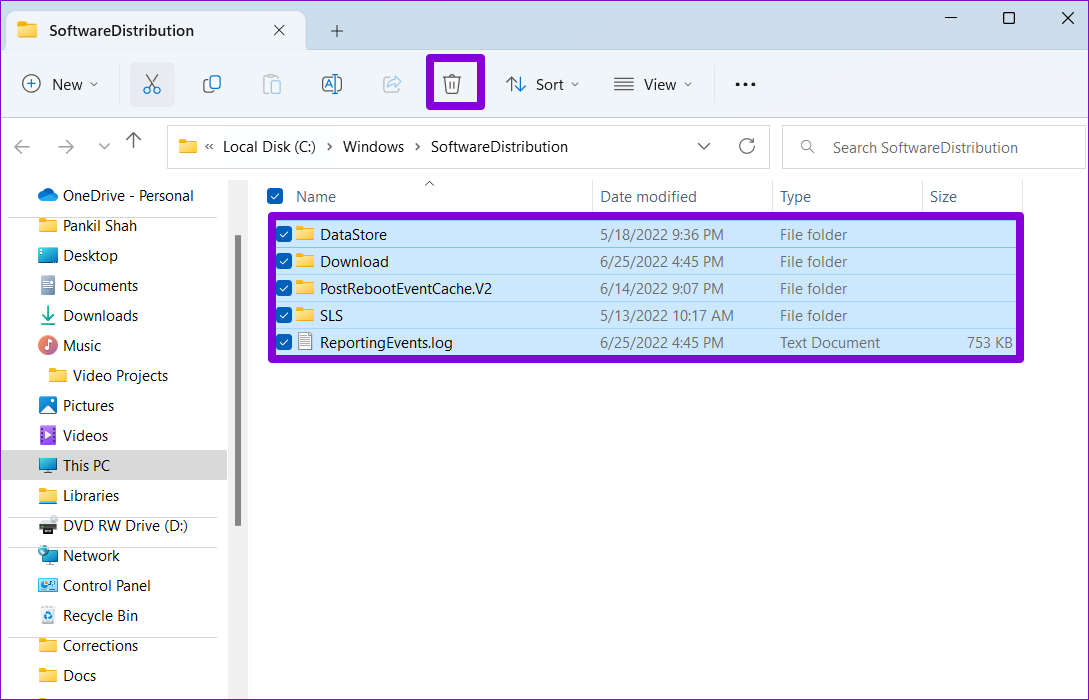
Step 5: Return to the Services window > right-click on Windows Update > click Start.

Fix 5: Run SFC and Check Disk Scans
Issues with the system files on your PC can also affect the Windows update process. To rule this out, run an SFC (System File Checker) scan and Check Disk to repair corrupted or missing system files on your PC. Here’s how.
Step 1: Right-click on the Start menu icon > select Terminal (Admin).

Step 2: Paste the following command in the console and press Enter.
sfc /scannow

Step 3: Paste the following command in the console and press Enter to run the check disk scan.
chkdsk C: /f

Restart your PC after running the above commands and try to install Windows updates again.
Fix 6: Check Device Manager for Errors
Third-party drivers on your PC can also sometimes interfere with Windows processes. If one of the drivers on your PC is causing an issue, you must fix it first by employing the steps below.
Step 1: Right-click on the Start icon and select Device Manager.
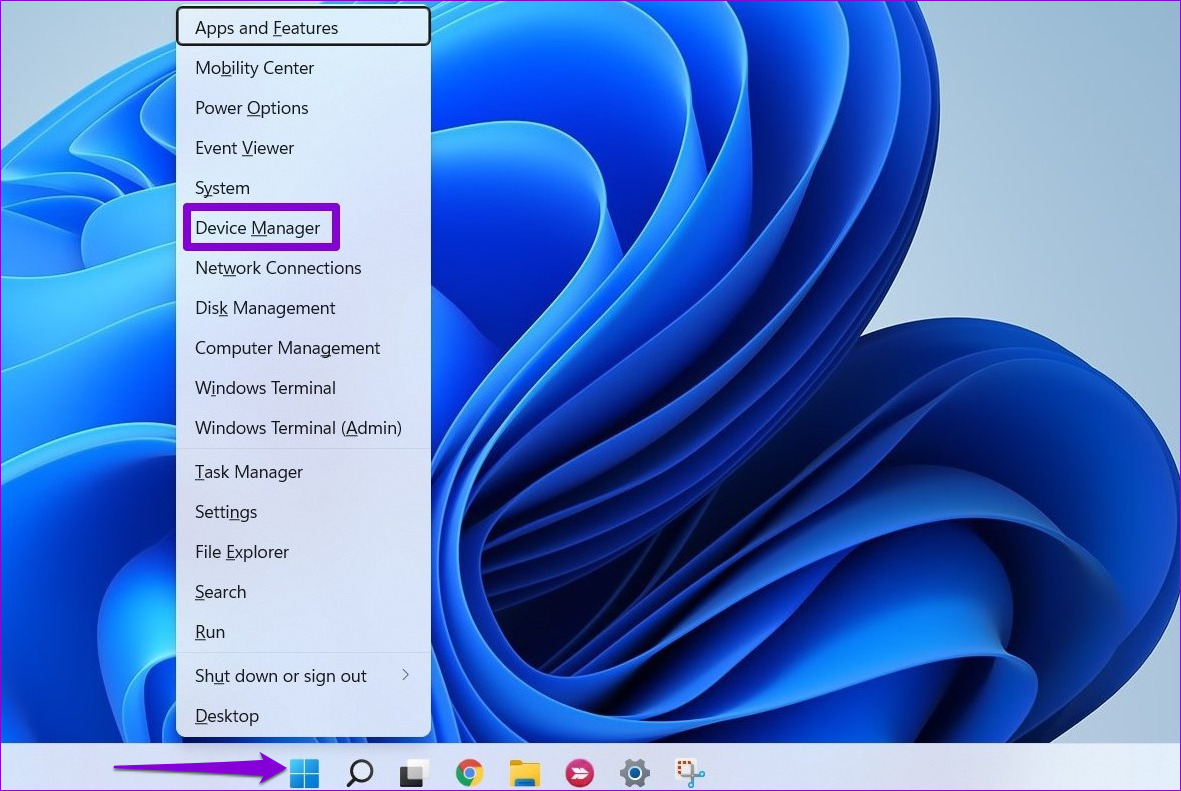
Step 2: Scroll through the list and look for drivers with a yellow exclamation sign. If one is found, right-click on it and select Update driver.

Follow the on-screen instructions to finish updating the driver. Once updated, check to see if Windows can install updates.
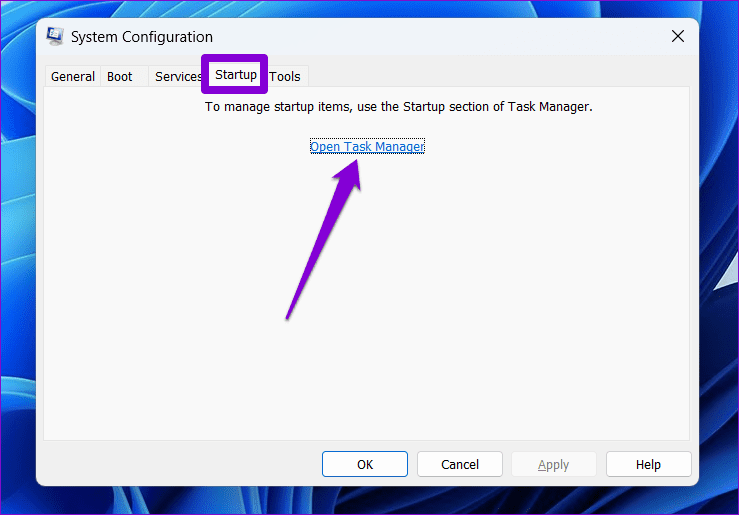
Fix 7: Try Clean Boot
If nothing works, try booting Windows in a clean boot state. This will load your PC without third-party apps and programs and prevent them from interfering with the update process.
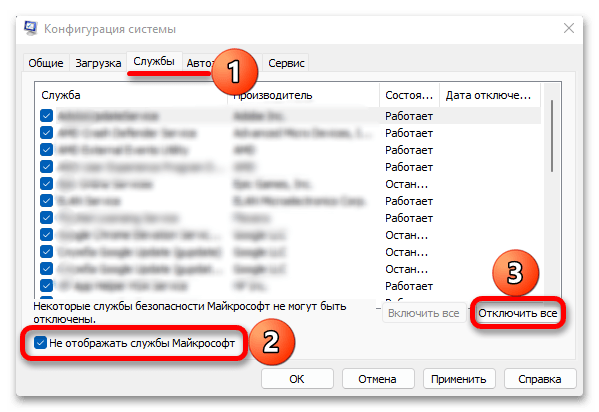
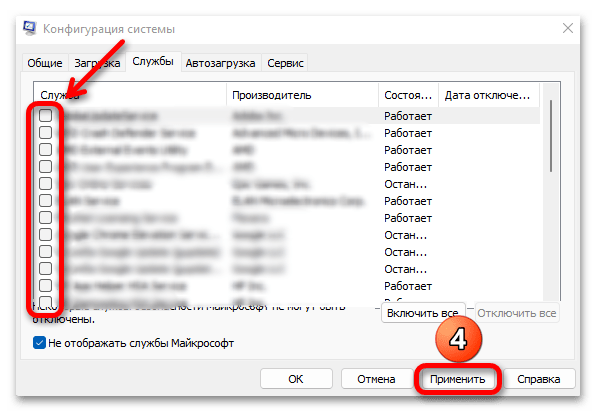
Step 1: Press the Windows key + R to open the Run dialog box, type msconfig, and press Enter.
Step 2: Under the Services tab, check the box for Hide all Microsoft services box. Then, click the Disable all button.
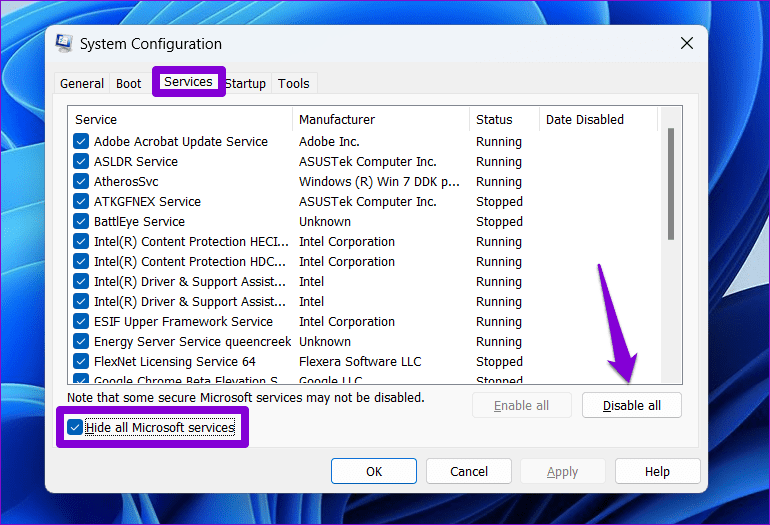
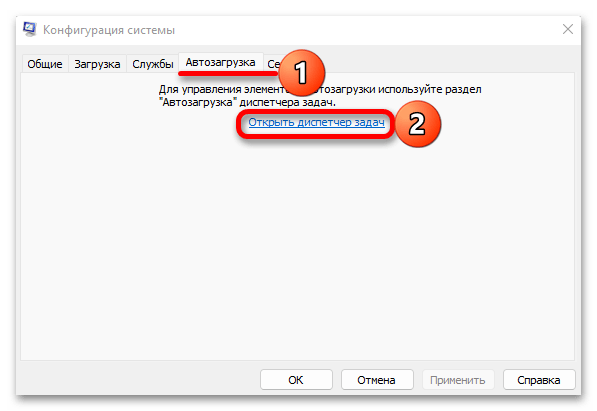
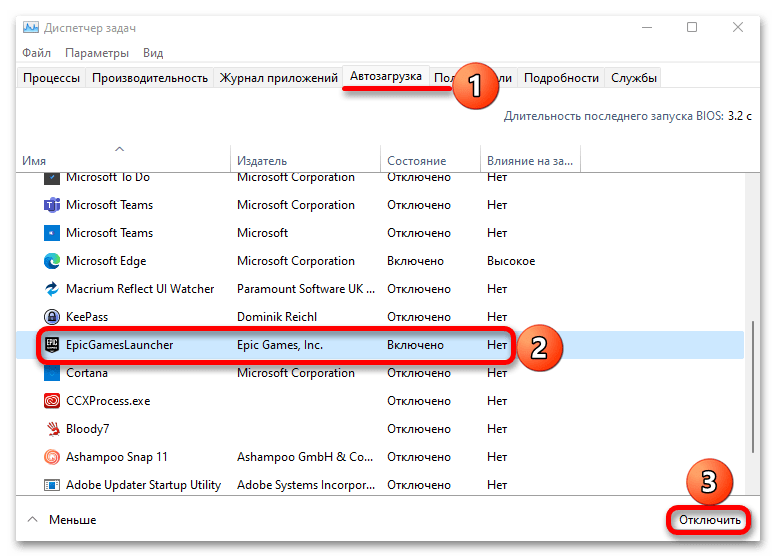
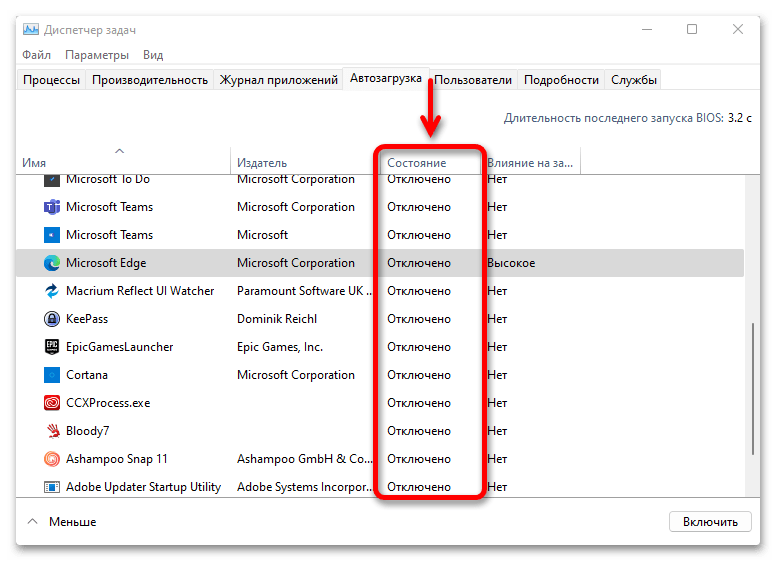
Step 3: Switch to the Startup tab and click on Open Task Manager.
Step 4: Select a third-party app or program and click the Disable button at the top. Repeat this step to disable all the third-party apps and programs.

Restart your PC to enter the clean boot state, and you should be able to install Windows updates without a problem.
Was this helpful?
Thanks for your feedback!
The article above may contain affiliate links which help support Guiding Tech. The content remains unbiased and authentic and will never affect our editorial integrity.