
Установка обновлений рекомендуется для повышения стабильности и производительности системы, для установки или апгрейда новых компонентов, которые используются многими программами и системой, например установка Net Framework 4.7 выполняется через установку обновлений. Также регулярные обновления помогают устранять уязвимости и повышают безопасность системы в целом.
Самый простой способ установить обновления — через Центр обновлений Windows.
Для всех версий Windows Server процедура установки обновлений почти одна и та же, за исключением минимальных отличий.
Установка обновлений на Windows Server 2012 R2
Чтобы попасть в Центр обновлений Windows, нужно нажать на кнопку Стартового Меню в левом нижнем углу рабочего стола и проследовать по пути:
Старт Меню (Start Menu) -> Панель управления (Control Panel) -> Система и безопасность (System and Security) -> Центр обновления Windows (Windows Update)
Либо можно войти в Старт Меню, ввести текст «update», если у Вас англоязычная версия Windows или «Центр обновления» для русскоязычной версии Windows, Вы увидите в списке найденных программ — Центр обновления Windows (Windows Update), нажмите на данную опцию.
Также в Центр обновления Windows можно попасть через командную строку Powershell, набрав команду «control update» и подтвердив ввод кнопкой Enter
В центре обновления Windows нажмите кнопку Поиск обновлений (Cheсk for updates).
После окончания поиска видно, что найдены важные и опциональные пакеты обновлений, нажмите кнопку Установить обновления (Install updates):
После того, как пакеты обновлений будут скачаны и установлены, Вы увидите сообщение об успешном обновлении, либо кнопку с требованием перезагрузить сервер для применения новой конфигурации (после нажатия кнопки сервер перезагрузится, все программы остановят свою работу, связь через удалённый рабочий стол станет недоступна, поэтому обязательно сохраните все Ваши файлы и незавершённые настройки/программы перед нажатием кнопки).
Если готовы, нажмите кнопку Перезагрузить сейчас (Restart now):
Также сервер можно перезапустить из Стартового меню:
Далее начнётся завершение работы и установка новых компонентов, иногда это может занимать несколько минут, а иногда может занять и полчаса, поэтому Ваш сервер может быть некоторое время недоступен для подключения, подождите 5-30 минут и затем пробуйте подключаться к серверу. (Вы всегда можете отслеживать процесс загрузки системы на наших серверах, используя окно VNC/IPMI-подключения.)
Обновления установлены.
Рекомендуется повторить процедуру установки обновлений и перезагрузить сервер снова, так как не все обновления устанавливаются сразу, некоторые становятся доступны только после установки предыдущих.
Установки обновлений на Windows Server 2016 и Windows Server 2019
Процедура такая же как и для Windows Server 2012 (смотрите выше в данной статье), поэтому описывать процесс детально не буду, лишь приложу несколько скриншотов, так как графический интерфейс отличается от Windows Server 2012 r2
Чтобы попасть в Центр обновлений Windows, нужно нажать на кнопку Стартового Меню в левом нижнем углу рабочего стола и проследовать по пути:
Старт Меню (Start Menu) -> кнопка Настройки (Settings) -> Обновления и безопасность (Update and Security) -> Центр обновления Windows (Windows Update)
Или найдите через поиск в Стартовом меню, затем перейдите в опцию «Windows Update settings«:
Поиск обновлений:
Скачивание и дальнейшая установка обновлений:
По окончанию установок перезапустите систему:
Система начнет перезапуск и соединение с сервером через удалённый рабочий стол будет разорвано на время его перезапуска.
Дождитесь пока сервер снова станет доступен к подключению, приблизительное время: 5-30 минут. (Вы всегда можете отслеживать процесс загрузки системы на наших серверах, используя окно VNC/IPMI-подключения.)
Рекомендуется повторить всю процедуру, так как многие обновления становятся доступны только после установки предыдущих.
Однако обратите внимание, что не рекомендуется устанавливать полностью все обновления в Windows Server 2016-2019 на серверах с размером диска 20 Гб или менее, так как обновления имеют большой размер и могут занять все свободное пространство.
Preface
Windows server update services (WSUS) retrieves Windows and other Microsoft products (such as office application products) updates and store them internally as a distribution point. So, it is not hectic for bandwidth consumption as each Microsoft device does not have to contact Microsoft servers for the update. WSUS is also a valid source if we consider a security point of view as well. The WSUS is a distribution point for local Windows servers and workstations to get the security and other updates from Microsoft servers. The WSUS servers can act as replica servers where the replica copies of Microsoft updates fetch from a central WSUS server and distribute the updates for a subnet or site. WSUS services can be used for testing updates before it approved for a server or workstation.
In this article, I am going to demonstrate how to deploy Microsoft Windows Server Update Services from the Windows server role group and configure to synchronize patches from Microsoft update servers. We are also going to look at how to configure Group Policy Object to auto-update the approved windows patches from the WSUS server and schedule the restart after the update installation. We are going to configure client-side targeting to group the computers to a specific target name so that it will be easier for administrators to troubleshoot or update the systems.
The following points are discussed in this article while demonstrating the WSUS role installation. I would recommend going through this article step by step for the audience who are new to this concept called WSUS. But for experienced administrators, you can go to the configuration step where you are stuck at configuring. Let us begin the installation and when you are ready with the server installed Windows server 2019 and joined to the Active Directory domain.
- Add Windows Server Update Services role
- WSUS Configuration Wizard
- Launch Windows Server Update Services Console
- Configure the Group Policy object for WSUS Clients
- Testing WSUS Client
The demonstration begins with installing the WSUS role from the Windows server 2019 role group from the server manager snap-in. Launch server manager and click on Add roles and features to start adding the server role.
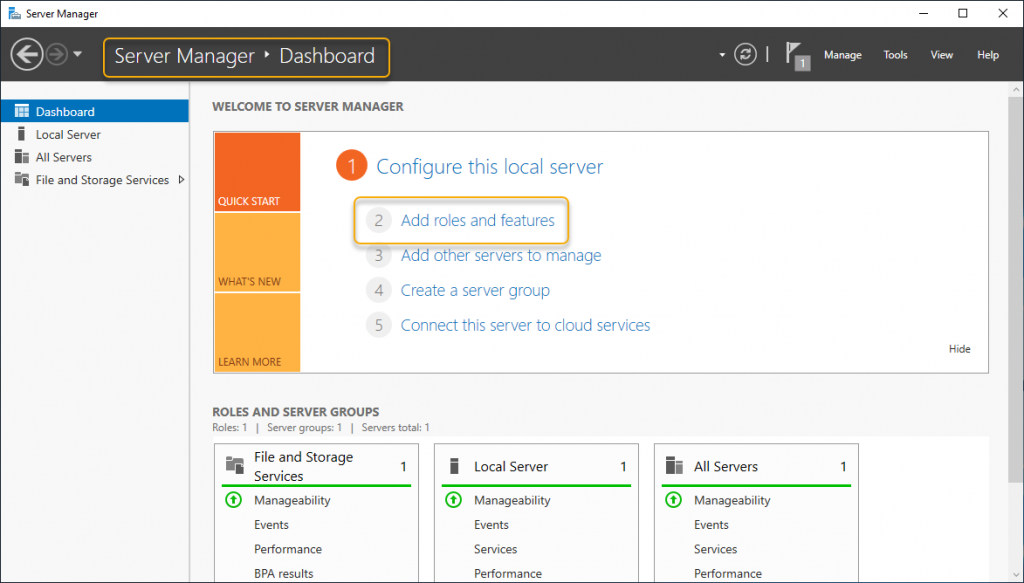
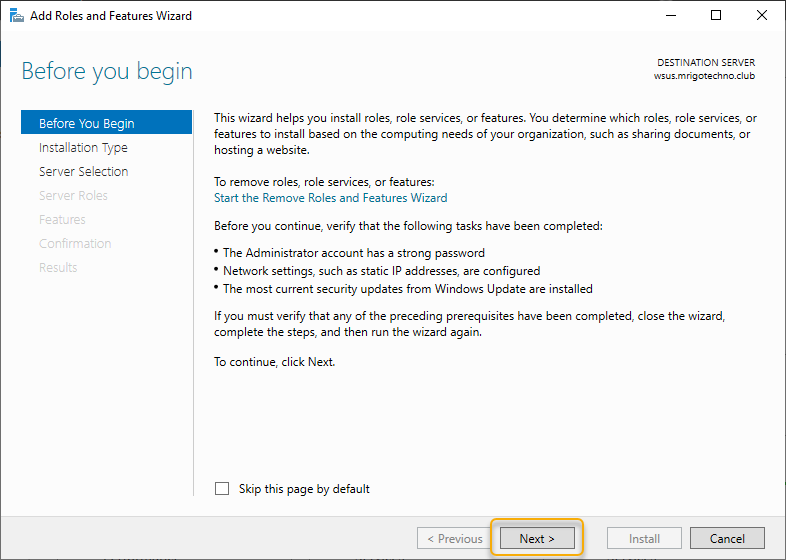
The wizard instructions give you a gist of how the Add roles and features wizard help you install the roles or features to your local or remote computer. You may go through the instruction if you are new to add roles and features of Windows Server. If you don’t want to see “before you begin page” anymore, click skip this page and click next to move on to the next page of the wizard.
The WSUS role comes under role-based or feature-based installation. So, click Role-Based or Feature-Based installation and click Next.

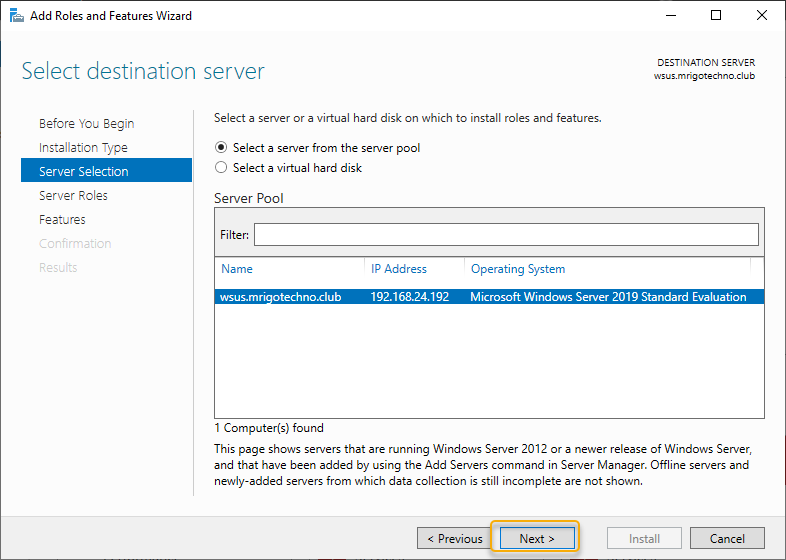
On the server selection, the local server listed, and our intention is also to install the WSUS role on the local server. Click Next to continue.
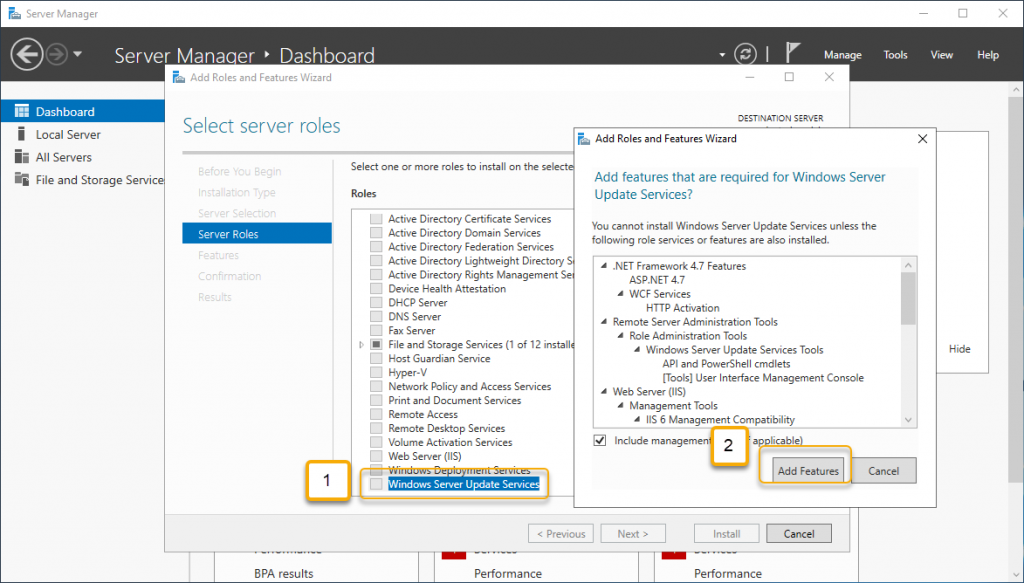
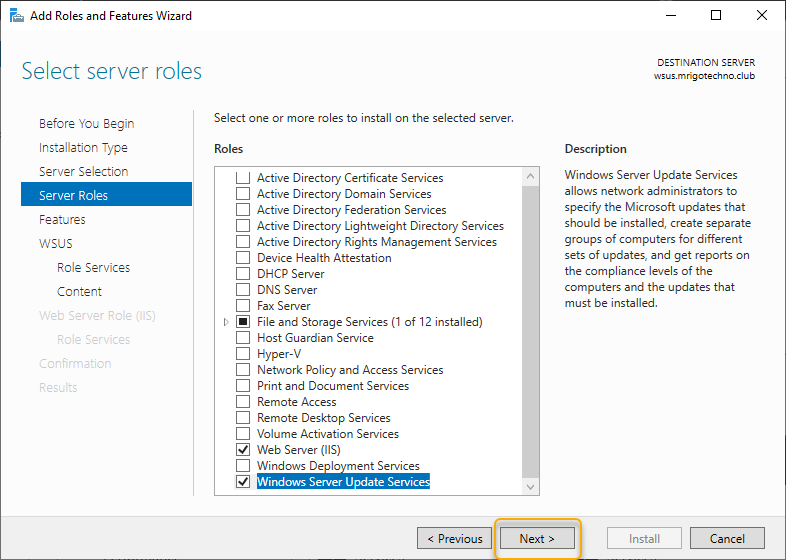
From the server roles list, select Windows Server Update Services, and when you click on the role, you will be prompted to choose the features to install, leave the default selection and click Add Features to return to the role selection window.
As the Windows Server Update Services role with checkbox selected, click Next to continue.
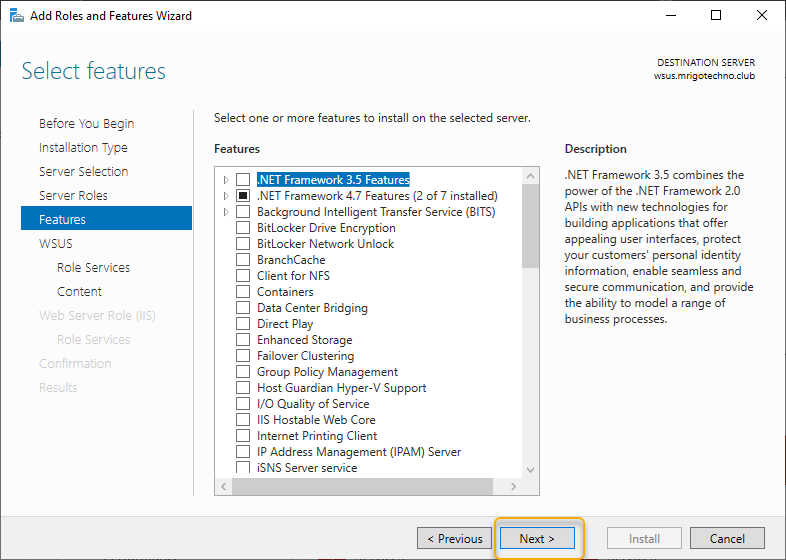
The next screen is to select features related to the role, leave the default selection, and click Next.
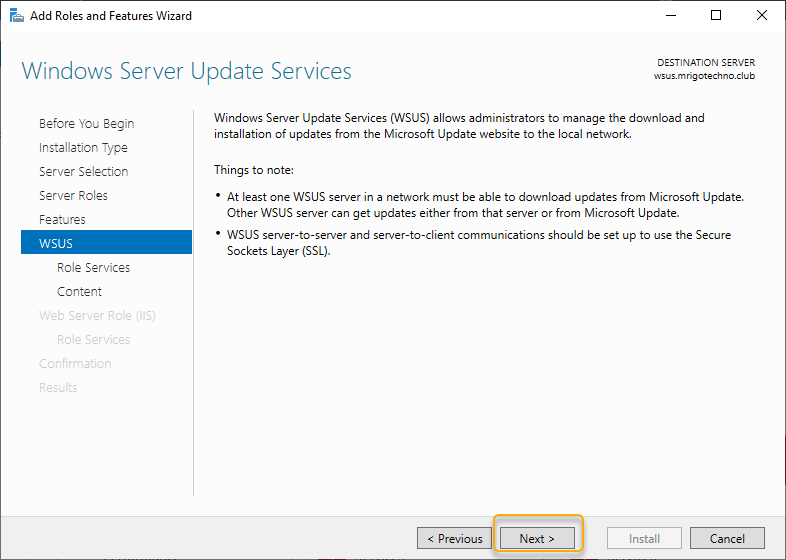
On the WSUS page, the instruction of WSUS would be given, go through the WSUS instruction, and click Next to continue.
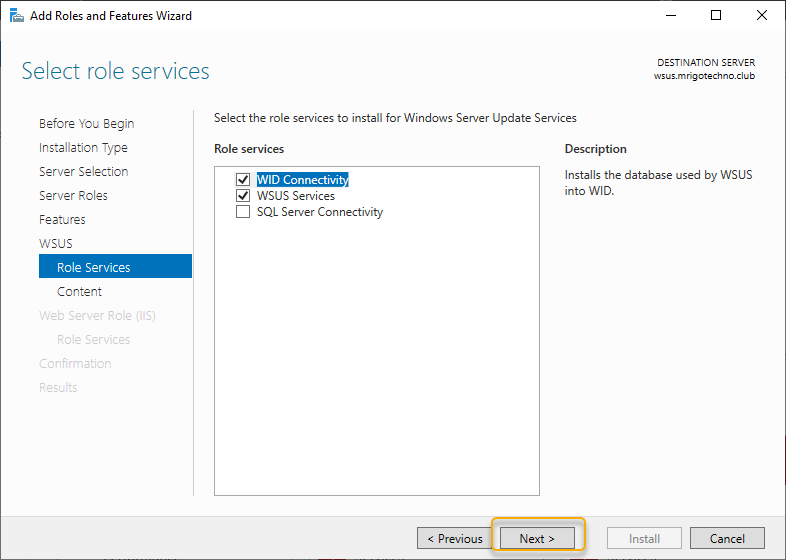
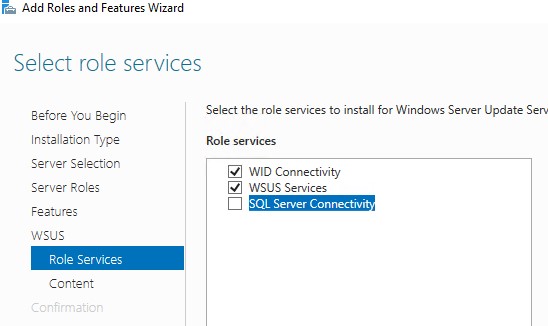
On the select role service page, leave the WID connectivity and WSUS roles selected, and move on to the next page by clicking Next.
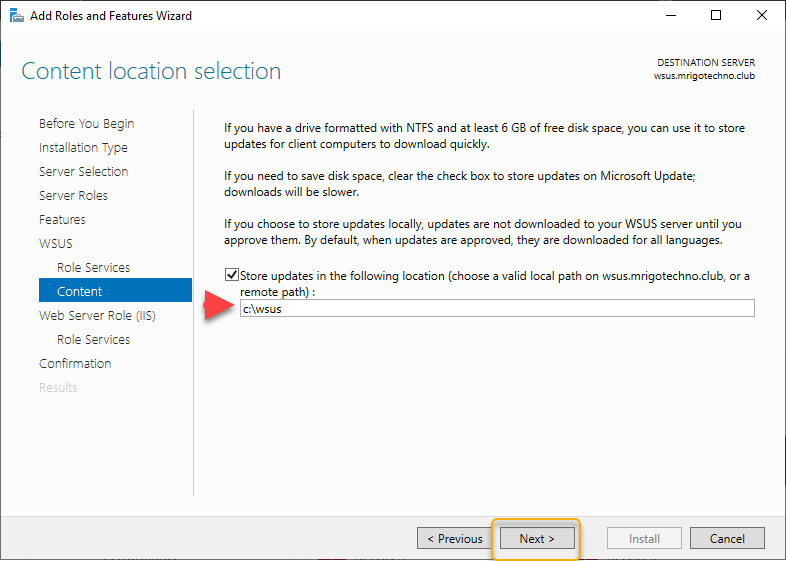
On the content location selection, give a path to a drive that has at least 50 GB disk space and enough space to grow as your update selection. It is also a good idea to select a keep the content away from the system drive. As this is a demonstration, I have pointed C:\WSUS as a content path. Type the folder path and click Next to continue.
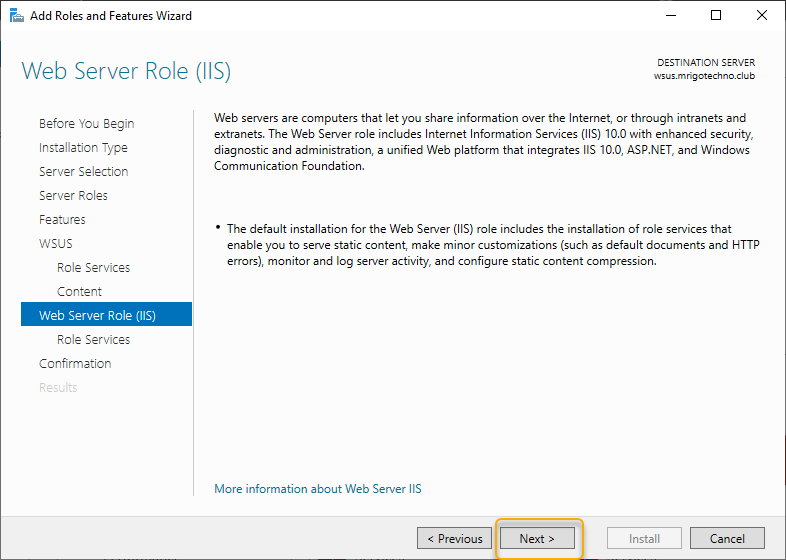
The WSUS clients such as Windows client workstations and Windows Servers mostly depend on Web services of WSUS for connectivity. For detailed information, you may go through the details on this page and click Next to continue.
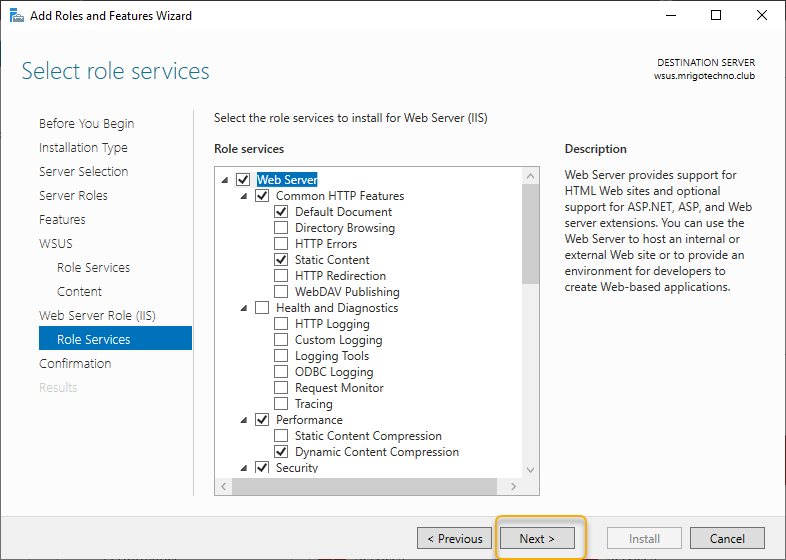
On the Role Services page, leave the default selection and click Next to continue.
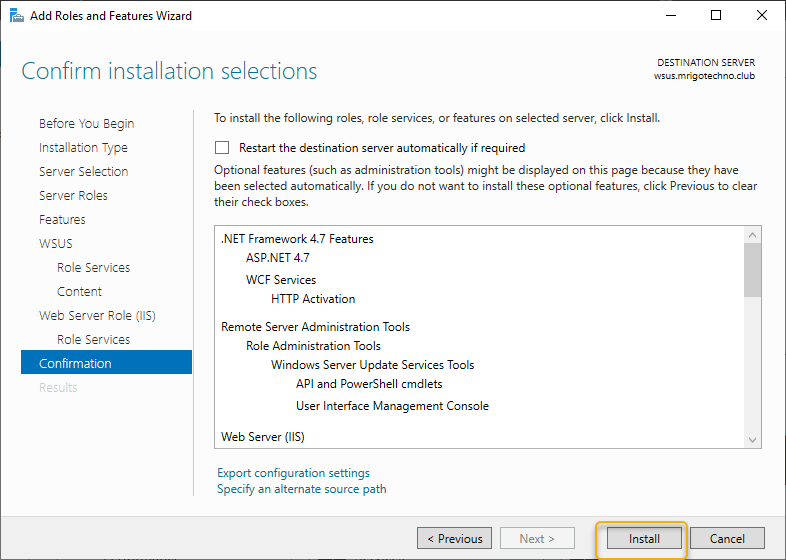
On the confirmation page, you would see all the roles and features selected so far to install the WSUS role, click install to start the installation.
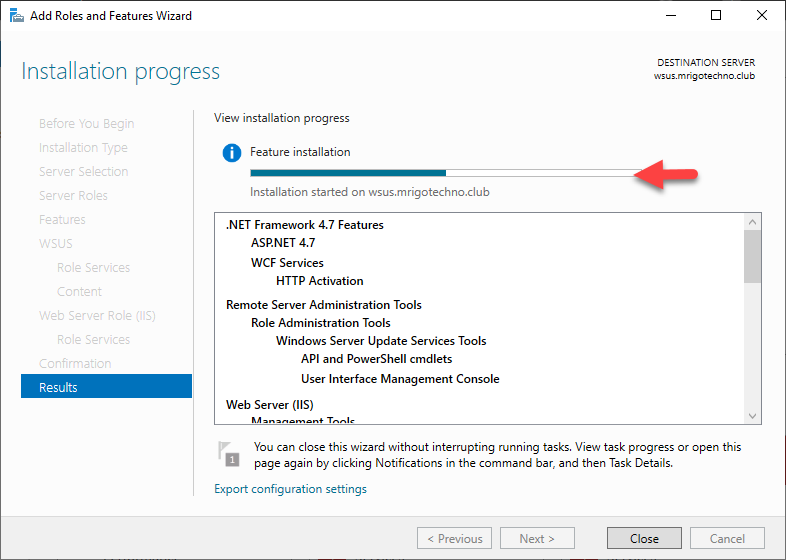
The view installation progress, let you know the installation progress of the installation, leave the WSUS installation to complete.
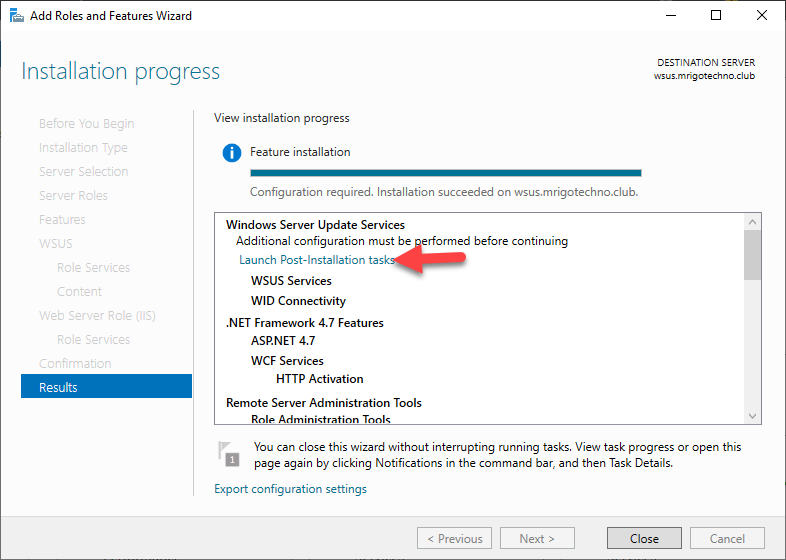
Once the installation completed, you would see launch post-installation, click post-installation to start.
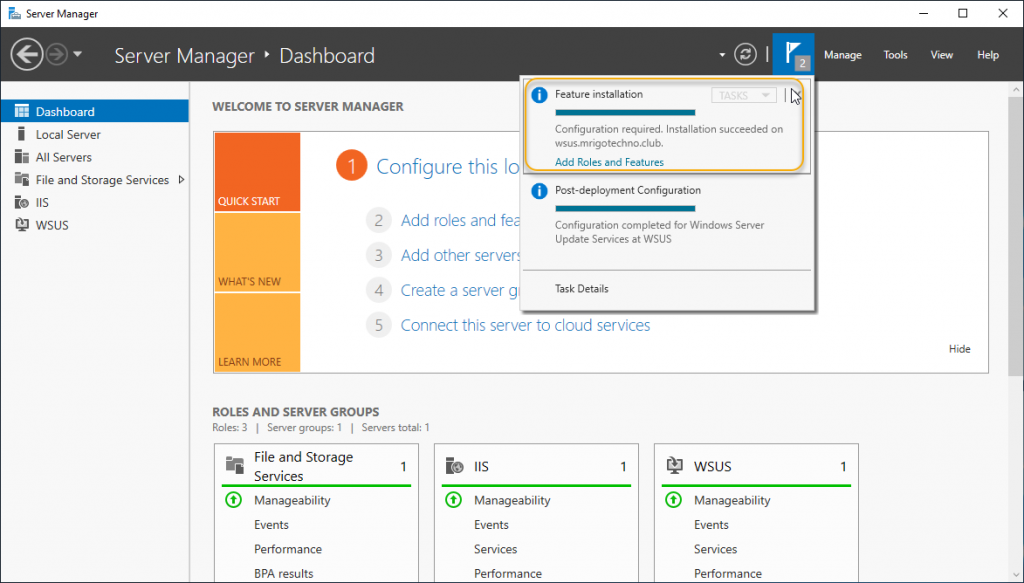
Click the notification flag to check the post-installation progress and status of it. After about two minutes, you would get the state as installation succeeded.
WSUS Configuration Wizard
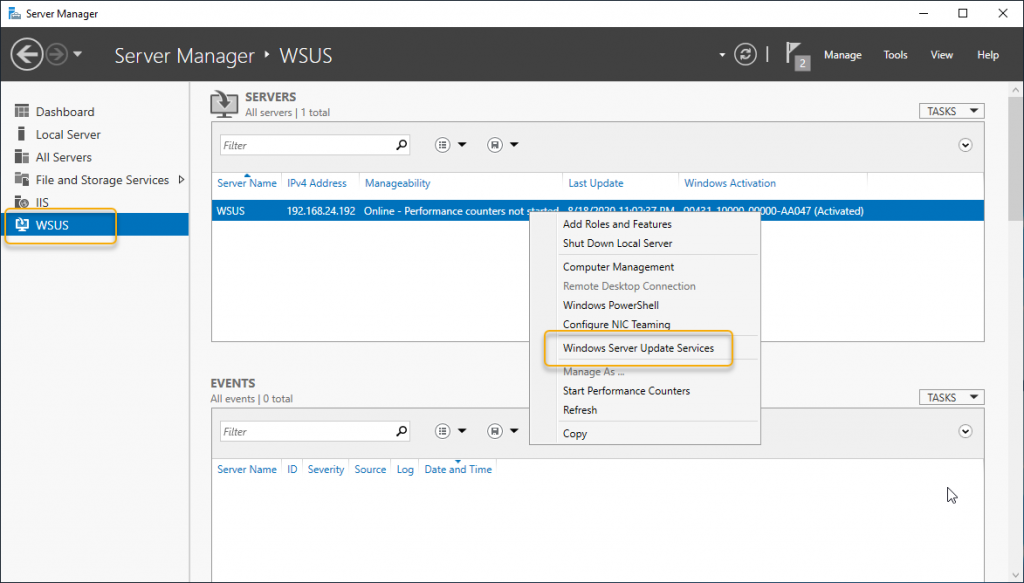
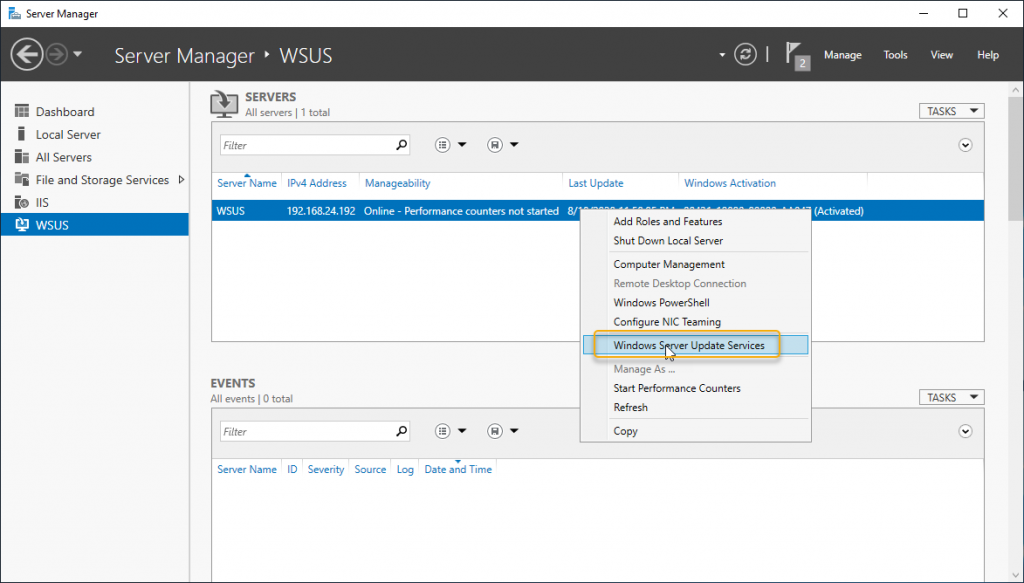
Select the WSUS role from the left side navigation and right-click the server and click Windows Server Update Services to start the WSUS configuration wizard.
On the before you begin page, there are some questions prompted to check if the firewall allowed to access the clients, connectivity to the internet to access the Microsoft servers to download the updates, and in there is any proxy server credentials to access the Microsoft servers. Go through the questions and get on them if required and click Next to continue.
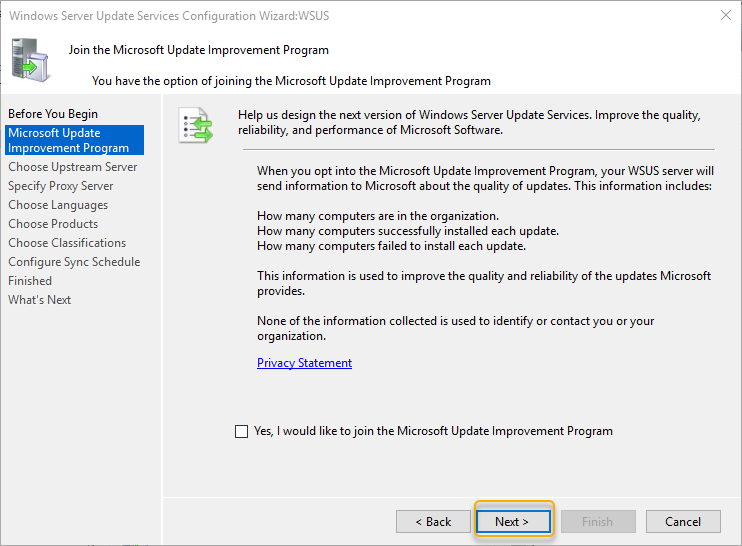
As this is a demonstration, I have unchecked the Microsoft update improvement program to participate. You can choose either to join or not, whatever you wish. Click next to continue.
This server is going to get the updates from the Microsoft Server, so select synchronize from Microsoft update and click next.
If you are using a proxy server to access the internet, type the proxy server details. Mostly the internet is connected directly, click Next to continue.
The next page is to connect the upstream server; this will take about ten minutes to complete the connection, wait for the server to connect to the upstream server.
The connection progress will give you the status of the connectivity, wait for the connection to happen to the upstream server.
Once the connectivity has completed connection to the upstream server, click Next to continue.
As all Microsoft systems installed with the English language in my lab network, I have selected English. In your installation, if multiple languages are needed or any specific language to choose, select the appropriate language, and click Next.
In this demonstration, I’m using a Windows 10 computer to test the Windows update settings, and you can go through the list and choose the appropriate selection for other windows to update such as Windows Server 2019, Office pro plus, and so on. Click Next to continue.
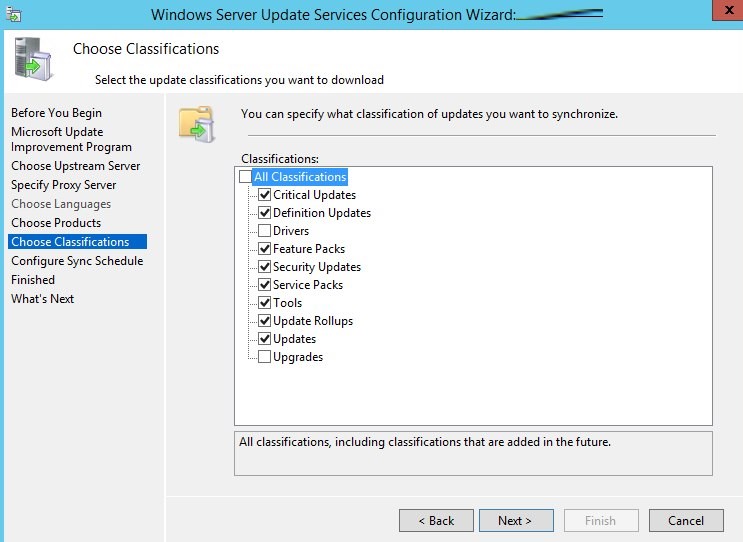
Select the updates as you need, I have selected Critical, definition, and security updates. You may also choose updates such as upgrades, drivers, and so on. Click Next to continue.
On the Synchronization schedule, select “synchrone automatically” and choose a time suitable for synchronization to happen, also windows update synchronization per day, default is 1. Select a time in the early morning window will be a good idea. Click Next to continue
On the Finished page, Select Begin initial synchronization and click Next.

On the what’s next page, click finish to end the WSUS configuration wizard and launch WSUS.
Launch Windows Server Update Services Console
The next is to go to the server manager and select the WSUS role on the left side navigation and right-click the server from the middle pane and click Windows Server Update Services.
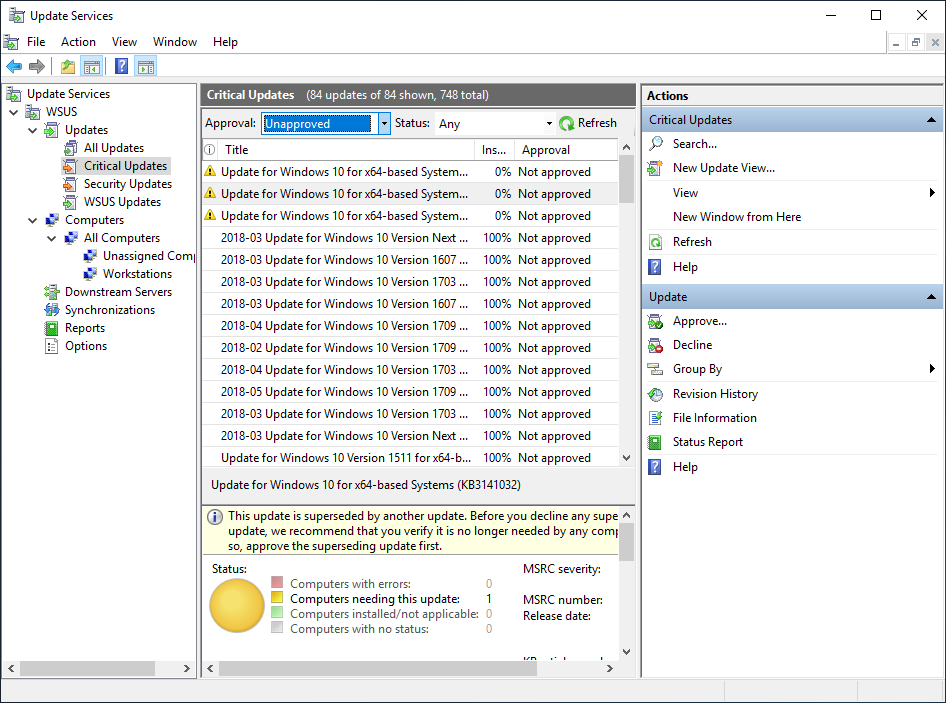
On the updates tab, expand it and select critical updates and change the status to any on the top filtering options and click refresh. You would see the critical updates available for installation.
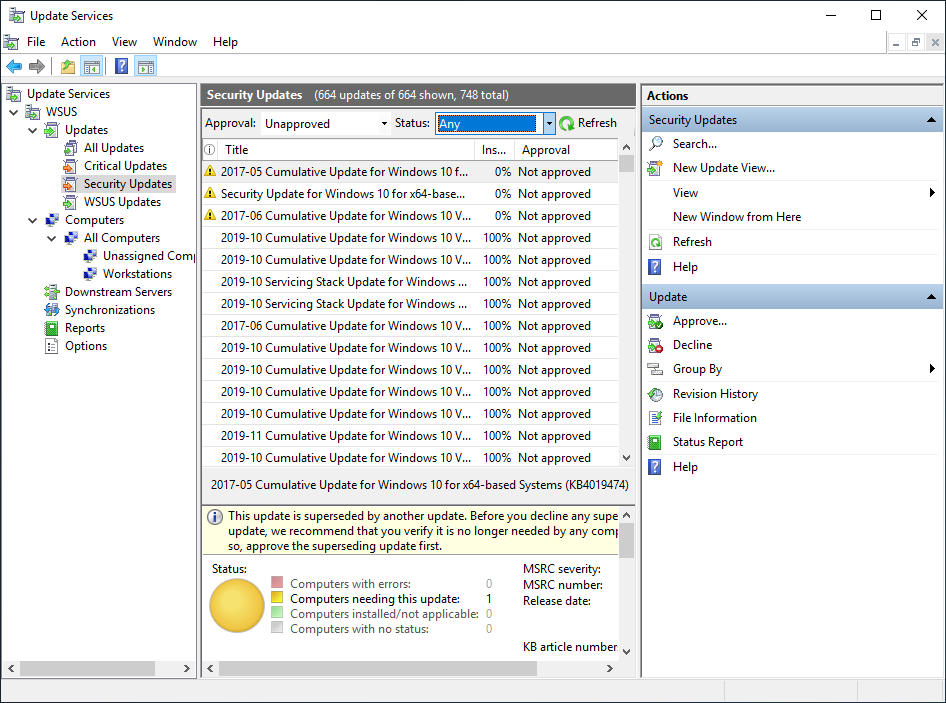
Same way, select security updates, and you would see the security updates ready for installation as in the below screen.
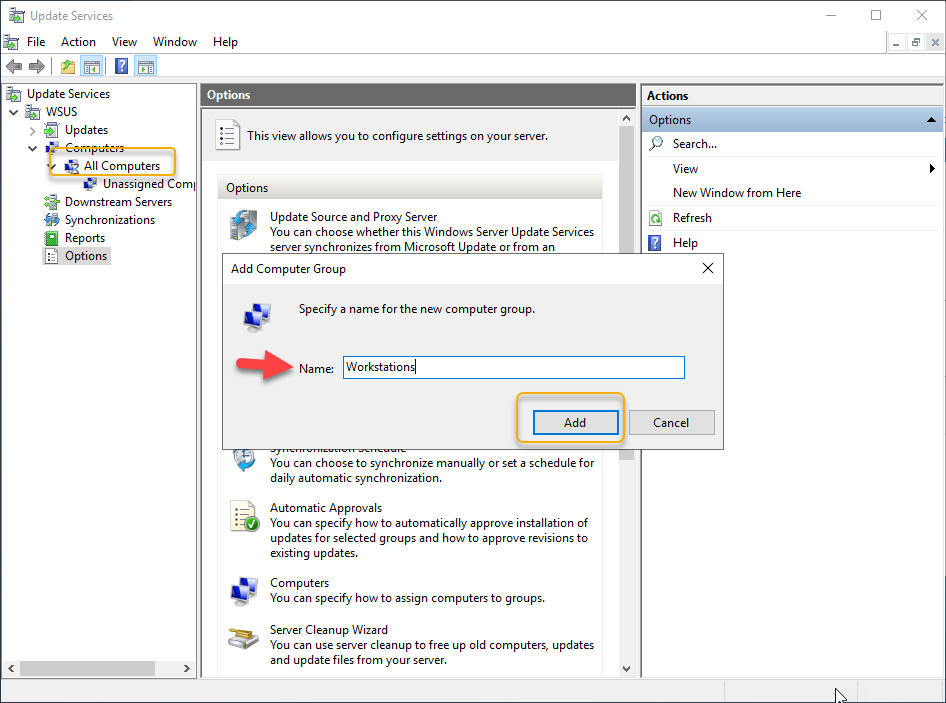
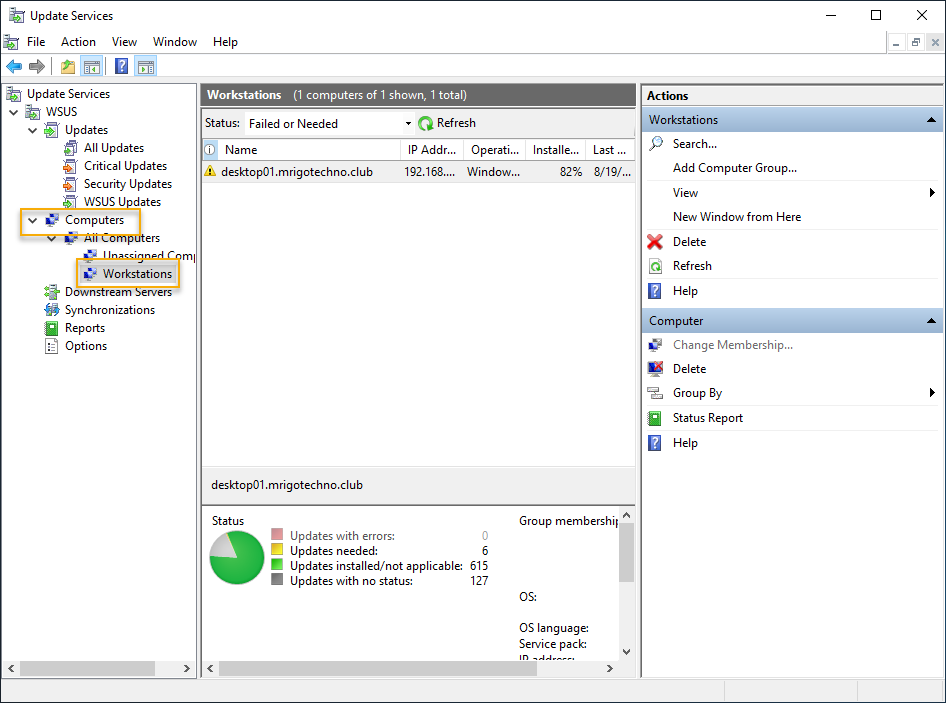
On the Computers hierarchy, we are going to create a group called workstations where all the workstation computers are grouped by client-side target GPO, which we are going to look at in the upcoming demonstration. On the All Computers node right-click and click Add computer Group and type a name, I am creating a group called workstations. Click Add to add the computer group.
Apart from already configured from WSUS configuration wizard, we are also going to do a slight configuration change on the options navigation under computers. Double click Computers and select User Group Policy or registry settings on computers to assign the computers to the group with the help of client-side targeting to assign the computers to the group.

Configure the Group Policy object for WSUS Clients
To configure client computers automatically get the configuration details of the WSUS server, we are going to use the Group Policy object to update the configurations.
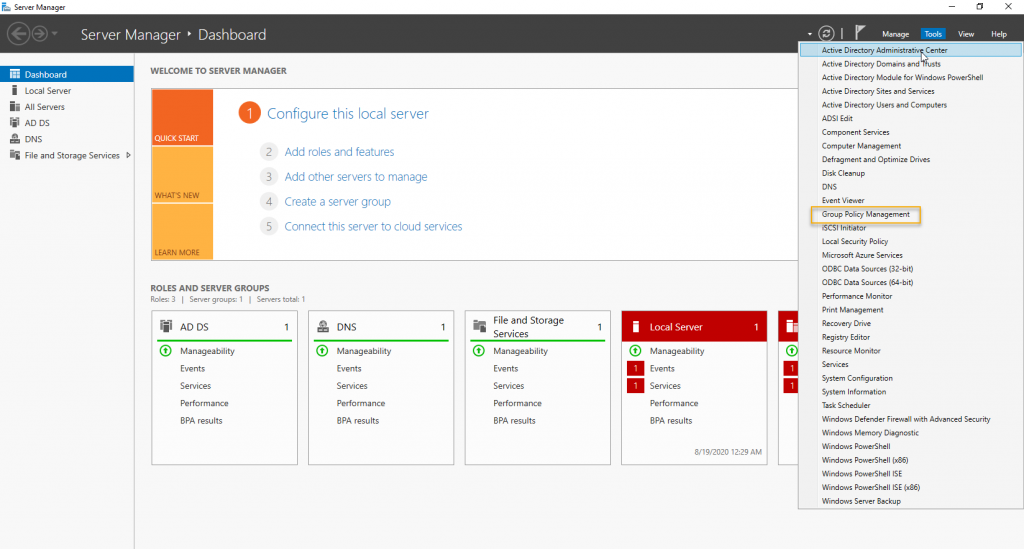
Login to Domain Controller and launch server manger. On the server manager snap-in click on tools and Group Policy Management to open Group Policy management console
Right-click the OU where the Computer objects of the computers to which you want to configure WSUS and click create and link Group policy object to create and link a new Group Policy object. The Group Policy object happens to be Computers OU under Company root OU in this demonstration.
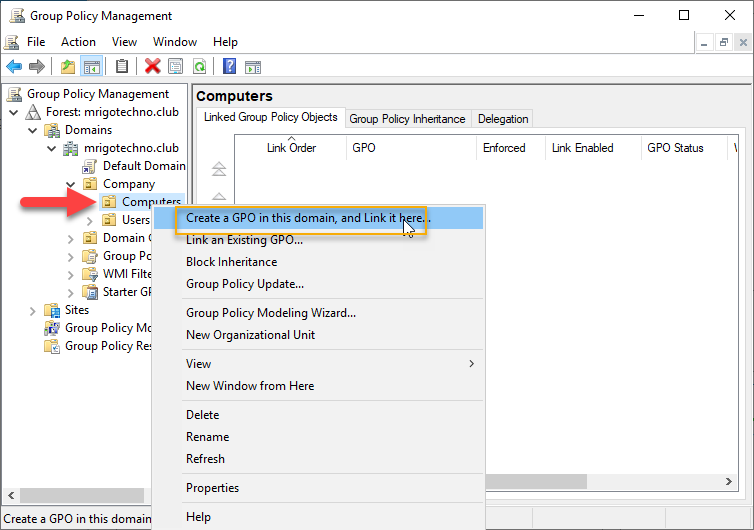
As this is Workstations Policy, I have given name as WSUS Workstations Policy. Type a name descriptive and click OK.

Right-Click the Policy created just before, and click Edit.
![Dutta has so far authored 16 books for adults, 13 of which are non-fiction while three are fiction.[5] His non-fiction books are based on a diverse range of subjects like The Brahmaputra published in 2001 by the National Book Trust; Cha Garam: The Tea Story revised and reprinted in 2013 by Orchid Publications; Unicornis: The Great Indian Rhinoceros published in 2001 by Konark; and The Roving Ministrel a biography on musician, singer and filmmaker Bhupen Hazarika, published by Rupa Publications in 2002.[6]
Anagarika's Swansong published in 2009 is a fictional novel by Dutta. Anagarika's Swansong is a satiric takeoff on the novel genre. This anti-novel debunks all the conventional elements that a novelist would otherwise employ, including a linear narrative, structural integrity, naturalistic characterization, emotional or situational conflict et al.
Anagarika in Sanskrit is one who renounces society and materialism in search of truth. In the book the author alludes to Prince Siddhartha who gave up his princely life to seek out in search for existential truths and to transform into Gautama Buddha, the enlightened one. The protagonist of The Anagarika's Swansong, is nameless and undertakes journey similar to that of Prince Siddhartha in the modern age to find the meaning of existence. However, because of his inferior intellect and he lives in Kaliyuga or "the era of untruth", he first lands up in to a local lunatic asylum, but finally stumbles into "poor man's enlightenment"![7]
The Ahoms published in 2016 is a historical fiction the delineates setting up of the Ahom Dynasty that ruled a large piece of Northeast India including all of present-day Assam. In 1228 A.D. an event occurred in the northeastern region of India, which not only changed the destiny of the Brahmaputra Valley and the surrounding mountains, but also of South East Asia. A group of Shan or Tai warriors, led by a brave leader named Sukapha, having left its original home in the Shan country in Myanmar, entered Upper Assam and set up the nucleus of what was later to become the powerful Ahom Empire. From the time Sukapha entered this region till it was annexed by the British in 1826, for nearly six centuries, his descendants reigned over a greater part of the Brahmaputra valley. Few dynasties in the world, let alone Asia, had enjoyed such a long period of almost unbroken rule. It was primarily due to the Ahom dynasty that the pre-colonial Assamese nation was born. Its reign witnessed the synthesis of the disparate tribes inhabiting the Brahmaputra Valley and the evolution of a distinct Assamese language, culture and nationalist identity. The Ahom Dynasty was one of the greatest political entities in medieval Asia, equal if not greater than the more well known counterparts in China or Japan. Its history is replete with tales of war, bravery, brutality, love, loyalty, treachery and treason. This book, The Ahoms, seeks to imaginatively acquaint readers with the saga of this fascinating dynasty and provide a glimpse of the major events during its six hundred year rule.[8]
Red Camellia Green published in 2016 is Mr Dutta's second fictional novel. Henry David Esscombe, a pioneer tea planter, comes to Assam in the latter half of the 1850s and opens out the Dhanboa Tea Garden. However, the unhealthy Assam environment takes its toll and, gravely ill, he summons his son David to take over the plantation. His daughter, Cordelia, desperate to see her dear papa again, accompanies her brother to Assam. As the brother-sister duo struggle to adapt to the changed circumstances, a host of individuals, including the phlegmatic Michael Bailin, the devilishly charming Christopher James Buckingham, the self-confessed anarchist Reverend Garry Swanson, the Assamese nobleman Gokuldeva Barua, the defiant conscripted tea workers Bircha and Meghu and a host of others, intrude into their lives. Against a backdrop of tea plantation life in the 1860s and the barbarous conditions whereby migrant workers were lured and enslaved, a chain of events unfold in this epical novel, leading to an unexpected, explosive climax which turns red the green leaves of Camellia.[9]](https://mrigotech.com/wp-content/uploads/2020/08/38.png)
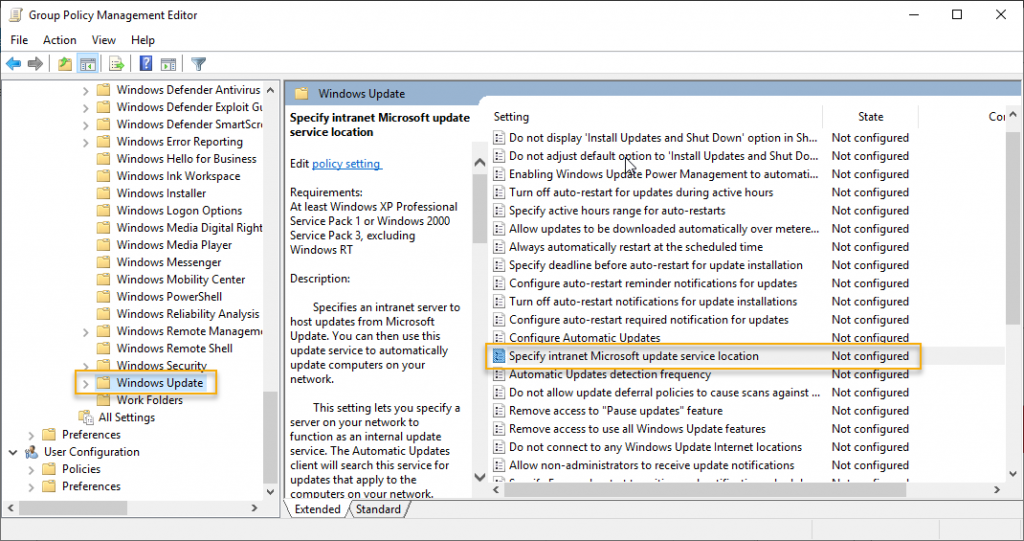
We are going to enable three Group Policies in the following GPO Section.
Computer Configuration -> Policies –> Administrative templates-> Windows Component-> Windows Update
The first one we are going to edit is “Specify Intranet Microsoft update Service location,” double click on it.
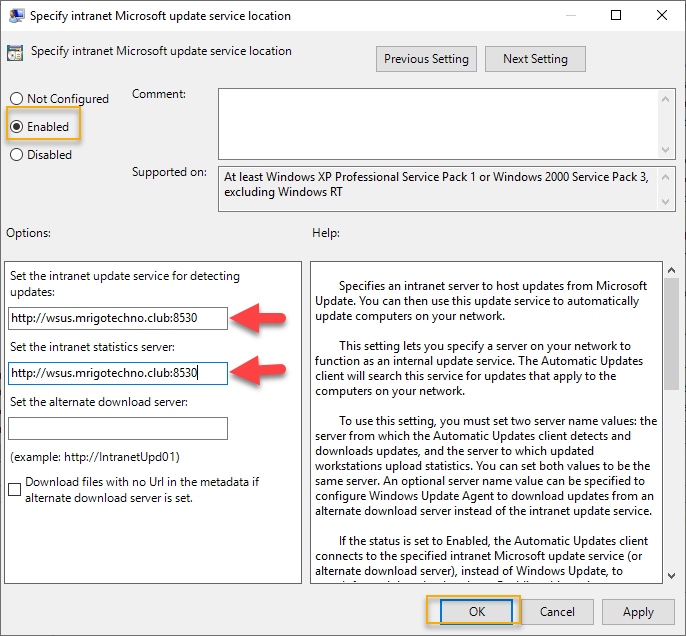
Click enable to enable this setting and type the URL of the WSUS server. In this demonstration, the server name of WSUS is WSUS.mrigotechno.club. Replace this hostname as per your installation and add 8530 to it. So the URL to provide on Set the intranet update service for detecting update and set the intranet statistics server is http://wsus.mrigotechno.club:8530
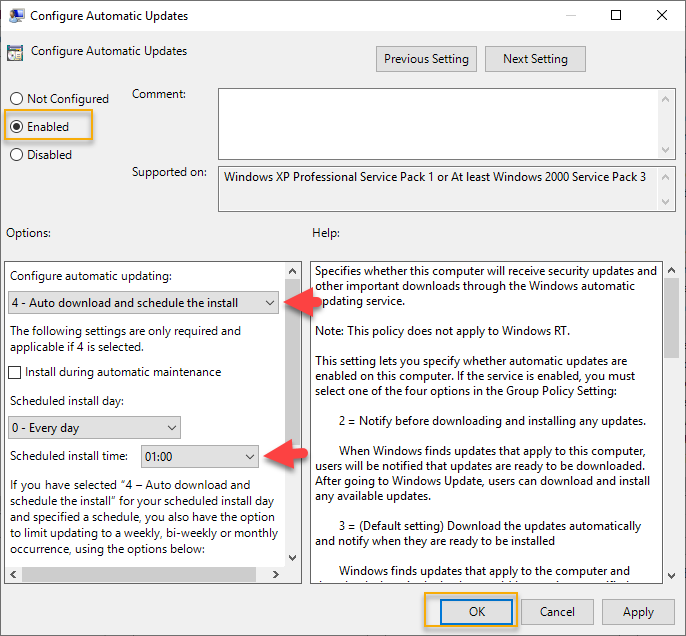
The Next setting is “Configure Automatic Updates,” double click to edit the setting.
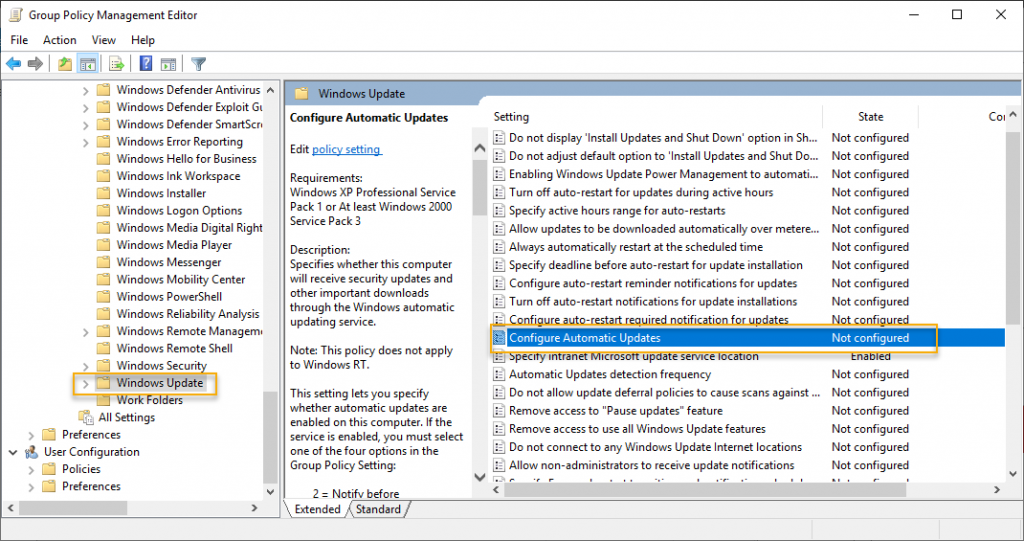
Click Enabled to enable the setting, and in the options section, select one of the four options which match your environment. The auto downloads and schedule the install under configure automatic updating is the good option as there is less overhead on the administration point of view. Also, select a time to schedule install. Click OK to go back to the GPO settings list.
The third setting is client-side targeting. Double click on the “Enable Client-Side Targeting” setting.
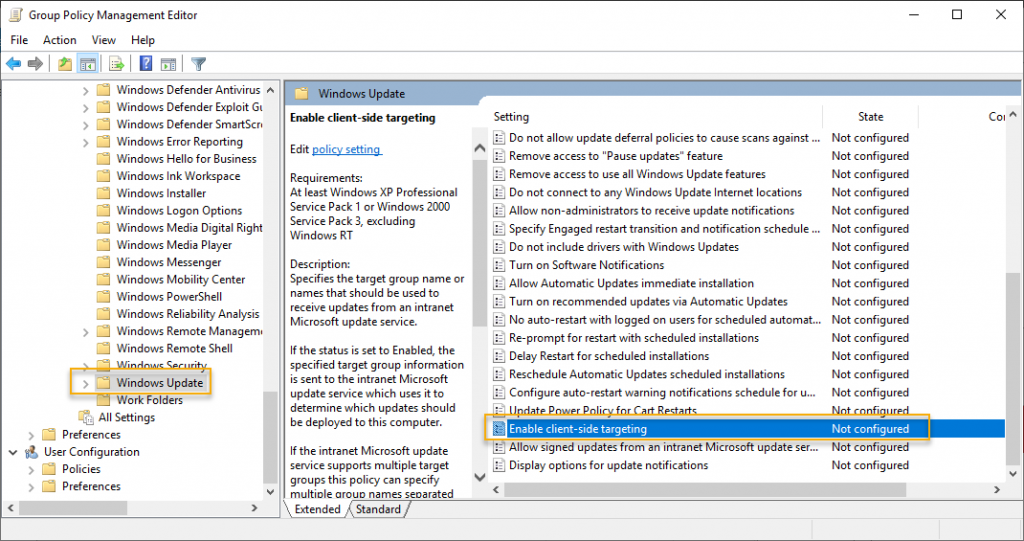
On the Client-Side Targeting settings, click enabled to enable these settings and type the group name that we created for the group created on the WSUS console previously. The group name was workstations, and you type the name that you have created and click OK

Testing WSUS Client
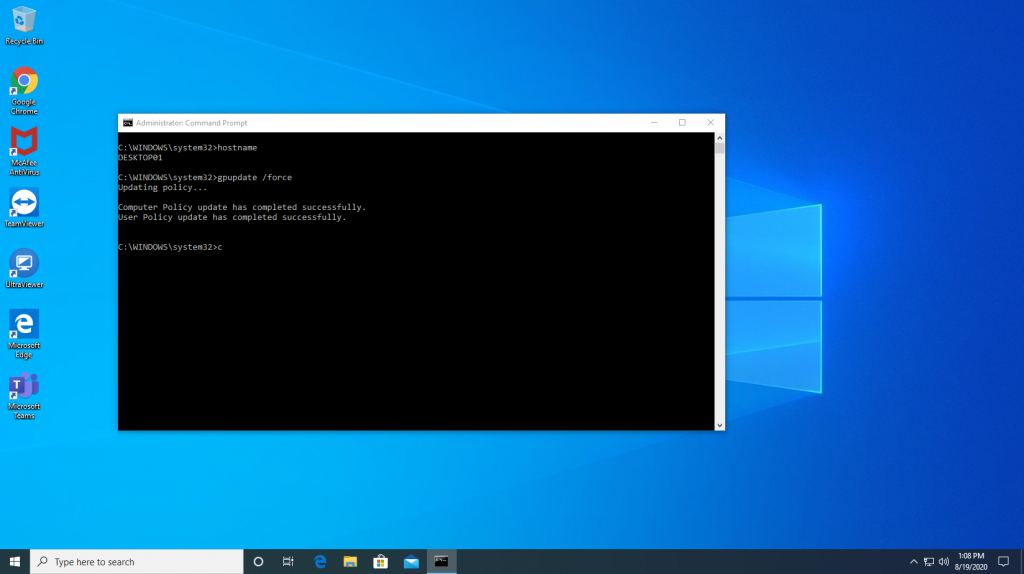
We have completed setting up Group Policy. Now I’m going to start the Client computer installed with Windows 10 and joined to the Active Directory domain. Open a command prompt and type the following command to get the group policy update.
gpupdate /force
You can see the command output as in the screen below on the Windows 10 computer.
Once the group policy is updated on the client computer, the client’s computer name and update status visible on the WSUS console under Computer Group, which happens to be client-side targeting.
Conclusion
This is the end of the Windows Server Update Services demonstration. In this article, we have covered installing the WSUS role and Configuring WSUS using configuration wizards. Once the WSUS installed and configured computer group created and Group Policy Object created on the Group Policy Management console on the domain controller. The Windows client computer tested with WSUS as the final verification of the WSUS deployment.
I have demonstrated other roles of Windows Server 2019 in Get An Admin article. You may have some questions or feedback to share with me, please click the comments below and share your thoughts. I am so happy to answer your questions.
С помощью сервера обновлений Windows Server Update Services (WSUS) вы можете развернуть собственную централизованную систему обновления продуктов Microsoft (операционных систем Widows, Office, SQL Server, Exchange и т.д.) на компьютерах и серверах в локальной сети компании. В этой статье мы рассмотрим, как установить и настроить сервер обновлений WSUS в Windows Server 2019/2016/2012R2.
Содержание:
- Установка роли WSUS в Windows Server
- Начальная настройка сервера обновлений WSUS в Windows Server
- Установка консоли администрирования WSUS в Windows 10/11
- Оптимизация производительности WSUS
Как работает WSUS?
Сервер WSUS реализован в виде отдельной роли Windows Server. В общих словах сервис WSUS можно описать так:
- После установки сервер WSUS по расписанию синхронизируется с серверами обновлений Microsoft Update в Интернете и скачивает новые обновления для выбранных продуктов;
- Администратор WSUS выбирает, какие обновления нужно установить на рабочие станции и сервера компании и одобряет их установку;
- Клиенты WSUS в локальной сети скачивают и устанавливают обновления с вашего сервера обновлений согласно настроенным политикам.
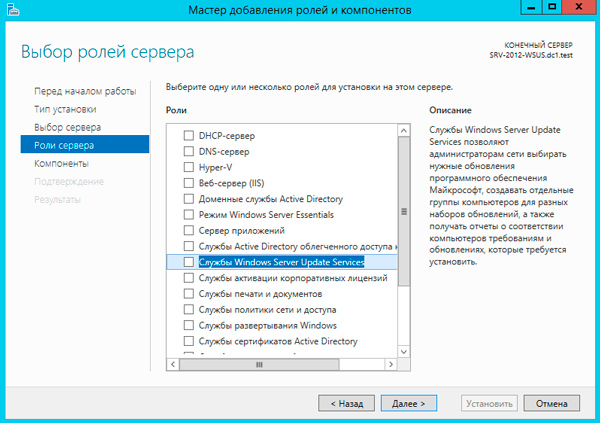
Установка роли WSUS в Windows Server
Начиная с Windows Server 2008, сервис WSUS выделен в отдельную роль, которую можно установить через консоль управления сервером или с помощью PowerShell.
Если вы развертываете новый сервер WSUS, рекомендуется сразу устанавливать его на последнем релизе Windows Server 2022 (возможна установка на Windows Serve Core).
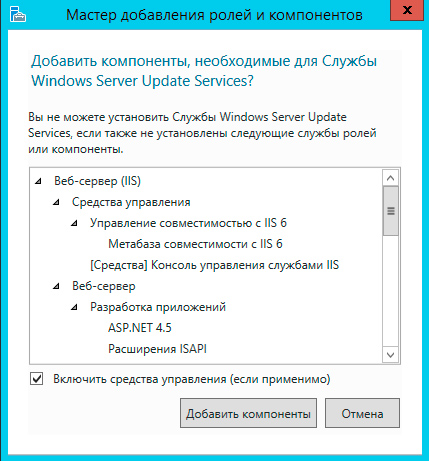
Чтобы установить WSUS, откройте консоль Server Manager и отметьте роль Windows Server Update Services (система автоматически выберет и предложит установить необходимые компоненты веб сервера IIS).

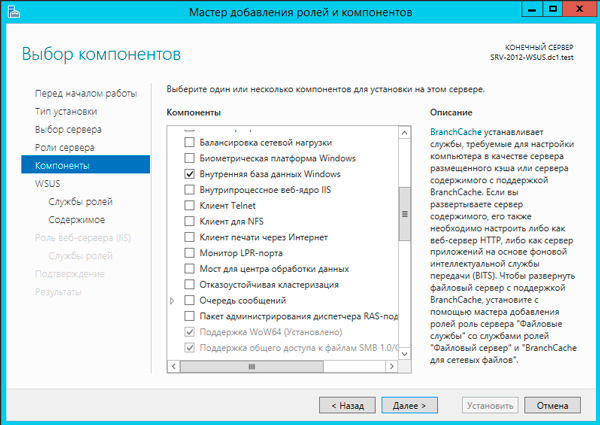
В следующем окне нужно выбрать, какие компоненты WSUS нужно установить. Обязательно отметьте опцию WSUS Services. Две следующие опции зависят от того, какую базу данных вы планируете использовать для WSUS.
Настройки сервера, метаданные обновлений, информация о клиентах WSUS хранятся в базе данных SQL Server. В качестве базы данных WSUS вы можете использовать:
- Windows Internal Database (WID) – встроенную базу данных Windows, опция WID Connectivity (это рекомендуемый и работоспособный вариант даже для больших инфраструктур);
- Отдельную базу Microsoft SQL Server, развернутую на локальном или удаленном сервере. Вы можете использовать редакции MS SQL Enterprise, Standard (требуют лицензирования) или бесплатную Express редакцию. Это опция SQL Server Connectivity.
Внутреннюю базу Windows (Windows Internal Database) рекомендуется использовать, если:
- У вас отсутствуют лицензии MS SQL Server;
- Вы не планируется использовать балансировку нагрузки на WSUS (NLB WSUS);
- При развертывании дочернего сервера WSUS (например, в филиалах). В этом случае на вторичных серверах рекомендуется использовать встроенную базу WSUS.
В бесплатной SQL Server Express Edition максимальный размер БД ограничен 10 Гб. Ограничение Windows Internal Database – 524 Гб. Например, в моей инфраструктуре размер базы данных WSUS на 3000 клиентов составил около 7Гб.
При установке роли WSUS и MS SQL Server на разных серверах есть ряд ограничений:
- SQL сервер с БД WSUS не может быть контроллером домена Active Directory;
- Сервер WSUS нельзя разворачивать на хосте с ролью Remote Desktop Services.
База WID по умолчанию называется SUSDB.mdf и хранится в каталоге windir%\wid\data\. Эта база поддерживает только Windows аутентификацию (но не SQL). Инстанс внутренней (WID) базы данных для WSUS называется server_name\Microsoft##WID.
Базу WID можно администрировать через SQL Server Management Studio (SSMS), если указать в строке подключения
\\.\pipe\MICROSOFT##WID\tsql\query
.
Если вы хотите хранить файлы обновлений локально на сервере WSUS, включите опцию Store updates in the following locations и укажите путь к каталогу. Это может быть папка на локальном диске (рекомендуется использовать отдельный физический или логический том), или сетевой каталог (UNC путь). Обновления скачиваются в указанный каталог только после их одобрения администратором WSUS.
Размер базы данных WSUS сильно зависит от количества продуктов и версий ОС Windows, которое вы планируете обновлять. В большой организации размер файлов обновлений на WSUS сервере может достигать сотни Гб.
Если у вас недостаточно места на дисках для хранения файлов обновлений, отключите эту опцию. В этом случае клиенты WSUS будут получать одобренный файлы обновлений из Интернета (вполне рабочий вариант для небольших сетей).

Также вы можете установить сервер WSUS с внутренней базой данный WID с помощью PowerShell командлета Install-WindowsFeature:
Install-WindowsFeature -Name UpdateServices, UpdateServices-WidDB, UpdateServices-Services, UpdateServices-RSAT, UpdateServices-API, UpdateServices-UI –IncludeManagementTools
Начальная настройка сервера обновлений WSUS в Windows Server
После окончания установки роли WSUS вам нужно выполнить его первоначальную настройку. Откройте Server Manager и выберите Post-Deployment Configuration -> Launch Post-Installation tasks.

Для управления WSUS из командной строки можно использовать консольную утилиту
WsusUtil.exe
. Например, чтобы указать путь к каталогу с файлами обновлений WSUS, выполните:
CD "C:\Program Files\Update Services\Tools"
WsusUtil.exe PostInstall CONTENT_DIR=E:\WSUS
Или, например, вы можете перенастроить ваш WSUS на внешнюю базу данных SQL Server:
wsusutil.exe postinstall SQL_INSTANCE_NAME="SQLSRV1\SQLINSTANCEWSUS" CONTENT_DIR=E:\WSUS_Content
Затем откройте консоль Windows Server Update Services. Запустится мастер первоначальной настройки сервера обновлений WSUS.
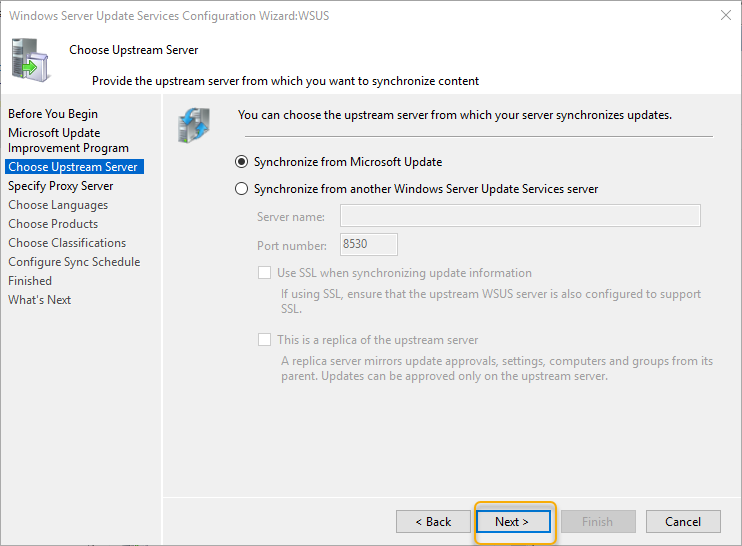
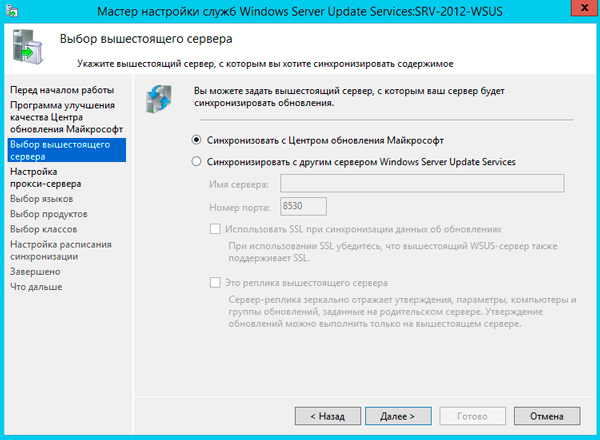
Укажите, будет ли сервер WSUS скачивать обновления с сайта Microsoft Update напрямую (Synchronize from Microsoft Update) или он должен получать их с вышестоящего WSUS сервера (Synchronize from another Windows Update Services server). Дочерние WSUS сервера обычно развертываются на удаленных площадках с большим количеством клиентов (300+) для снижения нагрузки на WAN канал.

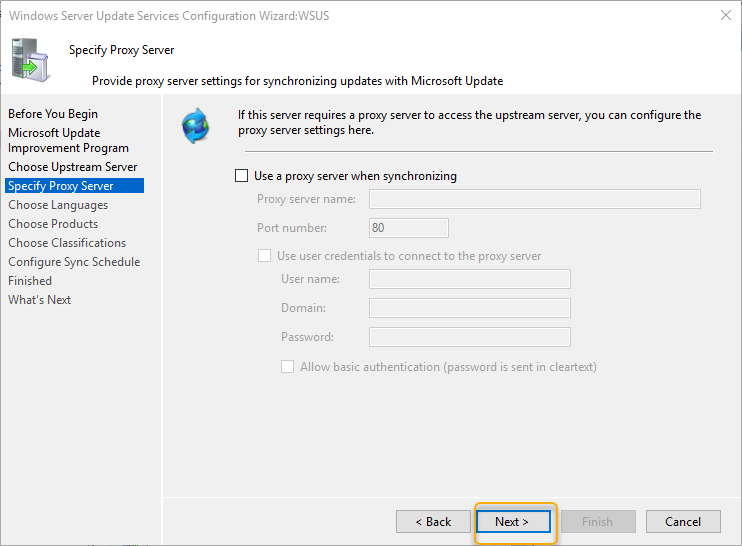
Если в вашей сети используется прокси-сервер для доступа в Интернет, далее нужно указать адрес и порт прокси сервера, и логин/пароль для аутентификации.

Проверьте подключение к вышестоящему серверу обновлений (или Windows Update). Нажмите кнопку Start Connecting.

Выберите языки продуктов, для которых WSUS будет получать обновления. Мы укажем English и Russian (список языков может быть в дальнейшем изменен из консоли WSUS).

Затем выберите продукты, для которых WSUS должен скачивать обновления. Выберите только те продукты Microsoft, которые используются в Вашей корпоративной сети. Например, если вы уверены, что в вашей сети не осталось компьютеров с Windows 7 или Windows 8, не выбирайте эти опции.
Обязательно включите в классификации следующие общие разделы:
- Developer Tools, Runtimes, and Redistributable — для обновления библиотек Visual C++ Runtime
- Windows Dictionary Updates в категории Windows
- Windows Server Manager – Windows Server Update Services (WSUS) Dynamic Installer

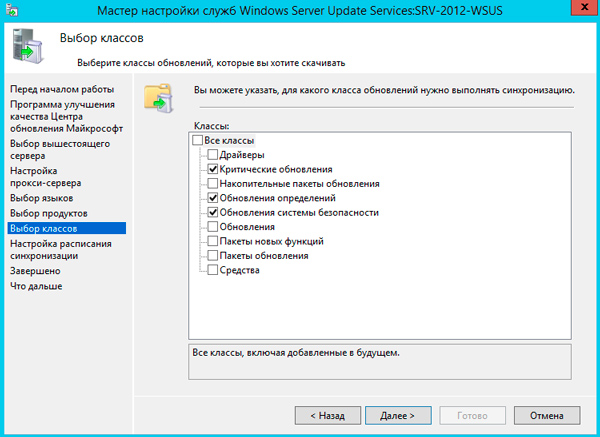
На странице Classification Page, нужно указать типы обновлений, которые будут распространяться через WSUS. Рекомендуется обязательно указать: Critical Updates, Definition Updates, Security Packs, Service Packs, Update Rollups, Updates.
Обновления редакций (билдов) Windows 10 (21H2, 20H2, 1909 и т.д.) в консоли WSUS входят в класс Upgrades.
Настройте расписание синхронизации обновлений. В большинстве случаев рекомендуется использовать автоматическую ежедневную синхронизацию сервера WSUS с серверами обновлений Microsoft Update. Рекомендуется выполнять синхронизацию в ночные часы, чтобы не загружать канал Интернет в рабочее время.

Первоначальная синхронизация сервера WSUS с вышестоящим сервером обновлений может занять несколько дней (в зависимости от количества продуктов, которое вы выбрали ранее).
После окончания работы мастера запустится консоль WSUS.

Консоль WSUS состоит из нескольких разделов:
- Updates – обновления, доступные на сервере WSUS (здесь можно управлять одобрением обновлений и назначать их для установки)
- Computers – здесь можно создать группы клиентов WSUS (компьютеры и серверы)
- Downstream Servers – позволяет настроить, будете ли вы получать из обновления Windows Update или вышестоящего сервера WSUS
- Syncronizations –расписание синхронизации обновлений
- Reports – отчёты WSUS
- Options – настройка сервера WSUS
Клиенты теперь могут получать обновления, подключившись к WSUS серверу по порту 8530 (в Windows Server 2003 и 2008 по умолчанию использоваться 80 порт). Проверьте, что этот порт открыт на сервере обновлений:
Test-NetConnection -ComputerName wsussrv1 -Port 8530
Можно использовать защищенное SSL подключение по порту 8531. Для этого нужно привязать сертификат в IIS.
Если порт закрыт, создайте соответствующее правило в Windows Defender Firewall.
Установка консоли администрирования WSUS в Windows 10/11
Для администрирования сервера обновления WSUS используется консоль Windows Server Update Services (
wsus.msc
). Вы можете управлять серверов WSUS как с помощью локальной консоли, так и по сети с удаленного компьютера.
Консоль администрирования WSUS для десктопных компьютеров с Windows 10 или 11 входит в состав RSAT. Для установки компонента Rsat.WSUS.Tool, выполните следующую PowerShell команду:
Add-WindowsCapability -Online -Name Rsat.WSUS.Tools~~~~0.0.1.0
Если вы хотите установить консоль WSUS в Windows Server, выполните команду:
Install-WindowsFeature -Name UpdateServices-Ui
При установке WSUS в Windows Server создаются две дополнительные локальные группы. Вы можете использовать их для предоставления доступа пользователям к консоли управления WSUS.
- WSUS Administrators
- WSUS Reporters
Для просмотра отчетов по установленным обновлениям и клиентам на WSUS нужно установить:
- Microsoft System CLR Types для SQL Server 2012 (SQLSysClrTypes.msi);
- Microsoft Report Viewer 2012 Runtime (ReportViewer.msi).
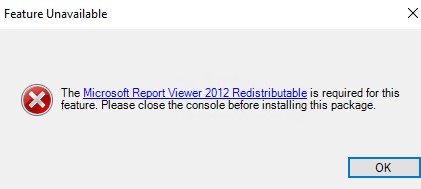
Если компоненты не установлен, при формировании любого отчета WSUS появится ошибка:
The Microsoft Report Viewer 2012 Redistributable is required for this feature. Please close the console before installing this package.
Оптимизация производительности WSUS
В этом разделе опишем несколько советов, касающихся оптимизации производительности сервера обновлений WSUS в реальных условиях.
- Для нормальной работы WSUS на сервере обновлений нужно должно быть свободным минимум 4 Гб RAM и 2CPU;
- При большом количестве клиентов WSUS (более 1500) вы можете столкнутся с существенным снижением производительность пула IIS WsusPoll, который раздает обновления клиентам. Может появляться ошибка 0x80244022 на клиентах, или при запуске консоль WSUS падать с ошибкой Error: Unexpected Error + Event ID 7053 в Event Viewer (The WSUS administration console has encountered an unexpected error. This may be a transient error; try restarting the administration console. If this error persists). Для решения проблемы нужно добавить RAM на сервер и оптимизировать настройки пула IIS в соответствии с рекомендациями в статье. Воспользуетесь такими командами:
Import-Module WebAdministration
Set-ItemProperty -Path IIS:\AppPools\WsusPool -Name queueLength -Value 2500
Set-ItemProperty -Path IIS:\AppPools\WsusPool -Name cpu.resetInterval -Value "00.00:15:00"
Set-ItemProperty -Path IIS:\AppPools\WsusPool -Name recycling.periodicRestart.privateMemory -Value 0
Set-ItemProperty -Path IIS:\AppPools\WsusPool -Name failure.loadBalancerCapabilities -Value "TcpLevel" - Включите автоматическое одобрения для обновлений антивируса Microsoft В противном случае WSUS станет существенно тормозить и потреблять всю доступную оперативную память.
Антивирусные проверки могут негативно влиять на производительность WSUS. Во встроенном Microsoft Defender антивирусе в Windows Server рекомендуется исключить следующие папки из области проверки:
- \WSUS\WSUSContent;
- %windir%\wid\data;
- \SoftwareDistribution\Download.
In this post I will cover the steps to install and configure WSUS (Windows Server Update Services) on Windows Server 2019. This guide should help you if you decide to install and configure WSUS from scratch.
In the past I have published several posts on WSUS. That includes installing WSUS and configuring WSUS. In addition to that I also published a post on WSUS troubleshooting. Since then I have been using Configuration Manager and never bothered to focus on WSUS.
Few days ago a colleague on mine contacted me and asked if I can publish a post on setting up WSUS on Windows Server 2019. The company where he works uses only WSUS to deploy the updates to computers. So he was looking for a guide that can help him setup and configure WSUS from scratch.

So I decided to publish this guide that is exclusively for admins who wish to install and configure WSUS to manage updates in their setup. I will also cover some WSUS basics which answers basic questions and the importance of WSUS.
It been quite a long time that I have actually configured anything in WSUS. That’s because the moment you start using SCCM to deploy updates, you forget about the WSUS console.
I have chosen Windows Server 2019 to install and configure WSUS. After Server 2012 R2 I believe Server 2019 is a stable release. I hate Windows Server 2016 because I have spent lot of time in troubleshooting windows update issues. For me the most important complain is that updates just don’t install properly on Server 2016.
Table of Contents
What are Windows Updates
Let’s start with some basics. When you install an operating system or image a machine, you always ensure it is patched with latest updates. Not just operating system but almost every software that we use needs to be constantly updated.
Windows updates are released to fix bugs, fix security issues in OS and to add new features to operating system. The Windows Updates rely on Windows Update service which is set to start automatically by default.
Windows Update service downloads and installs recommended and important updates automatically.
Microsoft updates can be classified into following categories :-
- Critical Updates
- Security Updates
- Definition Updates
- Drivers
- Update Rollups
- Service Packs
- Tools
- Feature Packs
- Updates
If you have migrated from Windows 7 to Windows 10, you will notice lot of new options under Windows Update. You get some cool options such as pause the updates for 7 days, change active hours for installing updates. In addition to that there are many useful options under Advanced Options. When you get time, go ahead and explore all of them.
Introduction to Windows Server Update Services
Windows Server Update Services (WSUS) enables the administrators to deploy the latest Microsoft product updates. WSUS is a Windows Server server role and when you install it, you can efficiently manage and deploy the updates.
One of the most important task of system administrators is to keep client and server computers updated with the latest software patches and security updates. Without WSUS it would be really hard to manage the updates deployment.
When you have a single WSUS server in your setup, the updates are downloaded directly from Microsoft Update. However if you install multiple WSUS server, you can configure WSUS server to act as an update source which is also known as an upstream server.
Rather than letting multiple computers download updates directly from internet, you can setup WSUS server and point the clients to download all the updates from a WSUS server. With this you save your Internet bandwidth and also speed up the Windows update process.
I can talk a lot about WSUS but let’s get started with installing WSUS.
WSUS Lab Setup
First of all let me cover about WSUS lab setup. I believe the best way to master WSUS is to install and configure it in your test or lab setup first. You can then start working on it and try several things.
I have created some virtual machines in my lab. Let me give you a list of machines and the OS info.
| Server Name | Operating System | Roles |
| CORPAD.PRAJWAL.LOCAL | Windows Server 2019 Datacenter | Active Directory, DNS, DHCP |
| CORPWSUS.PRAJWAL.LOCAL | Windows Server 2019 Datacenter | WSUS |
| CORPWIN10ENT.PRAJWAL.LOCAL | Windows 10 Enterprise | None |
| CORPWIN10PRO.PRAJWAL.LOCAL | Windows 10 Pro | None |
And if I had to show my setup in the form of a network diagram, this is how it’s going to look.

WSUS System Requirements
When you have decided to implement WSUS in your setup, you must first look into WSUS requirements. To plan your WSUS deployment I recommend reading this article from Microsoft. It covers all the information required to WSUS requirements, deployment scenarios, performance considerations etc.
This post covers the procedure to install Windows Server Update Services using Windows Internal Database (WID).
WSUS Firewall Ports / Exceptions
When you set up WSUS server, it is important that the server connects to Microsoft update to download updates. If there is a corporate firewall between WSUS and the Internet, you might have to configure that firewall to ensure WSUS can obtain updates.
To obtain updates from Microsoft Update, the WSUS server uses port 443 for HTTPS protocol. You must allow Internet access from WSUS to the following list of URLs :-
- http://windowsupdate.microsoft.com
- http://*.windowsupdate.microsoft.com
- https://*.windowsupdate.microsoft.com
- http://*.update.microsoft.com
- https://*.update.microsoft.com
- http://*.windowsupdate.com
- http://download.windowsupdate.com
- https://download.microsoft.com
- http://*.download.windowsupdate.com
- http://wustat.windows.com
- http://ntservicepack.microsoft.com
- http://go.microsoft.com
- http://dl.delivery.mp.microsoft.com
- https://dl.delivery.mp.microsoft.com
Install WSUS Role on Windows Server 2019
The steps to install Windows Server Update Services (WSUS) Role on Windows Server 2019 include :-
- Log on to the Windows 2019 server on which you plan to install the WSUS server role using an account that is a member of the Local Administrators group.
- In Server Manager, click Manage and click add Roles and Features.
- On the Before you begin page, click Next.
- In the select installation type page, select Role-based or feature-based installation option. Click Next.

On the Server Selection page, verify the server name and click Next.

Server Roles – Windows Server Update Services
On the Server roles page, select the role “Windows Server Update Services“. You should see Add features that are required for Windows Server Update Services box. Click Add Features, and then click Next.

On the Select features page, leave the options to default and click Next.

On the Windows Server Update Services page, click Next.

WSUS Database Type – Role Services
You must select role services / Database type to install for Windows Server Update services. Select WID Connectivity and WSUS Services. Click Next.

WSUS Content Location
Specify a content location to store the updates. I would recommend storing the updates on another drive and not on your C: drive. The size of this folder can grow eventually and you don’t want this folder to reside on C: drive. Hence choose either a separate drive or store the updates on remote server.
Click Next.

On the Web Server Role (IIS) page, click Next.

The role services to install web server (IIS) are select automatically. Do not change anything here and click Next.

A final confirmation before you install WSUS. Review the settings and click Install.

Once WSUS installation is complete, click Launch Post-Installation tasks.

Wait for the message Configuration successfully completed. Click Close.

Configure Windows Server Update Services (WSUS)
After you install WSUS, you can configure the WSUS server using WSUS Server configuration wizard. This is a one time configuration where you will configure some important WSUS options.
If you don’t see a WSUS Server configuration wizard or if you have skipped it by mistake, don’t worry. You can launch it by opening the WSUS Console > Options > WSUS Server Configuration wizard.
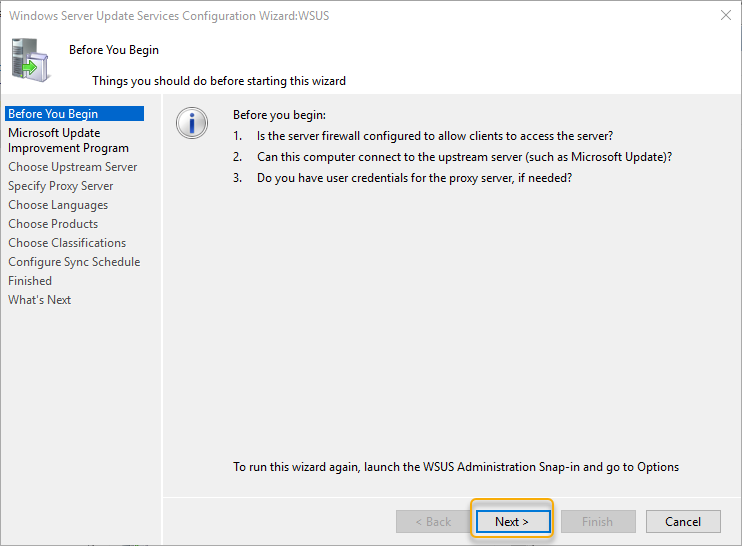
Note – Before you start to configure WSUS, some important points.
- Ensure the server firewall allows the clients to access the WSUS server. If the clients have issues connecting to WSUS server, updates won’t be downloaded from server.
- The WSUS downloads the updates from upstream server which is Microsoft update in our case. So ensure the firewall allows the WSUS server to connect to Microsoft Update.
- In case there is a proxy server in your setup, you must enter the credentials for proxy server while configuring WSUS. Have them handy as they are required.
On the Before you begin page, click Next.

Click Next.

Choose WSUS Upstream Server
This is an important section where you select the upstream server. You get two options.
- Synchronize from Microsoft Update – Selecting this option will download the updates from Microsoft update.
- Synchronize from another Windows Server Update Services server – Select this option if you want this WSUS server to download updates from already existing WSUS server. You must specify the server name and port number (8530) by default. If you are selecting the option to use SSL during updates synchronization, ensure that upstream WSUS server is also configured to support SSL.
Since this will be my only WSUS server, I will select Synchronize from Microsoft Update. Click Next.

Proxy Server
Specify Proxy server information if you have got one. If this option is selected, ensure you specify proxy server name and port number. In addition to that specify the credentials to connect to the proxy server. If you want to enable basic authentication for the user connecting to the proxy server, click Allow basic authentication (password in clear text).
Click Next.

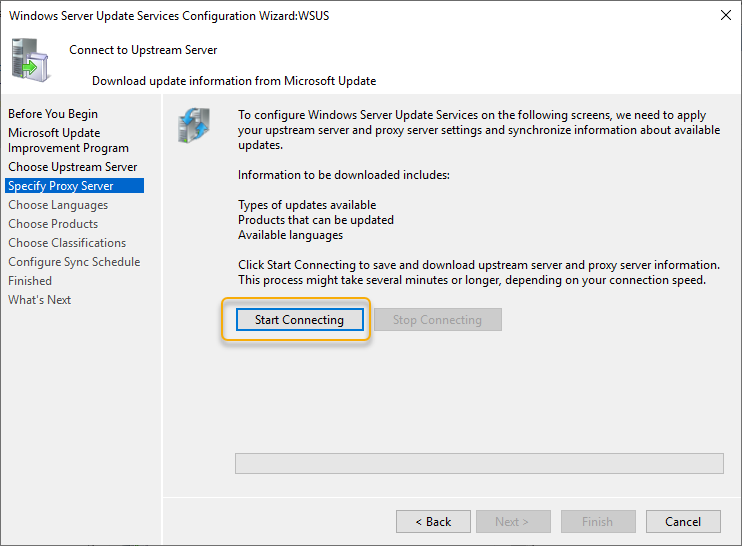
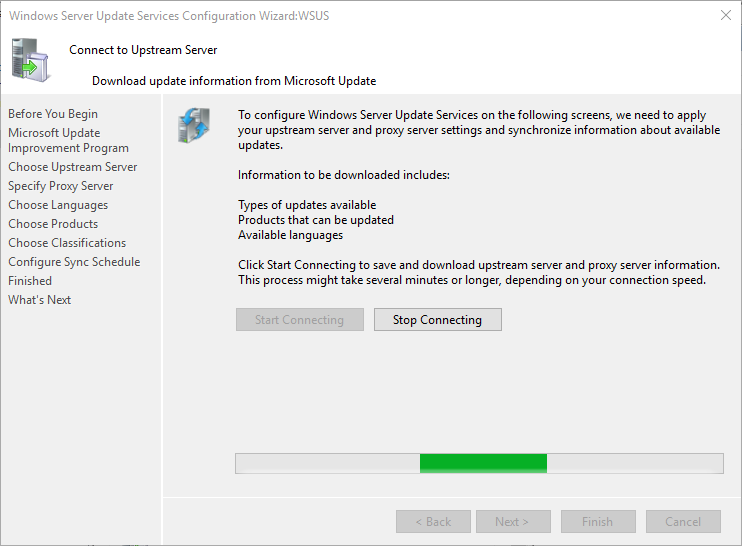
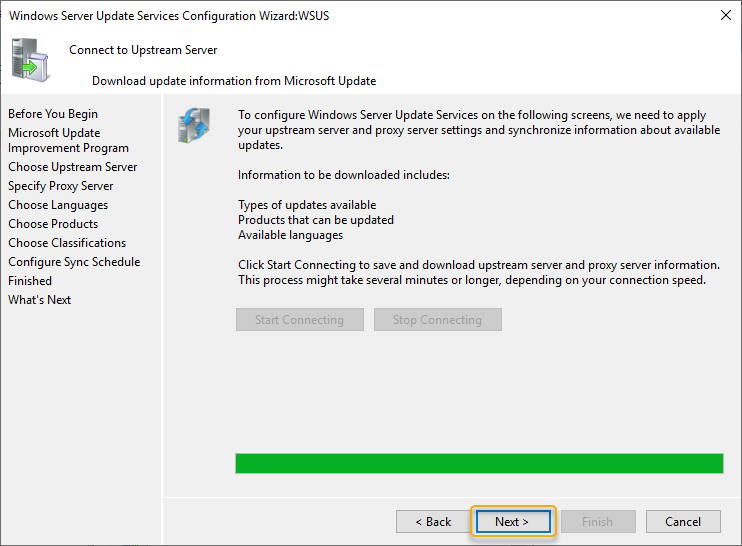
On the Connect to Upstream Server page, click Start Connecting button.

Once it is complete, click Next.

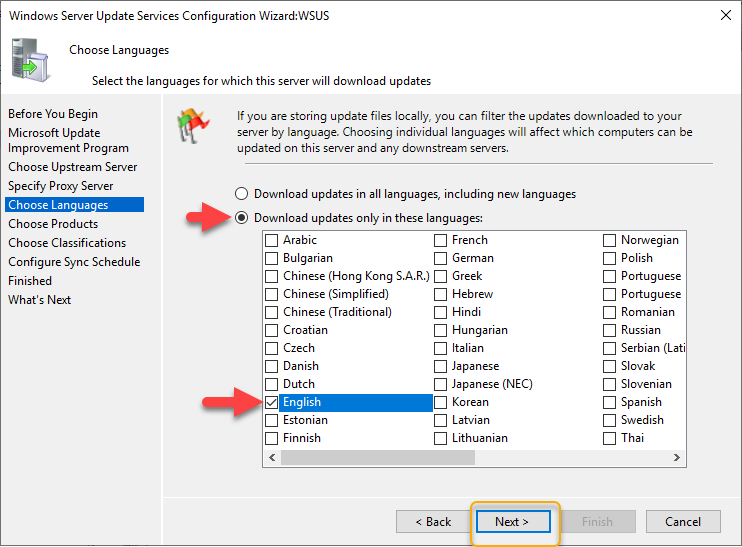
Choose Languages for Updates
On the Choose Languages page, you have the option to select the languages from updates. If you choose to download updates in all languages, you would find updates with all languages in the WSUS console.
However if you choose to get updates only for specific languages, select Download updates only in these languages. Select the languages for which you want updates.
Click Next.

Choose Products
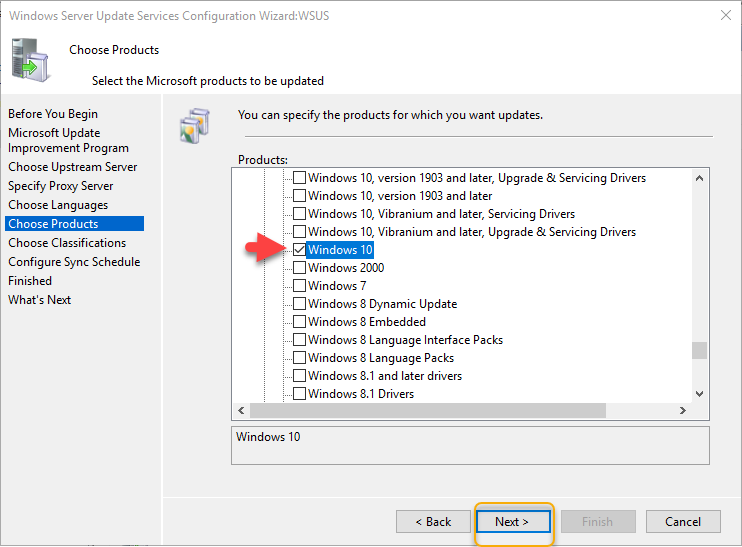
This is the page where you select the products for which you want the updates. A product is a specific edition of an operating system or application.
From the list of products you can select individual products or product families for which you want your server to synchronize updates. In this case I am going to select Windows Server 2019 and Windows 10 1903 as products.
Click Next.

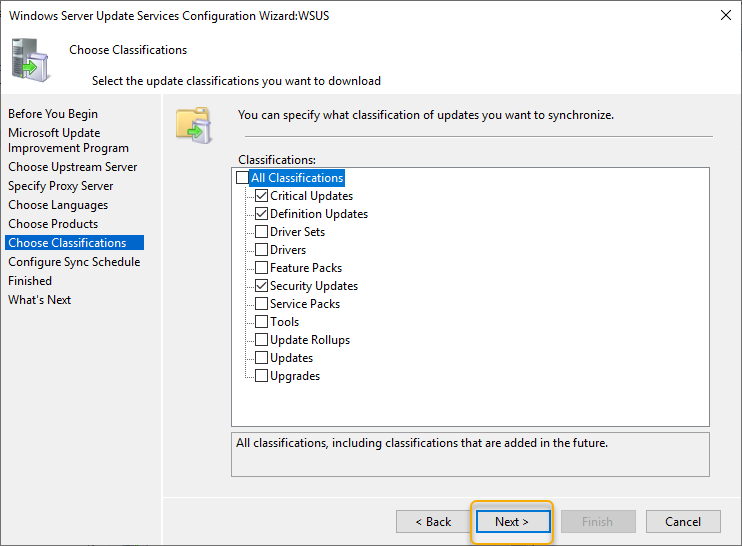
Choose Update Classifications
In the beginning of the post I have listed the types of updates. On the Choose Classifications page, select the required classifications. I have selected Critical Updates, Security Updates and Update Rollups.
Click Next.

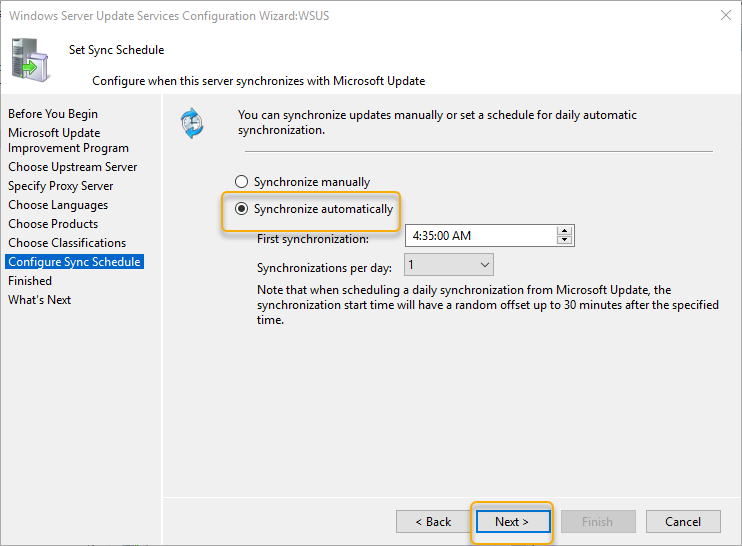
Configure WSUS Synchronization Schedule
You must decide on how do you want to perform WSUS sync. The Set Sync Schedule page lets you select whether to perform synchronization manually or automatically.
If you choose Synchronize manually, you must manually start the synchronization process from the WSUS Administration Console. With this option selected, you have to manually perform the sync every time. Therefore do not select this option if you are setting up the WSUS in production.
If you choose Synchronize automatically, the WSUS server will synchronize at set intervals. You can set the time of First synchronization. Then set the number of synchronizations per day. From the drop-down you can choose the value between 1-24.
Click Next.

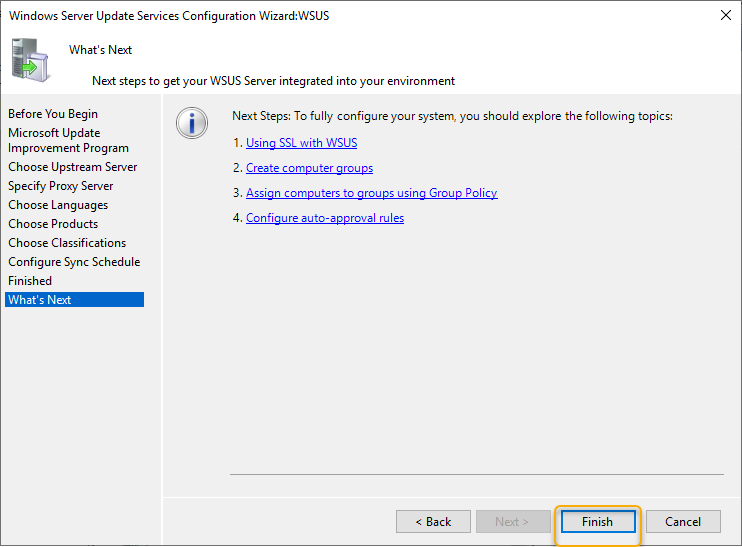
Click Begin initial synchronization. Click Next.

Finally on the last page, click Finish. This completes the steps to configure WSUS.

Configure Group Policy Settings for WSUS
After you install and configure WSUS, the next important task is to configure group policy settings for automatic updates. The new clients still don’t know about the new WSUS server that you just setup. Using group policy you can point your client machines to new WSUS server.
In an active directory environment, you can use Group Policy specify the WSUS server. The group policy settings will be used to obtain automatic updates from Windows Server Update Services (WSUS).
You can create the group policy and apply it at domain level. Or you can create and apply the GPO to a specific OU (containing your computers).
While there are many Windows Update policy settings, I am going to configure few of them. For a list of all windows update policy settings, read this article from Microsoft.
Configure Automatic Updates WSUS
To configure Automatic Updates group policy settings for WSUS
- Open the Group Policy Management console, and open an existing GPO or create a new one.
- Navigate to Computer Configuration > Policies > Administrative Templates > Windows Components > Windows Update.
- Double-click Configure Automatic Updates and set it to Enabled.
Under Configure automatic updating, select the desired option. Under Schedule install day, select the day when you want the updates to be installed. Set the scheduled install time.

In case you select Auto download and schedule the updates install, you get some options to limit updating frequency. If you have configured the settings, click Apply and OK.

Specify Intranet Microsoft Update Service Location
The next setting that you should configure is specify an intranet Microsoft update service location. The idea behind this is to ensure the client computers contact the specified intranet server instead of downloading updates from internet. Unless you configure this policy setting, the client computers wouldn’t know about the intranet server.
To enable the policy, click Enabled. Specify the intranet update service and intranet statistics server. Click Apply and OK.

On the client computer, check the resultant set of policy to confirm if the WSUS GPO is applied.

You can also verify the intranet update service location on client computers using registry. On the client computer, open Registry Editor and go to HKLM\SOFTWARE\Policies\Microsoft\Windows\WindowsUpdate.
Check the values of WUServer and WUStatusServer and confirm if the values match the one that you supplied in WSUS GPO.

Configure WSUS computer groups
By creating computer groups you can first test and target updates to specific computers. When you open WSUS console, you will find two default computer groups – All computers and Unassigned computers.
You can create custom computer groups to manage updates in your organization. As per Microsoft you must create at least one computer group in the WSUS console. Test updates before you deploy them to other computers in your organization.
To create a new computer group in WSUS console
In the WSUS Administration Console, under Update Services, expand the WSUS server. Expand computers, right-click All computers, and then click Add computer Group.
In the add computer Group dialog box, specify the name of the new group, and then click Add.

Click All Computers and you should see list of computers. Select the computers, right click and click Change Membership.

On the Set Computer Group Membership box, select the new group that you just created. Click OK.

Click the new group and you should find those computers.

Approve and Deploy Updates in WSUS
Once you have a test computer group created, your next task to deploy the updates to the test group. To do so you must first approve and deploy WSUS updates.
To approve the updates in WSUS
- Launch the WSUS Administration Console, click Updates > All Updates.
- In the All Updates section, select the updates that you want to approve for installation in your test computer group.
- Right-click the updates and click Approve.

Most of all in the Approve Updates dialog box, select your test group, and then click down arrow. Click Approved for Install. You an also set a deadline to install the updates. Click OK.

The Approval Progress window appears, which shows the progress of the tasks that affect update approval. When the approval process is complete, click Close.

Configure Auto Approval Rules in WSUS
If you don’t want to manually approve the updates you can configure auto approval rule in Windows Server Update Services.
To configure Automatic Approvals in WSUS
- Launch WSUS Administration Console, expand the WSUS server, and then click Options.
- In Options, click Automatic Approvals.
- You should find the default automatic approval rule and if you wish you can edit it and use it.
- To create a new approval rule, click New Rule.

Check the box When an update is in a specific classification. Select the classifications. You can also approve the update for computers groups. I am going to select Windows 10 as that is my test computer group. Finally you can set a deadline for the update approval and specify auto approval rule name.
After you configure the rule, click OK.

On the Automatic Approvals window, you can find the rule that you just created. If you wish to run this rule, click Run Rule.

WSUS Reports
The last section that I want to cover is the WSUS reports. Clicking Reports in the WSUS console shows the list of reports. WSUS comes with several reports to help you find the updates deployment status, sync reports and computers reports.
- Update Reports – Includes Updates status summary, detailed and tabular status, tabular status for Approved Updates.
- Computer Reports – Computer Status Summary, Detailed Status, Tabular Status and Computer tabular Status for approved updates.
- Synchronization Reports – Shows the results of last synchronization.

This completes the steps to install and configure WSUS. I am sure this guide will help you to setup WSUS in your lab setup. If you have any questions related to WSUS, do let me know in comments section.
Still Need Help?
If you need further assistance on the above article or want to discuss other technical issues, check out some of these options.
Тема настройки локального сервера обновлений (WSUS) уже поднималась на нашем сайте, но так как с тех пор прошло довольно много времени и произошли довольно серьезные изменения, то назрела необходимость обновить статью. Сегодня мы расскажем о настройке роли WSUS на платформе Windows Server 2012, данный процесс во многом стал проще и легче, а службы WSUS теперь полноценно интегрированы в систему.
Онлайн-курс по устройству компьютерных сетей
На углубленном курсе «Архитектура современных компьютерных сетей» вы с нуля научитесь работать с Wireshark и «под микроскопом» изучите работу сетевых протоколов. На протяжении курса надо будет выполнить более пятидесяти лабораторных работ в Wireshark.
Наш предыдущий материал рассматривал установку WSUS на платформе Windows Server 2008, тогда это была довольно непростая задача для неподготовленного администратора. Требовалось установить дополнительные пакеты, специальным образом настроить веб-сервер, да и сами службы WSUS устанавливались как отдельное приложение.
Начиная с Windows Server 2008 R2, WSUS был включен в состав ОС в качестве одной из ролей, поэтому, несмотря на то, что мы будем рассматривать платформу Windows Server 2012 R2, все сказанное, за незначительными поправками, будет справедливо и для Server 2008 R2.
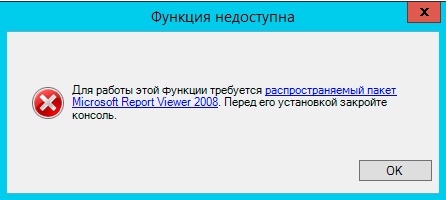
Из сторонних пакетов потребуется установить только Microsoft Report Viewer 2008 SP1 Redistributable, однако он не является обязательным и на работу службы не влияет, а требуется только для формирования отчетов. Поэтому даже если вы забудете его установить — ничего страшного не произойдет, при первом обращении к отчетам система сообщит вам об этом и даст ссылку на скачивание.
Важно! Существует ряд ограничений на установку служб ролей WSUS. Сервер БД WSUS не может быть контроллером домена, Сервер WSUS не может быть одновременно сервером терминалов Remote Desktop Services.
Для установки WSUS откроем Диспетчер серверов и перейдем в Управление — Добавить роли и компоненты. В открывшемся мастере добавляем роль Службы Windows Server Update Services.
Следующим шагом будут добавлены все необходимые роли и компоненты, таким образом больше ничего настраивать отдельно не придется.
В качестве хранилища по умолчанию WSUS предлагает использовать внутреннюю базу данных Windows (Windows Internal Database, WID). Для небольших внедрений мы не видим смысла в установке отдельного SQL-сервера, никаких существенных преимуществ это не даст.
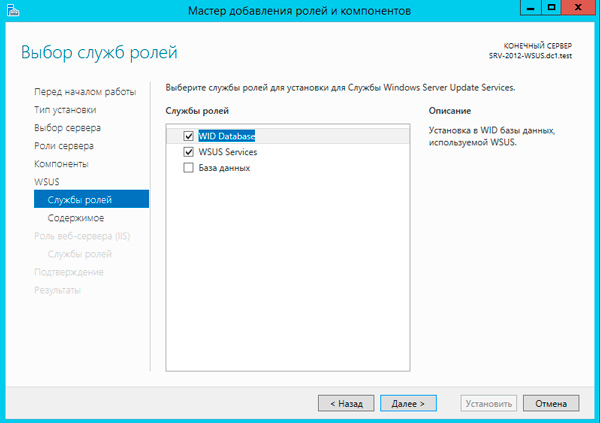
Следующим шагом переходим к базовым настройкам служб роли. В нашем случае потребуется выбрать опции WID Database и WSUS Services, если вы собираетесь использовать SQL-сервер, то вместо WID Database следует выбрать опцию База данных. Сам сервер баз данных к этому моменту уже должен быть развернут в вашей сети.
Следующим шагом укажите размещение хранилища обновлений, рекомендуем выделить для этих целей отдельный жесткий диск или раздел диска.
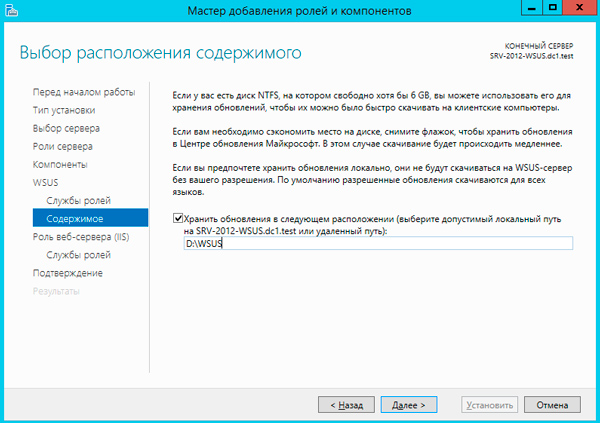
Также возможен вариант, когда на сервере WSUS будет храниться только информация об обновлениях, сами пакеты обновлений будут, после их одобрения и назначения администратором, скачиваться с серверов Microsoft. На наш взгляд такая схема будет удобна небольшим компаниям с хорошим интернет каналом, действительно, ради десятка машин организовывать локальное хранилище большого смысла не имеет, особенно если WSUS не единственная роль данного сервера.
Для приблизительной оценки требуемого места приведем данные с одной реальной инсталляции, произведенной летом 2012 года. На текущий момент выбраны следующие продукты: все клиентские ОС от Windows XP до Windows 8.1, кроме Vista, все серверные ОС от Server 2003 до Server 2012 R2, Office 2010, Exchange 2010, SQL Server 2008 — 2012, а также ряд дополнительных продуктов из разряда Распространяемых пакетов Visual C++ и т.п.
Размер обновлений в хранилище на текущий момент (два года после установки) — 173 ГБ, размер SQL базы данных — около 10 ГБ.
Если вы выбрали внешнюю базу данных, то также потребуется указать параметры подключения к SQL серверу. После чего можно переходить к установке роли, перезагрузка не требуется. После установки нажмите на флажок с желтым восклицательным знаком в Диспетчере серверов и щелкните Запуск послеустановочных задач, дождитесь окончания процедуры (восклицательный знак исчезнет).

На этом установку роли можно считать законченной и переходит к настройке службы WSUS, мы подробно освещали этот процесс в предыдущей статье и не видим смысла заострять на этом внимание.
Если коротко, то сначала нужно выбрать источник синхронизации: сервера Microsoft или вышестоящий WSUS сервер.
Затем выбрать языки и продукты.

Указать классы обновлений.
И задать параметры автоматической синхронизации.

Процесс первоначальной синхронизации может занять продолжительное время, зависящее от выбранного набора продуктов и классов, а также скорости вашего интернет канала.
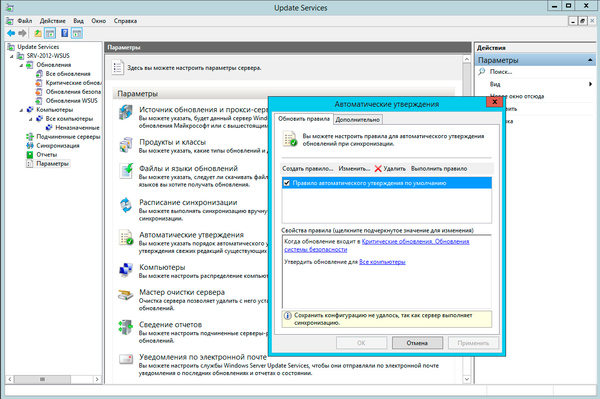
Не забудьте указать правила автоматического одобрения и одобрить уже скачанные обновления.
После чего потребуется сообщить клиентам расположение вашего WSUS сервера, это можно сделать через групповые политики: Конфигурация компьютера — Политики — Административные шаблоны — Центр обновления Windows — Указать размещение службы обновлений Microsoft в интрасети.
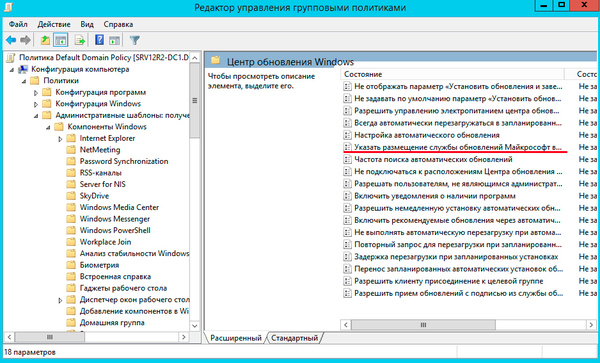
Или в локальных политиках: Пуск — Выполнить — gpedit.msc, затем Конфигурация компьютера — Административные шаблоны — Центр обновления Windows (Windows Update)- Указать размещение службы обновлений Microsoft в интрасети.
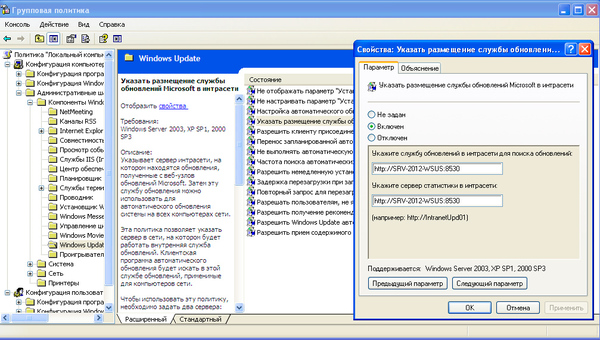
Путь к серверу следует прописывать как http://SERVER_NAME:8530, при этом рекомендуем явно указывать порт службы. Через некоторое время компьютеры начнут получать обновления и появятся в консоли сервера, где можно получить детальную информацию по уже установленным и требующимся обновлениям.

Кстати, если вы забыли установить Microsoft Report Viewer 2008 SP1 Redistributable, то при попытке вызвать отчет получите следующее сообщение, которое содержит ссылку на скачивание необходимого пакета. :
Как видим, Microsoft проделало большую работу по совершенствованию службы WSUS, теперь это одна из ролей системы и ее установка и настройка не должна вызывать затруднений даже у новичков.
Онлайн-курс по устройству компьютерных сетей
На углубленном курсе «Архитектура современных компьютерных сетей» вы с нуля научитесь работать с Wireshark и «под микроскопом» изучите работу сетевых протоколов. На протяжении курса надо будет выполнить более пятидесяти лабораторных работ в Wireshark.