
Статья успешно отправлена на почту
Последние изменения: 2024-10-29
Если после установки Windows 10 Creators Update от Microsoft у Вас не запускается Центр мобильных устройств Windows (WMDC), то можно исправить это, воспользовавшись одним из следующих способов.
Предложенные способы работают только в том случае, если ваша версия Windows поддерживает WMDC. В некоторых более новых версиях Центр мобильных устройств может отсутствовать, и тогда рекомендуем обратиться к инструкции ниже.
Как запустить WMDC, если он поддерживается Windows
Способ 1
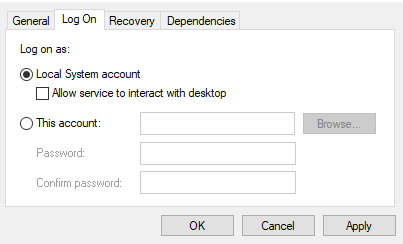
- Нажимаем «Win»+ R и вводим «services.msc». Нажимаем Enter для запуска.
- Ищем службу «Возможности подключения устройств на платформе Windows Mobile».

- Щёлкаем правой кнопкой мыши по этой службе и выбираем «Свойства».
- Переходим на вкладку «Вход в систему» и ставим флажок напротив «Вход с системной учётной записью».

- Теперь делаем то же самое с службой «Возможности подключения устройств на платформе Windows Mobile-2003».
- С помощью правой кнопки мыши перезапускаем обе службы.

Способ 2
- Запустите Редактор реестра. Для этого нажмите на клавиатуре «WIN»+ R и введите «regedit».
- В редакторе реестра перейдите по адресу «Компьютер\HKEY_LOCAL_MACHINE\SYSTEM\CurrentControlSet\Services\RapiMgr»
- Щёлкните правой кнопкой мыши по пустому месту в правой части экрана. Выберите «Создать» — «Параметр DWORD (32 бита)».
- Переименуйте создавшийся параметр в «SvcHostSplitDisable».
- Щёлкните двойным щелчком по этому параметру и укажите значение «1». У Вас должен получиться результат, как на скриншоте.

- Теперь перейдите в редакторе реестра по другому адресу «Компьютер\HKEY_LOCAL_MACHINE\SYSTEM\CurrentControlSet\Services\WcesComm».
- Создайте такой же параметр, как описано в пунктах 3-5, с таким же значением.

После того, как всё выполнено, закройте редактор реестра и перезагрузите ПК. После перезагрузки у вас, вероятно, не будет видно окна Центра Устройств Windows Mobile, но в остальном всё будет работать нормально.
Как запустить WMDC, если он не поддерживается Windows
У более актуальных версий Windows (10 и выше) WMDC может отсутствовать, и тогда потребуется добавить и запустить его вручную.
-
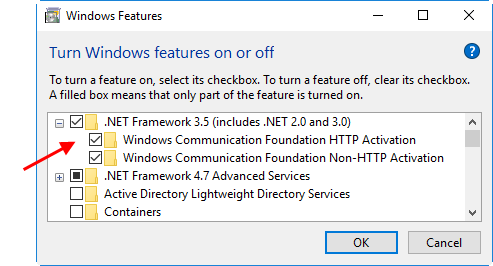
Откройте «Панель управления» → «Программы и компоненты» → «Включение или отключение компонентов Windows». Поставьте галочки на 3-х указанных пунктах и нажмите «ОК».

-
Проверяем что в панели управления, в установленных программах WMDC ОТСУТСТВУЕТ. Если он там есть — удалите и перезагрузите ПК.

-
Скачайте один из файлов, который подходит под архитектуру вашей Windows.
drvupdate-amd64.exe
drvupdate-x86.exe
-
Правая кнопка мыши по файлу → «Свойства» → «Совместимость». Проставьте галки как указано на картинке.
-
Запустите файл и установите WMDC. Если под конец установки будет ошибка про почту, Outlook и др. — пропустите.
-
Скачайте и запустите файл от имени администратора. После того как он отработает — перезагрузите ПК.
WMDC-Helper.exe
-
В командной строке от имени администратора выполните две команды. Перезагрузите компьютер.
REG ADD HKLM\SYSTEM\CurrentControlSet\Services\RapiMgr /v SvcHostSplitDisable /t REG_DWORD /d 1 /f
REG ADD HKLM\SYSTEM\CurrentControlSet\Services\WcesComm /v SvcHostSplitDisable /t REG_DWORD /d 1 /f
-
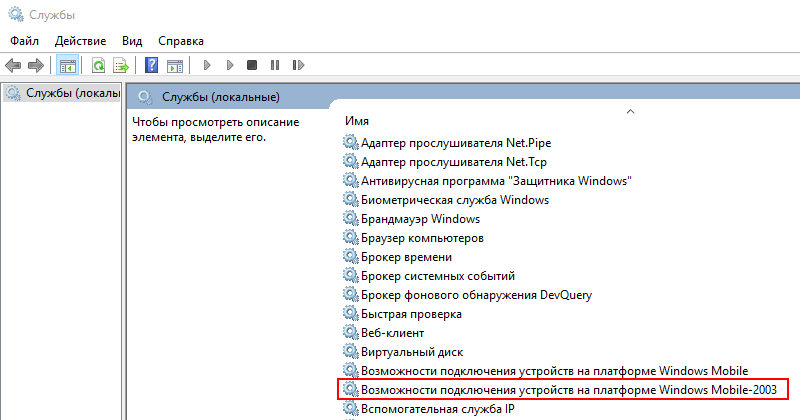
Нажмите Win+R, введите в строке «services.msc» и нажмите Enter. Откроется окно, в котором нужно найти службы, указанные на картинке ниже.

-
Для данных служб установите настройки как на скриншотах ниже.
-
Перезапустите обе службы. Можно работать!


Issue:
Windows Mobile Device Center (WMDC) will not open on Windows 10
Windows Mobile Devices will not show as Connected in WMDC when using Windows 10
Basic Troubleshooting for WMDC on Windows 10
1. Download and Install WMDC
The installer for WMDC can be downloaded from the links below:
64bit: https://dl.waspbarcode.com/kb/wmdc/wmdc-64-bit-drvupdate-amd64.exe
32bit https://dl.waspbarcode.com/kb/wmdc/wmdc-32-bit-drvupdate-x86.exe
If WMDC does not open after being installed, proceed to the next step.
2. Run WMDC_Service_Fix.bat
Download the following
https://dl.waspbarcode.com/kb/wmdc/WMDC_Service_Fix.bat
Right click the file, and choose Run as Administrator
If successful, the screen should show the following:

If your system does not allow running bat files, or if you are concerned about running bat files on your system, there are comments in the file which detail every command being executed.
You can also find instructions to manually change these settings in the following article:
https://support.waspbarcode.com/kb/articles/1568
3. Verify Connection Settings
Some mobile devices require specific connection settings to connect properly
HC1 Connection settings:
https://support.waspbarcode.com/kb/articles/1018
4. Establish the Mobile Device Connection
Open Windows Mobile Device Center
then plug in the mobile device.
It should install the drivers and, within a few minutes, start showing connecting then connected.

If the mobile device does not connect, proceed to the next step
5. Thorough Device Removal
Unplug the device from USB
Follow the steps in the Knowledge Base article below:
https://support.waspbarcode.com/kb/articles/1229
Go back to the previous step, and Establish the Mobile Device Connection
Occasionally, this step needs to be completed several times before your Mobile Device will connect.
If, after several attempts, it has not connected, proceed to:
Additional Troubleshooting for WMDC on Windows 10
Additional Troubleshooting for WMDC on Windows 10
1. Remove McAfee Live Safe
McAfee Live Safe interferes with the operation of many mobile devices
https://support.waspbarcode.com/kb/articles/1050
If you have Live Safe, or any other protection software mentioned in the above article:
Using add/remove programs, completely uninstall that software
2. Verify that .NET 3.5 has been fully installed
Open Control Panel > Programs and Features > Turn Windows features on or off.

Allow Windows to update the feature.
3. Download and run the WMDC-Helper.exe
Download WMDC-Helper.exe the from the following:
https://www.junipersys.com/support/article/12162
After it has downloaded, right-click it, and select Run as Administrator.
4. Reboot the PC (Do Not Skip this Step)
5. Warm or Cold Boot your Mobile Device
While the PC is rebooting, perform a warm or cold boot depending upon the following:
Is there is any data on the device that needs to be kept?
If there is not, then clean/cold boot the device.
If there is data that needs to be retained on the device, warm boot the device.
6. Verify Connection Settings
Some mobile devices require specific connection settings to connect properly
(If a cold/clean boot was performed these settings will need to be applied again)
HC1 Connection settings:
https://support.waspbarcode.com/kb/articles/1018
WDT60 Connection Settings:
https://support.waspbarcode.com/kb/articles/1099
(There are no specific connection settings for the WDT90 or WDT92)
7. Establish the Mobile Device Connection
Open Windows Mobile Device Center
then plug in the mobile device.
It should install the drivers and, within a few minutes, start showing connecting then connected.
If the mobile device does not connect, proceed to the next step
8. Thorough Device Removal
Unplug the device from USB
Follow the steps in the Knowledge Base article below:
https://support.waspbarcode.com/kb/articles/1229
Attempt the previous step again.
9. Update the Driver, if Necessary
In the Device Manager, Open the Other topic
If you see either RNDIS or Datalogic Serial,
Right click on that item and choose Update Driver

Browse to the following directory:
C:\Windows\Windows Mobile\
Be sure that Include Subfolders is checked and select Next
This should install the appropriate driver for your mobile device, which will now show as one of the devices listed in the previous step.
Go back and attempt to Establish the Mobile Device Connection again
Occasionally, these steps needs to be completed several times before your Mobile Device will connect.
If, after several attempts, it has not connected, proceed to:
Advanced Troubleshooting for WMDC on Windows 10
Advanced Troubleshooting for WMDC on Windows 10
This section is for more advanced users, if all of the above has failed to resolve the issue.
1. Uninstall and Reinstall .NET 3.5
If .NET errors are contributing to the failure of WMDC, you may need to uninstall and reinstall .NET 3.5
The following article details this process:
https://support.waspbarcode.com/kb/articles/1285
2. Uninstall and Reinstall WMDC
In add/remove programs, uninstall all instances of Windows Mobile Device Center and related updates.
You may need to refer to the following if it does not properly uninstall:
https://support.waspbarcode.com/kb/articles/1346
3. Verify that Microsoft Windows Remote Desktop Connection is not interfering with the WMDC connection
When using Microsoft’s Windows Remote Desktop Connection to remote into a PC, no mobile device connected to this PC will show as Connected in WMDC. This is a limitation of how Windows Remote Desktop handles USB connections.
If the you must troubleshoot the device using a remote connection, it is recommended to use other remote desktop tools to do so.
4. Verify that nothing is interfering with the WMDC connection
Sometimes, in particularly restrictive systems, there may be other components interfering with the connection.
В этой статье показаны действия, с помощью которых можно разблокировать Центр мобильности Windows в Windows 8.1, Windows 10 на настольном компьютере.
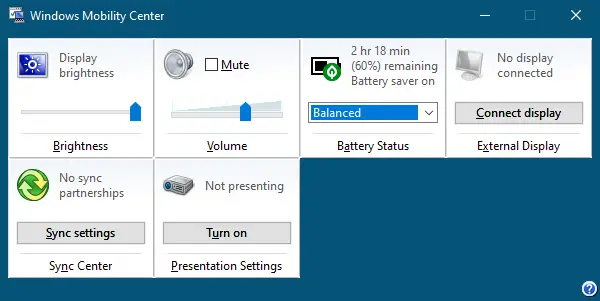
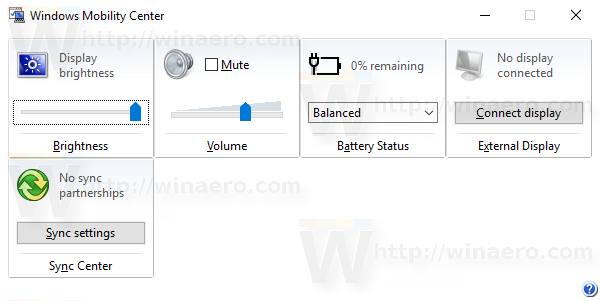
Центр мобильности Windows — одна из стандартных опций операционной системы, доступная пользователям ноутбуков и планшетов. Очень полезное приложение, позволяющее менять яркость экрана, параметры электропитания, синхронизацию автономных файлов, режим монитора в одном месте и при помощи простого и понятного интерфейса.
На обычном компьютере Центр мобильности Windows не доступен. Далее в статье показаны действия которые нужно выполнить чтобы разблокировать «Центр мобильности Windows» в Windows 8.1, Windows 10 на обычном, настольном компьютере.
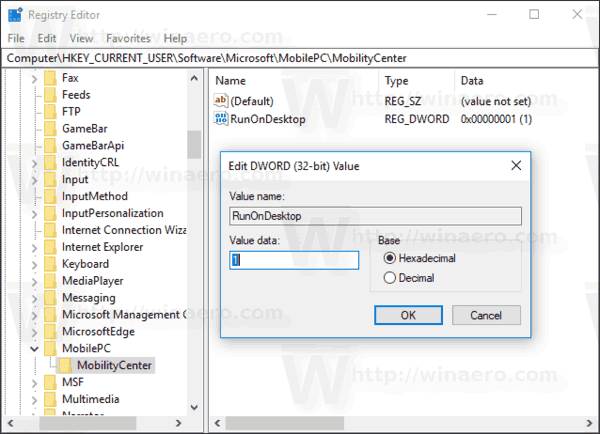
Для того чтобы разблокировать Центр мобильности Windows, создайте и примените файл реестра следующего содержания:
Windows Registry Editor Version 5.00.
[HKEY_CURRENT_USER\\Software\\Microsoft\\MobilePC\\MobilityCenter]
«RunOnDesktop»=dword:00000001
Для того чтобы вернуть все в исходное состояние и тем самым заблокировать «Центр мобильности Windows», создайте и примените файл реестра следующего содержания:
Windows Registry Editor Version 5.00.
[-HKEY_CURRENT_USER\\Software\\Microsoft\\MobilePC]
Вы также можете скачать архив MobilityCenter_On_Off.zip в котором содержатся два файла реестра:
- MobilityCenterOn.reg — файл реестра для разблокировки Центра мобильности Windows
- MobilityCenterOff.reg — файл реестра для блокировки Центра мобильности Windows
Скачайте архив, распакуйте и примените соответствующий reg-файл:
Скачать zip-архив MobilityCenter_On_Off.zip с файлами реестра.
Изменения вступают в силу сразу (перезапуск проводника или перезагрузка системы не требуется).
Проверим работоспособность Центра мобильности Windows. Для этого откройте диалоговое окно Выполнить нажав сочетание клавиш + R
Введите команду mblctr и нажмите клавишу Enter ↵.

Откроется окно Центр мобильности Windows.

Теперь осталось создать ярлык для запуска Центра мобильности Windows.
Щелкаем правой кнопкой мыши на рабочем столе, в открывшемся контекстном меню рабочего стола выбираем пункт Создать > Ярлык.

В открывшемся окне Создать ярлык в поле Укажите расположение объекта: введите путь к исполняемому файлу Центра мобильности Windows.
%WINDIR%\\System32\\mblctr.exe
И нажмите кнопку Далее.

В следующем окне в поле Введите имя ярлыка: введите любое название для своего ярлыка и нажмите кнопку Готово.

В результате наших действий на рабочем столе появится ярлык запускающий Центр мобильности Windows.

Windows 10 comes with a built-in feature called Windows Mobility Centre. With the help of Windows Mobility Centre on a Windows 10 laptop or notebook, you can quickly and easily access or adjust the display brightness, mute or adjust volume, view and change Power Plans, access the remaining battery percentage, set Sync Settings, and connect to an external display. However, this feature is active by default on laptops only, so you need to allow the same first if you are using Windows 10 on a desktop PC.
This post will guide you through enabling the Windows Mobility Centre on Windows 10 desktop and multiple ways to open it.
How to enable or turn on Windows Mobility Center on Windows 10 desktop computer?
Those who have not enabled the Windows Mobility Center on Windows 10 desktop PC and try to access it will receive a message “Windows Mobility Center is available only on laptops.”
Gentle Reminder: To enable the Windows Mobility Center on Windows 10 desktop computer, you need to modify the Registry; hence, we recommend taking the full backup of the Windows Registry and creating a system restore point. In case something goes wrong, you can revert your PC to a previous working state.
To enable or turn on the Windows Mobility Center on Windows 10 desktop, perform the following steps:-
Step 1. Press the Windows logo + R keys to open the Run dialog box.
Step 2. In the Run dialog box, type the following and hit Enter from the keyboard or click the OK button to open the Windows Registry:-
regedit

Step 3. In the Registry Editor window that opens, navigate to the following key:-
Computer\HKEY_CURRENT_USER\Software\Microsoft\MobilePC
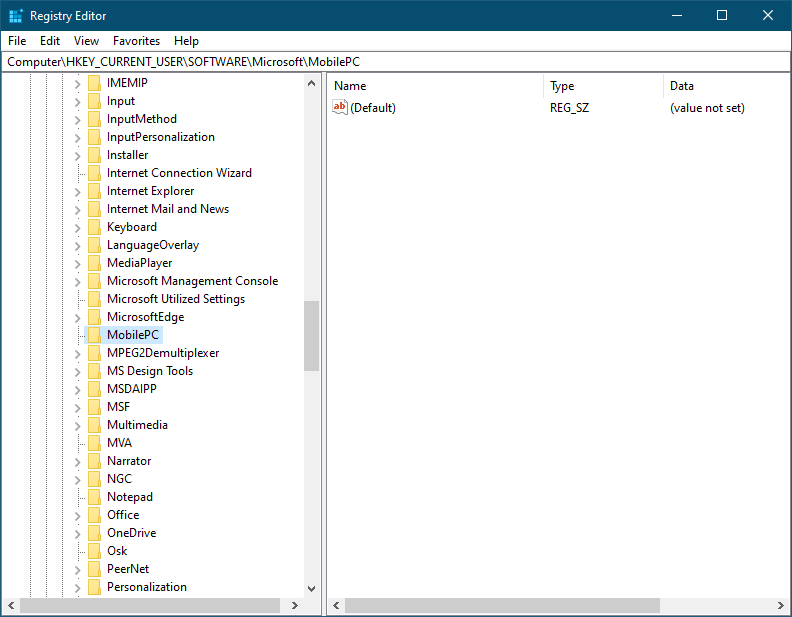
Note: On the MobilePC folder, you need to create two sub-keys, AdaptableSettings and MobilityCenter. If any key is present, you can skip the step.
Step 4. Right-click on MobilePC and select New, and then Key. Name the newly created key as AdaptableSettings.
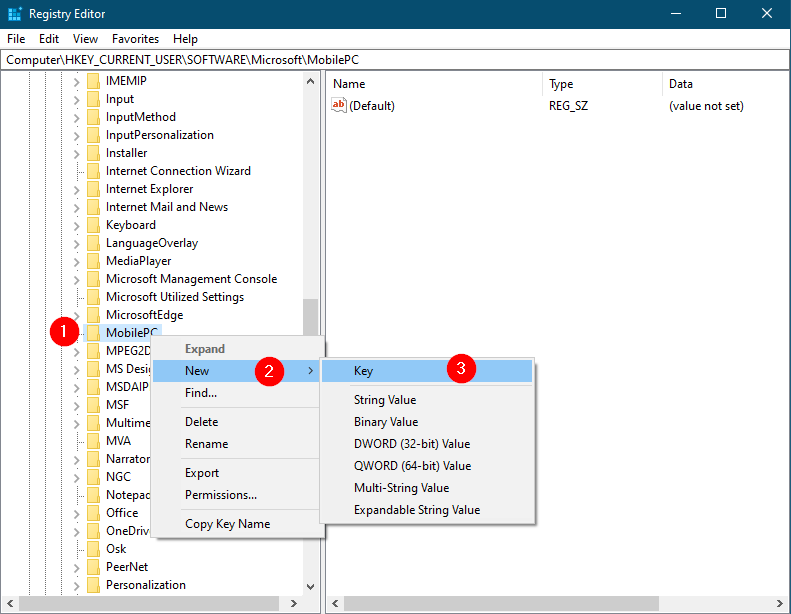
Step 5. Again, right-click on MobilePC, select New, and then Key. Name the newly created key as MobilityCenter.
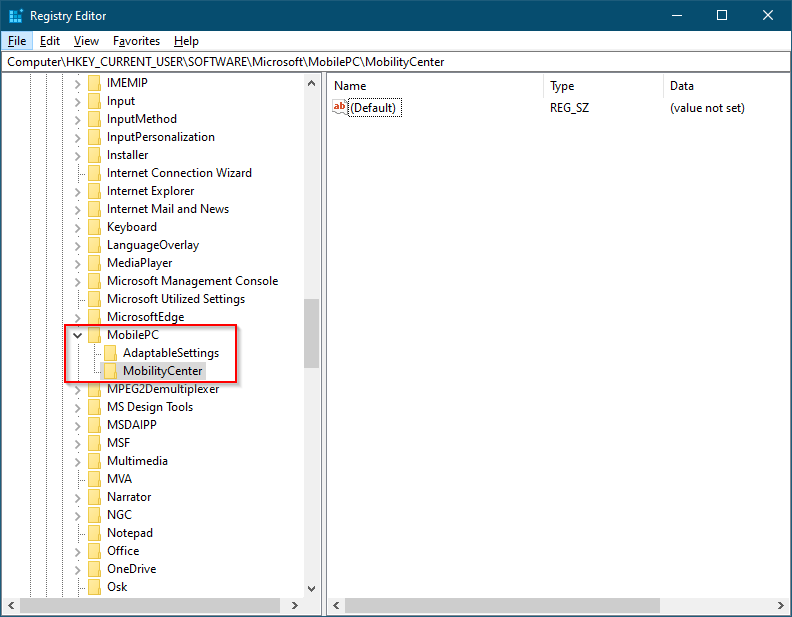
Once both keys are created or already present, it should look like a lead-in image.
Step 6. Now, highlight the AdaptableSettings key on the left side pane by clicking on it, perform a right-click on it, and select New and then DWORD (32-bit) Value.
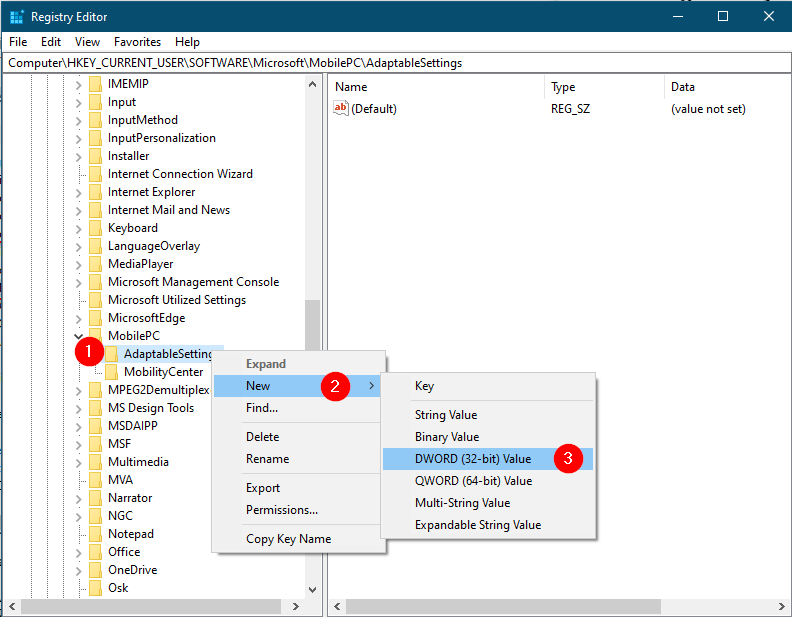
Step 7. Name the newly created DWORD (32-bit) Value as SkipBatteryCheck.
Step 8. On the right side pane of the AdaptableSettings key, double-click on SkipBatteryCheck. Change its Value Data from 0 to 1.
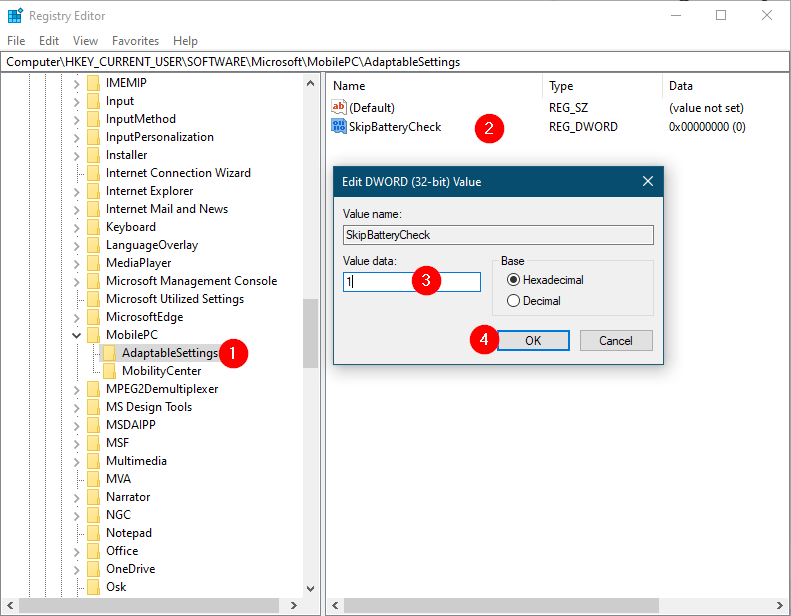
Step 9. Click OK to save the changes.
Step 10. Now, select the MobilityCenter on the left side pane and right-click on it. Choose New and then DWORD (32-bit) Value. Name the newly created DWORD (32-bit) Value as RunOnDesktop.
Step 11. Double-click on the RunOnDesktop on the right side pane and set its Value data to 1.
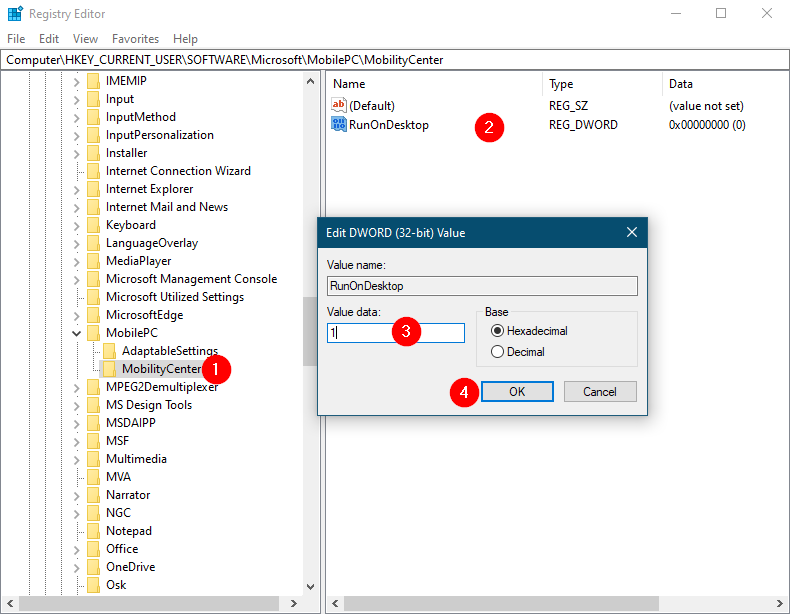
Step 12. Click OK to apply the changes.
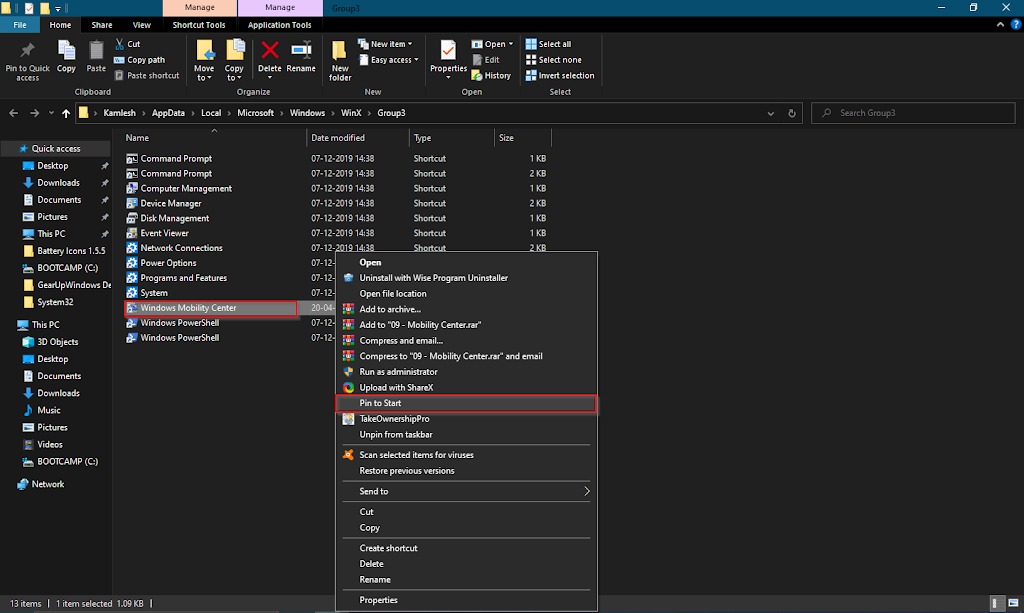
Once you complete the above steps, press the Windows logo + R keys to open the Run dialog box. Copy and paste the following path and press Enter from the keyboard:-
%LocalAppdata%\Microsoft\Windows\WinX\Group3
Here, you will see an executable file of Windows Mobile Center. Double-click on the Windows Mobile Center shortcut to open it. For easy access, you can drag it to the Windows 10 Taskbar or right-click on the program shortcut and select Pin to Start.
After performing the above steps, you should enable Windows Mobility Center on your Windows 10 desktop computer.
The second part of this article is about how to access Windows Mobility Center on Windows 10. There are at least five ways to access Windows Mobility Center on Windows 10 computers or laptops. These are the following:-
- Open Windows Mobility Center using the Search box
- Launch Windows Mobility Center via the Battery icon in the system tray
- Start Windows Mobility Center through Win + X menu
- Begin Windows Mobility Center from the Run Command box
- Open Windows Mobility Center via a shortcut
How to Start Windows Mobility Center on Windows 10 using the Search box?
The search box is the simplest way to open the Windows Mobility Center on Windows 10 PC.
Step 1. To open the Windows Mobility Center, click on the Start button/menu of Windows 10 and type Windows Mobility Center.
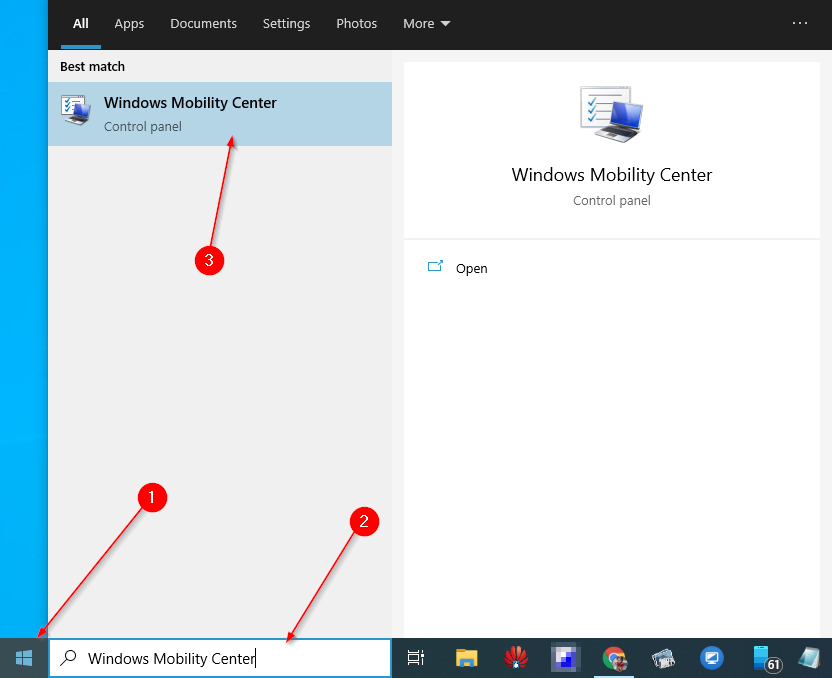
Step 2. From the available top search results, click on the Windows Mobility Center to open it.
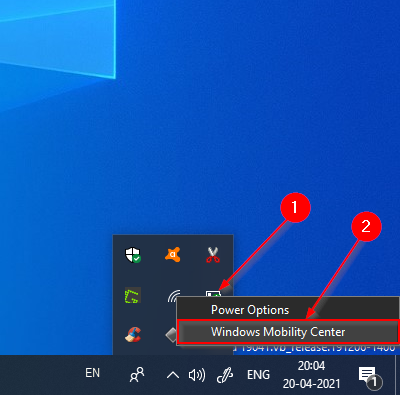
How to Launch Windows Mobility Center on Windows 10 using the Battery icon in the system tray?
It is yet another straightforward way to open the Windows Mobility Center in Windows 10. Just right-click on the battery icon in the Taskbar system tray and click on the Windows Mobility Centre option to open it. If the battery icon is missing from the Taskbar, you can not perform this task.
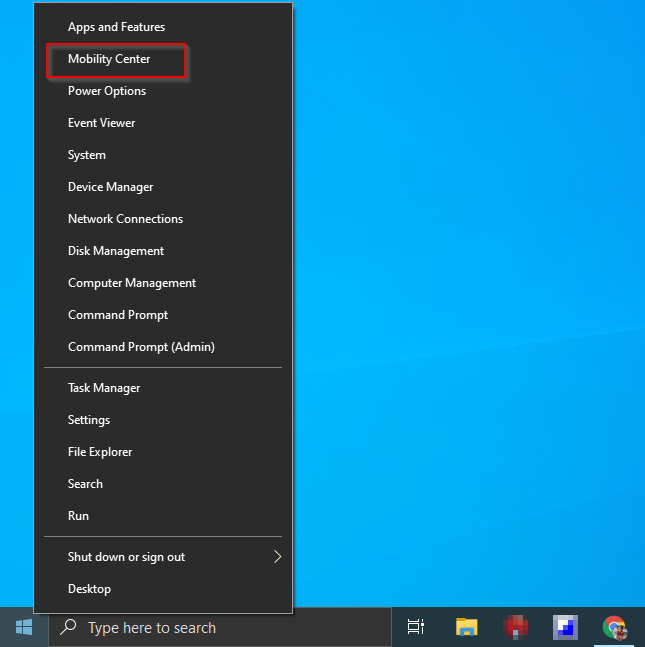
How to Open Windows Mobility Center on Windows 10 via the Win + X menu?
By pressing the Windows logo + X hotkey open the power user menu and then click on the Mobility Centre to open it.
Alternatively, please right-click on the Start button to access the WinX menu and then select the Mobility Centre to open it.
How to Access Windows Mobility Center on Windows 10 using the Run Command box?
It is also possible to open the Windows Mobility Center on Windows 10 using the Run dialog box. Just press the Windows logo + R keys from the keyboard to open the Run box. Type mblctr in the box and hit Enter button from the keyboard to open Windows Mobility Centre.
How to Launch Windows Mobility Center on Windows 10 via a Shortcut?
It is the last option to access the Windows Mobility Center on Windows 10. Press and hold the Windows logo key and then press the R key from the keyboard to open the Run dialog box. Copy and paste the following path and press Enter from the keyboard:-
%LocalAppdata%\Microsoft\Windows\WinX\Group3
It will open a folder Group3, where you will see several system program shortcuts listed. Copy the shortcut of “Windows Mobility Center” and paste it on the Windows 10 desktop to quickly access it. You can also drag the shortcut to Windows 10 Taskbar for easy access. You can even pin it to the Start menu by right-clicking on it and selecting Pin to Start.
That’s all!!!
Conclusion
In conclusion, the Windows Mobility Center is a useful feature built into Windows 10 laptops that allows easy access and adjustment of various settings such as display brightness, volume, power plans, battery percentage, Sync Settings, and external display connection. However, this feature is not enabled by default on desktop PCs, and users need to modify the Registry to activate it. This article has provided a step-by-step guide to enable the Windows Mobility Center on Windows 10 desktop and various ways to access it, such as using the search box, battery icon, Win + X menu, Run Command box, and a shortcut. By following these methods, users can access and use the Windows Mobility Center to adjust their device’s settings quickly and easily.
Windows Mobility Center (mblctr.exe) is a special app that comes bundled with Windows 10. It is present by default on mobile devices like laptops and tablets. It allows changing brightness, volume, power plans, screen orientation, display projection, Sync Center settings, and presentation settings of your device. By default, the ability to run the app is restricted to mobile devices only. It doesn’t start on desktop PCs. Here is how to unlock it on a Desktop PC.
Windows Mobility Center was first introduced in Windows 7. Windows 8, Windows 8.1 and Windows 10 also include it, however it is mostly superseded by Action Center’s buttons for quickly toggling these above mentioned settings. Still if you prefer to use Mobility Center, you can activate it on a Desktop computer. It can still be useful because it can be extended by OEMs (your PC vendor) with additional tiles to toggle various system settings like Bluetooth or your monitor.
If you try to launch Windows Mobility Center on a desktop PC, it will show the following message:
Windows Mobility Center is available only on laptops.
This behavior can be overridden with a simple Registry tweak. If you find use for the Windows Mobility Center on a desktop PC, here is how to apply the change.
To enable Mobility Center on a Desktop PC in Windows 10, do the following.
- Open the Registry Editor app.
- Go to the following Registry key.
HKEY_CURRENT_USER\Software\Microsoft
See how to go to a Registry key with one click.
- Create a new subkey here called «MobilePC».
- Under «MobilePC», create a new subkey «MobilityCenter».
- On the right, create a new 32-Bit DWORD value RunOnDesktop.
Note: Even if you are running 64-bit Windows you must still create a 32-bit DWORD value.
Set its value data to 1.
Now you can launch the Windows Mobility Center on your Desktop PC without issues.
To undo the change, delete the RunOnDesktop value you’ve created and you are done.
Here are the contents of this Registry tweak in *.REG format.
Windows Registry Editor Version 5.00

[HKEY_CURRENT_USER\Software\Microsoft\MobilePC\MobilityCenter]
"RunOnDesktop"=dword:00000001
The Undo tweak looks as follows:
Windows Registry Editor Version 5.00

[HKEY_CURRENT_USER\Software\Microsoft\MobilePC\MobilityCenter]
"RunOnDesktop"=-
To save your time, you can download the following ready-to-use Registry files.
Download Registry Files
Note: This tweak also works in Windows 7 and Windows 8/8.1.
That’s it.
Support us
Winaero greatly relies on your support. You can help the site keep bringing you interesting and useful content and software by using these options:
If you like this article, please share it using the buttons below. It won’t take a lot from you, but it will help us grow. Thanks for your support!