
Одним из недостатков Windows является скудный набор встроенной кастомизации. Более того, с каждой версией операционной системы он становился всё меньше и меньше: сначала исчезли темы приложений, а вскоре и гаджеты Windows. Благо, в ОС от Microsoft есть достаточно возможностей для разработчиков для создания своих приложений, позволяющих кастомизировать систему на усмотрение пользователя.
- В тему: Как изменить цвет выделения в Windows 10 без сторонних программ
WinDynamicDesktop — установка динамических обоев

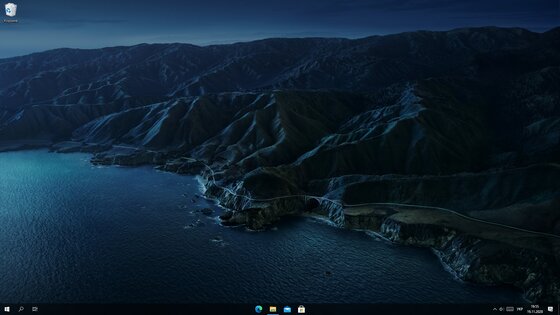
Это бесплатная программа с открытым исходным кодом, благодаря которой пользователи Windows с лёгкостью смогут устанавливать динамические обои из macOS, которые меняются в зависимости от времени суток (к примеру, когда у вас за окном рассвет, на обоях тоже рассвет). Сразу же после запуска, приложение спрашивает ваше местоположение для того, чтобы узнать время восхода и заката солнца в вашем регионе, также его можно ввести вручную. После этого можно выбрать одну из многих тем, доступных по умолчанию, либо создать свою.
GitHub | Microsoft Store (бесплатно)
TaskbarX — кастомизация панели задач
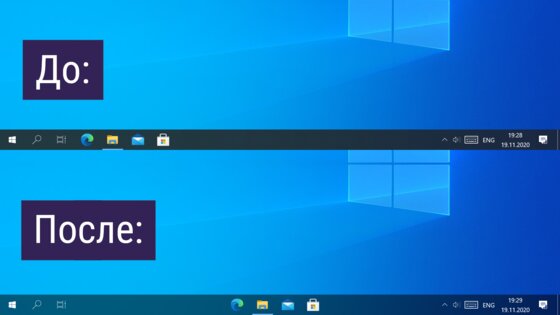
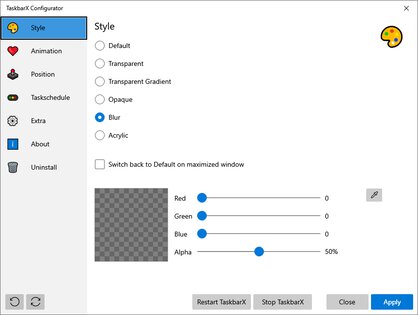
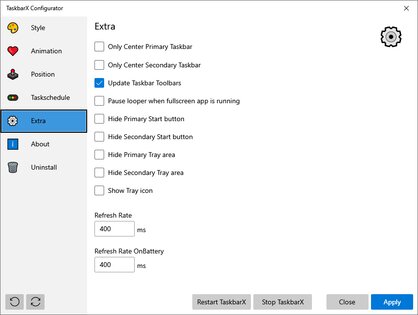
TaskbarX позволяет настроить панель задач Windows 10, изменить её фон или центрировать иконки, а также скрывать трей, иконки и кнопку пуска на других мониторах. Программа очень быстрая и легковесная, а также не затрагивает реестр, что делает ее полностью безопасной.
GitHub (бесплатно) | Microsoft Store (1 доллар)
Rainmeter — виджеты из Windows 7 и macOS
Windows Vista хоть и невзлюбили за ее нестабильность, но вот гаджеты (виджеты в Vista и 7) многим пользователям пришлись по нраву, их даже сумели портировать на Windows XP. По каким-то причинам Microsoft решила убрать этот функционал в Windows 8 (вероятнее всего, из-за живых плиток, которые выполняют похожую функцию). Да, гаджеты можно вернуть и в Windows 10, но зачем, когда есть стороннее приложение под названием Rainmeter, которое имеет даже больше функционала и регулярно обновляется?
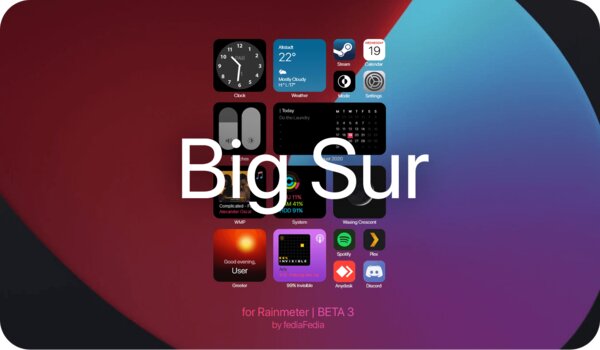
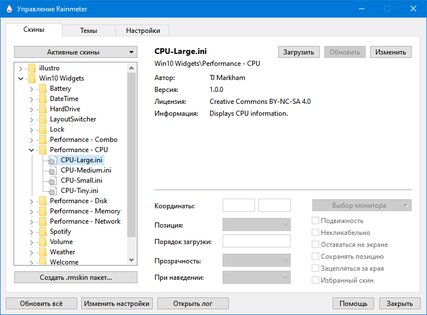
Rainmeter позволяет отображать виджеты на рабочем столе с практически любым функционалом, начиная от простых часов и заканчивая мониторингом использования процессора. В приложении есть поддержка сторонних скинов на любой вкус и цвет, коих большое количество в интернете. Один разработчик сумел даже скопировать виджеты macOS Big Sur и её Dock. Мои любимые же — Win10Widgets, которые выполнены в стиле Fluent Design и прекрасно вписываются в рабочий стол Windows 10.
Кроме этого, приложение легковесное (занимает 16 МБ ОЗУ) и потребляет минимум ресурсов, что подойдёт даже для ноутбуков. Как и первые две утилиты, эта тоже имеет открытый исходный код и совершенно бесплатна.
Официальный сайт (бесплатно)
Winaero Tweaker — твикер с кучей возможностей
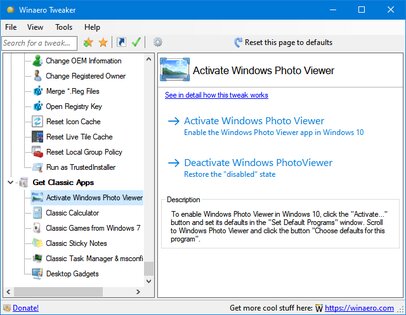
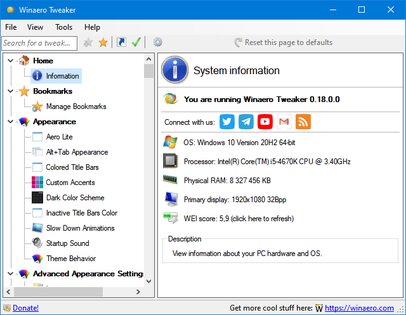
Под Windows существует множество программ-твикеров для кастомизации системы, но самая мощная из них — Winaero Tweaker. Количество доступных настроек просто зашкаливает, и наверняка какая-то из них придётся вам по душе. Приложение позволяет настроить как внешний вид системы, так и её функционал, а также не требует установки.
Твикер встречает нас окном с двумя частями: слева дерево доступных опций, а справа — их настройки. Под каждым пунктом есть подробное описание на английском языке. Также присутствует поиск для того, чтобы быстро найти нужный пункт.
Краткий список функций (полный список доступен на этой странице):
- возможность установить свой акцентный цвет системы;
- выключение автоматических обновлений Windows и драйверов;
- выбор звука включения ПК;
- настройки системных шрифтов и их размера;
- отключение Windows Defender;
- возможность изменения цвета и толщины рамки окон;
- отключение запроса пароля после выхода компьютера из спящего режима;
- включение старых встроенных приложений Windows (например, просмотрщика фото);
- возможность вернуть старый вид настроек громкости звука и батареи в панели задач.
ВНИМАНИЕ! Перед использованием, обязательно сделайте точку восстановления системы на случай каких-либо проблем.
Официальный сайт (бесплатно)
QuickLook — предпросмотр файлов без полного открытия
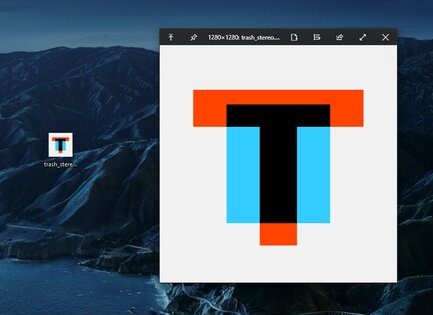
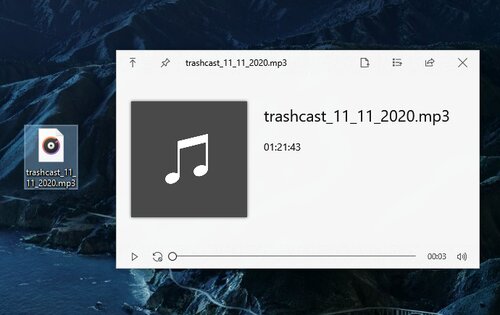
Это приложение позволяет выводить содержание файла на экран нажатием на пробел, прямо как в macOS. Таким образом можно быстро просматривать документы, фотографии и даже видео. С помощью Ctrl и колеса мыши можно увеличивать или уменьшать превью, а кликом на Enter откроется стандартное приложение для открытия данного типа файлов. Также твик поддерживает различные плагины для интеграции с другими файловыми менеджерами, либо открытия неподдерживаемых типов файлов.
GitHub | Microsoft Store (бесплатно)
SmartTaskbar — автоматическое скрытие панели задач
Данная утилита пригодится обладателям ноутбуков, позволяя автоматически скрывать панель задач при открытии окон на весь экран, тем самым увеличивая количество полезного пространства. Также у приложения есть ручной режим работы, который позволяет скрывать панель задач двойным кликом по иконке программы в трее и возможность выключить анимацию сворачивания.
GitHub | Microsoft Store (бесплатно)
PowerToys — продвинутая панель поиска и активные углы из macOS
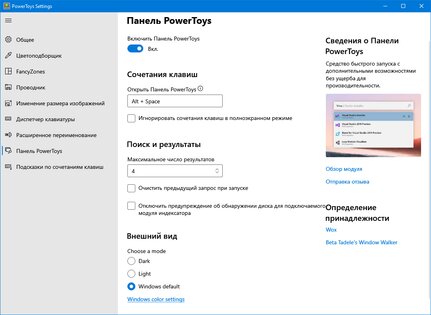
Microsoft PowerToys — это набор полезных утилит от самой Microsoft, призванных расширить функционал системы. Впервые этот набор создавался ещё для Windows 95 и позже был адаптирован под Windows XP. Спустя 12 лет, компания вспомнила об этом приложении и решила перезагрузить проект уже для Windows 10, с новыми функциями и открытым исходным кодом.
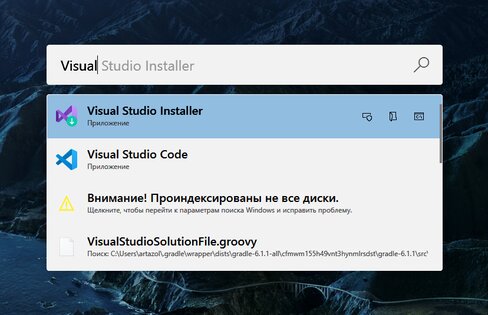
Одной из самых интересных утилит является PowerToys Run, которая добавляет в Windows 10 поиск наподобие Spotlight из macOS, которая работает по всей системе и позволяет искать приложения, файлы, запущенные процессы или даже проводить простые математические расчёты. Запускается же он сочетанием клавиш Alt + Space, при желании его можно изменить в настройках.
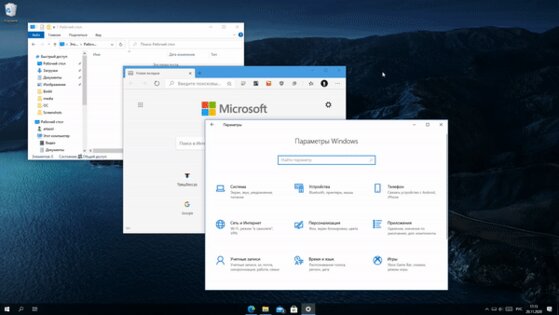
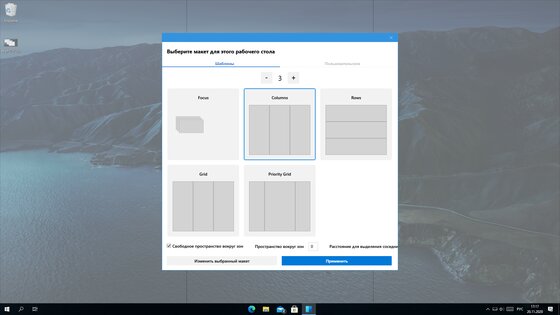
Вторая полезная функция — FancyZones. В Windows 10, если вы перетащите окно в угол или сторону экрана, оно изменится до определенного размера, заполнив половину или четверть экрана. FancyZones же позволяет создавать свои макеты расположения окон и быстро их применять. В приложении можно выбирать как заготовленные шаблоны отображения, так и создавать свои. Чтобы воспользоваться ими, достаточно зажать Shift и переместить окно приложения в нужную область.
GitHub (бесплатно)
Applies ToWindows 11 Windows 10
Поддержка Windows 10 прекратится в октябре 2025 г.
После 14 октября 2025 г. корпорация Майкрософт больше не будет предоставлять бесплатные обновления программного обеспечения из Центра обновления Windows, техническую помощь и исправления безопасности для Windows 10. Ваш компьютер по-прежнему будет работать, но мы рекомендуем перейти на Windows 11.
Подробнее
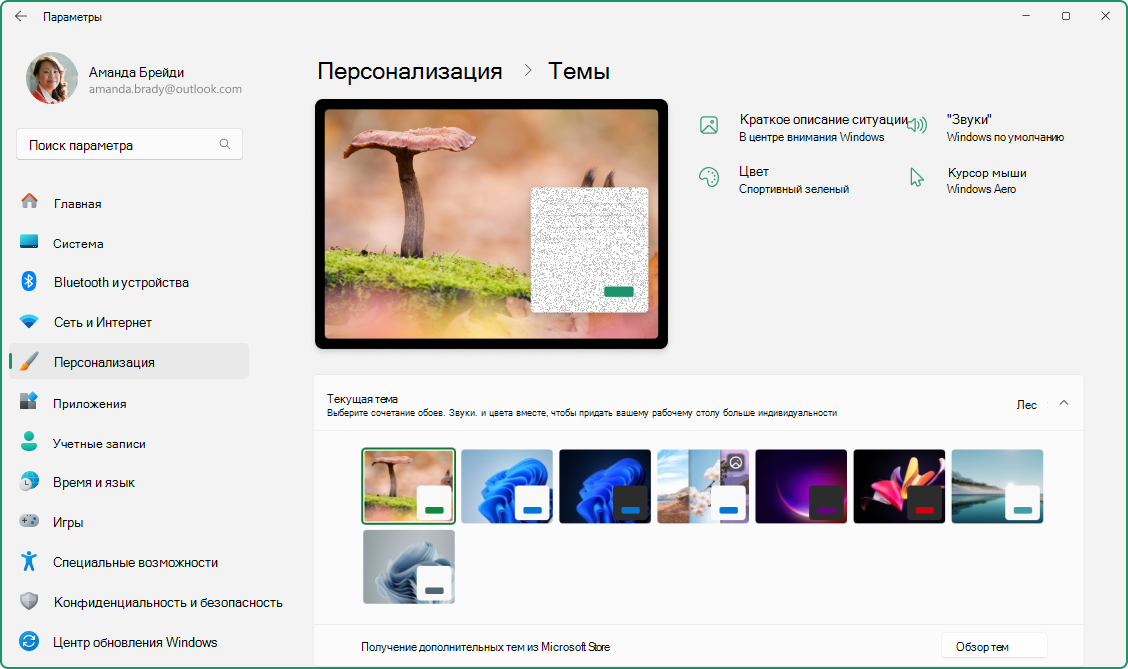
Темы Windows — это сочетание фоновых рисунков рабочего стола, цветов окон, звуков и других элементов, позволяющих персонализировать интерфейс Windows. Темы предоставляют целостный и визуально привлекательный интерфейс, который может повысить производительность и удовольствие при использовании устройства.
Применение темы
-
В приложении «Настройки» на устройстве с Windows, выберите Персонализация > темы или используйте следующий ярлык:
Темы

-
Выберите один из доступных по умолчанию тем или выберите Обзор тем , чтобы скачать новые темы из Microsoft Store.
Изучение тем Windows в Microsoft Store
-
Выберите нужную тему, чтобы применить ее к рабочему столу
Настройка темы и предоставление общего доступа к ней
Чтобы дополнительно настроить тему, выберите параметры Фон, Цвет, Звуки и Курсор мыши. Каждый вариант позволяет персонализировать интерфейс в соответствии с вашими предпочтениями.
Сохранение темы
Настроив все параметры, сохраните тему, чтобы при необходимости можно было легко повторно применить ее параметры.
-
В приложении «Настройки» на устройстве с Windows, выберите Персонализация > темы
-
Выберите Сохранить и укажите имя темы.
Общий доступ к теме
Экспорт собственной темы позволяет поддерживать согласованный внешний вид на разных устройствах, делиться персонализированными параметрами с друзьями и семьей или быстро применять предпочитаемую тему без необходимости каждый раз вручную настраивать параметры. Это позволяет сэкономить время и обеспечить согласованный визуальный интерфейс.
-
В приложении «Настройки» на устройстве с Windows, выберите Персонализация > темы
-
Щелкните правой кнопкой мыши сохраненную тему и выберите Сохранить тему для общего доступа. При этом создается файл .deskthemepack , которым можно поделиться с другими пользователями.
Удаление темы
Если у вас слишком много тем или вы хотите очистить старые темы, их можно легко удалить.
-
В приложении «Настройки» на устройстве с Windows, выберите Персонализация > темы
-
Щелкните правой кнопкой мыши сохраненную тему и выберите Удалить.
Примечание: Вы не можете удалить темы Windows по умолчанию.
Цветовые фильтры и контрастные темы
Windows предоставляет надежные возможности для настройки контрастных тем и цветовых фильтров, что упрощает взаимодействие с устройствами пользователей с нарушениями зрения или определенными специальными возможностями.
-
Контрастные темы повышают видимость текста и элементов пользовательского интерфейса с помощью различных сочетаний цветов, которые можно настроить в соответствии с индивидуальными предпочтениями
-
Цветовые фильтры изменяют цветовую палитру на экране, чтобы помочь пользователям различать вещи, которые отличаются только цветом
Дополнительные сведения см. в статьях Изменение контрастности цветов в Windows и Использование цветовых фильтров в Windows.
Нужна дополнительная помощь?
Нужны дополнительные параметры?
Изучите преимущества подписки, просмотрите учебные курсы, узнайте, как защитить свое устройство и т. д.
So, you’re staring at your Windows 10 desktop, thinking it’s kind of boring, right? Well, guess what? You can totally change that. Customizing your Windows 10 desktop is actually pretty easy and fun. Let me show you how.
First off, why bother customizing? Well, it’s not just about making things look cool (although that’s a big part of it). It’s also about making your desktop work better for you. Like, maybe you want quick access to your favorite apps or you want to organize your files in a way that makes sense to you. Whatever the reason, customizing your desktop can make your life a lot easier.
Okay, so where do we start? Let’s talk about the basics first. You know, like changing your wallpaper and stuff. Then we’ll get into more advanced things like customizing your taskbar and even using some cool apps to really make your desktop stand out.
But before we dive in, let me ask you something: have you ever tried customizing your desktop before? If you have, you might already know some of this stuff. If not, don’t worry—I’ll walk you through it.
Getting Started: The Easy Stuff
Alright, let’s start with the basics. Changing your wallpaper is probably the easiest way to customize your desktop. You can use any image you want, as long as it’s saved on your computer.
To change your wallpaper, just right-click on your desktop and select «Personalize.» From there, you can choose a picture from your computer or even use one of the default images that come with Windows 10. Easy, right?
But wait, there’s more! You can also change the color of your taskbar and start menu. Just go to the «Colors» section in the personalization settings. You can choose a color or let Windows pick an accent color based on your wallpaper. Pretty neat, huh?
Customizing Your Taskbar
Now let’s talk about the taskbar. This is the bar at the bottom of your screen where you can pin your favorite apps for easy access. You can customize it in a bunch of ways.
First, you can move the taskbar to a different part of the screen. Just right-click on the taskbar, make sure it’s not locked, and then drag it to the side or top of the screen. You can also resize it by dragging the edge.
Another cool thing you can do is change the icons on the taskbar. You can pin any app to the taskbar by right-clicking on it and selecting «Pin to taskbar.» You can also unpin apps you don’t use anymore. Just right-click on the icon and select «Unpin from taskbar.».
Oh, and you can also change the size of the icons. Just right-click on the taskbar, go to «Taskbar settings,» and then use the slider to change the size. Small icons can save space, while larger icons are easier to click on. It’s up to you!
The Start menu is another place where you can do a lot of customization. You can pin your favorite apps to the Start menu for quick access. Just right-click on an app and select «Pin to Start.».
You can also resize the tiles in the Start menu. Just right-click on a tile and select «Resize.» You can choose from small, medium, wide, or large tiles. This is great if you want to make your most-used apps stand out.
And if you really want to get fancy, you can even change the color of the Start menu. Just go to the «Colors» section in the personalization settings and choose a color. You can also turn on transparency effects if you want a more modern look.
Using Cool Apps to Customize Your Desktop
So, we’ve covered the basics. But what if you want to take things to the next level? There are some really cool apps out there that can help you customize your desktop even more. Let me tell you about a few of them.
Rainmeter
Rainmeter is a free app that lets you add custom widgets to your desktop. You can display things like the weather, your CPU usage, or even your favorite RSS feeds. It’s super customizable, and there are tons of skins available online.
To get started with Rainmeter, just download it from their website and install it. Once it’s installed, you can add widgets by right-clicking on the Rainmeter icon in the system tray and selecting «Manage.». From there, you can browse and add new skins.
One of the coolest things about Rainmeter is that you can create your own skins if you know a bit of coding. But even if you don’t, there are plenty of pre-made skins available online. Just do a quick search for «Rainmeter skins» and you’ll find tons of options.
Fences
Fences is another cool app that helps you organize your desktop. It lets you create «fences» that group your icons together. You can label each fence and even change the background color.
To use Fences, just download it from the Stardock website and install it. Once it’s installed, you can create a new fence by right-clicking on your desktop and selecting «Create new fence.». You can then drag and drop your icons into the fence to organize them.
Fences is great if you have a lot of icons on your desktop and want to keep things organized. It’s also really customizable, so you can make it look however you want.
DisplayFusion
DisplayFusion is an app that lets you customize your desktop wallpaper and more. You can use different wallpapers for each monitor, create custom wallpaper profiles, and even add custom scripts to automate tasks.
To get started with DisplayFusion, just download it from their website and install it. Once it’s installed, you can change your wallpaper by right-clicking on the DisplayFusion icon in the system tray and selecting «Wallpaper.». From there, you can choose a new wallpaper or create a custom wallpaper profile.
DisplayFusion is great if you have multiple monitors and want to use different wallpapers on each one. It’s also really customizable, so you can make it work exactly how you want.
Advanced Customization Tips
Alright, so we’ve covered the basics and some cool apps. But what if you want to get really advanced with your customization? Here are a few tips to take things to the next level.
First, you can change the icons for your apps. This is a bit more involved, but it’s totally doable. You’ll need to find or create new icons and then replace the old ones. There are plenty of icon packs available online, or you can create your own using an image editor.
To change an icon, just right-click on the app shortcut, go to «Properties,» and then click on «Change Icon.» From there, you can browse and select a new icon. Easy, right?
Another advanced tip is to customize your file explorer. You can change the folder icons, add custom columns, and even change the background color. This is great if you want to make your file explorer look more organized and personalized.
To customize your file explorer, just open it up and go to the «View» tab. From there, you can change the layout, add custom columns, and more. You can also change the folder icons by right-clicking on a folder, going to «Properties,» and then clicking on «Customize.».
And if you really want to get fancy, you can even create custom themes for Windows 10. This involves editing some system files, so it’s a bit more advanced. But if you’re up for the challenge, there are plenty of tutorials available online to help you get started.
Wrapping Up: Why Customization Matters
So, why does all this matter? Well, customizing your Windows 10 desktop isn’t just about making things look cool. It’s also about making your desktop work better for you. By organizing your icons, changing your wallpaper, and customizing your taskbar, you can make your desktop more efficient and easier to use.
Plus, let’s be honest—it’s just fun to make your desktop look exactly how you want it to. So why not give it a try? You might be surprised at how much you enjoy it.
FAQ
Q: Can I use any image as my wallpaper?
A: Yep! As long as it’s saved on your computer, you can use it as your wallpaper. Just right-click on your desktop, select «Personalize,» and then choose your image.
Q: How do I change the color of my taskbar?
A: Easy! Just go to the «Colors» section in the personalization settings. You can choose a color or let Windows pick an accent color based on your wallpaper.
Q: Can I use Rainmeter to display the weather on my desktop?
A: Absolutely. Rainmeter has tons of widgets, including weather widgets. Just download Rainmeter, install it, and then add the weather widget from the «Manage» section.
Q: Is Fences free to use?
A: Fences offers a free trial, but you’ll need to purchase it if you want to keep using it after the trial period. It’s definitely worth it if you have a lot of icons on your desktop and want to keep things organized.
Q: Can I use DisplayFusion to set different wallpapers for each monitor?
A: Yep! DisplayFusion lets you use different wallpapers for each monitor. Just download it, install it, and then go to the «Wallpaper» section to choose your wallpapers. You can even create custom wallpaper profiles to switch between different sets of wallpapers easily.
Каких только экспериментов с Windows различных версий мы не проводили в материалах 3DNews! Мы проверяли на практике необычные техники сброса пользовательского пароля в операционной системе, рассказывали о самостоятельной сборке Live CD/USB-дистрибутивов ОС, способах отключения «шпионских» функций телеметрии и защиты данных, выуживали сведения о скрытых настройках и малоизвестных возможностях платформы, а также об эффективных и надёжных методах восстановления Windows при возникновении сбоев. Пришло время продолжить былые эксперименты и поделиться информацией о способах модификации интерфейса Windows 10, самой распространённой на сегодня системы для персональных компьютеров. Цель не то чтобы благородная, зато интересная.
Дисклеймер. Использование перечисленных в заметке инструкций и утилит, как правило, влечёт изменение системных файлов и библиотек Windows 10, вмешательство в которые может нарушить стабильную работу ОС и привести к сбоям. Воспроизводить описанные ниже действия можно исключительно по собственной инициативе и на свой страх и риск. Во избежание неприятностей настоятельно рекомендуем создать резервную копию операционной системы и данных. Редакция не несёт никакой ответственности за любые возможные последствия.
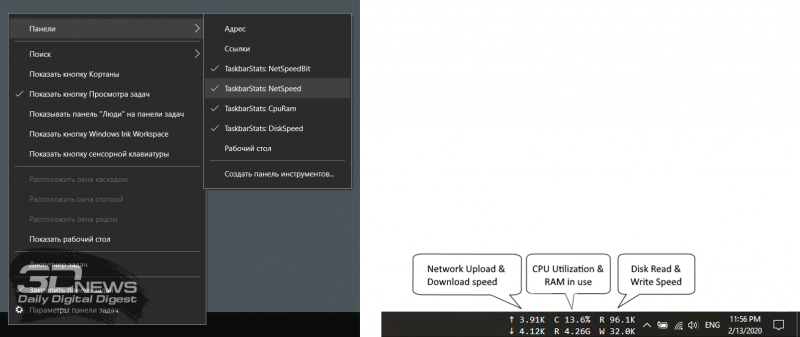
⇡#Добавление системных индикаторов на панель задач
С помощью утилиты Taskbar stats можно расширить информативность панели задач Windows 10 и разместить на ней индикаторы загруженности процессора и оперативной памяти, скорости входящих и исходящих сетевых соединений, а также сведения об операциях с дисковым накопителем. Всё, что необходимо сделать, — это установить приложение (по ссылке находится страничка приложения на Github) и затем в контекстном меню панели задач включить отображение подходящих индикаторов. Распространяется Taskbar stats бесплатно и потребляет минимум ресурсов.
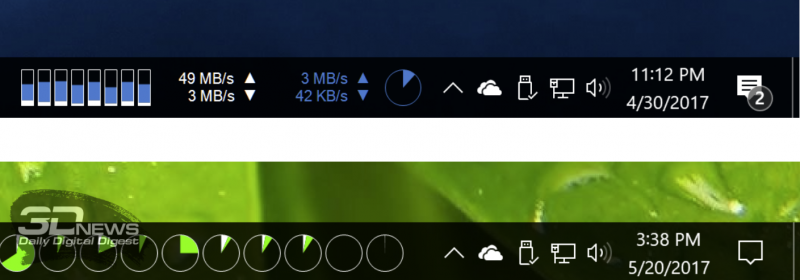
Тем, кому индикаторы Taskbar stats кажутся излишне аскетичными, можем посоветовать утилиту XMeters. Она решает аналогичные задачи, но по части визуализации данных намного интереснее, да и настроек в ней больше. XMeters представлена в двух редакциях — Free и Professional, последняя стоит 5 долларов США. Расставаться с кровными с ходу не стоит, так как возможностей бесплатной версии программы вполне достаточно для оперативного мониторинга системных ресурсов компьютера.
⇡#Выравнивание значков панели задач по центру (как в macOS и Chrome OS)
Научить Windows 10 автоматически центрировать иконки приложений в панели задач позволяет крохотная и занимающая около сотни килобайт утилита CenterTaskbar. Программа использует API Microsoft UI Automation, умеет взаимодействовать с размещённой вертикально панелью задач, поддерживает мультимониторные системы и распространяется с открытыми исходными кодами.
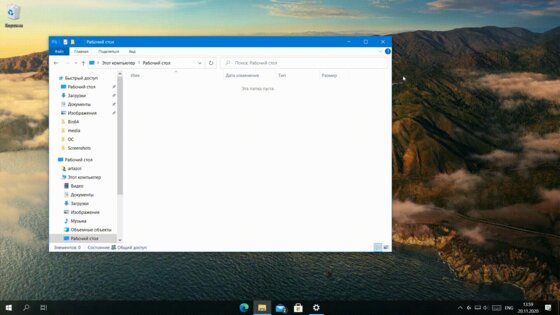
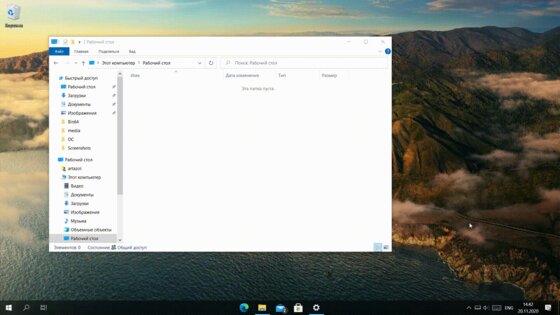
⇡#Добавление дня недели в часы на панели задач
По умолчанию часы Windows 10 демонстрируют в правом нижнем углу рабочего стола только текущее время и дату, которые посредством нехитрых манипуляций с настройками ОС можно дополнить информацией о дне недели. Проделывается данная операция в панели управления Windows 10, в настройках региональных параметров и формата даты.
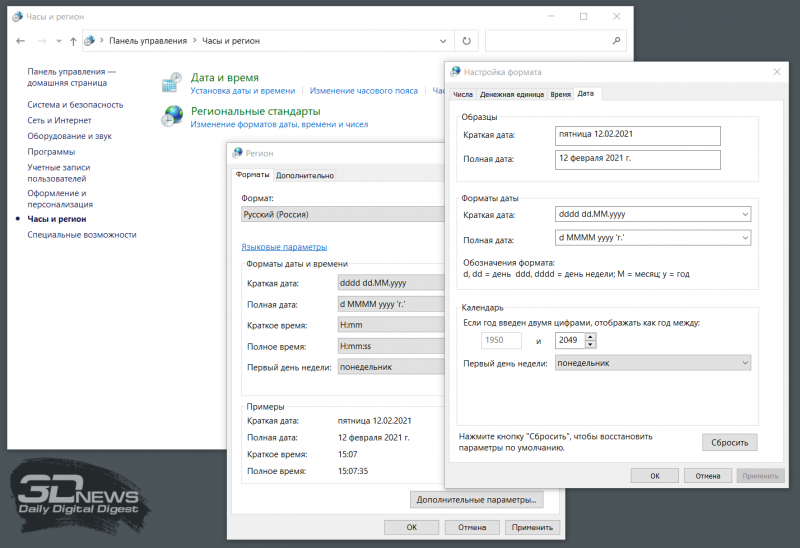
Достаточно, руководствуясь приведёнными выше скриншотами, добавить в поле «Краткая дата» символы dddd и нажать клавишу «Применить». В результате размещённые в области уведомлений часы дополнятся сведениями о текущем дне недели. Самое то для забывчивых пользователей и тех, кто привык вдумчиво наблюдать за течением времени.

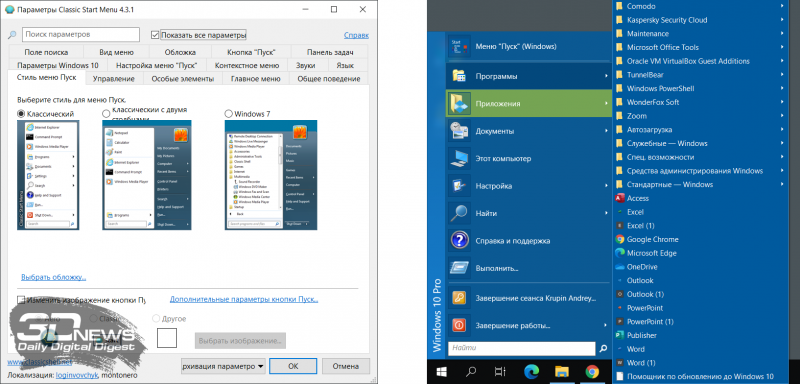
⇡#Возвращение классического меню «Пуск»
Кто устал от бесконечных экспериментов разработчиков Windows 10 с плиточным меню «Пуск», тот может вернуть в операционную систему классическое оформление этого элемента интерфейса. Повернуть время вспять позволяет утилита Classic Shell, в один клик мыши возвращающая прежнее древовидное меню «Пуск», которое было в Windows 7 и более ранних версиях ОС. Приложение также дает возможность поиграться с настройками панели задач, контекстного меню и прочими элементами рабочего окружения Windows 10. Единственное но: поскольку программа Classic Shell не обновлялась более трёх лет (последняя версия была выпущена в декабре 2017 года), некоторые функции в ней уже не работают. Тем не менее со своей основной задачей приложение справляется отлично.
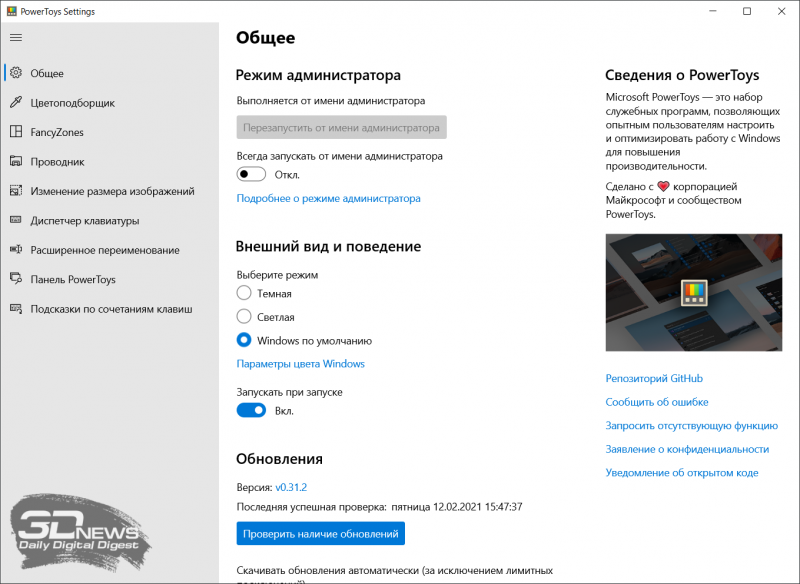
⇡#Расширение возможностей рабочего окружения Windows 10
В этом деле можно положиться на разработанный командой Microsoft фирменный набор приложений PowerToys, добавляющий в «десятку» массу полезных функций и инструментов. Среди них: цветоподборщик, возможность предварительного просмотра значков SVG-файлов (.svg) и документов Markdown (.md), расширение оболочки Windows 10 для быстрого изменения размера изображений, диспетчер клавиатуры, средства мгновенного запуска программ и массового переименования файлов, а также многие другие функции. Интересной особенностью PowerToys является диспетчер окон FancyZones, который позволяет легко создавать сложные макеты окон и быстро размещать окна в этих макетах. Внимания заслуживают также всплывающие подсказки по сочетаниям клавиш, появляющиеся, когда пользователь удерживает клавишу Windows более одной секунды. При этом отображаются все доступные сочетания клавиш для текущего состояния рабочего стола.
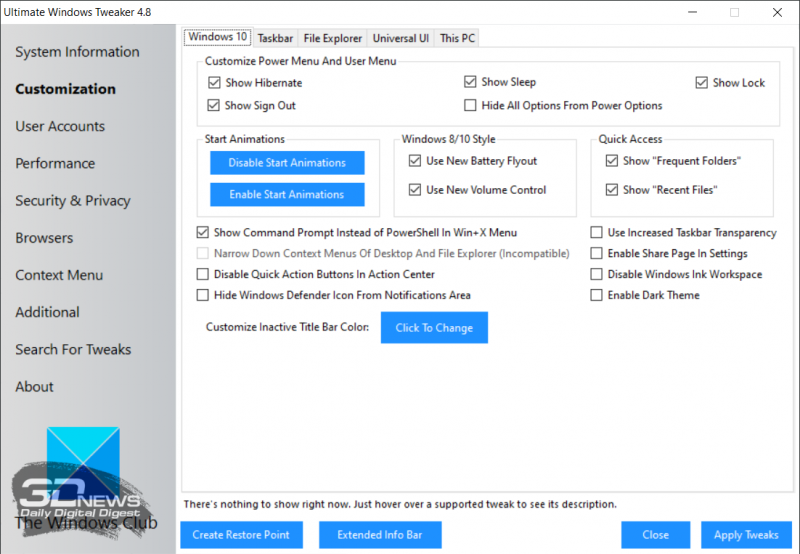
⇡#Настройка скрытых параметров интерфейса Windows 10
Для любителей копнуть поглубже предназначены всевозможные утилиты-твикеры, позволяющие добраться до самых потаённых настроек операционной системы. В глобальной сети представлено огромное множество таких программ. Из заслуживающих доверия выделим Ultimate Windows Tweaker, открывающий доступ более чем к двум сотням скрытых параметров ОС и позволяющий конфигурировать едва ли не все элементы пользовательского интерфейса «десятки» — от меню «Пуск» и панели задач до настроек проводника и рабочего стола. Как правило, для активации тех или иных функций твикеры изменяют значения в реестре либо в конфигурационных файлах Windows 10. Именно по этой причине взаимодействие с подобного рода приложениями требует предельной аккуратности и понимания того, что любые внесённые в систему изменения могут нарушить её стабильную работу.
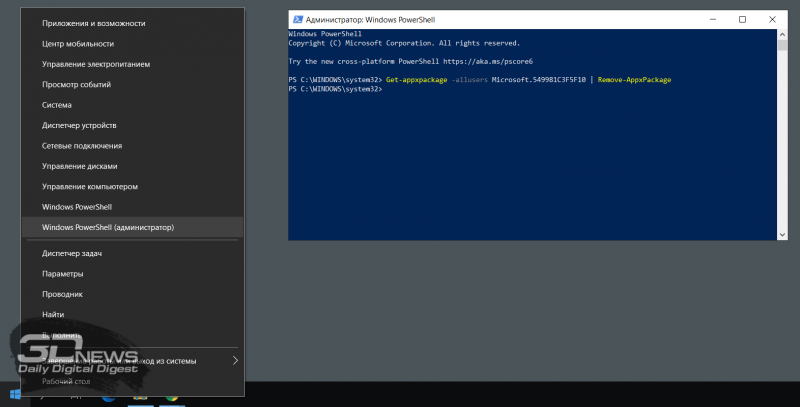
⇡#Удаление голосового помощника Cortana
Для русскоязычных пользователей Windows 10 этот напичканный искусственным интеллектом инструмент несёт довольно мало практической ценности, и его можно смело исключить из системы. Чтобы значок «Кортаны» не мозолил глаза, а на диске освободилось место, нужно открыть консоль PowerShell от имени администратора и ввести команду Get-appxpackage -allusers Microsoft.549981C3F5F10 | Remove-AppxPackage. После этого от голосового помощника Cortana останутся одни воспоминания.
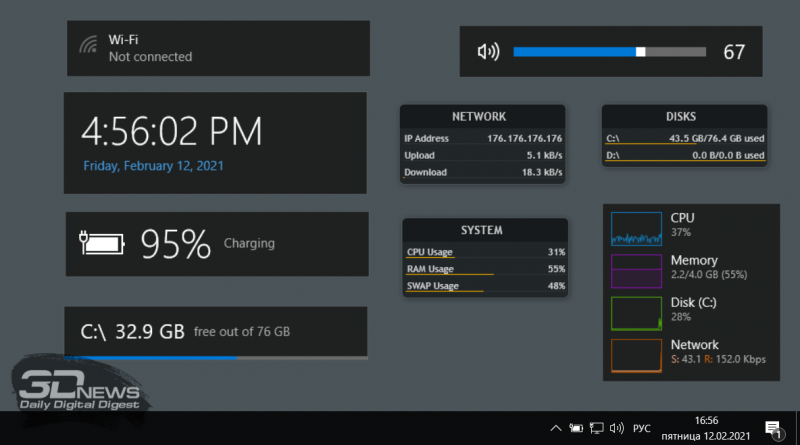
⇡#Добавление виджетов в Windows 10
В былые времена программная платформа Windows позволяла размещать на рабочем столе виджеты (в мире Windows известные как гаджеты) — миниатюрные приложения, отображающие ту или иную полезную для пользователя информацию. Впоследствии из соображений безопасности Microsoft отключила эту функцию, которую без труда можно вернуть на место посредством сторонних решений, таких, например, как Win10 Widgets. Данная программа построена на базе известной opensource-разработки Rainmeter и содержит большое количество разнообразных настраиваемых виджетов, позволяющих мониторить состояние системы, следить за расходом трафика, контролировать заряд аккумулятора ноутбука и решать прочие задачи.
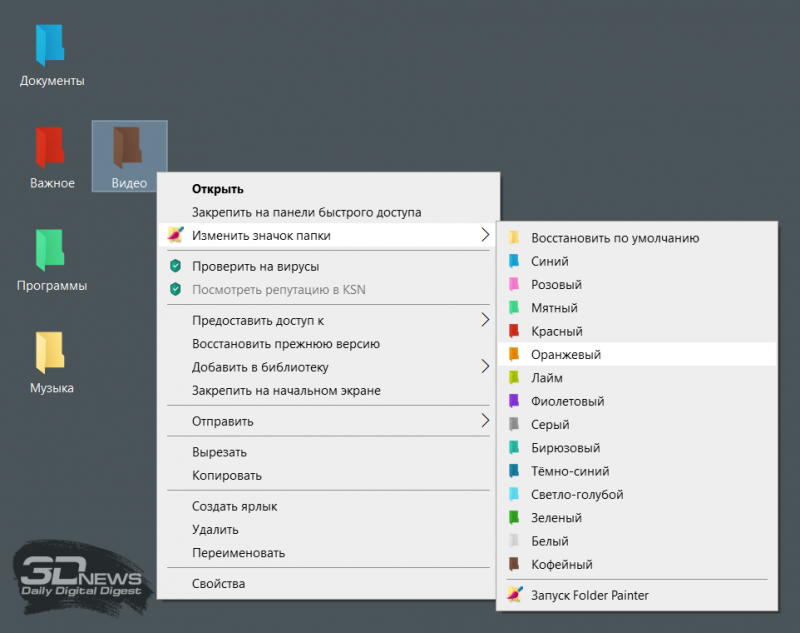
⇡#Окрашивание значков директорий в различные цвета
Такая функциональность Windows 10 не только добавит красок в рабочее окружение системы, но и упростит визуальный поиск папок с файлами. Реализовать её можно с помощью бесплатной утилиты Folder Painter, которая добавляет в контекстное меню необходимые опции для цветовой пометки значков директорий. Всё гениальное просто.
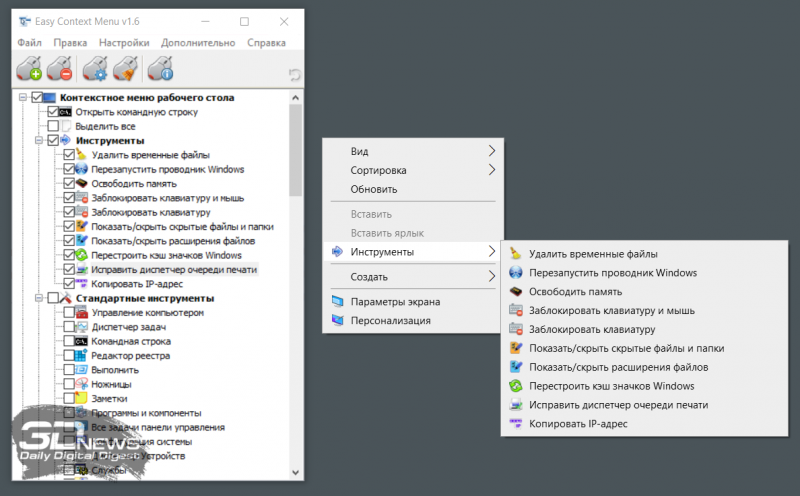
⇡#Расширение функциональности контекстного меню
С этой доработкой можно существенно повысить эффективность работы в операционной системе Windows 10. Необходимо всего лишь воспользоваться программой Easy Context Menu, позволяющей дополнить контекстное меню часто используемыми командами и инструментами. Например, можно добавить пункты для открытия командной строки, блокировки клавиатуры, удаления временных файлов, копирования IP-адреса и прочие элементы меню, выполняющие те или иные быстрые действия. Особо мудрить с Easy Context Menu не стоит, так как в противном случае вся польза от этой программы может сойти на нет.
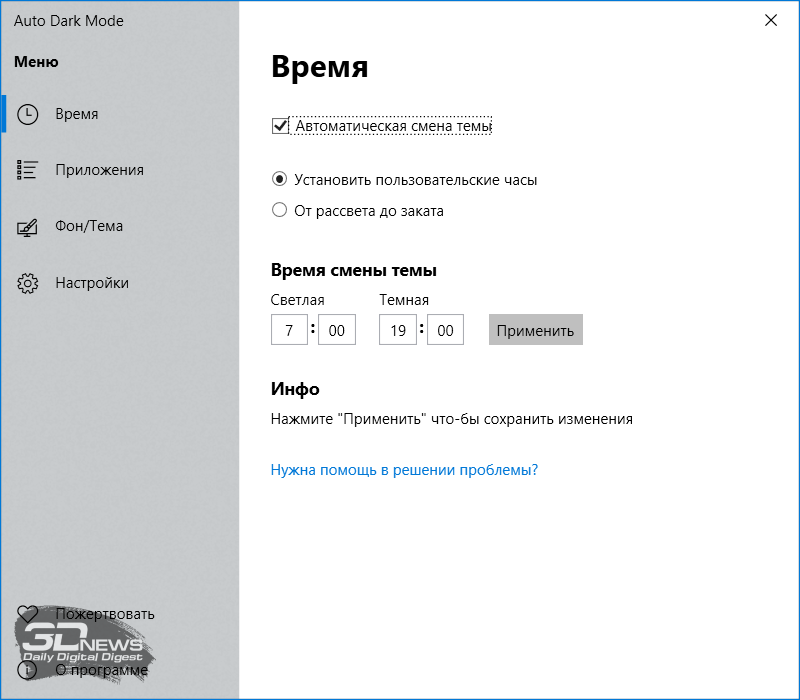
⇡#Автоматическое переключение между светлой и тёмной темами оформления Windows 10
Для быстрого выбора подходящего режима работы пользовательского интерфейса предусмотрена соответствующая опция в меню уведомлений «десятки», однако куда практичнее доверить управление этой функцией автоматике. Сделать это можно с помощью утилиты Auto Dark Mode. Процесс настройки предельно простой: устанавливаем программу, запускаем, ставим галочку напротив пункта «Автоматическая смена темы», выбираем подходящее время для переключения в дневной/ночной режим и жмём «Применить». Ничего сложного.
Ну а в завершение выпуска в очередной раз напомним о важности резервного копирования данных, создания дисковых образов и файловых архивов. В арсенале Windows 10 для этого имеются все необходимые средства, а регулярное и своевременное их использование позволит быстро восстановить работу компьютера в случае технических сбоев операционной системы.
Если Вы заметили ошибку — выделите ее мышью и нажмите CTRL+ENTER.
(Image credit: Mauro Huculak)
Windows 10 includes a slew of settings to customize the appearance of the desktop and apps, making them look better and reflecting your personality.
For example, you can change the desktop background with a custom image or use a theme from the Microsoft Store. You can enable the dark mode or change the color accent for visual elements. You can tweak and organize the Start menu and Taskbar, and you can adjust a variety of settings to change the entire look and feel of Windows 10.
In this how-to guide, I will explain how to customize the desktop appearance and make the experience more personal. (You can change the appearance of Windows 11 with these instructions.)
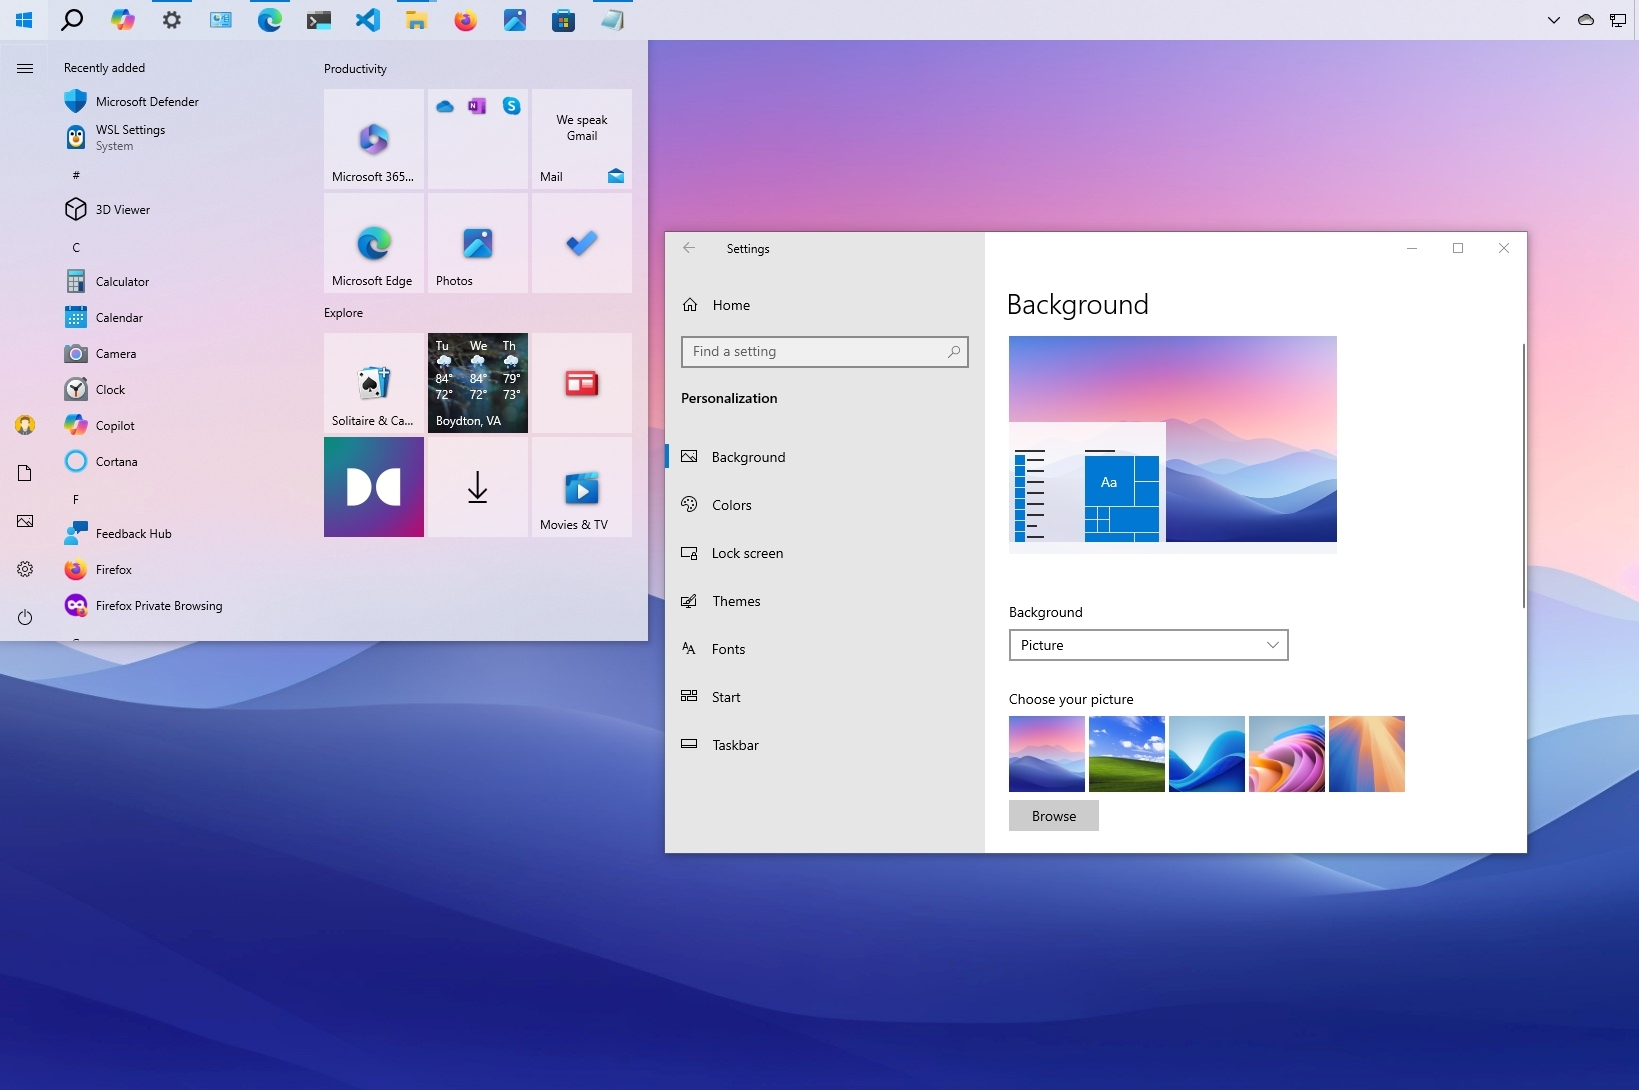
How to change desktop background on Windows 10
The easiest way to personalize Windows 10 is to change the desktop background with a custom image or collection of pictures.
Change desktop wallpaper
To change the Windows 10 desktop background, use these steps:
- Open Settings.
- Click on Personalization.
- Click on Background.
- Select the Picture option using the «Background» menu.
- Click the Browse button
- Choose the image to set as background.
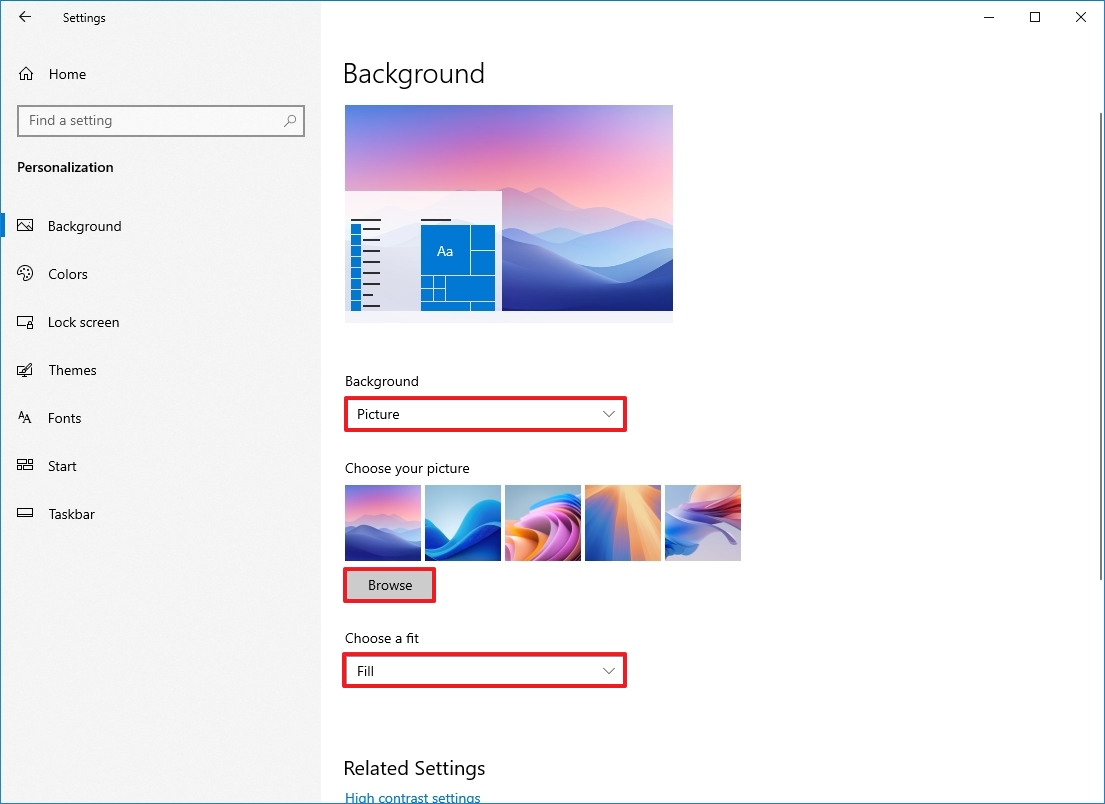
- Select the fit that best suits the images using the «Choose a fit» menu:
- Fill.
- Fit.
- Stretch.
- Center.
- Span.
If you have a multi-monitor setup, use these steps to choose a different background for each display.
Set up desktop slideshow
To showcase a picture collection on the desktop, use these steps:
All the latest news, reviews, and guides for Windows and Xbox diehards.
- Open Settings.
- Click on Personalization.
- Click on Background.
- Select the Slideshow option using the «Background» menu.
- Click the Browse button.
- Choose the folder with the picture collection.
- Select how often images should rotate using the «Change picture every» menu.
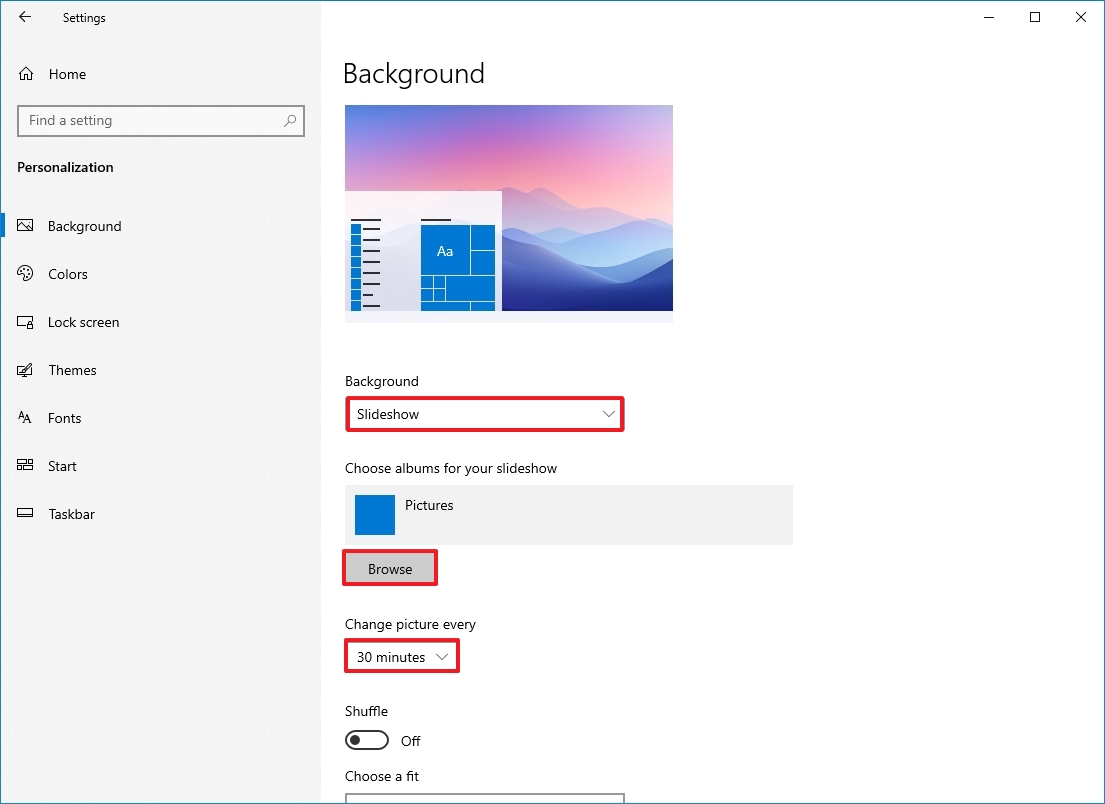
- (Optional) Turn on the Shuffle toggle switch to show images in random order.
- Select the fit that best suits the images using the «Choose a fit» menu:
- Fill.
- Fit.
- Stretch.
- Center.
- Span.
Once you complete these steps, the desktop will display the collection of pictures in the background at the intervals you specified.
How to change system colors on Windows 10
Windows 10 allows you to change the color accent for elements that appear across the experience, including for Start, taskbar, Action Center, title bars, and links in apps and Settings.
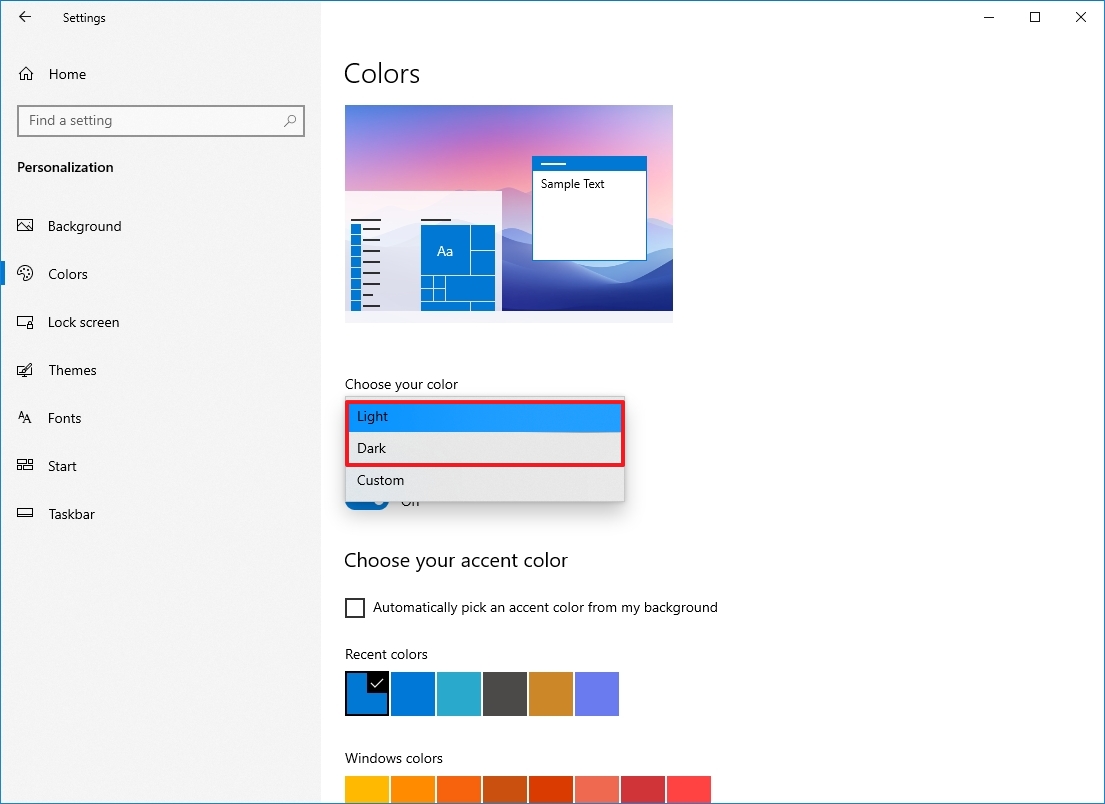
Enable dark or light mode
Windows 10 includes two personalization modes. The light mode is the default mode and works well during the daytime, and then there’s the dark mode, which uses a dark color scheme in backgrounds, other parts of the operating system, and supported apps. It’s also an option more suited for a low-light environment.
To switch between the light and dark modes, use these steps:
- Open Settings.
- Click on Personalization.
- Click on Colors.
- Select the Light or Dark mode using the «Choose your color» menu.
If you want to go a step further, you can use this guide to configure your computer to switch between the dark and light mode automatically.
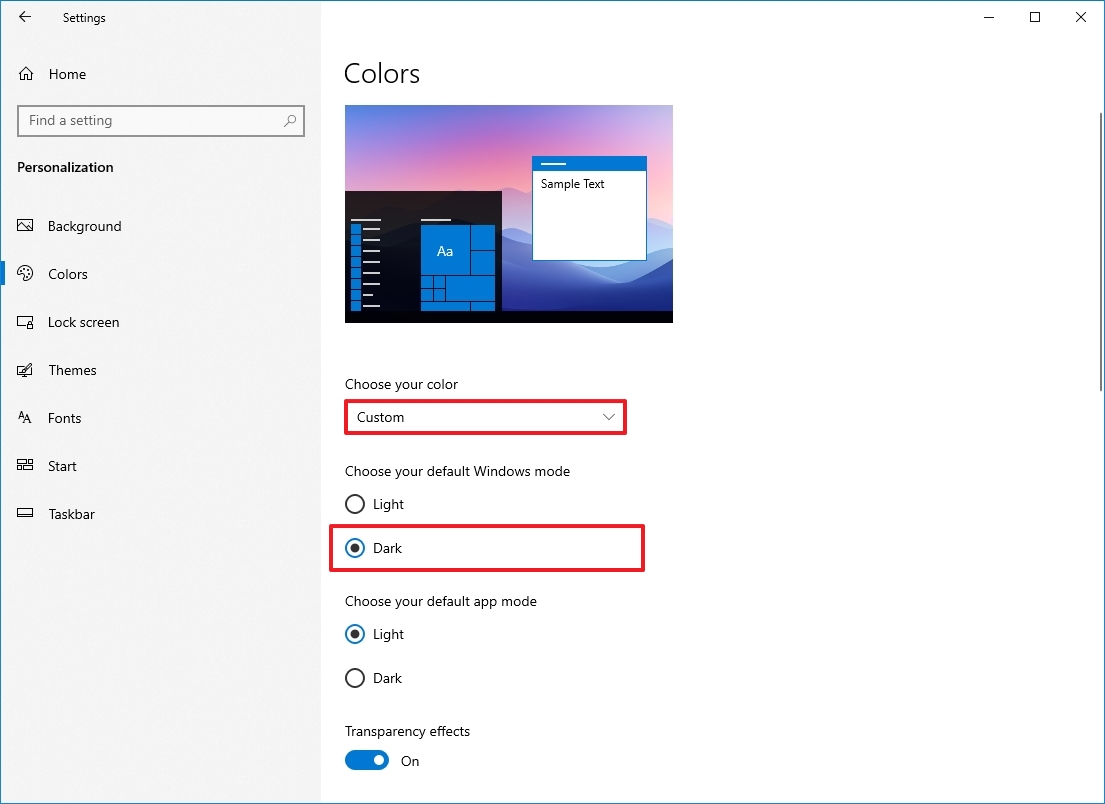
Set custom color mode
You can also use a custom color mode on Windows 10 using these steps:
- Open Settings.
- Click on Personalization.
- Click on Colors.
- Select the Custom option using the «Choose your color» menu.
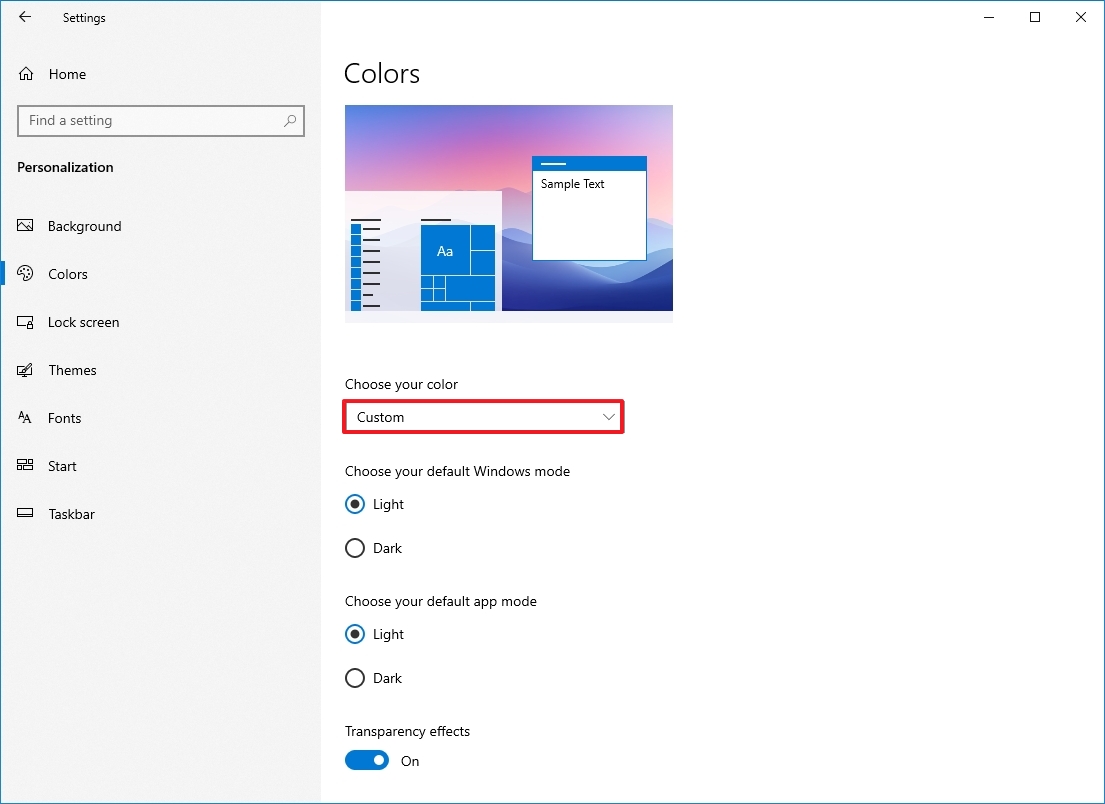
- Use the «Choose your default Windows mode» options to decide whether the Start, Taskbar, Notifications, and other elements should use light or dark color mode.
- Use the «Choose your default app mode» option to decide whether apps should use light or dark color modes.
After you complete the steps, the color mode will apply depending on your configuration.
If you want to use the original light color mode, you need to select «Dark» for the Windows mode and «Light» for the default app mode.
Control transparency effects
Some elements of Windows 10, such as the Start, taskbar, Notifications, and apps, include transparency effects with blur and noise textures. You can enable or disable these effects on the «Colors» page.
To enable or disable Windows 10 transparency, use these steps:
- Open Settings.
- Click on Personalization.
- Click on Colors.
- Turn on or off the Transparency effects toggle switch.
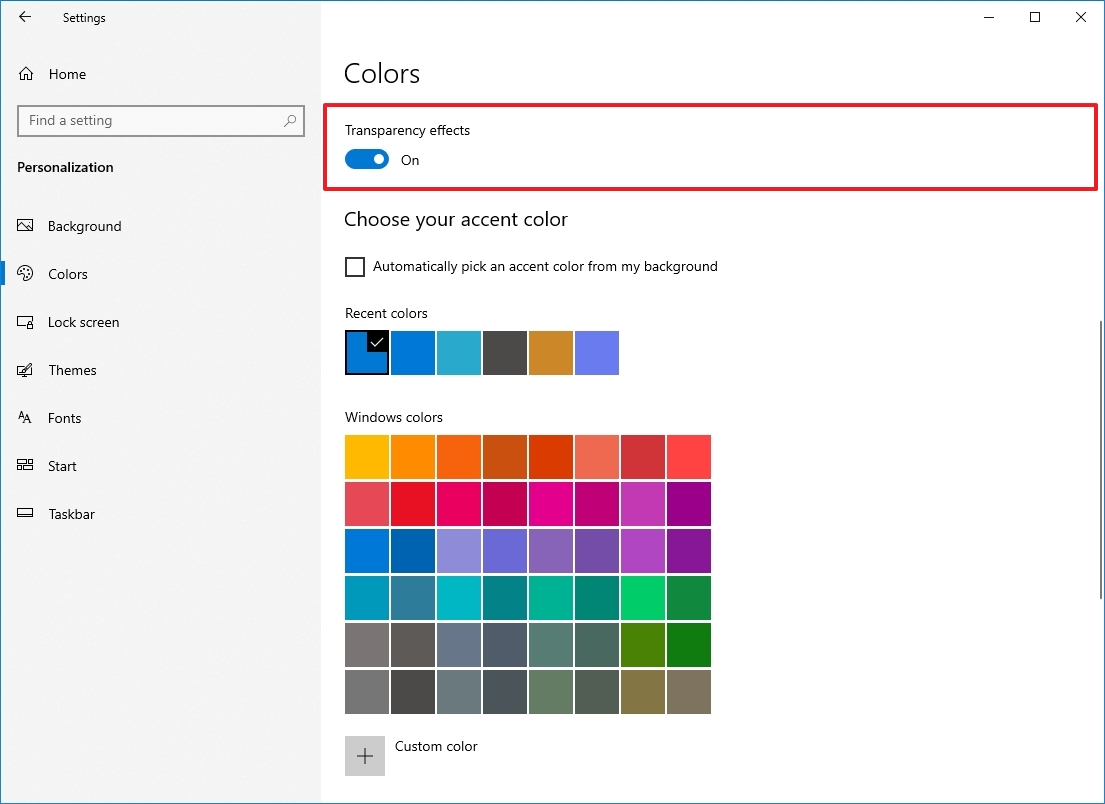
Once you complete the steps, transparency effects will be available according to your selection.
Select color accent
To change the system color on Windows 10, use these steps:
- Open Settings.
- Click on Personalization.
- Click on Colors.
- Select the color accent you want across Windows 10
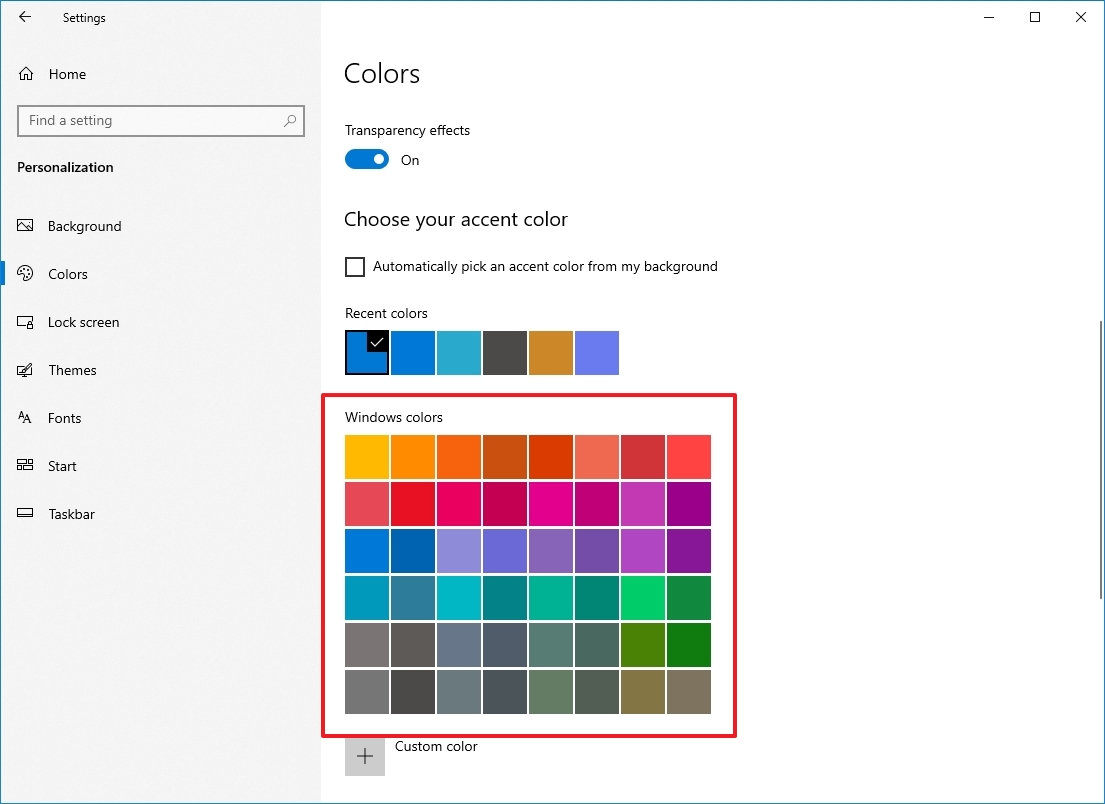
- Quick tip: If you want to use again a previous color, you can use the «Recent colors» list.
- (Optional) Check the «Automatically pick an accent color from my background» option under the «Choose your accent color» section to allow the system to set a color scheme based on the colors of the current wallpaper.
After you complete the steps, buttons, links, system icons, and other elements will switch to the color you specified. If you want to see Start, taskbar, Notifications, and other components use the same color scheme, you must enable the options at the bottom of the page.
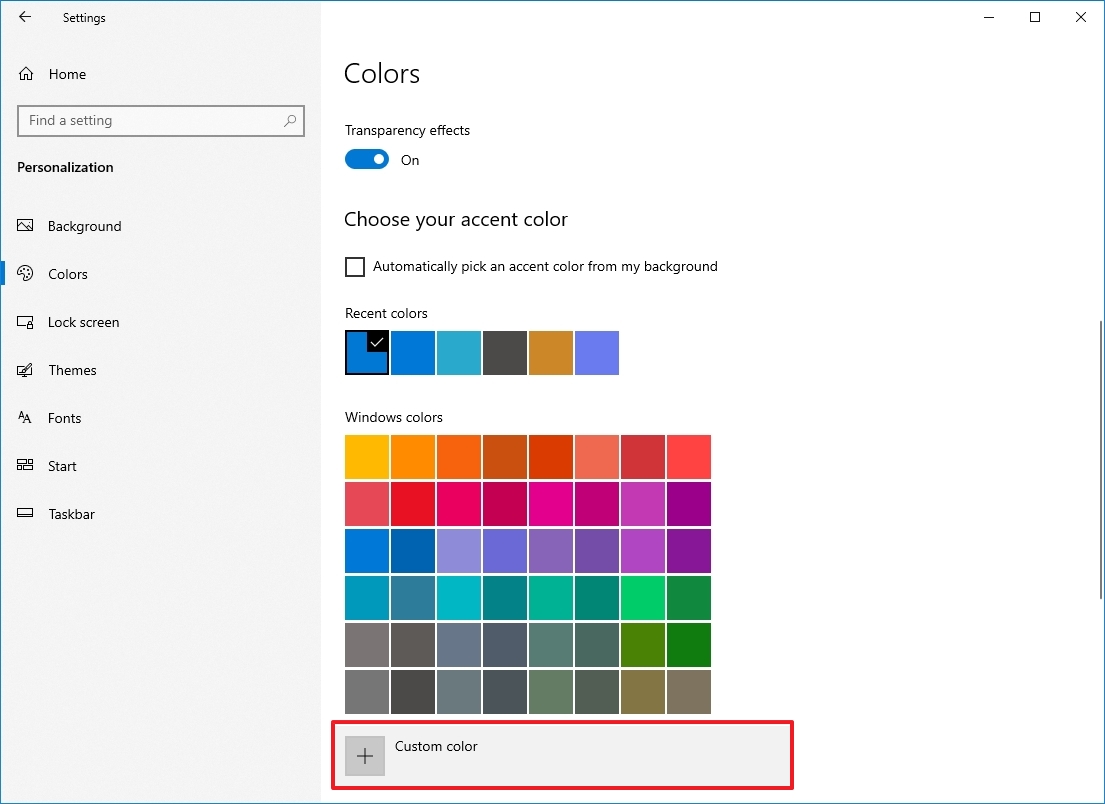
Create custom accent color
If the color you want isn’t on the list, you can create a custom one using these steps:
- Open Settings.
- Click on Personalization.
- Click on Colors.
- Click the Custom color button.
- Create a custom color using the palette.
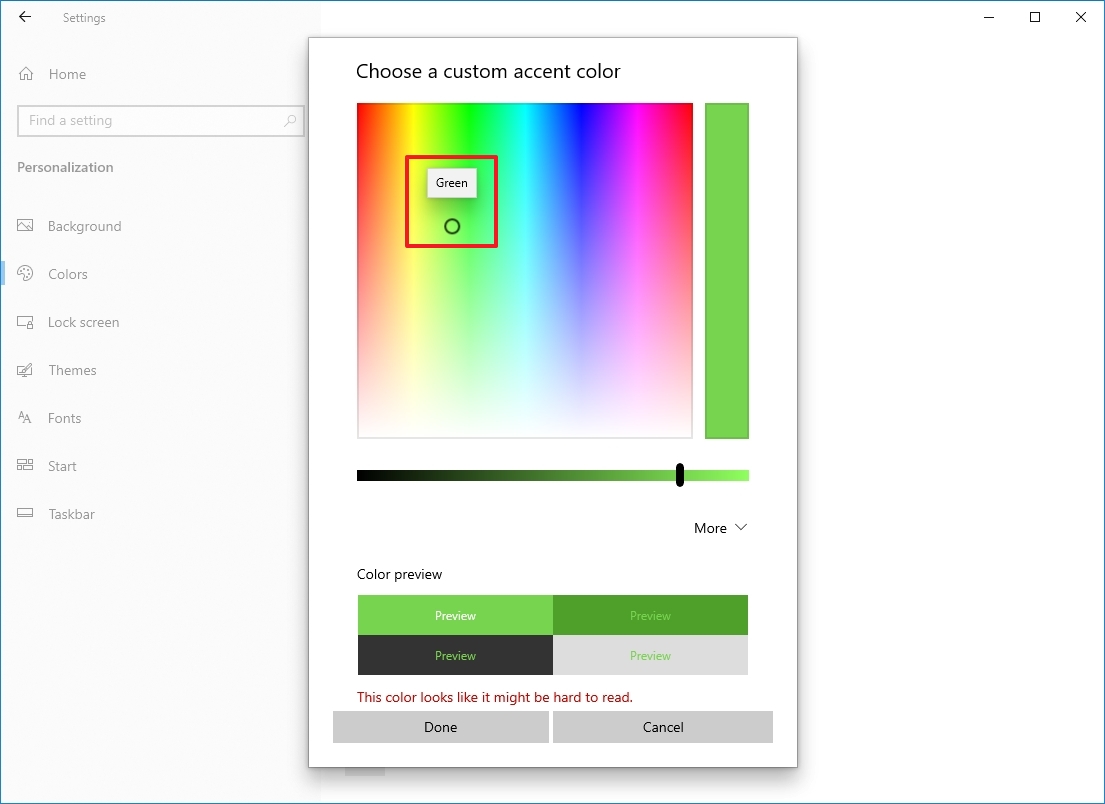
- (Optional) Click the More button to use RGB or HSV codes to create a new color.
- Click the Done button.
Once you complete the steps, the desktop will use the custom color you created.
Set accent color for elements
Windows 10 uses a dark and light color scheme for the Start, Taskbar, Notifications, and File Explorer out of the box. You can also use an accent color to customize these elements further.
To show accent color for Windows 10 elements, use these steps:
- Open Settings.
- Click on Personalization.
- Click on Colors.
- Select the Custom option using the «Choose your color» menu.
- Choose the Dark option using the «Choose your default Windows mode» option.
- Check the «Start, taskbar, and action center» option under the «Show accent color on the following surfaces» section.
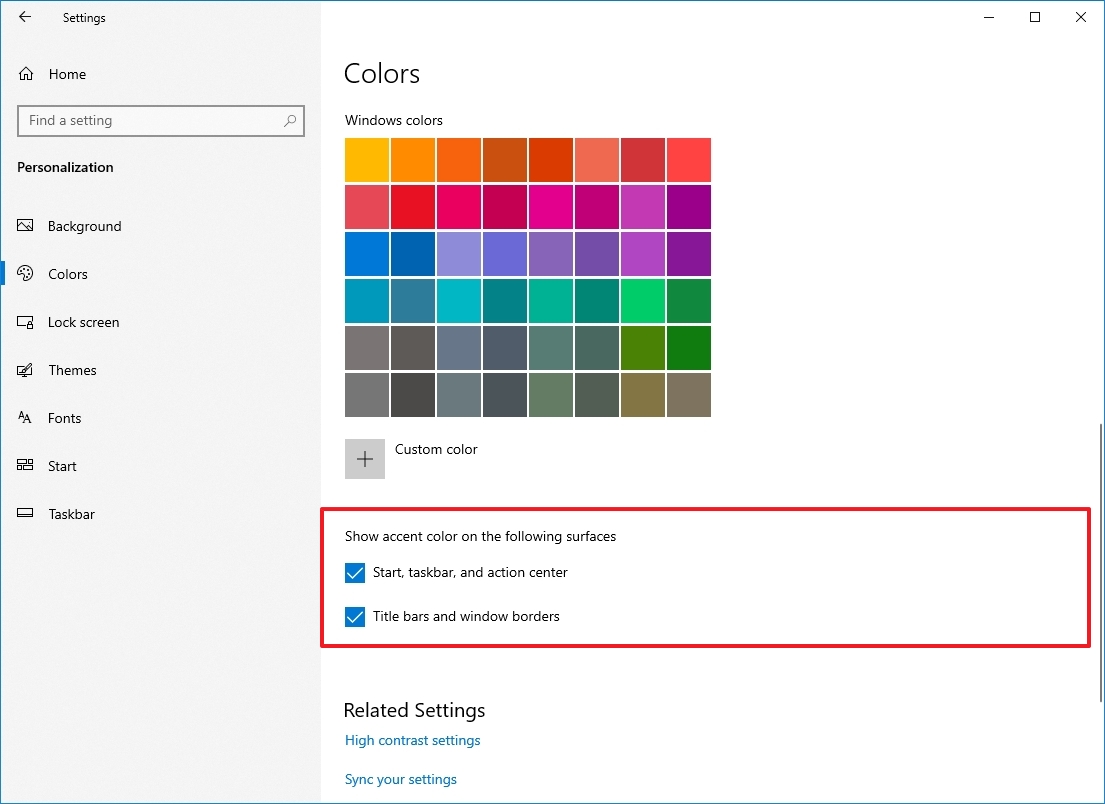
- Check the «Title bars and window borders» option.
After you complete the steps, the Start menu, Taskbar, Notifications, and other elements will use the selected color instead of a dark or light color scheme.
How to customize the Lock screen on Windows 10
You can also customize the Lock screen, which is the screen that slides up every time you need to get to the Sign-in screen.
Set custom image on Lock screen
The lock screen uses «Windows Spotlight» as the default option to display different backgrounds every time you sign in to Windows 10, and while this option pulls stunning images from the cloud, you can also set any image you want.
To use a custom image on the Windows 10 Lock screen, use these steps:
- Open Settings.
- Click on Personalization.
- Click on Lock screen.
- Select the Picture option using the «Background» menu.
- Click the Browse button.
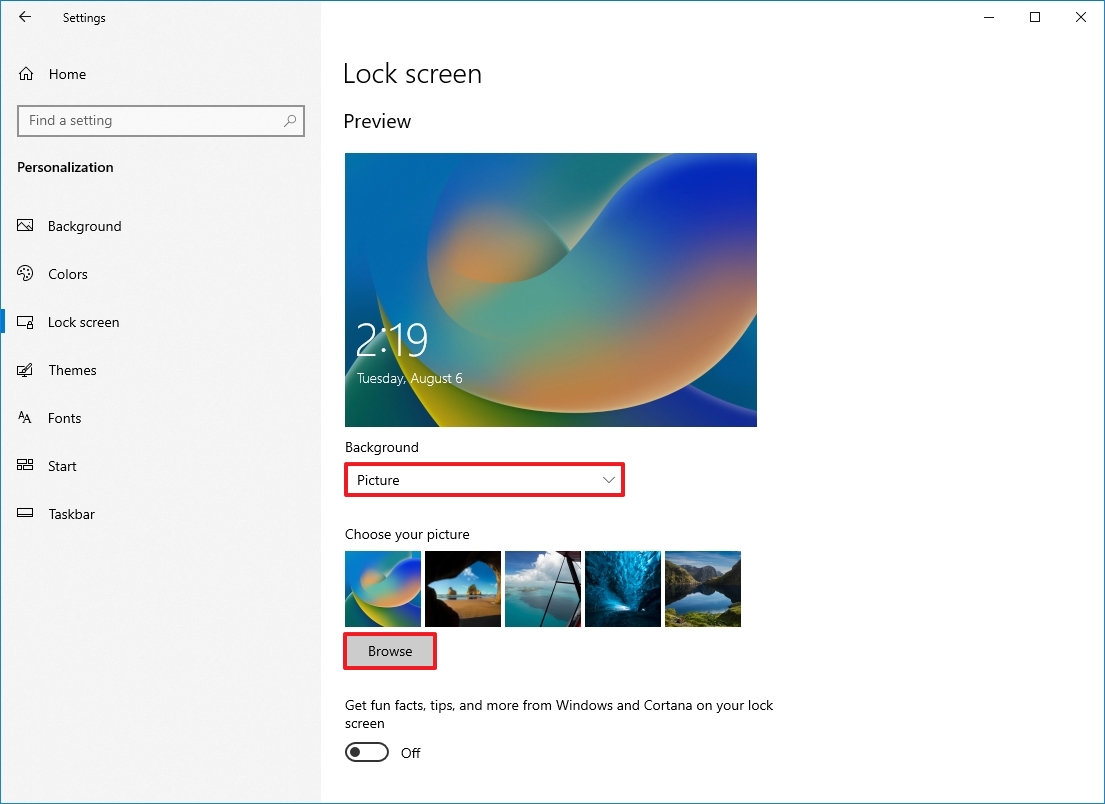
- Select the picture you want to use.
- Click the Choose picture button.
- (Optional) Turn off the «Get fun facts, tips, tricks, and more on your lock screen» option.
Once you complete the steps, the Lock screen will show the custom image that you selected.
Display slideshow on Lock screen
To show a collection of pictures in the Lock screen, use these steps:
- Open Settings.
- Click on Personalization.
- Click on Lock screen.
- Select the Slideshow option using the «Background» menu.
- Click the «Add a folder» button to locate the folder with the images you want to see.
- Quick tip: You can delete a source by selecting the item from the list and clicking the «Remove» button.
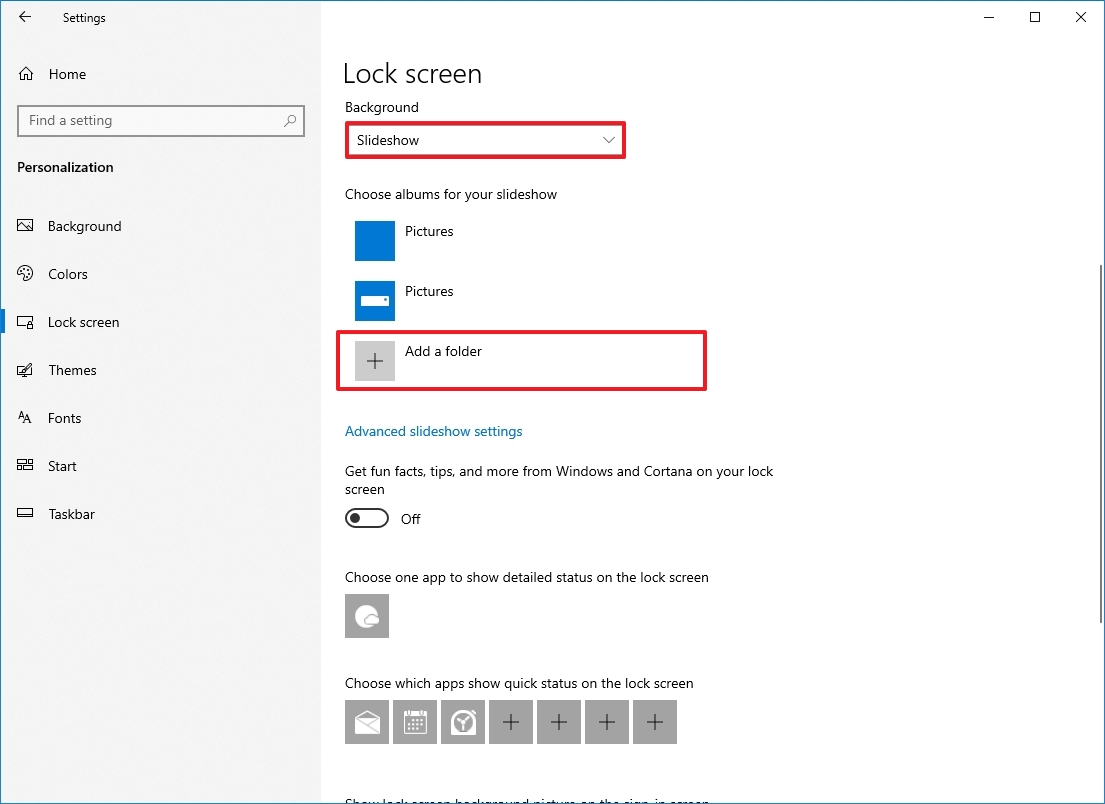
- (Optional) Turn off the «Get fun facts, tips, tricks, and more on your lock screen» option.
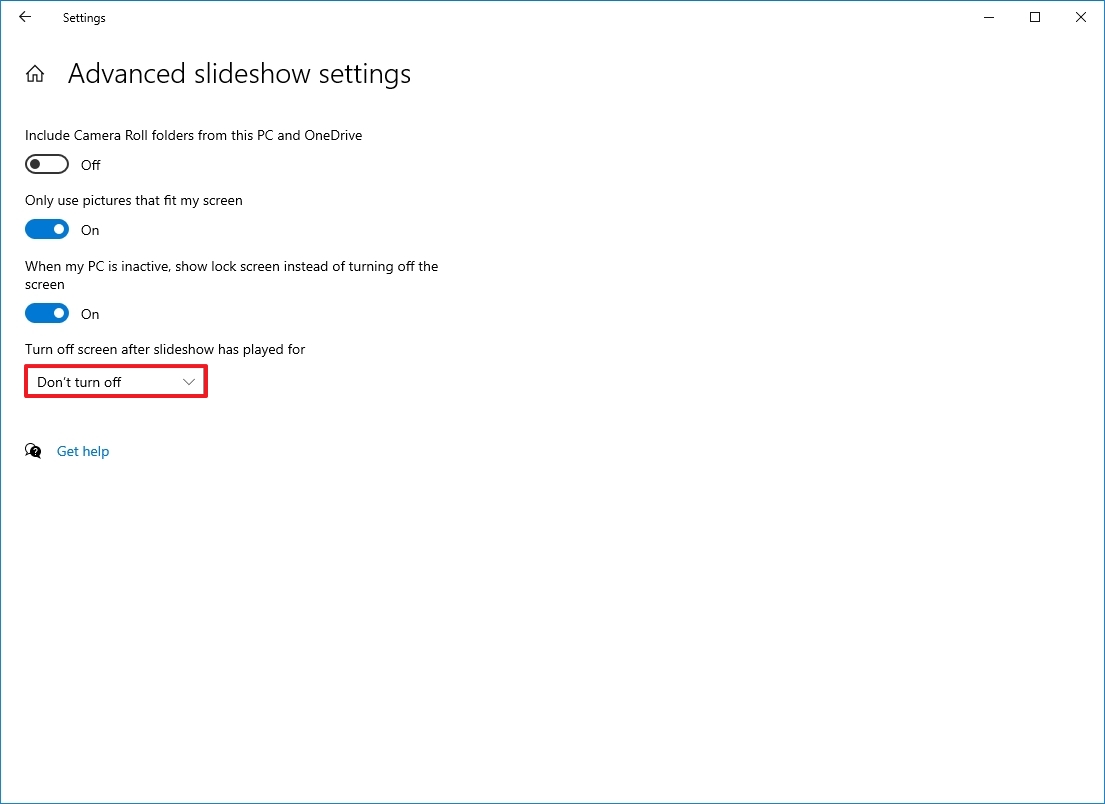
- (Optional) Click the «Advanced slideshow settings» option.
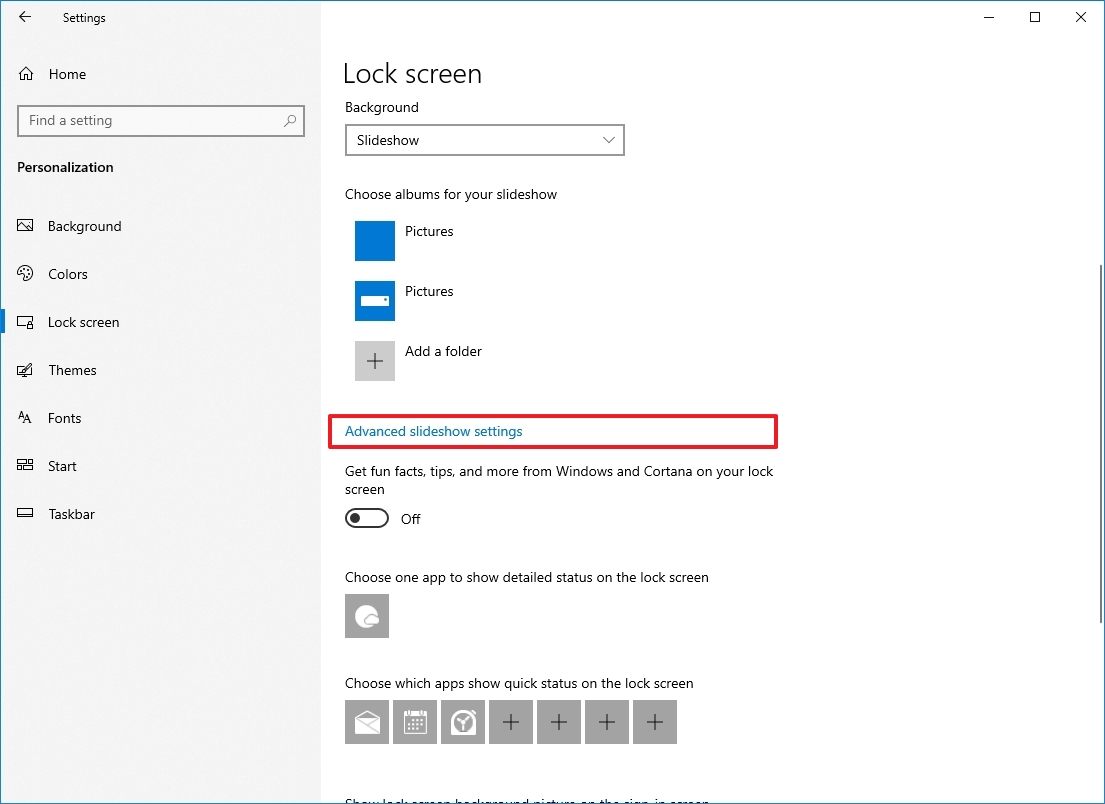
- Select the slideshow settings:
- Include Camera Roll folders from this PC and OneDrive.
- Only use pictures that fit my screen.
- When my PC is inactive, show lock screen instead of turning off the screen.
- Use the «Turn off screen after the slideshow has played for» menu and select when turning off the monitor.
After you complete the steps, every time you power on your device, the Lock screen will show a different image background from the collection.
Enable Windows Spotlight on Lock screen
On Windows 10, it’s also possible to show background images dynamically in the Lock screen similarly like in the desktop.
To enable Spotlight on the Lock screen, use these steps:
- Open Settings.
- Click on Personalization.
- Click on Lock screen.
- Select the Windows Spotlight option using the «Background» menu.
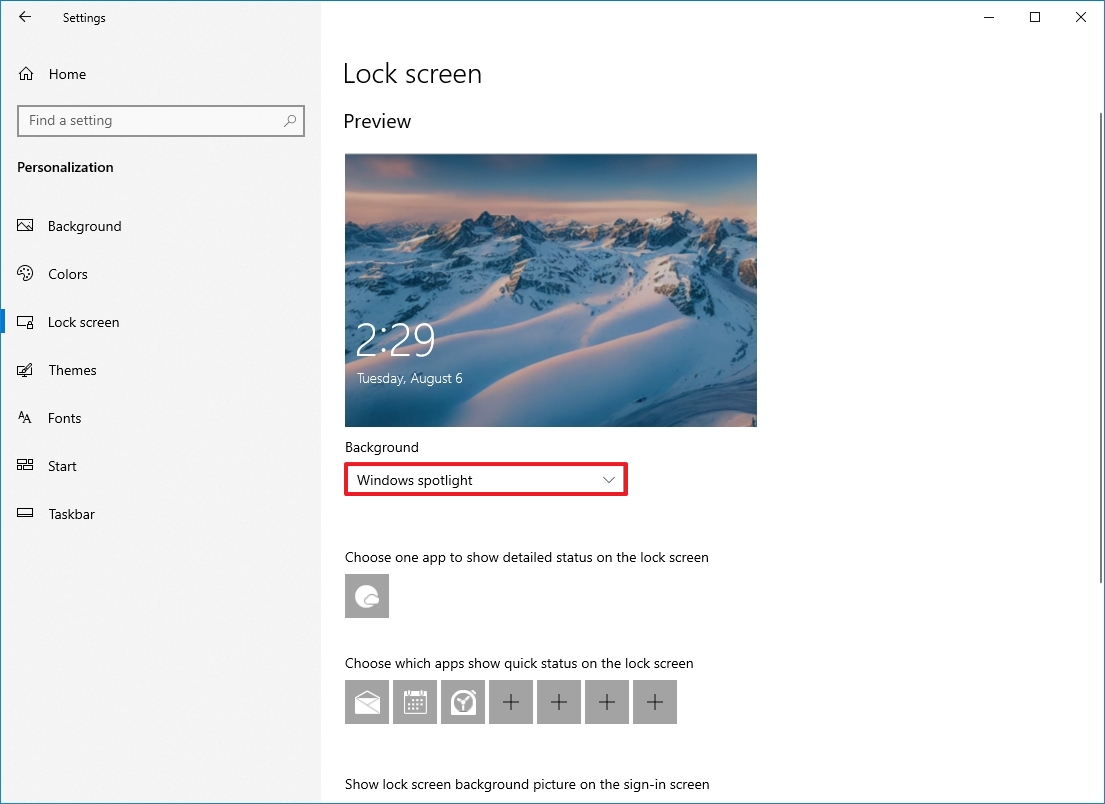
Once you complete the steps, the Lock screen will periodically showcase different wallpapers downloaded automatically from the cloud.
Control weather notifications on Lock screen
The Lock screen, by default, shows the weather along with other widgets for news, sports, and finance, but you can always enable or disable this feature or choose other apps to show notifications.
To manage the Lock screen notification settings, use these steps:
- Open Settings.
- Click on Personalization.
- Click on Lock screen.
- Under the «Choose one app to show detailed status on the lock screen» section, click the plus (or app icon) button and select the «Weather and more» option to show weather information or the «None» option to disable it.
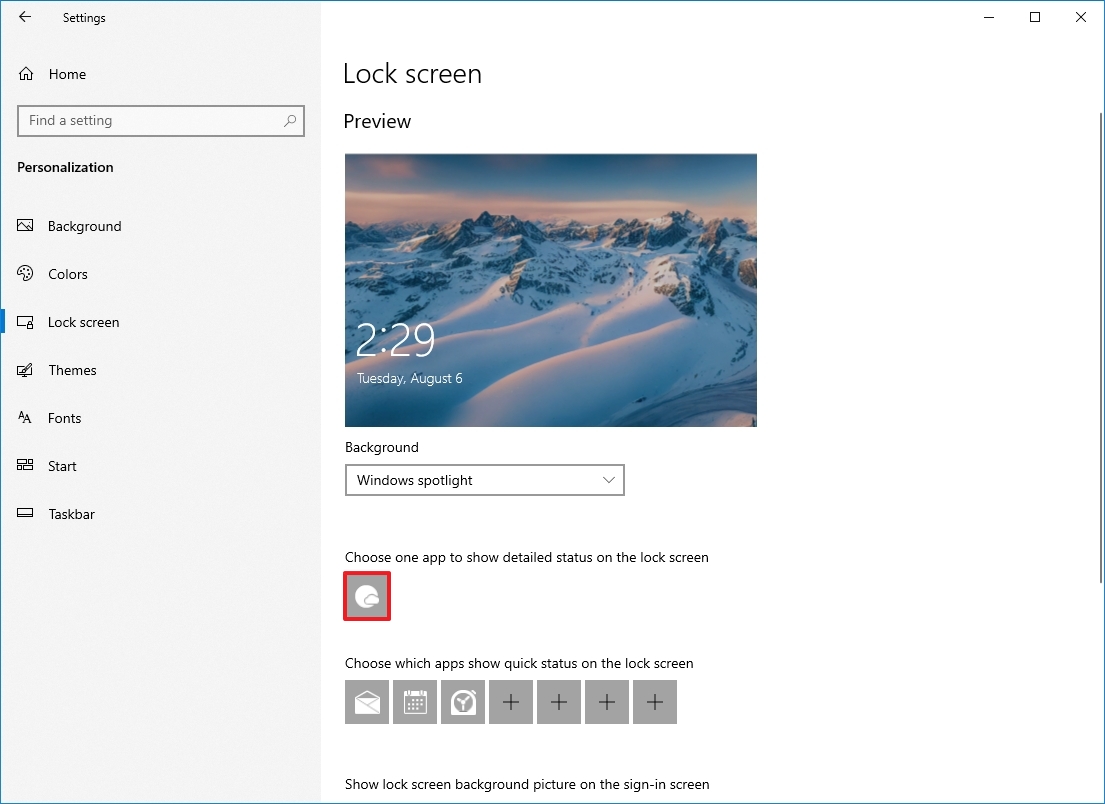
- Under the «Choose which apps show quick status on the lock screen» section, click the plus (or app icon) button and select an app.
- Repeat step 5 to show up to six apps with quick status on the lock screen.
Once you complete the steps, the Lock screen will display notifications for apps in the bottom-left corner of the screen.
Disable Sign-in screen background
Windows 10 shows the same lock screen background on the sign-in screen, and you can disable this behavior if you only want to show a solid color background.
To disable the Sign-in screen background, use these steps:
- Open Settings.
- Click on Personalization.
- Click on Lock screen.
- Turn off the «Show lock screen background picture on the sign-in screen» toggle switch.
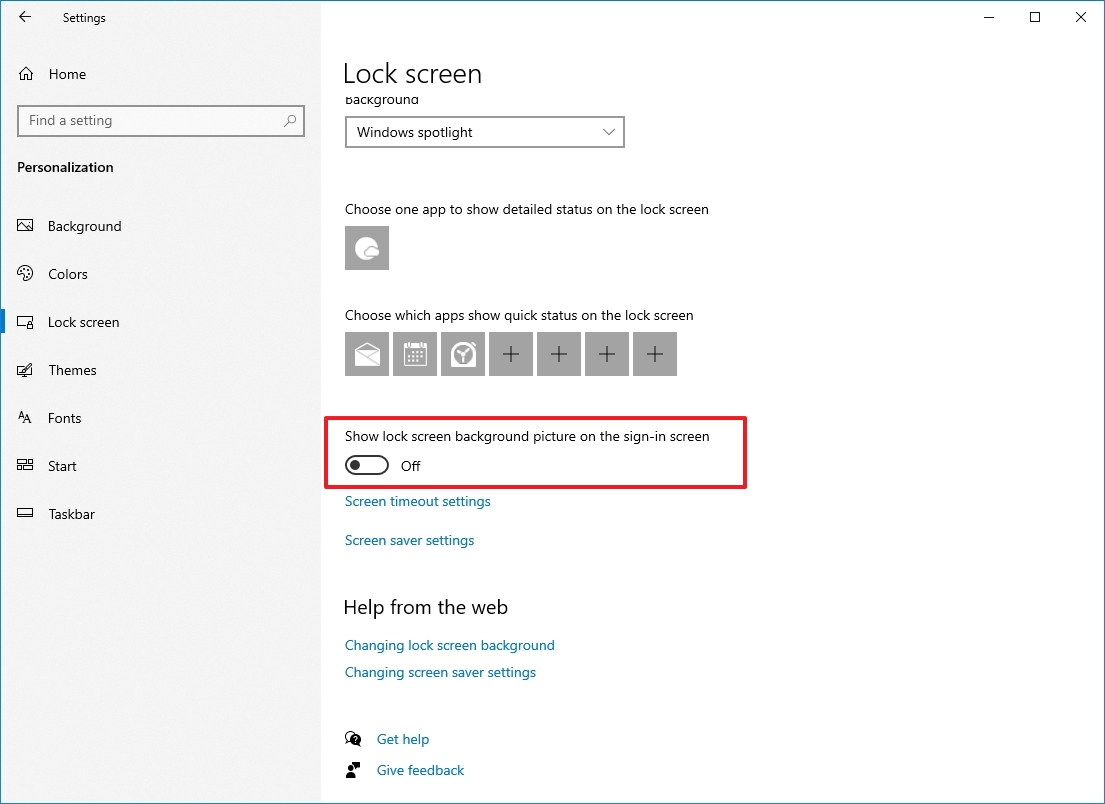
After you complete the steps, the Sign-in screen will display a solid color as the background.
How to change themes on Windows 10
On Windows 10, a theme is a small package containing one or more background images, accent colors, and, in some cases, sounds. If you want to personalize your desktop, you can choose from hundreds of them from the Microsoft Store.
To download and install a new theme on Windows 10, use these steps:
- Open Settings.
- Click on Personalization.
- Click on Themes.
- Click the «Get more themes in the Microsoft Store» option.
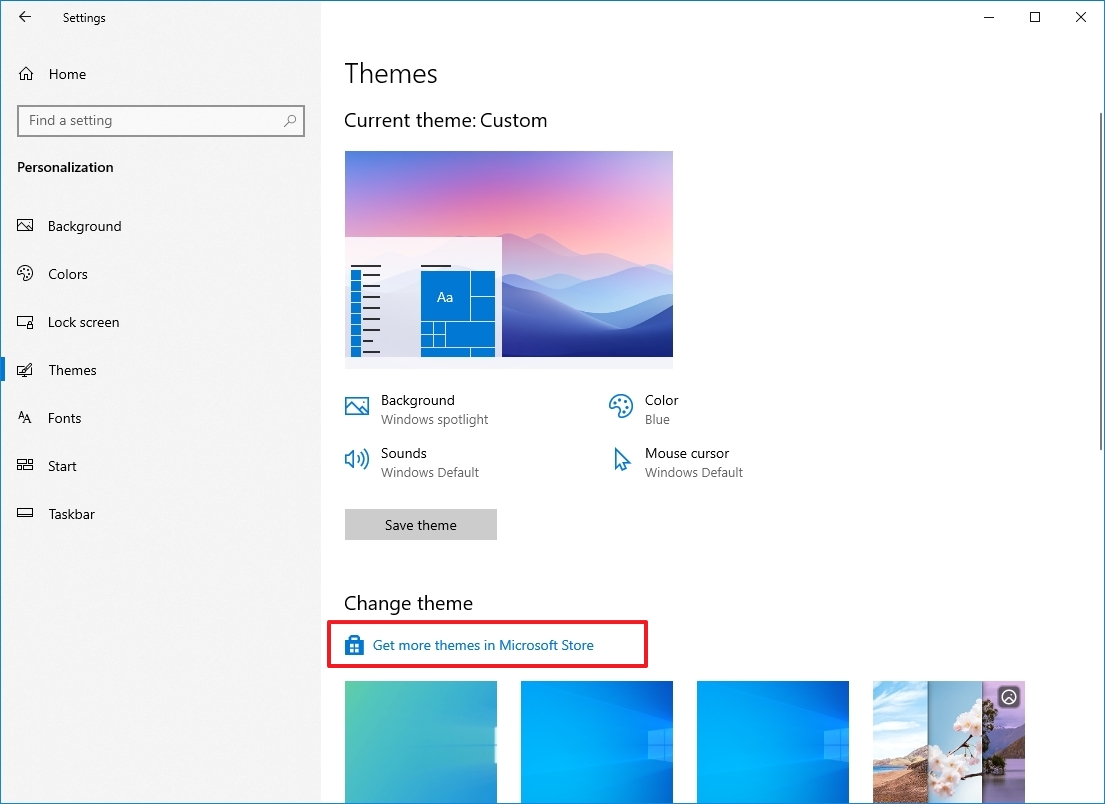
- Select the theme you want.
- Click the Get (or Install) button.
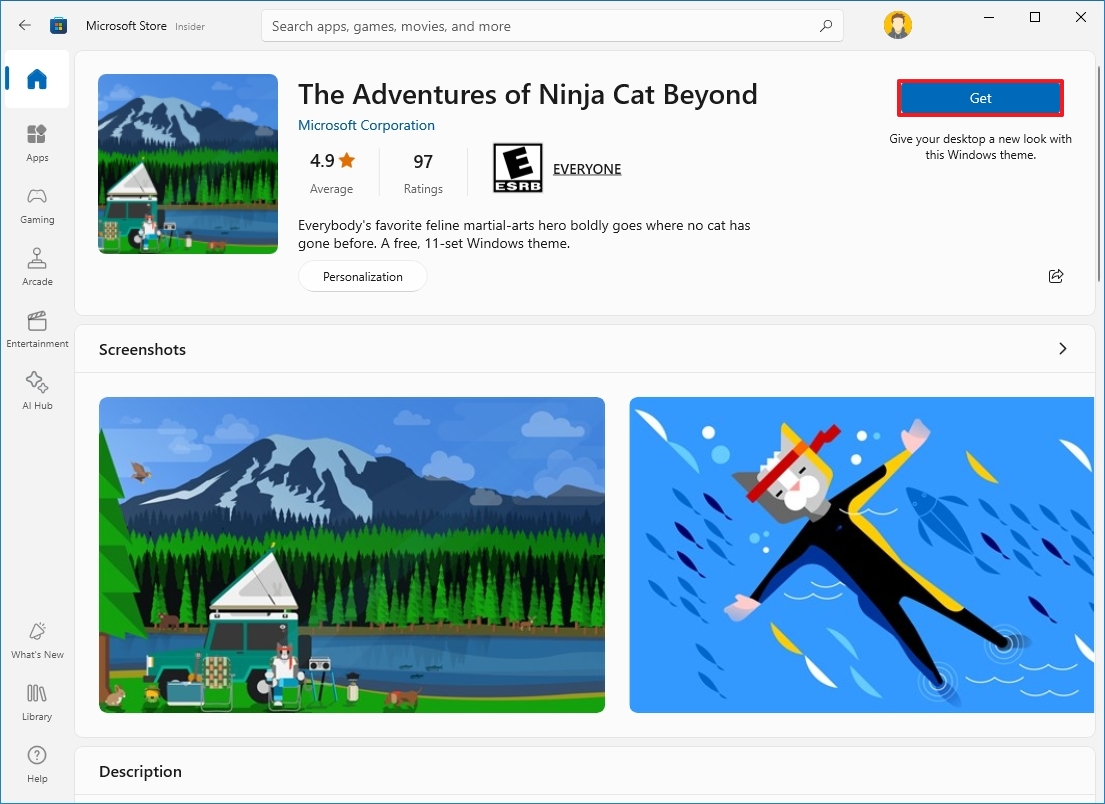
- Click the Apply button.
- Click the newly added theme to apply it from the «Themes» page.

Once you complete the steps, the theme will apply, and the background will be updated with a collection of images and custom accent colors.
How to customize the Start menu on Windows 10
The Start menu is an essential component of Windows 10, as it’s the experience where you can find your apps, settings, and files.
There are several ways to customize the menu. Some of the settings can be customized from Start itself, and some additional options can be configured through the Settings app.
To customize the Start menu with the Settings app, use these steps:
- Open Settings.
- Click on Personalization.
- Click on Start.
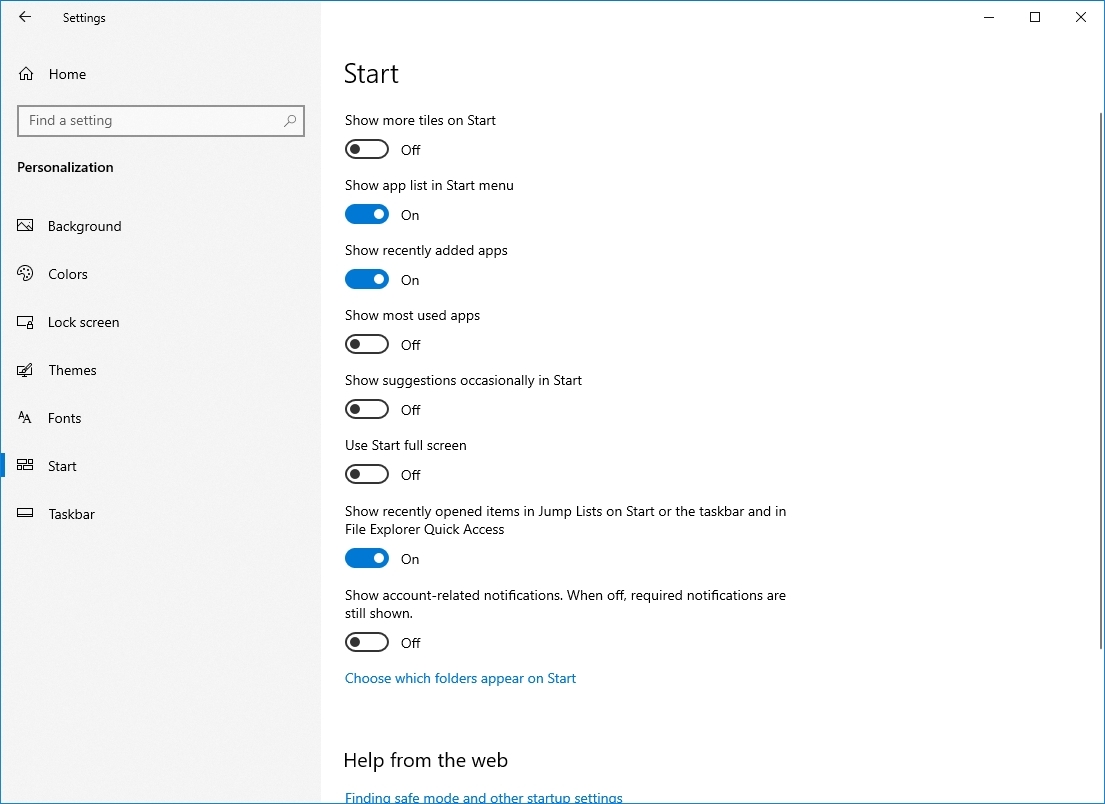
The Start page includes several options you can customize, including:
- Show more tiles on Start — Allows you to add a fourth column of tiles to fit up to 8 (small) tiles in a single row.
- Show app list in Start menu — Disabling this option will remove the all apps list with only access to your pinned Live Tiles. You can continue to access the apps clicking the All apps button on the top-left, or typing a search as you open the menu.
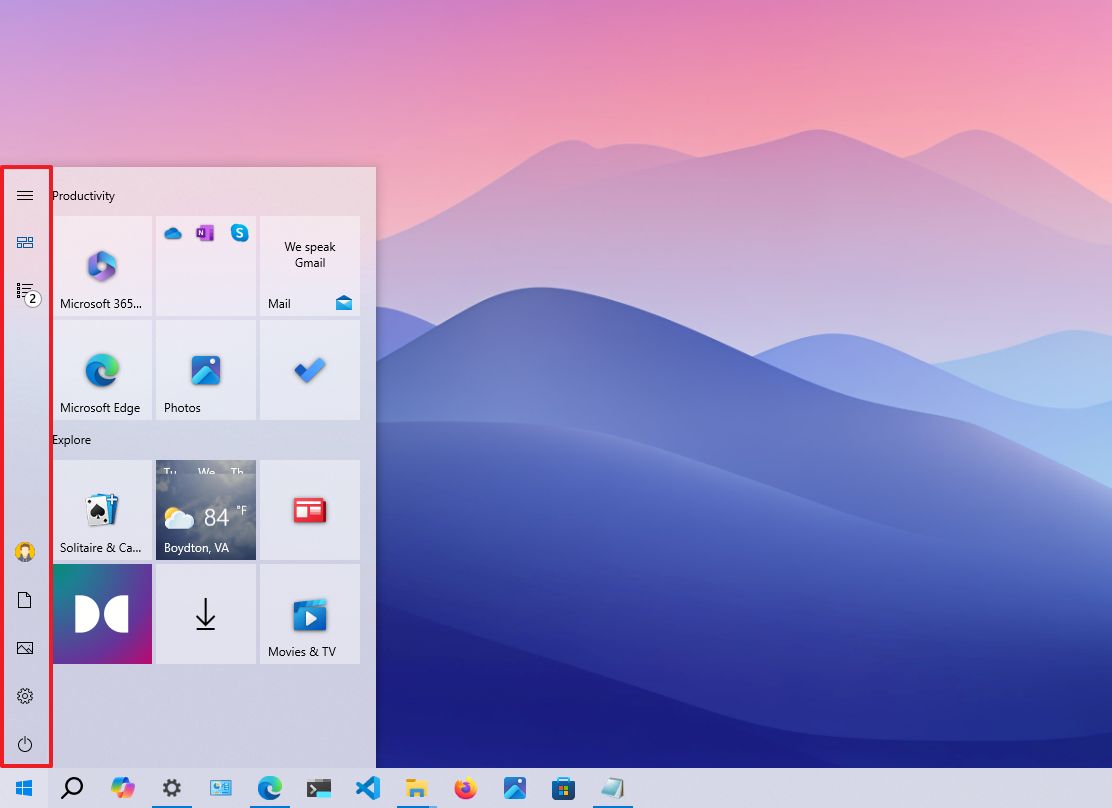
- Show recently added apps — If you’re not interested in seeing the «Recently added» list, you can turn off this option.
- Show most used apps — The Start menu lists your more frequently used apps, but you can disable this option if you only want to see all the apps.
- Occasionally show suggestions in Start — You can disable this option to prevent seeing recommendations from the Microsoft Store.
- Use full screen — Enables a Windows 8.1 Start screen-like experience to stretch the menu across the desktop, allowing you to see more pinned tiles without scrolling.
Control folders on Start
To add or remove quick folder access from the Start menu, use these steps:
- Open Settings.
- Click on Personalization.
- Click on Start.
- Click the «Choose which folders appear on Start» option.
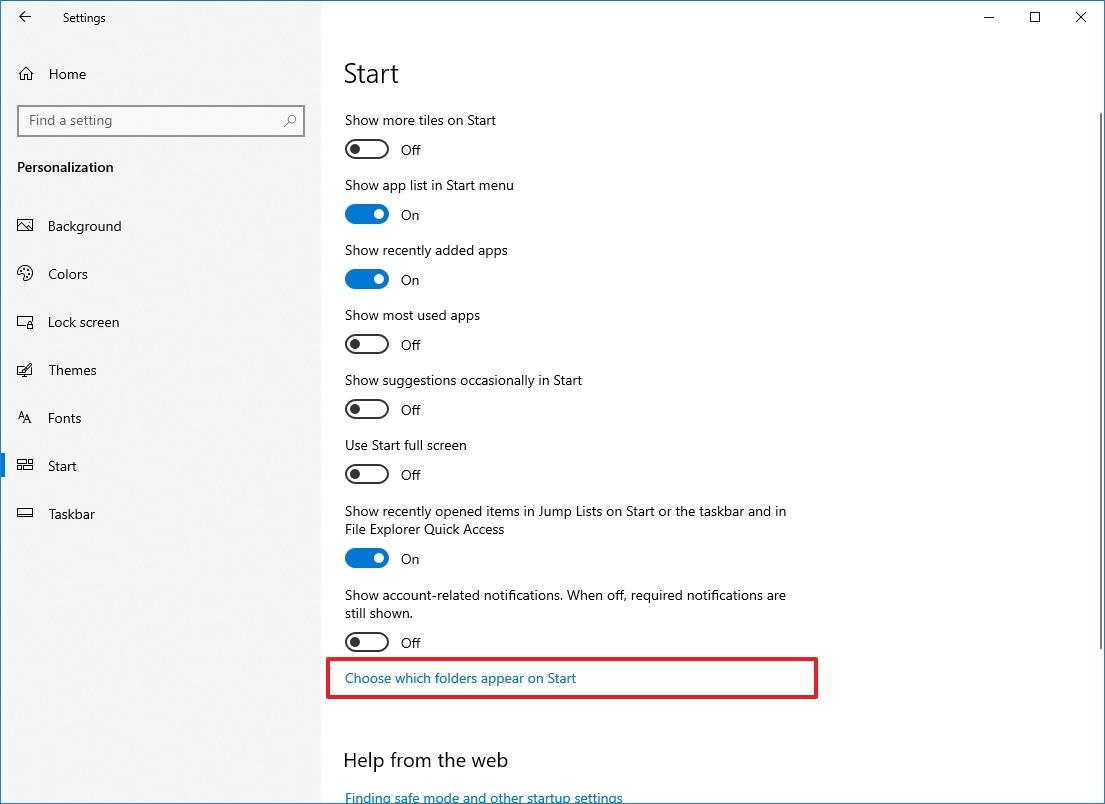
- Turn on or off the toggle switches for the items you want to be listed in the Start menu.
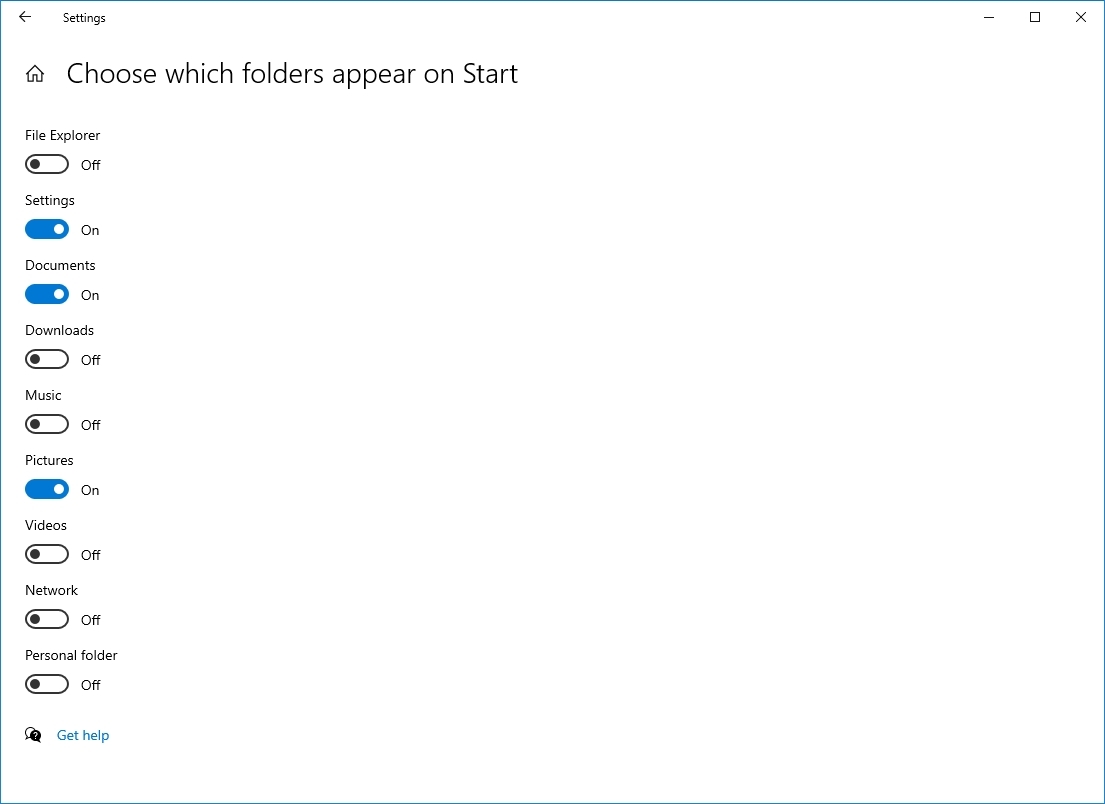
Once you complete the steps, the left rail menu will only include access to the folder you specified.
Customize Live Tiles
In addition to the customization options available, you can also personalize the experience from within the menu.
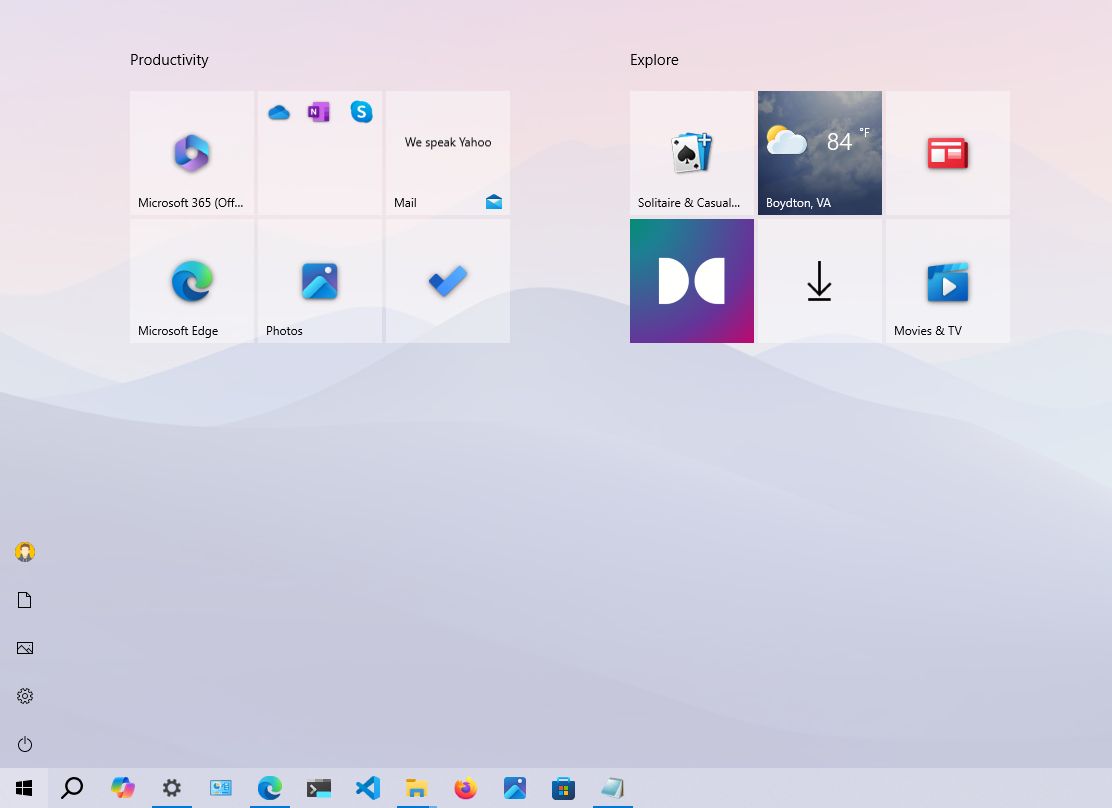
Resizing Start
You can resize the menu vertically and horizontally by stretching the edges outwards using the mouse.
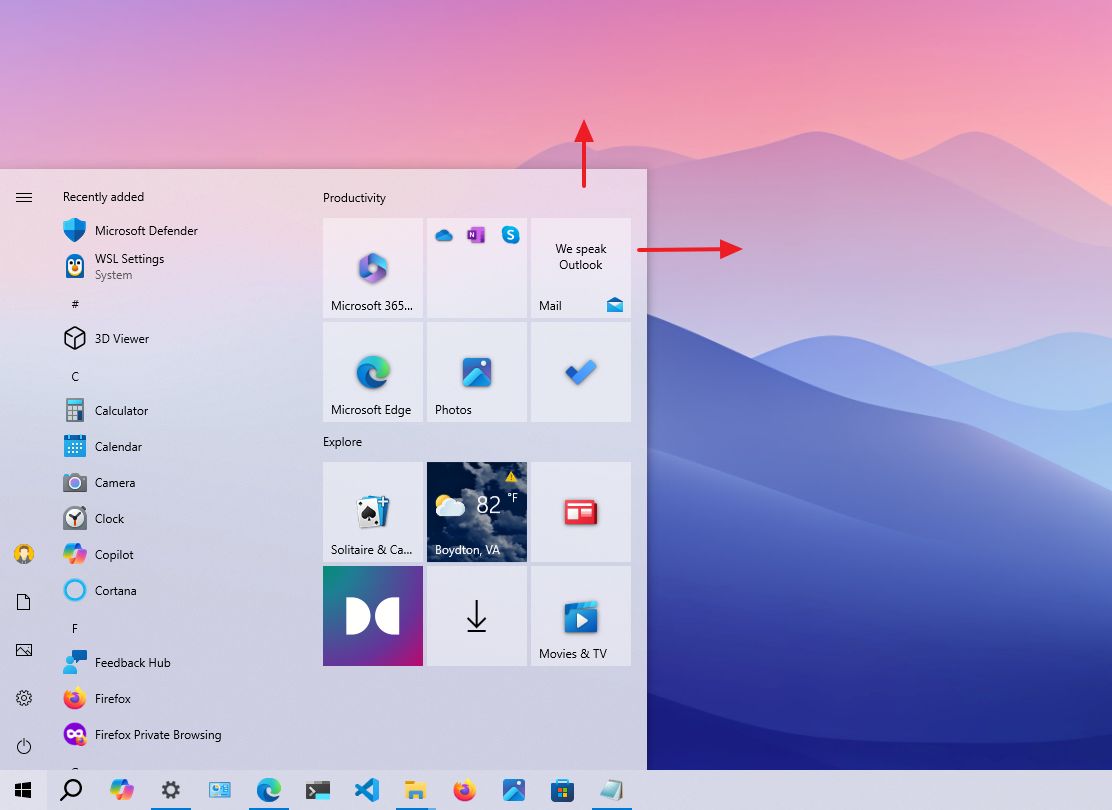
You can also open the menu and use the «Ctrl + arrow keys» keyboard shortcut to change the height and width.
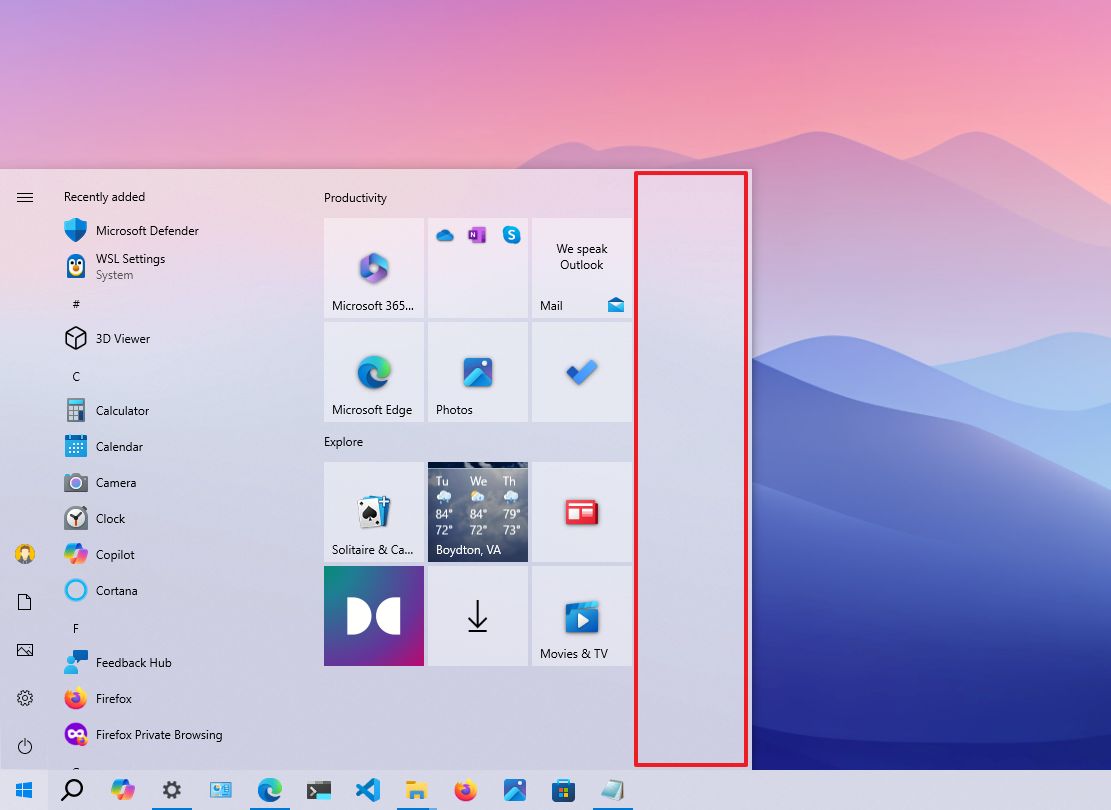
Working with tiles, folders, and groups
The Start menu provides the ability to drag tiles around, group tiles together in sections, and create folders anywhere on the menu.
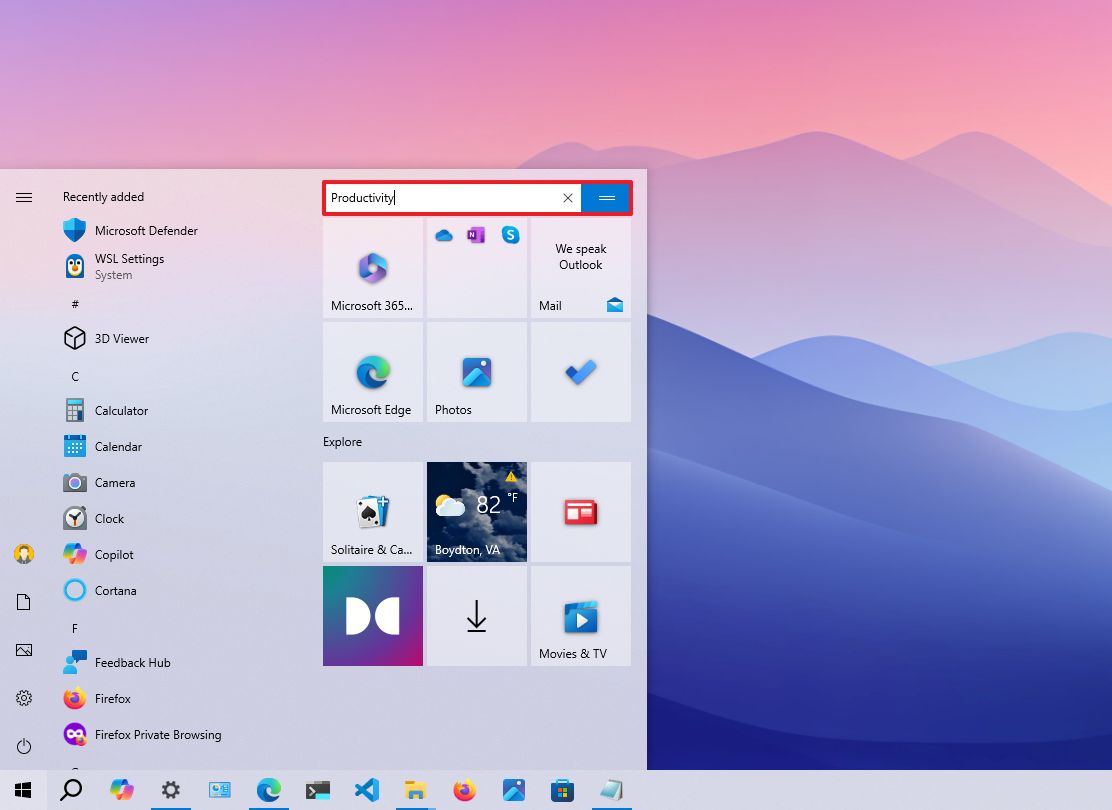
To better organize your app tiles, you can create a group by dragging tiles into an empty space. You can even click the group’s header to change its name to anything that makes more sense for the group—and yes, emojis are supported.
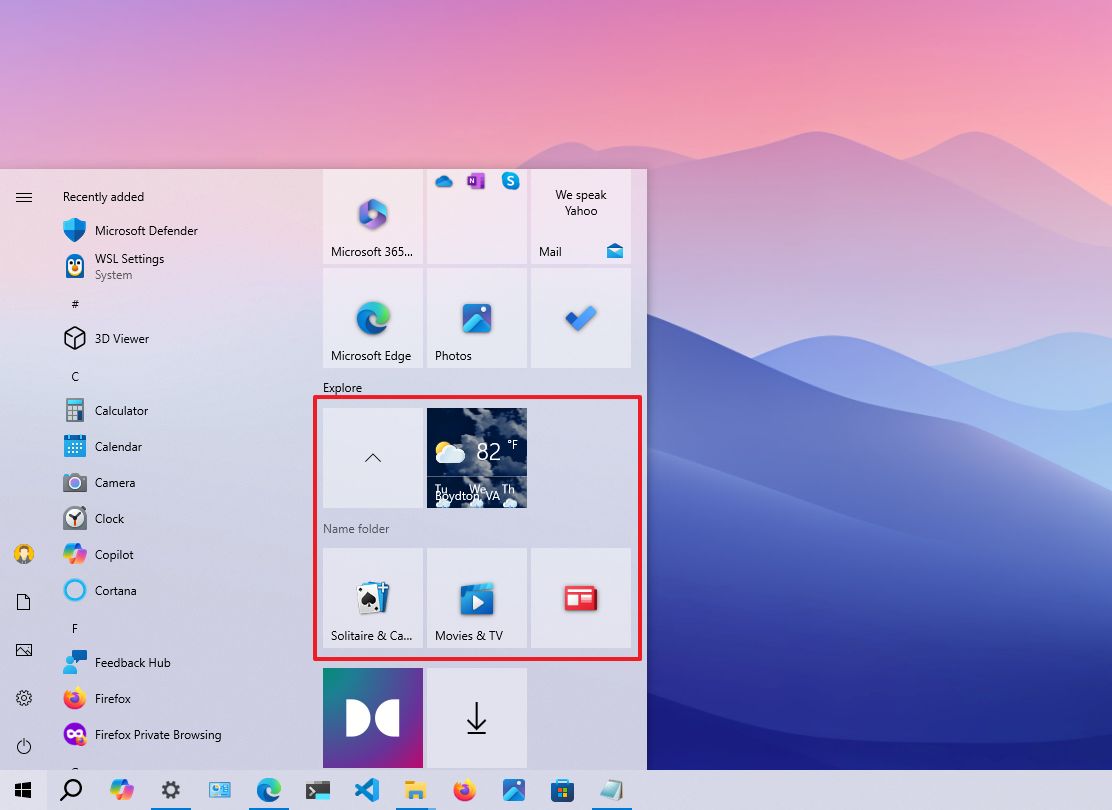
You can also create folders, which is another way to group tiles to optimize the Start menu space. You can create a new folder by dragging and dropping a tile on top of another tile. Then, dropping more items into the folder will add them to the group.
Live Tiles and folders include support for different sizes, which you can change by right-clicking a tile, selecting the «Resize» menu, and choosing from one of the available sizes, including «Small,» «Medium,» «Wide,» or «Large.»
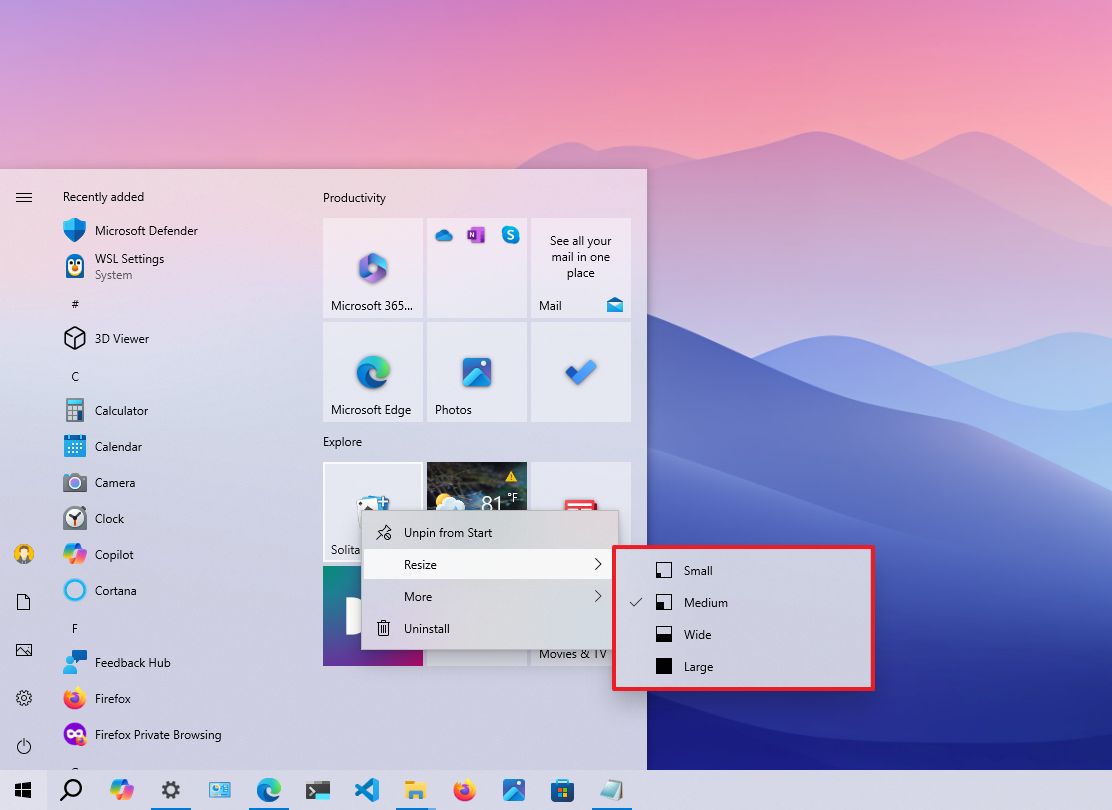
If you’re not interested in live updates, right-click the tile, select the «More» menu, and choose the «Turn Live Tile off» option. Depending on the app, you may also see additional options, such as the option to pin or unpin the taskbar, run it with administrator privileges, and more.

How to customize Taskbar on Windows 10
The Taskbar is perhaps one of Windows 10’s essential components, and you can customize it in many ways using the Settings app and options available within the experience.
Change Taskbar settings
To change basic Taskbar settings on Windows 10, use these steps:
- Open Settings.
- Click on Personalization.
- Click on Taskbar.
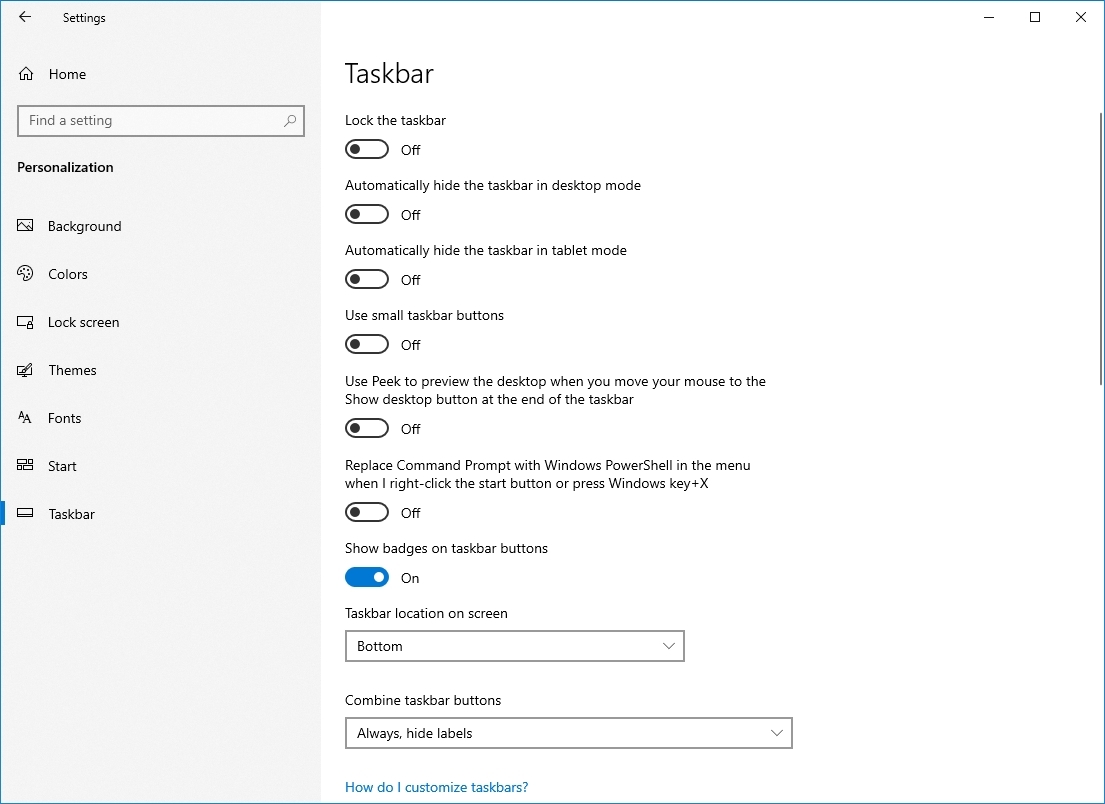
In the Taskbar page, you can change many basic settings, including:
- Lock the taskbar — When enabled, you can’t move or resize the taskbar. If disabled, you can click and drag the taskbar to any side of the screen, and you drag the edge of the bar to change the height.
- Automatically hide the taskbar in desktop mode — If enabled, the bar will stay hidden, unless you’re actively interacting with it in normal mode.
- Automatically hide the taskbar in tablet mode — If enabled, the bar will stay hidden, unless you’re actively interacting with it in tablet mode.
- Use small taskbar buttons — Allows you to use smaller buttons to reduce the footprint of the taskbar.
- Show badges on taskbar buttons — Apps in the taskbar can show status notifications, and this option lets you disable or enable the feature.
Change Taskbar location
Although you can change the location of the taskbar by dragging it around with the mouse, this page also includes a drop-down menu that allows you to relocate the bar anywhere you like.
To change the Taskbar location, use these steps:
- Open Settings.
- Click on Personalization.
- Click on Taskbar.
- Select the location using the «Taskbar location on screen» menu:
- Left.
- Top.
- Right.
- Bottom.
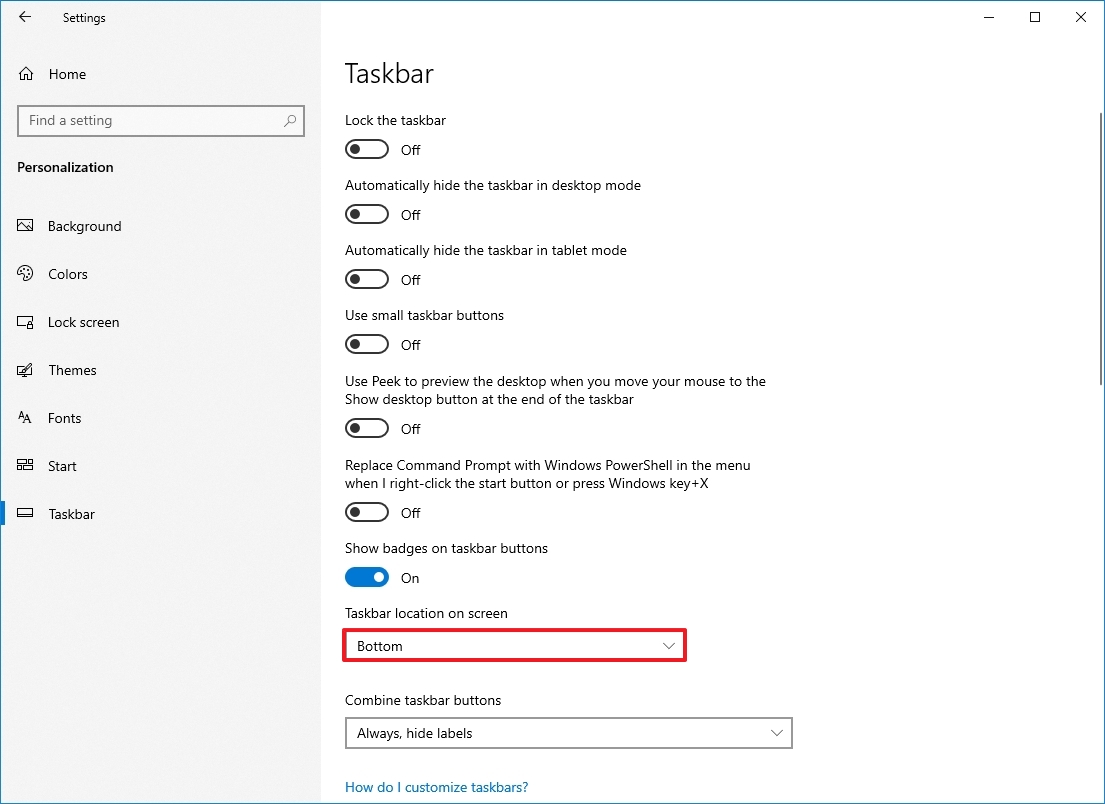
After you complete the steps, the taskbar will relocate to the side of the screen you selected.
Customize Taskbar visuals
The taskbar also lets you combine buttons in three different ways, including always combine and hide their labels (default), show labels and combine buttons only when the taskbar is full, and never combine and show button labels.
To combine the Taskbar buttons, use these steps:
- Open Settings.
- Click on Personalization.
- Click on Taskbar.
- Select the best option for you using the «Combine taskbar buttons» menu:
- Always, hide labels.
- When taskbar is full.
- Never.
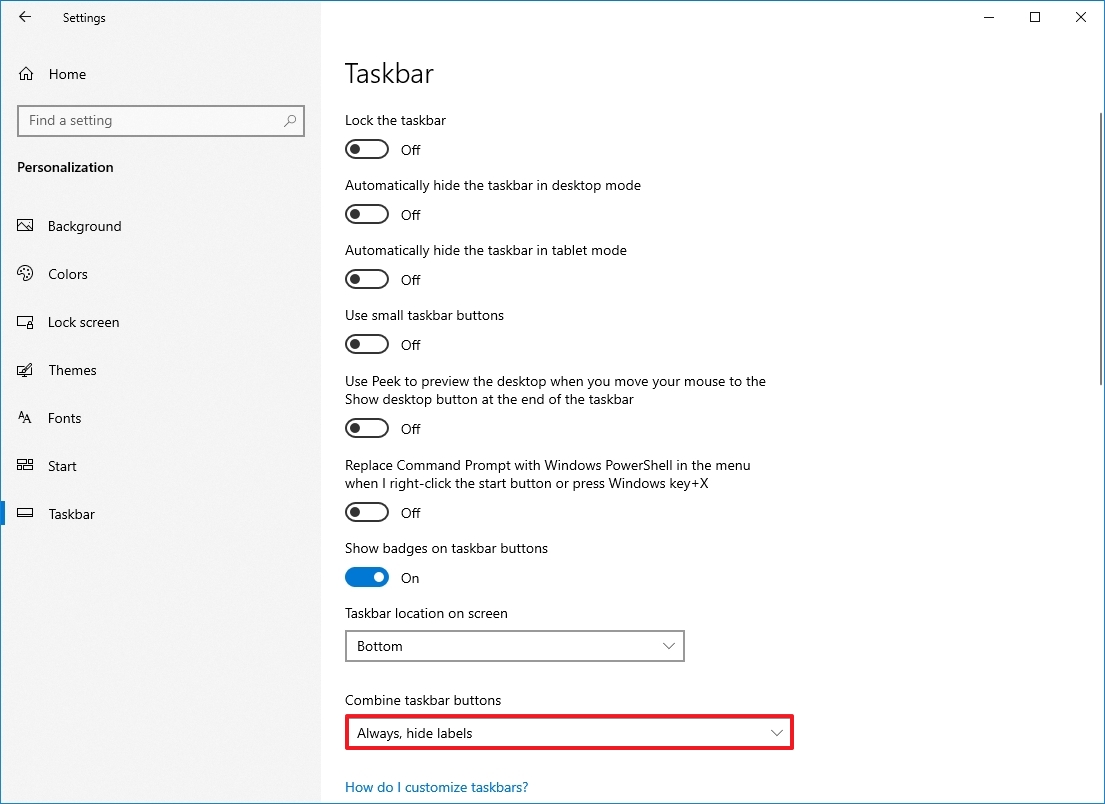
Once you complete the steps, the taskbar the changes will apply accordingly.
Customize notification area
The bottom-right corner of the taskbar is where the notification area is located, and it usually gets cluttered with system and app icons. However, you can customize it to show only the icons you need using these steps:
- Open Settings.
- Click on Personalization.
- Click on Taskbar.
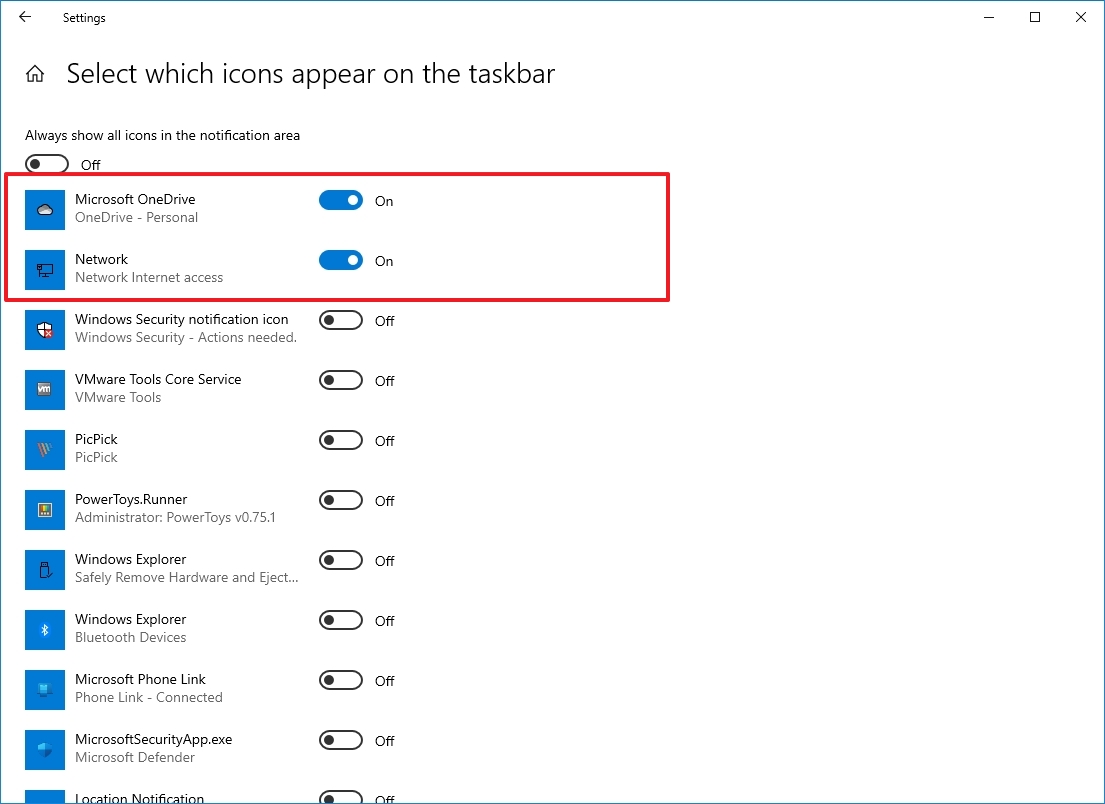
- Click the «Select which icons appear on the taskbar» option under the «Notification area» section.
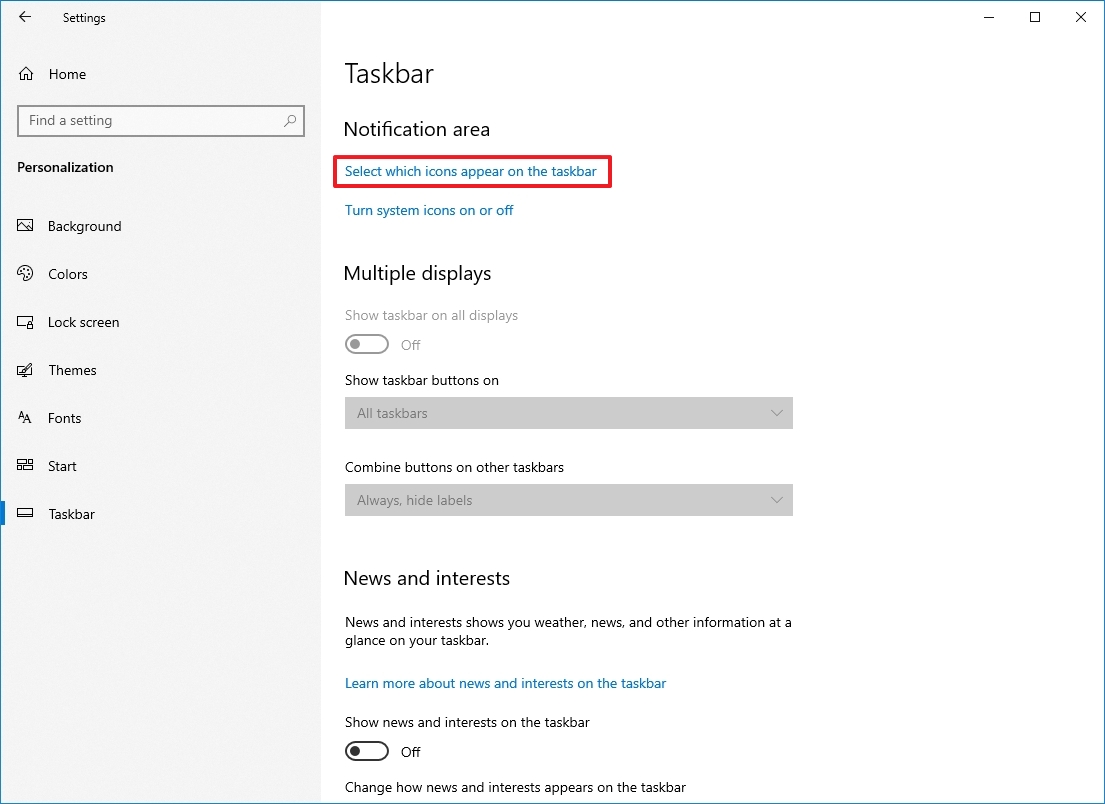
- Turn on the toggle switch for each icon you want to appear in the bottom-right corner of the screen.
Quick tip: There’s also a toggle switch to always show all icons in the notification area, but it’ll clutter the taskbar reducing the space to pin apps.
- Click the «Turn system icons on or off» option under the «Notification area» section.
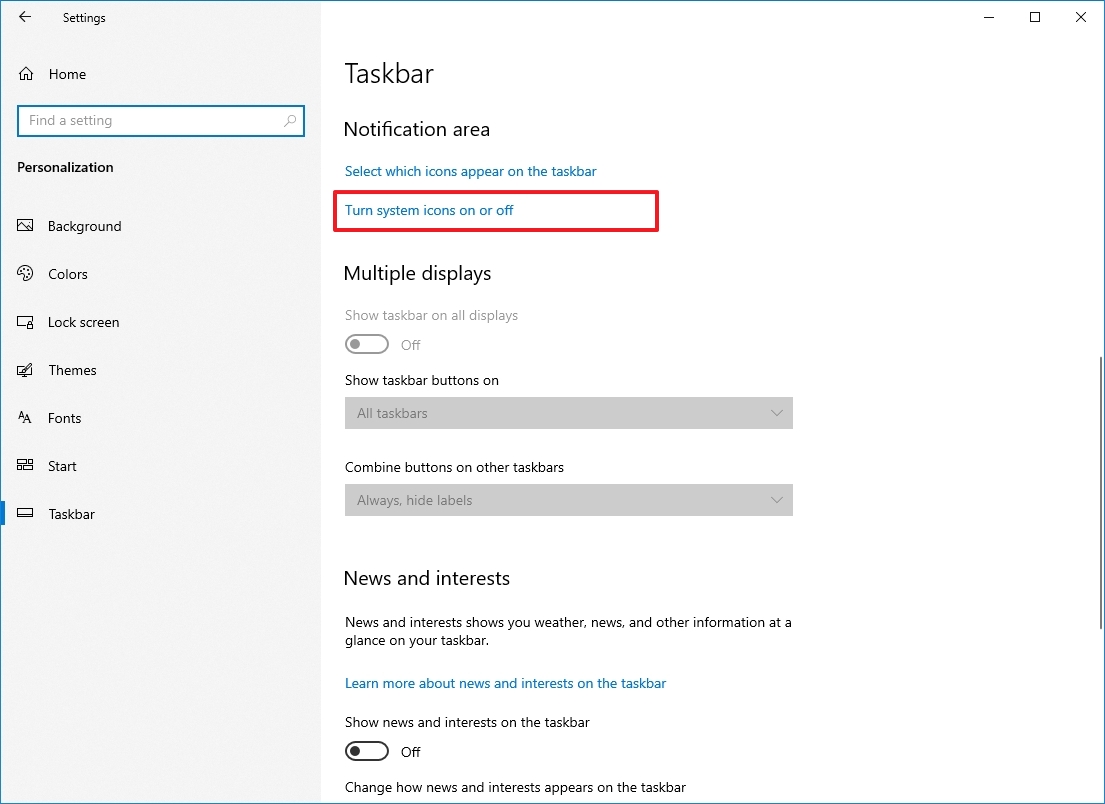
- Turn on the toggle switch for each system icons (such as Clock, Volume, and Network) that will appear in the bottom-right corner of the screen.
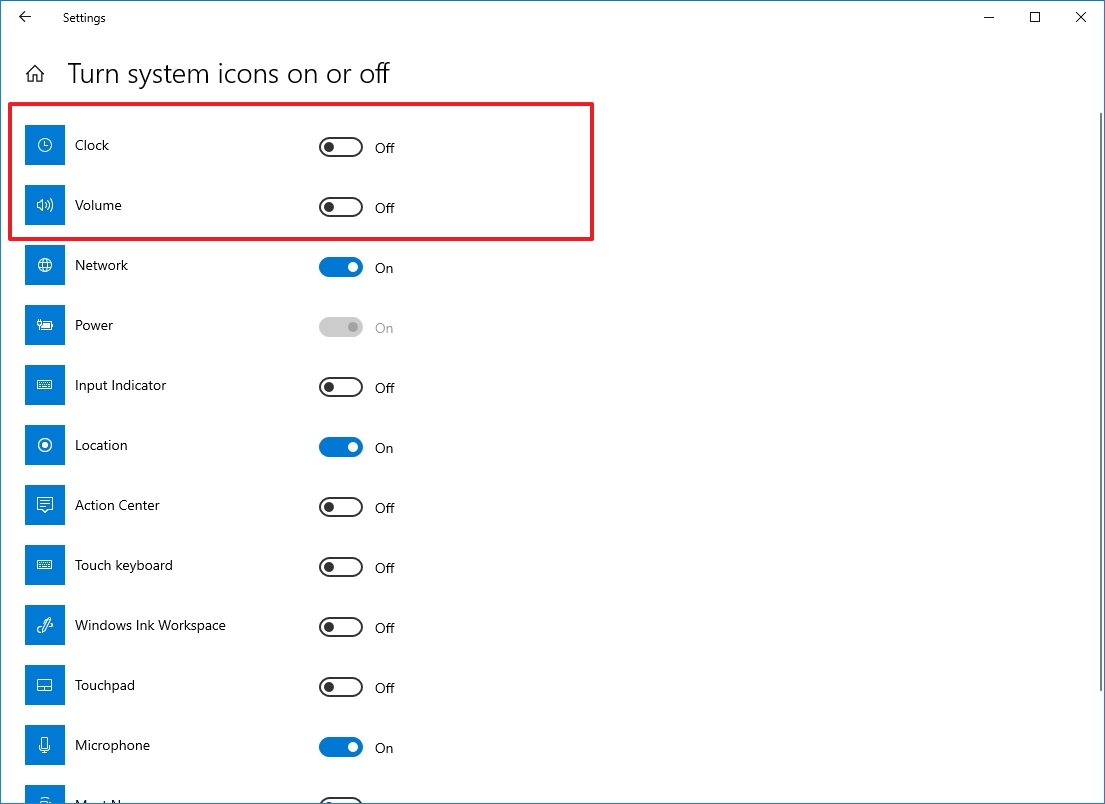
After you complete these steps, only the icons you need will appear in the notification area.
Customize Taskbar for multiple displays
If you have a multi-monitor setup, the Taskbar page also includes additional settings to show the bar on all displays, choose where the apps button appears, and combine buttons on another Taskbar.
To customize the taskbar for multiple displays, use these steps:
- Open Settings.
- Click on Personalization.
- Click on Taskbar.
- Turn on the «Show taskbar on all displays» toggle switch under the «Multiple displays» section.
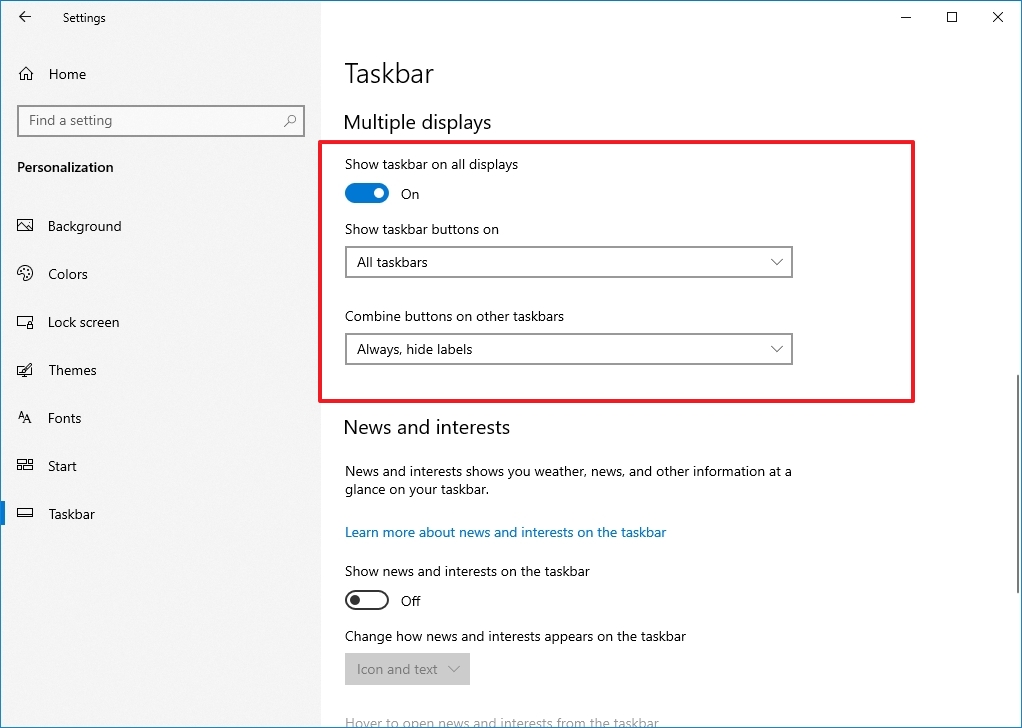
- (Optional) Use the Show taskbar button on the drop-down menu and select in which displays the buttons should appear:
- All taskbars.
- Main taskbar and taskbar where window is open.
- Taskbar where window is open.
- (Optional) Use the «Combine buttons other taskbars» menu and select the best option for you:
- Always, hide labels.
- When taskbar is full.
- Never.
Once you complete the steps, the taskbar will display on all the monitors according to your settings selection.
Optimize taskbar space
In addition to the customization options available through the Settings app, you can change a few other options from the taskbar itself.
For instance, if you don’t actively use the search box, you can make it smaller or remove the box to create more space to pin additional apps.
To remove the search box, you can right-click the taskbar, select «Search,» click the «Hidden» option, or select the «Show search box» option.
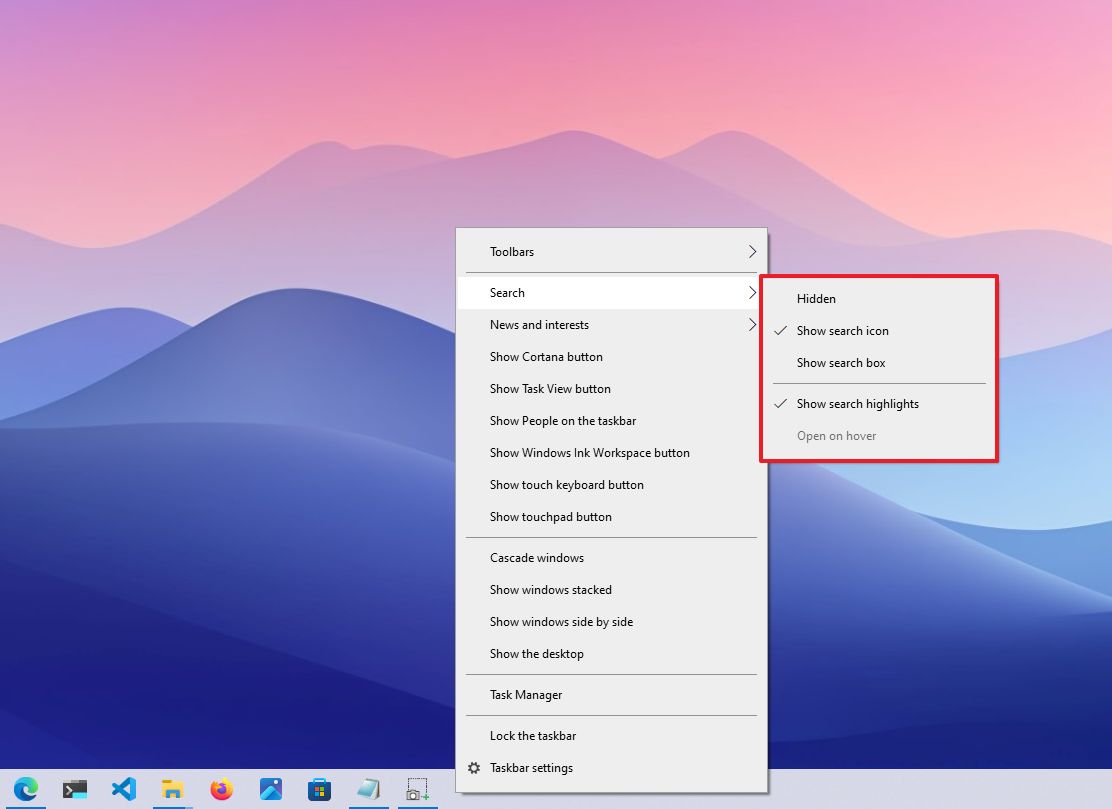
Using the same Taskbar context menu, you can remove the Task View and other buttons, which will free up valuable space.
You can also check this guide for more details on how to fully optimize the space on the Taskbar.
While the default settings should be more than adequate for most users, Windows 10 offers many settings to make the experience more personal without requiring third-party tools or hacks.
I’m focusing this guide on personalizing the desktop with settings that would fit more users, but it’s worth noting that there are many other ways to customize Windows 10.
More resources
For more helpful articles, coverage, and answers to common questions about Windows 10 and Windows 11, visit the following resources:
- Windows 11 on Windows Central — All you need to know
- Windows 10 on Windows Central — All you need to know
Mauro Huculak has been a Windows How-To Expert contributor for WindowsCentral.com for nearly a decade and has over 15 years of experience writing comprehensive guides. He also has an IT background and has achieved different professional certifications from Microsoft, Cisco, VMware, and CompTIA. He has been recognized as a Microsoft MVP for many years.