
Rufus is an open-source program that creates bootable USB sticks for Windows installation and more. Compared to Microsoft’s Media Creation Tool, Rufus offers many more options for configuration setup. If you’re interested in such a program, we’ll show you how to use it.
Further reading: 9 replacements for Windows features that Microsoft abandoned
Why is Rufus better?
With the Media Creation Tool, Microsoft provides its own software to configure USB sticks for installing Windows 10 or 11. So, why do you need Rufus at all? I’ll tell you why.
Rufus is not limited to installation media for Windows, but also supports Linux, live, and emergency systems as well as other bootable ISO files. In addition to the ISO format, Rufus also processes Virtual Hard Disks from Microsoft (VHD) and disc image files (IMG). This tool enables bios updates from DOS directly from the stick as well.
Rufus comes with a selection of pre-configured systems for booting USB sticks. The selection can be extended almost at will by loading your own ISO files.
Rufus
Many older computers and mainboards require this update mode. However, Rufus is the better choice for installing the Microsoft operating system compared to the Media Creation Tool. During Windows setup, you can clearly choose between real Uefi and Bios compatibility mode.
Secondly, the hardware requirements of Windows 11 can be easily bypassed and the current operating system can be installed on older computers.
Thirdly, the tool downloads the desired Windows version directly and processes it immediately. And, finally, Rufus allows the complete Windows installation on the stick, i.e. a “Windows to go.”
Normal or portable version?
Two versions for Windows (64-bit) are available for download on the Rufus website. One of the two is labelled “p” for portable. In other words, it’s a program that starts directly without installation. Is there a difference between the two versions?
In principle, there’s no difference and at first glance this is confusing. This is because the “normal” version also starts directly and without installation. However, the automatic update check is switched off for the file labelled as portable while the other checks daily whether a new program version is available.
The update check can be switched on and off in the program settings. The same applies to the extended drive properties and the extended formatting options, both of which are hidden by default in the portable version.
Note: The file labelled “x86” on the website is suitable for earlier 32-bit versions of Windows, the file labeled “arm64” for Windows on the (new) ARM basis.
Stick for Windows installation
If Rufus offers more setting options than Microsoft’s Media Creation Tool, doesn’t that make configuring the installation stick unnecessarily complicated? No, not at all!
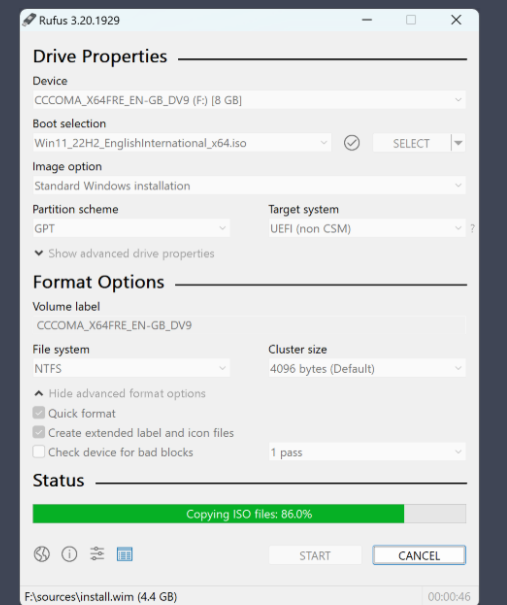
If you hide the advanced drive properties and formatting options already mentioned, Rufus shows the reduced interface shown in the picture (above). A USB stick with at least 8GB of storage capacity is required for the Windows installation. As soon as it’s inserted in the computer, it appears at the top under “Drive.”
Use the “Select” button to integrate the desired Windows ISO. You can obtain this from the official Microsoft download page. Accept the remaining default settings–this applies in particular to the partition scheme, target, and file system.
To do this, click on “Start,” confirm the other dialogue windows, and wait until Rufus has written to the USB data carrier. Then close the program interface. The stick configured in this way is bootable and can be used both for a new Windows installation and upgrade.
Important: When using Rufus, the previous content of the USB stick will be overwritten and deleted. Therefore, please back up important data stored on it separately beforehand.
Uefi or CSM compatibility mode
Rufus’ settings allow the Windows installation to be clearly set to the modern Uefi or the older Bios compatibility mode.
If you install Windows on an older computer using Microsoft’s Media Creation Tool, you often do not know in advance how the system will be installed: Whether in the older CSM compatibility mode (Compatibility Support Module, also known as “Legacy”) with the MBR hard disk partition scheme or in modern Uefi mode and the GPT partition style. You can view this later in the Windows settings, but depending on the hardware and Bios/Uefi settings, you may not be able to influence it.
Rufus, on the other hand, allows you to define the partitioning scheme from the outset and, correspondingly, the operating mode specified in the “Target system” tool. Whenever possible on the part of the mainboard or the Bios/Uefi, you should select the settings “GPT” and “UEFI (without CSM).”
Only if booting and the subsequent Windows installation fail and this cannot be rectified by changing the Bios/Uefi settings, create a new stick with the Rufus combination “MBR” and “BIOS (or UEFI-CSM).”
Tip: If explicitly requested, Rufus also offers the option of configuring the stick for Windows installation in dual mode. This allows the mobile data carrier to be used on UEFI and legacy hardware.
To do this, press the Alt-E key combination and Rufus will briefly display the confirmation message “Dual UEFI/BIOS mode enabled” at the bottom. The partition scheme is now set to “MBR” and “BIOS or UEFI” to the right.
Install Windows 11 despite hardware requirements
Microsoft has significantly tightened the system requirements for Windows 11 compared to the previous version. However, with the help of Rufus, the current operating system can also be installed on formally unsuitable PCs.
Windows 11 can initially only be installed on computers that fulfill Microsoft’s system requirements.
These include Uefi operation, Secure Boot switched on, a Trusted Platform Module (TPM) version 2.0, and a compatible processor. For the common Core i CPUs from Intel, this must be at least generation 8.
However, as the previous generation 7 models are also suitable for Windows 11 in principle, it makes sense to switch off the hardware check during setup. This makes Rufus particularly easy.
After loading the Windows 11 ISO file and inserting the USB stick, click on “Start” on the program interface as described. This opens a dialogue box in which the option at the top is important. “Remove requirement for 4GB RAM, Secure Boot and TPM 2.0” skips the hardware check when installing or updating later. You can also deactivate the requirement for an online account and the automatic encryption of the hard drive here.
Setup I: Completely reinstall Windows
Because Rufus automatically makes the Windows stick bootable, the Microsoft operating system can be freshly installed without much effort. To do this, insert the installation stick into the switched-off computer, switch it on, and press the button with which you can select the USB data carrier as the boot medium.
Instead of booting from the hard drive as usual, the computer will now boot from the stick. The button is specific to the PC, mainboard or manufacturer, and is usually displayed briefly on the monitor when booting up. On older PCs, the boot sequence may have to be changed in the bios.
After booting from the mobile data carrier, Microsoft’s setup wizard starts. Among other things, you specify the partition on which the operating system is to be installed. Make sure you select the correct partition as the destination so that you do not accidentally delete the data on another partition. The current version 24H2 of Windows 11 requires your explicit consent to “delete all files, apps and settings” for the first time.
However, this only applies to the partition selected in the next step for the Windows installation, not to the other hard drive areas.
Setup II: Upgrading Windows 11
Upgrading a running Windows system is easy in itself, but there is one point where you need to pay close attention. On newer computers, the annual major function update — for example from Windows 11 23H2 to version 24H2 — is carried out via the normal Windows update. The same applies to upgrading from Windows 10 to 11.
However, if the hardware does not fulfill the system requirements of the newer operating system, this type of update will fail. This is where the setup stick modified with Rufus can help.
To upgrade, plug the stick into the running computer, and double-click the “Setup.exe” file on the mobile data carrier. It’s now important to select the option “Change how updates are downloaded from Setup -> Not now” in the first dialogue window.
Only then do you start the actual update by clicking on “Accept.” You may also see the message “What you should take care of.” In this case, click on “Accept” and the upgrade will start with the transfer of all programs, files, and settings.
Download installation files
Rufus also allows you to download the Windows 10 and 11 ISO files for the installation stick directly, but this option may be hidden depending on the settings.
Instead of first downloading the ISO files for Windows 10 or 11 from Microsoft and then integrating them into Rufus from your hard drive, you can do this directly in the Sticktool. To do this, click on the small black arrow to the right of the “Select” button on the user interface and switch to “Download.”
If you do not have this option, first click on the small “Show application settings” button at the bottom. This is the second of the four buttons on the right. Set the “Check for new version” option to “Daily (default)” and close the window and program.
After restarting Rufus, click on the arrow and “Download” to select the current version of Windows 10 or 11, start the download and then create the boot stick for the Windows installation as described.
Windows-To-Go
Microsoft has discontinued “Windows to go,” but Rufus still enables the complete installation of the system on the USB stick to take with you.
Always having your personal Windows on the USB stick with you sounds practical, but has a decisive disadvantage compared to the permanently installed system on the hard drive. It’s much slower.
If you still want to try it out, you can create a to-go stick with Rufus. This should have at least 16, preferably 32GB of storage space.
After plugging in the stick, integrate the desired and previously downloaded ISO file on the Rufus interface via “Selection.” Below this in the “Image property” field, switch to “Windows To Go,” check the other options, and click on “Start.”
In the next steps, specify the Windows version (essentially Home or Pro) and a few other settings. Finally, click on “OK” to create the stick with the system to go.
This article originally appeared on our sister publication PC-WELT and was translated and localized from German.
Do you want to install Windows 11 but want to avoid using a Microsoft account to sign in? Or maybe you want to install Windows without BitLocker drive encryption. You can do both and more when you use Rufus to create custom Windows installation media.
There may be a time when you want to customize the installation options for Windows. Whether installing Windows with only a local user account or bypassing the Windows 11 hardware requirements, you might need to create a custom installation media for Windows at some point.
As a computer technician, I have had some experience building Windows images (including drivers and apps) for corporate distribution, and it is a reasonably complex process. It is not something the average computer user would want to do.
Now there are a lot of articles out there that tell you how to modify the registry during the installation of Windows. For an experienced Windows user, these registry tweaks can be tricky to implement.
But what if you could take all of those registry tweaks and incorporate them into an installation media and then use that to install Windows? You can do just that with Rufus. Rufus is a stand-alone program for creating bootable USB drives from ISO (International Organization for Standardization) files.
Rufus works exceptionally well for creating bootable USB drives from Windows and Linux ISO files, as well as for making a bootable UBCD (Ultimate Boot CD) USB drive for diagnostics. The list of options for each operating system varies, so here are the customizations you can make to the current version(s) of Windows installation media.
Windows 10
- Create a local account with username
- Set regional options to the same values as this user’s
- Disable data collection (Skip privacy questions)
- Disable BitLocker device encryption
Windows 11 (includes all of the above plus)
- Remove requirement for 4GB + RAM, Secure Boot and TPM 2.0
- Remove requirement for an online Microsoft account
To create a bootable USB drive with Rufus, you will need an 8GB or larger USB drive, a Windows 10 or Windows 11 ISO file, and of course, Rufus. Remember that no matter what installation option you choose for Windows, you will need a legitimate product key to activate it.
- Download Rufus.
- Download and run the Windows Media Creation Tool for your version of Windows.
Windows 11 / Windows 10
The Windows Media Creation tool is a stand-alone program and does not require installation. Just start it up. If you’re prompted for an administrator password or confirmation, type the password or provide confirmation. Accept the license terms, select the language, select ISO file as the media to use, and then select where to save the ISO file. Let the file download, and then proceed to the next step. - Insert a USB drive (8TB or larger).
- Open Rufus. Since it is a stand-alone program, it does not require installation, just start it up. If you’re prompted for an administrator password or confirmation, type the password or provide confirmation.
On the main screen you will find three (3) sections; Drive Properties, Format options, and Status.
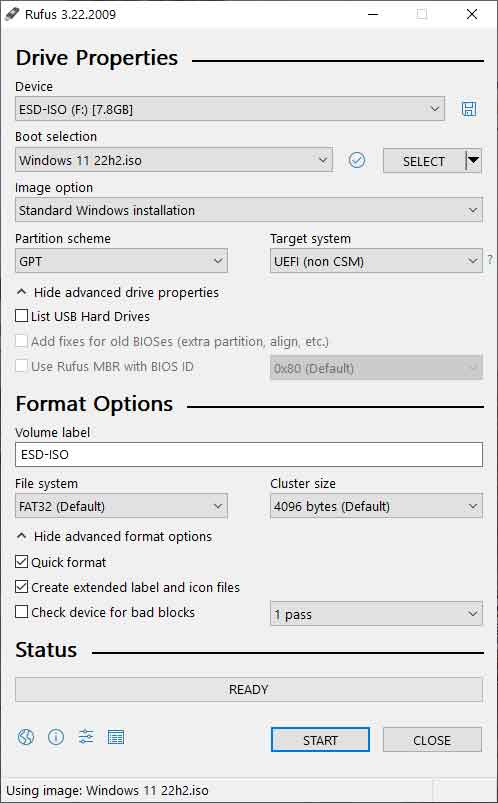
Under Drive properties, make sure the USB drive you want to use is selected in the Device pull-down menu.
Right below the Device pull-down menu, you will find the Boot selection. Left-click the Select button, navigate to the ISO file you downloaded and select it. Rufus will recognize the ISO file and load default settings based on the operating system.
Usually, the default settings work perfectly, so there is no need to change them. Just go down to the Status section and left-click on Start. The Windows User Experience dialog box appears with the customizations that are available for the version of Windows you are working with.
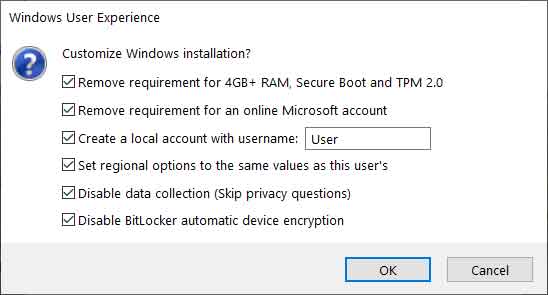
Select all of the options you want to include in your custom installation media and then left-click on OK. At this point you should be ready to go.
c62e7f3b-d560-4df9-86d5-8d51a3043f41|10|3.3|96d5b379-7e1d-4dac-a6ba-1e50db561b04
Creating a bootable USB drive with Windows 11 is a crucial skill for anyone looking to install or repair their operating system. Whether you have supported or unsupported hardware, this guide will walk you through the steps using Rufus, a popular free tool. By the end of this tutorial, you’ll have a bootable USB drive ready to install Windows 11, bypassing any hardware limitations.
Key Takeaways
- Rufus allows you to create a bootable USB for Windows 11, even on unsupported hardware.
- You’ll need a USB flash drive of at least 8GB and the latest Windows 11 ISO file.
- Customizing your installation through Rufus can help bypass hardware requirements and other setup steps.
Step 1: Download Rufus
Start by downloading Rufus, the tool you’ll use to create your bootable USB drive.

- Open your web browser and go to the official Rufus download page.
- Scroll down to find the download links.
- Choose the standard 64-bit version for most installations. However, if you have specific requirements, you can select the portable version or other alternatives.

Once downloaded, open Rufus to begin the setup process.
Step 2: Get the Windows 11 ISO File

Before you proceed, you’ll need the latest Windows 11 ISO file. If you don’t have it yet, follow this guide to download the Windows 11 ISO from Microsoft’s website. Once you have it saved on your computer, come back to Rufus to continue.
Step 3: Plug in Your USB Flash Drive

Ensure your USB flash drive is at least 8GB in size. Plug it into your computer, and Rufus should automatically detect it.

If it doesn’t appear, ensure the drive is properly inserted and try again. Once detected, you can proceed to select the ISO file.
Step 4: Select the Windows 11 ISO File

- In Rufus, click on the “Select” button.
- Navigate to where you saved the Windows 11 ISO file.
- Double-click the ISO file to load it into Rufus.

Step 5: Choose Partition Scheme and Target System
Rufus offers two main partition schemes: GPT and MBR. Here’s how to choose:
- GPT: Suitable for most modern systems with UEFI BIOS (typically computers made after 2012).
- MBR: Necessary for older systems that still use Legacy BIOS (pre-2012 hardware).

If you’re unsure, start with GPT. If your computer fails to boot from the USB, repeat the process with MBR selected.
Step 6: Adjust Volume Label and File System
Next, you’ll want to adjust some settings related to the USB drive formatting:

- Volume Label: Give your USB drive a name (e.g., “Windows 11”). This helps you easily identify it later.
- File System: Leave this option set to NTFS, which is the default and appropriate for most installations.
- Cluster Size: Leave this on the default setting as well.
These default settings work well in most situations, so unless you have specific needs, there’s no need to change them.

Finally, click on “Start” to proceed.
Step 7: Advanced Formatting and Customization Options
Rufus offers additional customization options that can help streamline the installation process, particularly if you’re working with unsupported hardware:

- Remove Windows 11 Hardware Requirements: This option bypasses the minimum hardware checks, so it’s recommended to keep this enabled even if your hardware is supported.
- Remove Microsoft Account Requirement: If you want to avoid using a Microsoft account during installation, enable this option.
- Skip User Account Creation: You can skip creating a user account during setup by checking this option and entering a default username (optional).
- Regional Options: You can set the regional settings (time, date, language) for the installation to match those of your current computer. If you prefer this, check the box.
- Disable Data Collection: Check this to avoid privacy questions during setup.
- Disable BitLocker Encryption: Disabling this option prevents automatic encryption of your drive by BitLocker.
After adjusting these options, click “OK” to proceed.
Step 8: Start the Bootable USB Creation Process

Next, a warning will pop up, informing you that all data on your USB drive will be erased. If you have any important files on the drive, back them up now. If you’re sure you’re ready, click OK to begin

The process will typically take around 10 minutes, depending on the speed of your system and USB drive. You can monitor the progress in Rufus through the status bar.
Step 9: Finalize and Test Your Bootable USB

Once Rufus completes the process, the status bar will turn fully green, indicating that your bootable USB is ready. The name of your USB drive will also change to the volume label you set earlier (e.g., “Windows 11”).

To confirm, you can open “This PC” or “File Explorer” on your computer, locate the USB drive, and ensure that the necessary Windows 11 files are present. Your bootable USB is now ready to install Windows 11 on any supported or unsupported system.
Conclusion
Creating a bootable USB drive for Windows 11 using Rufus is a straightforward process, even for beginners. With this guide, you can customize your installation and bypass hardware limitations. Now, you’re ready to install or repair Windows 11 on any system, supported or not. Good luck, and happy computing!
Frequently Asked Questions (FAQs)
How large should my USB drive be for a Windows 11 installation?
Your USB drive should be at least 8GB to accommodate the Windows 11 ISO file and installation tools.
Can I create a Windows 11 bootable USB on unsupported hardware?
Yes, by using Rufus, you can bypass the hardware requirements, allowing you to install Windows 11 on unsupported PCs.
What is the difference between GPT and MBR in Rufus?
GPT is used for newer systems with UEFI BIOS, while MBR is for older systems with Legacy BIOS. Use GPT unless your hardware is older (pre-2012).
Do I need an internet connection to install Windows 11?
By using Rufus to remove the Microsoft account requirement, you can skip the need for an internet connection during setup.
Is Rufus safe to use?
Yes, Rufus is widely used and considered safe for creating bootable USB drives. Just ensure you download it from the official website.
Друзья, если вы из числа тех, кто ещё не обновил своё железо компьютера до соответствия Windows 11, приводим для вас простейший способ создания установочной флешки Windows 11 для компьютеров без UEFI, Secure Boot и TPM 2.0 — с помощью утилиты Rufus. Утилита при записи ISO-образа установки Windows 11 предусматривает настройки, в числе которых — возможность снятия ограничений на установку Windows 11 на компьютерах без UEFI, Secure Boot и TPM 2.0. Давайте посмотрим, как с помощью Rufus создать установочную флешку Windows 11 для компьютеров, которые не соответствуют системным требованиям этой операционной системы.
Итак, друзья, Windows 11 с её системными требованиями, которым не соответствует большая половина компьютеров в мире. Возможно, вы проверили свой компьютер на совместимость в Windows 11, и он показал проседание компонентов, принципиально важных для официального использования операционной системы, а это:
- 2 ядра процессора,
- 4 Гб оперативной памяти,
- 64 Гб места на диске,
- UEFI,
- Secure Boot,
- TPM 2.0.
В таком случае устанавливать Windows 11 на свой компьютер вам необходимо неофициально. Есть масса способов это сделать, все они приведены в статье сайта «Как установить Windows 11 без TPM 2.0, Secure Boot и UEFI». Приводимый в этой статье способ с использованием утилиты Rufus безоговорочно выигрывает у всех остальных простотой и лёгкостью. Этот способ убирает проверку соответствия компьютера системным требованиям Windows 11. Такая проверка при обычной установке Windows 11 блокирует дальнейшую установку с выдачей ошибки «Запуск Windows 11 на этом компьютере невозможен».
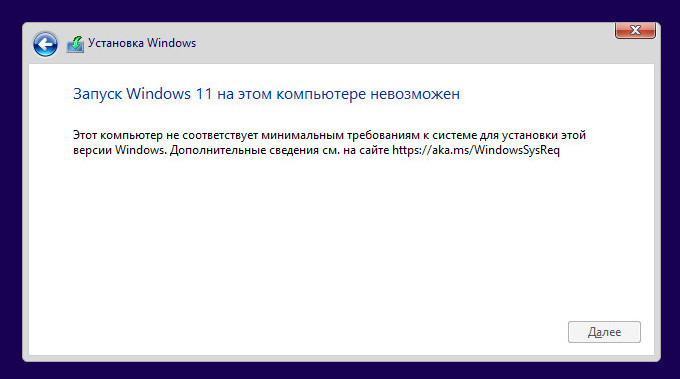
Созданная с помощью Rufus установочная флешка Windows 11 установит операционную систему на компьютеры, не отвечающие любым системным требованиям Windows 11. Т.е. на компьютеры с несовместимым процессором, с оперативной памятью меньше 4 Гб, с местом на диске меньше 64 Гб, без модуля безопасности TPM 2.0 и даже без UEFI и Secure Boot. Т.е. с такой флешкой, друзья, вы даже сможете установить Windows 11 как Legacy-систему на компьютер со старым BIOS Legacy.
Rufus является продуктом проекта энтузиастов с GitHub, это бесплатная портативная утилита для создания загрузочной флешки. Скачать утилиту можно:
- На её сайте rufus.ie/ru;
- В магазине Microsoft Store.
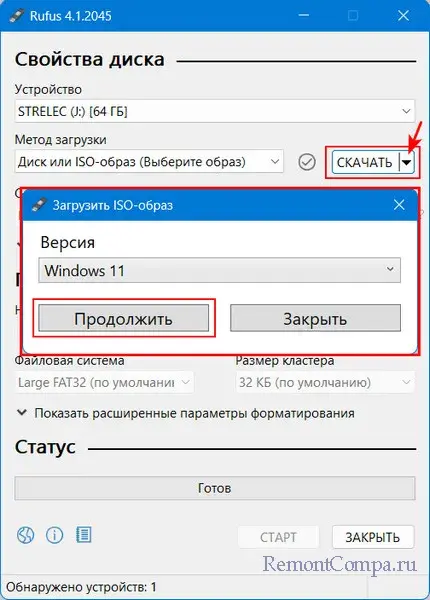
Запускаем утилиту. Если у вас скачан установочный ISO-образ Windows 11 с официального сайта, указываете его в блоке «Метод загрузки».
Если не скачан, можете скачать с помощью Rufus. В окне утилиты выбираем «Скачать», указываем Windows 11 и скачиваем.
В блоке «Схема раздела» указываем стиль разметки диска:
- GPT для современных компьютеров с BIOS UEFI;
- MBR для старых компьютер с BIOS Legacy.
Нажимаем «Старт». Перед нами появляются настройки создания установочной флешки Windows 11. Первая настройка «Удалить требования 4 ГБ ОЗУ, безопасной загрузки и TPM 2.0» — это и есть снятие ограничений на установку Windows 11 на несоответствующих ей компьютерах. Эта настройка предустановлена. Мы просто жмём «Ок» для старта создания установочной флешки.
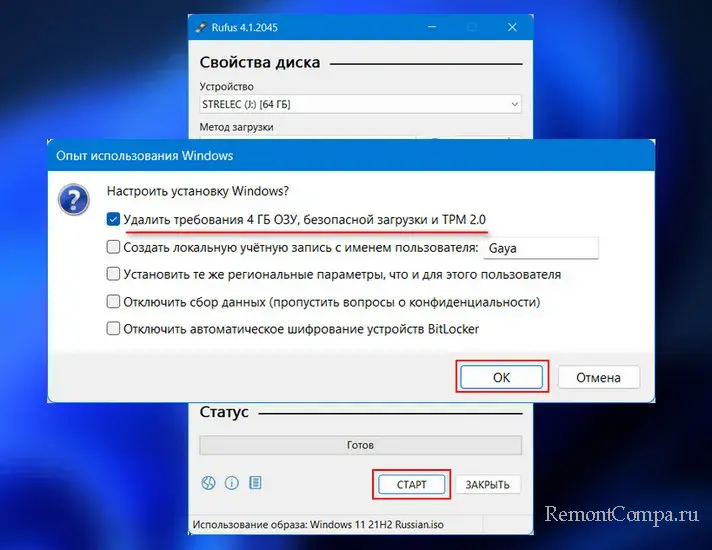
Дожидаемся завершения записи флешки. И всё – у нас есть установочная флешка Windows 11 для компьютеров, которые не отвечают требованиям этой операционной системы.
Увы, друзья, использовать такую флешку для обновления до Windows 11 путём запуска файла setup.exe, не получится. Снятие блокировки на установку Windows на не отвечающих её требованиям компьютерах работает только в процессе установки операционной системы с нуля. Так что если вы планируете обновиться до Windows 11 вообще или новой её версии на неподдерживаемом ею компьютере, вам в помощь статья сайта «Как обновиться до Windows 11 на не отвечающих системным требованиям компьютерах».
Напоследок, друзья, лайфхак: если вы до сих пор используете Windows 7, которую Rufus не поддерживает, либо у вас проблемы с запуском актуальной версии Rufus, запустите Rufus в среде WinPE 11-10-8 Sergei Strelec.
Время на прочтение2 мин
Количество просмотров15K

По информации Comss.ru, в бета-версии утилиты для создания загрузочных накопителей Rufus 3.19 разработчики добавили диалоговое окно для кастомизированной настройки установщика Windows 11. Там можно выбрать опции для отключения обязательного требования наличия учетной записи Microsoft в процессе установки (с помощью локального аккаунта штатным образом сборку Windows 11 22H2 установить нельзя) и обход проверки на наличие у ПК криптографического модуля TPM и протокола Secure Boot.
Microsoft решила, что новые сборки Windows 11 нельзя будет установить с помощью локального аккаунта. Для установки потребуется обязательное подключение к интернету и вход в зарегистрированный ранее рабочий аккаунт Microsoft, даже если данная версия ОС используется только локально.
С помощью новой версии Rufus теперь можно обойти это ограничение (только нужно устанавливать ОС без активного сетевого соединения) не мучаясь с поиском путей обхода: в одних версиях, если нажать комбинацию «Alt + F4» на диалоге с требованием войти в онлайн-учетку, то он просто закроется, а установка продолжится. Другой способ избежать требования подключения к интернету при установке Windows 11: при появлении диалогового окна с настройкой сети нажать «Shift+F10» и запустить CMD, потом там запустить команду taskmgr и в диспетчере задач выполнить действие «снять задачу» на процессе «OOBENetworkConnectionFlow.exe». Также есть третий способ: ввести любую почту и фейковый пароль от аккаунта, а система потом выдаст ошибку и даст возможность создать локальную учетку. Не во всех новых версиях Windows 11 эти способы работают.
Microsoft позиционирует Windows 11 как защищенную и безопасную систему. Поэтому и возникло требование по поддержке и наличию в ПК или ноутбуке пользователя модуля TPM 2.0 при установке новой ОС. Разработчик с помощью этой технологии собирается защищать пользователей от растущего уровня киберпреступности в мире, включая распространение фишинговых рассылок и внедрение программ-вымогателей. Microsoft настаивает, что ПК с TPM и новой ОС помогут обеспечить более высокий уровень защиты от различных атак. Позиция компании — все новые ПК с Windows 11 будут поставляться с TPM 2.0. Rufus теперь позволяет обойти и это требование Microsoft.
В январе 2022 года Microsoft заявила, что устройства на ОС Windows 10 и 11 должны быть подключены к сети не менее восьми часов, чтобы получить последние обновления и корректно установить их из Центра обновления ОС Windows. Время, в течение которого устройства под управлением Windows подключены к Центру обновления Windows, отслеживается Microsoft как «Подключение к обновлению». Если этот показатель будет меньше 8 часов, то, согласно расчетам и полученной разработчиками Microsoft статистике, устройства пользователей не смогут успешно обновиться.
В начале июня 2022 года Microsoft закрыла доступ пользователям из РФ на скачивание утилит (MediaCreationTool, Windows 11 Installation Assistant), дистрибутивов Office, серверных продуктов и ISO-образов Windows 10 и Windows 11 с сайта компании. Скачивать их можно только через VPN. Предварительная версия причины таких ограничений — по правительственному предписанию с территории России и Беларуси невозможно скачать или установить никакие файлы с сайтов Microsoft.