
Войдите с помощью учетной записи Майкрософт
Войдите или создайте учетную запись.
Здравствуйте,
Выберите другую учетную запись.
У вас несколько учетных записей
Выберите учетную запись, с помощью которой нужно войти.
Applies ToWindows 11 Windows 10
Поддержка Windows 10 прекратится в октябре 2025 г.
После 14 октября 2025 г. корпорация Майкрософт больше не будет предоставлять бесплатные обновления программного обеспечения из Центра обновления Windows, техническую помощь и исправления безопасности для Windows 10. Ваш компьютер по-прежнему будет работать, но мы рекомендуем перейти на Windows 11.
Подробнее
Получение темы
Чтобы получить тему, разверните одну из указанных ниже категорий, выберите ссылку для темы и нажмите кнопку Открыть. Тема будет сохранена на компьютере и отобразится на рабочем столе.
Нужна дополнительная помощь?
Нужны дополнительные параметры?
Изучите преимущества подписки, просмотрите учебные курсы, узнайте, как защитить свое устройство и т. д.
Спасибо за ваш отзыв!
×

Step:1
Create a restore point:
First, Create a restore point its important,if you make a mistake in the customization, the restore point help to restore the system to its original state
- A detailed explanation of Create a restore point
Step:2
Patch your windows:
- The custom themes theme will only work if you install the theme patcher, so you must install the Ultra UXTheme Patcher to use the third-party theme on your Windows.
- If they still don’t work (Unpatched) after installing Ultra UXTheme Patcher you need to do some work manually .
Step:3
Change your custom themes:
- Copy and paste your theme into this (C: \ Windows \ Resources \ Themes) folder.
- How to use a custom themes in Windows will be explained in more detail with the image.
Step:4
Icon installation:
- Install the icon using the application 7TSP GUI. (This method only applies to Windows 10 and 11 users)
- Detailed explanation with pictures about installing and uninstalling 7tsp
Step:5
Removing the ribbon menu (toolbar) from Explorer : Windows 10 and 11
- Windows 10 users must use the OldNewExplorer program to remove the ribbon menu. Extract the downloaded OldNewExplorer file and then open the oldNewExplorer.exe application. Select the “Use Command Bar” box and uncheck the last two boxes then click Install to install OldNewExplorer.

- Windows 11 users can hide the ribbon menu using StartAllBack. Install the downloaded StartAllBack application, then open the Explorer option and select the Win7 command bar.


Step:6
To change the start menu and taskbar:
- Windows 10 User Use StartIsBack.
- Windows 11 User Use StartAllBack
How to Remove Custom Theme and Icon Pack

×
Download Page
Are you new to Windows customization?
Follow the steps given on this post page and I always recommend Creating a Restore Point before starting the customization. If you have any other doubts comment below.
- Explanation of Customization
Что Microsoft только не делала с дизайном Windows — каждый релиз новой версии операционной системы сопровождался обновлением внешнего вида: Luna в XP, Aero в Vista и 7, а затем не очень удачный Metro в Windows 8.1. Лишь спустя несколько лет, с выходом 10-й версии, дизайнеры Microsoft наконец определились со стилем своих продуктов и появился Fluent Design. Однако, даже сейчас Windows 10 выглядит не очень — система по-прежнему смотрится устаревшей на фоне других ОС. Но никто не мешает ставить сторонние темы для рабочего стола и всей системы в целом — в этой статье собраны самые популярные и красивые пакеты оформления, а также инструкция по установке.
Вы захотите скачать: 15 тем для Windows 10
Big Sur
Первой темой будет Big Sur, которая понравится любителям дизайна Apple. Кроме внешнего вида окон и иконок, этот пак включает в себя виджеты для Rainmeter, а также скин для приложений, имитирующих Dock из macOS — Rocketdock или Nexus.
Porcelain

Эта тема определённо понравится любителям минимализма. Ничего лишнего, только самое необходимое. Одним из достоинств её являются частые обновления — разработчик регулярно исправляет баги и добавляет поддержку новых версий Windows 10.
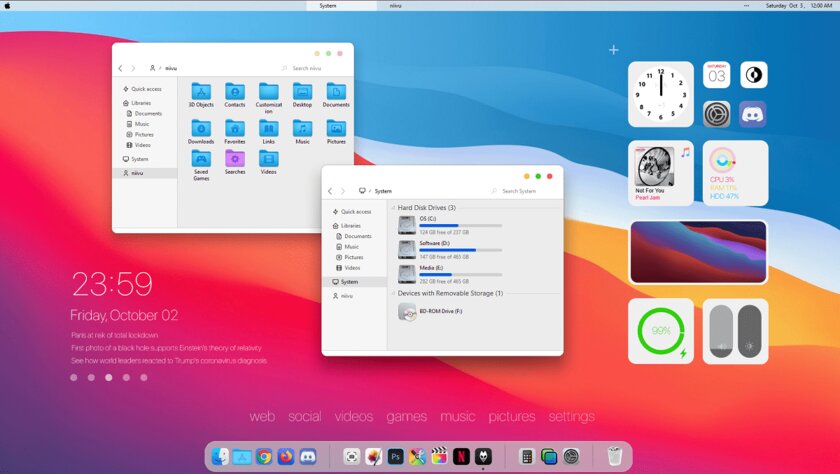
Fluent
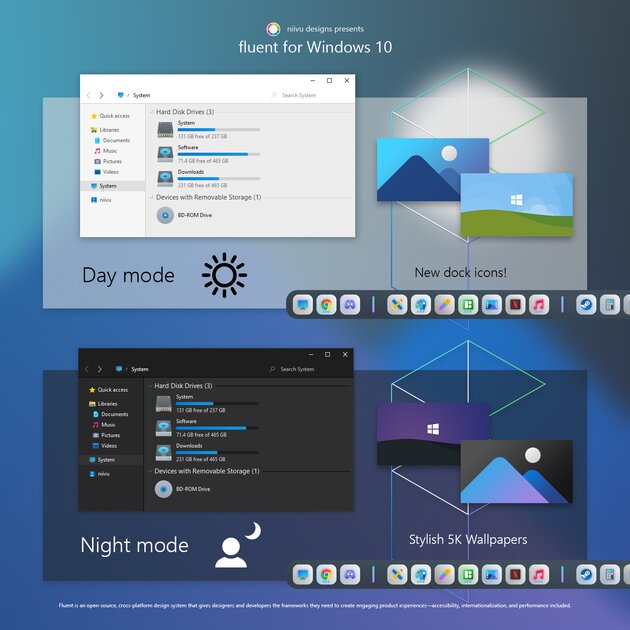
В отличие от других тем, эта не меняет стиль системы кардинально, а лишь немного дополняет его — более минималистичный проводник с обновлёнными иконками поможет освежить пользовательский опыт, добавив в него новые краски.
Windows 10X
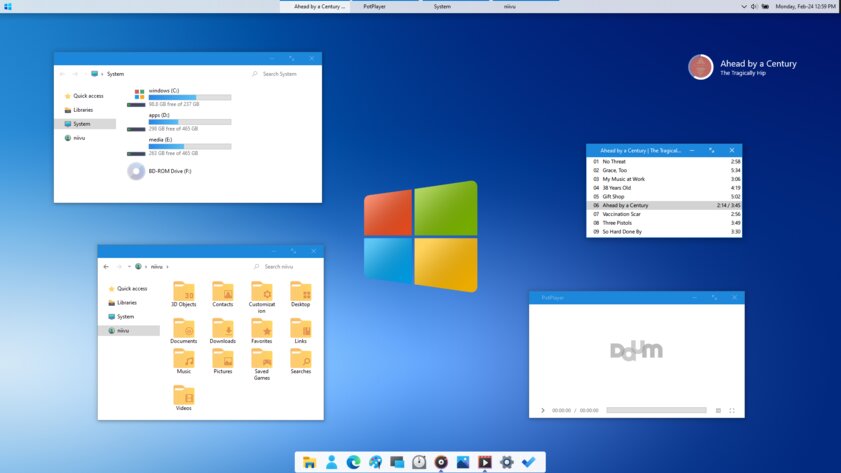
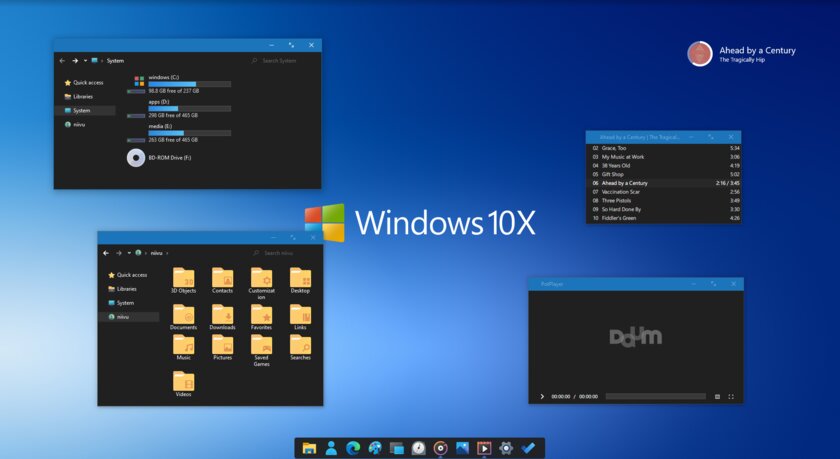
Релиз Windows 10X уже не за горами, а умельцы в интернете уже перенесли своё виденье дизайна будущей ОС на текущую версию Windows. Эта тема меняет не только внешний вид окон и иконок, но и имеет свои скины для PotPlayer, foobar2000 и различных приложений для имитации Dock.
Papyros

Papyros — это качественная адаптация популярной темы для Linux с названием Papyrus, внешний вид которой вдохновлён Material Design. Для пользователей доступно 5 разных вариаций тем с разными цветами заголовков, а также огромный набор системных иконок и приложений.
Penumbra
Встроенная тёмная тема Windows хороша, но она затрагивает лишь часть системы, оставляя некоторые белые участки. На этот счёт есть Penumbra — это минималистичный пак оформления, напоминающий по цветам продукты Adobe.
Janguru
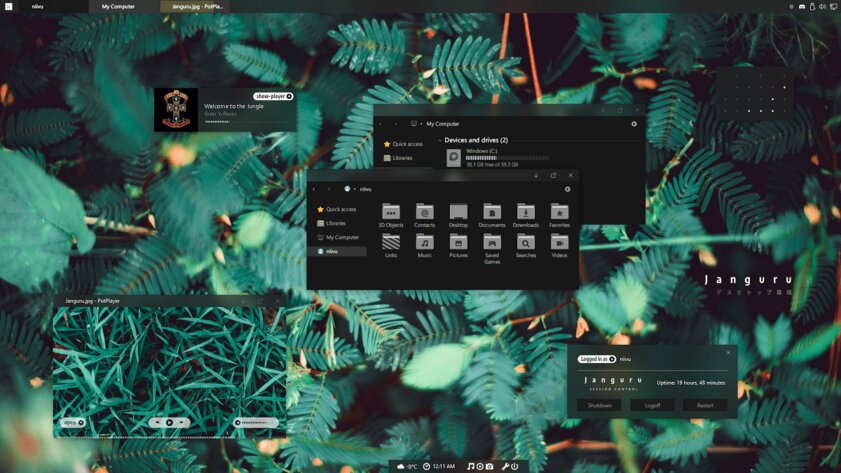
Особенностью этой темы является поддержка размытия заголовков окон, а также полностью чёрный фон приложений. Кроме этого, у Janguru есть свои значки курсора, большой набор иконок и виджетов для Rainmeter.
Gray Dark

Ещё одна тема, выполненная в тёмных тонах. Не одним проводником единым — в комплекте с Gray Dark идёт набор скинов для StartIsBack, а также опциональный набор иконок, дополняющий тему. На выбор доступно несколько цветовых вариаций, их видно на скриншотах выше.
Gray Light

Gray Light — это противоположность теме Dark Gray. Вместо оттенков серого теперь преобладает белый, других значительных отличий нет. Кроме самого пака оформления, в описании также лежат ссылки на обои, что стоят на скриншотах выше.
Matte
В отличие от других тёмных тем, эта выполнена не в чёрных и серых тонах, а в мятных, в паре со строгими значками. Отличным дополнением будет скин для StartIsBack и разные вариации оформления. А частые обновления оперативно исправляют баги и различные недоработки.
Windows 20
Эта тема была вдохновлена концептом с названием «Windows 20» от Avdan. Конечно, перенести дизайн полностью не вышло, но максимально приблизиться к оригиналу получилось. Тут и иконки в стиле Fluent Design, и закругления на месте.
Dracula
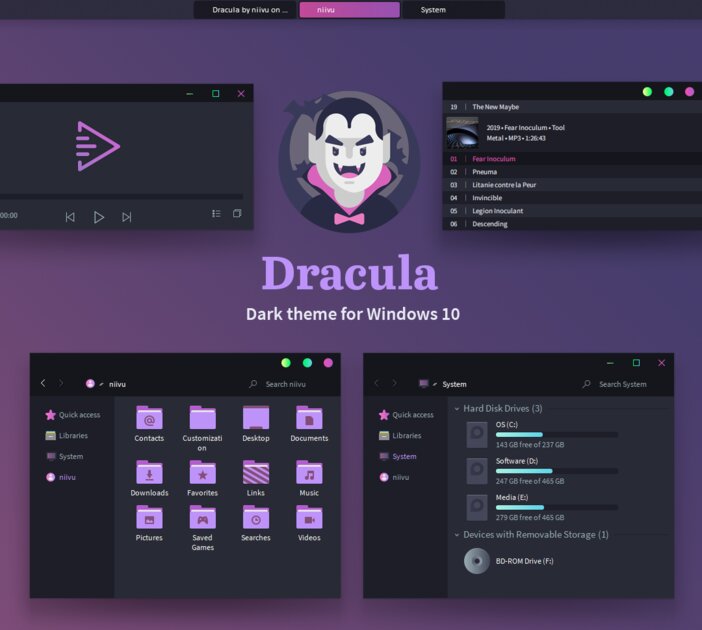
Надоели скучные монохромные темы? На этот случай есть Dracula, которая привносит больше красок в оформление системы. Вместо оттенков серого, преобладают фиолетовые тона и градиенты. Также доступны разные вариации иконок для закрытия или сворачивания окон, скины для StartIsBack и оформление для Microsoft Office.
Discord Theme
Ещё одной интересной темой будет Discord Theme, так как она использует цвета и оформление одноимённого мессенджера для геймеров. Приятные для глаза оттенки помогут в снижении напряжения при использовании компьютера.
Glassic
Не обошлось и без прозрачных тем, что слегка напоминают Aero из прошлых версий Windows. Для корректного отображения прозрачности необходимо установить дополнительную программу под названием «Glass8», ссылка на которую есть в описании пака оформления.
BIB 2.0
Последней темой в подборке станет BIB 2.0. Это минималистичный пак оформления для Windows, с тремя вариациями кнопок заголовка окон, приятными иконками и с поддержкой мониторов с высокой плотностью пикселей.
Как устанавливать темы для Windows 10
Основой всех тем для Windows является приложение под названием UltraUXThemePatcher. Оно активирует поддержку сторонних пакетов оформления. Устанавливаем его и перезагружаем компьютер.
Затем, скачанные файлы тем (файлы с расширением .theme) необходимо поместить в папку по пути C:\Windows\Resources\Themes. После этого, кликаем правой кнопкой мыши по рабочему столу и выбираем пункт «Персонализация», а потом «Темы». Список должен пополниться свежеустановленными пакетами оформления.
Для корректного отображения тем необходимо дополнительно установить ещё одно приложение — OldNewExplorer. С его помощью можно убрать ленту в «Проводнике», сделав файловый менеджер похожим на тот, что стоит в Windows 7.
К сожалению, единого метода для замены системных значков на кастомные нет, но в архивах с каждой темой есть инструкции в виде текстовых файлов, некоторые из них требуют установки дополнительного ПО.
Внимание! Всегда делайте точку восстановления системы перед любыми модификациями Windows.
Using a Windows 10 theme is the quickest way to customise your PC. A theme can contain custom sounds, wallpapers, color adjustments as well as other personalization tweaks. So far, Microsoft didn’t go crazy about letting us customise Windows 10 however we want. Sure, a lot of those restrictions were imposed for security reasons, but geeks will always find ways to tinker with how Windows looks and behaves.
Microsoft does not officially support 3rd party themes unless they are digitally signed by them. It’s somewhat understandable since people might embed them with malware and spread it across the internet. However, users have found ways to bypass Microsoft’s limitation and install third-party themes n Windows 10.
If you want to stay on the official site, I’m sorry to break it to you, but most Microsoft-supported themes are nothing short of boring. It’s true that the selection on their website got better lately, but they severely limit the customizations that can be done by UI designers. If you’re looking for something really special, independent design websites like DeviantArt have superior Windows 10 themes in terms of aesthetics.
Are you in the market for a customized Windows 10 theme? Then you got some choices to make. You either stay official and install a Microsoft theme, or you take the long route modify your computer to allow the installation of non-Microsoft themes. Keep in mind that Microsoft themes are extremely easy to install, while 3rd party themes will require you to take extra steps with a minimal amount of risk.
To make it easier for you, we created two guides below that will cover both the official(Method 1) and the unofficial way(Method 2). Let’s see how you can customize your Windows 10 look.
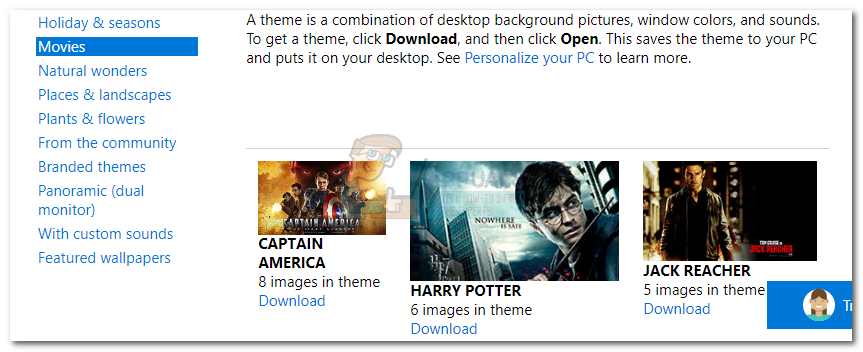
How to Install Microsoft Themes on Windows 10
If you’re after the quickest way of installing a Windows 10 theme, Microsoft has hundreds of different options neatly grouped into intuitive categories. You can browse all of them by visiting this website. The installation is extremely easy, but here’s a quick guide, just in case you get confused:
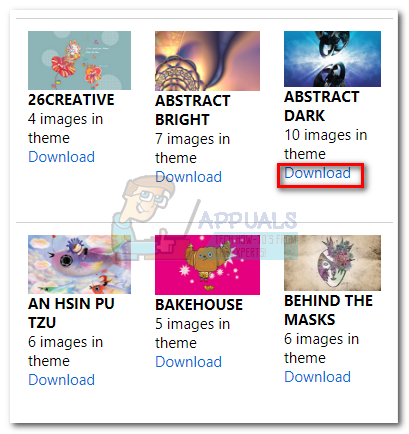
- Visit Microsoft’s website and browse for a theme. Don’t settle for just the Featured themes category, as a lot of good themes aren’t present there. If you use a dual monitor, select a theme from the Panoramic category.

Note: Keep in mind that this website is exclusively designed for Window 10 themes. Installing them on an older Windows version won’t work.
- Once you decide on a theme, click the Download button under it and wait for the process to complete.

- Open the .themepack file and wait for the theme to unpack.
- Now right-click anywhere on your desktop and click Personalize.
- Go to Themes, click on the theme that you’ve just unpacked and click Use Custom Theme.

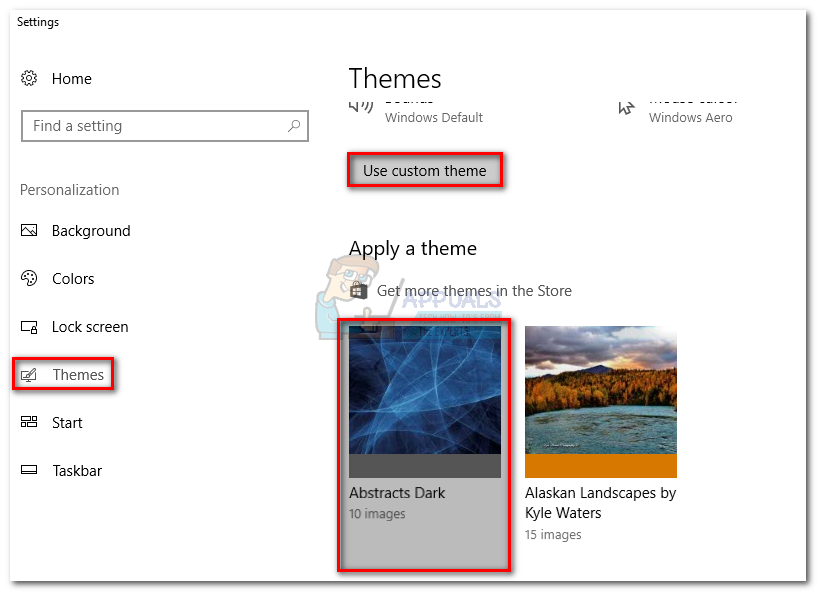
That’s it. The Microsoft theme you previously downloaded is active.
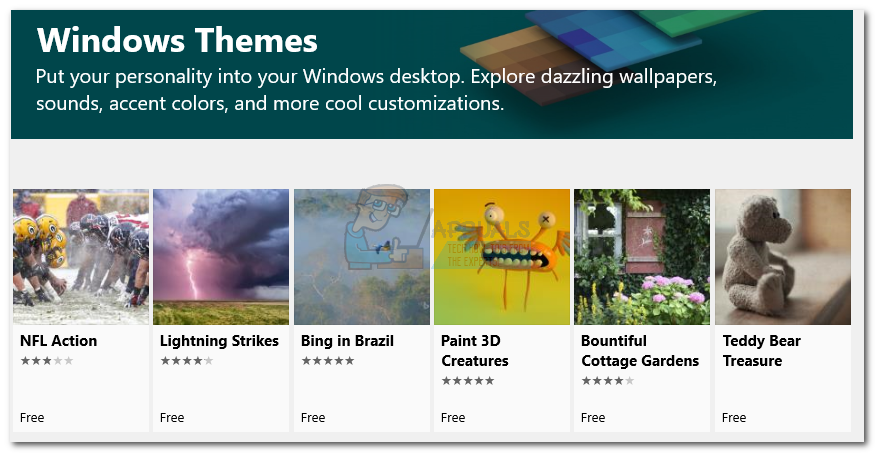
Note: Another way to apply a Microsoft-certified theme is to go to Settings > Themes and click on Get more themes in the Store (under Apply a theme). This will open up a Microsoft Store window with a limited selection of Windows 10 themes. But the theme selection in Microsoft Store is very limited when compared to the first method.
How to Install Non-Microsoft Themes on Windows 10
If you want to apply third-party themes, you’ll need to patch your system first. The DeviantArt community is filled with fancy third-party themes, but they are not as easier to install. To use them, you’ll have to spend a few minutes tinkering with your system.
Keep in mind that tinkering with system files can be dangerous and precaution methods should be taken. In order to eliminate every potential risk, we strongly advise you to start this process by creating a system restore point. If something goes terribly wrong, you’ll be able to save your Windows installation with minimal effort.
The software used to modify the stuff required to allow 3rd party themes is called UltraUXThemePatcher. The good news is, the software has reached a stage where it’s stable for the vast majority of users. The installer will automatically back up the original system files. So if anything goes wrong after the installation, uninstalling UltraUXThemePatcher will revert your system to the original behavior.
Note: Installing this application might lead to unexpected problems that might not be resolved by uninstalling UltraUXThemePatcher. To eliminate this risk, I strongly advise you to start with Step 1 where we create a system restore point.
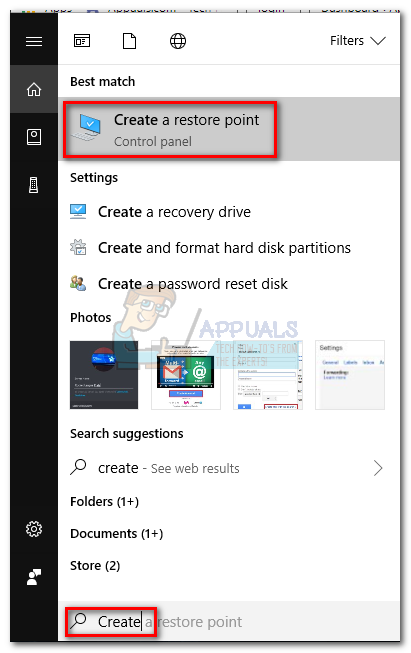
Step 1: Creating a System Restore Point
- Access the search bar in the bottom-left corner. Search for “restore” and click on Create a Restore point.

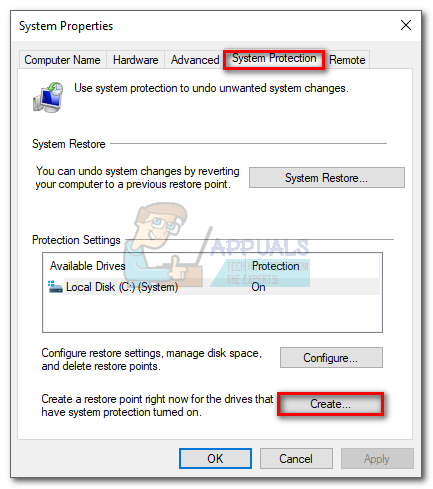
- Under System Protection, click on Create.

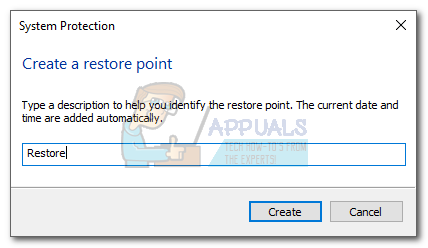
- Name your restore point and click on Create.

- Wait until the restore point is created. Do not start with Step 2 until the process is complete.
Step 2: Compatibility Checks
Before you let UltraUXThemePatcher modify important system files, it’s extremely important to verify if the software is compatible with your Windows version is supported. Here’s what you need to do:
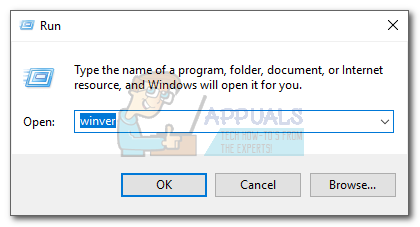
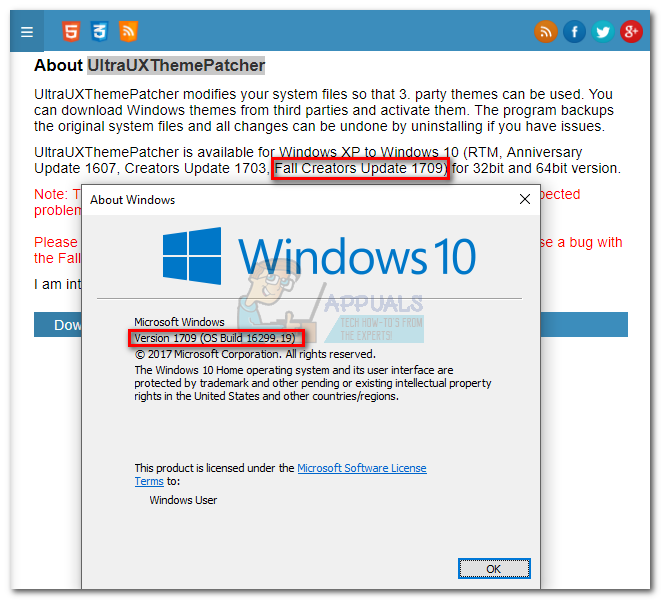
- Press Windows Key + R, type “winver” and press Enter.

- Find out your Windows 10 version. You can leave the About window open for further references.
- Visit this link, go to the About section and see if your version of Windows 10 is supported by UltraUXThemePatcher. If it is, you can proceed safely to Step 3.

Step 3: Installing UltraUXThemePatcher
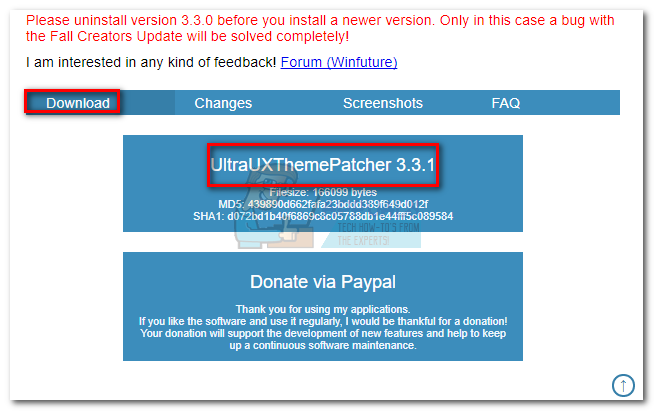
- Visit this link and download the latest version of UltraUXThemePatcher. Scroll down to the Download section and download the latest version.

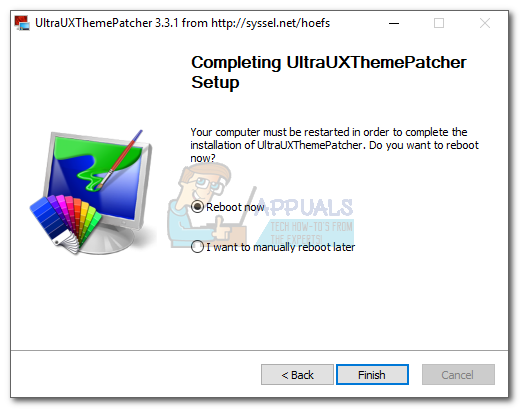
- Right-click on the UltraUXThemePatcher executable and click on Run as Administrator.

- Follow through with the installation instructions, then hit the Install button.

- Reboot your system to allow the changes to take effect.


Step 4: Using 3rd party Windows themes
Now that you’ve successfully patched your system files, you can use 3rd party themes from websites like DeviantArt. Some premium themes are paid only, but you can find a decent amount of freebies. Here’s a quick guide on how to apply them to your system:
- Download a 3rd party theme from a website like DeviantArt. Keep in mind that most custom 3rd party themes will only work on certain Windows 10 builds. Before you apply it to your system, check out the Description section to find if yours is supported.
- Unpack the theme and make sure to copy the folder specifically designed for your Windows 10 build.

- Paste the theme folder in C:\ Windows \ Resources \ Themes.
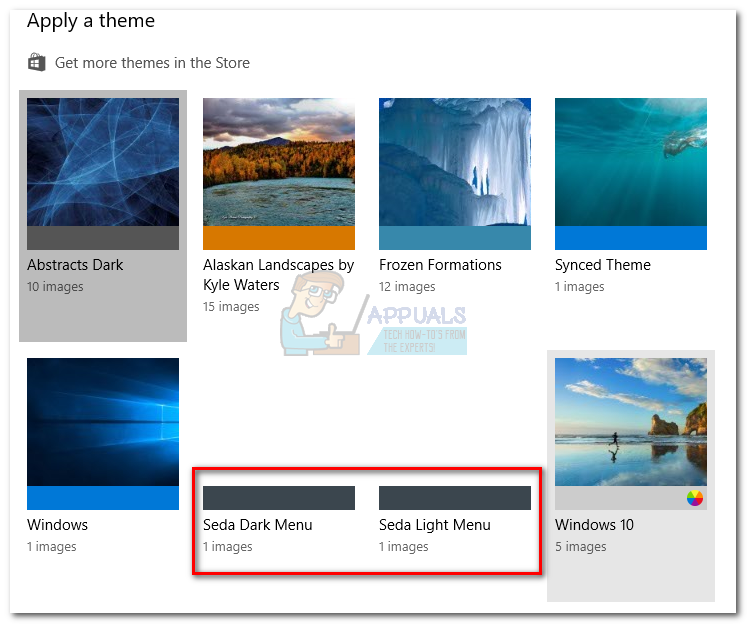
- Now, right-click an empty space on the desktop, select Personalize > Themes and scroll down just under Apply a theme. You should be able to see the 3rd party theme.

- Select the theme, then click on Use custom theme to enable it on your system.

Kevin Arrows
Kevin Arrows is a highly experienced and knowledgeable technology specialist with over a decade of industry experience. He holds a Microsoft Certified Technology Specialist (MCTS) certification and has a deep passion for staying up-to-date on the latest tech developments. Kevin has written extensively on a wide range of tech-related topics, showcasing his expertise and knowledge in areas such as software development, cybersecurity, and cloud computing. His contributions to the tech field have been widely recognized and respected by his peers, and he is highly regarded for his ability to explain complex technical concepts in a clear and concise manner.
Microsoft’s Windows is a pretty closed affair meaning it’s not an open-sourced software like Linux-based operating systems. This gives Microsoft greater control over the user experience which is essential for Microsoft. This also means you’d have to be dependent on the company to provide features such as themes. Fortunately, unlike Mac, Windows is popular.
As a result, there is no lack of third-party developer support and even with the restrictions, Windows can be quite customizable, provided you’re willing to take risks. Installing third-party themes requires modifying some core system files that can break your PC in case things go south. Let’s see how you can apply custom themes on Windows 10 using UltraUXThemePatcher and UXStyle.
Windows does have a Themes feature, by the way, but for years now it has been the same. It only lets you change the wallpapers and the color of certain Window elements. This is why perhaps these supposed “themes” are aptly called visual styles. Windows does not support third-party themes and you’ll need Microsoft-signed themes (visual styles) on their website. A popular tool called UltraUXThemePatcher bypasses this restriction and allows third-party themes to make changes to your system. With each new release though, the company makes a few changes to the Theme engine which means for every update, you’ll need a new version of UltraUXThemePatcher to support it.
There is another tool called UxStyle that allows you to install third-party themes but does not make any changes to system files. It’s a safer approach and you don’t have to worry about a Windows update breaking something other than your themes. There’s a pretty good chance this won’t work for you. UxStyle hasn’t been updated beyond Windows 10 Technical Preview versions.
Downloads UltraUXThemePatcher
- UltraUXThemePatcher
- UxStyle (uxstyle.com)
Download the setup file, right-click it, and select Run as administrator. Follow the on-screen setup wizard to install whichever of the two tools you’ve chosen. Once installed, you’ll have to reboot your system before you can install any themes.
Note
- Before you try anything, it is better to create a system restore point.
- The three system files that UltraUXThemePatcher modifies are uxtheme.dll, UXInit.dll, themeui.dll. These files are located in the C:\windows\system32\ folder. If you’re running the latest version of Windows, anything beyond the Creator’s update, there’s a small chance UltraUXThemePatcher will not be able to take ownership of these files. In that case, download and install TakeOwnershipEx from Winaero. Navigate to the System32 folder, right-click each of the above .dll files, and select Take Ownership/Restore Rights.

To install third-party themes, you’ll first of all need one. You can find many themes for Windows all over the internet, some paid but mostly free. Some themes come with a .exe installer so you don’t have to do much but double-click on them. These installers will install everything from the required icon packs, cursor themes, necessary tools to modify Windows Explorer, visual styles, etc. Most of the time though these will also attempt to install unwanted browser add-ons, search tools, or other adware on your system so be very careful while clicking any buttons. A good source for such themes is skinpacks.com.
The best source for all your customization needs though is deviantart.com. Here you’ll find tons of visual styles for Windows and themes and icons for many other pieces of software. For example, let’s download the Ades Theme for Windows 10 by unisira from DeviantArt.
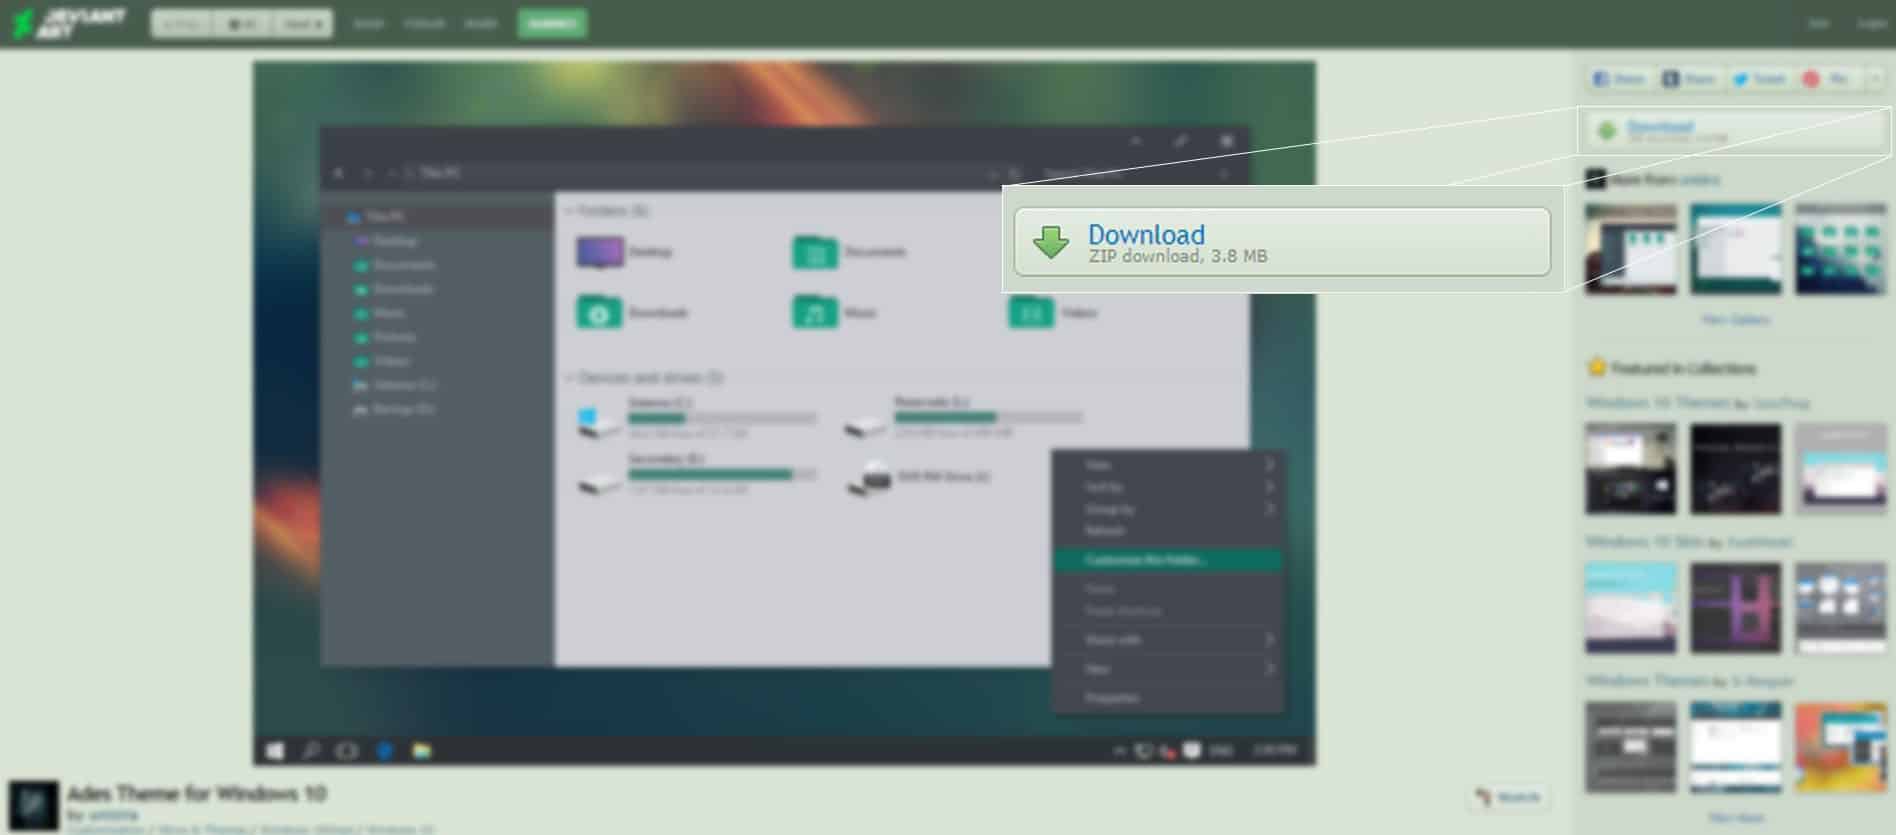
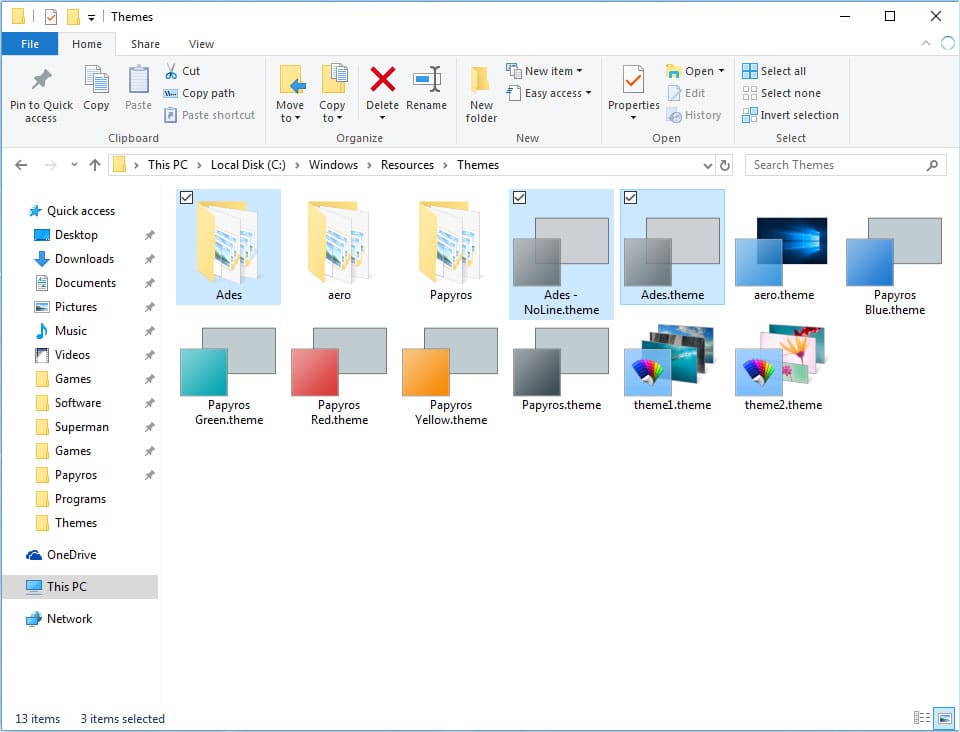
Just click the Download button on the right to get a zip file. Extract the file and move the contents inside the Themes folder to the C:\Windows\Resources\Themes\ folder. You’ll find the Windows Aero theme here by default and any other themes you may have installed from Microsoft’s website.
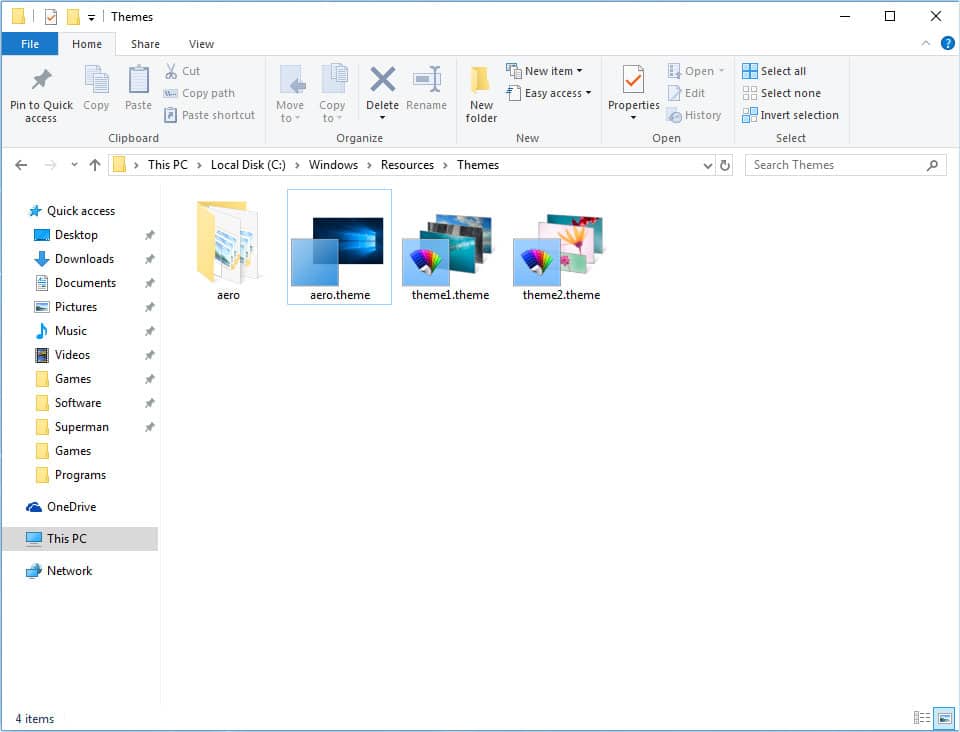
Every zip you download will probably have a different folder structure. You only need to move the contents of the folder which has .theme file(s) and it will also have a folder of the same name. Once you’ve moved the theme files to the appropriate folder, you can double-click on any of the .theme files to apply it.
Also, most theme designers aren’t fans of the Ribbon bar introduced with Windows 8, so their themes are designed keeping the old-school Windows 7 style explorer in mind. The Ribbon bar can make things look awkward, but you can easily remove it with a tool called OldNewExplorer.
Read Next: How to Combine Multiple Partitions into a Single Partition
Was this Article helpful?
YesNo