
The Windows taskbar is an essential component of the Windows operating system, acting as a versatile platform for multitasking and quick access to applications and system notifications. The taskbar allows you to pin your favorite apps for easy access, view open applications, and manage system notifications. It also includes the Start menu, search bar, and system tray, making it a central hub for navigating and controlling various aspects of the system.
Customization is a key feature of the Windows taskbar, allowing you to tailor it to your preferences. You can align taskbar icons to the center or to the side, pin or unpin apps, and show or hide system tray icons. These customization options make the taskbar not only a functional tool but also a personalized control center that enhances user productivity and experience.
This article describes how to customize the taskbar so that you can make the most out of its features. Whether you want to change the alignment of the icons, manage which apps appear, or adjust the visibility of system tray icons, you’ll find step-by-step instructions to help you personalize your taskbar to suit your workflow and preferences.
Configure the taskbar layout

The Windows taskbar consists of various components, each serving a unique purpose:
|
1. Widgets |
2. Start |
3. Search |
4. Task view |
5. Applications |
6. System tray |
While some components can be customized or removed to suit your preferences, others are essential for the proper functioning of Windows and cannot be removed. Expand each section to learn more about each component or area of the taskbar and discover how you can personalize the taskbar to better suit your needs.
Widgets are interactive elements that display dynamic content and provide quick access to various apps and features. They are designed to help you staying informed and organized by presenting personalized information at a glance.
To open the widgets board, you can:
-
Hover over, or select, the Widgets button on the taskbar
-
Press the Windows key + W
-
Swipe from the side of the screen, if the taskbar is aligned to the center

To show or hide Widgets from the taskbar:
-
Right-click on the taskbar and select Taskbar settings , or use the following shortcut:
Taskbar
-
Under Taskbar items, toggle the Widgets switch to On or Off
To learn more about Widgets, see Stay Up to Date With Widgets in Windows.
The Start menu is a central hub that provides quick access to your apps, settings, and files. The Start menu is divided into several sections, including Pinned, All, and Recommended apps, allowing you to easily find and launch your most-used applications and recent files. It’s designed to be intuitive and customizable, helping you to efficiently navigate your system and personalize your Windows experience.
Additionally, the Start menu includes user account options, allowing you to sign in, sign out, lock your device, or switch user accounts.
To open the Start menu, you can:
-
Select the Start button on the taskbar
-
Press the Windows key on your keyboard
-
Swipe from the bottom of the screen
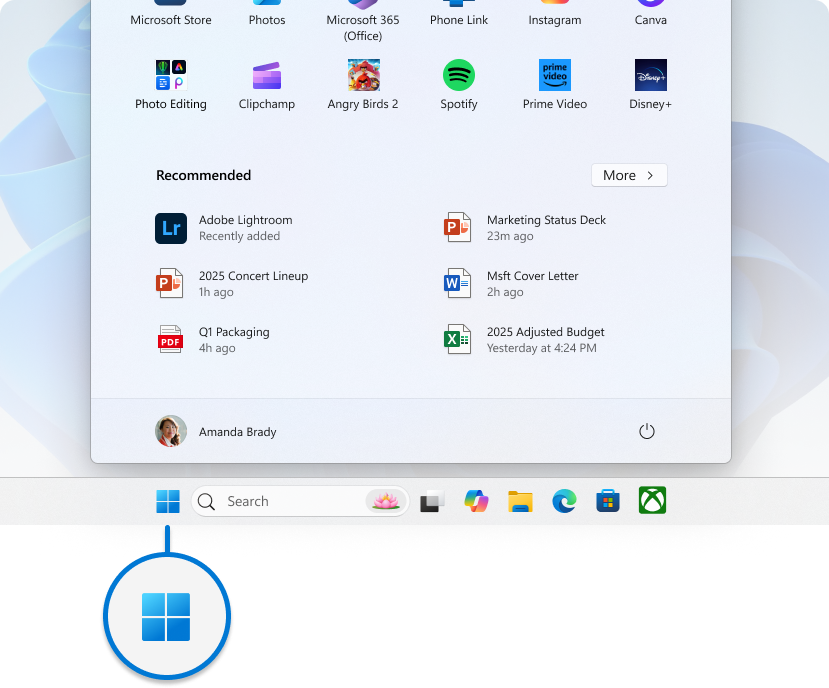
While you can’t remove the Start menu from the taskbar, you can change its position to be aligned on the side instead of being centered. For more information, see Change the taskbar alignment.
To learn more about the Start menu, see Customize the Windows Start menu.
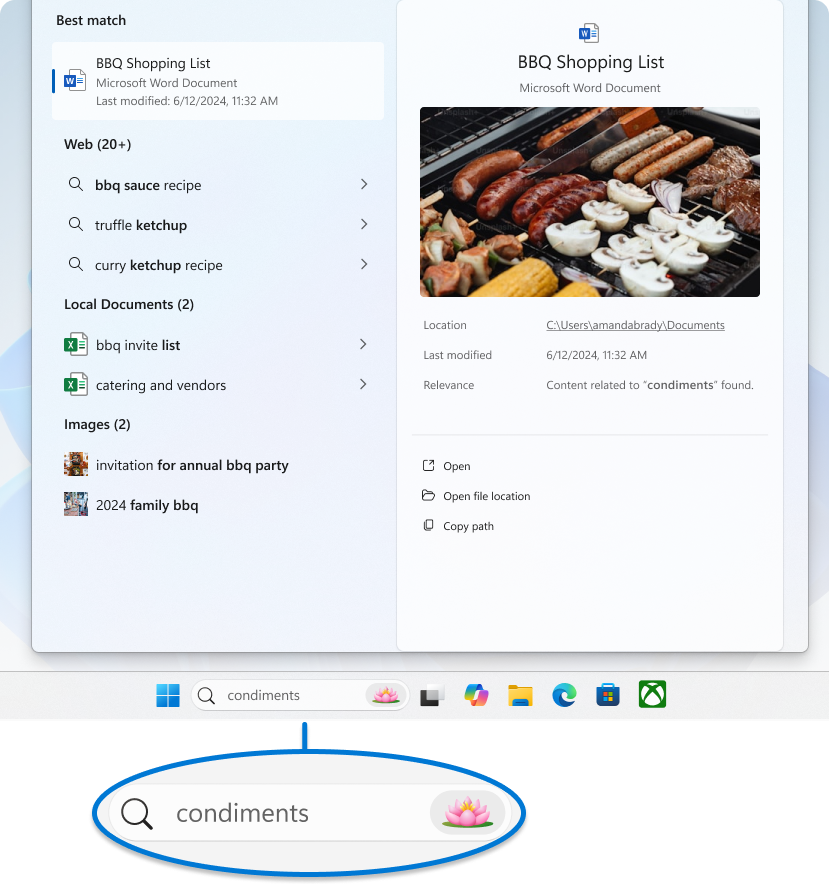
Windows Search is a powerful feature that allows you to find files, applications, settings, and even web results directly from your desktop. The search box, conveniently located on the taskbar, provides a seamless way to access this functionality. Additionally, Windows Search integrates web search capabilities from Microsoft Bing, enabling you to get search results without opening a browser.
To open the Search, you can:
To start a search using Windows Search you can:
-
Use the Search box on the taskbar: select the search box located on the taskbar and start typing your query. This will bring up a list of relevant results, including files, applications, settings, and web results powered by Microsoft Bing
-
Press the Windows key + S to open the search box
-
Start Menu Search: you can also start a search by opening the Start menu and then typing your query directly
To configure Search on the taskbar:
-
Right-click on the taskbar and select Taskbar settings , or use the following shortcut:
Taskbar
-
Under Taskbar items, use the dropdown menu to configure the search area. You can choose from the following options:
-
Search box: Displays a full text box to enter your search
-
Search icon and label: Shows a search icon along with the label «Search«
-
Search icon only: Displays only the search icon
-
Hide: Removes the search feature from the taskbar
To learn more, see Search for anything, anywhere.
The task view button on the taskbar is designed to enhance your multitasking experience in Windows. It allows you to quickly access and manage all your open windows and multiple desktops. When you open task view, a thumbnail view of all your active applications is displayed, making it easy to switch between tasks or close unnecessary windows. Additionally, task view enables you to create and manage multiple desktops, providing a clutter-free workspace tailored to different projects or activities. This feature is particularly useful when you need to organize your workflow efficiently and maintain focus on specific tasks.
To open task view, you can:
-
Select the task view button on the taskbar
-
Press the Windows key + Tab
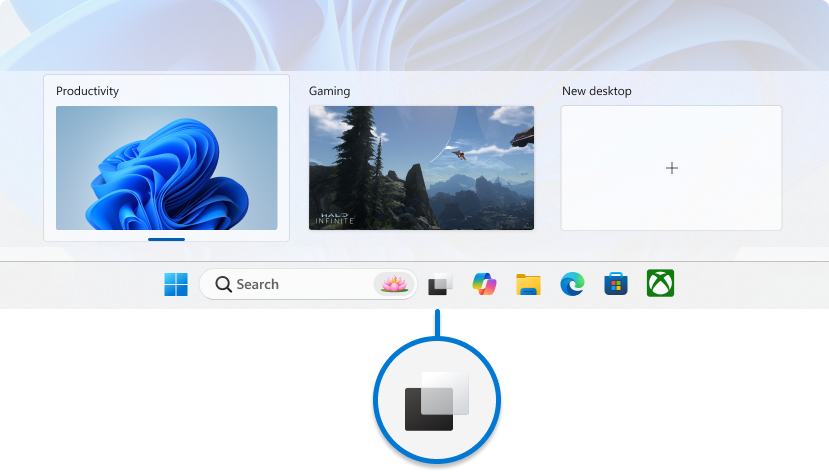
To show or hide the task view button from the taskbar:
-
Right-click on the taskbar and select Taskbar settings , or use the following shortcut:
Taskbar
-
Under Taskbar items, toggle the Task view switch to On or Off
To learn more, see How to Multitask in Windows and Configure Multiple Desktops in Windows.
The area of the taskbar used for apps in Windows is designed to provide quick access and management of your applications. You can pin your favorite apps to the taskbar or unpin unused apps. Additionally, you can rearrange the icons by selecting and dragging them to your preferred order.
Running apps are displayed on the taskbar with a line under the icon to indicate they are open. The currently active app is highlighted with the Windows accent color, making it easy to identify which app is in use. This setup allows for efficient multitasking and quick navigation between your applications.

Pin an app to the taskbar
There are different ways to pin apps to the taskbar. For example:
-
In the Search box on the taskbar, type the name of the app you want to pin to the taskbar. Right-click on the app, then select Pin to taskbar
-
If the app is already open, right-click on the icon on the taskbar, then select Pin to taskbar
Unpin an app from the taskbar
To unpin an app, right-click on the pinned icon on the taskbar, then select Unpin from taskbar .
Rearrange the apps on the taskbar
Whenever you want to change the order of app buttons on the taskbar, drag the app’s icon from its current position to a different one.
Tip: Each app on the taskbar offers a jump list, which allows you to quickly perform certain tasks like opening a recent file or accessing frequently used features. To access the jump list, simply right-click on the app icon. If you want to control the display of jump lists, go to Settings > Personalization > Start and toggle the option for Show recently opened items in Jump Lists on Start or the taskbar.
System tray
The system tray area on the taskbar includes various buttons and elements that provide quick access to system functions and notifications. You can customize each part of the system tray to suit your preferences.
The taskbar’s system tray displays icons for background apps, making it easy to monitor and interact with them. You can customize which apps and system tools, like the pen menu, touch keyboard, and virtual touchpad, are visible to keep your taskbar organized and focused on what’s important. Additionally, the system tray features dynamic privacy indicators that show real-time information about location, microphone, and camera access, giving you transparency and control over your privacy settings.

To customize the system tray area:
-
Right-click on the taskbar and select Taskbar settings , or use the following shortcut:
Taskbar
-
Under System tray icons, choose the icons you want to appear in the system tray. The options are Pen Menu, Touch keyboard, and Virtual Touchpad
-
Under Other system tray icons, select if you want to enable the hidden icon menu (also referred to as overflow area), and which icons can appear in the system tray
To rearrange the icons in the system tray area, you can drag and drop them. You can move icons that are currently visible in the system tray as well as those in the overflow area . To make an icon visible, drag it from the overflow area to the system tray. Conversely, to hide an icon, drag it from the system tray back to the overflow area.
Quick Settings provides a convenient way to access and modify frequently used settings without navigating through menus. For example, you can quickly adjust the volume, change screen brightness, switch Wi-Fi networks, or turn on accessibility tools.
The Quick Settings area is comprised of:
-
Network icon: This icon represents your Wi-Fi or Ethernet connection
-
Volume icon: This icon represents the sound settings
-
Battery icon: This icon represents the battery status on laptops and tablets
To open Quick Settings, you can:
-
Select the Quick Settings area on the taskbar
-
Press the Windows key + A
-
Swipe from the bottom of the Quick Settings area
While you can’t remove Quick Settings from the taskbar, you can customize it by moving and arranging the elements to suit your preferences.
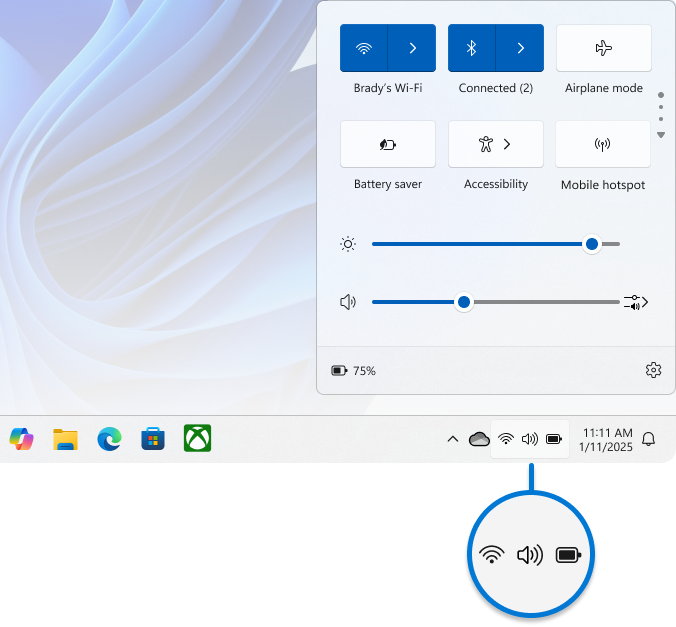
Tip: If you Right-click on one of the Quick Settings area icons, you can quickly access settings or diagnostics options.
The calendar and notification area provides a convenient way to access the calendar, where you can start a focus session, and the notification center. The notification center displays alerts and notifications about incoming emails, updates, and other system activities.
To open the calendar and notification center flyout, you can:
-
Select the clock or the notification bell icon on the taskbar
-
Press the Windows key + N
-
Swipe from the side of the screen
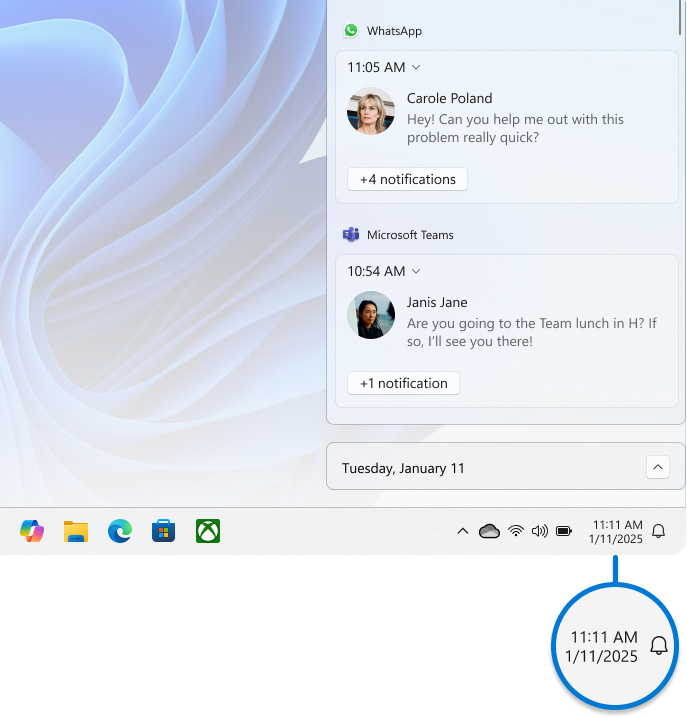
To show or hide the time and date from the taskbar:
-
Right-click on the clock on the taskbar, and select Adjust date and time, or use the following shortcut:
Date & time
-
Toggle the Show time and date in the System tray switch to On or Off
-
If set to On, you can show seconds alongside hours and minutes in your system tray clock by checking the option Show seconds in system tray clock (uses more power)
To learn more, see How To Use Focus in Windows and Notifications and Do Not Disturb in Windows.
Change the taskbar color
You can modify the color of the taskbar by changing the Windows color mode or by configuring accent colors.

To learn more, see Personalize Your Colors in Windows.
Configure the taskbar behaviors
In addition to customizing the layout of the taskbar, you can change various behaviors to enhance your user experience. These behaviors include how the taskbar responds to different actions, such as automatically hiding when not in use, displaying badges on taskbar buttons, and managing system notifications. By adjusting these settings, you can create a more efficient and personalized workflow that suits your specific needs. Expand each section to learn more.
Typically, the taskbar icons are centered, but you can also align them to the side of the taskbar.
-
Right-click on the taskbar and select Taskbar settings , or use the following shortcut:
Taskbar
-
Expand Taskbar behaviors and select your desired option for Taskbar alignment
Note: The taskbar settings allow you to align taskbar icons in the center or on the left. There are no settings for moving a taskbar to the top or to the side of the screen. The taskbar is positioned at the bottom of the screen.
A badge on a taskbar button is an alert to let you know that some activity is happening, or needs to happen, with that app.

For example, a bell badge on the Clock app alerts you about an active alarm that will notify you at the time you set.
To modify the taskbar’s behavior:
-
Right-click on the taskbar and select Taskbar settings , or use the following shortcut:
Taskbar
-
Expand Taskbar behaviors, and check or uncheck the option Show badges on taskbar apps
This option controls whether the icons of apps on the taskbar flash to get your attention when they need it. This typically happens when an app opens minimized or behind another window and requires your interaction. By default, an app icon flashes several times and stays highlighted until you select it or open the app.
To modify the taskbar’s behavior:
-
Right-click on the taskbar and select Taskbar settings , or use the following shortcut:
Taskbar
-
Expand Taskbar behaviors, and check or uncheck the option Show flashing on taskbar apps
This option is designed to enhance productivity and improve the process of sharing information during online meetings, particularly when using Microsoft Teams. When you are in a meeting call through Microsoft Teams, you can hover over the apps running on your taskbar, and you will be prompted with a button that allows you to share your window with the meeting attendees. This eliminates the need to switch back and forth between applications, ensuring a seamless and uninterrupted meeting experience. To stop sharing, you can hover over the window again and select Stop Sharing or choose another window to share.
To modify the taskbar’s behavior:
-
Right-click on the taskbar and select Taskbar settings , or use the following shortcut:
Taskbar
-
Expand Taskbar behaviors, and check or uncheck the option Share any window from my taskbar
This option allows you to display the taskbar on multiple monitors. When the option is enabled, the taskbar appears on all connected displays, providing easy access to your pinned apps, Start menu, and system tray on each screen. This can be useful if you want a consistent taskbar experience across all displays.
To modify the taskbar’s behavior:
-
Right-click on the taskbar and select Taskbar settings , or use the following shortcut:
Taskbar
-
Expand Taskbar behaviors, and check or uncheck the option Show my taskbar on all displays
You can hide the taskbar both in desktop mode and tablet mode. Press and hold (or right-click) any empty space on the taskbar, select Taskbar settings, select Taskbar behaviors, and select Automatically hide the taskbar.
To see the taskbar after it’s hidden, hover your mouse over, or touch, the bottom edge of your screen.
To modify the taskbar’s behavior:
-
Right-click on the taskbar and select Taskbar settings , or use the following shortcut:
Taskbar
-
Expand Taskbar behaviors, and check or uncheck the option Automatically hide the taskbar
Note: This setting is only available on 2-in-1 devices with tablet functionality.
When you disconnect or fold back the keyboard on your 2-in-1 device, you’ll now see the tablet-optimized taskbar. This taskbar has two states: collapsed and expanded. In the collapsed state, the taskbar is minimized so you can focus on your task, but you can still see critical status icons like the time or battery level. When you need to use the taskbar, swipe up from the bottom to see the expanded state that has a touch-friendly design with larger icons. When you launch an app, the taskbar will automatically collapse again.
To turn the tablet-optimized taskbar on or off:
-
Right-click on the taskbar and select Taskbar settings , or use the following shortcut:
Taskbar
-
To turn off the tablet-optimized taskbar, uncheck the box next to Optimize taskbar for touch interactions when this device is used as a tablet. To turn it back on again, recheck the box
This small area on the side of the taskbar is useful for quickly accessing the desktop by minimizing all open windows. Simply select this area to get to the desktop. Select it again to restore the open windows to their previous state.

To configure this area:
-
Right-click on the taskbar and select Taskbar settings , or use the following shortcut:
Taskbar
-
Expand the section Taskbar behaviors, then enable or disable the option Select the far corner of the taskbar to show the desktop
Windows 11 comes with a whole new set of features and improvements. One of the most talked about changes is the redesigned taskbar, which allows for more customization than ever before.
If you’re not happy with the default settings, don’t worry – there are some software options available to help you customize your taskbar just the way you want it.
To fix various Windows 10/11 problems, we recommend Outbyte PC Repair:
This software will repair common computer errors, protect you from file loss, malware damage, hardware failure, and optimise your computer for peak performance. In three simple steps, you can resolve PC issues and remove virus damage:
- Download Outbyte PC Repair Software
- Click Start Scan to detect Windows 10/11 issues that may be causing PC issues.
- Click Repair All to fix issues with your computer’s security and performance.
This month, Outbyte has been downloaded by 23,167 readers.
In this blog post, we will take a look at the best Windows 11 taskbar customization software options currently available.
#1. Ashampoo Taskbar Customizer

Ashampoo Taskbar Customizer is a great choice for those who are looking for an easy-to-use solution. It allows you to quickly and easily customize your taskbar in Windows 11. You can move icons, change their size, add more dividers, and much more. The program also offers some advanced options, such as customizing the context menu or creating your own keyboard shortcuts.
With ATC, you can modify the taskbar color and adjust the transparency as well, creating a more visually appealing experience.
#2. 7+ Taskbar Tweaker

7+ Taskbar Tweaker is a robust and powerful program that allows you to control nearly every aspect of your taskbar.
You can customize it any way you want, including changing the position of icons, organizing them into groups, and adding more dividers. The program also offers many advanced options, such as creating custom jump lists or setting up shortcuts.
With 7+ Taskbar Tweaker, there will be an option to lessen the extra space between anchored items and icons. Additionally, we may override the default behavior to define what should happen when double-clicking on a specific bar shortcut.
7+ Taskbar Tweaker is a great choice for people who want to customize their taskbar in more detail.
#3. TaskbarXI

TaskbarXI is a lightweight and simple taskbar customization tool developed by an independent developer Chris Andriessen. It allows you to convert your Windows 11 taskbar into a dock, pretty similar to macOS. It also gives you control over the position of your taskbar icons. You will be given the option to choose between a variety of different animations and change their speeds. The animations can be disabled if you don’t like animations and want them to move in an instant.
TaskbarXI is available on Microsoft Store, but it is not free to download. You can get it at a minimal price of $1.39.
#4. Start11

Start11 is an amazing Windows Start menu and taskbar customization tool developed by the Stardock software company. This amazing tool lets you customize your Windows 11 start menu and taskbar to provide it with a personal touch. The Start Menu in Windows 11 is undoubtedly one of the most significant changes, but if you don’t like it and are habitual of using the Windows 10 Start Menu, the Star11 will let you get back to the old Windows 10 Start menu on your Windows 11 system.
Along with that, it also comes with an amazing set of options to customize the taskbar. On Windows 11, there is no option to reposition your taskbar like in Windows 10. However, with Start11, you can move your taskbar to the top, left, or right.
The application is not available on Microsoft Store, but you can download it for free on Stardock’s official website.
#5. TranslucentTB

TranslucentTB is a lightweight program that offers an elegant way to customize the taskbar in Windows 11. The program has an intuitive user interface and allows you to easily change the transparency, color, size, and position of your taskbar.
The Windows 11 taskbar may be customized using this small, lightweight, and simple-to-use tool to give it a more attractive appearance by making it translucent and transparent. It consumes extremely few system resources, making it compatible with older or less powerful systems.
Conclusion
Windows 11 taskbar customizations can make your computer more attractive and easier to use. By utilizing any of these top Windows 11 taskbar customization software, you can easily customize the look and feel of your PC to make it more appealing while improving its productivity.
With the right software, you can customize your taskbar with just a few clicks. The programs listed here are some of the best Windows 11 taskbar customization software options currently available – each one offering its own unique features and advantages. Choose the one that fits your needs best, and start customizing your taskbar today!
What is the best Windows 11 taskbar customization software?
All of the programs listed here are excellent options for customizing your Windows 11 taskbar. It’s important to choose one that fits your needs and preferences, as each has its own unique features and advantages.
Is it safe to use a taskbar customization program?
Yes, it is safe to use a taskbar customization program. All of the programs listed here are reliable and secure, so you can feel confident about using them.
Can I customize my Windows 11 taskbar without using the software?
Yes, it is possible to customize your Windows 11 taskbar without using the software. You can use the built-in options in the Settings app to make changes to your taskbar – although some of the more advanced features may require a third-party program.
Peter is an Electrical Engineer whose primary interest is tinkering with his computer. He is passionate about Windows 10 Platform and enjoys writing tips and tutorials about it.

Windows 11 has brought a lot of new features and upgrades to the table, and one of the most notable changes is its revamped taskbar. With its sleek design and customizable features, the Windows 11 taskbar significantly improved from its predecessor. If you are someone who likes to personalize their workspace or wants to optimize their workflow, then this guide is for you. In this article, we will provide a step-by-step Windows 11 taskbar customization guide to help you make the most out of your taskbar. From changing the taskbar color to pinning your favorite apps and tools, we have got you covered.
Customize the Windows Taskbar Settings
First, we will take a look at your default taskbar options. Open up your settings when clicking on the gear icon in your taskbar, or open up your start menu and search for Settings. Navigate to Personalization and select Taskbar.
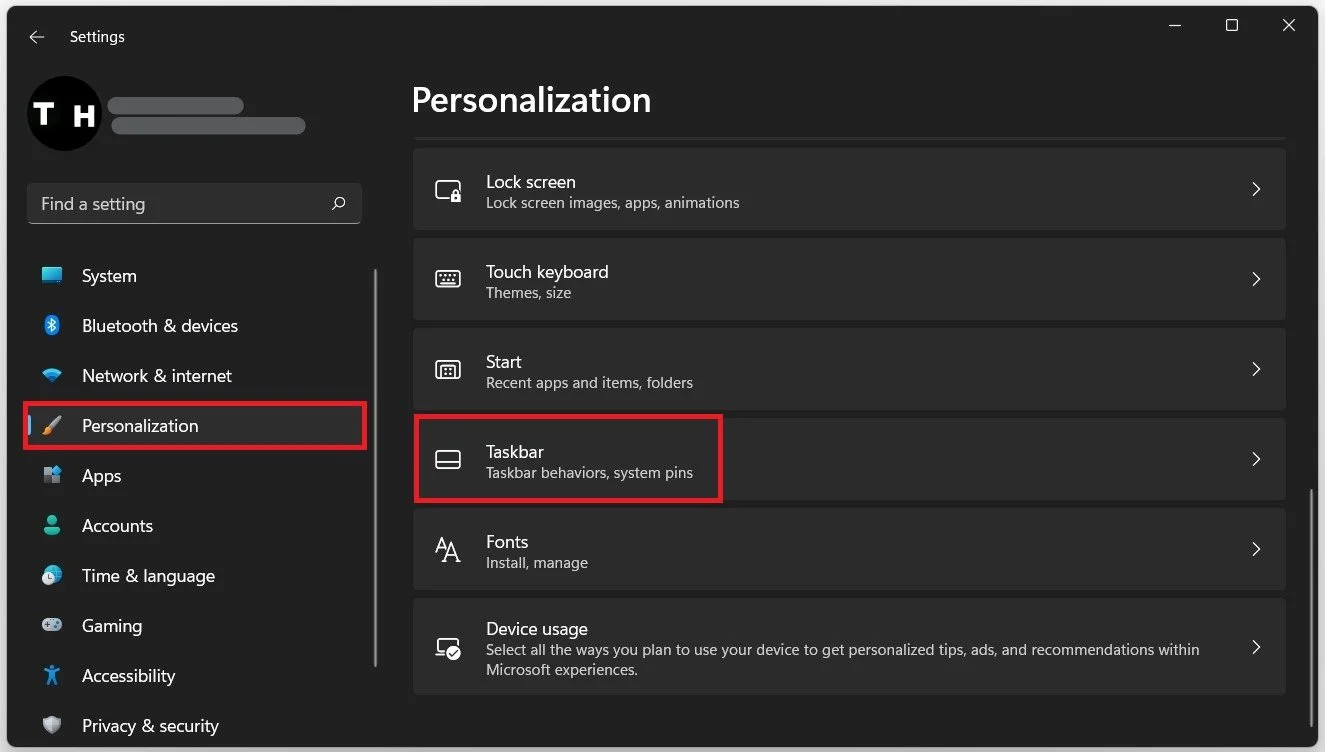
Windows Settings > Personalization > Taskbar
The first option lets you disable some of the default taskbar items. Enable or disable the Search, Task view and Widgets to your liking.
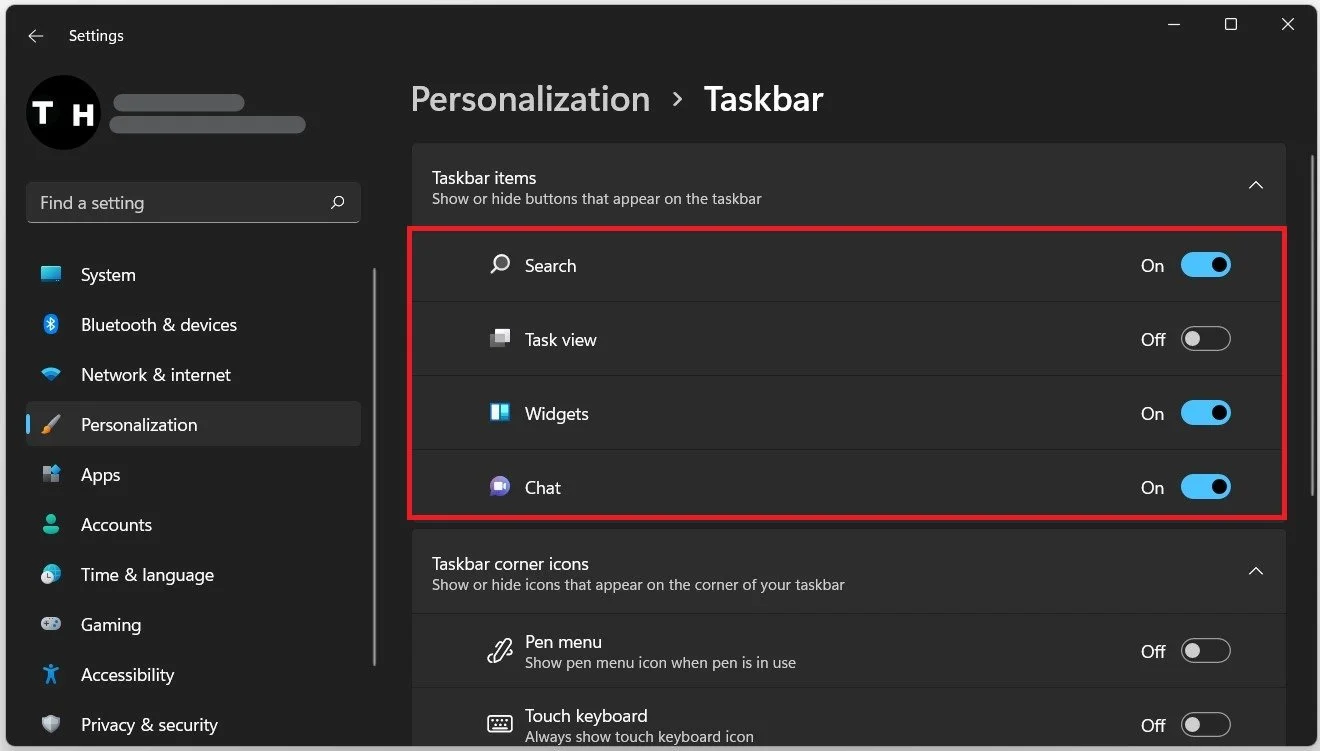
Windows Settings > Personalization > Taskbar > Taskbar Items
Below, you can show or hide icons on the corner of your taskbar next to your system tray. Expand your Taskbar corner overflow settings to show or hide more icons that could come in handy, depending on what you prefer to do with your taskbar. We will leave most of these settings disabled to keep a clean taskbar. Under Taskbar behaviors, you can change the taskbar alignment from the center to the left side, in case you prefer the Windows 10 look. You can also enable the Automatically hide the taskbar option. For users with multiple displays, you can also enable the Show my taskbar on all displays option.
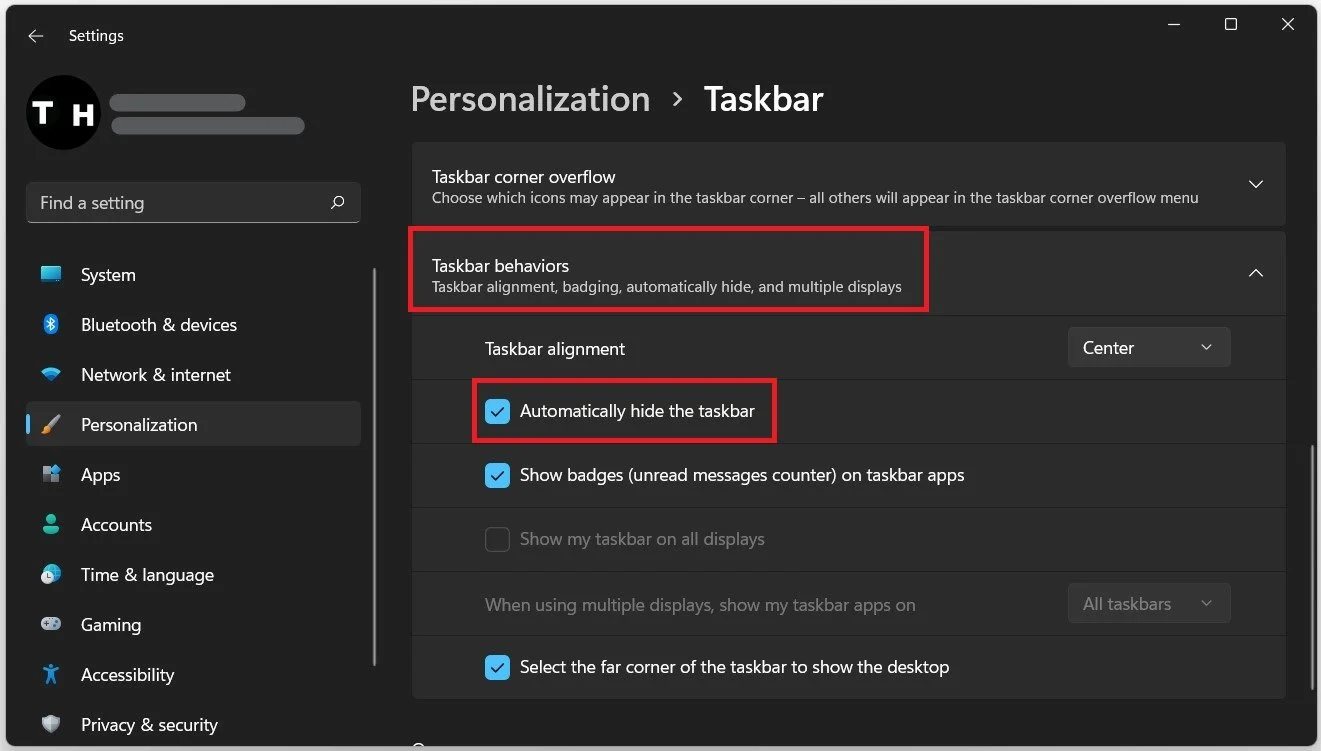
Windows Settings > Personalization > Taskbar > Taskbar Behaviors
Change the Taskbar Colors
After verifying these settings, navigate back to your main Personalization options. Click on Colors. Expand the Accent color, and you will find the Show accent color on Start and taskbar options. While this option is enabled, you can apply your selected accent color to your taskbar! Choose a Windows color, or click View colors to select any color you choose.
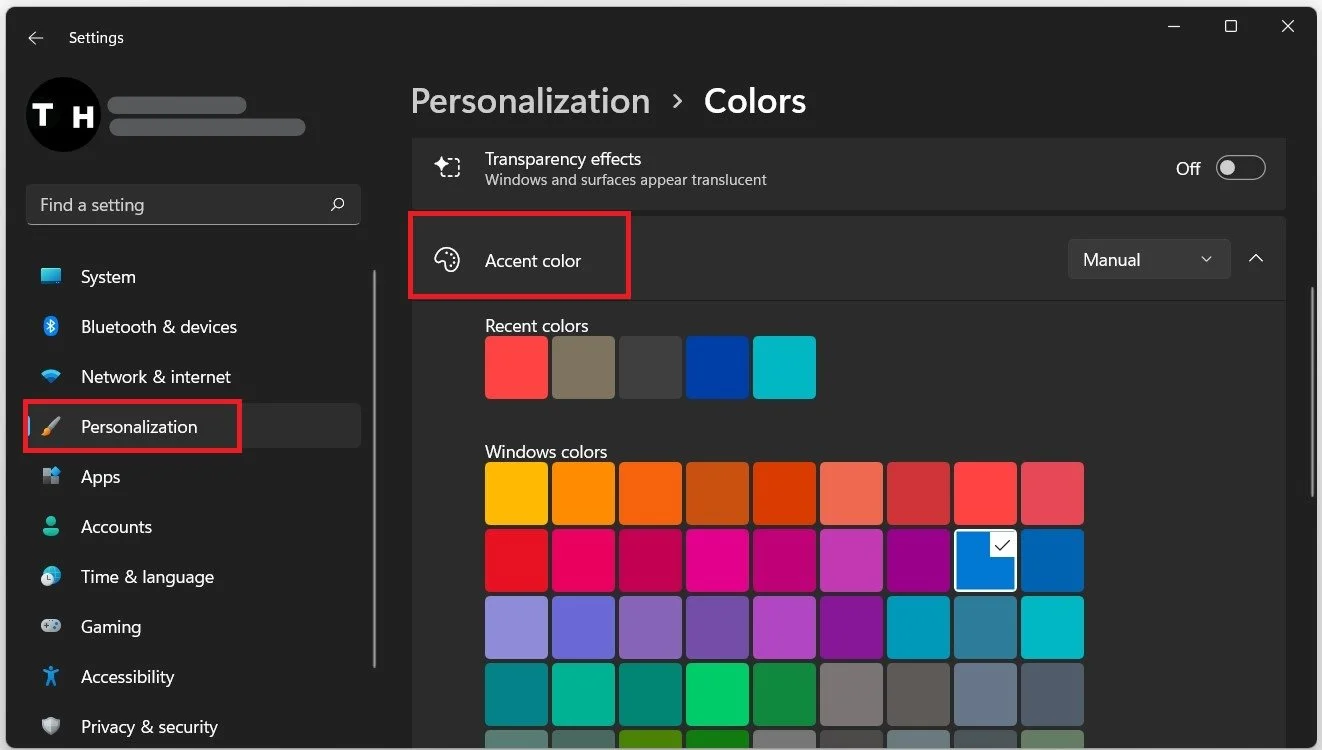
Windows Settings > Personalization > Taskbar > Colors
Transparent Windows 11 Taskbar
A simple app can make your taskbar transparent! Open up your Microsoft Store application and search for TranslucentTB to find this free-to-install application. Click Free, and Windows will take a moment to download and install the application. When it’s done, click on Launch, and you will be greeted with a pop-up message, telling you that you can tweak the taskbar’s appearance with the tray icon.
In your taskbar, click on the TB icon, to access its settings and play around with them to see what works best for you. When selecting Exit, you will exit out of the application and revert your taskbar back to normal. To re-apply the changes, simply search for TranslucentTB in your start menu search.

How to Change the Taskbar Size
You can also change the size of your taskbar by making a change in your registry editor. Simply search for Registry Editor in your start menu search to open it up. If you cannot find it here, open this dialogue box using the Windows key + R shortcut. Type regedit and hit enter. On the window, navigate to HKEY_CURRENT_USER\Software\Microsoft\Windows\CurrentVersion\Explorer\Advanced

-
Right-click anywhere within the Registry editor right side panel and choose New -> DWORD (32-bit) Value. Set the name of this DWORD to TaskbarSi.
-
Double-click TaskbarSi to set its value. For a small taskbar, make sure to set the value to 0. The default taskbar size is 1, and to make it larger, set this value to 2. Based on your preference, set the value as 0 or 2, assuming you don’t like the new default size of the taskbar in Windows 11. Notably, icons from third-party apps will look a little pixelated when you use the large taskbar.
After setting your preferred value, restart your PC for the changes to take effect. Alternatively, you can also open up your task manager. Search for Task Manager in your start menu search to open it up. Under Apps, right-click Windows Explorer and select Restart. This will allow the changes in your Registry Editor to take effect without restarting your PC.

Task Manager > Processes > Windows Explorer > Restart
Customizing the Windows 11 Taskbar is a straightforward process that allows you to tailor your desktop experience to suit your personal preferences. With just a few clicks, you can change the position of the taskbar, adjust its size, and pin your favorite apps for quick access. Whether you want a sleek, minimalist look or need to boost productivity, this guide will walk you through the steps to make your taskbar work for you.
Customizing the Windows 11 Taskbar
Customizing the Windows 11 Taskbar can enhance your workflow and personalize your desktop environment. Here’s a simple guide to help you get started.
Step 1: Access Taskbar Settings
Right-click on the taskbar and select “Taskbar settings.”
This will open up a menu where you can tweak various aspects of the taskbar. You can find options to adjust the taskbar’s appearance and functionality to better suit your needs.
Step 2: Change Taskbar Alignment
In the Taskbar settings menu, look for “Taskbar alignment” and choose your preferred position (left or center).
Changing the alignment can impact how you interact with your desktop. Centering the taskbar icons might give a modern feel, while aligning them to the left can resemble older Windows versions.
Step 3: Pin Your Favorite Apps
Open the app you want to pin, right-click its icon on the taskbar, and select “Pin to taskbar.”
Pinning apps provides easy access to your most-used programs. This is especially useful if you frequently switch between certain applications throughout your day.
Step 4: Adjust Taskbar Size
In Taskbar settings, toggle “Use small taskbar buttons” to adjust the size of the taskbar icons.
Smaller icons can free up screen space, offering a cleaner look. Larger icons, on the other hand, may be easier to click, which is helpful for users with accessibility needs.
Step 5: Customize Notification Area
In Taskbar settings, scroll to “Notification area” and choose which icons appear on the taskbar.
Customizing the notification area ensures that you only see the icons that matter most to you, reducing clutter.
After completing these steps, your Windows 11 Taskbar will be personalized to better suit your preferences and needs. You’ll have quicker access to the applications and tools you use most, arranged in a way that feels intuitive and efficient.
Tips for Customizing the Windows 11 Taskbar
- Consider using the “Auto-hide the taskbar” option to maximize screen space.
- Experiment with different visual effects under “Taskbar behaviors” for a more personalized look.
- Use keyboard shortcuts to enhance your taskbar navigation efficiency.
- Regularly update pinned apps to ensure quick access to the latest versions.
- Explore third-party customization tools for even more taskbar tweaks.
Frequently Asked Questions
How do I unpin an app from the taskbar?
Simply right-click the app’s icon on the taskbar and select “Unpin from taskbar.”
Can I move the taskbar to the top of the screen?
As of now, Windows 11 does not support moving the taskbar to the top. It can only be aligned to the center or left.
How do I get back the old Windows 10 taskbar?
Windows 11 doesn’t natively support reverting to the Windows 10 taskbar design, but third-party tools might offer a similar experience.
Why are some icons hidden in the notification area?
Windows automatically hides some icons to reduce clutter. You can customize which icons are always visible through the Taskbar settings.
Can I change the taskbar color?
Yes, you can change the taskbar color under “Personalization” settings by selecting a new accent color.
Summary
- Right-click taskbar > “Taskbar settings.”
- Change alignment in settings.
- Open app > Right-click icon > “Pin to taskbar.”
- Toggle “Use small taskbar buttons.”
- Customize “Notification area” icons.
Conclusion
Customizing the Windows 11 Taskbar is like redecorating your room—you get to decide what feels right for your digital workspace. By following the steps outlined above, you’re not only making your PC look good, but you’re also making it function just the way you want. Think of the taskbar as the control center for your computer, and tailoring it to your liking can save you time and make your user experience more enjoyable.
Whether you’re a power user needing maximum efficiency or just someone who enjoys a tidy desktop, these customizations offer something for everyone. Don’t be afraid to experiment with different settings or explore more advanced third-party tools for even greater customization. Your taskbar should reflect your personality and meet your needs—after all, it’s the gateway to your digital world. So dive in and make those changes today!
Matthew Burleigh has been writing tech tutorials since 2008. His writing has appeared on dozens of different websites and been read over 50 million times.
After receiving his Bachelor’s and Master’s degrees in Computer Science he spent several years working in IT management for small businesses. However, he now works full time writing content online and creating websites.
His main writing topics include iPhones, Microsoft Office, Google Apps, Android, and Photoshop, but he has also written about many other tech topics as well.
Read his full bio here.
The Windows 11 taskbar styling guide
Table of contents
- Introduction
- Finding targets
- Missing customizations
- Contributing
- Themes
- General
- Taskbar size
- Taskbar background
- Taskbar border
- Task list
- Start button image
- Hide the start button
- Task list buttons size
- Task list buttons corner radius
- Task list labels
- Task list labels font
- Task list running indicator
- Notification area (system tray)
- Tray icons size
- Tray icons size (system icons)
- Tray icons spacing
- Tray icons padding
- Tray icons padding (system icons)
- Hide the network icon
- Hide the volume icon
- Chevron icon width
- Clock
- Hide the notification bell icon
- Copilot button image
- Hide the «Show Desktop» button
- Transforms
- Translate
- Rotate
- Scale
- Skew
- Other properties
- Colors
- Solid color
- Accent colors
- Transparent color
- Acrylic effect as color
- Mica effect as color
- Gradient as color
- Image as color
Introduction
This is a collection of commonly requested taskbar styling customizations for
Windows 11. It is intended to be used with the Windows 11 Taskbar
Styler Windhawk mod.
If you’re not familiar with Windhawk, here are the steps for installing the mod:
- Download Windhawk from windhawk.net and install it.
- Go to «Mods» in the upper right menu.
- Find and install the «Windows 11 Taskbar Styler» mod.
After installing the mod, open its Settings tab and adjust the styles according
to your preferences.
Some customizations are best to be adjusted with other Windhawk mods. Links to
those mods are provided where applicable.
See also: The Windows 11 start menu styling
guide,
The Windows 11 notification center styling
guide.
Finding targets
How to find targets using UWPSpy.
Missing customizations
If you’re looking for a customization that is not listed here, please open an
issue.
Contributing
If you have a taskbar styling customization or theme that you would like to
share, please submit a pull request.
Themes
Themes are collections of styles that can be imported into the Windows 11
Taskbar Styler mod. The following themes are available:
| Link | Screenshot |
|---|---|
| WinXP |

|
| Bubbles |

|
| TranslucentTaskbar |

|
| Squircle |

|
| RosePine |

|
| DockLike |

|
| WinVista |

|
| CleanSlate |

|
| Lucent |

|
| 21996Taskbar |

|
| BottomDensy |

|
| TaskbarXII |

|
General
Taskbar size
Use the Taskbar height and icon
size mod.
Taskbar background
Target:
Taskbar.TaskbarFrame > Grid#RootGrid > Taskbar.TaskbarBackground > Grid > Rectangle#BackgroundFill
To set a solid color background, use the following style:
Replace <color> with the desired color. See colors section for all
options (e.g. if you want blurred background effect).
Note
For some themes, a different target has to be used to customize the taskbar
background:
- The WinXP theme spans the taskbar border over the
full taskbar height. To customize the background, use the
Rectangle#BackgroundStroketarget. - The DockLike theme hides the standard taskbar
background element. To customize the background, use theGrid#RootGrid
target and theBackground=<color>style.
Taskbar border
Target:
Rectangle#BackgroundStroke
It can be customized in the same way as the background, see Taskbar
background.
Task list
Start button image
Target:
Taskbar.ExperienceToggleButton#LaunchListButton[AutomationProperties.AutomationId=StartButton] > Taskbar.TaskListButtonPanel > Border#BackgroundElement
Style:
Background:=<ImageBrush Stretch="Uniform" ImageSource="<image>" />
Target:
Taskbar.ExperienceToggleButton#LaunchListButton[AutomationProperties.AutomationId=StartButton] > Taskbar.TaskListButtonPanel > Microsoft.UI.Xaml.Controls.AnimatedVisualPlayer#Icon
Style:
Replace <image> with your own image, a local file path or a URL, for example:
- Windows 10:
https://i.imgur.com/lEvZStx.png. - Windows XP:
https://i.imgur.com/RX5DqT3.png(use withStretch="None").
To set a different image for each Start button state — normal, hovered, pressed —
refer to this
comment.
Hide the start button
Target:
Taskbar.ExperienceToggleButton#LaunchListButton[AutomationProperties.AutomationId=StartButton]
Style:
Task list buttons size
Use the Taskbar height and icon
size mod.
Task list buttons corner radius
Targets:
Taskbar.ExperienceToggleButton
Style:
Replace <radius> with the desired radius. A larger value will make the corners
more rounded. Default: 4.
Task list labels
Various task list label customizations are available in the Taskbar Labels for
Windows 11 mod.
Task list labels font
Target:
Style:
Replace <font> with the desired font. For a list of fonts that are shipped
with Windows 11, refer to this page.
Task list running indicator
Target:
Taskbar.TaskListLabeledButtonPanel@RunningIndicatorStates > Rectangle#RunningIndicator
Various styles can be applied to the running indicator. Here are some examples:
Styles:
Fill@ActiveRunningIndicator=Red
Width@ActiveRunningIndicator=20
The following visual states1 can be used:
ActiveRunningIndicatorInactiveRunningIndicatorRequestingAttentionRunningIndicator
Some customizations for the running indicator are available in the Taskbar
Labels for Windows 11 mod.
Notification area (system tray)
Tray icons size
Target:
SystemTray.ImageIconContent > Grid#ContainerGrid > Image
Styles:
Replace <size> with the desired size. Default: 16.
Tray icons size (system icons)
Target:
SystemTray.TextIconContent > Grid#ContainerGrid > SystemTray.AdaptiveTextBlock#Base > TextBlock#InnerTextBlock
Style:
Replace <size> with the desired size. Default: 32.
Tray icons spacing
Target:
SystemTray.NotifyIconView#NotifyItemIcon
Style:
Replace <width> with the desired width for the icon and the spacing. Default:
32.
Tray icons padding
Target:
SystemTray.ImageIconContent > Grid#ContainerGrid
Style:
To reduce the spacing even more, replace <padding> with the desired padding.
Default: 4,0.
Tray icons padding (system icons)
Target:
SystemTray.TextIconContent > Grid#ContainerGrid
Style:
Replace <padding> with the desired padding. Default: 4,0.
Hide the network icon
Target:
SystemTray.OmniButton#ControlCenterButton > Grid > ContentPresenter > ItemsPresenter > StackPanel > ContentPresenter[1] > SystemTray.IconView > Grid > Grid
Style:
Hide the volume icon
Target:
SystemTray.OmniButton#ControlCenterButton > Grid > ContentPresenter > ItemsPresenter > StackPanel > ContentPresenter[2] > SystemTray.IconView > Grid > Grid
Style:
Chevron icon width
Target:
SystemTray.ChevronIconView
Style:
Replace <width> with the desired width. Default: 32.
Clock
Clock customizations are available in the Taskbar Clock
Customization mod.
Hide the notification bell icon
Target:
SystemTray.OmniButton#NotificationCenterButton > Grid > ContentPresenter > ItemsPresenter > StackPanel > ContentPresenter > SystemTray.IconView#SystemTrayIcon > Grid > Grid > SystemTray.TextIconContent
Style:
Copilot button image
Target:
ContentPresenter#ContentPresenter > Grid#ContentGrid > Microsoft.UI.Xaml.Controls.AnimatedVisualPlayer#LottieIcon
Style:
Target:
SystemTray.CopilotIcon#CopilotIcon > Grid#ContainerGrid > Border#BackgroundBorder
Style:
Background:=<ImageBrush Stretch="None" ImageSource="<image>" />
- Copilot icon without preview label:
https://i.imgur.com/lfwEWzI.png. - Old Copilot icon:
https://i.imgur.com/Z6eCNH3.png.
Hide the «Show Desktop» button
Target:
SystemTray.Stack#ShowDesktopStack
Style:
Transforms
You can use transformation styles to translate, rotate, scale, or skew elements.
Tip
Should I use RenderTransform or Transform3D?
For 2D transformations, it is best to stick to RenderTransform in most cases. Using Transform3D for 2D transformations can cause elements to become blurry. For 3D transformations, you must use Transform3D.
Tip
You can mix and match transformations when using Transform3D! You can also use RenderTransform and Transform3D together.
For example: Transform3D:=<CompositeTransform3D TranslateY="-15" RotationZ="15" ScaleX="1.5" />
Translate
RenderTransform:=<TranslateTransform Y="-15" X="15" />
— or —
Transform3D:=<CompositeTransform3D TranslateY="-15" TranslateX="15" TranslateZ="-15" />
Rotate
RenderTransform:=<RotateTransform Angle="15" />
— or —
Transform3D:=<CompositeTransform3D RotationX="-15" RotationY="15" RotationZ="-15" />
X: 3D vertical rotation.Y: 3D horizontal rotation.Z: 2D rotation.
Scale
RenderTransform:=<ScaleTransform ScaleX="1.5" ScaleY="-1.5" />
— or —
Transform3D:=<CompositeTransform3D ScaleX="-1.5" ScaleY="1.5" ScaleZ="-1.5" />
Skew
RenderTransform:=<SkewTransform AngleX="-15" AngleY="15" />
Other properties
- Rotate, Scale and Skew:
CenterX: Offsets the transform’s origin on the X axis.CenterY: Offsets the transform’s origin on the Y axis.CenterZ: Offsets the transform’s origin on the Z axis. (Only forTransform3D)
Colors
In the following examples we’re gonna use Fill as an example, but this also
works for other properties that accept colors like Background.
Solid color
Replace <color> with the desired color.
A color can be a name (e.g. Red) or a hex code (e.g. #FF0000).
The color can be semi-transparent (e.g. #80FF0000). To have a fully
transparent background, use Transparent.
Accent colors
A Color can also be a ThemeResource or StaticResource. There are many such
styles built into Windows.
Fill:=<SolidColorBrush Color="{ThemeResource SystemAccentColor}" Opacity="0.8" />
Accent colors have different lightness available, like SystemAccentColorLight2
or SystemAccentColorDark1. The word Light or Dark is appended at end with
a number ranging from 1-3. Check out the official Microsoft
docs
for all variations.
Fill:=<SolidColorBrush Color="{ThemeResource SystemAccentColorDark2}" Opacity="0.5" />
Transparent color
To have a fully transparent background, use the following style:
Acrylic effect as color
In order to have an acrylic effect (a blurred background) you can use
AcrylicBrush, this comes with TintOpacity which defines how much of the
color needs to be applied.
Fill:=<AcrylicBrush TintColor="Black" TintOpacity="0.8" />
You can also mix acrylic with a variation of an accent color for a more dynamic
look that fits current theme.
Fill:=<AcrylicBrush TintColor="{ThemeResource SystemAccentColorDark2}" TintOpacity="0.3" />
Mica effect as color
Note
Unfortunately I haven’t figured this out yet. If you have any info please
contribute by making a pull request.
Gradient as color
The background can also be a gradient. For example, to have a gradient from
yellow to red to blue to lime green, use the following style:
Fill:=<LinearGradientBrush StartPoint="0,0.5" EndPoint="1,0.5"><GradientStop Color="Yellow" Offset="0.0" /><GradientStop Color="Red" Offset="0.25" /><GradientStop Color="Blue" Offset="0.75" /><GradientStop Color="LimeGreen" Offset="1.0" /></LinearGradientBrush>
Image as color
The background can also be an image:
Fill:=<ImageBrush Stretch="UniformToFill" ImageSource="<image>" />
Replace <image> with your own image, a URL or a local file path.
-
See Finding targets on how to use UWPSpy to find all of the available visual states for an element ↩