
Question
following statements as true (T) or false (F).
1 _ Custom shapes like polygons take longer to create than other windows.
2 — Circles are more expensive than other window shapes.
pas
3 — Triangle-shaped windows are easier to clean than circle-shaped windows.
Vocabulary

Key Concept
Shape properties
OtherGeneral StudiesOther
Shape properties refer to the characteristics of geometric shapes, such as their sides, angles, and area. Different shapes have different properties that affect how they are created and used.
1 Answer
Step 1: Analyze Statement 1
The statement claims that custom shapes like polygons take longer to create than other windows. This is generally true because custom shapes often require more design time and precision.
Result: True (T)
Step 2: Analyze Statement 2
This statement suggests that circles are more expensive than other window shapes. The cost can depend on various factors, but typically, circular windows may require specialized manufacturing techniques, making them potentially more expensive.
Result: True (T)
Step 3: Analyze Statement 3
The statement compares the ease of cleaning triangle-shaped windows to circle-shaped windows. Generally, triangle-shaped windows may have fewer curves and edges, making them easier to clean than circular windows, which can be more challenging due to their shape.
Result: True (T)
Final Answer
1 — True (T)
2 — True (T)
3 — True (T)
See Full Answer
Answered Sep 30 at 06:16 (Basic Model)
😉Want a more accurate answer?
We bring the world’s top AI models — our Super AI, OpenAI o1, Claude 3.5, GPT-4o, Gemini 2.0 — together in one place. Pick one and see how it solves your question!
Advertisement
Custom shapes are great for simplifying the association between marks and what they represent so the viewers can enjoy the visualization without having to constantly check the legend to remind themselves what they’re looking at. But you can see them being used for various purposes in the wild such as navigation/filter controls in dashboards. Custom polygons provide another great way to draw custom shapes in Tableau although they are almost exclusively used in maps by most.
In this blog post, I will be sharing some rather unusual example use cases for both of these mark types about which I got questions about from many Tableau users via the blog or in person conversations at this year’s Tableau conference.
Before we go on any further, please keep in mind that large and/or asymmetrical shapes can negatively affect the accurate readability of your visualizations since their center (which is where the value on the axis corresponds) may be difficult to pinpoint AND most of the data below (while they may look prettier this way) can be more accurately depicted with basic chart types like the good old bar chart. For most of these examples I relied on the Sample – Superstore dataset even though the titles of the visualizations may say otherwise. All of these visualizations are published on Tableau public for you to download and explore. You can also find information as comments inside the calculated fields that I created.
Let’s start with using marks to create the customized bar chart you see below.

In simple bar chart form this would look like the following:

Now, how do you make this imaginary Sales data look like a chart that shows # births annually? By making the bars look like little kids holding hands, of course. : )
The core piece is the calculation that generates the evenly spaced marks. In this case I divided SUM(Sales) for each region in Superstore dataset into chunks of 5000 until we span the total amount.

This gets you most of the way and you can actually stop at this point if you don’t care about any more precision than increments of 5000. But what happens if you want to be a bit more precise? By using another calculation to show different marks for fractions of 5000…

In this case, my dataset contained enough rows to accommodate all the marks I needed for my visualization. But what if it didn’t? The next example answers this question, as well as showing a different chart type.
Stacked icons are commonly used when author of the visualization isn’t too worried about exactness conveyed by the chart. For example our next pictogram shows tanks in Bacteria and Osterlich armies. I can clearly see Bacteria has the superior army. The difference is large enough that even a coarse visualization like this gets the point across. If I cared to count the tanks in the viz and looked up the population, I could have even found out that it corresponds to 0.46 tanks per capita! : )

In this case since my dataset had fewer rows than the marks shown on the viz, I had to generate rows. To achieve this I used one of the densification tricks I showed earlier in my Coxcomb chart blog post. You can see the custom SQL query below which adds a new row for each existing row with the value for Sales set to 0.

After doing this, I can right click on my Sales column and select “Create Bins”. I need to set the bin size to the quantity my each icon will represent. In the sample workbook, I created bins of 10,000 (icon says 10^6 tanks but underlying data is still aggregated Superstore). Now if I look at my data, this is what I see (0 rows are highlighted).
There are really two values in my dataset for each Market. But if I drag Sales (bin) into rows or columns shelf, now I can select “Show Missing Values” from pill context menu to tell Tableau also to show me the buckets that contain no data. Bins are normally used to generate histograms and this setting is intended to show/hide empty bins in the histogram. To show me the empty bins, Tableau creates new rows for me. This way my 2 rows for Bacteria become 27 rows which means now I can show 27 marks.
Same method can be used with multiple dimensions as well. The following example demonstrates this using Region and Product Type dimensions.

In this case, the custom SQL query looks slightly different but rest of the process is the same.
")
You can do a lot more with custom marks if you are adventurous and prefer prioritizing visually interesting charts at the expense of readability and accuracy. For example you can use a custom mark like a stencil as shown below.

In this visualization, marks are overlaid on top of a stacked bar chart. Custom mark (the beer glass) has a hollow center (transparent PNG) and is on the secondary axis where the bottom of the glass is fixed at 0 to achieve the effect. White, yellow color pattern is used in stacked bar chart to resemble beer and foam. This chart is visually interesting but especially considering lack of axis and the fact that it is unclear whether the quantity is associated with the height or area, it is not easy to interpret.
You can take it even further and use images themselves to mimic bar charts as shown in the following example.

I hope that’s enough for the infographics. How about something more exciting, such as directed graphs? You could create a graph in Tableau using a dual axis chart combining lines and circles. But how do you indicate direction?

The first tab in the Tableau public visualization linked via the image above shows how to achieve this using custom marks. This is done by creating 360 custom marks to cover every 1 degree rotation of arrow and first vertex. A calculated field determines the angle for each edge which is used to decide which rotated arrow to display. Note that since the graph can be dynamic, the domain of the field on marks card (angles) may also change. This may lead to changes in what mark is used for what angle. To avoid this, if you look at the dataset associated with this example you will notice that the complete domain (of all possible angles) is added to provide padding but then “pseudo-filtered out” using Pages shelf so these rows don’t have any effect on the visualization itself.
An even more interesting way to do this to use the polygon mark type and custom render the arrows. This example uses the binning technique we discussed earlier to generate rows to accommodate each arrow (each arrow is made up of 8 points).

XFirstStep and YFirstStep fields draw the arrow and scale it based on the distance between points it will connect. Then rotatedX and rotatedY fields take the arrow and rotate it based on the angle between the two points. Since the arrows are rendered as polygons, they could be modified on the fly. I took it one step further and even parameterized the arrow so you can design your custom arrow! Just use the “Design your arrow” tab : ) Below is an example of different arrows you can create…

Enjoy!
If you’re like me, nothing excites me like bringing a dashboard to life using proper shapes and colors. In this blog post I will show you three different techniques on how to implement shapes into your Tableau dashboard. The three different ways I will dive into are:
- Default Shapes
- Custom Shapes
- Text Shapes
First, let’s cover what shapes are available to us in Tableau.
Default Shapes in Tableau
In the Marks card in Tableau, there are many different options given to developers on how they want data displayed. One of these is the Shapes option.
When you click down on the drop down in the marks card you will see different options. When you drag a field to the different areas of the Marks card, different results will show up in your worksheet because your default setting is Automatic. Tableau will determine what type of Mark is best for your field.
If you do not like the default selection or if you’re going for a more specific representation of your data, you can select the drop down on your Marks card to choose what you want your data displayed as.
In the case above, I dragged an aggregate measure for Profits to the marks card and placed it on the Text mark. This gives me a sum total of profits in my worksheet. If I were to click the drop down and select Circle, my sum total of profits would appear next to a blue circle. Changing the type in the Marks card will change the display of the data in your worksheet. If you choose the Shape option you will then be able to click on the Shape button and select what shape represents your data.
Once you’ve dragged your field onto the marks card, select Shape in the drop down. Now select whatever shape that you want to represent your data. If you drag a dimension to the shape Mark, then the different values within your Dimension will be represented with different shapes. You can see some of the default shapes that Tableau provides you below.
Custom Shapes in Tableau
Take a look through the default options in the More Shapes area, and you might find something you like. If you either want a different shape or have a specific shape in mind for your use case, then you are able to use custom shapes to represent your data in Tableau.

If you are not able to find a shape that you like, you can use google images to find your desired image. Most of the time you will want to search via Advanced Search for a transparent image as that will render most appropriately in Tableau. Go ahead and save your desired image in the My Tableau Repository folder in Shapes. If you add a new folder under My Tableau Repository it will show up under the Shapes section of the Marks card.

When you upload a shape to your Shapes folder under My Tableau Repository, it may not show up immediately when you click on the Shapes mark. If you face this issue, click the Reload Shapes button. The new folder and shapes should appear in your options.
By clicking Assign Palette, your shapes will be assigned in whatever order they appear in the folder. If you want specific values of your dimension to have a certain shape, name the shapes in your folder after the dimension values and you should have a seamless transition when clicking Assign Palette.
Text Shapes
Both of the examples I have shown thus far involve the Marks card in Tableau. This next use of shapes will apply only to Text boxes, not the Marks card.
Say you want an arrow, in this example for a positive or negative change, but you want that shape to appear in either a tooltip, title, or text box. This is where we can use a text object to show shapes.
In the example below, you see that I have created a calculation that returns a txt object when it meets a certain criteria, in this case the YoY change for expenses being greater than 0. Because this shape is surrounded by quotes, it will appear as text. To get different shapes for your dashboard, you can visit sites like www.alt-codes.net to get different shapes.

As you see in the formula below, if a measure does not meet this criteria, then a NULL will be returned. This means that this field will not even show up as a space in the text field you’ve placed it in.

In the fields I’ve highlighted below, I’ve colored them different colors so that if either of them show up, they are colored appropriately. In this example, if revenues have decline then a down arrow text shape will appear and that field has been colored red. If the revenues have increased, then a green up arrow text shape will appear. The field that does not meet the criteria will be a NULL and now show up at all. This is how you can use text shapes to indicate KPIs in Tableau.
Hopefully you have found this tutorial on ways to use shapes in Tableau to be helpful.
The Tableau tips series has always been about the small hacks which significantly impact dashboard building process if well implemented. If you’ve been following our work, you know by now that this article is inspired by our last week article on building a Lollipop chart in Tableau. Our goal is to explore ways in which external shapes and images can be used in dashboard development rather than the standard shapes provided by Tableau.
Using data set in the snap shot below, we will create a Lollipop chart like in the previous post, however instead of using the standard shapes provided by Tableau, we’ll use external shapes (flags shapes to be precise) to spice up our viz.
You can create a sample of data set above in an excel sheet or download the data here to follow along.
(Our assumption is that by now you know how to create a Lollipop chart, and therefore we won’t be revisiting our previous article. However, for those who would like to revisit kindly check here.)
Step 1: Create a simple Lollipop chart
Guided by the previous article, use the data set shared above to create the Lollipop chart below.
(Note; In this case, we’ve used a circle as our shape for the second chart. But, now we would like to substitute the circle shapes with flags representing each country for our data set.)
Step 2: Download flag shapes
Open the site, flaticon.com and search for flags. Download flag shapes related to the data.
For this case, i have downloaded the following flag shapes.
Step 3: Load flag shapes to Tableau
To do this, go to documents on your local machine, open a folder named My Tableau Repository >> Shapes. Inside this folder, create a new folder and name it Flags and copy all the shapes downloaded to this folder.
Step 4: Use flag shapes in our viz
To effect this, first select the second chart of the viz and drag the dimension field Country to the Shape tab, see results below.
On the legend that appears on the right corner, double click one of the icons to edit shape.
Note that, when you open the drop-down arrow under ‘Select Shape Palette’ our folder named Flags cannot be Traced.
To load our shapes, click on ‘Reload Shapes’. Note that our custom shapes are now appearing in the Shape Palette.
Now, match every data item with the right flag shape.
Executing, we’ve;
As simple as that. This chart does not add any additional metric other than what is presented in Step 1, however it helps developers add the visual element of interpreting charts and graphs. As a user, you don’t need to read the chart rather you can interpret it by looking at the various images presented.
Note; same procedure can be used when adding other useful icons in dashboards like information icon among other icons.
I hope this article was helpful to you, to receive more of the Tableau tips and tricks kindly join our mailing list by subscribing below.
Thank you for reading.
Sometimes we need our own custom Shapes or pictures to use in the Tableau Chart. In this tutorial you get to learn how to add custom shapes in Tableau (Workbook and Data-set are attached).
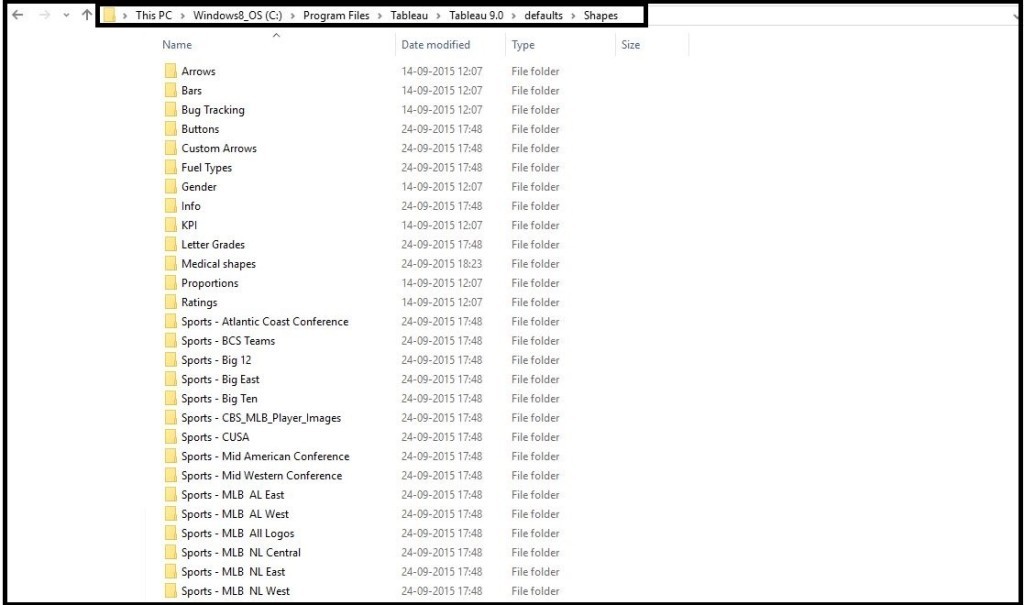
Step 1. Adding Shapes to the Tableau Shapes folder
Firstly you have to add the Shapes (as png/jpg/jpeg) in the program files folder you can copy a folder or directly files.
I have upload a folder named Medical Shapes (The used icons are downloaded from Flaticons).
Step 2. Now chart using custom shapes in Tableau
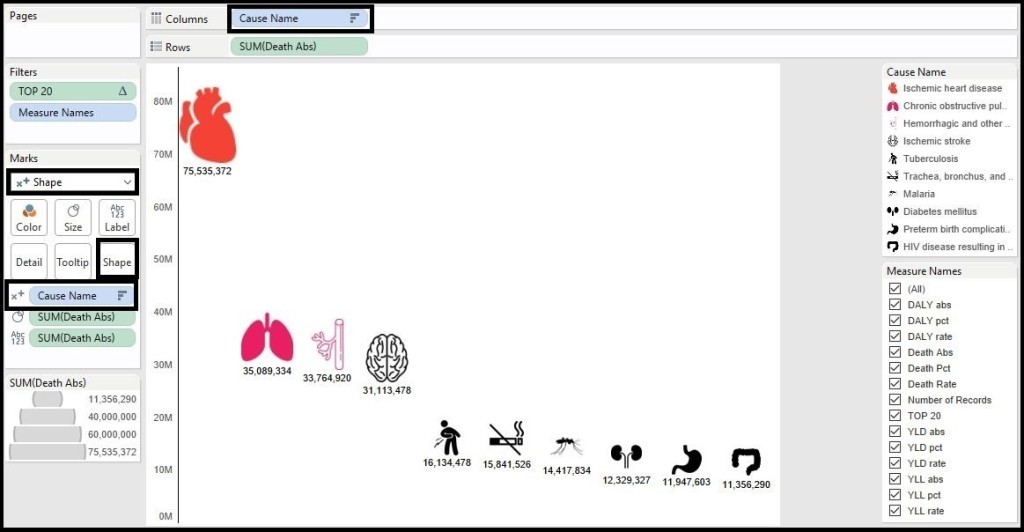
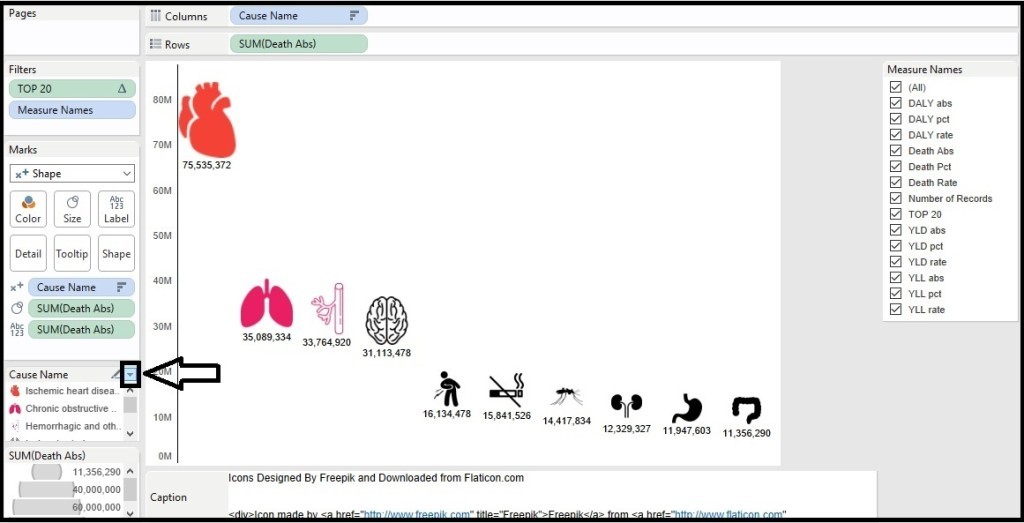
a. Put the Cause Name in Columns shelf (I have shown only top 10 values in the chart)
b. Put the Death Abs in the Rows shelf
c. and Change the Chart type to shapes in Marks Card
d. Now put Cause Name in Shape.
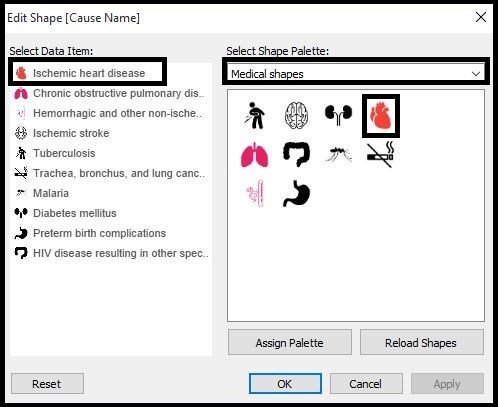
Step 3. Changing the Shapes
To change the shapes click on the drop down menu and click edit shapes
Now select the folder or file which you’ve uploaded and then you’ll see your uploaded shapes,
Select data items from left and the shape from the right for each data and done.
For the Size put Death Abs in the size(Marks card).
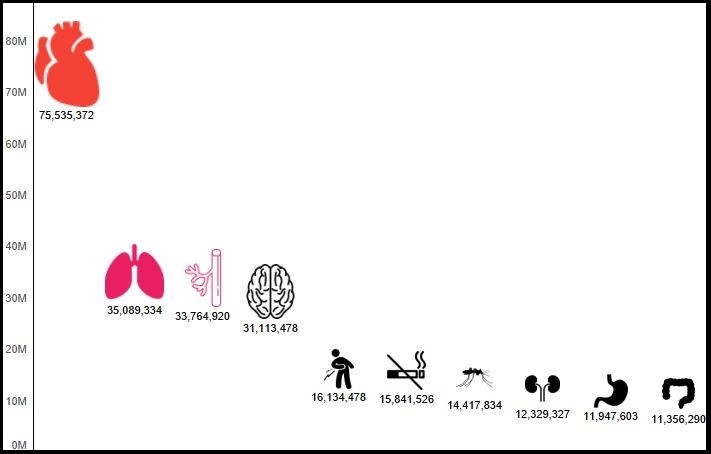
Upload and change as many shapes you want.
Data Source: Global Burden of Disease Study 2010 (GBD 2010). Results by Cause 1990-2010. Institute for Health Metrics and Evaluation (IHME), 2012.
Download Workbook here!
Download Dataset here!