
OVER 8M USERS TRUST CUSTOM CURSOR

Custom Cursor for Windows Video
Enjoy a short video presentation of our Custom Cursor for Windows app
Custom Cursor for Windows Video
Enjoy a short video presentation of our Custom Cursor for Windows app
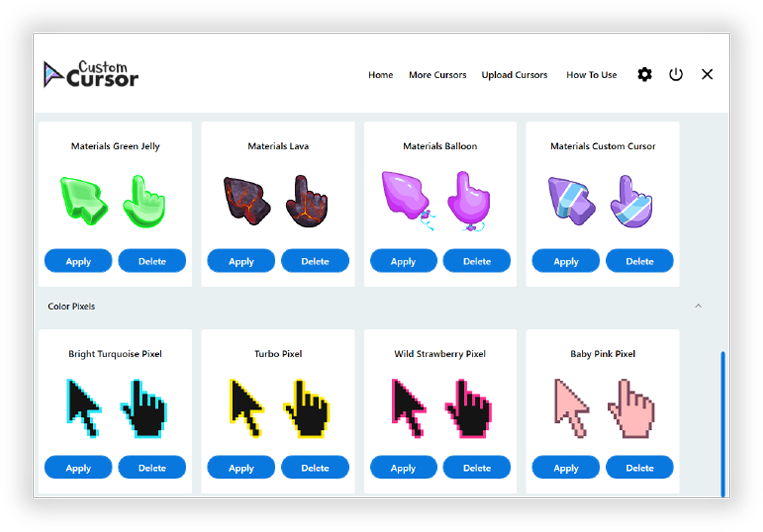
Intuitive and Convenient
The program is very easy to use — you just need to select the cursor pack
from the preview list and press the «Apply» button to start using new mouse cursors on your
Windows desktop.
DOWNLOAD
Intuitive and Convenient
The program is very easy to use — you just need to select the cursor pack from
the preview list and press the «Apply» button to start using new mouse cursors on your Windows
desktop.
DOWNLOAD
ADD BRIGHTNESS TO YOUR LIFE
Native and easy control of your cursor
There is a possibility to set the size of the cursor. Thousands of
additional custom cursors packs are available for download from the custom-cursor.com site.
DOWNLOAD
Native and easy control of your cursor
There is a possibility to set the size of the cursor. Thousands of additional
custom cursors packs are available for download from the custom-cursor.com site.
DOWNLOAD

DOWNLOAD CUSTOM CURSOR FOR WINDOWS
Add brightness to your life.
Download Custom Cursor for Windows and use
it completely free of charge.
DOWNLOAD
DOWNLOAD CUSTOM CURSOR FOR WINDOWS
Add brightness to your life.
Download Custom Cursor for Windows and use it
completely free of charge.
DOWNLOAD
-
Anime Cursor
-
Mac Cursor
-
Windows Cursor
-
Chrome Cursor
Install our extension to modify cursor in your windows 10 for free. It is mostly used for
Most game lovers and UI designers will love this concept of customized cursors for use in their daily life.
If you want to use it, you have to install our chrome extension, and you will get many options of customized icons for free without any hassle of installation.
There are a few different ways to create a custom cursor.
- First of all just install the custom cursor chrome extension.
- After installation, select the cursor pack for cursor customization.
- Add cursor pack for future use.
- Use it on your windows 10/Google chrome.
Курсоры для windows
Спорить с тем, что обычный курсор практичен, бесполезно, но всё же при оформлении интерфейса вполне может потребоваться оригинальный указатель мышки и уж поскольку наш сайт посвящен всевозможным украшениям для рабочего стола, мы подобрали самые лучшие модификации курсоров. Конечно же они все отличаются друг от друга цветами, формами, размерами и дизайном, поэтому мы старались собрать самое лучшее в надежде удовлетворить самых требовательных пользователей.
На до сразу оговориться о том, что собранные здесь курсоры для Windows, немного отличаются друг от друга способом установки, для установки одних потребуется специальная программа CursorFX бесплатную версию которой можно скачать у нас, а другие можно установить стандартными средствами не прибегая к услугам сторонних программ. Основное различие этих двух способов заключается в том что с помощью программы меняется весь пакет курсоров для конкретной темы оформления, второй же позволяет менять указатели по одному.
В любом случае любое разнообразие в оформлении пойдёт на пользу и будет приятно глазу.
Explore Custom Mouse Cursors Setup for Windows 10.
Published
5 min read
Custom Mouse Cursors for Windows 10: How to Get Started
The mouse cursor is one of the few components that every Windows 10 user interacts with daily. While the default arrow cursor serves its purpose, many users yearn for a more personalized experience. Custom mouse cursors can enhance your computing experience, making it not only visually appealing but also uniquely tailored to your tastes. This comprehensive guide will explore the various aspects of custom mouse cursors for Windows 10, offering step-by-step instructions on how to find, install, and create your unique cursor.
Understanding Mouse Cursors
Before diving into customization, let’s discuss what mouse cursors are and how they function. The mouse cursor is a graphical object in a user interface that represents the position of the pointer. It allows users to interact with objects on the screen, such as buttons, links, and text fields. While the typical cursor is an arrow, Windows allows for a variety of pointers, including text select, precision select, link select, and busy indicators.
Why Use Custom Mouse Cursors?
Custom mouse cursors can serve several purposes:
- Personalization: Custom cursors allow you to express your personality, interests, or brand.
- Visibility: Some individuals may find default cursors hard to see, and custom designs can enhance visibility for users with visual impairments.
- Enhanced Functionality: There are cursors designed to improve the user experience for specific tasks, such as gaming or graphic design.
Where to Find Custom Cursors
There are many online resources where you can find custom mouse cursors. Some well-known websites include:
- DeviantArt: A community of artists where you can find unique and creative cursor packs.
- CursorFX: Offers highly customizable cursor sets, from animated to static designs.
- RW Designer: Provides a cursor editor and a large library of cursors to choose from.
Installing Custom Mouse Cursors on Windows 10
Once you have selected your custom mouse cursor, it’s time to install it. Here is a step-by-step guide:
-
Download the Cursor: When you choose a cursor pack, download the file. Most custom cursor packs are in a .zip format, which contains the necessary cursor files.
-
Extract the Files: If the cursor pack is in a .zip format, right-click on the file and select «Extract All.» Choose a location (like your desktop) for easy access.
-
Open Mouse Settings:
- Go to the Start menu and click on the gear icon (Settings).
- Navigate to «Devices.»
- Click on «Mouse» on the left sidebar.
- Under «Related settings,» click on «Additional mouse options.»
-
Change Mouse Pointers:
- In the Mouse Properties window, click on the «Pointers» tab.
- Here, you will find a list of different pointer types, including Normal Select, Help Select, Busy, etc.
-
Browse for New Cursors:
- Select the pointer type you wish to change (for example, ‘Normal Select’).
- Click on the «Browse» button and navigate to the folder where you extracted your cursor files.
- Select the desired cursor file and click «Open.»
-
Apply Changes:
- Repeat the process for other cursor types you want to customize.
- Once you have replaced the desired pointers, click «Apply» and then «OK» to save your changes.
-
Test Your New Cursor: Move your mouse around the screen to see how the new cursor looks and feels during use. If it doesn’t suit your preferences, repeat the steps to change it again.
Creating Your Custom Mouse Cursors
If you feel particularly creative, you might want to create your custom cursors. Fortunately, this is easier than it sounds. Here’s how to do it:
-
Choose a Cursor Design Tool: There are several software programs available for creating cursors:
- RealWorld Cursor Editor: A free tool that lets you draw and edit cursor images.
- Greenfish Icon Editor Pro: An excellent tool for creating and editing icons and cursors.
-
Design Your Cursor:
- Open your chosen software and start a new file, selecting a size (standard is typically 32×32 or 48×48 pixels).
- Use the drawing tools to create a design. You can draw directly or modify an existing cursor file.
- Make sure to keep the design simple and recognizable, as complex designs might not display well.
-
Save Your Cursor: Once satisfied with your design:
- Save it as a .cur (static cursor) or .ani (animated cursor) file.
- Ensure that you save it in a dedicated folder for better organization.
-
Install Your Custom Cursor: Follow the installation steps outlined above to apply your newly created cursor.
Tips for Selecting and Customizing Cursors
When selecting or creating a custom mouse cursor, consider the following:
- Visibility: Ensure that your cursor design contrasts well with your desktop background and is easily visible.
- Size: Bigger isn’t always better; however, if you’re visually impaired or have difficulty using small cursors, consider larger designs.
- Functionality: Ensure that your cursor design accurately reflects its intended function. For example, a busy cursor should indicate loading or waiting.
- Consistency: Keep a consistent style throughout your cursor set to create a cohesive look.
Troubleshooting Common Issues
When dealing with custom mouse cursors, you might encounter some issues. Here are solutions to common problems:
- Cursor Doesn’t Change: Make sure that you properly applied and saved your changes in the Mouse Properties panel. Try restarting your system if the cursor does not reflect the change immediately.
- Cursor Visibility Problems: If your cursor is too hard to see on your chosen background, consider editing the cursor to include outlines or shadows for better visibility.
- Cursor Flickering or Lag: If you experience issues like flickering or lag, this could be due to a high-resolution animated cursor. Opt for static or lower-resolution versions instead.
Maintaining Your Cursor Collection
Like any collection, keeping your custom mouse cursors organized ensures you can easily access them when needed. Here are some best practices for maintaining your cursor collection:
- Create Folders: Organize your cursor files into folders based on their designs or types—one for animated, one for static, etc.
- Label Cursor Files: Rename files with descriptive names so you can easily identify which is which when browsing through your collection.
- Backup Your Cursors: Periodically back up your cursor files on an external drive or cloud storage to prevent loss.
Conclusion
Custom mouse cursors can significantly enhance your Windows 10 experience by adding a personal touch or increasing usability. With the various options available for downloading, installing, and even designing your custom cursors, the possibilities are virtually limitless. From expressing your creativity to improving accessibility, custom cursors can be as simple or complex as you desire.
Whether you choose to download pre-made cursors or create your own from scratch, exploring this aspect of your operating system can be a fun and exhilarating experience that brings a new flair to your daily computing tasks. So, go ahead and start your journey into the world of custom mouse cursors—your mouse will thank you for it!
Introduction
Your mouse cursor plays an important role when using your computer. But, after a while, it might get boring looking at the same pointing arrow all day long. Luckily, in Windows, it’s really easy to install and use custom cursors. For this reason, I’ve made this quick guide so you can properly enjoy my creations.
But before we move on with the guide, I want to explain a few concepts to make sure we’re on the same page.
So what is a cursor? A mouse cursor is that little icon on your screen that you use to interact with your operating system. In Windows this is also called a pointer but we’re going to use the term «cursor» because it’s more popular.
What is a cursor scheme? As you may have noticed, the mouse cursor changes from a simple arrow to various icons like a pointy hand or a vertical line, depending on your interaction with the operating system. The set of all the cursors used at once makes up a cursor scheme.
To use custom cursors you can either replace them one by one or install an entire scheme. In this guide we’ll be focusing on how to install and use an entire cursor scheme.
Compatibility
- all my cursor schemes are compatible with Windows 7, 8, 8.1, 10, 11
- all my cursor schemes support Windows scaling up to 400%. This means that the cursors will look pixel perfect and sharp, regardless of how big or small your screen is
STEP 1: INSTALL A CURSOR SCHEME

- first, you need to unpack the archive you have downloaded
- then, you need to open each folder you have unpacked and look for the _install.inf file
- now Right Click on the _install.inf file and select Install from the context menu (in Windows 11 you have to first click on Show more options to get the classic context menu with the Install option)
STEP 2: APPLY A CURSOR SCHEME

- open the Control Panel from the Start Menu
- change the View by to Large or Small Icons and click on the Mouse link
- go to the Pointers tab and from the Scheme drop-down menu choose the one you just installed
- for best results, make sure the option Enable pointer shadow is disabled
- finally, click Apply or OK
STEP 3 (OPTIONAL): CHANGE THE CURSOR SIZE

-
If the cursor you selected is too small for your screen, there’s a trick to increase its size in the Windows Settings. Keep in mind that you can only do this in Windows 10 & 11. Here’s how it works:
- open the Windows Settings from the Start Menu and find the Pointer Size option
- increase the size of the pointer to whatever you like. This action will change your cursor scheme to the default one so don’t panic
- follow STEP 2 of the guide again to switch back to your custom cursor scheme while keeping the increased size of the cursor
CURSOR TESTING AREA
Now it’s time to test out your new cursors! Hover over each box to preview some of the cursors in the Cursor Pack you just applied. Please keep in mind that CSS doesn’t support all the Windows Cursors so only 12 are displayed below, but all my Cursors Packs are fully complete. Each square is labeled with the cursor type, making it easy to test the appearance and functionality of each cursor in real time.