
This document discusses several ways to configure printer sharing.
The Basics
A «server» is any machine that communicates directly to a printer. A «client» is any machine that sends print jobs to a server for final printing. Clients can also be servers if they communicate directly with any printers of their own.
By default, CUPS uses the Internet Printing Protocol (IPP) to send jobs from a client to a server. When printing to legacy print servers you may also use the Line Printer Daemon (LPD) protocol when printing to older UNIX-based servers or Server Message Block (SMB) when printing to Windows® servers.
Clients can automatically discover and access shared printers via DNS Service Discovery (DNS-SD a.k.a. Bonjour®). SMB browsing can also be used to manually discover and access shared printers when Samba is installed.
Configuring the Server
You must enable printer sharing on the server before clients can print through it. The simplest way to do this is to use the cupsctl(8) command on the server:
cupsctl --share-printers
By default, the above command will allow printing from other clients on the same subnet as your server. To allow printing from any subnet, use the following command instead:
cupsctl --share-printers --remote-any
Next, tag each printer that you want to share using the lpadmin(8) command on the server, for example:
lpadmin -p printer -o printer-is-shared=true
You can require authentication for shared printing by setting the policy on each printer, for example:
lpadmin -p printer -o printer-op-policy=authenticated
Automatic Configuration using IPP
Note:
This method of configuration does not work on macOS 10.7 or later because sandboxed applications do not always have direct network access.
CUPS can be configured to run without a local spooler and send all jobs to a
single server. However, if that server goes down then all printing will be
disabled. Use this configuration only as absolutely necessary.
The default server is normally the local system («localhost»). To override
the default server create a file named /etc/cups/client.conf with a
line as follows:
ServerName server
The server name can be the hostname or IP address of the default
server. If the server is not using the default IPP port (631), you can add the
port number at the end like this:
ServerName server:port
The default server can also be customized on a per-user basis. To set a
user-specific server create a file named ~/.cups/client.conf instead.
The user client.conf file takes precedence over the system one.
Finally, you can set the CUPS_SERVER environment variable to
override the default server for a single process, for example:
CUPS_SERVER=server:port firefox http://www.cups.org
will run the Firefox web browser pointed to the specified server and
port. The environment variable overrides both the user and system
client.conf files, if any.
Manual Configuration of Print Queues
Note:
This method of configuration does not work on macOS 10.7 or later because sandboxed applications do not always have direct network access.
The most tedious method of configuring client machines is to configure
each remote queue by hand using the lpadmin(8)
command:
lpadmin -p printer -E -v ipp://server/printers/printer -m everywhere
The printer name is the name of the printer on the server machine.
The server name is the hostname or IP address of the server machine.
Repeat the lpadmin command for each remote printer you wish to use.
В офисной сети вы можете печатать напрямую с Linux устройств на общие сетевые принтеры, подключенные к Windows компьютерами. В этой статье мы покажем, как настроить печать из Linux на сетевой принтер, опубликованный на компьютере с Windows 10/11.
- Начнем с настройки Windows компьютера, к которому подключен принтер.Опубликуйте общий сетевой принтер в Windows. Откройте консоль управления принтерами (
printmanagement.msc
), откройте свойства принтера, перейдите на вкладку Sharing, включите опцию Share this printer и задайте сетевое имя принтера (имя не должно содержать пробелы или спец символы); - Создайте отдельного локального пользователя winusr1 с известным паролем. Можно удалить пользователя из локальной группы Users, сделать срок действия пароля не ограниченным и запретить менять пароль.
Можно с помощью PowerShell создать локального пользователя с указанными настройками:
$pass = ConvertTo-SecureString "p-0m-2024" -AsPlainText -Force
New-LocalUser -Name winusr1 -Password $pass -PasswordNeverExpires -UserMayNotChangePassword
Remove-LocalGroupMember -Group Users -Member winusr1
По умолчанию в Windows сетевые принтеры доступны по протоколу SMB. Чтобы проверить доступ к принтеру из Linux, установите smbclient:
В Ubuntu/Debian выполните команду:
$ sudo apt install smbclient
Чтобы вывести список SMB ресурсов на удаленном компьютере
$ smbclient -L \\192.168.31.94 -U winusr1
Где:
- 192.168.31.94 – IP адрес или имя компьютера с Windows
- winusr1 – имя пользователя Windows
Команда выведет список опубликованных сетевых папок (в том числе общих административных папок) и принтеров.
Из консоли вы можете проверить доступность SMB принтера и отправить файл на печать:
$ smbclient -W DOMAIN -U winusr1//192.168.31.94/HPM1530
Распечатать указанный файл:
smb: \> print /home/sysops/test.txt
printing file test.txt as test.txt (196,6 kb/s) (average 196,6 kb/s)
smb: \> quit
Для удобного доступа к сетевым принтерам и их управлением проще всего воспользоваться встроенным сервером печати для Linux – CUPS (Common UNIX Printing System). Для управления CUPS используется веб интерфейс system-config-printer.
В большинстве десктопных дистрибутивов Linux пакет CUPS и system-config-printer установлены по умолчанию. Проверьте это (если нужно, установите):
$ dpkg -l cups
$ dpkg -l system-config-printer
$ systemctl status cups
Теперь можно подключить сетевой принтер в Linux:
- Откройте веб-интерфейс CUPS, перейдя в браузере по URL
localhost:631
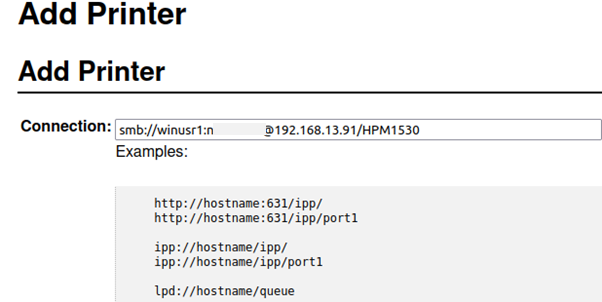
; - Перейдите в Administration -> Add printer -> Other network printers -> Windows Printer via SAMBA;
- Укажите параметры подключения к принтеру в формате
smb://winusr1:[email protected]/HPM1530
(строка содержит имя пользователя и пароль, имя/IP удаленного Windows хоста и имя принтера);
- Затем задайте имя и описание принтера;
- На следующем шаге CUPS предложит выбрать производителя принтера и модель (для установки соответствующего драйвера). Список драйверов может быть довольно большим. Для быстрого поиска названия драйвера по модели принтера воспользуйтесь командой:
$ lpinfo -m| grep 1536
Выберите найденный драйвер в CUPS.
- Установка принтера завершена.

Где найти драйвера для CUPS под Linux. Например, в случае с принтерами HP, в большинстве десктопных дистрибутивов Linux предустановлен пакет HP Linux Printing and Imaging System (HPLIP). В нем содержится драйвера для подавляющего большинства принтеров.
$ dpkg -l hplip

Можно установить пакет HPLIP вручную:
$ sudo apt install hplip hplip-gui
Аналогичные пакеты с драйверами выпускают и другие вендоры, либо вы можете самостоятельно найти готовый PPD файл для конкретного принтера. Также вы можете использовать огромную библиотеку PPD драйверов печати foomatic (автоматически устанавливается для ubuntu-desktop):
$ apt install foomatic-db-compressed-ppds
Первая попытка отправить документ из Linux на печать в Windows завершилась с ошибкой. Информация об ошибке печати есть логе /var/log/cups/error_log:
E [22/Jan/2024:11:38:35 +0400] [Job 13] SMB connection failed!
E [22/Jan/2024:11:38:35 +0400] [Job 13] Unable to connect to CIFS host:
Эта ошибка указывает на то, что CUPS не может подключиться к SMB папке принтера на Linux. Причина в том, что по умолчанию для доступа к сетевой папке smbclient Linux использует протокол SMB 1.0, который по умолчанию отключен в Windows 10 и 11.
Чтобы клиент SMB в Linux использовал более безопасный SMB 2 или 3 для подключения, отредактируйте файл /etc/samba/smb.conf. Добавьте в секцию [global] строки:
client min protocol = SMB2
client max protocol = SMB3
Перезапустите CUPS:
$ sudo systemctl restart cups
Теперь клиент Linux сможет успешно отправить задание на общий принтер в Windows.
Также вы можете добавить принтер Windows из командной строки из командой строки CUPS:
Сначала нужно получить название драйвера для вашей модели принтера:
$ lpinfo --make-and-model '1536' -m
Скопируйте полное название драйвера и можете подключить SMB принтер:
$ sudo lpadmin -p HP1536mfp -v smb://winusr1:[email protected]/HPM1536 -m postscript-hp:0/ppd/hplip/HP/hp-laserjet_m1530_mfp_series-ps.ppd
Включить принтер:
$ cupsenable HP1536mfp
Вывести список принтеров:
$ lpsatat -v
$ lpstat -p
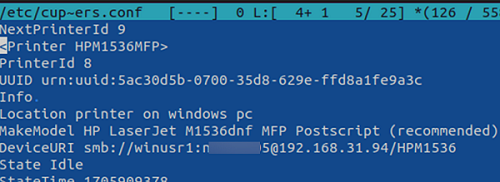
Список подключенных SMB принтеров содержимся в файле /etc/cups/printers.conf. Обратите внимание, что в файле в открытом виде содержатся пароль Windows пользователя, который вы используете для подключения к принтеру (поэтому не нужно назначать никаких прав этому пользователю на Window машине).
This article explains how to connect and print from a Linux computer to a shared printer connected to a Windows host.
- The first step is to share the printer on a Windows computer to which it is connected. Open the printer properties, go to the Sharing tab, enable the Share this printer option, and specify the shared printer name (the name must not contain spaces or special characters);
- Create a new local user winusr1. Remove a user from the local Users group, set the password to never expire, and prevent password changes.
You can use PowerShell to create a local user with the specified settings:
$pass = ConvertTo-SecureString "pass2024W0rd-" -AsPlainText -Force
 New-LocalUser -Name winusr1 -Password $pass -PasswordNeverExpires -UserMayNotChangePassword
 Remove-LocalGroupMember -Group Users -Member winusr1
By default, the SMB protocol is used to connect shared Windows printers. Install the smbclient to check if the shared printer on the Windows host can be remotely accessed from Linux:
On Ubuntu/Debian run the command:
$ sudo apt install smbclient
List SMB shares on a remote Windows machine
$ smbclient -L \\192.168.31.94 -U winusr1
- 192.168.31.94 – IP address or hostname of the Windows computer
- winusr1 – local Windows username
This command lists shared network folders (including administrative shares) and printers.
From the console, you can check the availability of an SMB printer and send a file to print:
$ smbclient -W DOMAIN -U winusr1//192.168.31.94/HPM1530
Print the specified file:
smb: \> print /home/sysops/test.txt
 printing file test.txt as test.txt (856,2 kb/s)
 smb: \> quit
The easiest way to access and manage network printers under Linux is to use the built-in Common UNIX Printing System (CUPS). The system-config-printer web interface is used to manage CUPS.
CUPS and system-config-printer are installed by default on most Linux desktop distros. Check and install if necessary:
$ dpkg -l cups
 $ dpkg -l system-config-printer
 $ systemctl status cups
Now connect a shared network printer from Linux:
- Navigate to the following URL in your browser to open the CUPS web interface
localhost:631; - Go to Administration -> Add printer -> Other network printers -> Windows Printer via SAMBA;
- Use the following format to specify the shared printer connection settings
smb://winusr1:[email protected]/HPM1530(This string includes the user name and password, the remote Windows hostname/IP and the shared printer name); - Then set the printer name and description;
- Next, CUPS will ask you to select the printer manufacturer and model. The list of drivers can be quite long. Use the following command to find the driver name by printer model quickly:
$ lpinfo -m| grep 1536
Select the driver you found in CUPS.
- The shared printer installation is complete.

Where can you find CUPS print drivers for Linux? In the case of HP printers, for example, most Linux distributions come with the HP Linux Printing and Imaging System (HPLIP) package pre-installed. It includes drivers for most HP printers.
$ dpkg -l hplip

You can install the HPLIP package manually:
$ sudo apt install hplip hplip-gui
Other vendors may also release similar driver packages, or you may be able to find a pre-built PPD file for a specific printer. It is also possible to use the foomatic PPD printer driver library (automatically installed on ubuntu-desktop):
$ apt install foomatic-db-compressed-ppds
The first attempt to print a document from Linux to a shared Windows printer failed in my case with an error. Check /var/log/cups/error_log for errors:
E [Job 13] SMB connection failed!
E [Job 13] Unable to connect to CIFS host: NT_STATUS_IO_TIMEOUT

This indicates that CUPS cannot connect to the printer’s SMB folder on the Windows machine. In this case, the problem is that Linux smbclient tries to use SMB 1.0 protocol to access shared printers. The SMB 1.0 version is disabled on Windows 10 and 11, and such a connection will be rejected.
Edit the file /etc/samba/smb.conf to make the Linux SMB client use a more secure SMB 2 or 3 version for connections. In the [global] section, add the following lines:
client min protocol = SMB2
client max protocol = SMB3
Restart CUPS:
$ sudo systemctl restart cups
The Linux client can now successfully print to a shared printer on the Windows computer.
You can also connect to a shared Windows printer from the command line. The first step is to find the name of the driver for your printer model:
$ lpinfo --make-and-model '1536' -m
Copy the full name of the driver and connect the SMB printer:
$ sudo lpadmin -p HP1536mfp -v smb://winusr1:[email protected]/HPM1536 -m postscript-hp:0/ppd/hplip/HP/hp-laserjet_m1530_mfp_series-ps.ppd
Enable the CUPS printer on Linux:
$ cupsenable HP1536mfp
List printers:
$ lpsatat -v
 $ lpstat -p
The list of connected SMB printers is stored in the /etc/cups/printers.conf file. Note that the Windows username and password you use to connect to the printer are stored here in plain text (so this user must have minimal permissions on the Windows machine).
Enterprise Networking Planet content and product recommendations are editorially independent. We may make money when you click on links to our partners. Learn More.
Network printing is a leading cause of high blood pressure and premature hair loss in our long-suffering network administrator demographic. Fortunately, the FOSS world, as usual, does its best to mitigate our suffering. Today you shall learn how to use CUPS and Samba together to set up automagic client printer installations. That’s right, my hardworking friends, none of this dashing about to individual workstations burdened with driver disks and Windows CDs. The goal here is to never leave your snug underground lair.
Please note that today’s topic is only about printers. I know you’re dying to figure out how to share your multi-function devices, so that all your LAN hosts can scan and fax. We’ll get to this in a future article, especially how to share scanners, because that is something you can do in Linux that you can’t do in Windows.
The Easy Way: Buy The Right Printer
In my ideal environment, all printers would have native networking and administration utilities. Samsung and HP both have a lot of printers with Linux, Mac OS X, Windows, and networking support. You can get a nice network-ready (wired and wireless) Samsung color laser for under $500, which is a lot more fun and less work than running a separate printer server.
Prerequisites
Since we don’t all have the option to purchase wonderful new printers, the next best thing is a robust Linux printer server starring CUPS and Samba. The CUPS/Samba printer we’re building today will not require users to authenticate to install and use printers, so it’s not for admins who need everything locked down. This setup is good for home users, businesses that don’t need a lock on everything, and those unfortunate network admins who still have Windows 9x machines under their care.
You need:
- Name resolution working reliably
- An already-configured and working CUPS server with printers configured
- The cups-devel package installed, also called libcups2-devel and libcupsys2-dev
- Samba server
- CUPS Windows drivers
- Adobe or Microsoft Postscript drivers
The commands and examples are all from a Debian system, so you may need to
adjust filenames for different systems.
Samba Server
If you don’t have a Samba server already running on your network, here is a complete example configuration. All of your Windows hosts must belong to the workgroup named in smb.conf. Linux and Mac OS X don’t care about workgroups, so don’t worry about them.
First create these two directories:
# mkdir -m 777 /sharedstuff
# mkdir -m 777 /var/spool/samba
Then create this smb.conf, using your own LAN address and workgroup name:
'global'
	workgroup = samba2
	netbios name = xena
	server string = lan file and printer server
	hosts allow = 192.168.1.
	security = user
	load printers = yes
	printing = cups
	printcap name = cups'share1'
	path = /sharedstuff
	comment = files for everyone
	read only = no
	browseable = yes
	guest ok = yes'printers'
	comment = All Printers
	path = /var/spool/samba
	browseable = yes
	printable = yes
        writable = no
	guest ok = yes'print$'
	comment = Printer Drivers
	path = /usr/share/cups/drivers
	browseable = yes
	guest ok = no
	read only = yes
	write list = root
Run the testparm command to check your syntax. If you get a “WARNING: passdb expand explicit = yes is deprecated” error, ignore it, it’s a leftover meaningless bit of cruft. Restart Samba:
# /etc/init.d/samba restart
Now you should have a “share1” folder in Network Neighborhood and your other Samba browsers. Use this to copy the driver files between your machines, which we’ll get to in a moment.
CUPS Configuration
This is a nice simple CUPS configuration for sharing printers. Make sure you have the last four lines- those are necessary for sharing Windows printers:
LogLevel info
Port 631
Browsing On
BrowseAddress 192.168.1.255
<Location />
Order Deny,Allow
Deny From All
Allow From 192.168.1.*
Allow From 127.0.0.1
</Location>
<Location /admin>
AuthType Basic
AuthClass System
Allow From 127.0.0.1
Order Deny,Allow
Deny From All
</Location>
mime.convs:
application/octet-stream application/vnd.cups-raw 0 —
mime.types:
application/octet-stream
CUPS Windows Drivers
Download and unpack the CUPS Windows drivers, currently cups-windows-6.0-source.tar.gz. Enter the source directory and run this command:
# make install
Creating directory /usr/share/cups/drivers…
Installing cups6.inf…
Installing cups6.ini…
Installing cupsps6.dll…
Installing cupsui6.dll…
Now you need either the Postscript drivers copied from a Windows PC, or get the Adobe drivers, winsteng.exe. They’re all the same; get the Adobe drivers if you can’t find them on your Windows PC.
To use the Adobe drivers, download and install them on a Windows system. You don’t need a printer, you just want to extract the files. On Windows 2000/XP, look for the windowssystem32spooldriversw32x86 directory. On Windows 9x/ME look for the WIN40 directory. Copy the contents of these directories into /usr/share/cups/drivers directory on the Samba/CUPS server. This is how it looks for Windows 2000/XP:
cups6.ini
cupsps6.dll
cupsui6.dll
ps5ui.dll
pscript5.dll
pscript.hlp
pscript.ntf
Add these for Windows 9x/ME:
adfonts.mfm
adobeps4.drv
adobeps4.hlp
iconlib.dll
psmon.dll
Be to sure to convert all filenames to lowercase. If you don’t cupsaddsmb won’t work.
Export CUPS Drivers to Samba
Now create a Samba user. This must correspond to a Linux system user. The easy way is to use root:
# smbpasswd -a root
New SMB password:
Retype new SMB password:
Now export the CUPS drivers to Samba with cupsaddsmb. If you have more than one Samba server on your network, disconnect from the network first or cupsaddsmb will go nuts trying to install all the printers, which won’t work:
# ifdown eth0
To export the drivers, use the command:
# cupsaddsmb -H localhost -U root -a -v
Figure 1.(Click for a larger image)
You can get an idea of just how much output the command produces, and what you should expect to see, by looking at Figure 1.
Important smb.conf Tweak
Go back to your smb.conf and make a small but very important change. Change security = user to security = share. If you don’t, you’ll have to set up Samba users and passwords for all of your users.
Restart CUPS and Samba, and rejoin the network:
# /etc/init.d/samba restart
# /etc/init.d/cupsys restart
# ifup eth0
Automagic Windows Installation
Give Samba a minute or two to broadcast itself to your LAN. Then go to any Windows PC on your LAN, run the Add Printer Wizard, and voila! Automatic printer installation from the Samba server.
Now What?
If you get a message like “the printer server does not have the correct printer driver installed” you have a couple of options. First, test the offending .ppd file with the cupstestppd command. PPD files are plain text files, so if you can find an error you can fix it.
Another option is to search for a .ppd file that Windows will accept. You might find this on another Windows PC, on the same Adobe page where you downloaded the Postscript drivers, or on linuxprinting.org.
Finally, the worst-case scenario is you have to hunt down a driver CD, and don’t forget your Windows CD, and install the drivers locally. True, this means leaving the lair, but with a bit of luck it won’t happen often.
Resources
CUPS.org
The Official Samba-3 HOWTO and Reference Guide
Задача: есть принтер, подключённый к машине Windows по локальной сети, и есть компьютер с Linux и установленной там системой печати CUPS. Нужна печатать с Linux-машины на Windows-машину.
Решение: с помощью веб-формы CUPS добавляем принтер в Linux и указываем логин guest для печати на Windows машину.
Рассматривать будем на рабочем примере: есть компьютер под Windows XP по адресу 192.168.1.1, на нём по SAMBA виден расшаренный принтер LaserJet 1200, который имеет сетевое имя HPLaserJ. С других машин под Windows печать на него идёт, но через CUPS при попытке отправить задание на печать вылезает ошибка.
При использовании SMB протокола пишет:
Connection failed with error NT_STATUS_ACCESS_DENIEDЕсли пытаюсь печатать через IPP, получаю:
Unable to connect to SAMBA host, will retry in 60 seconds…foomatic-rip version $Revision$ running…
Пароля на принтеры нет.
Решение проблемы просто до смешного. Добавляем в веб-форме CUPS принтер, как сказано здесь, выбираем способ подключения Windows printer via Samba. Далее в строке адреса пишем:
smb://guest@192.168.1.1/HPLaserJ
И всё! Печать пошла!
И почему в гигантской, хотя и бестолковой, документации CUPS это не выделено ярким шрифтом?
В приложениях KDE нужно выставить адрес службы печати на локальный: 127.0.0.1:631.
Если же в вашей Windows-машине используется
авторизация через домен, то надо в строке адреса указывать пароль и имя пользователя.
smb://usrername:userpassword@domainname/computername/printername
Во избежание излишних нервных перенапряжений, не рекомендую пользоваться именами принтеров с пробелами и кириллицей.
Ссылки:
Решение было найдено, страшно сказать, на ЛОРе. Что поражает, так это то, что такую простую вещь никто нигде не освещает. Надеюсь, это поможет кому-то ещё.