
Tensorflow is one of the most-used deep-learning frameworks. It’s arguably the most popular machine learning platform on the web, with a broad range of users from those just starting out, to people looking for an edge in their careers and businesses.
Not all users know that you can install the TensorFlow GPU if your hardware supports it. We’ll discuss what Tensorflow is, how it’s used in today’s world, and how to install the latest TensorFlow version with CUDA, cudNN, and GPU support in Windows, Mac, and Linux.
Introduction to TensorFlow
TensorFlow is an open-source software library for machine learning, created by Google. It was initially released on November 28, 2015, and it’s now used across many fields including research in the sciences and engineering.
The idea behind TensorFlow is to make it quick and simple to train deep neural networks that use a diversity of mathematical models. These networks are then able to learn from data without human intervention or supervision, making them more efficient than conventional methods. The library also offers support for processing on multiple machines simultaneously with different operating systems and GPUs.
How to Keep Track of TensorFlow/Keras Model Development with Neptune
Debug and Visualize Your TensorFlow/Keras Model: Hands-on Guide
TensorFlow applications
TensorFlow is a library for deep learning built by Google, it’s been gaining a lot of traction ever since its introduction early last year. The main features include automatic differentiation, convolutional neural networks (CNN), and recurrent neural networks (RNN). It’s written in C++ and Python, for high performance it uses a server called a “Cloud TensorFlow” that runs on Google Cloud Platform. It doesn’t require a GPU, which is one of its main features.
The newest release of Tensorflow also supports data visualization through matplotlib. This visualization library is very popular, and it’s often used in data science coursework, as well as by artists and engineers to do data visualizations using MATLAB or Python / R / etc.
Installing the latest TensorFlow version with CUDA, cudNN, and GPU support
Let’s see how to install the latest TensorFlow version on Windows, macOS, and Linux.
Windows
Prerequisite
- Python 3.6–3.8
- Windows 7 or later (with C++ redistributable)
- Check https://www.tensorflow.org/install/so… For latest version information
Steps
1) Download Microsoft Visual Studio from:
https://visualstudio.microsoft.com/vs…
2) Install the NVIDIA CUDA Toolkit (https://developer.nvidia.com/cuda-too…), check the version of software and hardware requirements, we’ll be using :
| Version | Python version | Compiler | Build tools | cuDNN | CUDA |
| tensorflow-2.5.0 | 3.6-3.9 | GCC 7.3.1 | Bazel 3.7.2 | 8.1 | 11.2 |
We will install CUDA version 11.2, but make sure you install the latest or updated version (for example – 11.2.2 if it’s available).
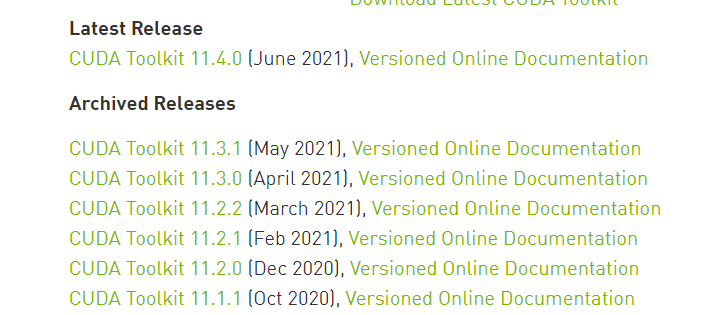
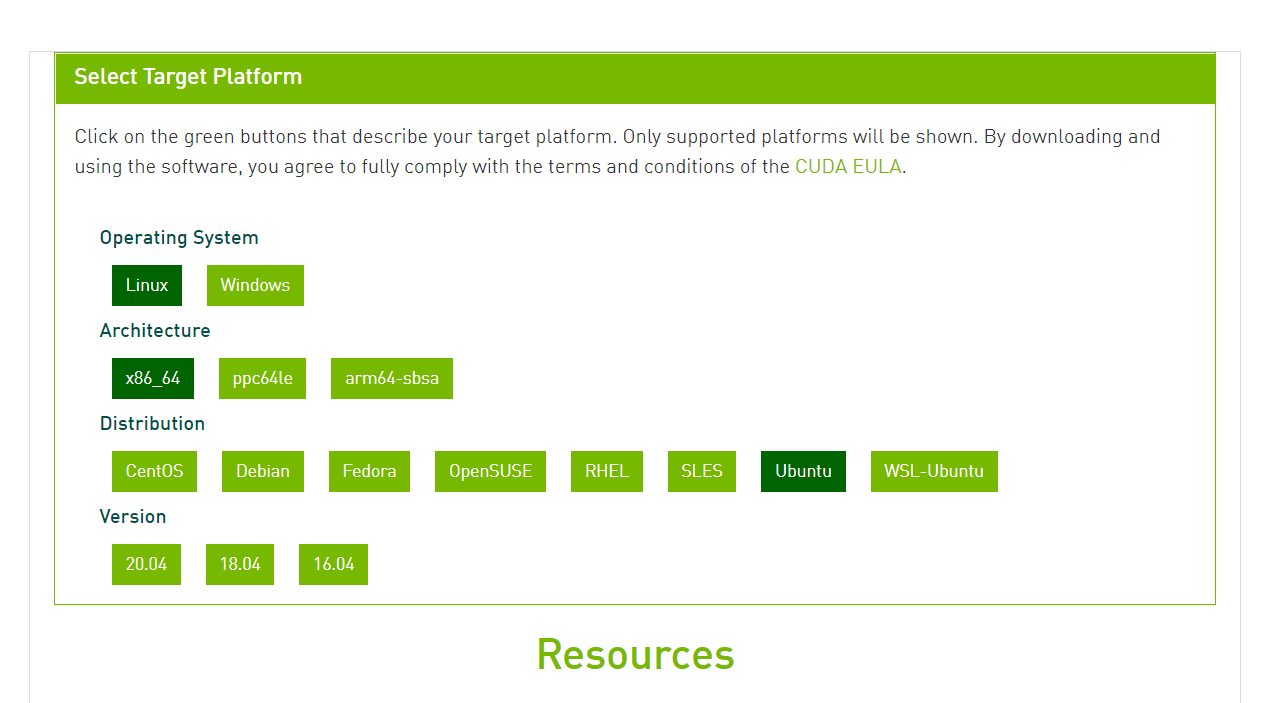
Click on the newest version and a screen will pop up, where you can choose from a few options, so follow the below image and choose these options for Windows.

Once you choose the above options, wait for the download to complete.

Install it with the Express (Recommended) option, it will take a while to install on your machine.
3) Now we’ll download NVIDIA cuDNN, https://developer.nvidia.com/cudnn
Check the version code from the TensorFlow site.
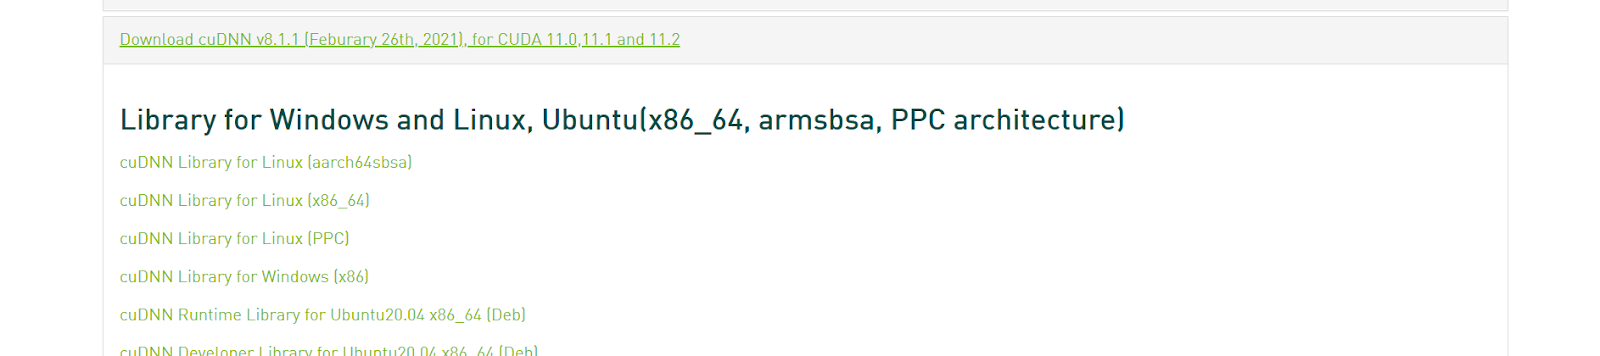
Now, check versions for CUDA and cuDNN, and click download for your operating system. If you can’t find your desired version, click on cuDNN Archive and download from there.
Once the download is complete, extract the files.

Now, copy these 3 folders (bin, include, lib). Go to C Drive>Program Files, and search for NVIDIA GPU Computing Toolkit.

Open the folder, select CUDA > Version Name, and replace (paste) those copied files.
Now click on the bin folder and copy the path. It should look like this: C:Program FilesNVIDIA GPU Computing ToolkitCUDAv11.2bin.
On your PC, search for Environment variables, as shown below.
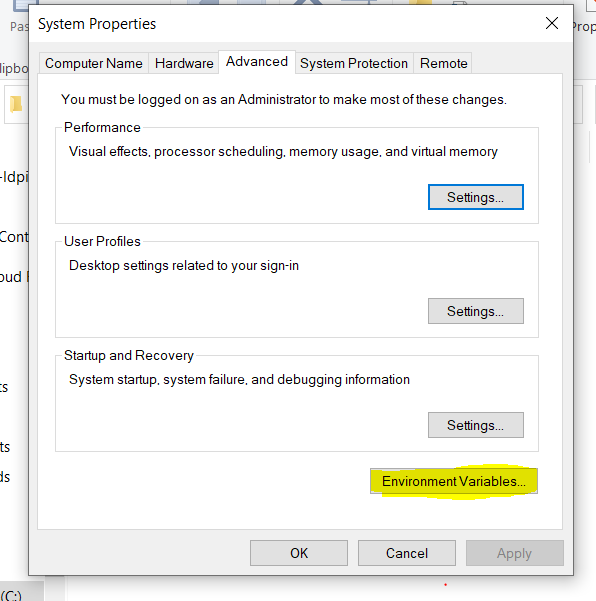
Click on Environment Variables on the bottom left. Now click on the link which states PATH.
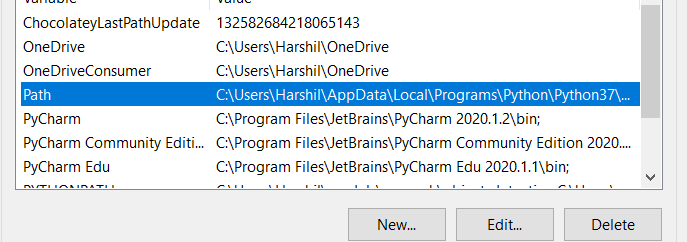
Once you click on the PATH, you will see something like this.

Now click on New (Top Left), and paste the bin path here. Go to the CUDA folder, select libnvvm folder, and copy its path. Follow the same process and paste that path into the system path. Next, just restart your PC.
4) Installing Tensorflow
Open conda prompt. If not installed, get it here → https://www.anaconda.com/products/individual.
Now copy the below commands and paste them into the prompt (Check for the versions).
conda create --name tf2.5 python==3.8
conda activate tf2.5 (version)
pip install tensorflow (With GPU Support) //Install TensorFlow GPU command, pip install --upgrade tensorflow-gpu
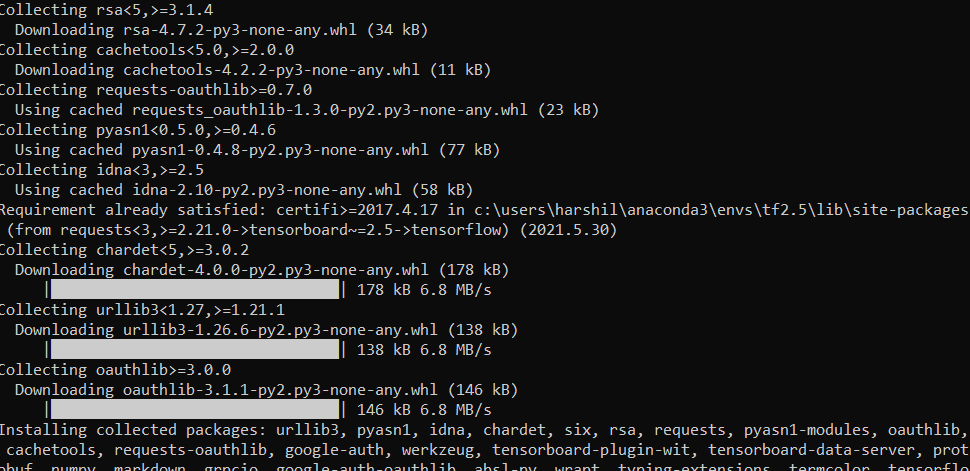
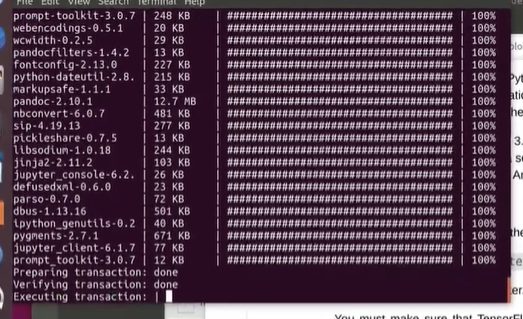
You’ll see an installation screen like this. If you see any errors, Make sure you’re using the correct version and don’t miss any steps.
We’ve installed everything, so let’s test it out in Pycharm.
Test
To test the whole process we’ll use Pycharm. If not installed, get the community edition → https://www.jetbrains.com/pycharm/download/#section=windows.
First, to check if TensorFlow GPU has been installed properly on your machine, run the below code:
import tensorflow as tf
tf.test.is_built_with_cuda()
tf.test.is_gpu_available(cuda_only=False, min_cuda_compute_capability=None)
It should show TRUE as output. If it’s FALSE or some error, look at the steps.
Now let’s run some code.
For a simple demo, we train it on the MNIST dataset of handwritten digits. We’ll see through how to create the network as well as initialize a loss function, check accuracy, and more.
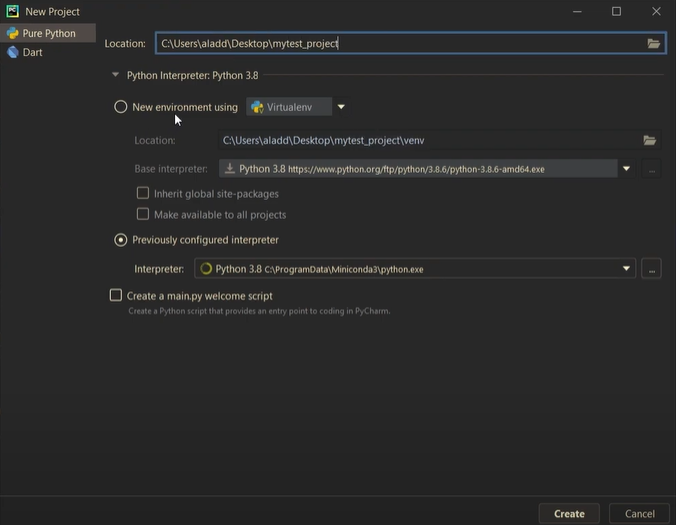
Configure the env, create a new Python file, and paste the below code:
import torch
import torchvision
import torch.nn.functional as F
import torchvision.datasets as datasets
import torchvision.transforms as transforms
from torch import optim
from torch import nn
from torch.utils.data import DataLoader
from tqdm import tqdm
Check the rest of the code here -> https://github.com/aladdinpersson/Machine-Learning-Collection/blob/master/ML/Pytorch/Basics/pytorch_simple_CNN.py.
When you run the code, look for successfully opened cuda(versioncode).

Once the training started, all the steps were successful!
MacOS
MacOS doesn’t support Nvidia GPU for the latest versions, so this will be a CPU-only installation. You can get GPU support on a Mac with some extra effort and requirements.
Prerequisite
- Python 3.6–3.8
- macOS 10.12.6 (Sierra) or later (no GPU support)
- Check https://www.tensorflow.org/install/so… For the latest version information

You can install the latest version available on the site, but for this tutorial, we’ll be using Python 3.8. Also, check with the TensorFlow site for version support.
2) Prepare environment:
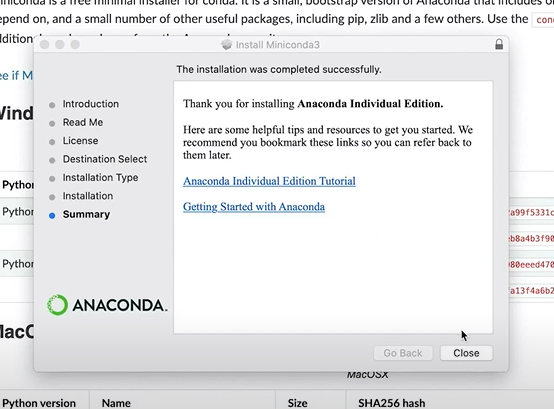
After installing Miniconda, open the command prompt.
conda install -y jupyter

This will take some time to install jupyter. Next, install the Mac tensorflow.yml file. You can also create a .yml file to install TensorFlow and dependencies (mentioned below).
dependencies:
    - python=3.8
    - pip>=19.0
    - jupyter
    - scikit-learn
    - scipy
    - pandas
    - pandas-datareader
    - matplotlib
    - pillow
    - tqdm
    - requests
    - h5py
    - pyyaml
    - flask
    - boto3
    - pip:
        - tensorflow==2.4
        - bayesian-optimization
        - gym
        - kaggle
Run the following command from the same directory that contains tensorflow.yml.
conda env create -f tensorflow.yml -n tensorflow
This installation might take a few minutes.
Activate the environment using the following command:
python -m ipykernel install --user --name tensorflow --display-name "Python 3.8 (tensorflow)"
Test
To test the whole process, we’ll use a Jupyter notebook. Use this command to start Jupyter:
jupyter notebook
Cope the below code and run on jupyter notebook.
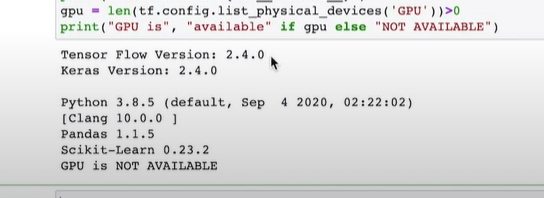
import sys

import tensorflow.keras
import pandas as pd
import sklearn as sk
import tensorflow as tf

print(f"Tensor Flow Version: {tf.__version__}")
print(f"Keras Version: {tensorflow.keras.__version__}")
print()
print(f"Python {sys.version}")
print(f"Pandas {pd.__version__}")
print(f"Scikit-Learn {sk.__version__}")
gpu = len(tf.config.list_physical_devices('GPU'))>0
print("GPU is", "available" if gpu else "NOT AVAILABLE")
This might take some time, but you’ll see something like this with your installed versions.
Linux
We can install both CPU and GPU versions on Linux.
Prerequisite
- Python 3.6–3.8
- Ubuntu 16.04 or later
- Check https://www.tensorflow.org/install/so… for the latest version information
Steps
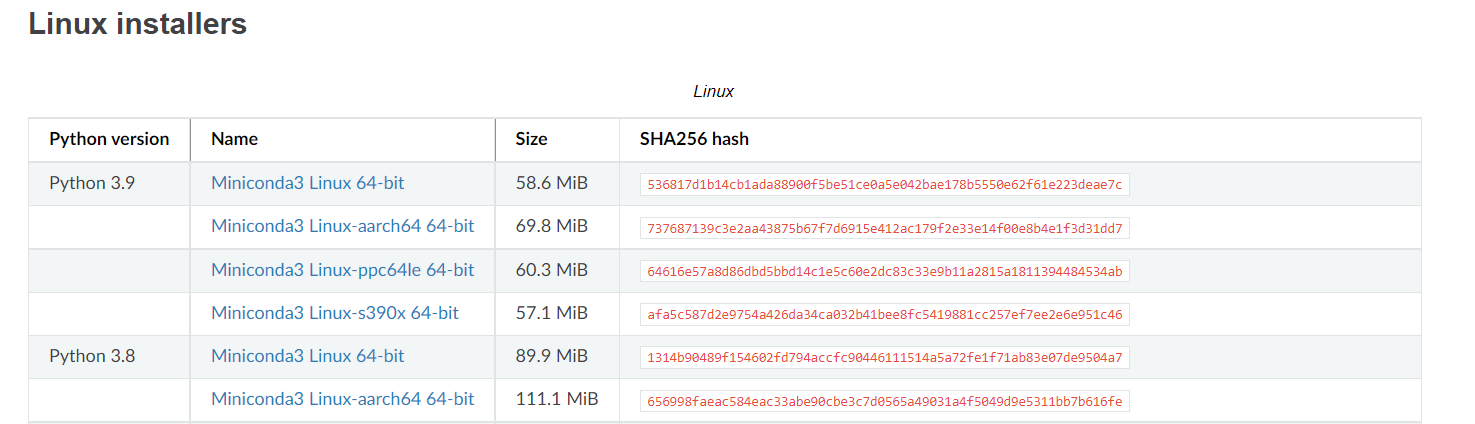
1) First download and install Miniconda from https://docs.conda.io/en/latest/miniconda.html
2) To install CUDA on your machine, you will need:
- CUDA capable GPU,
- A supported version of Linux,
- NVIDIA CUDA Toolkit (https://developer.nvidia.com/cuda-downloads).
You can install CUDA by running,
$ sudo apt install nvidia-cuda-toolkit
After installing CUDA, run to verify the install:
nvcc -V
You’ll see it output something like this:
nvcc: NVIDIA (R) Cuda compiler driver
Copyright (c) 2005-2021 NVIDIA Corporation
Built on Sun_Jul_22_21:07:16_PDT_2019
Cuda compilation tools, release ‘version’
3) Now we’ll download NVIDIA cuDNN, https://developer.nvidia.com/cudnn
Check the version code from the TensorFlow site.
After downloading, extract the files:
tar -xvzf cudnn-10.1-linux-x64-'version'.tgz
Now, we’ll copy the extracted files to the CUDA installation path:
sudo cp cuda/include/cudnn.h /usr/lib/cuda/include/
sudo cp cuda/lib64/libcudnn* /usr/lib/cuda/lib64/
Setting up the file permissions of cuDNN:
$ sudo chmod a+r /usr/lib/cuda/include/cudnn.h /usr/lib/cuda/lib64/libcudnn*
4) Get the environment ready:
Export CUDA environment variables. To set them, run:
$ echo 'export LD_LIBRARY_PATH=/usr/lib/cuda/lib64:$LD_LIBRARY_PATH' >> ~/.bashrc
$ echo 'export LD_LIBRARY_PATH=/usr/lib/cuda/include:$LD_LIBRARY_PATH' >> ~/.bashrc
You can also set the environment with conda and jupyter notebook.
After installing Miniconda, open the command prompt.
conda install -y jupyter
Now, check with TensorFlow site for version, and run the below command:
conda create --name tensorflow python=3.8
To enter the environment:
conda activate tensorflow
Let’s create Jupyter support for your new environment:
conda install nb_conda
This will take some time to get things done.
To Install CPU only, use the following command:
conda install -c anaconda tensorflow
To Install both GPU and CPU, use the following command:
conda install -c anaconda tensorflow-gpu
To add additional libraries, update or create the ymp file in your root location, use:
conda env update --file tools.yml
Below are additional libraries you need to install (you can install them with pip).
dependencies:
    - jupyter
    - scikit-learn
    - scipy
    - pandas
    - pandas-datareader
    - matplotlib
    - pillow
    - tqdm
    - requests
    - h5py
    - pyyaml
    - flask
    - boto3
    - pip
    - pip:
        - bayesian-optimization
        - gym
        - kaggle
Test
There are two ways you can test your GPU.
First, you can run this command:
import tensorflow as tf
tf.config.list_physical_devices("GPU")
You will see similar output, [PhysicalDevice(name=’/physical_device:GPU:0′, device_type=’GPU’)]
Second, you can also use a jupyter notebook. Use this command to start Jupyter.
jupyter notebook
Now, run the below code:
import sys

import tensorflow.keras
import pandas as pd
import sklearn as sk
import tensorflow as tf

print(f"Tensor Flow Version: {tf.__version__}")
print(f"Keras Version: {tensorflow.keras.__version__}")
print()
print(f"Python {sys.version}")
print(f"Pandas {pd.__version__}")
print(f"Scikit-Learn {sk.__version__}")
gpu = len(tf.config.list_physical_devices('GPU'))>0
print("GPU is", "available" if gpu else "NOT AVAILABLE")
You’ll see results something like this:
TensorFlow Version: 'version'
Keras Version: 'version'-tf

Python 3.8.0
Pandas 'version'
Scikit-Learn 'version'
GPU is available
So, when you see a GPU is available, you successfully installed TensorFlow on your machine.
Conclusion
TensorFlow is a free and open-source software library for machine learning created by Google, and it’s most notably known for its GPU accelerated computation speed. We saw how to install TensorFlow on Windows, Mac, and Linux. I hope that this guide helps you get started with TensorFlow!
References and recommended reading:
- https://github.com/aladdinpersson/Machine-Learning-Collection/blob/master/ML/Pytorch/Basics/pytorch_simple_CNN.py
- https://www.youtube.com/watch?v=dj-Jntz-74g
- https://github.com/jeffheaton/t81_558_deep_learning/blob/master/install/tensorflow-install-jul-2020.ipynb
- https://www.tensorflow.org/guide/gpu
- https://www.liquidweb.com/kb/how-to-install-tensorflow-on-ubuntu-18-04/
- https://www.pyimagesearch.com/2019/12/09/how-to-install-tensorflow-2-0-on-macos/
- https://towardsdatascience.com/installing-tensorflow-gpu-in-ubuntu-20-04-4ee3ca4cb75d
Was the article useful?
Explore more content topics:
TensorFlow 2 with GPU on Windows: Step-by-step instructions
How to properly install CUDA and cuDNN on Windows to use TensorFlow with GPU support
Software requirements
- Python 3.9–3.11
- pip version 19.0 or higher for Linux (requires manylinux2014 support) and Windows. pip version 20.3 or higher for macOS.
- Windows Native Requires Microsoft Visual C++ Redistributable for Visual Studio 2015, 2017 and 2019
The following NVIDIA® software required for GPU support
- NVIDIA® GPU drivers version 450.80.02 or higher.
- CUDA® Toolkit 11.8.
- cuDNN SDK 8.6.0.
Prerequisites
-
Download GeForce Experience to update drivers
-
Download Microsoft Visual C++ drivers
-
Download Visual Studio and Visual Studio Code
-
Download CUDA Toolkit version —
11.8or Lattest version (not recommended) -
Download cuDNN
v8.9.7for CUDAv11.8.0: -
Download NVIDIA Nsight Developer Tools:
- Nsight Integration for Visual Studio
- Nsight Compute
- Nsight Graphics
- Nsight Systems
Installation
-
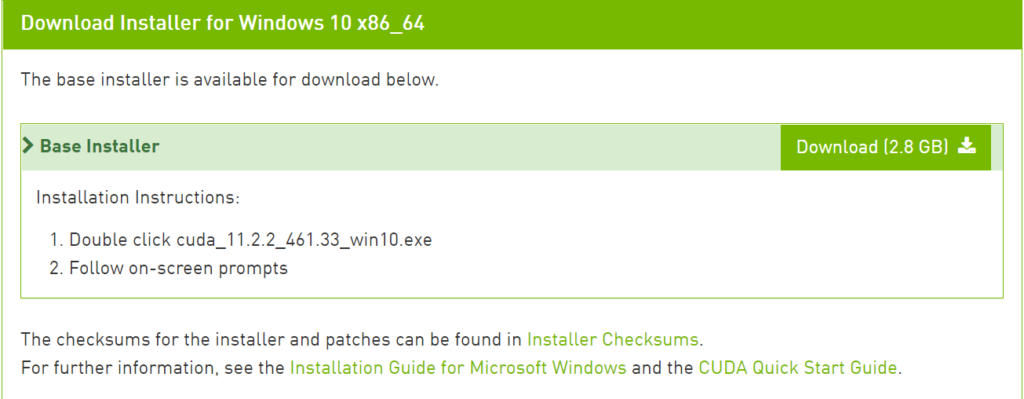
Cuda ToolkitOpen the downloaded file
cuda_11.8.0_522.06_windows.exeand follow the installation instructions.
In the options select
express installation
-
CUDNNUnzip the archive
cudnn-windows-x86_64-8.9.7.29_cuda11-archive.zipand move with replace all files in thelib,includeandbinfolders onC:\Program Files\NVIDIA GPU Computing Toolkit\CUDA\v11.8with files from the corresponding archive folders:
Add the following lines to your system and user
$Pathvariable:C:\Program Files\NVIDIA GPU Computing Toolkit\CUDA\v11.8 C:\Program Files\NVIDIA GPU Computing Toolkit\CUDA\v11.8\bin C:\Program Files\NVIDIA GPU Computing Toolkit\CUDA\v11.8\include C:\Program Files\NVIDIA GPU Computing Toolkit\CUDA\v11.8\lib C:\Program Files\NVIDIA GPU Computing Toolkit\CUDA\v11.8\lib\x64
-
NVIDIA Nsight Developer ToolsInstall all the NVIDIA Nsight developer tools that we downloaded earlier


Verifying installation success
-
Run the following commands in a terminalnvcc --version # Shows CUDA version
nvidia-smi # Shows the NVIDIA system management interface
Caution: TensorFlow 2.10 was the last TensorFlow release that supported GPU on native-Windows.
Starting with TensorFlow 2.11, you will need to install TensorFlow in WSL2, or install tensorflow or tensorflow-cpu and, optionally, try the TensorFlow-DirectML-Plugin`# Upgrade pip to latest version python -m pip install --upgrade pip # Anything above 2.10 is not supported on the GPU on Windows Native python -m pip install "tensorflow<2.11" # Verify the installation: python -c "import tensorflow as tf; print(tf.config.list_physical_devices('GPU'))" # If a list of GPU devices is returned, you've installed TensorFlow successfully.
# If a tensor is returned, you've installed TensorFlow successfully.
python -c "import tensorflow as tf; print(tf.reduce_sum(tf.random.normal([1000, 1000])))"
🎉 Thank you for your attention! 🎉 🔝 Back to top 🔝


In this tutorial, we are going to be covering the installation of CUDA, cuDNN and GPU-compatible Tensorflow on Windows 10. This article assumes that you have a CUDA-compatible GPU already installed on your PC such as an Nvidia GPU; but if you haven’t got this already, the tutorial, Change your computer GPU hardware in 7 steps to achieve faster Deep Learning on your Windows PC will help you get that hardware set up, ready for the steps below.
- Step 1: Check the software versions you will need to install
- Step 2: Download and Install Visual Studio Express
- 2.1 Visual Studio is a Prerequisite for CUDA Toolkit
- 2.2 Selecting and downloading Visual Studio Express
- 2.3 Installing Visual Studio Express
- 2.4 A PC reboot after installation of Visual Studio May be Required
- Step 3: Download CUDA Toolkit for Windows 10
- Step 3.1: Downloading CUDA 9.0 from the CUDA Toolkit Archive
- Step 3.2: Installing CUDA 9.0
- Step 4: Download Windows 10 CUDA patches
- Step 5: Download and Install cuDNN
- Step 5.1: Downloading cuDNN
- Step 5.2: Unzipping cuDNN files and copying to CUDA folders
- Step 5.3: Checking CUDA environment variables are set in Windows
- Step 6: Install Python (if you don’t already have it)
- Step 7: Install Tensorflow with GPU support
- Step 7.1: Calling up the command prompt with administration rights
- Step 7.2: System wide install of Tensorflow via python pip
- Step 8: Test Installation of TensorFlow and its access to GPU
- Conclusions
- Other postings of this article:
Step 1: Check the software versions you will need to install
Assuming that Windows is already installed on your PC, the additional bits of software you will install as part of these steps are:-
- Microsoft Visual Studio
- the NVIDIA CUDA Toolkit
- NVIDIA cuDNN
- Python
- Tensorflow (with GPU support)
Step 2: Download and Install Visual Studio Express
2.1 Visual Studio is a Prerequisite for CUDA Toolkit
Visual studio is required for the installation of Nvidia CUDA Toolkit (this prerequisite is referred to here). If you attempt to download and install CUDA Toolkit for Windows without having first installed Visual Studio, you get the message shown in Fig. 1, “No supported version of Visual Studio was found”.

2.2 Selecting and downloading Visual Studio Express
At the original time of writing, the most recent version of Visual Studio (which is free) is the Visual Studio Express Community Version 2017, shown in Fig 2. You can get previous versions of Visual Studio for free by joining “Visual Studio Dev Essentials” and then searching for the version of Visual Studio you want.

2.3 Installing Visual Studio Express
Once you have downloaded Visual Studio Express, its initial installation is straightforward. Fig 3 shows the executable file (.exe) you receive as a download.

When you press the ‘save file’ option on Fig 3, the window in Fig 4 will appear where you can set installation options (or just leave them as they are by default, as I did).

During installation, Visual Studio prompts you to as whether you ‘want to continue without workloads’. I pressed ‘continue’ here, as I had no intention of using workloads at all.

2.4 A PC reboot after installation of Visual Studio May be Required
After installing Visual Studio, I initially moved straight on to downloading and attempting to install CUDA Toolkit for Windows — that step is Step 3 which I will be describing next. I got a message that Visual Studio was still operating and was preventing the installation of CUDA Toolkit. Rebooting my PC before attempting to install CUDA Toolkit again solved this problem.
Step 3: Download CUDA Toolkit for Windows 10
These CUDA installation steps are loosely based on the Nvidia CUDA installation guide for windows. The CUDA Toolkit (free) can be downloaded from the Nvidia website here.
At the original time of writing this tutorial, the default version of CUDA Toolkit offered is version 10.0, as shown in Fig 6. However, you should check which version of CUDA Toolkit you choose for download and installation to ensure compatibility with Tensorflow (looking ahead to Step 7 of this process). When you go onto the Tensorflow website, the latest version of Tensorflow available (1.12.0) requires CUDA 9.0, not CUDA 10.0. To find CUDA 9.0 or any earlier releases, you need to navigate to the “Legacy Releases” on the bottom right hand side of Fig 6.

Step 3.1: Downloading CUDA 9.0 from the CUDA Toolkit Archive
Choosing “Legacy Releases” takes you to the CUDA Toolkit Archive. Based on Tensorflow installation guidance, the CUDA version required is 9.0, as listed in Fig 7.

Step 3.2: Installing CUDA 9.0
CUDA 9.0 comes as a base installation and four patches; the base installation of CUDA 9.0 must be installed first, followed by the patches. The options for the base install which I selected are shown in Fig. 8.

Running the base installer which has just been downloaded will produce the CUDA Setup Package window, as shown in Fig 9.

The CUDA installer extracts to your PC and, when complete, the NVIDIA CUDA Toolkit installation will start; you will get a message to that effect. The resulting NVIDIA Installer windows throughout the installation process are shown at Fig 10 — Fig 13. I chose the express installation option (Fig. 10).

Fig. 11 provides the opportunity to select installation location; I chose the default locations provided, which for CUDA is :
C:\Program Files\NVIDA GPU Computing Toolkit\CUDA\v9.0
Fig. 12 below shows the CUDA installations which rely on Visual studio, previously installed in Step 1.

Pressing ‘next’ at the window shown in Fig. 12 above, gives the final installation window, shown as Fig.13 below, where the NVIDIA installer is marked as finished.

Step 4: Download Windows 10 CUDA patches
At the time of writing, there are four CUDA patches to get (as well as the base installer), so let’s go and download these. They are shown in Fig.14.

When the four patches are downloaded, they can be installed in the same way as the base installer — with installation windows providing guidance through the process.
Step 5: Download and Install cuDNN
Having installed CUDA 9.0 base installer and its four patches, the next step is to find a compatible version of CuDNN. Based on the information on the Tensorflow website, Tensorflow with GPU support requires a cuDNN version of at least 7.2.
Step 5.1: Downloading cuDNN
In order to download CuDNN, you have to register to become a member of the NVIDIA Developer Program (which is free).

When you create an account, login and fill out some other required details about why you are using the account, you get the download page shown in Fig. 16.

As I have downloaded CUDA 9.0, the corresponding version of cuDNN is version 7.4.2. Choosing cuDNN version 7.4.2 enables the download as a zip file named as follows:
cudnn-9.0-windows10-x64-v7.zip
Step 5.2: Unzipping cuDNN files and copying to CUDA folders
Instructions at Nvidia provide support for windows cuDNN installation, as do instructions on the Tensorflow website ; I have reproduced these instructions in distilled form, based on my implementation of them. In my case, I downloaded the cuDNN .zip file named above into a folder which has the following path on my PC (your path will no doubt be different).
C:\Users\jo\Documents\cuDNN_downloads\
In the instructions below, I refer to the folder path “ C:\Users\jo\Documents\cuDNN_downloads\” (referred to just above) as “<downloadpath>”, such that the zip file is now in the path:
<downloadpath>\cudnn-9.0-windows10-x64-v7.5.0.56.zip
I unzipped the cuDNN “.zip” file where I downloaded it, hence the unzipped folder structure which will contain the required cuDNN files is now:-
<downloadpath>\cudnn-9.0-windows10-x64-v7.5.0.56\
There are three files in the unzipped cuDNN folder subdirectories which are to be copied into the CUDA Toolkit directories. These are cudnn64_7.dll, cudnn.h and cudnn.lib:
1. cudnn64_7.dll
cudnn64_7.dll can be found in the following path within the downloaded cuDNN files:
<downloadpath>\cudnn-9.0-windows10-x64-v7.5.0.56\cuda\bin\cudnn64_7.dll
Assuming that you installed CUDA 9.0 to its default path (as I did at Step 2.3), namely the following default path:
C:\Program Files\NVIDA GPU Computing Toolkit\CUDA\v9.0
you can copy the cudnn64_7.dll file directly into the CUDA folder’s bin folder path (note: you don’t need to create any new subfolders):
C:\Program Files\NVIDIA GPU Computing Toolkit\CUDA\v9.0\bin\2. cudnn.h
As with the cudnn64_7.dll file above, after downloading and unzipping the cuDNN folder, the header file cudnn64.h can be found in the path:
<downloadpath>\cudnn-9.0-windows10-x64-v7.5.0.56\cuda\ include\cudnn.h
Again, assuming that you installed CUDA 9.0 into the default path as I did at Step 2.3, copy cudnn.h directly into the CUDA folder with the following path (no new subfolders are necessary):
C:\Program Files\NVIDIA GPU Computing Toolkit\CUDA\v9.0\include\
3. cudnn.lib
The .lib file cudnn.lib can be found in the downloaded cuDNN path:
<downloadpath>\cudnn-9.0-windows10-x64-v7.5.0.56\cuda\lib\x64\cudnn.lib
Copy cudnn.lib directly into the CUDA folder with the following path:
C:\Program Files\NVIDIA GPU Computing Toolkit\CUDA\v9.0\lib\x64\
Step 5.3: Checking CUDA environment variables are set in Windows
Finally, the instructions at Nvidia direct that you ensure that the CUDA environment variable has previously been set up, as follows:
Variable Name: CUDA_PATH
Variable Value: C:\Program Files\NVIDIA GPU Computing Toolkit\CUDA\v9.0
In Windows 10, the Environment Variables can be found by choosing:
Control Panel ->System and Security->System->Advanced System settings.
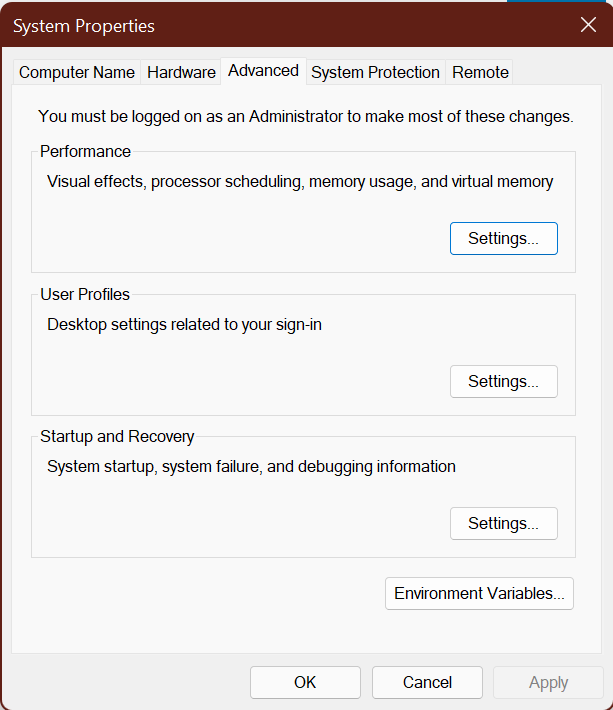
This opens up a window called “System Properties” (Fig 17), at which point the “Environment Variables” button should be chosen.

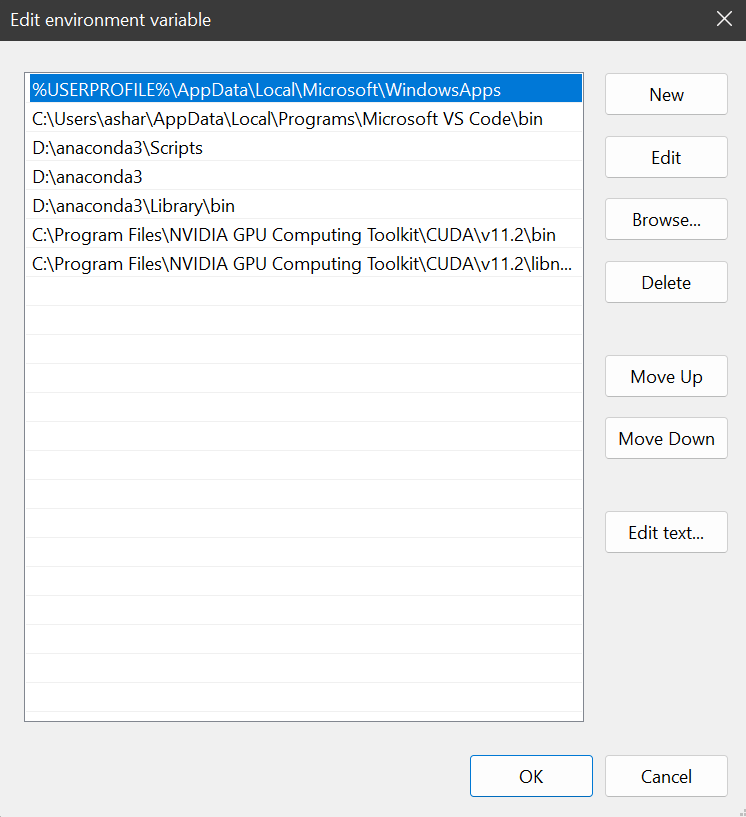
When the Environment Variables window then appears, within “system variables” (in the bottom half of the window), click on “Path” and choose the button “edit”. A new window will appear, called “Edit environment variable” as shown in Fig 18 below.
On checking the Environment Variables, I found the installation process which determines the CUDA installation path — Step 3.2, see Fig. 11 — had already added two paths to CUDA . These paths are shown in Fig 18 below, so I found I did not need to add a further CUDA path.

Step 6: Install Python (if you don’t already have it)
Now that CUDA and cuDNN are installed, it is time to install Python to enable Tensorflow to be installed later on. At the time of writing, the most up to date version of Python 3 available is Python 3.7, but the Python 3 versions required for Tensorflow are 3.4, 3.5 or 3.6. Python 3.6 can be downloaded for Windows 10 from here. When you run the Python installer for windows, the setup window in Fig 19 will appear.

Of the options in Fig. 19 above during Python installation, I chose to select all of them. These options are useful: Python’s ‘pip’ installer is used at Step 7.2 of this guide to install Tensorflow. Additionally, I use the IDE (integrated development environment for writing and running python code) called “IDLE” at Step 8.
In the “Advanced Options” (shown at Fig 20 below), I chose the installation of Python for all users (which was not ticked by default); this gives the system wide installation.

Tensorflow provides instructions for checking that CUDA, cuDNN and (optional: CUPTI) installation directories are correctly added to the PATH environmental variables. As the three cuDNN files were copied into the subfolders of CUDA, I did not update the existing CUDA environmental variables path.
Step 7.1: Calling up the command prompt with administration rights
In this step a system-wide install of Tensorflow is carried out, not a per user install, but an alternative means of carrying out this tensorflow installation (not covered here) is to create a Python virtual environment, activate the environment and install Tensorflow within that environment.
If you wish to make a system wide installation of Tensorflow, this requires administrative rights, therefore, accordingly the command prompt should be run with administrative rights. To do this, open up the command prompt by running ‘cmd’ in the search bar, and then right clicking on command prompt to choose ‘run as administrator’. This opens up Administrator: Command Prompt as shown in Fig 21.
Step 7.2: System wide install of Tensorflow via python pip
Having opened the Command Prompt, the system-wide installation command for Tensorflow with GPU support is as follows:
pip3 install --upgrade tensorflow-gpu
The “pip3” command (as opposed to “pip”) is required as the installation is to Python 3. Execution of this command in the command prompt is shown in Fig 22.

The resulting output from the command is shown in Fig 23, and if all goes to plan there should eventually be a message to confirm that Tensorflow has been installed successfully.

Step 8: Test Installation of TensorFlow and its access to GPU
Go to the start menu in windows and search for the IDE called ‘idle’, which will be installed as part of your python installation if you selected as I did at Step 6. A Python window should appear labelled Python 3.6.x Shell. At the prompt (denoted by ‘>>>’), import the Tensorflow package. This will check that Tensorflow has been installed (as you can import it). The command for the IDLE shell to import the tensorflow package is as follows:
# importing the tensorflow package
import tensorflow as tf
To test CUDA support for your Tensorflow installation, you can run the following command in the shell:
tf.test.is_built_with_cuda()
Finally, to confirm that the GPU is available to Tensorflow, you can test using a built-in utility function in TensorFlow as shown here:
tf.test.is_gpu_available(cuda_only=False, min_cuda_compute_capability=None)
It takes a few minutes to return a result from this; when it is finished it returns True, and then the prompt `>>>`appears again. Importing tensorflow and these tests are all shown in Fig 24 in the Python IDLE Shell.

Conclusions
These were the steps I took to install Visual Studio, CUDA Toolkit, CuDNN and Python 3.6, all with the ultimate aim of installing Tensorflow with GPU support on Windows 10. To date, my GPU based machine learning and deep learning work has been on Linux Ubuntu machines; by the same token, much of the machine learning community support online focuses on Ubuntu.
For Machine Learning, the major drawback to using Windows is that it is necessary to build more things from source (for example using Cmake) than on Linux, and also to install additional software for the build processes, such as Visual Studio. For example, if you were to install Caffe2 on Windows, there are no pre-built binaries and Windows build is in testing and beta mode. I installed CUDA and cuDNN on Windows 10 more out of curiosity than anything else, just to see how straightforward (or otherwise) it was.
As I suggested in [reference], now that CUDA, cuDNN and Tensorflow are successfully installed on Windows 10 and I have checked Tensorflow’s access to GPU, I am going to sweep the whole Windows 10 operating system away in order to make a fresh installation of Ubuntu 18.04 LTS. This new installation of Ubuntu will be covered in Part 3 of this series.
Other postings of this article:
This tutorial was originally posted by Dr Joanne Kitson as Installing Tensorflow with CUDA, cuDNN and GPU support on Windows 10 in Towards Data Science on Medium.com
В очередной раз после переустановки Windows осознал, что надо накатить драйвера, CUDA, cuDNN, Tensorflow/Keras для обучения нейронных сетей.
Каждый раз для меня это оказывается несложной, но времязатратной операцией: найти подходящую комбинацию Tensorflow/Keras, CUDA, cuDNN и Python несложно, но вспоминаю про эти зависимости только в тот момент, когда при импорте Tensorflow вижу, что видеокарта не обнаружена и начинаю поиск нужной страницы в документации Tensorflow.
В этот раз ситуация немного усложнилась. Помимо установки Tensorflow мне потребовалось установить PyTorch. Со своими зависимостями и поддерживаемыми версиями Python, CUDA и cuDNN.
По итогам нескольких часов экспериментов решил, что надо зафиксировать все полезные ссылки в одном посте для будущего меня.
Краткий алгоритм установки Tensorflow и PyTorch
Примечание: Установить Tensorflow и PyTorch можно в одном виртуальном окружении, но в статье этого алгоритма нет.
Подготовка к установке
- Определить какая версия Python поддерживается Tensorflow и PyTorch (на момент написания статьи мне не удалось установить PyTorch в виртуальном окружении с Python 3.9.5)
- Для выбранной версии Python найти подходящие версии Tensorflow и PyTorch
- Определить, какие версии CUDA поддерживают выбранные ранее версии Tensorflow и PyTorch
- Определить поддерживаемую версию cuDNN для Tensorflow – не все поддерживаемые CUDA версии cuDNN поддерживаются Tensorflow. Для PyTorch этой особенности не заметил
Установка CUDA и cuDNN
- Скачиваем подходящую версию CUDA и устанавливаем. Можно установить со всеми значениями по умолчанию
- Скачиваем cuDNN, подходящую для выбранной версии Tensorflow (п.1.2). Для скачивания cuDNN потребуется регистрация на сайте NVidia. “Установка” cuDNN заключается в распакове архива и заменой существующих файлов CUDA на файлы из архива
Устанавливаем Tensorflow
- Создаём виртуальное окружение для Tensorflow c выбранной версией Python. Назовём его, например,
py38tf - Переключаемся в окружение
py38tfи устанавливаем поддерживаемую версию Tensorflowpip install tensorflow==x.x.x - Проверяем поддержку GPU командой
python -c "import tensorflow as tf; print('CUDA available' if tf.config.list_physical_devices('GPU') else 'CUDA not available')"
Устанавливаем PyTorch
- Создаём виртуальное окружение для PyTorch c выбранной версией Python. Назовём его, например,
py38torch - Переключаемся в окружение
py38torchи устанавливаем поддерживаемую версию PyTorch - Проверяем поддержку GPU командой
python -c "import torch; print('CUDA available' if torch.cuda.is_available() else 'CUDA not available')"
В моём случае заработала комбинация:
- Python 3.8.8
- Драйвер NVidia 441.22
- CUDA 10.1
- cuDNN 7.6
- Tensorflow 2.3.0
- PyTorch 1.7.1+cu101
Tensorflow и PyTorch установлены в разных виртуальных окружениях.
Итого
Польза этой статьи будет понятна не скоро: систему переустанавливаю я не часто.
Если воспользуетесь этим алгоритмом и найдёте какие-то ошибки – пишите в комментарии
Hey guys, In this blog we will see how we can install Tensorflow with CUDA and cuDNN. This process can be tricky and frustrating if you are doing it for the very first time. So without any further due, let’s do it…
Step 1 – Decide versions for CUDA,cuDNN, and Visual Studio
https://www.tensorflow.org/install/source_windows#gpu
- We will download the following versions.
- CUDA 11.2
- cuDNN 8.1
- Microsoft Visual Studio 2019
Step 2 – Download the CUDA Toolkit
Download Link – https://developer.nvidia.com/cuda-11.2.2-download-archive
NOTE – There is no Windows 11 version for CUDA 11.2 that’s why I used Windows 10 version and it worked like charm 🙂
Windows > x86_64 > 10 > exe(local) > Download
Step 3 – Download cuDNN
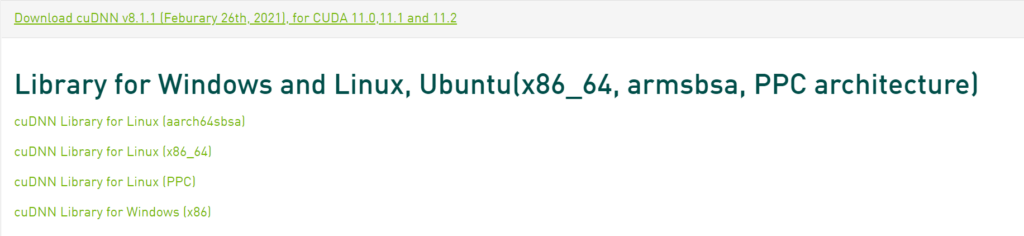
Download Link – https://developer.nvidia.com/rdp/cudnn-archive
- If you have an account on Nvidia simply Login otherwise click on Join Now.
- We will select the latest version of cuDNN (8.1.1) for CUDA 11.2 and we will download the zip for Windows.
Step 4 – Download Visual Studio 2019 Community.
Download Link – https://my.visualstudio.com/Downloads?PId=8228
- Login to Microsoft and then search Visual Studio 2019 and download the Community version.
- It will download a setup.
- Install that setup.
- It will ask to download workloads, just skip it and just install Visual Studio Core Editor.
Step 5 – Extracting and merging files
- Once you have successfully downloaded CUDA and cuDNN, install the CUDA toolkit by double-clicking on it.
- Agree and Continue > Express (Recommended). It can restart during the installation process.
- Then extract the cuDNN zip. It will produce 4 files.
- Copy all the files from the cuDNN folder and paste them into C:/Program Files/NVIDIA GPU Computing Toolkit/CUDA/v11.2 and replace the files in the destination.
- Now open the bin Folder and copy the path from the address bar.

- Now open the start menu and type env and you will see an option “Edit the System Environment Variables“. A window like the one below will pop up.
- Click on Environment Variables here.
- In the user variables (in the top section) double click on Path and click New.
- Now paste the bin path you copied in a new field and hit OK.
- Now do the same steps for libnvvp folder also.
- Copy the path to libnvvp folder and add a new record in path.
RESTART YOUR COMPUTER.
Step 6 – Check the successful installation of CUDA
- Run the nvidia-smi command in your terminal.
- You can see in the top right corner, CUDA Version: 11.2
Step 7 – Create a conda environment and install TensorFlow
- Now open your terminal and create a new conda environment.
- Use the following command and hit “y“.
- Here gpu is the name that I gave to my conda environment.
conda create -n gpu python=3.9
- Activate the conda environment and install tensorflow-gpu.
conda activate gpu
pip install tensorflow-gpu
- Now simply copy the code below and paste it into a file named test.py.
# install tensorflow with cuda and cudnn

import tensorflow as tf
tf.compat.v1.disable_eager_execution()

with tf.device('/gpu:0'):
    a = tf.constant([1.0, 2.0, 3.0, 4.0, 5.0, 6.0], shape=[2, 3], name='a')
    b = tf.constant([1.0, 2.0, 3.0, 4.0, 5.0, 6.0], shape=[3, 2], name='b')
    c = tf.matmul(a, b)

with tf.compat.v1.Session() as sess:
    print (sess.run(c))
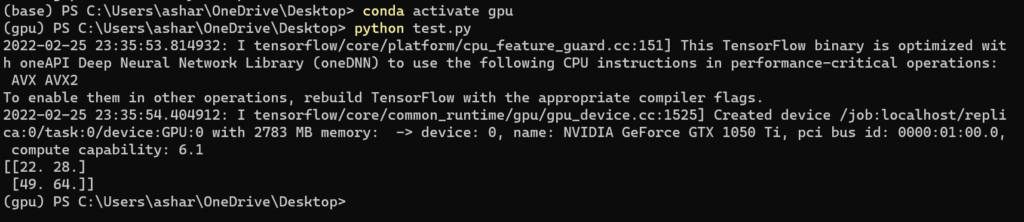
- Now run the python file in the conda environment.
- If you see these results, bingo!! we have successfully installed TensorFlow with CUDA and cuDNN support 🙂
Conclusion
Installing TensorFlow with CUDA and cuDNN enables you to leverage the power of NVIDIA GPUs for accelerated deep learning computations. By following the steps outlined in this article, you can successfully set up TensorFlow with GPU support and enhance the performance of your machine learning workflows.
So this is how you will install TensorFlow with Cuda and cuDNN in Windows, thanks for reading it and I hope you are taking something with you after reading this and till the next time…
FAQs
What is TensorFlow?
TensorFlow is an open-source machine learning library developed by Google Brain for building and training neural networks.
What is CUDA?
CUDA (Compute Unified Device Architecture) is a parallel computing platform and application programming interface model created by NVIDIA for GPU-accelerated computing.
What is cuDNN?
cuDNN (CUDA Deep Neural Network library) is a GPU-accelerated library of primitives for deep neural networks, providing highly optimized implementations of standard deep learning operations.
Why use GPU acceleration with TensorFlow?
GPU acceleration allows for faster training and inference of deep learning models, significantly reducing computation times compared to using CPUs alone.
How can I troubleshoot installation issues?
If you encounter installation issues, refer to the troubleshooting guides provided in the documentation of TensorFlow, CUDA Toolkit, and cuDNN. Common issues include compatibility problems, installation errors, and configuration issues.
Check out my other machine learning projects, deep learning projects, computer vision projects, NLP projects, Flask projects at machinelearningprojects.net