
Download Windows Speedup Tool to fix errors and make PC run faster
In this post, we explain how to get a crosshair cursor and how to make a crosshair appear for your mouse pointer in Windows 11/10. Generally, Windows 11/10 uses a crosshair cursor for precision selection. However, you can use it for regular purposes with the help of this guide.
There are two ways to get crosshair cursors for Windows 11 and Windows 10. First, you can use the in-built Mouse Properties panel. Second, you can use PowerToys. If you want to change the mouse pointer only, you can use the in-built settings. But if you want to enable or disable the crosshair cursor using a keyboard shortcut, and get more customization options, you can use Microsoft PowerToys.
To get Crosshair Cursor for Windows 11, follow these steps:
- Press Win+I to open Windows Settings.
- Go to Bluetooth & devices > Mouse.
- Click on Additional mouse settings.
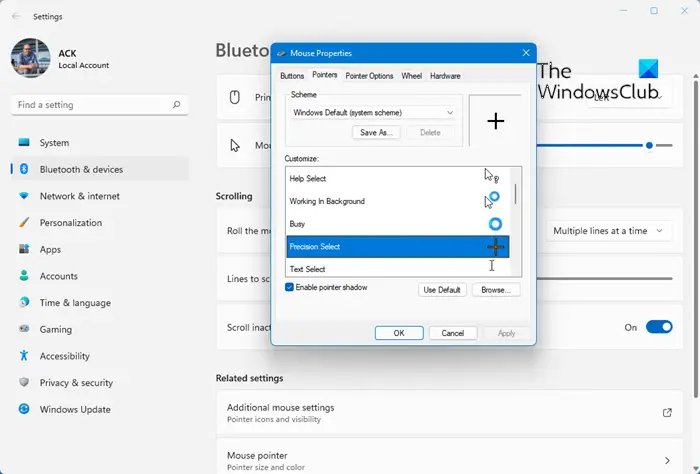
- Switch to the Pointers tab.
- Select Normal Select > Browse.
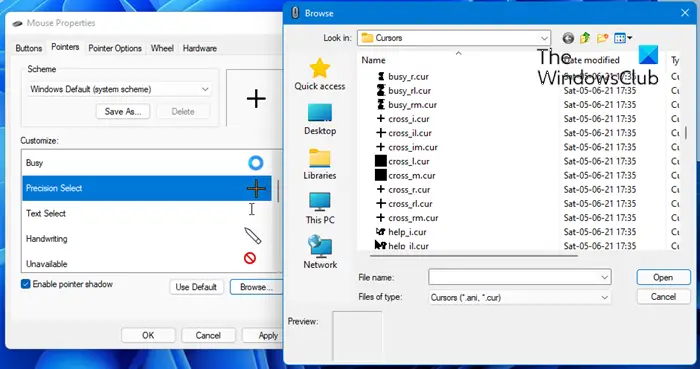
- Choose the crosshair mouse pointer and click on Open.
- Click the OK button.
First, you need to open the Windows Settings panel by pressing Win+I. Then, go to Bluetooth & devices and click on the Mouse settings. Here you can find the Additional mouse settings setting. You need to click on it to open the Mouse Properties panel.
Once it is opened, switch to the Pointers tab and click on the Normal Select option. Then, click on the Browse button.
Next, you need to select a crosshair cursor you like and click the Open button.
Once it is selected, click the OK button to save the change.
Enable Mouse Pointer Crosshair in Windows 11
To enable Mouse Pointer Crosshair in Windows 11 using PowerToys, follow these steps:
- Open PowerToys on your computer.
- Switch to the Mouse utilities tab.
- Toggle the Enable Mouse Pointer Crosshairs button.
- Press Ctrl+Alt+P to open the crosshair cursor.
Let’s check out these steps in detail.
First, you need to open PowerToys on your computer. If you haven’t installed it already, follow this guide to install PowerToys on Windows.
Once installed, open PowerToys, and switch to the Mouse utilities tab. Here you can find a section called Mouse Pointer Crosshairs. You need to find the Enable Mouse Pointer Crosshairs option and toggle the respective button to turn it on.

Then, press Ctrl+Alt+P to open the crosshairs cursor on your screen.
As mentioned earlier, there are tons of customization options available in PowerToys. For example, you can change the color, opacity, center radius, thickness, border color, border size, etc.
That’s all! I hope this guide helped.
Read: How to customize Mouse Buttons, Pointer, and Cursor in Windows 11/10
How do I download cursors for Windows?
If you want to change your mouse cursors, there are plenty of websites that offer mouse cursor downloads. Once you download them, you can change the cursor via Windows Settings > Mouse > Additional mouse settings.
Read: Crosshair stuck on Screen in Windows 11
Can Windows have 2 cursors?
No, Windows cannot have two cursors at the same time. However, there are some paid software available that allow you to add this feature to your Windows.
Related reads:
- Make Blinking Mouse Cursor Thicker & Bigger
- Change Mouse Cursor Thickness & Blinking Rate.
Anand Khanse is the Admin of TheWindowsClub.com, a 10-year Microsoft MVP (2006-16) & a Windows Insider MVP (2016-2022). Please read the entire post & the comments first, create a System Restore Point before making any changes to your system & be careful about any 3rd-party offers while installing freeware.
Vista & Win 7 icons
Find out how Vista icons differ from XP icons.
See how RealWorld Icon Editor handles Vista icons.
Graphics archives links
Clip art, Photo galleries, Wallpapers, Textures, 3D Models
15 Puzzle
Least moves
Noca Madureira54
The Male Boss64
The Male Boss66
The Male Boss68
The Male Boss68
- Скачайте и распакуйте архив open-crosshair-cursors-vr1.zip с помощью WinRar.
- Для Windows 10/11: используйте сочетание клавиш Win+I, чтобы открыть окно «Настройки». Или нажмите «Пуск», а затем иконку шестеренки. Перейдите в раздел «Темы» и кликните на пункт «Курсор мыши».
- Для Windows 7/8/8.1: откройте панель управления, раздел «Оборудование и звук». Там будет ссылка «Мышь» в разделе «Устройства и принтеры».
- В результате откроются свойства мыши. Перейдите во вкладку «Указатели».
- Если в архиве присутствует файл формата *.inf, нажмите по нему правой кнопкой и выберите пункт «Установить» в контекстном меню. Схема автоматически появится в списке доступных и Вам останется только выбрать её, после чего применить изменения.
- Если в архиве нет установщика, необходимо вручную задать курсор для каждого состояния. Жмите на кнопку «Обзор» и выбирайте нужный указатель. Выбирать все не обязательно. Будет достаточно задать «Основной режим», «Фоновый режим», «Занят» и еще несколько на свой вкус. По окончанию нажмите «Сохранить как», чтобы записать созданную схему в память операционной системы.
- Готово! Нажмите «ОК», чтобы сохранить изменения.
Примечание: когда курсоры слишком большие или, наоборот, слишком маленькие — Вы можете изменить их масштаб (размер) в настройках Windows.
Windows Crosshair Cursor Plusprimo (updated 2025)in today’s video i explain how to change your crosshair or cursor from the default to a custom one. this. There are two ways to get crosshair cursors for windows 11 and windows 10. first, you can use the in built mouse properties panel. second, you can use powertoys. if you want to change.

How To Change Your Cursor To A Crosshair On Windows 10 Youtube In this video i will show you how to change your normal cursor to the cross one in less than 2 min my socials: instagram: instagram mostafa. Custom cursor is a browser extension that lets you change your cursor to a custom one from our giant cursor collection to choose from or upload your own cursors. Changing your cursor on windows 10 is a fun and simple way to personalize your computer experience. all it takes is navigating through a few settings, and you can choose from a variety of cursor styles or even upload your own. follow these easy steps to give your cursor a fresh new look. The default mouse pointers and cursors included with windows are located in the c:\windows\cursors folder. this tutorial will show you how to change pointer size and color, change mouse pointers, and to select, save, and delete pointer schemes for your account in windows 10.

How To Change Your Mouse Cursor To Crosshair Windows 10 2021 Changing your cursor on windows 10 is a fun and simple way to personalize your computer experience. all it takes is navigating through a few settings, and you can choose from a variety of cursor styles or even upload your own. follow these easy steps to give your cursor a fresh new look. The default mouse pointers and cursors included with windows are located in the c:\windows\cursors folder. this tutorial will show you how to change pointer size and color, change mouse pointers, and to select, save, and delete pointer schemes for your account in windows 10. To change your pointer scheme: hold windows key and press x. choose control panel. open the control panel and switch to icons view. click on the mouse. navigate to the pointers. open the dropdown menu in the scheme. click on the pointer scheme that you would like to use. click on apply. click on ok. exit mouse properties. Changing your mouse pointer and cursor in windows 10 or 11 is a straightforward process that can significantly enhance your user experience, whether for accessibility, personalization, or productivity reasons. Fortunately, it’s easy to change mouse cursor in windows 10. we’ll show you how in a few simple steps. 1.open settings in windows 10 by clicking the start menu button in the bottom left corner of. In today’s video i explain how to change your crosshair or cursor from the default to a custom one. this works on both windows 10 or windows 11. be sure to watch the entire video.

How To Change Your Mouse Cursor To Crosshair Windows 10 2021 To change your pointer scheme: hold windows key and press x. choose control panel. open the control panel and switch to icons view. click on the mouse. navigate to the pointers. open the dropdown menu in the scheme. click on the pointer scheme that you would like to use. click on apply. click on ok. exit mouse properties. Changing your mouse pointer and cursor in windows 10 or 11 is a straightforward process that can significantly enhance your user experience, whether for accessibility, personalization, or productivity reasons. Fortunately, it’s easy to change mouse cursor in windows 10. we’ll show you how in a few simple steps. 1.open settings in windows 10 by clicking the start menu button in the bottom left corner of. In today’s video i explain how to change your crosshair or cursor from the default to a custom one. this works on both windows 10 or windows 11. be sure to watch the entire video.

How To Change Your Mouse Cursor To Crosshair Windows 10 2021 Fortunately, it’s easy to change mouse cursor in windows 10. we’ll show you how in a few simple steps. 1.open settings in windows 10 by clicking the start menu button in the bottom left corner of. In today’s video i explain how to change your crosshair or cursor from the default to a custom one. this works on both windows 10 or windows 11. be sure to watch the entire video.

How To Change Your Mouse Cursor To Crosshair Windows 10 2021
Контакты
Удиви меня


