
Applies ToWindows 11 Windows 10
Установочный носитель, например USB-устройство флэш-памяти, можно использовать для установки новой копии Windows, выполнения чистой установки Windows или переустановки Windows.
Чтобы создать установочный носитель, перейдите на веб-сайт загрузки программного обеспечения, где можно найти пошаговые инструкции. На этом веб-сайте можно выбрать версию Windows и создать установочный носитель на USB-накопителе. Кроме того, можно создать ISO-файл для использования на виртуальных машинах или записи установочного носителя на DVD-диске:
-
Перейдите на сайт скачать Windows 11.
-
В разделе Создание установочного носителя Windows 11 выберите Скачать. Скачан инструментMediaCreationTool.exe .
-
Запустите MediaCreationTool.exe. Средство создания носителя содержит инструкции по созданию установочного носителя.
Важно: Создайте резервную копию файлов перед установкой и переустановкой Windows на компьютере. Узнайте, как это сделать.
Для создания установочного носителя требуются следующие элементы:
-
Компьютер с надежным подключением к Интернету. Время загрузки зависит от подключения к Интернету.
-
USB-устройство флэш-памяти. Пустое USB-устройство флэш-памяти не менее 8 ГБ. Рекомендуется использовать пустое USB-устройство флэш-памяти, так как все содержимое на диске удаляется. Для виртуальных машин USB-устройство флэш-памяти не требуется. Вместо этого можно создать ISO-файл для использования на виртуальных машинах. Iso-файл также можно использовать для создания установочного носителя на DVD-диске.
-
Ключ продукта. Может потребоваться 25-значный ключ продукта (не требуется для цифровых лицензий). Сведения о поиске ключа продукта см. в статье Поиск ключа продукта Windows. Многие современные устройства содержат ключ продукта, встроенный в встроенное ПО устройства. Если ключ продукта внедрен в встроенное ПО устройства, его не нужно вводить вручную. Вместо этого, если ключ продукта в встроенном ПО соответствует устанавливаемой версии и выпуску Windows, ключ продукта применяется автоматически.
После создания установочного носителя Windows можно сбросить или переустановить. Дополнительные сведения см. в статье Параметры восстановления в Windows.
Нужна дополнительная помощь?
Нужны дополнительные параметры?
Изучите преимущества подписки, просмотрите учебные курсы, узнайте, как защитить свое устройство и т. д.
Creating a Windows ISO file allows you to package your Windows installation files into a single, bootable image. ISO files are crucial for clean installations, backups, or deploying Windows across multiple devices. Here’s a step-by-step guide on how to create a Windows ISO file.
Why Create a Windows ISO File?
-
Backup Installation Media: Keep a digital copy of your Windows installer.
-
Bootable USB Creation: Create bootable media for system recovery or installations.
-
Customization: Add drivers, updates, or settings to the installation files.
-
Convenience: Consolidate installation files into a single, easily transferable file.
Pre-Requisites
- Windows Installation Files:
- Either from a Windows DVD or the Microsoft Media Creation Tool.
- A Reliable Tool for ISO Creation:
- Popular tools include PowerISO, ImgBurn, or third-party utilities like Rufus.
- Sufficient Disk Space:
- Ensure at least 8-10 GB of free space for ISO creation.
Method 1: Use Microsoft Media Creation Tool
Microsoft provides an official tool to create ISO files for Windows installations.
Steps:
- Download the Media Creation Tool:
- Visit the Microsoft website and download the tool.
- Launch the Tool:
- Run the downloaded
.exefile as an administrator.
- Run the downloaded
- Choose Installation Media:
- Select Create installation media (USB flash drive, DVD, or ISO file).
- Select ISO Option:
- Follow the prompts to choose your language, edition, and architecture (e.g., 32-bit or 64-bit).
- Select ISO file as the desired output format.
- Save and Download:
- Save the ISO file to your preferred location.
- The tool will download and package Windows files into an ISO.
Method 2: Use ImgBurn for Existing Installation Files
ImgBurn is a popular utility for creating ISO files from existing installation files or folders.
Steps:
- Download and Install ImgBurn:
- Download ImgBurn from its official website.
- Prepare Windows Files:
- Ensure all necessary files (from a Windows DVD or extracted archive) are in a single folder.
- Create the ISO:
- Open ImgBurn and select Create image file from files/folders.
- Add your folder containing the Windows installation files.
- Set Bootable Disk Options:
- Under the Advanced tab, choose Bootable Disk.
- Provide the bootable file (typically
bootsect.bin).
- Build the ISO:
- Click the Build button to start the process.
- Save the ISO file to your desired location.
Method 3: Use Command Prompt for Advanced Users
For advanced users comfortable with the command line, you can use Windows’ built-in tools to create an ISO file.
Steps:
- Prepare Files:
- Copy all installation files to a single folder.
- Install the Windows ADK (Assessment and Deployment Kit):
- Download and install the Windows ADK from the Microsoft website.
- Create the ISO Using OSCDIMG Command:
- Open Command Prompt as an administrator.
- Use the following command:
oscdimg -m -u2 -b"path_to_bootfile" "source_folder" "output_iso_path" - Replace
path_to_bootfile,source_folder, andoutput_iso_pathwith your respective paths.
Tips for ISO Creation
- Verify the ISO File: After creation, test the ISO by mounting it or using virtualization software like VirtualBox or VMware.
- Store Securely: Save your ISO files in a reliable location or cloud storage for easy access.
- Use for Deployment: ISO files can be used with tools like Rufus to create bootable USB drives.
Conclusion
Creating a Windows ISO file is an essential skill for IT administrators, MSPs, and tech enthusiasts. Whether you’re preparing installation media or safeguarding a backup, this guide provides you with multiple methods to create a reliable ISO file. Always ensure you use trusted tools and verify your ISO before deployment.
ISO files offer users many advantages regarding backups, system restore, and portability. Windows OS prides itself on built-in support for creating ISO files. Users can mount the ISO image to upgrade Windows, install apps, access media, and more. Similarly, you can convert files and folders to ISO format to backup files. EaseUS will show how to create ISO file from folder. Hurry up and learn!
Create Bootable Rescue Media via Bootable Media Creator
Any backup media, be it an ISO file or a system image, is essential to prevent computers from accidents and boot failures. Even if you have backup files, drive failures can put your data at risk. To avoid such cases, the best way is to create a bootable disk of Windows and data in advance.
The rescue media separates the backup OS and data from the PC and keeps it safe against all odds. EaseUS Todo Backup helps create rescue media with a USB drive or a CD/DVD with just a few clicks. Todo Backup can make a Windows image of a drive and put ISO on USB drives.
EaseUS Todo Backup provides features like cloning, incremental and differential backup, encrypted backup, scheduled backup, and more. To ensure adequate data security, you can store encrypted backup files on the EaseUS cloud. It also allows you to transfer your Windows to another computer without trouble. Here is how to use EaseUS backup software to create a rescue media.
Step 1. Prepare a USB drive which can be written and read.
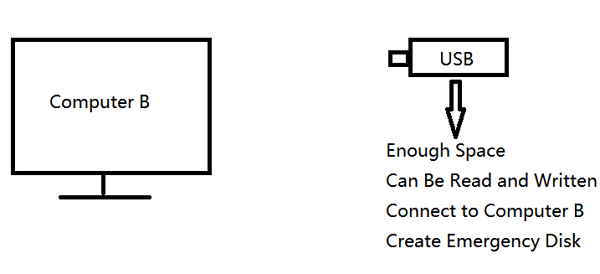
Step 2. Launch and install EaseUS Todo Backup on the Computer B.
Step 3. Find and click «Tools» and choose «Create Emergency Disk«.

Step 4. Choose the Boot disk location. You can create an ISO file, a bootable USB or CD/DVD disc.

Step 5. Then click «Create» to start.
There are plenty of third-party tools for creating ISO image files from folders. Although some offer free services, they have limitations, and premium software is expensive. How do we create ISO files from folders?
Method 1. Create ISO Image from Folder Using DISM Command
Deployment Image Servicing and Management (DISM) is a command tool that creates and manages Windows images and virtual hard drives. It allows you to create an ISO image from a USB drive easily. Follow the steps to create ISO files with the DISM Build Image command.
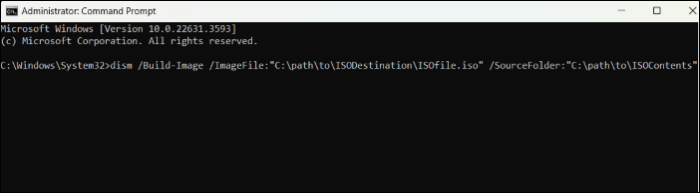
Step 1. Open Command Prompt as administrator.
Step 2. Use the command below to create an ISO file from a folder:
- dism /Build-Image /ImageFile:»C:\path\to\output\file.iso» /SourceFolder:»C:\path\to\folder»
Replace the ImageFile path with the desired location and name of the ISO file you want.
Replace the SourceFolder path with the folder containing the files you want to make the ISO compilation.
For example, if you want to store the iso file in the «ISODestination» folder as ISOfile.iso and the ISO content is present at «ISOContents,» the command will look like this:
- dism /Build-Image /ImageFile:»C:\path\to\ISODestination\ISOfile.iso» /SourceFolder:»C:\path\to\ISOContents»
Step 3. Execute the command and wait for the OS to create an ISO file. Find the ISO file in the output path.
Share this article on your social media to help more people create an ISO image from a folder easily.
Method 2. Create ISO Image from Folder Using ADK
Windows offers a Windows Assessment and Deployment Kit (ADK) for creating ISO files. Let’s see how to use ADK to create ISO files and consider some reliable third-party tools. The ADK contains tools to customize Windows images for large-scale organizational deployment. One feature is OSCDIMG, a command-line tool for making ISO images from folders using CMD.
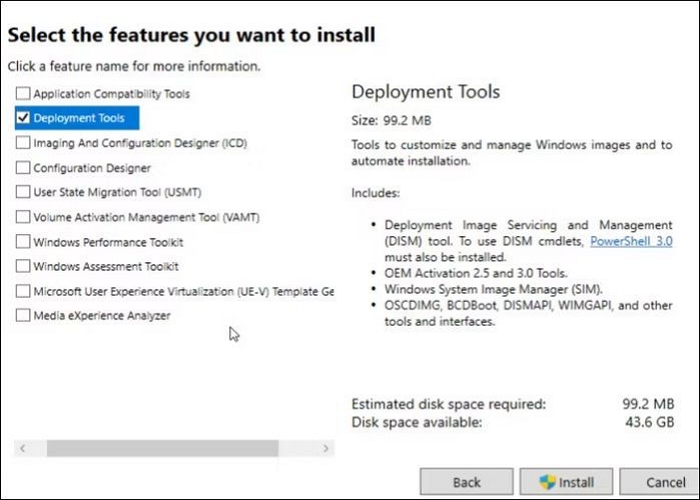
Step 1. Download and install Windows Assessment and Deployment Kit (ADK) on your PC. While selecting the features you want to install, check the Deployment tools option before clicking Install.
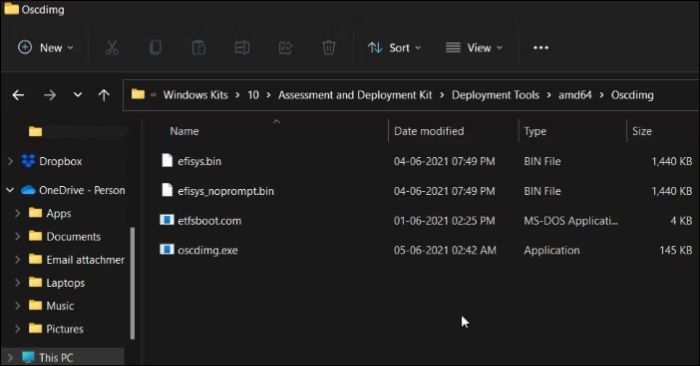
Step 2. Once you install the Windows ADK, you must find the OSCDIMG tool to start creating ISO files of folders.
Note: Keep all the contents you want to create an ISO image within a single folder.
Step 3. Click on the Windows key, type CMD, and open it with administrator privileges.
Step 4. By default, the OSCDIMG tool is located below.
- C:\Program Files (x86)\Windows Kits\10\Assessment and Deployment Kit\Deployment Tools\amd64\OSCDIMG
If you go to the location above, you can find a folder with a different version number than ten, depending on the ADK version.
Step 5. Once you confirm the OSCDIMG tool location, use the command below to change the directory to the folder with OSCDIMG tool files.
- cd /d path
Replace the path with the location given in step 4. The full command with the path will look like:
- Cd /d C:\Program Files (x86)\Windows Kits\10\Assessment and Deployment Kit\Deployment Tools\amd64\OSCDIMG
Step 6. Once you select the directory, the command below will help you create an IOS image file from a folder.
- OSCDIMG -n -d -m PathToSource Destinationfile.ISO
Replace the SrouceLocation with the folder location you want to convert to an ISO file and the destination file with the location where you want to save the file.
If the folder location is D:\CovertToISOFolder and you want to save the file as D:\SaveISOFile.iso, the command will look like this:
- OSCDIMG -n -d -m D:\CovertToISOFolde D:\SaveISOFile.iso
Step 7. After you execute the command, the ISO image process will start. Once the creation is completed, a 100% complete message with the final image file size is displayed on CMD.
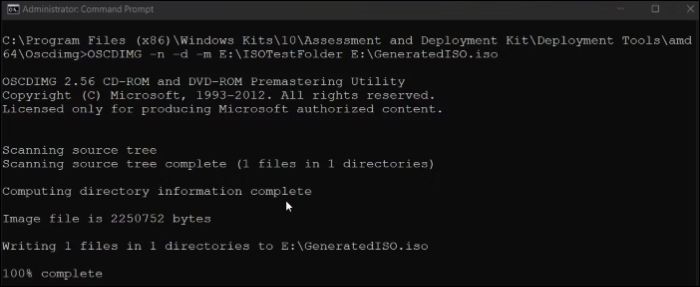
Find the ISO file of the folder at the selected location. Now, you can mount it on a PC or burn it to a disc.
Method 3. Create an ISO Image from Folder with PowerISO
As the name suggests, PowerISO is known for creating ISO files and folders for Windows OS. The guide below details creating an ISO file from a folder.
Step 1. Download and install PowerISO from the official website.
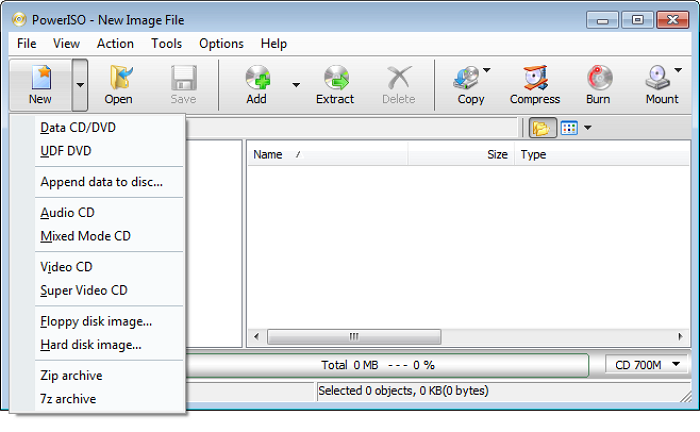
Step 2. By default, an empty compilation of ISO9660 and the Joliet file system will exist. To create a new DVD ISO file, click on the «New» button or choose «File > New > Data CD / DVD Image.» To change the media type, click on the media type area at the bottom and change it.
Step 3. Add the files or folder you want to compile, and make the necessary modifications. Click the Add button to add files and folders. Drag and drop option is also available.
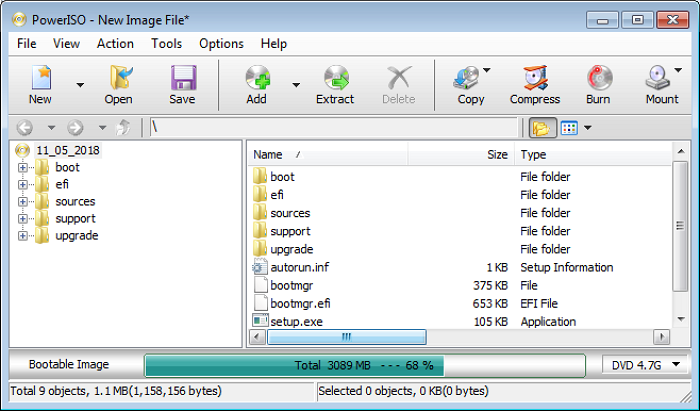
Step 4. PowerISO provides multiple options for creating ISO images:
- Click «Action > New Folder» to create a new folder.
- Click «Action > Change Label» to change the default label.
- Click «Action > Boot > Add boot information..» to add the boot information file to the compilation. This will create a bootable ISO file.
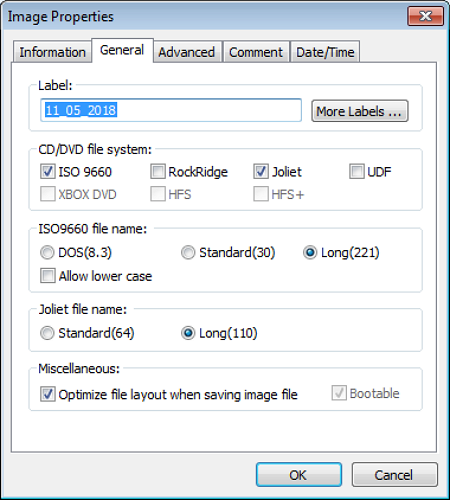
- Click «File > Properties» to change/update the ISO file properties.
Step 5. Once you add the files and make the necessary modifications, click Save in the toolbar to save the compilation.
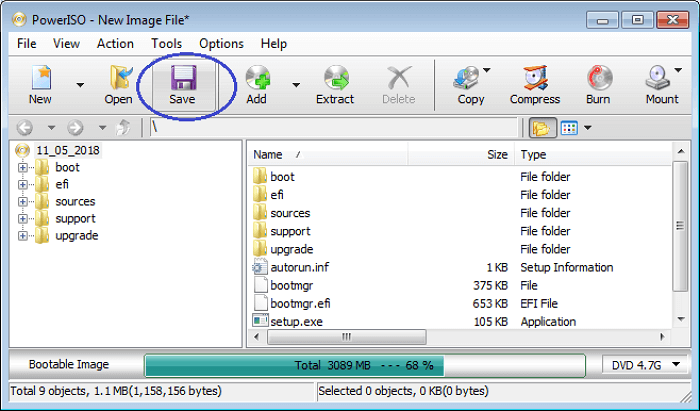
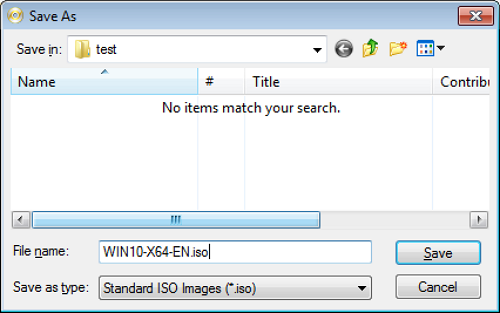
Step 6. Enter the iso file path name, and save it as a type «Standard ISO Images (*.iso)» in the Save As dialog box. Click Save.
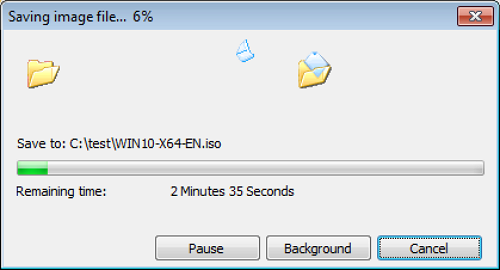
Step 7. You can see the progress information as soon as PowerISO starts creating the ISO. Once PowerISO completes writing ISO files, it automatically opens the newly created file.
Method 4. Create an ISO Image from Folder via ImgBurn
ImgBurn is another powerful software for creating ISO files from folders. The steps below help you convert a file or folder into an ISO image using ImgBurn.
Step 1. Navigate to the ImgBurn download page and use any mirror download link.
Step 2. After downloading, install the ImgBurn software and launch it.
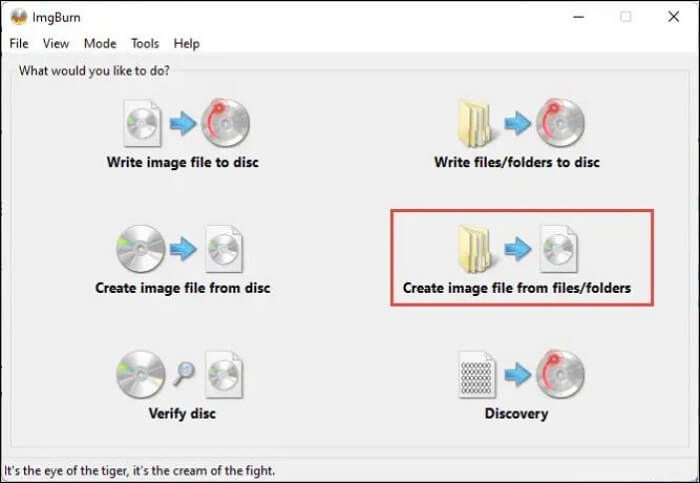
Step 3. Select Create image file from files/folders from the landing page.
Step 4. Click on Browse for a file or a folder button to add folders to ISO.
Step 5. From the browsing window, select the Source and Destination path to save the ISO image of a folder/file.
Step 6. Click on the Build button, and confirm the popup with a Yes.
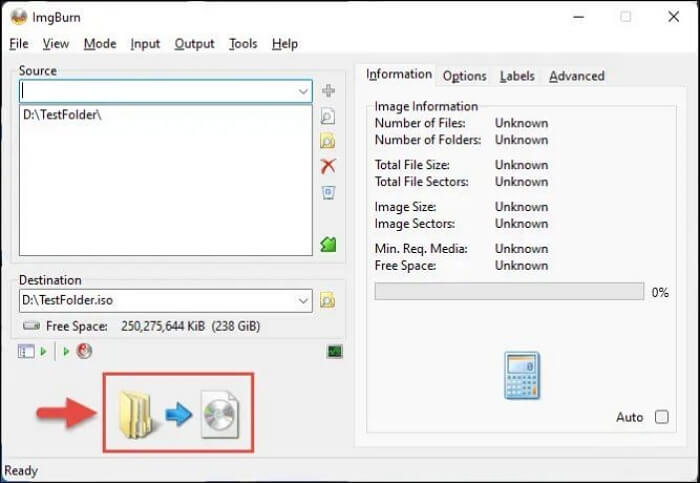
The tool asks for details of the volume labels and will assign one itself, so click Yes again.
Why Do You Need to Create ISO from a Folder
ISO image is just like a picture puzzle. It contains all the elements of a picture (ISO image) we can use to remodel the original photo. An ISO file groups multiple files of a folder into a compressed image, allowing you to share it over any network. The recipient can mount the ISO image with the Windows mount and burn option to retrieve its content.
ISO images are famous for restoring Windows systems, especially when a user wants to retrace back to a previous point. The advanced functions of an ISO image include a user’s ability to extract the ISO image, add modifications to it, and recreate the image. It’s like modifying an already existing ISO image and repackaging it. So, an ISO image is a backup, restore point, and more.
Share this article on your social media to help more people create an ISO image from a folder easily.
To Wrap Things Up
ISO files boast many advantages compared to other forms of backup. As ISO files are compressed versions of all the files, they will occupy less storage. Windows native can only make ISO files on the OS, so if you want to create ISO file from folder, third-party apps greatly help. The post introduces Windows DISM, ADK, PowerISO, and ImgBurn to convert files/folders to ISO images.
Creating bootable media is a great way to back up files, folders, or the OS. Rescue media protects data against threats and provides options to boot the PC or access content directly. With EaseUS Todo Backup, creating bootable rescue media and safeguarding your data takes a few clicks.
FAQs on Creating ISO Files from Folder
Here are some of the most frequently asked questions about creating ISO file from folder.
1. How do I create an ISO file from a drive?
For Windows users, Microsoft offers a Media Creation tool for creating an ISO file from a drive. Download the tool, select Installation Media, and create an ISO file from the drive.
2. How to create an ISO file for free?
Microsoft’s Media Creation tool is the best tool for creating an ISO file for a Windows drive. Freemium options like PowerISO, ImgBurn, ISO Workshop, and ISO Disk are great for making other ISO files.
3. How to make ISO file from folder without software?
You must use third-party tools to make an ISO file of a folder. For native Windows users, Microsoft contains Assessment and Deployment Kit (ADK) software and the DISM command to cover folders to ISO files.
An ISO image file is basically a virtual disk that stores data the same way as a physical disk would. You can even mount it on your Windows computer to access the data inside it like a physical drive. However, it is commonly used as a source file for burning some data to a CD or DVD.
Another popular use of ISO files is for installing applications and even Windows OS through it. So, whatever reason you want to create an ISO file for, there are several methods you can use.
You can natively create an ISO file using the Windows ADK tool, or you can try out one of the many third-party applications that provide this feature.
Using Windows Assessment and Deployment Kit
The only native way you can create an ISO image on Windows is by using the Windows Assessment and Deployment Kit (ADK). The Windows ADK is a set of tools provided by Microsoft to customize and deploy the Windows operating system to other computers.
Windows ADK contains a wide variety of tools, but we’ll be looking at the Deployment Tools feature. This feature has the Oscdimg tool which we’ll use to create an ISO image file.
If you want to use the Windows ADK for the single purpose of creating an ISO file, you can choose to only install the Deployment Tools feature. So, let’s first download and install the Windows ADK.
- Press Windows + R to open the Run utility.
- Type
winverand press Enter. - Note down your Windows 10 or 11 version.

- Open a browser of your choice.
- Go to the Download and Install Windows ADK page.
- Make sure to download the Windows ADK for the specific version of your Windows. (If you use Windows 10, scroll down to the Other ADK downloads section.)
- After the download is complete, run the setup file.
- Click on Next to install Windows ADK on the default location. (If you want to install Windows ADK on a separate location, click on the Browse option and choose your location.)

- Choose an option to let Microsoft collect insights for Windows kits or not, and hit Next.

- Accept the License Agreement.

- Make sure to select Deployment Tools and deselect all the other options. (If you want to install other Windows ADK features, you can select them as well.)

- Click on Install, and select Yes on the popup.
- After the installation completes, click on Close.


Now that you have installed the Windows ADK Deployment tools let’s see how you can use them to create an ISO image file.
- Make sure all the files you want to put into an ISO file are contained in a single folder.
- Open File Explorer and navigate to
C:\Program Files (x86)\Windows Kits. (If you’ve installed Windows ADK in a different location, go through there instead.)
- Double-click on the numbered folder inside Windows Kits. (The numbered folder will differ depending on your Windows ADK version.)
- Go to Assessment and Deployment Kit > Deployment Tools > amd64.
- Right-click on the Oscdimg folder and select Copy as path.

- Now, press Windows + R to open the Run dialog box.
- Type
cmdand press Ctrl + Shift + Enter to open Command Prompt with admin access. - Now, you need to change your current directory to the OSCDIMG tool location. Type the command
cd /dand right-click on the Command prompt to enter the recently copied file path.
- Press Enter to change the current directory to the OSCDIMG tool location.
- Now, enter the command
OSCDIMG -n -d -m "Source File Location" "ISO File Location with Name.iso" - Replace “Source File Location” with the actual file path of the folder you want to convert to an ISO image. If you don’t know how to get the file path of the folder, you can use the same method as above to do so.
- Replace “ISO File Location with Name.iso” with the location where you want the iso file to be with its name.
- For example,
OSCDIMG -n -d -m "C:\Users\Username\Documents\Project 1" “D:\ISO File.iso”will create an ISO file of the contents inside the Project 1 Folder and save it in E drive as ISO File.iso.
- Your ISO file has been successfully created.


Using Third-Party Applications
Another way you can create ISO files in Windows is by using third-party applications that provide this feature. There are a ton of third-party apps like ISO Workshop, Ultimate ISO Maker, and PowerISO Maker that you can use to create ISO files.
These third-party apps are very useful if you value convenience, as you can create ISO files with a simple click of a button. However, when using free apps that provide this feature, you can face roadblocks like ISO file size limitations.
You are here:
Home » Windows 10 » How To Create Bootable Windows 10/8.1/7 ISO From Files/Folders
Update: This method works perfectly with the newly released Windows 10 as well. That is, you can use this method to create bootable Windows 10 ISO from files and folders.
A couple of weeks ago, I downloaded Windows 7 SP1 Ultimate 64-bit ISO on my Windows 8.1 PC from Microsoft (using my MSDN subscription) and installed Windows 7 in dual-boot with Windows 8.1 using my USB flash drive as bootable media. The installation was uneventful and Windows 7 has been running as it should.
Two days back, I decided to free up some disk space on my Windows 8.1 drive and manually deleted all contents in the Downloads folder and also uninstalled tens of programs that I had installed over the last three months. After gaining GBs of disk space, I realized that the previously downloaded Windows 7 SP1 ISO, which was present in the Downloads folder, has also been deleted along with other files.
Even though I could easily download Windows 7 SP1 ISO pack again in a couple of minutes, I decided to create an ISO file from the bootable Windows 7 USB drive that I had prepared to install Windows 7. Preparing a bootable Windows ISO from installation files/folders is relatively easy and doesn’t take much time either. In short, if have Windows installation files and want to create an ISO image file out of it, you can do so in a few minutes.
Make bootable Windows ISO from installation files
NOTE: This method is applicable to Windows 10, 8.1 and 7 versions.
In this guide, I will show you how you can create a bootable Windows 7/8.1/10 ISO image file from Windows installation files.
Step 1: If all the installation files are in a folder on your PC, you can skip to the next step. And if the files and folders on a USB drive, connect the USB flash drive containing Windows installation files to a PC running Windows 7/8/10 and copy all the contents from the USB to a newly created folder on desktop or any other location.

Step 2: Visit this page and download ImgBurn software. ImgBurn is a free burning application but the setup offers you install Skype and Mobogenie during the installation. Make sure to select appropriate options to install the software without Skype and Mobogenie.

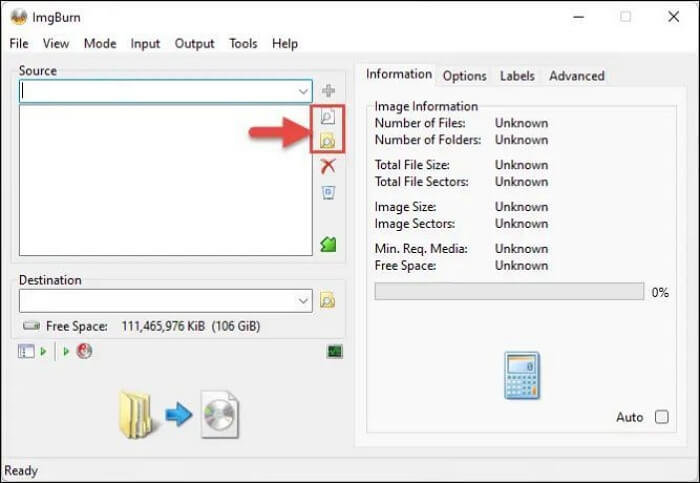
Step 3: Launch ImgBurn. Click on Create image file from files/folders option.

Step 4: In the resulting ImgBurn dialog, click on the small folder icon (see picture) next to the Source box to browse to the folder containing all copied files from the bootable Windows USB. Browse to the folder and then click Select folder.

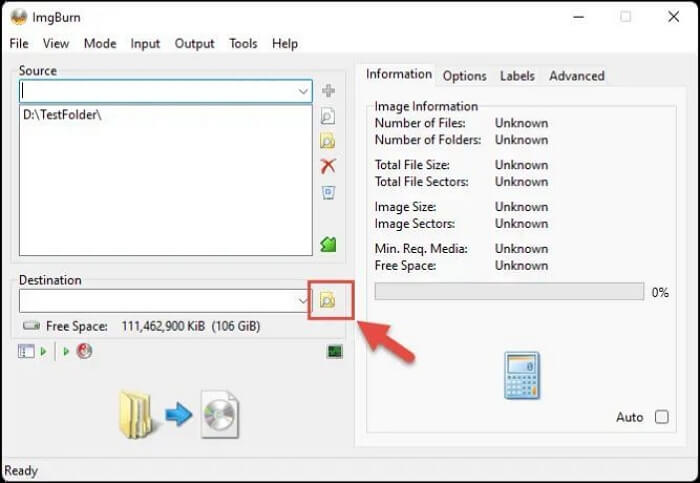
Step 5: Next, click on the browse icon located next to the Destination box to select a location to save the bootable ISO image file that you’re preparing now. Select a location and click Save button.

Step 6: On the right side, switch to the Advanced tab (see picture) to see four tabs. Here, click on the tab labeled Bootable Disc.
Step 7: Now, select the option labeled Make Image Bootable, select Emulation type as None (custom), and type 8 in the Sectors to load box by removing the existing 4. Note that if you’re preparing a bootable Vista ISO, you need to keep the 4. For Windows 7, Windows 8 and Windows 10, you need to type 8 in the Sectors to load field.

Step 8: Click on the small folder icon next to Boot Image box (see picture) and then browse to the folder containing Windows installation files (the folder that contains files copied from the USB), open Boot folder, select etfsboot.com file, and then click Open button to select etfsboot.com as the boot image file. We are almost done!

Step 9: Finally, click on the Build button (see picture) to begin creating your bootable Windows ISO image file. Upon clicking the Build button, three dialog boxes will appear one after another. Simply click the Yes button when you see the first dialog, click the OK button when you see the second, and then, click the Yes button again when you see the last dialog.


Once the bootable ISO image is ready, you’ll see “Operation successfully completed” message.
That’s it! You can now use the ISO file anywhere to install Windows. How to test an ISO file to check if it’s really bootable guide might also interest you.