
Applies ToWindows 11 Windows 10
Установочный носитель, например USB-устройство флэш-памяти, можно использовать для установки новой копии Windows, выполнения чистой установки Windows или переустановки Windows.
Чтобы создать установочный носитель, перейдите на веб-сайт загрузки программного обеспечения, где можно найти пошаговые инструкции. На этом веб-сайте можно выбрать версию Windows и создать установочный носитель на USB-накопителе. Кроме того, можно создать ISO-файл для использования на виртуальных машинах или записи установочного носителя на DVD-диске:
-
Перейдите на сайт скачать Windows 11.
-
В разделе Создание установочного носителя Windows 11 выберите Скачать. Скачан инструментMediaCreationTool.exe .
-
Запустите MediaCreationTool.exe. Средство создания носителя содержит инструкции по созданию установочного носителя.
Важно: Создайте резервную копию файлов перед установкой и переустановкой Windows на компьютере. Узнайте, как это сделать.
Для создания установочного носителя требуются следующие элементы:
-
Компьютер с надежным подключением к Интернету. Время загрузки зависит от подключения к Интернету.
-
USB-устройство флэш-памяти. Пустое USB-устройство флэш-памяти не менее 8 ГБ. Рекомендуется использовать пустое USB-устройство флэш-памяти, так как все содержимое на диске удаляется. Для виртуальных машин USB-устройство флэш-памяти не требуется. Вместо этого можно создать ISO-файл для использования на виртуальных машинах. Iso-файл также можно использовать для создания установочного носителя на DVD-диске.
-
Ключ продукта. Может потребоваться 25-значный ключ продукта (не требуется для цифровых лицензий). Сведения о поиске ключа продукта см. в статье Поиск ключа продукта Windows. Многие современные устройства содержат ключ продукта, встроенный в встроенное ПО устройства. Если ключ продукта внедрен в встроенное ПО устройства, его не нужно вводить вручную. Вместо этого, если ключ продукта в встроенном ПО соответствует устанавливаемой версии и выпуску Windows, ключ продукта применяется автоматически.
После создания установочного носителя Windows можно сбросить или переустановить. Дополнительные сведения см. в статье Параметры восстановления в Windows.
Нужна дополнительная помощь?
Нужны дополнительные параметры?
Изучите преимущества подписки, просмотрите учебные курсы, узнайте, как защитить свое устройство и т. д.
В инструкции ниже подробно о том, как создать загрузочную флешку Windows 10 различными способами — с помощью официальных средств, предоставляемых Майкрософт или сторонних программ.
Приведены методы записи установочного USB-накопителя с оригинальной Windows 10 Pro и Home x64 (64-бит) и x86 (32-бит) в фирменной утилите Microsoft Installation Media Creation Tool и дополнительные способы и бесплатные программы, которые помогут вам в записи установочного USB накопителя из ISO образа с Windows 10 для установки ОС в системах UEFI и Legacy, на GPT и MBR диск или, если это необходимо — для восстановления системы.
Media Creation Tool
Сразу после выхода финальной версии новой ОС, на сайте Microsoft появилась официальная утилита Windows 10 Installation Media Creation Tool (сегодня Microsoft Media Creation Tool), позволяющая создать загрузочную флешку для последующей установки системы, автоматически загружающая на накопитель последнюю выпущенную финальную версию Windows 10 и создающая USB-накопитель для загрузки как в UEFI так и в Legacy режиме, подходящий для GPT и MBR дисков HDD и SSD.
С помощью данной программы вы получаете оригинальную Windows 10 Pro (Профессиональная, в том числе для рабочих станций), Home (Домашняя), Home для одного языка с сайта Майкрософт. И в полной мере такая флешка подойдет в том случае, если у вас есть ключ Windows 10, цифровая лицензия, либо на компьютере или ноутбуке уже была установлена лицензионная Windows 10 или 8.1 при покупке, а теперь хотите выполнить чистую установку. В последних двух случаях при установке пропустите ввод ключа, нажав «У меня нет ключа продукта», система активируется автоматически при подключении к Интернету. Вы можете установить Windows 10 с такого USB накопителя и без выполнения этих условий и работать без активации (и без особых ограничений), либо активировать её ключом от предыдущей версии системы.
Шаги по созданию загрузочной флешки Windows 10 официальным способом будут выглядеть следующим образом, сам накопитель желательно подключить сразу, размер — не менее 8 Гб, данные с нее в процессе будут удалены:
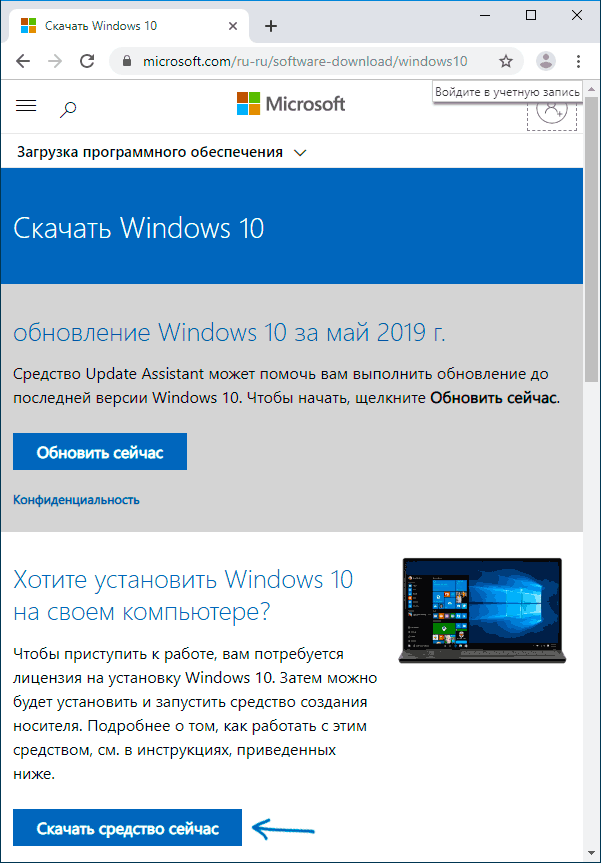
- Скачать утилиту для создания загрузочной флешки Windows 10 Microsoft Installation Media Creation Tool можно с официального сайта https://www.microsoft.com/ru-ru/software-download/windows10, нажав кнопку «Скачать средство сейчас». Если загрузка окажется недоступной, можно использовать альтернативные методы.

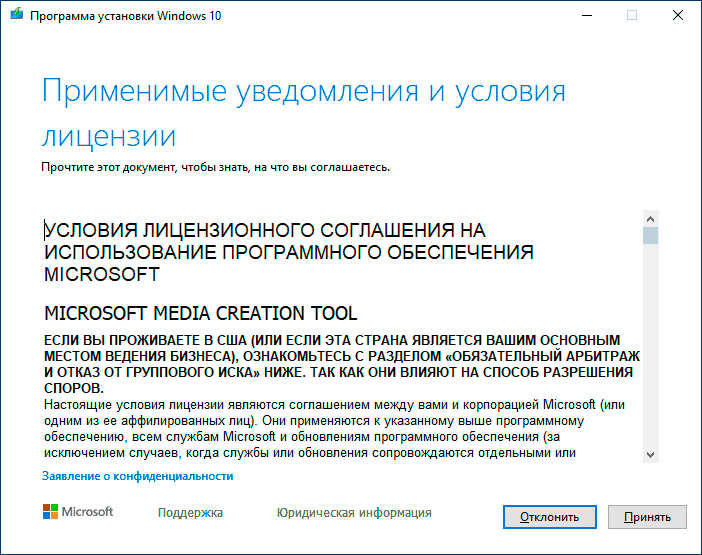
- Запустите загруженную утилиту и примите условия лицензионного соглашения.

- Выберите пункт «Создать установочный носитель USB-устройство флэш памяти» и нажмите «Далее».
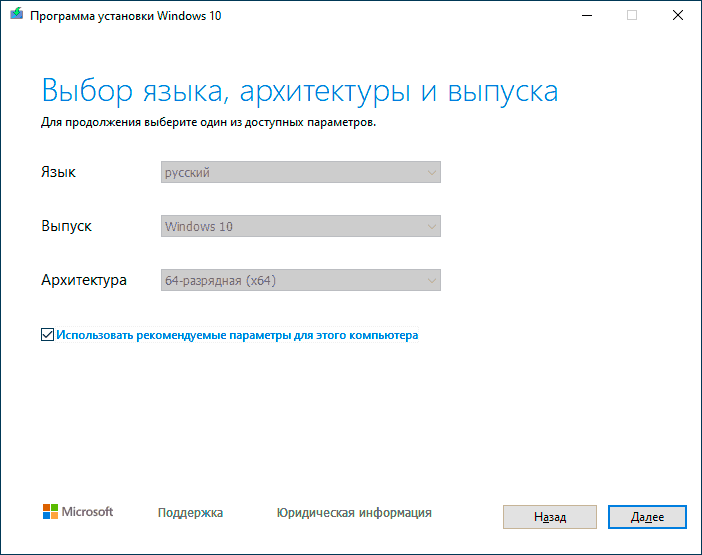
- Через некоторое время появится окно выбора архитектуры, языка системы и её выпуска. По умолчанию установлены рекомендуемые параметры, в соответствии с характеристиками текущей системы, но сняв отметку, вы можете выбрать другой язык или разрядность — 64-бит или 32-бит. Учитывайте, что в одном образе содержатся сразу все редакции Windows 10: в поле выпуск ничего поменять нельзя, выбор профессиональной или домашней версии ОС происходит во время установки.
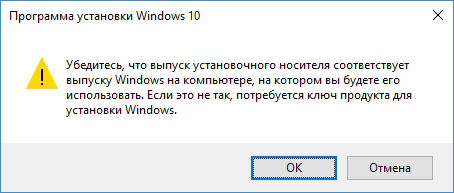
- В случае, если вы сняли отметку «Использовать рекомендуемые параметры для этого компьютера» и выбрали иную разрядность или язык, вы увидите предупреждение: «Убедитесь, что выпуск установочного носителя соответствует выпуску Windows на компьютере, на котором вы будете его использовать». Учитывая, что на данным момент времени в образе содержатся сразу все выпуски Windows 10, обычно на это предупреждение не следует обращать внимания.

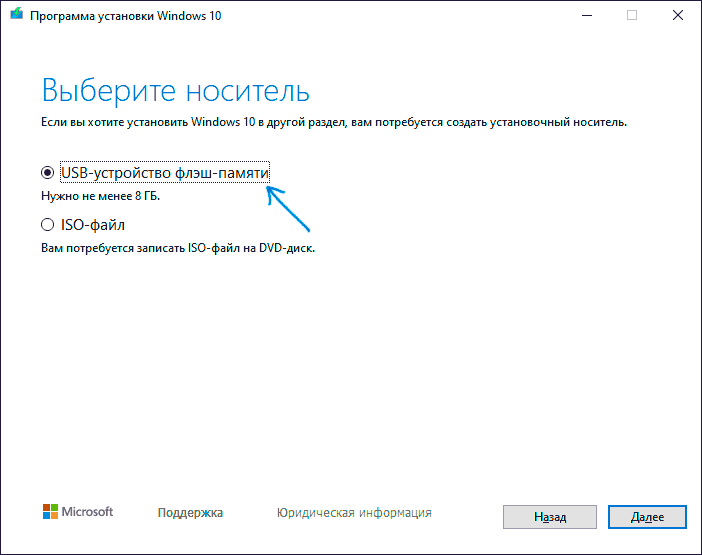
- Выберите пункт «USB-устройство флэш-памяти», если требуется, чтобы программа сама записала загрузочную установочную флешку, либо, при желании, вы можете выбрать пункт «ISO-файл», чтобы скачать оригинальный образ Windows 10 и записать его на USB или DVD самостоятельно.
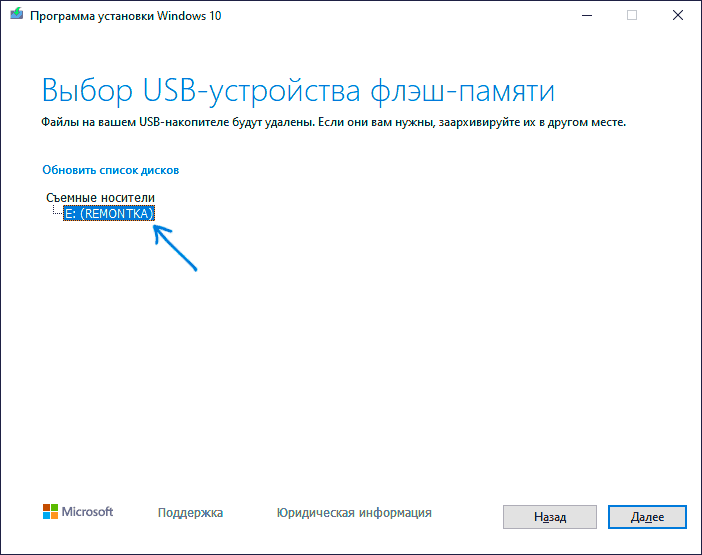
- Выберите накопитель, который будет использоваться из списка. Важно: все данные с флешки или внешнего жесткого диска (со всех его разделов) будут удалены. При этом, если вы создаете установочный накопитель на внешнем жестком диске или на USB накопителе размером более 32 Гб, вам пригодятся сведения в разделе «Дополнительная информация» в конце этой инструкции.
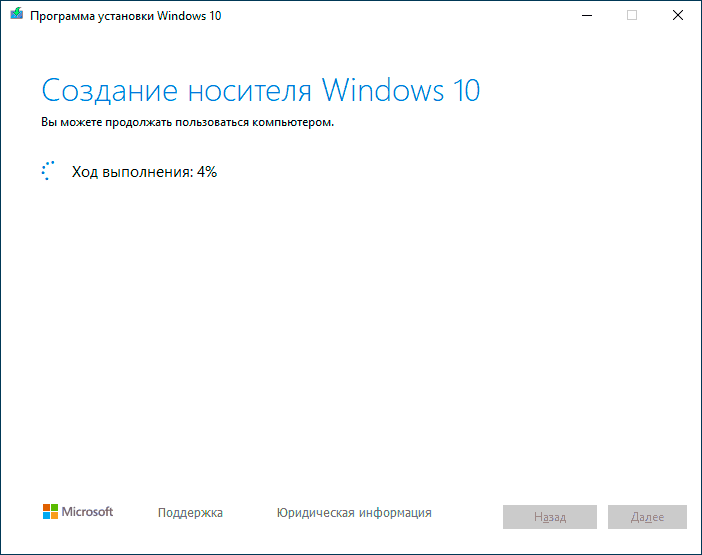
- Начнется скачивание файлов установки Windows 10, а затем — их запись на флешку: Создание установочного накопителя. Эти этапы могут занять продолжительное время.
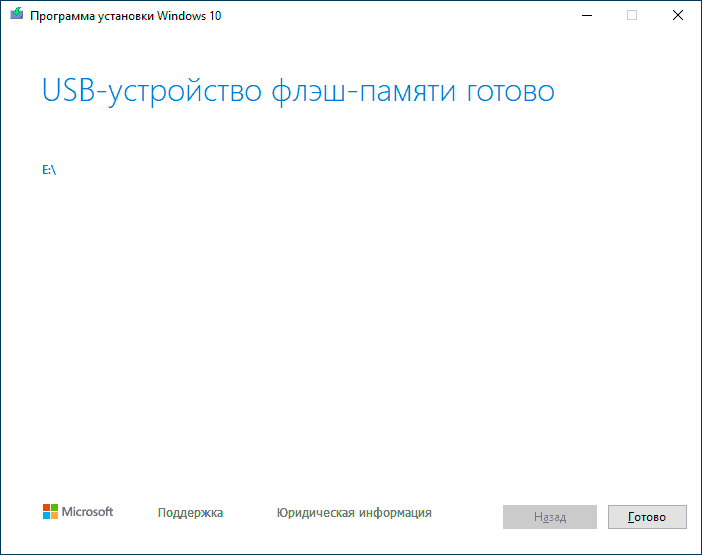
- По завершении вы получите сообщение «USB-устройство флэш-памяти готово», можно закрыть утилиту и использовать созданный накопитель.

По окончании у вас будет готовый накопитель с оригинальной Windows 10 последней версии, который пригодится не только для чистой установки системы на системах UEFI и Legacy (CSM), но и для ее восстановления в случае сбоев.
Использование Rufus для записи установочного USB
Если ваш компьютер или ноутбук не имеет UEFI (то есть у вас обычный БИОС) или по какой-то иной причине предыдущий способ не подошел, Rufus — отличная программа (и на русском языке), чтобы быстро сделать загрузочную USB флешку для установки Windows 10 для самых разных систем.
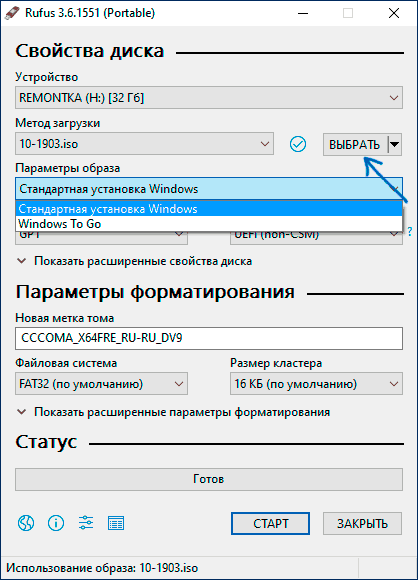
В программе достаточно указать USB накопитель, на который будет произведена запись, нажать кнопку «Выбрать», чтобы указать путь к образу ISO с Windows 10 (также вы можете скачать Windows 10 прямо в Rufus, однако в РФ функция может не работать), а в поле «Параметры образа» указать «Стандартная установка Windows».
Также следует обратить внимание на выбор пунктов в «Схема раздела» и «Целевая система». В общем случае, при выборе следует исходить из следующего:
- Для компьютеров с обычным БИОС или для установки Windows 10 на компьютере с UEFI на диск MBR выбираем «MBR» в качестве схемы разделов и «BIOS или UEFI-CSM» в целевой системе.
- Для компьютеров с UEFI для установки на GPT диск выбираем соответствующие параметры.
После этого достаточно нажать «Старт» и дождаться завершения копирования файлов на флешку. Более подробно о доступных настройках в программе, видео инструкция и официальный сайт утилиты — Загрузочная флешка Windows 10 в Rufus.
Ventoy
Бесплатная утилита Ventoy для создания загрузочных и мультизагрузочных накопителей быстро набрала популярность за счет удобства использования, совместимости и функциональности. Подойдет она и для создания установочного накопителя Windows 10 — для UEFI и Legacy загрузки, в том числе с поддержкой Secure Boot.
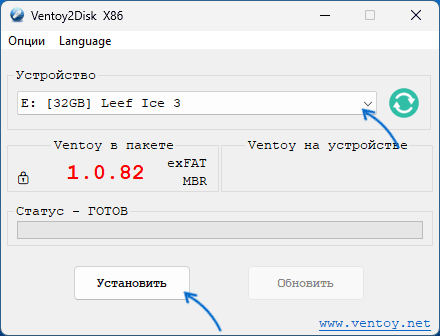
В общих чертах порядок использования программы состоит из следующих шагов:
- Установка Ventoy на накопитель: он форматируется и делится на два раздела — один с загрузчиком, другой — для файлов ISO образов.
- Простое копирование образа ISO с Windows 10 или другой операционной системой на соответствующий раздел.
Подробно об использовании Ventoy, настройках и дополнительных возможностях инструмента в инструкции про использование Ventoy.
Создание загрузочной флешки Windows 10 без программ
Вы можете сделать загрузочную флешку Windows 10 вообще без программ: это требует, чтобы ваша материнская плата (на том компьютере, где будет использоваться загрузочная флешка) была с ПО UEFI (большинство материнских плат последних лет), т.е. поддерживала EFI-загрузку, а установка проводилась на диск HDD или SSD с таблицей разделов GPT (или было не критичным удаление всех разделов с него). Внимание: этот способ не сработает, если внутри файла образа есть файлы размером более 4 Гб. Подходящий образ ISO может быть создан с помощью Media Creation Tool.
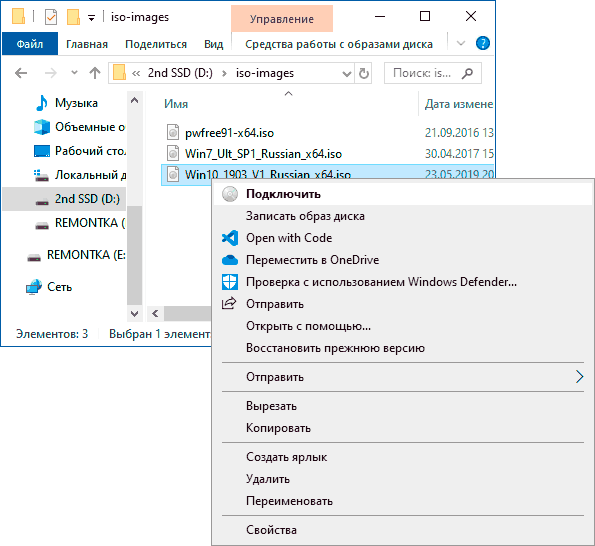
Вам потребуется: образ ISO с системой и USB накопитель подходящего объема, отформатированный в FAT32 (обязательный пункт для данного способа). Причем если он уже в нужной файловой системе, имеющиеся данные с него удалять не обязательно. Сами же действия по созданию загрузочной флешки Windows 10 состоят из следующих шагов:
- Смонтируйте образ Windows 10 в системе, в последних версиях ОС это можно сделать, нажав по файлу образа правой кнопкой мыши и выбрав пункт «Подключить».

- Скопируйте все содержимое, все файлы и папки, из смонтированного образа на USB накопитель.

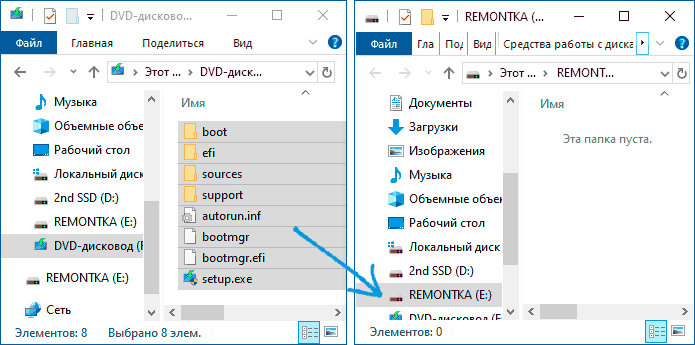
Готово. Теперь, при условии, что на компьютере выставлен режим загрузки UEFI, вы можете легко загрузиться и установить Windows 10 с изготовленного накопителя. Для того, чтобы выбрать загрузку с флешки, лучше всего воспользоваться Boot Menu материнской платы.
UltraISO
Программа UltraISO, служащая для создания, изменения и записи ISO образов, очень популярна у пользователей и, в том числе, может быть использована для того, чтобы сделать загрузочную флешку.
Процесс создания состоит из следующих шагов:
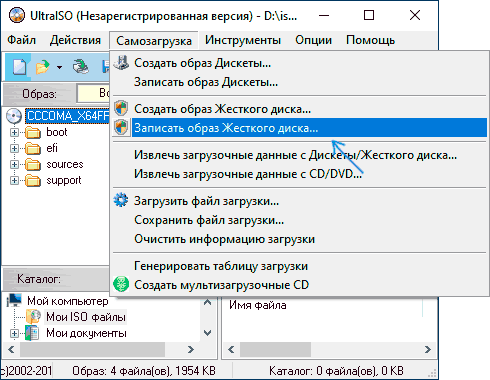
- Открыть образ ISO Windows 10 в UltraISO через меню Файл — Открыть.
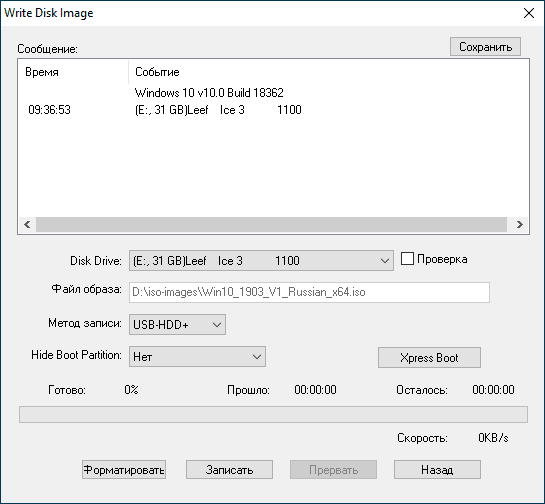
- В пункте меню «Самозагрузка» выбрать пункт «Записать образ жесткого диска».

- С помощью мастера записать установочный образ на USB накопитель, какие-либо параметры обычно менять не требуется.

Более подробно процесс описан у меня в руководстве Создание загрузочной флешки в UltraISO.
Windows 7 USB/DVD Download Tool
Официальная бесплатная утилита Microsoft, изначально созданная для записи образа Windows 7 на DVD-диск или USB накопитель не потеряла актуальности и с выходом новых версий ОС — ее все так же можно использовать, если вам нужен дистрибутив для установки.
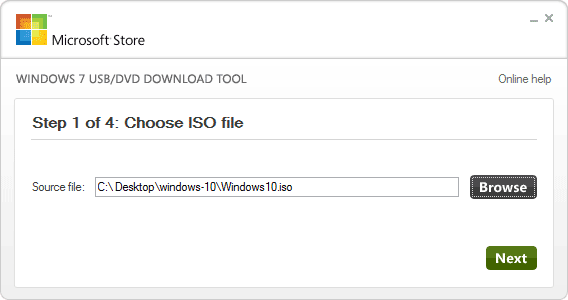
Процесс создания загрузочной флешки Windows 10 в данной программе состоит из 4-х шагов:
- Выберите образ ISO с Windows 10 на вашем компьютере и нажмите «Next» (Далее).

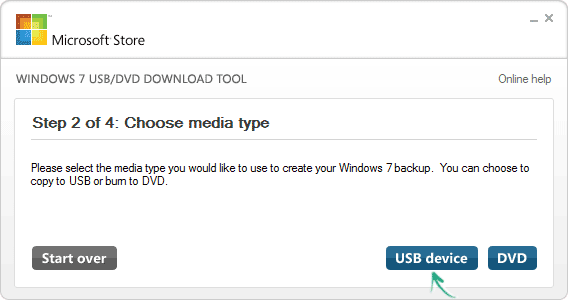
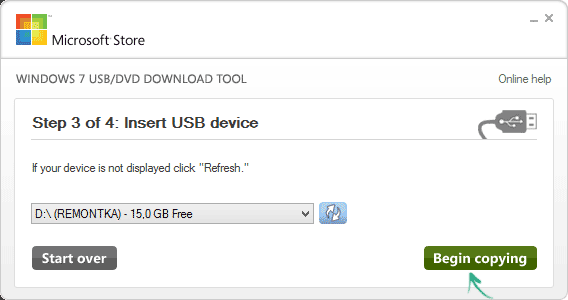
- Выберите: USB device — для загрузочной флешки или DVD — для создания диска.
- Выберите USB накопитель из списка. Нажмите кнопку «Begin copying» (появится предупреждение о том, что все данные с флешки будут удалены).
- Дождитесь окончания процесса копирования файлов.
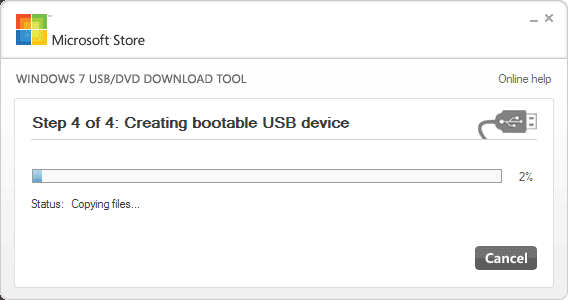
На этом создание установочного USB-диска завершено, можно начинать им пользоваться.
Скачать Windows 7 USB/DVD Download Tool на данный момент можно со страницы на официальном сайте — wudt.codeplex.com (обновление: сайт более недсотупен, но вы можете скачать оригинальный файл, с помощью подходов, описанных в этой инструкции).
WinSetupFromUSB для создания мультизагрузочной флешки
WinSetupFromUSB — одни из моих любимых программ для целей записи загрузочных и мультизагрузочных USB. Ее можно использовать и для Windows 10, причем с помощью программы вы можете создать одну флешку с разными образами Windows 10.

Процесс (в базовом варианте, без учета нюансов) будет состоять из выбора USB накопителя, установки отметки «Autoformat it with FBinst» (в случае если образ не добавляется к уже имеющимся на флешке), указания пути к ISO образу Windows 10 (в поле для Windows Vista, 7, 8, 10) и нажатия кнопки «Go». Для детальной информации: Инструкция и видео по использованию WinSetupFromUSB.
Некоторые дополнительные сведения, которые могут быть полезны в контексте создания загрузочной флешки Windows 10:
- Загрузиться с флешки проще всего, используя Boot Menu, а не изменяя параметры загрузки в БИОС или UEFI. Если в меню загрузки накопитель отображается 2 раза — с пометкой UEFI (или EFI) и без неё, для установки на GPT диск выбирайте с пометкой, для установки на MBR — без пометки.
- В последнее время получил несколько комментариев о том, что при использовании внешнего USB диска (HDD) для создания загрузочного накопителя, он приобретает файловую систему FAT32 и его объем меняется: в данной ситуации, после того, как файлы установки на диске больше не нужны, нажмите клавиши Win+R, введите diskmgmt.msc и в управлении дисками удалите все разделы с этого накопителя, после чего отформатируйте его с нужной вам файловой системой. Либо используйте инструкцию: Как удалить разделы на флешке.
- Установку с флешки можно произвести не только загрузившись с неё в БИОС, но и запустив файл setup.exe с накопителя: единственное условие в данном случае — разрядность устанавливаемой системы должна совпадать с устанавливаемой (а на компьютере должна быть установлена система не старше Windows 7). Если же вам нужно поменять 32-бит на 64-бит, то установку следует производить как описано в материале Установка Windows 10 с флешки.
- После работы официальной утилиты Майкрософт для создания установочного USB на диске могут остаться папки ESD и Windows.BT, их можно удалить.
По сути, для того, чтобы сделать установочную флешку Windows 10 подходят все способы, которые работают для Windows 8.1, в том числе через командную строку, многочисленные программы для создания загрузочной флешки. Так что, если вам не хватило описанных выше вариантов, вы можете смело использовать любой другой для предыдущей версии ОС.
В дальнейшем может пригодиться пошаговое описание процесса установки: Установка Windows 10 с флешки. Полезные в рассматриваемом контексте дополнительные материалы — Создание загрузочной флешки Windows 11, Создание загрузочной флешки Windows 10 на Mac, Загрузочная флешка Windows 10 в Linux, Запуск Windows 10 с флешки без установки
Creating a Windows 10 installation USB is a straightforward process that can be incredibly useful for reinstalling Windows or setting it up on a new computer. In this tutorial, we’ll walk you through the steps to make this USB drive, including some tips and a bonus method that allows you to use your USB drive for regular storage even after making it bootable.
Key Takeaways
- Use the Media Creation Tool: Download the Windows 10 Media Creation Tool from the official Microsoft website to get started.
- Rufus for More Control: Use Rufus to create a bootable USB drive and customize installation settings, like disabling data collection.
- Ventoy for Flexibility: Ventoy lets you store multiple ISO files on the same USB drive, allowing both regular and bootable usage.
Step 1: Download the Windows Installation Media Creation Tool
 2")
The first step to creating a Windows 10 installation USB is to download the Media Creation Tool from the Microsoft website. You can also find it by searching for “Download Windows 10” on Google.
- Once on the Microsoft page, scroll down to find the Media Creation Tool.
- Download the tool and run it on your computer.
Step 2: Create Installation Media
 3")
After running the Media Creation Tool:
- Accept the terms and select the option Create installation media for another PC.
- Choose your preferred language and make sure to select the correct architecture (32-bit or 64-bit) based on your computer’s specifications.
 4")
Step 3: Choose Media Type
 5")
Next, the tool will ask you to select the type of media to use. You have two options:
- Direct USB Installation: This installs Windows directly to the USB drive.
- Download ISO File: This option downloads an ISO file, which is recommended.
Why Choose ISO?
Downloading the ISO file gives you more flexibility. You can write the ISO to your USB drive using a third-party tool like Rufus, which provides additional options and control during the creation process.
Step 4: Use Rufus to Create the Bootable USB Drive
 6")
Now that you’ve downloaded the ISO file, it’s time to make your USB drive bootable using Rufus. Rufus is a free tool that helps write ISO files to USB drives efficiently.
- Download and install Rufus.
- Insert a USB drive into your PC and launch Rufus.
- Backup any important information from the USB drive, as it will be formatted during this process.
- In Rufus, select your USB drive at the top, click on Select, and navigate to the path where you stored the ISO file.
- Leave all the settings on default and click Start.
Benefits of Using Rufus
 7")
Rufus allows you to customize the setup by offering options such as:
- Create a Local Account: You can create a local account and set regional settings.
- Disable Data Collection: Skip privacy questions during the installation, saving time.
Step 5: Finalize and Verify
 8")
Once Rufus completes the process, you should see a drive named ESD-ISO with the Windows installation files. If you see this, congratulations! You’ve successfully created a Windows 10 installation USB.
Bonus Tip: Make Your USB Drive Usable for Both Booting and Storage
 9")
If you want to make your USB drive bootable and still be able to use it for regular storage, you can use a tool called Ventoy. Here’s how:
- Download and run Ventoy.
- Insert your USB drive and make sure it’s selected in Ventoy.
- Click Install, which will format the drive, so be sure to backup any important files.
- Once Ventoy is done, create a folder called ISO on your USB drive.
- Copy any bootable ISO files, including the Windows 10 ISO, into this folder.
Now, your USB drive will function as a bootable device and a regular storage device, giving you flexibility in how you use it.
Conclusion
Creating a Windows 10 installation USB is a handy skill, whether you’re reinstalling Windows or setting it up on a new machine. By following this guide, you’ll have a reliable bootable USB drive, with added options for flexibility using tools like Rufus and Ventoy. If you found this tutorial helpful, feel free to leave a comment below. For more free software tutorials, check out the video suggested at the end of this post.
FAQs
1. Can I use the same USB drive for both Windows 10 and 11?
Yes, by using Ventoy, you can store both Windows 10 and 11 ISO files on the same USB drive.
2. How much space do I need on my USB drive?
A minimum of 8 GB is recommended for the installation media, but more space may be needed if you’re storing multiple ISO files.
3. What if Rufus doesn’t recognize my USB drive?
Ensure your USB drive is properly inserted and try using a different USB port or restarting Rufus.
4. Can I still use the USB drive for regular file storage after making it bootable?
Yes, if you use Ventoy, you can store regular files alongside your bootable ISO files.
5. Do I need to format my USB drive before using it with Rufus?
Rufus will automatically format the drive during the creation process, so pre-formatting isn’t necessary.
Table of contents
- What Is the Windows 10 Media Creation Tool?
- Does the Windows 10 Media Creation Tool Still Work?
- How to Get the Windows 10 Media Creation Tool
- How to Use the Media Creation Tool in Windows 10
- How to Update your Windows PC with Media Creation Tool
- How to Create Windows 10 Installation Media
- Conclusion
- FAQ
Welcome to our comprehensive guide on how to get and use the Windows 10 Media Creation Tool ! If you’re ready to take control of your Windows 10 upgrades and installations, you’ve come to the right place. In this article, we will walk you through the process of obtaining the Media Creation Tool and show you how to make the most of its powerful features.
The Windows 10 Media Creation Tool is a simple utility that empowers you to upgrade your Windows. Originally designed for updating your current OS to the latest version, it has since become a go-to tool for manual Windows 10 updates too.
You can use the Windows 10 Media Creation Tool to:
- Upgrade your current operating system to the latest version of Windows 10.
- Perform a clean installation of Windows 10 on your computer.
- Create a bootable USB drive or DVD for installing Windows 10 on another computer.
- Download a Windows 10 ISO image and save it for future use.
- Reinstall Windows 10 on your system to start fresh.
- Repair or troubleshoot your existing Windows 10 installation.
- Customize Windows 10 installation options, such as language, edition, and architecture.
According to some users, you can save a few bucks by using the free upgrade tool instead of paying for a license key. Even though the free upgrade program has officially ended, you can still upgrade from Windows 7 or 8.1 for free. So, yes. The Media Creation Tool still works. With some caveats, of course. The first is that your current OS should be an original copy with a product key. This way, you’ll be able to claim a digital license for the latest Windows 10 version rather than entering a paid Windows 10 license key. Here are some things you can do with the Microsoft Media Creation Tool even now:
- Upgrade your Windows 7/8/8.1 to Windows 10
- Update your current version of Windows 10 to the latest release
- Update Windows 10 Home to Windows 10 Pro if you have the product key for a business edition of Windows 7/8/8.1
- Create a Windows 10 installation drive
And guess what? The Windows 10 Media Creation Tool is still going strong and Microsoft supports it! It does a great job and keeps up with the latest Windows 10 versions. Plus, Microsoft keeps updating the tool to make sure it works well with the newest Windows 10 updates. So, you can count on it to get the job done smoothly!
You can get the Media Creation Tool on the Microsoft website. The tool can either be downloaded to your desktop and launched or used straight from the website.
To get the Media Creation Tool, go to the official Microsoft website and follow these steps:
- On the Microsoft website, navigate to the Download Windows 10 page.
- Scroll down until you find the section titled Create Windows 10 installation media. Here, you’ll see a button that says Download tool now.
- Click on the Download tool now button. This will initiate the download of the Windows 10 Media Creation Tool.
- Once the download is complete, locate the downloaded file. It is usually named MediaCreationTool.exe or something similar.
- Double-click on the downloaded file to run the Windows 10 Media Creation Tool.
- If prompted by User Account Control, click Yes to allow the tool to make changes to your device.
- The tool will launch, and you will see the Windows 10 Media Creation Tool interface.
Congratulations! You have successfully downloaded the Windows 10 Media Creation Tool. After downloading this tool, you can proceed with installing Windows 10 or create a bootable ISO image on a removable medium. You can even visit this page from a mobile phone and download a Windows 10 ISO file, which you can then transfer to your PC.
Before you go ahead and upgrade or update your PC via the Media Creation Tool, make sure that your PC and programs meet all the conditions below:
- The current version of Windows on your PC should be properly activated. If you’re upgrading to Windows 10 via the free upgrade method, you need a genuine product key so that you can obtain a free Windows 10 license after the upgrade.
- Make sure that your hardware drivers have been updated. It is essential that the chipset, audio, network, USB, and graphic drivers, in particular, are up to date. This will help prevent compatibility issues during and after the upgrade.
If you’re not sure which of your hardware drivers require updates, try Auslogics Driver Updater, which is a quick way to identify and update obsolete drivers on your PC.
Download Auslogics Driver Updater
Prevent hardware errors and ensure problem-free device operation with this advanced tool that detects outdated drivers and safely gets them updated.
Also Read:[EASY GUIDE] How to Update Device Drivers on a Windows 10 PC?
- Install all available BIOS updates for the PC. This step will help older computers work better when running Windows 10.
- Disconnect all peripheral devices from the computer before starting the upgrade process. This will help avoid possible interference that can stop updates from installing correctly.
- Remove your antivirus from the PC before you start the upgrade. As long as you retain access to your product activation key, reinstalling the AV tool shouldn’t be a problem.
Also Read: How to Remove Virus and Other Malware from Windows
- Back up your important data to an external hard drive or the cloud. This will prevent data loss if something goes wrong and all your files are lost. You can also create a full system image of your current Windows version and back it up.
With these preliminaries taken care of, you can now update or upgrade your machine with the Media Creation Tool.
- After downloading the Media Creation tool from the official Microsoft website, double-click the exe file to launch the tool.
- If a license terms page shows up, accept the terms and conditions to proceed.
- The Windows 10 Setup screen will launch. It is also known as the “What do you want to do?” screen.
You have two options here: “Upgrade this PC now” and “Create installation media (USB flash drive, DVD, or ISO file) for another computer”
The first option is suitable if you intend to upgrade the PC immediately.
The second option will download a Windows 10 image, which you can either mount as a virtual drive or burn to removable media.
- For an instant upgrade, choose “Upgrade this PC now” and click Next.
- The Windows Media Creation Tool will start downloading the installation files for Windows 10. The download duration depends on the size of the installation files and your network speed.
- When all the needed files have been downloaded, you will get the Ready to install screen. You will be asked to choose what should be kept and what should be deleted along with your current Windows version: “Keep personal files and apps”, “Keep personal files only”, “Nothing”.
- Make your choice and continue with the rest of the upgrade. The installation process will begin after you click the Install button.
The process may take a while. If your computer uses an SSD as primary storage, the upgrade will take less time to finish. Your computer will boot up a couple of times during the upgrade.
- When Windows 10 is installed, you can check your activation status by navigating to Settings > Update & Security > Windows Update > Activation. You will notice that your PC has been activated with a digital license. Even if it isn’t activated, you can enter your old product key, and a Windows 10 digital license will be assigned to the computer.
- Go ahead and install your software and connect your USB devices.
If you want to install Windows 10 on multiple computers and don’t want to bother with downloading the installation file every time, you can save it. This will enable you to use it repeatedly as long as the PC you want to upgrade supports the upgrade process.
- Download the Windows 10 Media Creation Tool from the official Microsoft website.

- On the Windows 10 Media Creation Tool interface, select “Create installation media (USB flash drive, DVD, or ISO file) for another PC” and click Next.
- Choose the language, edition, and architecture (32-bit or 64-bit) of Windows 10 that you want to create, or select the recommended options.

Also read: What is the difference: Program Files vs Program Files (x86)
- Select the media you want to use for the installation, such as a USB flash drive or an ISO file. If you choose a USB flash drive, make sure it’s connected to your computer. Click Next and the tool will start downloading Windows 10 or creating the installation media based on your selections.
- Wait for the process to complete. It may take some time depending on your internet speed or the size of the ISO file.
Once this is done, you will have a bootable USB drive or an ISO file containing Windows 10. The upgrade process will run as described previously. By upgrading to Windows 10, you’re also exchanging your product key for a digital license. This license is linked to the device, so you can update your PC or reinstall Windows 10 on it using this method as many times as you like.
Windows 10 might run a bit slowly on older computers – and understandably so, since those PCs are optimized for older versions of Windows. Using an ancient PC after an upgrade can be mildly frustrating, especially if old files and apps were kept.
A tool like Auslogics BoostSpeed can make the user experience better. You can use it to clean up your PC and optimize it for better performance.
Download Auslogics BoostSpeed
Your one-stop PC maintenance and optimization tool, this program will clean, speed up, repair and tweak your system to ensure maximum speed and efficiency.
Conclusion
Now you can see how simple it is to download the Media Creation Tool and how easy-to-use and reliable it is for updating your computer to Windows 10. Its most useful feature is the ability to create a Windows Installation Media and perform updates on multiple PCs.
FAQ
If you’re experiencing issues with the Media Creation Tool not working, here are a few common factors to consider:
- Internet connectivity: The tool requires a stable internet connection to download the necessary files. Check your internet connection and ensure it is stable and functioning properly.
- Antivirus or firewall interference: Your antivirus software or firewall settings may be blocking the Media Creation Tool from working correctly. Temporarily disable them or configure them to allow the tool’s access.
- Compatibility issues: Ensure that your system meets the minimum requirements to run the Media Creation Tool. Check the system specifications and compare them with the tool’s requirements.
- Corrupted or incomplete download: If the downloaded Media Creation Tool file is corrupted or incomplete, it may not work properly. Try re-downloading the tool from the official Microsoft website to ensure you have a complete and valid file.
If you’re still facing issues after considering these factors, it may be helpful to consult official Microsoft support resources or community forums for further assistance.
You can find the Windows Media Creation Tool on the official Microsoft website. Simply visit the Microsoft website and search for “Windows Media Creation Tool” in the search bar. Look for the official Microsoft link to the tool and click on it to access the download page.
Windows Update should bring the latest versions of Windows 10 to your computer. But it may not be the quickest option. If you want to speed things up, you can use the
Media Creation Tool to install Windows 10 on your PC:
- Open the Media Creation Tool on your PC.
- Select the “Upgrade this PC now” option.
- Click on “Next” to proceed.
- The Media Creation Tool will begin downloading the latest version of Windows 10 to your PC.
That’s it! You have successfully used the Media Creation Tool to install Windows 10. Remember to back up your important data before proceeding with the installation.
If you encounter the Media Creation Tool error 0x80072f8f, here are some steps to help resolve the issue:
- Check your system clock: Ensure that the date, time, and time zone settings on your computer are accurate. Correct any discrepancies and try running the Media Creation Tool again.
- Disable third-party antivirus/firewall: Temporarily disable any third-party antivirus or firewall software that may be blocking the Media Creation Tool’s connection to the internet. Once disabled, try running the tool again.
- Use a wired internet connection: If you’re using a Wi-Fi connection, switch to a wired connection for a more stable and reliable internet connection. Unstable or weak Wi-Fi signals can sometimes cause connectivity issues with the Media Creation Tool.
- Clear temporary files: Remove any temporary files that may interfere with the tool’s operation. Use the Disk Cleanup utility or a third-party cleaning tool to clear temporary files and free up disk space.
- Run the tool as an administrator: Right-click on the Media Creation Tool executable file and select “Run as administrator” to give it elevated privileges. This can help bypass any permission-related issues.
- Try using the tool on a different computer: If the error persists on one computer, try using the Media Creation Tool on a different computer to see if it works without any issues.
Here’s a detailed step-by-step guide on how to fix the Error Code 0x80072f8f – 0x20000.