
CREATE TABLESPACE — define a new tablespace
Synopsis
CREATE TABLESPACEtablespace_name[ OWNER {new_owner| CURRENT_ROLE | CURRENT_USER | SESSION_USER } ] LOCATION 'directory' [ WITH (tablespace_option=value[, ... ] ) ]
Description
CREATE TABLESPACE registers a new cluster-wide tablespace. The tablespace name must be distinct from the name of any existing tablespace in the database cluster.
A tablespace allows superusers to define an alternative location on the file system where the data files containing database objects (such as tables and indexes) can reside.
A user with appropriate privileges can pass tablespace_name to CREATE DATABASE, CREATE TABLE, CREATE INDEX or ADD CONSTRAINT to have the data files for these objects stored within the specified tablespace.
Warning
A tablespace cannot be used independently of the cluster in which it is defined; see Section 22.6.
Parameters
tablespace_name-
The name of a tablespace to be created. The name cannot begin with
pg_, as such names are reserved for system tablespaces. user_name-
The name of the user who will own the tablespace. If omitted, defaults to the user executing the command. Only superusers can create tablespaces, but they can assign ownership of tablespaces to non-superusers.
directory-
The directory that will be used for the tablespace. The directory must exist (
CREATE TABLESPACEwill not create it), should be empty, and must be owned by the PostgreSQL system user. The directory must be specified by an absolute path name. tablespace_option-
A tablespace parameter to be set or reset. Currently, the only available parameters are
seq_page_cost,random_page_cost,effective_io_concurrencyandmaintenance_io_concurrency. Setting these values for a particular tablespace will override the planner’s usual estimate of the cost of reading pages from tables in that tablespace, and the executor’s prefetching behavior, as established by the configuration parameters of the same name (see seq_page_cost, random_page_cost, effective_io_concurrency, maintenance_io_concurrency). This may be useful if one tablespace is located on a disk which is faster or slower than the remainder of the I/O subsystem.
Notes
CREATE TABLESPACE cannot be executed inside a transaction block.
Examples
To create a tablespace dbspace at file system location /data/dbs, first create the directory using operating system facilities and set the correct ownership:
mkdir /data/dbs
chown postgres:postgres /data/dbs
Then issue the tablespace creation command inside PostgreSQL:
CREATE TABLESPACE dbspace LOCATION '/data/dbs';
To create a tablespace owned by a different database user, use a command like this:
CREATE TABLESPACE indexspace OWNER genevieve LOCATION '/data/indexes';
Compatibility
CREATE TABLESPACE is a PostgreSQL extension.
The tablespace in Postgres is the location on the disk where all the data of the database is stored. This data includes tables, triggers indexes, etc. The tablespace is actually needed by Postgres for mapping the logical name onto the physical address/location on the disk. There are two default tablespaces:
● Pg_default — This tablespace stores default data.
● Pg_global — This tablespace stores global data.
In this post, we will gain some understanding of how to create the tablespace in PostgreSQL.
How to Create a Tablespace in PostgreSQL?
We have already seen why tablespace is needed by Postgres. Now we will acquire some knowledge of creating a tablespace in Postgres. The basic syntax for creating a tablespace is given below:
CREATE TABLESPACE tabspace_name
OWNER user
LOCATION dir_path;
In the above syntax:
● The tablespace is created by using the CREATE TABLESPACE command. After this command, the name of the tablespace is specified.
● We have to write the owner’s name after the OWNER clause. Also if we want to assign another owner/user to the tablespace, we can declare it here.
● The directory path is also written after the LOCATION clause. This directory path is an absolute path of a directory that must be owned by the user so that the data can be read and written in this directory. Initially, this directory should be empty.
Let’s dive into the topic using an example to make it more clear.
Example: Creating a Tablespace in PostgreSQL
Open the SQL Shell or psql and write the following command to create a table space:
CREATE TABLESPACE example_tablespace
LOCATION 'C:\Program Files\PostgreSQL\15\data';
The above code will create a tablespace named “example_tablespace” using the physical address “C:\Program Files\PostgreSQL\15\data”. But you have to keep in mind that the directory location you provided must exist. The above query has successfully created a tablespace.

Now if we want to list all the table space in this Postgres database server we will execute the following command:
\db
By executing this command the shell will return you all the tablespaces created in the database server like this:
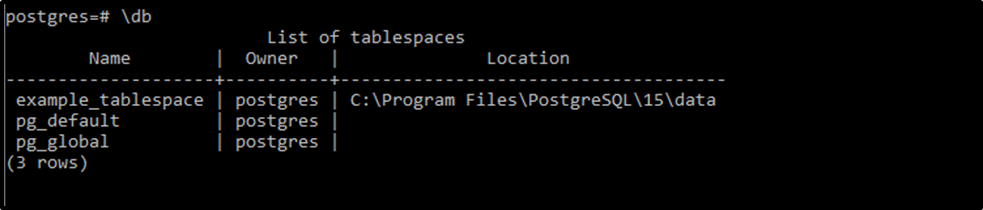
We can see that the example_tablespace we created is visible to us. If we want to get some additional information related to the tablespace we execute the following meta-command:
\db+
This will give more extensive information about the tablespace such as size and other options like this:

So this was all about creating a tablespace in PostgreSQL.
Advantages of Creating Tablespace
Tablespaces are beneficial in many ways. The most significant of them are:
● The tablespaces are used to derive the statistics. These stats are then used to optimize the performance parameters.
● The tablespace allows the administrators to manage the storage more efficiently.
Conclusion
To create a tablespace in PostgreSQL, the “CREATE TABLESPACE” statement is used with the “LOCATION” clause. Tablespace is the location on the disk where all the data for a database is stored. In this article, we have learned about tablespace and how to create a tablespace and retrieve detailed information about them using practical examples.
After you install PostgreSQL 14 on Windows, there are a few steps to create a sandbox database. This post shows you those steps, including a couple Windows OS tasks you’ll need to complete. You should note that these instructions are for the PostgreSQL psql Command Line Interface (CLI).
Open a Command Prompt with Administrator privileges. It should give you a command prompt like the following:
Microsoft Windows [Version 10.0.19042.1466]
(c) Microsoft Corporation. All rights reserved.

C:\Users\username>
Type psql to launch the PostgreSQL CLI and then the return or enter key:
Most likely, you’ll get the following error message. It means that your System Path environment variable doesn’t include the directory where the psql executable is found, and that’s why the command is not recognized.
'psql' is not recognized as an internal or external command, operable program or batch file.
You can set it temporarily in your current Windows CLI with the following command:
set PATH=%PATH%;C:\Program Files\PostgreSQL\14\bin;
For those familiar with Windows CLI navigation in prior releases, the convention is to append a semicolon at the end of the item added to the %PATH% environment variable. If you were to put the semicolon between the %PATH% and new directory path there would be two semicolons together. While it won’t do any harm, it’s best to follow the new convention or style.
CRITICAL NOTE: The rest of the post assumes you have set the correct %PATH% environment variable or added it to your System’s Path environment variable and restarted the Windows CLI after adding it through the GUI tool. The reason you need to restart the Windows CLI is that the %PATH% environment variable is inherited at startup and doesn’t change in an open Windows CLI shell.
Another common mistake some users make, at least those who have used an older version of the psql utility on a Linux distribution (or “distro”), is to type psql without any arguments to become the superuser. This error doesn’t occur in Linux because you most likely connected as the postgres user before trying to connect to the PostgreSQL database. A quick demonstration should illustrate the error and support explaining why it occurs on the Windows OS.
Attempting to connect to the PostgreSQL database as a non-postgres user:
You should get the following error:
psql: error: connection to server at "localhost" (::1), port 5432 failed: fe_sendauth: no password supplied
This error occurs because you’re not the postgres user, and all other users must designate that they’re connecting to the superuser account. The correct syntax is:
C:\Users\username>psql -U postgres
Then, you’ll be prompted for the password that you set when you installed PostreSQL database. Enter that password from the installation at the prompt.
Password for user postgres:
psql (14.1)
WARNING: Console code page (437) differs from Windows code page (1252)
         8-bit characters might not work correctly. See psql reference
         page "Notes for Windows users" for details.
Type "help" for help.

postgres=#
The warning message is telling you that the character set collation differs between your Windows OS and the PostgreSQL database. We’ll discuss this more later but for the sake of almost all your work, it won’t matter. If the warning message bothers you, you can run the chcp command before launching PostgreSQL when you open your Windows CLI:
The chcp command changes your terminal character set to align with the Latin 1 character set, which enables you to use things like non-English accent characters (the umlaut over an o, or ö). After running the You will see this when you connect after running that command:
psql (14.2)
Type "help" for help.

postgres#
INFO: The chcp command is used to supplement the international keyboard and character set information, allowing MS-DOS to be used in other countries and with different languages. Before the chcp command can be used, the nlsfunc must be loaded, and the country.sys must be loaded into the OS configuration.
If you are an experienced Windows OS user, you may want to edit your Windows Registry to change this behavior automatically for each Windows CLI session. You can do that by opening the Windows Registry with the regedit command as an Administrator. In regedit, add an Autorun element with a value of chcp 1252 to this part of the registry:
Computer\HKEY_LOCAL_MACHINE\SOFTWARE\Microsoft\Command Processor
This value automatically sets your Windows CLI to a Latin 1 character set everytime you launch a terminal shell with the cmd.exe utility. You should only do this if you understand it completely.
Now that you’re connected as the superuser, let’s examine the steps to configure your playground or videodb database. There are five steps to configure your database and one step to connect and use the videodb database as the student user
- Create Physical Directory
The directory for the data dictionary changes with PostgreSQL installations. You can find it with the following psql CLI command:
postgres=# show data_directory;
This will return the following:
           data_directory
-------------------------------------
 C:/Program Files/PostgreSQL/14/data
(1 row)
While it is possible to store your subdirectory in the data dictionary, it will raise a warning message. It’s actually a better practice to install your local databases in another location on your file system.
Open a new Windows OS CLI to create a subdirectory (or in Windows parlance folder) where you will store your videoDB database. Each new Windows OS CLI opens in your home directory. You need to create a physical video_db subdirectory in your home directory.
HINT: The name of the database inside PostgreSQL should map to the tablespace name and differ from the physical directory. Otherwise there is a chance you might get confused and make an error in the future.
In a new command line shell, you can use the following syntax to create videoDB subdirectory:
- Create Tablespace
Returning to the original Windows CLI shell where you are connected as the postgres superuser, you can create a video_db tablespace with the following syntax:
CREATE TABLESPACE video_db
  OWNER postgres
  LOCATION 'C:\Users\username\video_db';
This will return the following:
You can query whether you successfully create the video_db tablespace with the following:
SELECT * FROM pg_tablespace;
It should return the following:
  oid  |  spcname   | spcowner | spcacl | spcoptions
-------+------------+----------+--------+------------
  1663 | pg_default |       10 |        |
  1664 | pg_global  |       10 |        |
 16395 | video_db   |       10 |        |
(3 rows)
- Create a Database
You need to know the PostgreSQL default collation before you create a new database. You can write the following query to determine the default correlation:
postgres=# SELECT datname, datcollate FROM pg_database WHERE datname = 'postgres';
It should return something like this:
  datname  |         datcollate
-----------+----------------------------
 postgres  | English_United States.1252
(1 row)
The datcollate value of the postgres database needs to the same value for the LC_COLLATE and LC_CTYPE parameters when you create a database. You can create a videodb database with the following syntax provided you’ve made appropriate substitutions for the LC_COLLATE and LC_CTYPE values below:
CREATE DATABASE videodb
  WITH OWNER = postgres
       ENCODING = 'UTF8'
       TABLESPACE = video_db
       LC_COLLATE = 'English_United States.1252'
       LC_CTYPE = 'English_United States.1252'
       CONNECTION LIMIT = -1;
You can verify the creation of the videodb with the following command:
It should show you a display like the following:
                                                 List of databases
   Name    |  Owner   | Encoding |          Collate           |           Ctype            |   Access privileges
-----------+----------+----------+----------------------------+----------------------------+-----------------------
 postgres  | postgres | UTF8     | English_United States.1252 | English_United States.1252 |
 template0 | postgres | UTF8     | English_United States.1252 | English_United States.1252 | =c/postgres          +
           |          |          |                            |                            | postgres=CTc/postgres
 template1 | postgres | UTF8     | English_United States.1252 | English_United States.1252 | =c/postgres          +
           |          |          |                            |                            | postgres=CTc/postgres
 videodb   | postgres | UTF8     | English_United States.1252 | English_United States.1252 |
(4 rows)
Then, you can assign comment to the database with the following syntax:
COMMENT ON DATABASE videodb IS 'Video Store Database';
- Create a Role, Grant, and User
In this section you create a dba role, grant privileges on a videodb database to a role, and create a user with the role that you created previously with the following three statements. There are three steps in this sections.
- The first step creates a dba role:
CREATE ROLE dba WITH SUPERUSER;
- The second step grants all privileges on the videodb database to both the postgres superuser and the dba role:
GRANT ALL PRIVILEGES ON DATABASE videodb TO postgres;
GRANT ALL PRIVILEGES ON DATABASE videodb TO dba;
Any work in pgAdmin4 requires a grant on the videodb database to the postgres superuser. The grant enables visibility of the videodb database in the pgAdmin4 console as shown in the following image.
- The third step creates a student user with the dba role:
CREATE USER student
  WITH ROLE dba
       ENCRYPTED PASSWORD 'student';
After this step, you need to disconnect as the postgres superuser with the following command:
- It is possible that you may (and should if this is a new instance you are building) encounter an error when you try to connect as a sandboxed user. The syntax to connect as the student user is:
psql -d videodb -U student -W
All the options, which are preceded with a single dash (–) are case sensitive. The -d option sets the database for the connection. The -U option set user for the connection and the -W option instructs the psql CLI to prompt for the password.
While you shouldn’t encounter the following error during a Windows OS installation,
psql: FATAL: Peer authentication failed for user "student"
You can fix this in PostgreSQL 14 by changing the user access parameters in the pg_hba.conf configuration file. The file is found in the C:\Program Files\PostgreSQL\14\data directory. These are the correct out of the box settings you should see.
# TYPE  DATABASE        USER            ADDRESS                 METHOD

# "local" is for Unix domain socket connections only
local   all             all                                     scram-sha-256
# IPv4 local connections:
host    all             all             127.0.0.1/32            scram-sha-256
# IPv6 local connections:
host    all             all             ::1/128                 scram-sha-256
# Allow replication connections from localhost, by a user with the
# replication privilege.
local   replication     all                                     scram-sha-256
host    replication     all             127.0.0.1/32            scram-sha-256
host    replication     all             ::1/128                 scram-sha-256
If you find something that’s broken, fix it. The values above should ensure you make the changes successfully. You will need to restart the postgres service if you make changes.
If you plan on using the copy command to read external CSV (Comma Separated Value) files, you need to grant as the postgres superuser another privilege to the student user. This grants the pg_read_server_files role to the student user.
GRANT pg_read_server_files TO student;
- Create a Schema
The PostgreSQL database supports multiple schemas inside databases. The default schema for any database is the public schema. You must create separate schemas and refer to them explicitly when accessing them unless you alter the default search path. This section demonstrates how to:
- Create an app schema.
- Create a revision_history table in the app schema.
- Modify the standard search path to include other schemas
The process of creating a schema requires you grant the CREATE ON DATABASE privilege to the user as the postgres user. The initial grant of the create privilege requires the postgres superuser’s privileges. That means you must connect as the postgres user, like:
Then, as the postgres superuser, you use the following syntax to grant the create privilege to the student user on the videodb database:
GRANT CREATE ON DATABASE videodb TO student;
After granting the create privilege, you should exit the postgres superuser’s account, like
Now, you should connect as the student user to the videodb database (syntax introduced earlier but provided again below).
As the student user, create the app schema with the following syntax:
Then, you can query the result as follows:
SELECT   *
FROM     pg_catalog.pg_namespace
ORDER BY nspname;
You should see the following:
  oid  |      nspname       | nspowner |               nspacl
-------+--------------------+----------+-------------------------------------
 16399 | app                |    16398 |
 13388 | information_schema |       10 | {postgres=UC/postgres,=U/postgres}
    11 | pg_catalog         |       10 | {postgres=UC/postgres,=U/postgres}
    99 | pg_toast           |       10 |
  2200 | public             |       10 | {postgres=UC/postgres,=UC/postgres}
(5 rows)
If you create a table without a schema name, it is automatically placed in the public schema. That means any attempt to describe the table with the \d command line option returns without prepending the schema name returns an error, however, this is only true when you are using the default search parameter.
Let’s create a revision_history table in the app schema with a script file. A script file is a set of related SQL commands, like the following example that suppresses notices, drops any pre-existing revision_history table, and create the revision_history table.
-- Set client messages to warning or error, which means any
-- notice associated with the if exists clause is suppressed.
SET client_min_messages TO warning;

-- Conditionally drop an existing revision_history table in
-- the app schema.
DROP TABLE IF EXISTS revision_history;

-- Create a revision_history table.
CREATE TABLE app.revision_history
( revision_history_id serial
, session_id          VARCHAR
, table_name          VARCHAR
, revision_id         INTEGER );
You can run a script file by using a relative or absolute file name. An absolute file name includes a full path from a Windows logical driver letter, like C:\ or a Linux mount point. A relative file name is simply the file name.
If you want to use a relative file name, you must first navigate to the directory where you have saved the file first. This directory becomes your local drive and allows you call any file in it from the psql command prompt by using only its file name.
You should connect as the student user to the videodb database. The \i command lets you run a file, assuming you put the preceding script file into a revision_history file in your local directory.
If you try to describe the revision_history table with the \d command line option, like
It will show the following:
Did not find any relation named "revision_history".
That’s because there is no revision_history table in the public schema and the default search path only includes the public schema.
You can show the search path with the following:
It should return the following, which is a schema that shares the user’s name and public.
   search_path
-----------------
 "$user", public
(1 row)
You reset the search path as follows:
SET search_path TO app, "$user", public;
After you set the search_path, an attempt to describe the table will work because it searches for the table in the app and public schema. That means the following command:
Shows:
                                                  Table "app.revision_history"
       Column        |       Type        | Collation | Nullable |                            Default
---------------------+-------------------+-----------+----------+---------------------------------------------------------------
 revision_history_id | integer           |           | not null | nextval('revision_history_revision_history_id_seq'::regclass)
 session_id          | character varying |           |          |
 table_name          | character varying |           |          |
 revision_id         | integer           |           |          |
- Connect as student to videodb:
As shown in Step #4 above, you can now connect and use to the videodb as the student user with the following syntax:
psql -d videodb -U student -W
If you did everything correctly, you should see the following after correctly providing the student password for the student user:
Password:
psql (14.1)
WARNING: Console code page (437) differs from Windows code page (1252)
         8-bit characters might not work correctly. See psql reference
         page "Notes for Windows users" for details.
Type "help" for help.

videodb=>
After connecting to the videodb database, you can query the current database, like
SELECT current_database();
It should return the following:
 current_database
------------------
 videodb
(1 row)
This has shown you how to create a videodb tablespace, a videodb database, a dba role, a student user, an app schema, and connect to your new videodb database as the student user. As always, I hope it lets you get a lot down with little effort and avoiding pages and pages of documentation.
Skip to content
Summary: In this tutorial, you’ll learn about PostgreSQL tablespaces and how to create and use tablespaces to store database objects.
Introduction to PostgreSQL tablespaces #
A tablespace is a storage location on a disk where PostgreSQL stores database objects such as tables and indexes.
By default, PostgreSQL stores all database objects in the default tablespaces. However, you can create tablespaces to optimize performance and efficiently manage disk usage.
Creating tablespaces #
To create a new tablespace, you use the CREATE TABLESPACE statement with the following syntax:
CREATE TABLESPACE tablespace_name
OWNER role_name
LOCATION 'path_to_directory';Code language: PostgreSQL SQL dialect and PL/pgSQL (pgsql)
In this syntax:
- Fisst, specify the name of the tablespace in the
CREATE TABLESPACEclause. - Second, provide the name of the owner of the tablespace. If you don’t, PostgreSQL will assign the current role as the owner.
- Third, specify the directory path where PostgreSQL stores this tablespace’s database objects.
It’s important to note two points:
- The directory of the tablespace must exist and PostgreSQL must be the owner of that directory.
- PostgreSQL must have read and write access to the directory.
We’ll create a new tablespace called pg_tablespace.
Step 1. Create a directory for the tablespace and change the owner to postgres: #
mkdir -p /var/lib/postgresql/tablespaces/my_tablespace
chown postgres:postgres /var/lib/postgresql/tablespaces/my_tablespaceCode language: PostgreSQL SQL dialect and PL/pgSQL (pgsql)
You can replace the path with a real directory path on your server.
Step 2. Create a new tablespace in PostgreSQL: #
CREATE TABLESPACE my_tablespace
    OWNER postgres
    LOCATION '/var/lib/postgresql/tablespaces/my_tablespace';Code language: PostgreSQL SQL dialect and PL/pgSQL (pgsql)
Using tablespaces #
After creating the new tablespace, you can use it in statements like CREATE TABLE, CREATE INDEX, etc.
For example, the following statement creates a new table and assigns it to the pg_tablespace:
CREATE TABLE customers(
     customer_id INT GENERATED ALWAYS AS IDENTITY PRIMARY KEY,
     name VARCHAR(255) NOT NULL,
     phone VARCHAR(25) NOT NULL,
     address VARCHAR
) TABLESPACE my_tablespace;Code language: PostgreSQL SQL dialect and PL/pgSQL (pgsql)
The clause TABLESPACE my_tablespace assigns the my_tablespace to the customers table.
You can store indexes in a tablespace located in fast storage to optimize query performance. For example:
CREATE INDEX ON customers(name)
TABLESPACE my_tablespace;Code language: PostgreSQL SQL dialect and PL/pgSQL (pgsql)
The following table lists all object types that you can assign tablespaces to them:
Here’s a table listing all object types that can be stored in a PostgreSQL tablespace, along with the corresponding SQL statements and their meanings:
| Object Type | SQL Statement | Meaning |
|---|---|---|
| Table | CREATE TABLE my_table (...) TABLESPACE my_tablespace; |
Stores table data in a tablespace. |
| Index | CREATE INDEX ON my_table(...)TABLESPACE my_tablespace; |
Stores an index in a specific tablespace to improve query performance. |
| Materialized View | CREATE MATERIALIZED VIEW my_viewTABLESPACE my_tablespacequery; |
Stores the materiallized view physically in a tablespace for faster retrieval. |
| Sequence | CREATE SEQUENCE my_seq TABLESPACE my_tablespace; |
Create a sequence and stores its values in a tablespace. |
| Partitioned Table | CREATE TABLE sales (id INT, sale_date DATE) PARTITION BY RANGE (sale_date) TABLESPACE my_tablespace; |
A parent table that organizes child partitions, which can be in different tablespaces. |
| Partition (Child Table) | CREATE TABLE sales_2025 PARTITION OF sales FOR VALUES FROM ('2025-01-01') TO ('2025-12-31') TABLESPACE fast_storage; |
A child table storing partitioned data in a separate tablespace. |
| Temporary Table | CREATE TEMP TABLE temp_table (...) TABLESPACE my_tablespace; |
A temporary table that can use a custom tablespace. |
Default tablespaces #
PostgreSQL comes with two default tablespaces:
pg_defaultpg_global
pg_default #
The pg_default tablespace is where PostgreSQL stores all database objects (tables, indexes, sequences, etc.) unless you explicitly specify a different tablespace.
The pg_default tablespace is located in the data directory of the PostgreSQL installation.
pg_global #
The pg_global tablespace stores shared system catalogs that are global to all databases within a single PostgreSQL instance.
Why Use Tablespaces? #
- Enhance disk I/O performance by distributing data across multiple storage devices.
- Place indexes on high-speed storage like SSD for faster query performance.
- Use tablespaces for multi-tenant architectures, storing tenant-specific data in separate locations.
Summary #
- A tablespace is a storage location that holds database objects.
- Use the
CREATE TABLESPACEstatement to create a new tablespace.
Was this tutorial helpful ?
Provide feedback
Saved searches
Use saved searches to filter your results more quickly
Sign up