
INTRODUCTION
In cryptography and computer security, self-signed certificates are public key certificates that are not issued by a certificate authority. These self-signed certificates are easy to make and do not cost money. However, they do not provide any trust value. On modern Windows versions (Windows Server 2022/2019/2016/2012R2) you can create a self-signed certificate using the built-in PowerShell cmdlet [New-SelfSignedCertificate](https://learn.microsoft.com/en-us/powershell/module/pki/new-selfsignedcertificate?view=windowsserver2022-ps) without using additional tools. In this tutorial, we will learn how to Create a Self-Signed Certificate in Windows Server.
Prerequisites
-
Windows Server
-
PowerShell with Administrator
-
Internet connectivity
Step 1. Login to your Windows Server
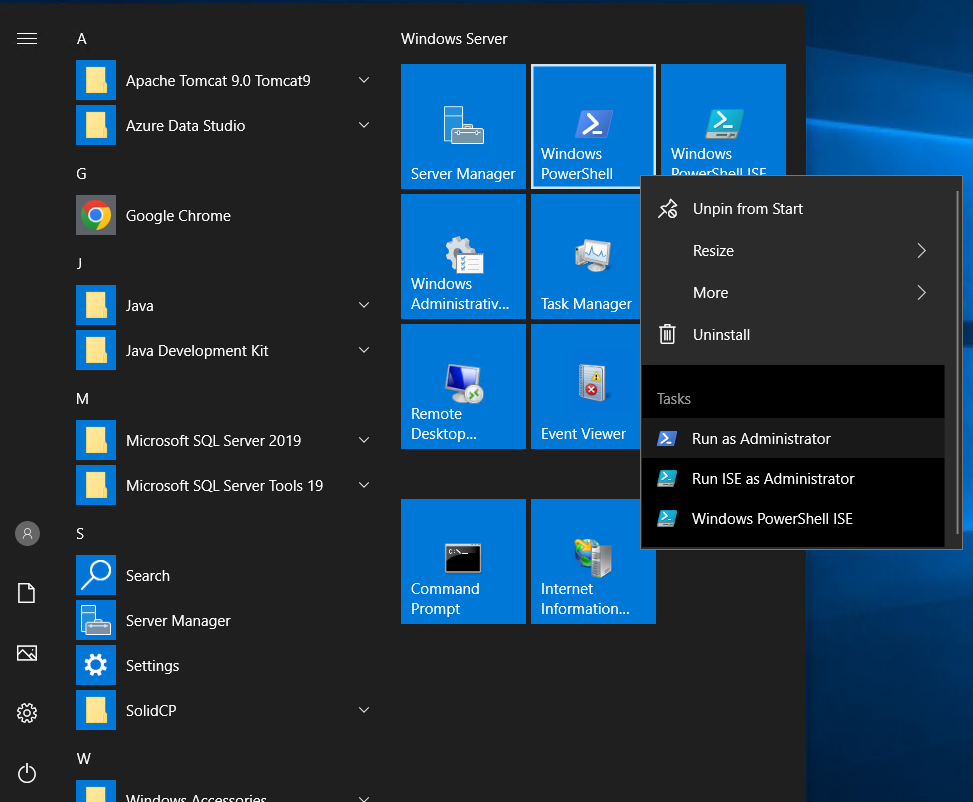
Step 2. Open PowerShell with Administrator
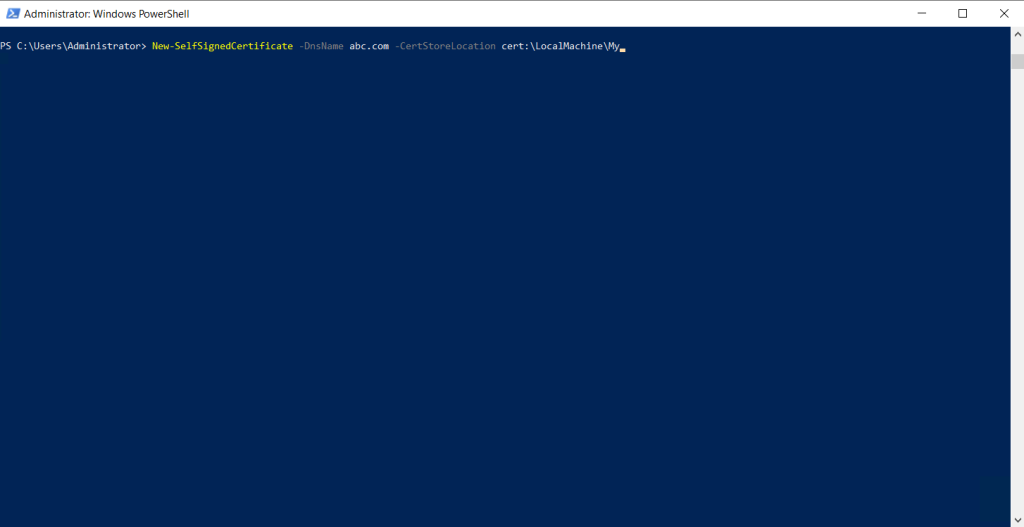
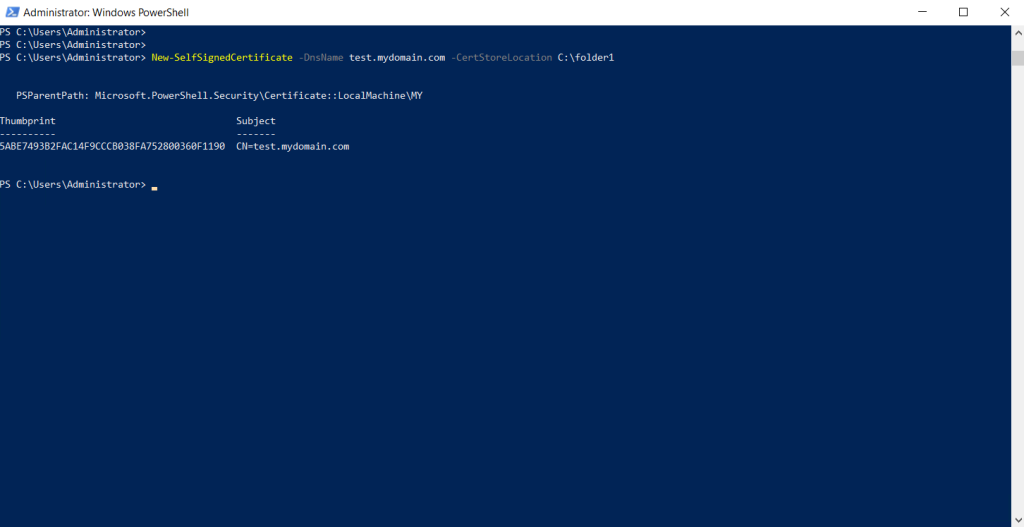
Step 3. Run the following command to generate a self-signed certificate
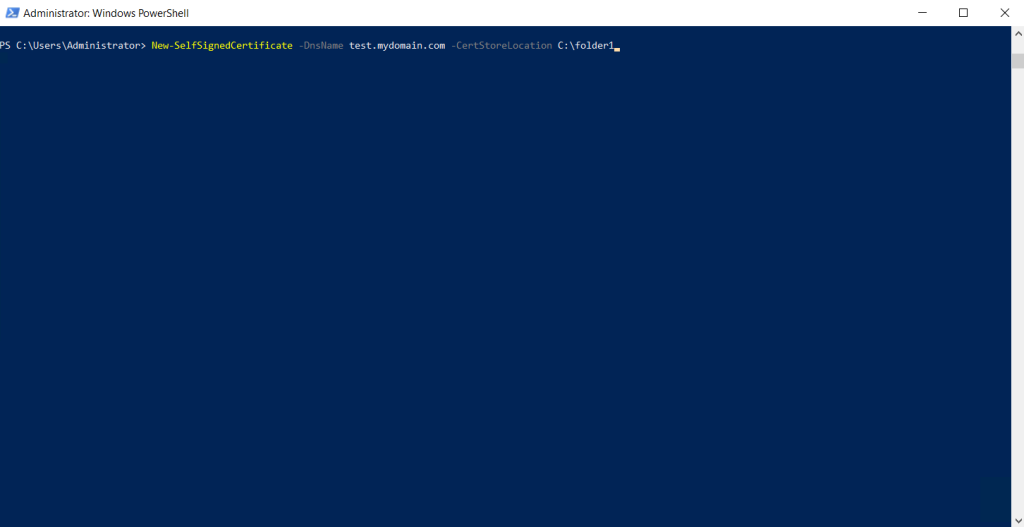
Step 4. We will edit the domain name and certificate location according to our preference.
Step 5. Self-signed certificate generated.
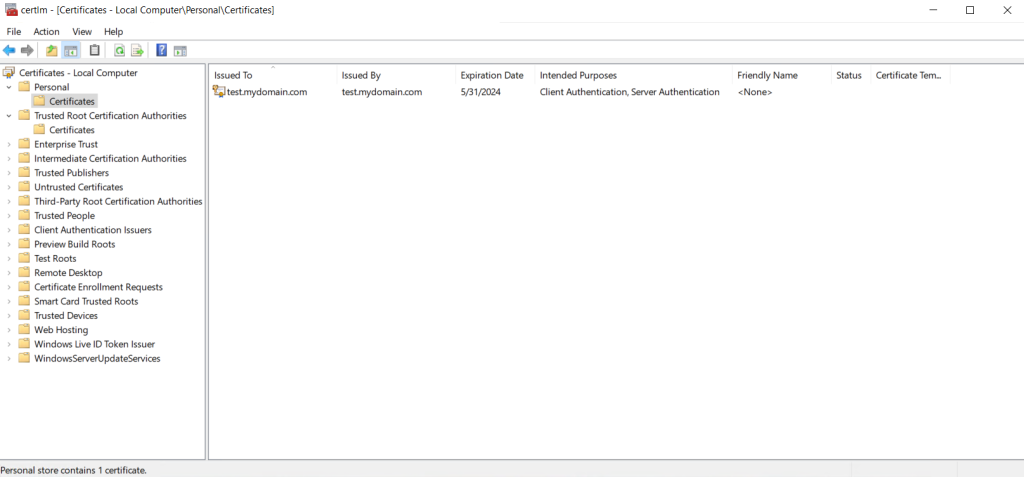
Step 6. Check our recently generated self-signed certificate by running certlm.msc in run.
Thank You!
Most Windows administrators, who are familiar with PKI, know about the MakeCert.exetool, which allows to create self-signed certificates. This tool is part of the Microsoft .NET Framework SDK and Microsoft Windows SDK. You can create a self-signed certificate using the built-in PowerShell cmdlet New-SelfSignedCertificate without using additional tools.
Contents:
- New-SelfSignedCertificate: Creating a Self-Signed Certificate with PowerShell
- Create a Certificate with the Subject Alternative Name (SAN) Using PowerShell
- How to Export a Self-Signed Certificate on Windows?
- Generating a Self-Signed Certificate for Code Signing on Windows
- Creating SHA-256 Self-Signed SSL Certificate in IIS on Windows Server
New-SelfSignedCertificate: Creating a Self-Signed Certificate with PowerShell
To create a self-signed certificate with PowerShell, you can use the built-in New-SelfSignedCertificate cmdlet, which is a part of the PowerShell PKI (Public Key Infrastructure) module:
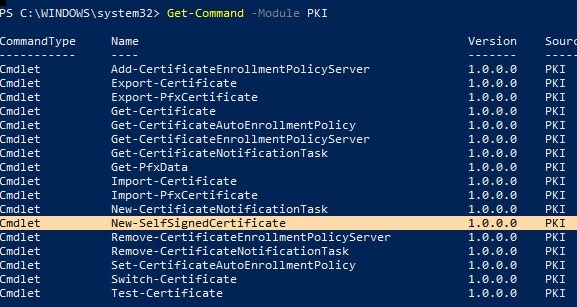
To list all available cmdlets in the PKI module, run the command:
Get-Command -Module PKI
It is recommended to use self-signed certificates for testing/developing tasks or to provide certificates for internal Intranet services (IIS, Exchange, Web Application Proxy, LDAPS, ADRMS, DirectAccess, etc.) if you cannot deploy PKI/CA infrastructure or purchase a trusted certificate from an external provider.
To create a certificate, you have to specify the values of –DnsName (name of a server, the name may be arbitrary and even different from the current hostname) and -CertStoreLocation (a local certificate store in which the generated certificate will be placed).
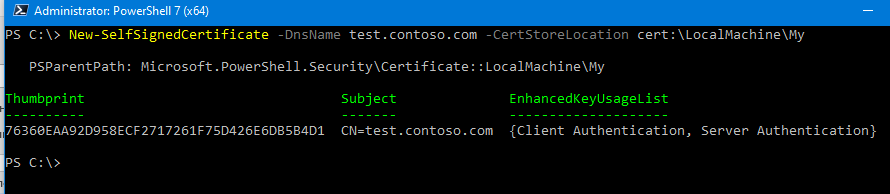
To create a new SSL certificate (with the default SSLServerAuthentication type) for the DNS name test.contoso.com (use an FQDN name) and place it to the personal certificates on a computer, run the following command:
New-SelfSignedCertificate -DnsName test.contoso.com -CertStoreLocation cert:\LocalMachine\My

The command will return the Thumbprint, Subject, and EnhancedKeyUsageList of the new certificate. By default, such a certificate can be used for Client Authentication (1.3.6.1.5.5.7.3.2) or Server Authentication (1.3.6.1.5.5.7.3.1).
If you run this command in a non-elevated PowerShell prompt (without local admin permissions), an error will appear:
New-SelfSignedCertificate : CertEnroll::CX509Enrollment::_CreateRequest: Access denied. 0x80090010 (-2146893808 NTE_PERM)
If you have specified a non-standard cryptographic provider (CSP) ( for example, using the -KeyAlgorithm "ECDSA_secP256r1" -Provider "Microsoft Smart Card Key Storage Provider"parameters), make sure it is installed on your computer (the default is Microsoft Enhanced Cryptographic Provider). Otherwise, an error will appear:
New-SelfSignedCertificate: CertEnroll::CX509Enrollment::_CreateRequest: Provider type not defined. 0x80090017 (-2146893801 NTE_PROV_TYPE_NOT_DEF).
By default, a self-signed certificate is generated with the following settings:
- Cryptographic algorithm: RSA;
- Key length: 2048 bit;
- Acceptable key usage: Client Authentication and Server Authentication;
- The certificate can be used for: Digital Signature, Key Encipherment;
- Certificate validity period: 1 year;
- Crypto provider: Microsoft Software Key Storage Provider.
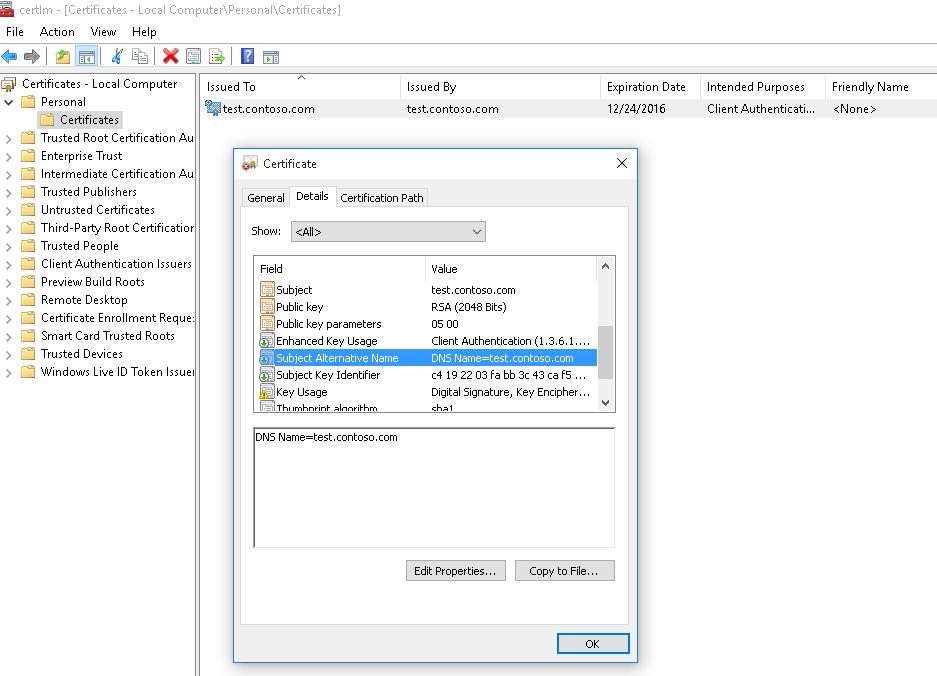
This command creates a new certificate and imports it into the computer’s personal certificate store. Open the certlm.msc MMC snap-in and make sure that a new certificate appears in the Personal section of the computer’s certificate store.

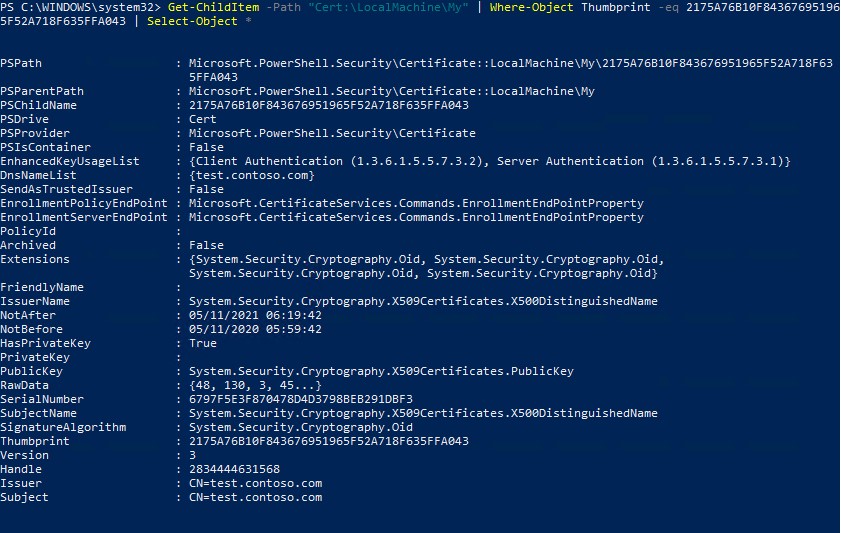
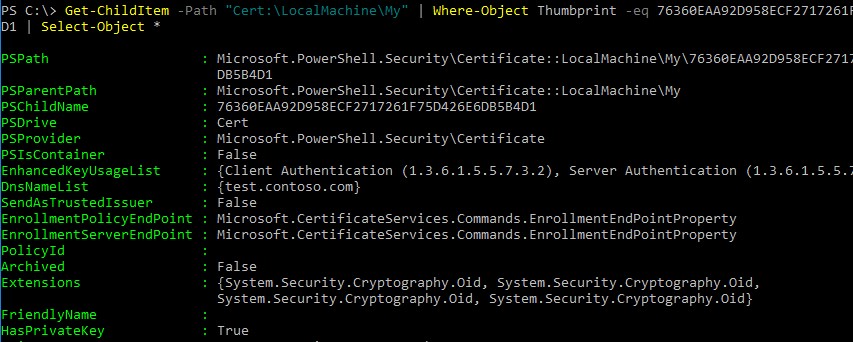
Using the Get-ChildItem cmdlet, you can display all the parameters of the created certificate by its Thumbprint:
Get-ChildItem -Path "Cert:\LocalMachine\My" | Where-Object Thumbprint -eq 2175A76B10F843676951965F52A718F635FFA043 | Select-Object *
PSPath                   : Microsoft.PowerShell.Security\Certificate::LocalMachine\My\2175A76B10F843676951965F52A718F635FFA043
PSParentPath             : Microsoft.PowerShell.Security\Certificate::LocalMachine\My
PSChildName              : 2175A76B10F843676951965F52A718F635FFA043
PSDrive                  : Cert
PSProvider               : Microsoft.PowerShell.Security\Certificate
PSIsContainer            : False
EnhancedKeyUsageList     : {Client Authentication (1.3.6.1.5.5.7.3.2), Server Authentication (1.3.6.1.5.5.7.3.1)}
DnsNameList              : {test.contoso.com}
SendAsTrustedIssuer      : False
EnrollmentPolicyEndPoint : Microsoft.CertificateServices.Commands.EnrollmentEndPointProperty
EnrollmentServerEndPoint : Microsoft.CertificateServices.Commands.EnrollmentEndPointProperty
PolicyId                 :
Archived                 : False
Extensions               : {System.Security.Cryptography.Oid, System.Security.Cryptography.Oid,
System.Security.Cryptography.Oid, System.Security.Cryptography.Oid}
FriendlyName             :
IssuerName               : System.Security.Cryptography.X509Certificates.X500DistinguishedName
NotAfter                 : 12/4/2023 5:35:15 PM
NotBefore                : 12/4/2022 5:15:15 PM
HasPrivateKey            : True
PrivateKey               :
PublicKey                : System.Security.Cryptography.X509Certificates.PublicKey
RawData                  : {48, 130, 3, 45...}
SerialNumber             : 6797F5E3F870478D4D3798BEB291DBF3
SubjectName              : System.Security.Cryptography.X509Certificates.X500DistinguishedName
SignatureAlgorithm       : System.Security.Cryptography.Oid
Thumbprint               : 2175A76B10F843676951965F52A718F635FFA043
Version                  : 3
Handle                   : 2834444631568
Issuer                   : CN=test.contoso.com
Subject                  : CN=test.contoso.com
Note. This self-signed certificate will expire 1 year after it was created. You can set a different certificate validity period using the –NotAfter option. For example, you can issue an SSL/TLS certificate with a three-year validity period with the following commands:
$todaydt = Get-Date
 $3years = $todaydt.AddYears(3)
 New-SelfSignedCertificate -dnsname test.contoso.com -notafter $3years -CertStoreLocation cert:\LocalMachine\My
You can create a certificate chain. First, a root certificate (CA) is created. Then based on it, an SSL server certificate is generated:
$rootCert = New-SelfSignedCertificate -Subject 'CN=TestRootCA,O=TestRootCA,OU=TestRootCA' -KeyExportPolicy Exportable  -KeyUsage CertSign,CRLSign,DigitalSignature -KeyLength 2048 -KeyUsageProperty All -KeyAlgorithm 'RSA'  -HashAlgorithm 'SHA256'  -Provider 'Microsoft Enhanced RSA and AES Cryptographic Provider'
 New-SelfSignedCertificate -CertStoreLocation cert:\LocalMachine\My -DnsName "test2.contoso.com" -Signer $rootCert -KeyUsage KeyEncipherment,DigitalSignature
To change the certificate key length and encryption algorithm, you need to use the -KeyAlgorithm, -KeyLength, and -HashAlgorithm options. For example:
New-SelfSignedCertificate -KeyAlgorithm RSA -KeyLength 2048 -HashAlgorithm "SHA256" …
The Microsoft Platform Crypto Provider allows you to use the device’s Trusted Platform Module chip (TPM 2.0) to protect the key.
New-SelfSignedCertificate -Type Custom -Provider "Microsoft Platform Crypto Provider" ...
You can generate a document encryption certificate to protect your document and email. Use the DocumentEncryptionCert type when creating a cert:
$Params = @{
 "DnsName" = "myhostname"
 "CertStoreLocation" = "Cert:\\CurrentUser\\My"
 "KeyUsage" = "KeyEncipherment","DataEncipherment","KeyAgreement"
 "Type" = "DocumentEncryptionCert"
 }
 $doccert=New-SelfSignedCertificate @Params
Check the certificate EnhancedKeyUsageList value:
$doccert|select EnhancedKeyUsageList
{Document Encryption (1.3.6.1.4.1.311.80.1)}
Create a Certificate with the Subject Alternative Name (SAN) Using PowerShell
The New-SelfSignedCertificate cmdlet allows you to create a certificate with several different Subject Alternative Names (SANs).
Note. The Makecert.exetool, unlike the New-SelfSignedCertificate cmdlet, cannot create SAN and Wildcard certificates.[/alert]
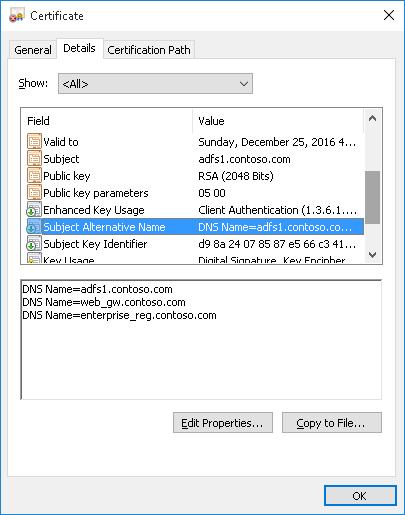
If you want to create a certificate with multiple names, the first name of the DnsName parameter will be used as the CN (Common Name) of the certificate. For example, let’s create a self-signed SAN certificate with the following names:
- Subject Name (CN):
adfs1.contoso.com - Subject Alternative Name (DNS):
web_gw.contoso.com - Subject Alternative Name (DNS):
enterprise_reg.contoso.com
You can the following command to generate a certificate with different common names (or even for multiple domains):
New-SelfSignedCertificate -DnsName adfs1.contoso.com,web_gw.contoso.com,enterprise_reg.contoso.com -CertStoreLocation cert:\LocalMachine\My
Also, you can generate a wildcard certificate for the entire domain namespace by specifying *.contoso.com as the server name.
New-SelfSignedCertificate -certstorelocation cert:\localmachine\my -dnsname *.contoso.com
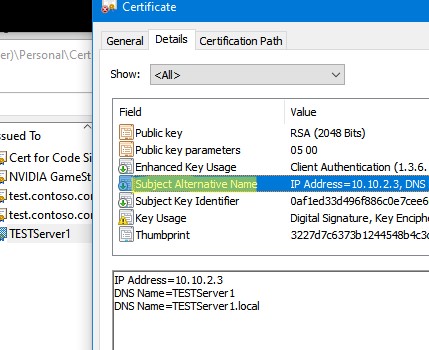
You can generate a self-signed certificate not only for a DNS hostname but also for an IP address. To do this, you need to use -TextExtension instead of the -DnsName parameter. For example:
New-SelfSignedCertificate -TextExtension @("2.5.29.17={text}IPAddress=10.1.2.3&DNS=TESTServer1&DNS=TESTServer1.local")
As you can see, the Subject Alternative Name field now contains the IP address of the host and its DNS names.
How to Export a Self-Signed Certificate on Windows?
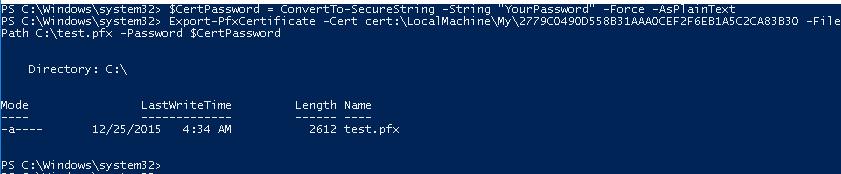
To export the generated certificate with a private key to a password-protected PFX file, you need to specify its Thumbprint. It can be copied from the results of the New-SelfSignedCertificate command. You also need to specify the certificate’s security password and convert it to a SecureString format:
$CertPassword = ConvertTo-SecureString -String “YourPassword” -Force –AsPlainText
 Export-PfxCertificate -Cert cert:\LocalMachine\My\2779C7928D055B21AAA0Cfe2F6BE1A5C2CA83B30 -FilePath C:\test.pfx -Password $CertPassword
You can export the certificate public key as follows (the private key is not included in the export):
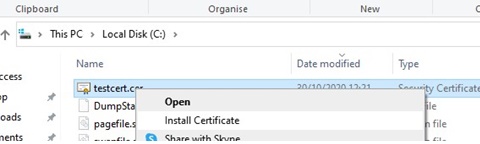
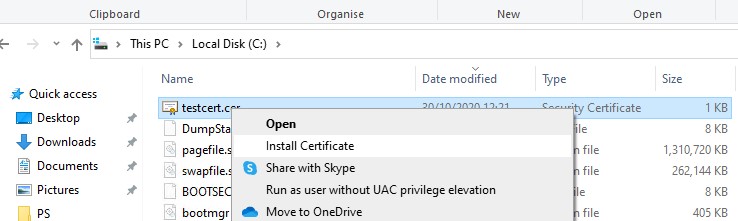
Export-Certificate -Cert Cert:\LocalMachine\My\2779C7928D055B21AAA0Cfe2F6BE1A5C2CA83B30 -FilePath C:\tstcert.cer
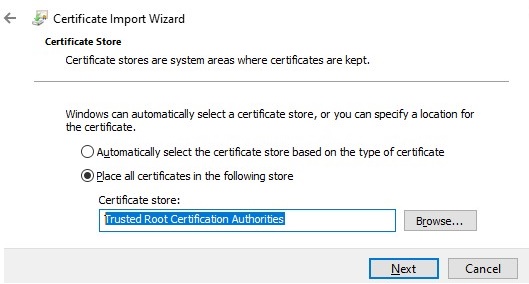
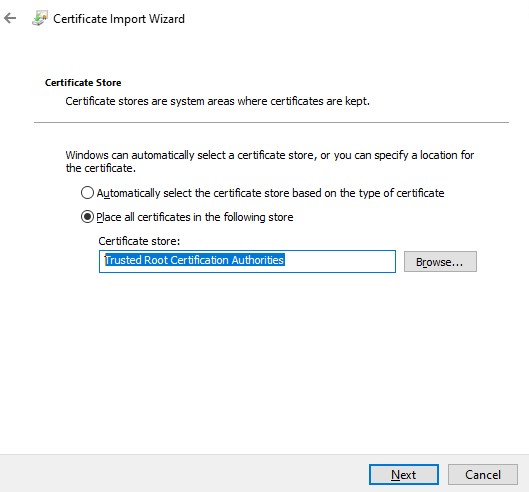
Make sure the *.CER (PFX) certificate file appears in the specified directory. If you right-click it and select the “Install Certificate” menu item, you can use the Certificate Import Wizard to add the certificate to the trusted root certificates on your computer.
Select Cert Store location -> Local Machine, Place all certificates in the following store -> Trusted Root Certification Authorities.
[alert]You can create a certificate and immediately import it into the Trusted Root Certificate store of the computer using the commands:
$SelfSignCert=New-SelfSignedCertificate …..
 $certFile = Export-Certificate -Cert $SelfSignCert -FilePath C:\ps\export-certname.cer
 Import-Certificate -CertStoreLocation Cert:\LocalMachine\AuthRoot -FilePath $certFile.FullName
You can deploy this public key or the certificate file itself on all user computers and servers in the Active Directory domain using GPO (How to deploy certificates to users with GPO?).
Generating a Self-Signed Certificate for Code Signing on Windows
In PowerShell 3.0, the New-SelfSifgnedCertificate cmdlet only generates SSL certificates which cannot be used to sign the driver code, application, or script (unlike the certificates generated by the MakeCert utility).
You can use the New-SelfSifgnedCertificate cmdlet to issue Code Signing certificates in PowerShell version 5.0 and newer.
To create a self-signed certificate for sign application code, run the command:
$cert = New-SelfSignedCertificate -Subject "My Code Signing Certificate” -Type CodeSigningCert -CertStoreLocation cert:\LocalMachine\My
Now you can sign your PowerShell script file with a self-signed certificate:
Set-AuthenticodeSignature -FilePath C:\PS\my_posh_script.ps1 -Certificate $cert
If you are receiving an UnknownError warning when executing the command, this means that the certificate is not trusted, because it is located in the user’s personal certificates store.

You need to move it to the Trusted Root Certificate store (don’t forget to periodically scan the Windows certificate root store for untrusted and suspicious certificates and update the lists of trusted root certificates).
Move-Item -Path $cert.PSPath -Destination "Cert:\CurrentUser\Root"
Now you can use this self-signed certificate to sign your PowerShell scripts, drivers, or applications.
Creating SHA-256 Self-Signed SSL Certificate in IIS on Windows Server
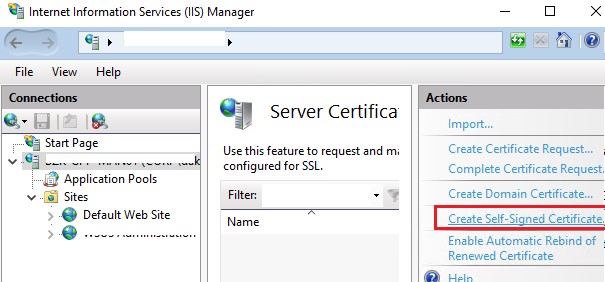
Please note that when creating a self-signed certificate for IIS through the Internet Information Manager console (using Create Self-Signed Certificate action menu item), an SSL certificate is created using the SHA-1 encryption algorithm. Such certificates are considered untrusted by many browsers and cannot be used to establish a secure connection (or you may see other SSL warnings and errors). The New-SelfSignedCertificate cmdlet allows you to create a more popular type of certificate using the SHA-256 encryption algorithm.

You can bind a self-signed SHA-256 certificate generated with PowerShell to an IIS site on Windows Server. If you create an SSL certificate using PowerShell and place it in the computer’s certificate store, it will automatically be available to IIS sites.
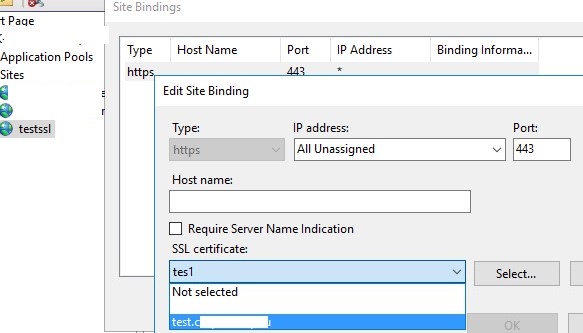
Open the IIS Manager console (inetmgr.exe), select your site, and then select the certificate you created in the Site Binding options. Save your changes.
You can also bind an SSL certificate by its thumbprint to an IIS site:
New-IISSiteBinding -Name "Default Web Site" -BindingInformation "*:443:" -CertificateThumbPrint $yourCert.Thumbprint -CertStoreLocation "Cert:\LocalMachine\My" -Protocol https
Большинству администраторов Windows, знакомых с темой PKI, известна утилита MakeCert.exe, с помощью которой можно создать самоподписанный сертификат. Эта утилита включена в состав Microsoft .NET Framework SDK и Microsoft Windows SDK. В современных версиях Windows 11/10/8.1 и Windows Server 2022/2019/2016/2012R2 вы можете создать самоподписанный сертификат с помощью встроенных командлетов PowerShell без использования дополнительных утилит.
Содержание:
- New-SelfSignedCertificate: создать самоподписанный SSL сертификат в PowerShell
- Как сгенерировать SAN (SubjectAltName) сертификат с помощью PowerShell?
- Экспорт самоподписаного сертификата в Windows
- Сгенерировать сертификат для подписи кода типа Code Signing
- Создать самоподписанный SSL сертификат SHA-256 для IIS
New-SelfSignedCertificate: создать самоподписанный SSL сертификат в PowerShell
Для создания самоподписанного сертификата в PowerShell нужно использовать командлет New-SelfSignedCertificate, входящий в состав модуля PKI (Public Key Infrastructure).
Чтобы вывести список всех доступных командлетов в модуле PKI, выполните команду:
Get-Command -Module PKI

Самоподписанные SSL сертификаты рекомендуется использовать в тестовых целях или для обеспечения сертификатами внутренних интранет служб (IIS, Exchange, Web Application Proxy, LDAPS, ADRMS, DirectAccess и т.п.), в тех случая когда по какой-то причине приобретение сертификата у внешнего провайдера или разворачивание инфраструктуры PKI/CA невозможны.
Совет. Не забывайте, что вы можете использования полноценные бесплатные SSL сертификаты от Let’s Encrypt. Например, вы можете SSL сертификат Let’s Encrypt и привязать его к сайту IIS.
Для создания сертификата нужно указать значения -DnsName (DNS имя сервера, имя может быть произвольным и отличаться от имени localhost) и -CertStoreLocation (раздел локального хранилища сертификатов, в который будет помещен сгенерированный сертификат).
Чтобы создать новый SSL сертификат для DNS имени test.contoso.com (указывается FQDN имя) и поместить его в список персональных сертификатов компьютера, выполните команду:
New-SelfSignedCertificate -DnsName test.contoso.com -CertStoreLocation cert:\LocalMachine\My
Команда вернет отпечаток нового сертификата (Thumbprint), Subject и EnhancedKeyUsageList. По умолчанию такой сертификат можно использовать для аутентификации клиента Client Authentication (1.3.6.1.5.5.7.3.2) или сервера Server Authentication (1.3.6.1.5.5.7.3.1).
Если вы запустите эту команду в PowerShell без прав администратор, появится ошибка:
New-SelfSignedCertificate : CertEnroll::CX509Enrollment::_CreateRequest: Access denied. 0x80090010 (-2146893808 NTE_PERM)
Если вы указали нестандартный криптографический провайдер CSPs (например, с помощью параметров
-KeyAlgorithm "ECDSA_secP256r1" -Provider 'Microsoft Smart Card Key Storage Provider'
), убедитесь, что он установлен на компьютере (по умолчанию используется CSP Microsoft Enhanced Cryptographic Provider). Иначе появится ошибка:
New-SelfSignedCertificate: CertEnroll::CX509Enrollment::_CreateRequest: Provider type not defined. 0x80090017 (-2146893801 NTE_PROV_TYPE_NOT_DEF).
По-умолчанию генерируется самоподписанный сертификат со следующим параметрами:
- Криптографический алгоритм: RSA;
- Размер ключа: 2048 бит;
- Допустимые варианты использования ключа: Client Authentication и Server Authentication;
- Сертификат может использоваться для: Digital Signature, Key Encipherment ;
- Срок действия сертификата: 1 год.
- Криптопровадер: Microsoft Software Key Storage Provider
Данная команда создаст новый сертификат и импортирует его в персональное хранилище компьютера. Откройте оснастку certlm.msc и проверьте, что в разделе Personal хранилища сертификатов компьютера появился новый сертификат.
С помощью командлета Get-ChildItem можно вывести все параметры созданного сертификата по его отпечатку (Thumbprint):
Get-ChildItem -Path "Cert:\LocalMachine\My" | Where-Object Thumbprint -eq 76360EAA92D958ECF2717261F75D426E6DB5B4D1 | Select-Object *
PSPath                   : Microsoft.PowerShell.Security\Certificate::LocalMachine\My\76360EAA92D958ECF2717261F75D426E6
  DB5B4D1
PSParentPath             : Microsoft.PowerShell.Security\Certificate::LocalMachine\My
PSChildName              : 76360EAA92D958ECF2717261F75D426E6DB5B4D1
PSDrive                  : Cert
PSProvider               : Microsoft.PowerShell.Security\Certificate
PSIsContainer            : False
EnhancedKeyUsageList     : {Client Authentication (1.3.6.1.5.5.7.3.2), Server Authentication (1.3.6.1.5.5.7.3.1)}
DnsNameList              : {test.contoso.com}
SendAsTrustedIssuer      : False
EnrollmentPolicyEndPoint : Microsoft.CertificateServices.Commands.EnrollmentEndPointProperty
EnrollmentServerEndPoint : Microsoft.CertificateServices.Commands.EnrollmentEndPointProperty
PolicyId                 :
Archived                 : False
Extensions               : {System.Security.Cryptography.Oid, System.Security.Cryptography.Oid,
                           System.Security.Cryptography.Oid, System.Security.Cryptography.Oid}
FriendlyName             :
HasPrivateKey            : True
PrivateKey               : System.Security.Cryptography.RSACng
IssuerName               : System.Security.Cryptography.X509Certificates.X500DistinguishedName
NotAfter                 : 12/2/2023 3:41:18 PM
NotBefore                : 12/2/2022 3:21:18 PM
PublicKey                : System.Security.Cryptography.X509Certificates.PublicKey
 RawData                  : {48, 130, 3, 45…}
SerialNumber             : 24682351DA9C59874573BA2B5BB39874
SignatureAlgorithm       : System.Security.Cryptography.Oid
SubjectName              : System.Security.Cryptography.X509Certificates.X500DistinguishedName
Thumbprint               : 76360EAA92D958ECF2717261F75D426E6DB5B4D1
Version                  : 3
Handle                   : 2007435579936
Issuer                   : CN=test.contoso.com
Subject                  : CN=test.contoso.com
Примечание. Срок действия такого самоподписанного сертификата истекает через 1 год с момента его создания. Можно задать другой срок действия сертификата с помощью атрибута —NotAfter.Чтобы выпустить сертификат на 3 года, выполните следующие команды:
$todaydate = Get-Date
$add3year = $todaydate.AddYears(3)
New-SelfSignedCertificate -dnsname test.contoso.com -notafter $add3year -CertStoreLocation cert:\LocalMachine\My
Можно создать цепочку сертификатов. Сначала создается корневой сертификат (CA), а на основании него генерируется SSL сертификат сервера:
$rootCert = New-SelfSignedCertificate -Subject "CN=TestRootCA,O=TestRootCA,OU=TestRootCA" -KeyExportPolicy Exportable  -KeyUsage CertSign,CRLSign,DigitalSignature -KeyLength 2048 -KeyUsageProperty All -KeyAlgorithm 'RSA'  -HashAlgorithm 'SHA256'  -Provider "Microsoft Enhanced RSA and AES Cryptographic Provider"
New-SelfSignedCertificate -CertStoreLocation cert:\LocalMachine\My -DnsName "test2.contoso.com" -Signer $rootCert -KeyUsage KeyEncipherment,DigitalSignature
Чтобы изменить длину ключа сертификата и алгоритм шифрования, нужно использовать параметры
–KeyAlgorithm
,
–KeyLength
и
–HashAlgorithm
. Например:
New-SelfSignedCertificate -KeyAlgorithm RSA -KeyLength 2048 -HashAlgorithm "SHA256"
Если на компьютере доступен модуль TPM 2.0, можно использовать его для защиты ключа:
New-SelfSignedCertificate -Type Custom -Provider "Microsoft Platform Crypto Provider" ...
Провайдер Microsoft Platform Crypto Provider использует Trusted Platform Module чип устройства для создания ассиметричного ключа.
$Params = @{
"DnsName"           = "mylocalhostname"
"CertStoreLocation" = "Cert:\\CurrentUser\\My"
"KeyUsage"          = "KeyEncipherment","DataEncipherment","KeyAgreement"
"Type"              = "DocumentEncryptionCert"
}
New-SelfSignedCertificate @Params
Как сгенерировать SAN (SubjectAltName) сертификат с помощью PowerShell?
Командлет New-SelfSignedCertificate позволяет создать сертификат с несколькими различными именами Subject Alternative Names (SAN).
Примечание. Утилита Makecert.exe, в отличии от командлета New-SelfSignedCertificate, не умеет создавать сертификаты с SAN.
Если создается сертификат с несколькими именами, первое имя в параметре DnsName будет использоваться в качестве CN (Common Name) сертификата. К примеру, создадим сертификат, у которого указаны следующие имена:
- Subject Name (CN): adfs1.contoso.com
- Subject Alternative Name (DNS): web-gw.contoso.com
- Subject Alternative Name (DNS): enterprise-reg.contoso.com
Команда создания сертификата будет такой:
New-SelfSignedCertificate -DnsName adfs1.contoso.com,web_gw.contoso.com,enterprise_reg.contoso.com -CertStoreLocation cert:\LocalMachine\My
Также можно сгенерировать wildcard сертификат для всего пространства имен домена, для этого в качестве имени сервера указывается *.contoso.com.
New-SelfSignedCertificate -certstorelocation cert:\localmachine\my -dnsname *.contoso.com
Вы можете привязать сертификат не только к DNS имени, но и к IP адресу. Для этого вместе параметр -DnsName нужно использовать -TextExtension. Например:
New-SelfSignedCertificate -TextExtension @("2.5.29.17={text}IPAddress=10.10.2.3&DNS=TESTServer1&DNS=TESTServer1.local")
Как вы видите, в поле Subject Alternative Name теперь содержится IP адрес.
Экспорт самоподписаного сертификата в Windows
Для экспорта полученного сертификата c закрытым ключом в pfx файл, защищенный паролем, нужно получить его отпечаток (Thumbprint). Сначала нужно указать пароль защиты сертификата и преобразовать его в формат SecureString. Значение Thumbprint нужно скопировать из результатов выполнения команды New-SelfSignedCertificate.
$CertPassword = ConvertTo-SecureString -String “YourPassword” -Force –AsPlainText
Export-PfxCertificate -Cert cert:\LocalMachine\My\2779C0490D558B31AAA0CEF2F6EB1A5C2CA83B30 -FilePath C:\test.pfx -Password $CertPassword

Можно экспортировать открытый ключ сертификата:
Export-Certificate -Cert Cert:\LocalMachine\My\2779C0490D558B31AAA0CEF2F6EB1A5C2CA83B30 -FilePath C:\testcert.cer
Проверьте, что в указанном каталоге появился CER (PFX) файл сертификата. Если щелкнуть по нему правой клавишей и выбрать пункт меню Install Certificate, можно с помощью мастера импорта сертификатов добавить сертификат в корневые доверенные сертификаты компьютера.
Выберите Store location -> Local Machine, Place all certificates in the following store -> Trusted Root Certification Authorities.
Можно создать сертификат и сразу импортировать его в доверенные корневые сертификаты компьютера командами:
$cert=New-SelfSignedCertificate …..
$certFile = Export-Certificate -Cert $cert -FilePath C:\certname.cer
Import-Certificate -CertStoreLocation Cert:\LocalMachine\AuthRoot -FilePath $certFile.FullName
Полученный открытый ключ или сам файл сертификата можно распространить на все компьютеры и сервера в домене с помощью GPO (пример установки сертификата на компьютеры с помощью групповых политик).
Сгенерировать сертификат для подписи кода типа Code Signing
В PoweShell 3.0 командлет New-SelfSifgnedCertificate позволял генерировать только SSL сертификаты, которые нельзя было использоваться для подписывания кода драйверов и приложений (в отличии сертификатов, генерируемых утилитой MakeCert).
В версии PowerShell 5 командлет New-SelfSifgnedCertificate теперь можно использовать чтобы выпустить сертификат типа Code Signing.
Вы можете обновить версию PowerShell согласно инструкции.
Для создания самоподписанного сертфиката для подписывания кода приложений, выполните команду:
$cert = New-SelfSignedCertificate -Subject "Cert for Code Signing” -Type CodeSigningCert -CertStoreLocation cert:\LocalMachine\My
Теперь можно подписать ваш PowerShell скрипт эти сертификатом:
Set-AuthenticodeSignature -FilePath C:\PS\test_script.ps1 -Certificate $cert
Если при выполнении команды появится предупреждение UnknownError, значит этот сертификат недоверенный, т.к. находится в персональном хранилище сертификатов пользователя.

Нужно переместить его в корневые сертификаты (не забывайте периодически проверять хранилище сертификатов Windows на наличие недоверенных сертфикатов и обновлять списки корневых сертификатов):
Move-Item -Path $cert.PSPath -Destination "Cert:\CurrentUser\Root"
Теперь вы можете использовать этот самоподписанный сертификат для подписи PowerShell скриптов, драйверов или приложений.
Создать самоподписанный SSL сертификат SHA-256 для IIS
Обратите внимание, что при создании самоподписанный сертификат для IIS через консоль Internet Information Manager (пункт меню Create Self-Signed Certificate), создается сертификат с использованием алгоритма шифрования SHA-1. Такие сертификаты многими браузерами считаются недоверенными, поэтому они могут выдавать предупреждение о небезопасном подключении. Командлет New-SelfSignedCertificate позволяет создать более популярный тип сертификата с помощью алгоритма шифрования SHA-256.
Вы можете привязать самоподписанный сертификат SHA-256, созданный в PowerShell, к сайту IIS. Если вы с помощью PowerShell создали SSL сертификат и поместили его в хранилище сертификатов компьютера, он будет автоматически доступен для сайтов IIS.
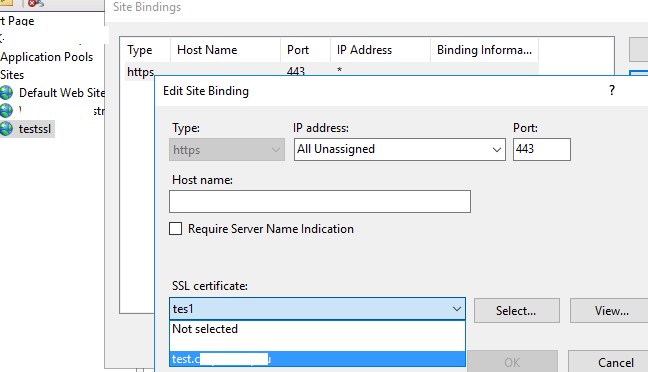
Запустите консоль IIS Manager, выберите ваш сайт, затем в настройке Site Binding, выберите созданный вами сертификат и сохраните изменения.
Также можно привязать SSL сертификат к сайту IIS по его отпечатку:
New-IISSiteBinding -Name "Default Web Site" -BindingInformation "*:443:" -CertificateThumbPrint $yourCert.Thumbprint -CertStoreLocation "Cert:\LocalMachine\My" -Protocol https
If you don’t have your own PKI and just want to perform some tests on a specific application or OS feature, you will probably need to generate a self-signed certificate. You can easily achieve this on Windows server without any additional tool or product. With the newer version of Windows server (since the version Windows server 2012), a new powershell cmdlet can generate this kind of certificate : New-SelfSignedCertificate
The command is quite simple:
New-SelfSignedCertificate -KeyUsage DigitalSignature,KeyEncipherment -KeyLength 2048 -KeyAlgorithm RSA -DnsName mywebserver.domain.local -Type SSLServerAuthentication -TextExtension @("2.5.29.37={text}1.3.6.1.5.5.7.3.1")
In this example, the self signed certificate will be created with the following options:
– Subject CN and SAN Dns Name: mywebserver.domain.local
– Public key: RSA (2048 bits)
– Key usage: DigitalSignature and KeyEncipherment
– Enhanced key usage: Server Authentication (1.3.6.1.5.5.7.3.1)
Before Windows server 2012 (Windows 2008), the powershell cmdlet New-SelfSignedCertificate is not available.
In this scenario, you can use instead the builtin cli tool called certreq.exe. First, you have to write a definition file we will called def.ini:
[Version]
Signature="$Windows NT$"

[NewRequest]
Subject = "CN=mywebserver.domain.local"

KeyLength = 2048
KeySpec = 1
KeyUsage = 0xA0
MachineKeySet = True
ProviderName = "Microsoft RSA SChannel Cryptographic Provider"
ProviderType = 12
SMIME = FALSE
RequestType = Cert

[Strings]
szOID_SUBJECT_ALT_NAME2 = "2.5.29.17"
szOID_ENHANCED_KEY_USAGE = "2.5.29.37"
szOID_PKIX_KP_SERVER_AUTH = "1.3.6.1.5.5.7.3.1"

[Extensions]
%szOID_SUBJECT_ALT_NAME2% = "{text}dns=mywebserver.domain.local"
%szOID_ENHANCED_KEY_USAGE% = "{text}%szOID_PKIX_KP_SERVER_AUTH%"
After that, launch the certreq.exe command:
certreq.exe -new def.ini my.req
In the command above, the file my.req is the certificate request file. The ini file contains the line : RequestType = Cert
With this line, the self-signed certificate will be created automatically. You can now find it by opening your Certificate MMC snap-in (Local Machine)
You will find below more information on:
– New-SelfSignedCertificate
– certreq.exe and inf structure
My Powershell script categories
- Active Directory
- Cluster
- Database
- Exchange
- Files and folders
- Hardware
- Network
- Operating System
- PKI
- SCCM
- Service and process
- Tips
- VMWare
Creating a self-signed certificate on Windows Server 2019 is a straightforward process that allows you to secure your website or application without the need for a trusted third-party certificate authority. While self-signed certificates may not be suitable for production environments, they are useful for local development or testing purposes. In this tutorial, we will guide you through the steps to create a self-signed certificate on Windows Server 2019.
Step 1: Launch the Internet Information Services (IIS) Manager by searching for it in the Start menu.
Step 2: In the IIS Manager, select your server name in the Connections pane on the left-hand side.
Step 3: Double-click on «Server Certificates» in the main pane.
Step 4: In the Server Certificates window, click on «Create Self-Signed Certificate» in the Actions pane on the right-hand side.
Step 5: Enter a friendly name for the certificate in the «Specify a friendly name for the certificate» field. This name is for identification purposes only and can be anything you like.
Step 6: Select the desired certificate store from the drop-down menu. The Personal store is recommended for web server certificates.
Step 7: Click on the «OK» button to create the self-signed certificate.
| Pros | Cons |
|---|---|
| 1. Quick and easy process to create a self-signed certificate without relying on a third-party certificate authority. | 1. Self-signed certificates are not trusted by default and may trigger security warnings in web browsers. |
| 2. Suitable for local development or testing purposes to secure websites or applications. | 2. Self-signed certificates are not recommended for production environments as they do not provide the same level of trust as certificates issued by trusted authorities. |
| 3. Can be easily generated and managed within the Windows Server environment. | 3. Self-signed certificates need to be manually deployed and trusted on client machines and may require additional configuration. |
Creating a self-signed certificate on Windows Server 2019 allows you to establish secure connections for testing or development purposes. However, it is important to note that self-signed certificates are not recommended for production environments where trust and security are paramount.
Video Tutorial: How do I Create a self-signed certificate?
In Windows Server, the self-signed certificates are usually located in the certificate store. Here are the steps to locate the self-signed certificate in Windows Server:
1. Press the Windows key on your keyboard and type «mmc» to open the Microsoft Management Console.
2. In the Console window, go to the «File» menu and choose «Add/Remove Snap-in.«
3. In the Add or Remove Snap-ins window, select «Certificates» and click on the «Add» button.
4. In the Certificates snap-in window, choose «Computer account» and click on the «Next» button.
5. Select «Local computer» and click on the «Finish» button.
6. Click on the «OK» button in the Add or Remove Snap-ins window.
7. In the Console window, expand the «Certificates (Local Computer)» node and then expand the «Personal» folder.
8. Navigate to the «Certificates» folder within the «Personal» folder.
9. The self-signed certificate(s) will be listed in the right pane of the Console window.
Note: The above steps assume that you have administrative privileges on the Windows Server.
How to create SSL certificate in Server 2019?
To create an SSL certificate in Server 2019, you can follow these steps:
1. Launch the Internet Information Services (IIS) Manager by searching for it in the Start menu.
2. In the left-hand pane, navigate to the server’s name and open the «Server Certificates» feature.
3. On the right-hand side, click on «Create Certificate Request» to start the certificate creation process.
4. Enter the required information in the «Distinguished Name Properties» window, including common name (usually the fully qualified domain name), organization, organizational unit, city, state, and country. Click «Next» to proceed.
5. Choose the cryptographic service provider and bit length for the key pair. A recommended provider is the default «Microsoft RSA SChannel Cryptographic Provider» with a key length of at least 2048 bits. Click «Next» to proceed.
6. Specify the file path and name where you want to save the certificate request file (.csr). Click «Finish» to complete the process. Note down the location of the file.
7. Now, you need to submit the certificate request to a certificate authority (CA), such as Symantec, Thawte, or Let’s Encrypt. Consult with your chosen CA for their specific process.
8. Once your certificate request is approved by the CA, they will provide you with a signed SSL certificate, typically in the form of a .cer or .pfx file.
9. Back in the IIS Manager, go to «Complete Certificate Request» under the «Server Certificates» feature.
10. Specify the path to the certificate file provided by the CA and a friendly name to identify the certificate.
11. Click «OK» to complete the process; the SSL certificate is now installed on your Server 2019.
It’s worth noting that the exact steps may vary depending on your specific server configuration and the CA you choose to obtain the SSL certificate from. Always refer to the documentation provided by your CA for any specific instructions they may have.
How do I Create a self-signed certificate in Windows?
To create a self-signed certificate in Windows, you can follow these steps:
1. Launch the Microsoft Management Console (mmc.exe) by searching for it in the Start menu.
2. In the Management Console, go to «File» and select «Add/Remove Snap-in.«
3. From the list of available snap-ins, choose «Certificates» and click on the «Add» button.
4. In the «Certificates» dialog box, select «Computer account» and click «Next.«
5. Choose «Local computer» and click «Finish,» followed by «OK» in the «Add or Remove Snap-ins» dialog.
6. Now, expand the «Certificates (Local Computer)» node, then expand «Personal» and select «Certificates.«
7. Right-click on the «Certificates» node and choose «All Tasks,» followed by «Advanced Operations» and then «Create Custom Request.«
8. In the «Certificate Enrollment» wizard, select «Proceed without enrollment policy» and click «Next.«
9. Choose «No template» and click on the «Next» button.
10. In the «Certificate Information» window, click on the «Details» arrow to expand the options.
11. Scroll down and select «Properties,» followed by clicking on the «Edit Properties» button.
12. In the «Certificate Properties» window, specify the required information such as common name, organization, country, etc.
13. After filling in the necessary details, click «OK» to close the «Certificate Properties» window.
14. Back in the «Certificate Enrollment» wizard, click «Next» and specify a filename for the certificate request.
15. Choose a location to save the certificate request file, then click «Finish» to complete the process.
By following these steps, you will have created a self-signed certificate in Windows. This certificate can be used for various purposes like securing web servers or testing in a local environment. However, please note that self-signed certificates are not trusted by default and may generate security warnings when used on public-facing websites.
How to create a self-signed certificate for client and server?
Creating a self-signed certificate for both the client and server involves a series of steps. Here’s a professional perspective on how to accomplish this:
1. Generate a private key: Start by generating a private key for the server and the client. This can be done using a tool like OpenSSL by running the appropriate commands to generate RSA (or other encryption algorithm) keys.
2. Create a Certificate Signing Request (CSR): Using the private key generated in the previous step, create a CSR for both the server and client. This step involves providing the necessary information, such as the common name (domain name) and organization details, to create the certificate.
3. Generate the self-signed certificate: Once the CSR is created, you can use the private key and CSR to generate the self-signed certificate. This involves signing the certificate using the private key without involving any external Certificate Authority (CA).
4. Install the certificate on the server and client: After generating the self-signed certificate, it needs to be installed on both the server and client. The specific steps to install the certificate might vary depending on the server or client software being used, but generally, it involves importing or adding the certificate to the appropriate certificate store or configuration file.
5. Configure the server and client to use the certificates: Once the certificates are installed, the server and client need to be configured to use them. This step involves configuring the server to present the self-signed certificate during the SSL/TLS handshake and configuring the client to trust the server’s self-signed certificate.
It’s worth noting that self-signed certificates are not validated by a trusted CA and may result in trust errors in web browsers or other client applications. They are typically used in testing or development environments, and for the purposes of encryption and securing communication between the client and server. In production environments, it’s recommended to use certificates signed by a trusted CA to establish trust and avoid potential security issues.
How to create self-signed certificate using CMD?
To create a self-signed certificate using the Command Prompt (CMD) in Windows, you can follow these steps:
1. Open the Command Prompt: Press the Windows key, type «cmd,» and click on the «Command Prompt» app.
2. Navigate to the directory where you want to create the certificate: Use the `cd` command followed by the directory path. For example, `cd C:\Certificates`.
3. Generate a new private key: Run the following command to create a new private key file (e.g., private.key):
«`
openssl genrsa -out private.key 2048
«`
This command generates a 2048-bit RSA private key.
4. Create the self-signed certificate: Enter the following command to create a self-signed certificate (e.g., certificate.crt):
«`
openssl req -new -x509 -key private.key -out certificate.crt -days 365
«`
This command creates a self-signed certificate that is valid for 365 days. You will be prompted to enter some information like Common Name (the fully qualified domain name).
5. Provide the required information: Follow the prompts to provide the necessary information for the certificate, such as the Common Name, Organization, Locality, etc. Press Enter to leave a field blank.
6. Generate the self-signed certificate: The above command will generate the self-signed certificate file (certificate.crt) in the specified directory.
7.(Optional) Convert the certificate format: You can convert the certificate issued in PEM format (default) to other formats like PFX or CRT if needed using additional tools like OpenSSL or other certificate management software.
Please note that the steps above utilize the OpenSSL command-line tool, which may not be pre-installed on your Windows system. You may need to download and install OpenSSL separately before proceeding with the command above.
Keep in mind that self-signed certificates are not trusted by default in most web browsers or applications. They are useful for local development or testing purposes but not recommended for public-facing production environments.