
In this era of digital world, there is no need to explain the importance of a digital certificate or a system that manages the digital certificate, Public Key Infrastructure (PKI). If your company is quite behind in this and not implemented a PKI infrastructure yet, it’s time to do now. The very first thing you should do is to set up a root CA, then one or more subordinate CA according to the environment size and structure, and a CA database, enforcement servers, and many more. Well, when it comes to set up a root CA, there are two types of root CAs. Enterprise Root CA and Standalone Root CA. Let’s see about setting up a Enterprise Root CA in a different post, let’s limit this post to a Standalone Root CA (Certificate Authority). Let’s see a step-by-step procedure to set up a Standalone Root CA in ADCS with a list of requirements and benefits of setting up a Standalone Root CA in the PKI infrastructure.
What Is ADCS?
Microsoft ADCS is the Active Directory Certificate Services server role in Windows Server. It allows administrators to manage and generate digital certificates for use in a variety of scenarios, such as authenticating users and devices, encrypting communication, and validating signatures. ADCS is a key component of many PKI deployments and helps organizations to secure their data and communications.
ADCS includes a number of features that make it a powerful and flexible tool for certificate management. For example, ADCS can be used to issue certificates to user accounts and computers in an Active Directory domain. ADCS can also be configured to automatically enroll users and computers in a certificate program, making it easy to keep track of who has which certificates. In addition, ADCS provides a web enrollment interface that allows users to request and retrieve certificates without having to use the ADCS console.
ADCS is an important part of many PKI deployments and can help organizations to secure their data and communications.
What Is A Root CA?
A Root CA is a certification authority that is trusted by all other CAs in a given PKI hierarchy. A Root CA’s certificate is self-signed and contains information that identifies the Root CA as well as the Root CA’s public key. The Root CA’s public key is used to verify the signatures of all other certificates in the PKI hierarchy.
What Is A Standalone Root CA In ADCS?
A standalone root CA is a Certification Authority (CA) that is not integrated with an existing public key infrastructure (PKI). A PKI is a system of digital certificates, public and private keys, and other related components that are used to verify the identity of individuals or devices and to encrypt information. A standalone root CA can issue and manage digital certificates for use in a PKI, but it is not itself part of a PKI.
A standalone root CA is typically used in organizations that do not have an existing PKI, or in situations where it is not possible or desirable to integrate a new CA into an existing PKI. For example, a standalone root CA might be used to issue digital certificates for use in a PKI that is being created from scratch, or to issue digital certificates for use in a PKI that exists outside of the organization.
There are several benefits to using a standalone root CA. First, it can be faster and easier to deploy than a CA that is integrated into an existing PKI. Second, it can be less expensive to maintain and operate than a CA that is part of a PKI. Finally, it can provide more flexibility in terms of the types of certificates that can be issued and the way in which they are used.
However, there are also some drawbacks to using a standalone root CA. First, it is more vulnerable to attack than a CA that is part of a PKI. Second, it can be more difficult to manage and operate than a CA that is integrated into an existing PKI. Finally, it may not be possible to issue all types of certificates that are available from a CA that is part of a PKI.
In summary, a standalone root CA is a CA that is not integrated with an existing PKI. It has several benefits, but also some drawbacks. It is typically used in organizations that do not have an existing PKI, or in situations where it is not possible or desirable to integrate a new CA into an existing PKI.
Why You Should Need to Have a Root CA?
Why You Should Set Up A Standalone Root CA?
A lot of people ask why they should set up A Standalone Root CA. The answer is simple: because it’s more secure. When you set up A Standalone Root CA, your server will be its own Certificate Authority. This means that your server will generate its own certificates, and no one else will be able to issue certificates for your domain.
There are a few reasons why this is more secure:
-
It’s much harder for someone to spoof your certificates if they can’t generate their own.
-
If someone does manage to get ahold of your private key, they won’t be able to use it to issue new certificates – they’ll only be able to use it for the sites that already have certificates from your server.
-
set up A Standalone Root CA is more resistant to attack than other types of Certificate Authorities. This is because the attacker would need to compromise the server itself in order to issue new certificates.
Overall, set up A Standalone Root CA is a more secure way to manage your certificates. If you’re looking for the highest level of security possible, this is the way to go.
Things Required To Set Up A Standalone Root CA In ADCS:
There are nothing much required to set up Standalone Root CA server. You just need to have these two things. That’s all.
-
A Windows Server (a bare-metal or a virtual machine)
-
An Administrator account to set up ADCS
How To Set Up A Standalone Root CA On Windows Server?
Let’s see steps to set up a standalone root CA for your organization. We have created a Windows VM on our lab to demonstrate this demo. You can go through this steps on your production or test environments to set up a standalone root CA. Let’s get started.
Note: This server is not attached to the Active Directory. It’s a workgroup machine.
Step 1. Set up Active Directory Certificate Service (ADCS) Role- Open the ‘Add Roles and Features’
Let’s begin this process with setting up ADCS role. Open the ‘Add Roles and Features’.
In Server Manager, go to Manage –> Add Roles and Features
Step 2. Select Role-Based Installation
Click Next button in the ‘Add Roles and Features’ wizard.
Select Role based or Feature based installation since it is a role based
Click Next.
Step 3. Select the Server on that you are going to install the ADCS Role
Since it has only local server, select that local server then click Next.
Step 4. Select ‘Active Directory Certificate Services’ role
Select “Active Directory Certificate Services” role then click on Next.
Step 5. Add the ‘Add Features’
Click on ‘Add Features’ button to add the ADCS features.
Click on Next, and Next again.
Step 6. Initiate the ADCS installation process
Click on Next, and Next again. This will take you to the ADCS installation wizard.
Click the Next button to initiate the ADCS installation process.
Step 7. Select ‘Certificate Authority’ role
You will to greeted with multiple option to choose. Select the first option ‘Certificate Authority role alone then click Next.
Step 8. Begin the installation of ‘Certificate Authority‘ role
Click on the Install button to being the installation of ‘Certificate Authority‘ role.
Step 9. Installation of ‘Certificate Authority‘ role in progress…
Step 10. Start the Active Directory Certificate Service configuration wizard
Upon the completion of the installation process, it prompts for Configuration, Select “Configure Active Directory Certificate Services on destination server” to start the ADCS configuration wizard.
Step 11. Select the Administrator account in the ADCS configuration wizard
By default Local Administrator Account should be selected (Server is in WorkGroup). Just ensure it is selected then click Next.
Step 12. Select ‘Certificate Authority’ role in the ADCS configuration wizard
You are allowed to Check the ‘Certificate Authority’ role alone as we have installed only CA role. Select ‘Certificate Authority’ role then click Next.
Step 13. Select the Standalone CA in the ADCS configuration wizard
You will be greeted to choose two types of CAs, Enterprise CA and Standalone CA. Enterprise CA option should be greyed out since this computer is not attached to the Active Directory and not part of any domain.
You are allowed to select only Standalone CA option. Select the Standalone CA option then click on Nex
Step 14. Select the Root CA
You will be greated with two options. Root CA and Subordinate CA. Since we are going to set up standalone root CA in this demo go with the Root CA option. We will cover about the Subordinate CA in a different post when we show you how to create two tier PKI system. Select Root CA then click Next.
Step 15. Create a new private key for Standalone Root CA
Private key is the first element of trust for any Certificate Authority. Let’s create a private key for this root CA. Since this is the newly created CA. Create a new private key.
Select “Create a New Private Key” then click Next.
Step 16. Select Key Length & Hash Algorithm based on requirement
Select the Cryptographic Provider, Hash Alogarithm, and Key Length as per your design. Then Click Next.
Step 17. Specify the name of the Certificate Authority
Specify the name of your CA, By default, Common Name with ‘- CA’ will be taken as the CA name.
Step 18. Specify the Certificate validation period
Validity period is the expiration time of the CA’s certificate. Normal practice is to keep the validity period for up to 10 years for root CA certificates. However, you can keep the validity period anywhere between 5 to 10 years.
Step 19. Specify Database & Logs location for Standalone Root CA
Specify the location for database and logs for your Standalone Root CA. You can leave this default as it is then click Next.
Step 20. Verify the summary of the configuration
Take a look at all the configurations then click on Configure button.
Step 21. Close the configuration wizard after the completion
Click on the Close button upon the completion of the configuration wizard.
Step 22. Close the Certificate Authority configuration wizard
Step 23. Open Certificate Authority Console
Server Manager -> Tools -> Certificate Authority
Right click on the Certificate Authority on the console then select Properties
Step 24. View the Certificate of the Standalone Root CA
Click on the View Certificate to open the certificate.
Step 25. Certificate of Standalone Root CA
Now you can start issuing the Certificates from this Standalone Root Certificate Authority.
That’s it. You are done with setting up a Standalone Root CA. This concludes the demo of building the Certificate Authority.
We hope this post would help you know a step-by-step procedure to set up a Standalone Root CA in ADCS. Please share this post and help to secure the digital world. Visit our social media page on Facebook, LinkedIn, Twitter, Telegram, Tumblr,Medium & Instagram, and subscribe to receive updates like this.
You may also like these articles:
In order to avoid warning messages about self-signed certificates when developing web applications on a local machine you can create your own devlopment Root Certificate Authority.
By trusting this Root CA you then implicitly trust any certificates that it has signed, so you don’t need to keep adding certificates to your local store as long as they were signed by the Root CA.
NB
This post assumes you are using Powershell.
Installation
You can check to see if you have openssl installed by running the following at a command line
If you get a version back it’s already installed.
If not you can use chocolatey.
You’ll now need to close and re-open your PowerShell window to ensure that you get the updated path. (I find refreshenv does not work reliably for me.)
Generating the Root CA
You may find it helpful to create a folder to work in. I’m working on my secondary HDD on D:\. Adjust your path accordingly
md \certificates
cd certificates
First of all we need to create a private key for our CA.
Since we are going to implicitly trust any certificates signed by this CA it makes sense to password protect it for safety’s sake
openssl genrsa -aes256 -out root-ca.key 4096
You will be prompted to enter a pass phrase. Make sure you choose a strong one.
As mentioned above if a bad actor can get a hold of your CA and use it to sign something, you will implicitly trust it.
You should now have a private key in the file root-ca.key.
We’ll now create the Root CA. We’ll tell openssl to create a new key valid for 3650 days using our root-ca.key and output that to root-ca.crt
For our purposes we can use the default configuration, but if you really want to lock down the creation of the Certificate Authority, you can use a configuration file. This page has a great guide
Note that I have also skipped creating anIntermediate CA. See here for details as to the difference.
openssl req -new -x509 -days 3650 -key root-ca.key -out root-ca.crt
You’ll be prompted to enter the pass phrase you created above, then some details for the CA key.
Country Name (2 letter code) [AU]:GB
State or Province Name (full name) [Some-State]:England
Locality Name (eg, city) []:
Organization Name (eg, company) [Internet Widgits Pty Ltd]:PaxDev
Organizational Unit Name (eg, section) []:PaxDev
Common Name (e.g. server FQDN or YOUR name) []:PaxDev
We can now import the CA to the LocalMachine\Root (Local Computer\Trusted Root Certification Authorities in the Certificates MMC snap-in).
From an elevated PowerShell prompt:
Import-Certificate root-ca.crt -CertStoreLocation Cert:\LocalMachine\Root\ -Verbose
Create a new SSL Certificate to use on a website
First of all we need to create a signing request. We’ll pass in the configuration in a file.
Create a new file. The name is unimportant, but I’ll go with ssl.conf
[req]
default_bits = 4096
prompt = no
default_md = sha256
distinguished_name = dn
req_extensions = v3_req

[dn]
C = GB
ST = England
O = PaxDev
CN = localhost-dev

[v3_req]
basicConstraints = CA:FALSE
keyUsage = nonRepudiation, digitalSignature, keyEncipherment
subjectAltName = @subjectAltNames

[subjectAltNames]
DNS.1 = localhost
DNS.2 = *.test-domain.com
IP.1 = 10.0.0.22
The first section sets up the key size and mode, then sets the distinguished name to be in the section [dn] and instructs openssl that we are using the V3 X.509 extensions and names the section they are in.
This allows us, in particular to
- State that this is not
CAcertificate — i.e. it cannot be used to sign other certificates - Use
Subject Alt Namesto define multiple addresses and wildcards that this certificate will authenticate.
The subjectAltNames section is a list of the URLs and/or IP Addresses that this certificate will be used for
We now generate a private key for the SSL certificate
openssl genrsa -aes256 -out localhost-dev.key 4096
You’ll be prompted for a passphrase again.
Now create a Certificate Signing Request or CSR
openssl req -new -key localhost-dev.key -config ssl.conf -out localhost-dev.csr
You’ll be prompted for the pass phrase you created in the previous step (not the CA pass phrase).
In this case we are signing with the ‘SSL Key’ to validate that it came from us.
Now we need our Root CA to create the certificate.
Firstly we need to duplicate the V3 X.509 extensions data from the above config file. I created a file called localhost-dev.v3.ext:
[v3_req]
basicConstraints = CA:FALSE
keyUsage = nonRepudiation, digitalSignature, keyEncipherment
subjectAltName = @subjectAltNames

[subjectAltNames]
DNS.1 = localhost
DNS.2 = *.test-domain.com
IP.1 = 10.0.0.22
openssl x509 -req -in localhost-dev.csr `
                      -CA root-ca.crt `
                      -extfile localhost-dev.v3.ext `
                      -CAkey root-ca.key `
                      -CAcreateserial `
                      -out localhost-dev.crt `
                      -days 365 `
                      -extensions v3_req
You will be prompted for the Root CA pass phrase.
(The Root CA signs the certificate and because we trusted it earlier we automatically trust any certificates signed by it.)
We need to combine the new Certificate with the SSL Key we created just now.
openssl pkcs12 -export -out localhost-dev.pfx -inkey localhost-dev.key -in localhost-dev.crt
You will be asked to confirm the SSL Key pass phrase. Leave the export password blank.
Finally we need to import the certificate to the LocalMachine\My (Local Computer\Personal in the Certificates MMC snap-in) store
Import-PfxCertificate localhost-dev.pfx -CertStoreLocation Cert:\LocalMachine\My\ -Verbose
You can now select your certificate in IIS Manager for the HTTPS binding.
NB You will still need to manually add exceptions for the site in Firefox but you do only need to do that once.
Introduction
For an SSL/TLS socket connection from a client application to a server application, we need a server-side certificate. Client and server applications can communicate with each other via socket programming. In order to make sure the communication is secure/encrypted, we need to define a server certificate at the time of creating a server-side socket. This article describes a step by step procedure from scratch on how to generate a server-side X509 certificate on Windows 7 for SSL/TLS TCP communication using OpenSSL.
Note
This tutorial does not require any kind of Linux simulation or virtualization of Linux distribution on Windows. Instead, it describes how to generate the certificate solely on Windows. The procedure is tested on Windows 7 and it is assumed that the procedure will also work seamlessly for Windows 10 as well.
Overall, we first create a self-signed «Root key/certificate» pair. Then using this root key/Certificate, we create an intermediate Key/Certificate. Finally, we create a server certificate using the intermediate certificate. While creating a server certificate or server certificate signing request, we may consider using the «IP address» of the computer on which the server is running, as the “Common Name” field. Common Name is the mandatory parameter when running a certificate creation command of Openssl. This is due to the fact that some SSL programming libraries require that. I used the password “1234” whenever a password is required while creating a certificate or certificate signing request. As a result of each of the following steps of creating Key/Certificate/Certificate Signing Request, the corresponding Key/Certificate/Certificate Signing Request will be generated in its corresponding folder as per the directory structure given ahead.
1-Install/Setup OpenSSL
Download «Win32 OpenSSL v1.1.0f Light» from [3] and install it as mentioned at [2]. After installing Openssl, the path openssl.exe file should be added in the system path. That “oenssl.exe” can be run from our desired folder from the command prompt.
2-Setup Directory
We will create a «\root» folder at C:\ and the following folder structure in the «\root» folder.
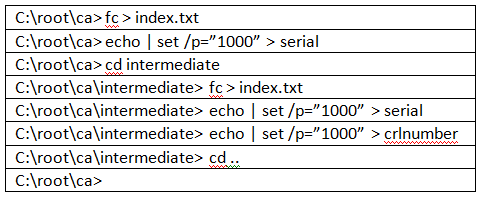
- Start Command Prompt
Start the command prompt; create a root folder and the following directory structure:Do the following to get index, serial and crlnumber files in the appropriate folders

- Get Configuration files
Extract the root configuration file [4] from the attachment (configurationFiles.zip) and save it as “openssl.cfg” at C:\root\caFor instance “C:\root\ca\openssl.cfg”
Extract the intermediate configuration file [5] from the attachment (configurationFiles.zip) and save it as “openssl.cfg” at C:\root\ca\intermediate
For instance «C:\root\ca\intermediate\openssl.cfg»
3-Certificate Creation Steps
- Set path at the command prompt
C:\root\ca> set RANDFILE=C:\root\ca\private\.rnd
C:\root\ca> set OPENSSL_CONF=C:\root\ca\openssl.cfg - Start OpenSSL
C:\root\ca>openssl
openssl> - Create a Root Key
openssl> genrsa -aes256 -out private/ca.key.pem 4096 - Create a Root Certificate (this is self-signed certificate)
openssl> req -config openssl.cnf \ -key private/ca.key.pem \ -new -x509 -days 7300 -sha256 -extensions v3_ca \ -out certs/ca.cert.pem - Create an Intermediate Key openssl> genrsa -aes256 \ -out intermediate/private/intermediate.key.pem 4096
- Create an Intermediate certificate signing request openssl> req -config intermediate/openssl.cfg -new -sha256 \ -key intermediate/private/intermediate.key.pem \ -out intermediate/csr/intermediate.csr.pem
- Create intermediate certificate (using Root Key/Certificate) openssl> req -config openssl.cfg \ -key private/ca.key.pem \ -new -x509 -days 7300 -sha256 -extensions v3_ca \ -out certs/ca.cert.pem
- Quit OpenSSL openssl> quit
C:\root\ca> - Get CA-Chain Cert C:\root\ca> type intermediate\certs\intermediate.cert.pem certs\ca.cert.pem > intermediate\certs\ca-chain.cert.pem
- Start OpenSSL
C:\root\ca>openssl
openssl> - Create a Server Key openssl>genrsa -aes256 \ -out intermediate/private/www.example.com.key.pem 2048
- Create a Server Signing Request openssl>req -config intermediate/openssl.cnf \ -key intermediate/private/www.example.com.key.pem \ -new -sha256 -out intermediate/csr/www.example.com.csr.pem
- Create a Server Certificate (Using Server signing Request and Intermediate Certificate/Key) openssl> ca -config intermediate/openssl.cnf \ -extensions server_cert -days 375 -notext -md sha256 \ -in intermediate/csr/www.example.com.csr.pem \ -out intermediate/certs/www.example.com.cert.pem
- Using Certificate Now the SSL/TLS server can be configured with server key and server certificate while using CA-Chain-Cert as a trust certificate for the server. The Root certificate has to be configured at the Windows to enable the client to connect to the server.
4-Configure SSL/TLS Client at Windows
In order to enable the client to connect with the Server, we need to register the Root certificate (created in step 3.4) at the Windows machine from where the Client will access the Server. Do Step 4.1 and 4.2 to complete the Root certificate registration on the Windows machine.
- Go to the Control Panel
-> Credential Manager -> Add a Certificate based credential -> Open Certificate Manager
- Right Click on the Certificate
-> All Tasks -> Import -> Next -> Browse
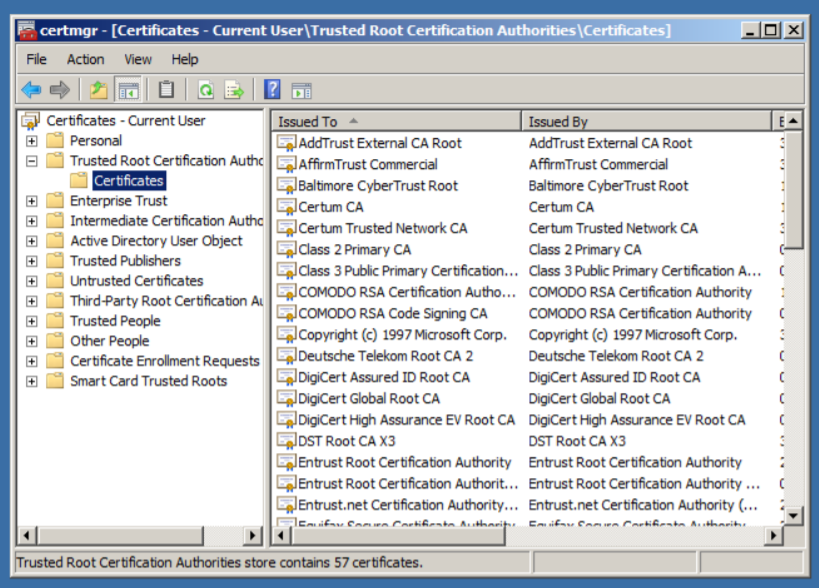
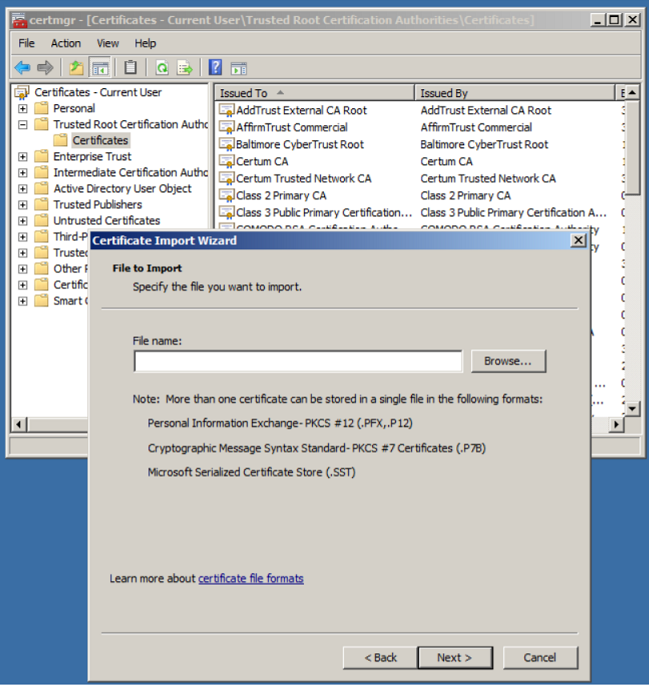
Browse the Root certificate that was generated in Step 3.4
References
- Creating SSL/TLS Certificates
- Installing OpenSSL
- Download OpenSSL for Windows
Note: This guide is archived and is no longer updated on this website. For any future updates to this guide, please refer to the version that can be found on docs.mjcb.ca.
The Server that will be hosting the Offline Root Certificate Authority requires minimal resources in order to operate. It is only to ever be used for issuing Subordinate Certificates to other TFS Labs Domain Servers and is also used to revoke or add new Subordinate Certificates if necessary. It is also used to refresh the CRL at least once a year.
The Server is setup as a standalone Windows Server and is never meant to be a member of an Active Directory Domain or even have any network connections to it. This means that it will require some local Security modifications that are normally handled through Group Policy from Active Directory. Since there is no connection to Active Directory, these changes will need to be applied locally.
Since there are no Network Connections to and from this virtual machine, create a virtual floppy disk that will be used for transferring files to and from the TFS-ROOT-CA Server. Name the file RootCAFiles (the file extension will vary based on whether you are using Hyper-V, VirtualBox or VMware) and store it in a location that will be available for all virtual machines that are being used. The first time that it is inserted into one of the virtual machines it will need to be formatted with the default settings.
Provision and configure a new virtual machine using the following settings:
- Create a new virtual machine with the following settings:
- Virtual CPU — 1
- Virtual Memory — 4096 MB
- Virtual Hard Disk — 60 GB
- Virtual Floppy Drive — 1
- Virtual Network Adapters — 0
- Install Windows Server 2019 Standard (Desktop Experience) with the default options.
- Set the hostname of the Server to TFS-ROOT-CA. Set it to be a member of the TFS-CA Workgroup instead of a Domain.
- Secure the local Administrator Account and additional User Accounts on the TFS-ROOT-CA Server:
- Use a complex password for the Administrator Account and store it securely.
- Ensure that there are no additional user accounts present on the Server. The Guest account should already be disabled by default and will be renamed in a further step in this guide.
- The Administrator account will be renamed to CA-Admin at a further step in this guide.
- There is no need to activate the Windows Server license, or even input a license key (make sure you are licensed though). If activation is ever needed on this Server, then the telephone option would be required in order to accomplish this since there is no network connection on this Server.
- On the root of the C:\ Drive create a folder called RootCA (C:\RootCA). This folder will store the Root Certificate, Subordinate Certificate and other necessary Certificate Files that are needed during the entire implementation process.
- Insert the RootCAFiles virtual floppy disk into the virtual floppy drive. Format the floppy disk with the default settings. Eject the disk when completed.
- Open the Local Group Policy Editor Console (gpedit.msc), confirm the following settings, and make any changes if necessary:
- Modify the Local Computer Policy > Computer Configuration > Windows Settings > Security Settings > Local Policies > Security Options settings to match the following:
- Accounts: Administrator account status — Enabled
- Accounts: Block Microsoft accounts — Users can’t add or log on with Microsoft Accounts
- Accounts: Guest account status — Disabled
- Accounts: Limit local account use of blank passwords to Console logon only — Enabled
- Accounts: Rename administrator account — CA-Admin
- Accounts: Rename guest account — Administrator
- Interactive Logon: Don’t display last signed-in — Enabled
- Interactive Logon: Don’t display username at sign-in — Enabled
- Network security: Do not store LAN Manager hash value on next password change — Enabled
- Network security: LAN Manager authentication level — Send NTLMv2 response only. Refuse LM & NTLM
- Modify the Local Computer Policy > Computer Configuration > Windows Settings > Security Settings > Local Policies > Security Options settings to match the following:
- Open the Local Security Policy Console (secpol.msc), confirm the following settings, and make any changes if necessary:
- Modify the Security Settings > Account Policies > Password Policy settings:
- Enforce password history — 24 passwords remembered
- Maximum password age — 90 days
- Minimum password age — 1 days
- Minimum password length — 14 characters
- Password must meet complexity requirements — Enabled
- Store passwords using reversible encryption — Disabled
- Modify the Security Settings > Account Policies > Account Lockout Policy settings:
- Account lockout threshold — 5 invalid login attempts
- Account lockout duration — 30 minutes
- Reset account lockout counter after — 30 minutes
- Modify the Security Settings > Account Policies > Password Policy settings:
- Restart the TFS-ROOT-CA Server to apply the updated security settings.
- Optional: Enable BitLocker in order to secure the TFS-ROOT-CA virtual machine while it is powered off or being stored in another location:
- Open the Server Manager Console (servermanager.exe), click on the Manage menu, and click on Add Roles and Features to start the installation wizard.
- On the Before You Begin screen, click the Next button to continue.
- On the Installation Type screen, select the option for Role-based or feature-based installation and click the Next button to continue.
- On the Server Selection screen, verify that the TFS-ROOT-CA Server is selected and click the Next button to continue.
- On the Server Roles screen, click the Next button to continue.
- On the Features screen, select the BitLocker Drive Encryption Feature. The installation wizard will ask to install the necessary management tools for the role. Click the Add Features button to continue.
- On the Features screen, click the Next button to continue.
- On the Confirmation screen, select the option to Restart the destination server automatically if required. When prompted with a warning about restarting the Server, click the Yes button (the Server must restart in order to continue). Click the Install button to continue.
- Once the TFS-ROOT-CA Server has restarted click the Close button on the Installation Progress screen.
- Open the Local Group Policy Editor Console (gpedit.msc) and modify the Computer Configuration > Administrative Templates > Windows Components > BitLocker Drive Encryption > Operating System Drives settings to match these settings:
- Require additional authentication at startup — Enabled
- Allow BitLocker without a compatible TPM (requires a password or a startup key on a USB flash drive) — Enabled
- Configure TPM startup: Allow TPM
- Configure TPM startup PIN: Allow startup PIN with TPM
- Configure TPM startup key: Allow startup key with TPM
- Configure TPM startup key and PIN: Allow startup key and PIN with TP
- Insert the RootCAFiles virtual floppy disk.
- Open File Explorer and go to This PC. Right-click on the C:\ Drive and select Turn on BitLocker.
- On the BitLocker Drive Encryption setup screen click the Next button to continue.
- On the Preparing your drive for BitLocker screen click the Next button to continue.
- On the BitLocker Drive Encryption setup screen, click the Next button to continue.
- On the Choose how to unlock your drive at startup screen, select the option to Enter a password.
- On the Create a password to unlock this drive screen, enter the password that you want to use to unlock the drive at boot up. Make sure that you do not forget this password as it will require the Recovery Keys in order to get back into the TFS-ROOT-CA virtual machine. Ensure that you use a complex password for this and make it at least 14 characters in length. Click the Next button to continue.
- On the How do you want to back up your recovery key? screen, select the option to Save to a file. Save the file to the A:\ Drive (floppy disk). Click the Next button to continue.
- Eject the RootCAFiles virtual floppy disk and then backup the recovery key to another device before you continue. This is critical in case there is an issue with the BitLocker password.
- On the Choose how much of your drive to encrypt screen, select the option to Encrypt entire drive (slower but best for PCs and drives already in use) and click the Next button.
- On the Choose which encryption mode to use screen, select the option for New encryption mode (best for fixed drives on this devices) and click the Next button to continue.
- On the Are you ready to encrypt this drive? screen, ensure that the Run BitLocker system check box is selected and then click the Continue button.
- When prompted, restart the TFS-ROOT-CA Server.
- Enter the password that you set for the drive to ensure that it is working correctly.
- Login to the TFS-ROOT-CA Server, you should receive a notification that the drive is encrypting. You can also check the status of BitLocker at anytime by going to File Explorer, then to This PC, right-clicking on the C:\ Drive and selecting the Manage BitLocker option.
1.2 Root CA CAPolicy.inf Installation
The CAPolicy.inf file is used to add configuration details to the Certificate at the time of creation. Create a file in the C:\Windows folder called CAPolicy.inf (ensure that it is saved with the inf extension and not the txt extension, otherwise these settings will be ignored). Copy the following contents into this file:
[Version]
Signature="$Windows NT$"

[PolicyStatementExtension]
Policies=AllIssuancePolicy,InternalPolicy
Critical=FALSE

; AllIssuancePolicy is set to the OID of 2.5.29.32.0 to ensure all Certificate templates are available.
[AllIssuancePolicy]
OID=2.5.29.32.0

[InternalPolicy]
OID=1.2.3.4.1455.67.89.5
Notice="The TFS Labs Certification Authority is an internal resource. Certificates that are issued by this Certificate Authority are for internal usage only."
URL=http://pki.corp.tfslabs.com/cps.html

[Certsrv_Server]
; Renewal information for the Root CA.
RenewalKeyLength=4096
RenewalValidityPeriod=Years
RenewalValidityPeriodUnits=10

; Disable support for issuing Certificates with the RSASSA-PSS algorithm.
AlternateSignatureAlgorithm=0

; The CRL publication period is the lifetime of the Root CA.
CRLPeriod=Years
CRLPeriodUnits=10

; The option for Delta CRL is disabled since this is a Root CA.
CRLDeltaPeriod=Days
CRLDeltaPeriodUnits=0
Note: You can update the OID number in the InternalPolicy section for your deployment if it is required. The OID number in this example is used in Microsoft examples, but it should work for your organization if it is only ever going to be used internally. You can register for one if you would like to through IANA.
Signature Algorithm Support Issues
The AlternateSignatureAlgorithm=0 flag in the CAPolicy.inf file explicitly uses SHA256 for the algorithm instead of RSASSA-PSS. This can cause issues with some devices (especially iOS) and by ensuring that it is disabled you shouldn’t have issues with these certificates.
1.3 Active Directory Certificate Services Role Installation
Once the TFS-ROOT-CA Server has been installed and configured properly, the Active Directory Certificate Services Role needs to be installed.
- Open the Server Manager Console (servermanager.exe), click on the Manage menu, and click on Add Roles and Features to start the installation wizard.
- On the Before You Begin screen, click the Next button to continue.
- On the Installation Type screen, select the option for Role-based or feature-based installation and click Next to continue.
- On the Server Selection screen, verify that the TFS-ROOT-CA Server is selected and click Next.
- On the Server Roles screen, select the Active Directory Certificate Services option. The installation wizard will ask to install the necessary management tools for the role. Click the Add Features button to continue.
- On the Server Roles screen, click the Next button to continue.
- On the Features screen, click the Next button to continue.
- On the Active Directory Certificate Services screen, click the Next button to continue.
- On the Role Services screen, select the option for Certification Authority and click the Next button to continue.
- On the Confirmation screen, select the option to Restart the destination server automatically if required. When prompted with a warning about restarting the Server, click the Yes button (the Server must restart in order to continue). Click the Install button to continue.
- Once the installation is completed, click the Close button.
1.4 Active Directory Certificate Services Role Configuration
Once the Active Directory Certificate Services Role has been added, it will need to be configured. In the process of configuring the role for the TFS Labs Domain, the following Root Certificate will be created:
| Root Certificate Setting | Value |
|---|---|
| Cryptographic Provider | RSA#Microsoft Software Key Storage Provider |
| Key Length | 4096 Bits |
| Signature Algorithm | SHA256RSA |
| Signature Hash Signature | SHA256 |
| CA Common Name | TFS Labs Certificate Authority |
| Validity Period | 10 Years |
- To begin the configuration of Active Directory Certificate Services on TFS-ROOT-CA, open the Server Manager Console (servermanager.exe). Click the Notifications icon in the upper-right hand corner and click the Configure Active Directory Certificate Services on the destination server link in the Post-deployment Configuration box.
- On the Credentials screen, verify that the Administrator credentials is set to TFS-ROOT-CA\CA-Admin and click Next to continue.
- On the Role Services screen, select the option for Certification Authority and click the Next button to continue.
- On the Setup Type screen, the option for Standalone CA should be selected. The option for Enterprise CA is not available since this Server is not a Domain Member Server. Click the Next button to continue.
- On the CA Type screen, ensure that the Root CA option is selected (the Subordinate CA option will be used later for the Enterprise CA). Click the Next button to continue.
- On the Private Key screen, verify that the Create a new private key option is selected. This is because this a new CA installation and the Private Key is not being restored from a previous Server. Click the Next button to continue.
- On the Cryptography for CA screen, make the following changes and then click the Next button to continue:
- Cryptographic Provider: RSA#Microsoft Software Key Storage Provider
- Key Length: 4096
- Hash Algorithm: SHA256
- On the CA Name screen, set the Common Name (CN) for the CA to TFS Labs Certificate Authority and click the Next button to continue.
- On the Validity Period screen, set the validity period to 10 Years and click the Next button to continue.
- On the CA Database screen, make no changes to the database location and click the Next button to continue.
- On the Confirmation screen, verify that the options are correct and click the Configure button to commit the changes.
- On the Results screen, click the Close button.
Certificate Validity Period
It is not advised to have the Root Certificate and the Subordinate Certificate set to have the same Validity Period. For example, if both Certificates have a 5 Year expiration date, it is possible that the Root Certificate will expire before the Subordinate Certificate since it was signed first. If this happens it will be extremely difficult to re-sign both Certificates because they will both be invalid at the same time.
1.5 Root Certificate Authority CRL Configuration
The CRL Configuration for the Root CA is configured in this step to give greater control over when this takes place, and the time is extended to 52 weeks since the CRL does not need to be updated often on the Root CA. It also ensures that the Subordinate CA lifetime is extended from 1 Year to 5 Years.
Active Directory Configuration Partition Distinguished Name
To determine what the correct format of this name would be for your domain you can check it in only a few steps.
- On one of your Domain Controllers, open the Active Directory Users and Computers Console (dsa.msc).
- Go to the View menu and select Advanced Features.
- Right-click on the root of your Domain and select Properties.
- Go to the Attribute Editor tab.
- Scroll down until you find the distinguishedName Attribute Field and click the View button.
- Copy the value in the Attribute Field, this is the information needed for Step 2 below.
Once the Active Directory Configuration Partition Distinguished Name has been determined, the rest of the configuration can continue.
- Open an Administrative Command Prompt.
- To define the Active Directory Configuration Partition Distinguished Name, run the following command:
Certutil -setreg CA\DSConfigDN "CN=Configuration,DC=corp,DC=tfslabs,DC=com"
- To define Validity Period Units for all issued certificates by this CA, run following commands:
Certutil -setreg CA\ValidityPeriodUnits 5
Certutil -setreg CA\ValidityPeriod "Years"
- To define CRL Period Units and CRL Period, run the following commands:
Certutil -setreg CA\CRLPeriodUnits 52
Certutil -setreg CA\CRLPeriod "Weeks"
- To define CRL Overlap Period Units and CRL Overlap Period, run the following commands:
Certutil -setreg CA\CRLOverlapPeriodUnits 12
Certutil -setreg CA\CRLOverlapPeriod "Hours"
- Restart the Active Directory Certificate Services service:
net stop CertSvc
net start CertSvc
CRL Renewal Period
As defined in Step 4 in Section 1.5, the CRL Period on the Root CA is set to 52 weeks. This means that every 52 weeks you will need to power on the TFS-ROOT-CA Server and renew the CRL. You should set a reminder in your calendar to do perform this task every 50 weeks to ensure that it is renewed in time.
1.6 Enable Auditing on the Root Certificate Authority
Auditing is needed on any Server running Active Directory Certificate Services. This will write logs to the Windows Event Log whenever a Certificate is issued or revoked.
- Open the Local Security Policy Console (secpol.msc) and modify the Security Settings > Local Policies > Audit Policy > Audit object access setting to audit Success and Failure.
- Enable auditing for the Certificate Authority by running the following command from an Administrative Command Prompt:
Certutil -setreg CA\AuditFilter 127
- Restart the Active Directory Certificate Services Service.
1.7 Root Certificate Authority CDP and AIA Configuration
Before the Subordinate Certificate Authority can be properly configured, the Certificate Revocation List needs to be configured on the Root CA Certificate. This configuration will be present in the Subordinate Certificate that will be issued on the Enterprise CA which will be installed on the TFS-CA01 Server.
- Open the Certification Authority Console (certsrv.msc) for the TFS-ROOT-CA Server.
- Right-click on TFS Labs Certificate Authority Server and select Properties.
- On the Extensions tab, verify that the CRL Distribution Point (CDP) extension is selected and click the Add button.
- Under the Location field, enter the following address and click the OK button:
http://pki.corp.tfslabs.com/CertData/<CaName><CRLNameSuffix><DeltaCRLAllowed>.crl
- Back on the Extensions tab, verify that the Include in CRLs. Clients use this to find Delta CRL locations. and Include in the CDP extension of issued certificates options are selected for the location that was just entered.
- Select the file:///CertEnroll/TFS%20Labs%20Certificate%20Authority.crl list item and click the Remove button. Click the Yes button to confirm that you want to remove the location.
- On the Extensions tab, verify that the Authority Information Access (AIA) extension is selected and click the Add button.
- Under the Location field, enter the following address and click the OK button:
http://pki.corp.tfslabs.com/CertData/<ServerDNSName>_<CaName><CertificateName>.crt
- Back on the Extensions tab, verify that the Include in the AIA extension of issued certificates option is selected for the location that was just entered.
- Select the file:///CertEnroll/_.crt list item and click the Remove button. Click the Yes button to confirm that you want to remove the location.
- Click the OK button to commit the changes. When prompted to restart Active Directory Certificate Services, click the Yes button.
- Verify that the settings are correct by running the following commands in an Administrative Command Prompt:
Certutil -getreg CA\CRLPublicationURLs
Certutil -getreg CA\CACertPublicationURLs
- In the Certification Authority Console (certsrv.msc), right-click on Revoked Certificates under TFS Labs Certificate Authority and select All Tasks > Publish.
- On the Publish CRL window, verify that New CRL is selected and click the OK button.
- Close the Certification Authority Console.
1.8 Root Certificate and CRL List Export
Exporting the Root Certificate CRL List is needed in order to make it available on the TFS-CA01 Server. The links to these files were referenced in the Certificate configuration, so they will need to be copied to the Subordinate CA Server for users to access these files.
- Add the RootCAFiles virtual floppy disk to the TFS-ROOT-CA virtual machine.
- Copy the contents of the C:\Windows\System32\CertSrv\CertEnroll folder to the C:\RootCA folder.
- Open the Certificates Console (certlm.msc) under the Local Computer Account and export the TFS Labs Certificate Authority Certificate from the Trusted Root Certification Authorities Store as a DER encoded binary. Save the file as C:\RootCA\TFS Labs Certificate Authority.cer.
- Copy the contents of the C:\RootCA folder to the A:\ Drive. The contents of the A:\ Drive should be the following:
A:\TFS Labs Certificate Authority.cer
A:\TFS Labs Certificate Authority.crl
A:\TFS-ROOT-CA_TFS Labs Certificate Authority.crt
- Eject the RootCAFiles virtual floppy disk.
Certificate Authority in Windows Server 2019
- Introduction
- Part 1 — Offline Root CA Setup
- Part 2 — Subordinate CA Setup
- Part 3 — Deploy Root and Subordinate Certificate
- Part 4 — Certificate Revocation Policies
- Part 5 — Configure Private Key Archive and Recovery
- Part 6 — Certificate Template Deployment
- Part 7 — Certificate Auto-Enrollment
- Part 8 — Final Steps
As several things have changed since I published “Howto: Make Your Own Cert With OpenSSL on Windows” 5 years ago, I’m publishing an updated how-to.
This time, I’m using the OpenSSL Windows binaries provided by the Curl developers:
I’m using OpenSSL version 1.1.1i. I chose the 32-bit version, so that you can still follow along in case you have to do this on a 32-bit computer.

This OpenSSL version from the Curl developers is packaged inside a ZIP file: it requires no installation with administrative rights. Just unzip the downloaded file.
Then open a command-line (I’m using cmd.exe) and go to the unzipped folder:

I issue the command “openssl version”, to check that I can run OpenSSL.
Now you are ready to follow along.
And just like in my previous how-to(s), I’m creating 2 certificates (not just one self-signed certificate): one root certificate and one subordinate certificate.
First we generate a 4096-bit long RSA key for our root CA and store it in file ca.key:
openssl genrsa -out ca.key 4096

This generates a private key that is not password protected. It is stored inside file ca.key as printable text (PEM format):

If you want to password-protect this private key, add command option -aes256 to encrypt the private key with AES using a key derived from a password you will be prompted for.
Next, we create our self-signed root CA certificate ca.crt; you’ll need to provide an identity for your root CA:
openssl req -new -x509 -days 1826 -key ca.key -out ca.crt -config openssl.cnf

The -x509 command option is used for a self-signed certificate. 1826 days gives us a cert valid for 5 years.
On Windows, you can double-click the root certificate we just created (ca.crt), and inspect it:


Next step: create our subordinate CA that will be used for the actual signing. First, generate the key:
openssl genrsa -out ia.key 4096

Then, request a certificate for this subordinate CA:
openssl req -new -key ia.key -out ia.csr -config openssl.cnf

Make sure that the Common Name you enter here is different from the Common Name you entered previously for the root CA. If they are the same, you will get an error later on when creating the pkcs12 file.
Next step: process the request for the subordinate CA certificate and get it signed by the root CA.
Here the command requires an extra option, that I did not use in previous how-tos. We need a small text file (altname.cnf), with the following content:
subjectAltName=DNS:www.didierstevens.com

I use the same value as I used for the Common Name (CN): http://www.didierstevens.com.
This subjectAltName is necessary, since Google Chrome version 58 and later no longer use the CN when there is no subjectAltName.
After creating this altname.cnf file, we can issue this command to create the subordinate CA signed by the root CA:
openssl x509 -req -days 730 -in ia.csr -CA ca.crt -CAkey ca.key -set_serial 01 -out ia.crt -extfile altname.cnf

The certificate (ia.crt) will be valid for 2 years (730 days) and I decided to choose my own serial number 01 for this cert (-set_serial 01). For the root CA, I let OpenSSL generate a random serial number.
You can also inspect this certificate (ia.crt) with Windows:

That’s all there is to it! Of course, there are many options I didn’t use. Consult the OpenSSL documentation for more info. For example, I didn’t restrict my subordinate CA key usage to digital signatures. It can be used for anything, even making another subordinate CA. When you buy a code signing certificate, the CA company will limit its use to code signing. And I did not use passwords to protect my keys. In a production environment, you want to protect your keys with passwords.
To use this subordinate CA key for Authenticode signatures with Microsoft’s signtool, you’ll have to package the keys and certs in a PKCS12 file:
openssl pkcs12 -export -out ia.p12 -inkey ia.key -in ia.crt -chain -CAfile ca.crt

Then it can be used to sign a Windows PE file:
signtool sign /f ia.p12 /fd sha256 /td sha256 /tr http://timestamp.globalsign.com/?signature=sha2 Dialog42.exe


Some Observations
Configuration file
Some OpenSSL commands (like the req command we used) require the openssl.cnf configuration file. That is why on Windows, we use command option: -config openssl.cnf
If we do not use this command option on Windows, we get an error:
Can't open C:/Windows/System32/OpenSSL/ssl/openssl.cnf for reading, No such file or directory
22256:error:02001003:system library:fopen:No such process::0:fopen('C:/Windows/System32/OpenSSL/ssl/openssl.cnf','r')
22256:error:2006D080:BIO routines:BIO_new_file:no such file::0:

Even if we run openssl.exe in the same folder as openssl.cnf.
Another option is to set environment variable OPENSSL_CONF to point to the configuration file:
set OPENSSL_CONF= c:\Demo\openssl-1.1.1i_2-win32-mingw\openssl.cnf
Then we can issue commands without referencing the openssl.cnf explicitly:

Command option subj
When we use command req like we did, we are prompted for extra information. This extra information can be passed via the command line too, with command option -subj:
openssl req -new -x509 -days 1826 -key ca.key -out ca.crt -subj “/C=BE/ST=/L=Brussels/O=Didier Stevens/OU=/CN=didierstevens.com/emailAddress=ca@didierstevens.com” -config openssl.cnf

Do not use interactive mode
Interactive mode in OpenSSL, is when you launch opensll.exe, and then issue commands at the OpenSSL prompt, like this:

The error message:
problem creating object tsa_policy1=1.2.3.4.1
25156:error:08064066:object identifier routines:OBJ_create:oid exists::0:
error in req
is a known issue with OpenSSL.
Interactive mode doesn’t “clean up” correctly between commands: it is best not to use interactive mode.
Certificates with a validity period longer than one year
I know that Chrome is no longer accepting certificates with a validity period longer than one year, so I expected my 2-year certificate to be rejected by Chrome (using Chrome 87 on Windows). It was not.
It turns out that this requirement does not apply to certificates like the one I created:
Beginning with Chrome 85, TLS server certificates issued on or after 2020-09-01 00:00:00 UTC will be required to have a validity period of 398 days or less. This will only apply to TLS server certificates from CAs that are trusted in a default installation of Google Chrome, commonly known as “publicly trusted CAs”, and will not apply to locally-operated CAs that have been manually configured.
X.509 Version 1 and Version 3
In my previous blog posts on OpenSSL, the created root certificates (ca.crt) are X.509 Version 3 certificates, and the created subordinate certificates (ia.crt) are X.509 Version 1 certificates. That’s because I did not use any version 3 extensions for the subordinate certificates, and thus OpenSSL creates version 1 certificates.
This changes with the use of the Subject Alternative Name (SAN) extension (subjectAltName) in this how-to. subjectAltName is a version 3 extension, and thus the subordinate certificate (ia.crt) created in this how-to is a version 3 X.509 certificate. In this how-to, I had only one Common Name and therefore I used just one SAN: DNS:www.didierstevens.com.
It is possible to use several SANs, and not only DNS, but also IP for example:
subjectAltName=DNS:www.didierstevens.com,DNS:*.didierstevens.be,IP:127.0.0.1
There are also version 3 extensions that dictate what a certificate can be used for. When these extensions are not present, a certificate can be used for everything.
If you want to limit the use of a certificate to web servers, you can use the following values:
basicConstraints = CA:FALSE
keyUsage = nonRepudiation, digitalSignature, keyEncipherment
extendedKeyUsage=serverAuth
subjectAltName=DNS:www.didierstevens.com
This one can not be used for code signing:
SignTool Error: No certificates were found that met all the given criteria.

And you can use the following values to limit the use of a certificate to code signing:
basicConstraints = CA:FALSE
keyUsage = digitalSignature
extendedKeyUsage=codeSigning
Caveat: I just did some basic tests with these extensions. For example, the cert restricted to code signing can be used by signtool, and Chrome will refuse it when I use it with my simple web server. I didn’t do exhaustive testing to see if code signing is the only thing this cert can be used for.
I did compare it with a commercial code signing certificate I acquired years ago, and there was a difference for the keyUsage: it was marked as critical.
basicConstraints = CA:FALSE
keyUsage = critical,digitalSignature
extendedKeyUsage=codeSigning
Installing the root certificate
When you use the subordinate certificate, you will see that it is still rejected by web browsers, and that the Authenticode signature is not valid.
That is because the subordinate’s root certificate is not trusted. If you install it as a trusted root certification authority, the subordinate certificate will be trusted.
Linux
You can use the same commands on a Linux machine where the OpenSSL package is installed.
Don’t use command option -config though: openssl will find its config file.
And I got an issue with the command option -subj and “empty strings”:
problems making Certificate Request
140254820331968:error:0D07A098:asn1 encoding routines:ASN1_mbstring_ncopy:string too short:../crypto/asn1/a_mbstr.c:100:minsize=1

I had to remove ST= and OU=.