
Applies ToWindows 11 Windows 10
Support for Windows 10 will end in October 2025
After October 14, 2025, Microsoft will no longer provide free software updates from Windows Update, technical assistance, or security fixes for Windows 10. Your PC will still work, but we recommend moving to Windows 11.
Learn more
The Recovery Drive utility in Windows is a valuable tool designed to back up essential system files needed to restore a PC to its original state. This utility creates a USB recovery media that can help you restore your Windows device to its factory settings, even if you replace the hard drive or completely wipe the drive. The recovery media includes built-in Windows files, any updates installed at the time of media creation, and any customizations from the PC manufacturer, ensuring a reliable backup solution for bare metal recovery scenarios.
Creating a recovery media is a proactive measure to ensure that you can quickly and efficiently restore your system in case of major issues such as hardware failure. This media can be used for bare metal recovery on the device it was created for, ensuring a smooth and efficient restoration process.
It’s recommended to recreate the recovery media annually to include the latest Windows updates and improvements. Additionally, it’s important to note that the recovery media doesn’t include your personal files. Therefore, you should use a different backup method, such as Windows Backup or File History, to back up your personal data separately.
Create a recovery drive
Warning: Use an empty USB drive because this process will erase any data that’s already stored on the drive.
-
To open Recovery Drive you can use one of the following methods:
-
From Start, search for Recovery Drive and select it
-
Use the command recoverydrive.exe
-
-
When the tool opens, make sure Back up system files to the recovery drive is selected and then select Next
-
Connect a USB drive to your PC, select it, and then select Next
-
Select Create. Many files need to be copied to the recovery media, so this might take a while
Reinstall Windows with a recovery drive
Follow these steps to reinstall Windows using the recovery media:
-
Start your device from the USB drive that was created with Recovery Drive. The process to boot from a USB drive may vary by manufacturer, so refer to your device’s manual if needed
-
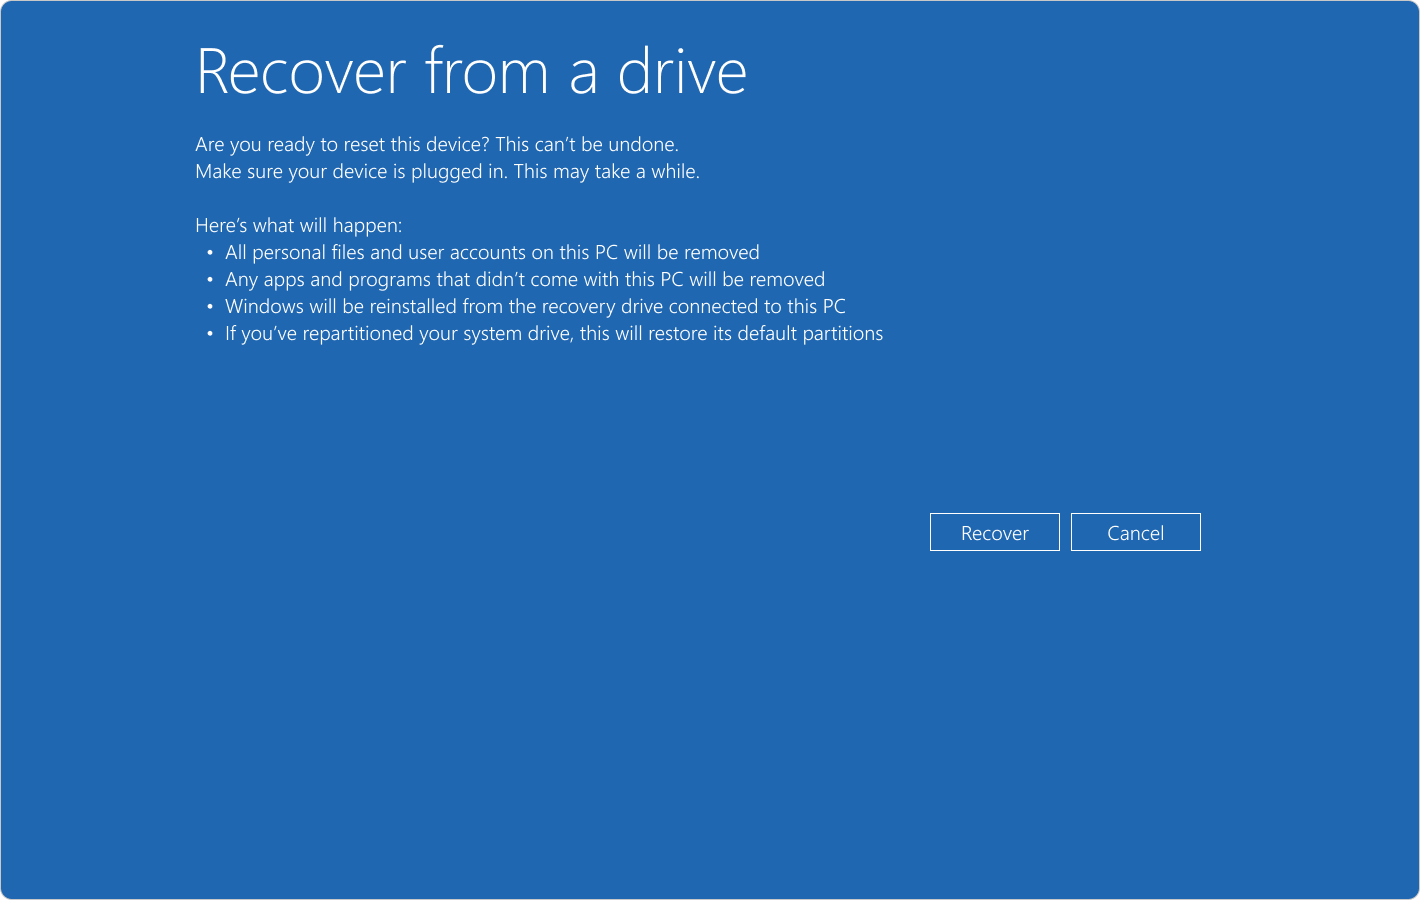
Once Windows Recovery Environment (Windows RE) loads, select Recover from a drive
-
Choose either Just remove my files of Fully clean the drive, depending on your preference
-
Select Recover to confirm and start the recovery process

Need more help?
Want more options?
Explore subscription benefits, browse training courses, learn how to secure your device, and more.
This article posted by MiniTool official site provides you with five solutions to create Windows system recovery USB. Each method is special and easy to complete. Just read through, compare them all, and figure out which one suits you most. Also, you can restore your dead computer with the recovery disk following the guide at the end part.
About Create Windows 7 Recovery USB Without DVD
As for creating Windows 7 recovery USB without DVD, it means to put system-related files and processes, not coming from an installation DVD or CD, into a USB flash drive to make it an installation device. Once you need to restore or recover your computer, you can make use of it for system installation.
Such recovery USB drive is a type of repair disk. Other repair disks are recovery DVD, CD, external hard disk, and so on. They all can also be used to boot up working or crashed computers.
Why Need to Create Recovery USB Disk?
Unlike most larger desktops and laptops that come with a system recovery CD/DVD that you can use to repair your computer system, netbooks and other small devices usually do not have a DVD/CD drive. So, even if you have the recovery CD or DVD, you can’t make use of it.
However, since small Windows devices like netbooks support USB disks, you can create a recovery USB disk with the same function as recovery DVD/CD to do the repair work on not only those small devices, but also large laptops, notebooks, desktops, and servers.
Then, how to make a recovery USB? How to build a recovery USB without DVD/CD?
MiniTool ShadowMaker is a professional and powerful file backup software that enables you to not only back up important files but also create a recovery USD drive in just a few steps.
Before start, you need to prepare a USB flash drive with at least 4 GB of free space. It is better to have no other files on the USB. If the USB is fresh new and has not yet been formatted, you can rely on MiniTool Partition Wizard to format it as the NTFS file system in the first place. Also, a working Windows 7 computer is needed to conduct the task.
Note: The USB drive will be formatted during the process. Therefore, please move important files to another safe place.
Step 1. Connect the USB disk to the Windows 7 computer.
Step 2. Download and install MiniTool ShadowMaker on the computer.
MiniTool ShadowMaker TrialClick to Download100%Clean & Safe
Step 3. Launch the program and click Keep Trial if it prompts.
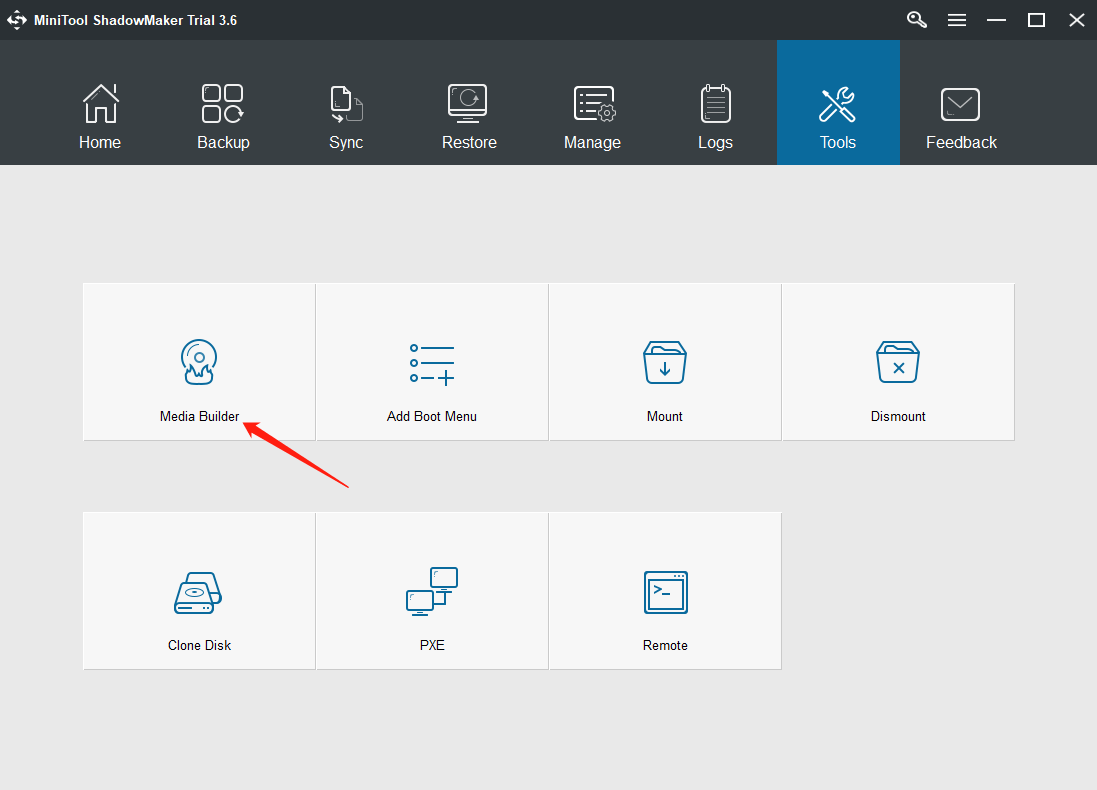
Step 4. Move to the Tools tab and select Media Builder.
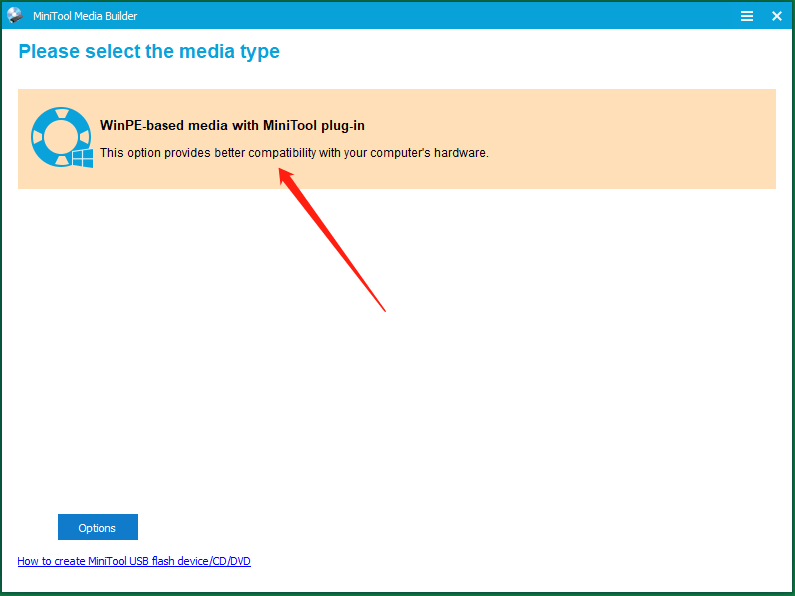
Step 5. In the new window, click WinPE-based media with MiniTool plug-in to choose it.
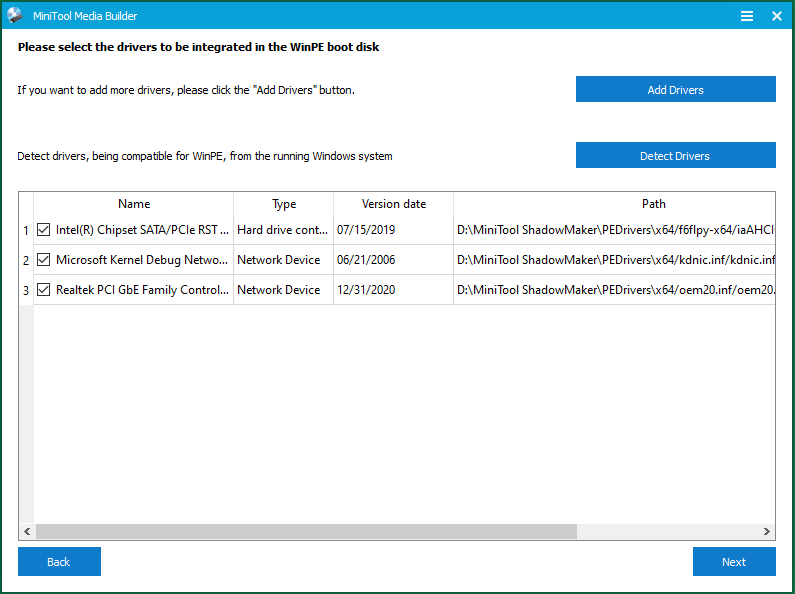
You can click the Options button to select which drivers to be integrated into the WinPE boot drive.
- Add Drivers: Manually add drivers on your hard disks to the recovery boot disk.
- Detect Drivers: Automatically check for and add drivers on your computer to the recovery drive.
Step 6. On the next screen, select USB Flash Disk to continue.
Step 7. It will warn you about data damage to the target USB drive. PLEASE MAKE SURE THAT THERE IS NO IMPORTANT DATA ON THE USB OR CRUCIAL FILES ARE MOVED OUT ALREADY. Just confirm by clicking Yes.
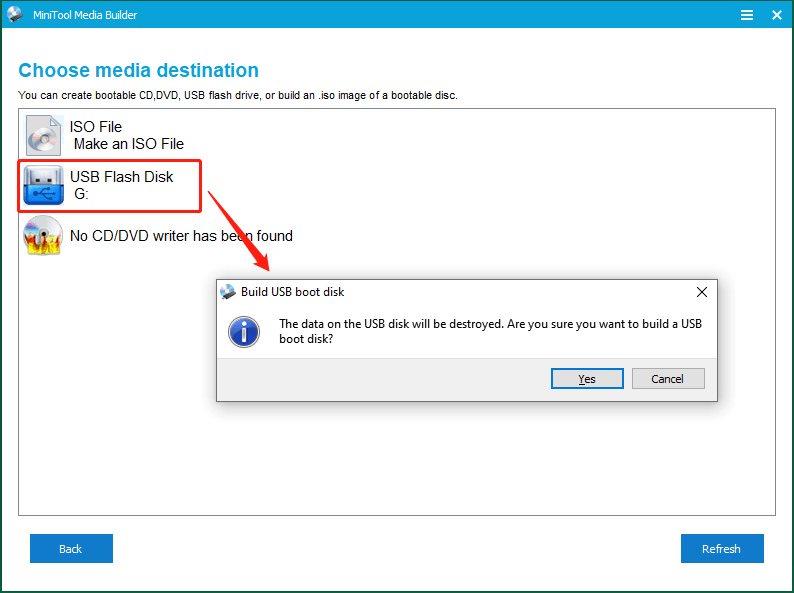
Tip: If you accidentally click Yes without moving vital data out of the USB drive, just plug out the USB immediately from your computer for there is no cancel option for you once the creation starts. Then, you may try your luck to recover the data with the help of MiniTool Data Recovery.
MiniTool Power Data Recovery TrialClick to Download100%Clean & Safe
Step 8. Wait until the process finishes. It won’t take long. Then, click Finish to exit.
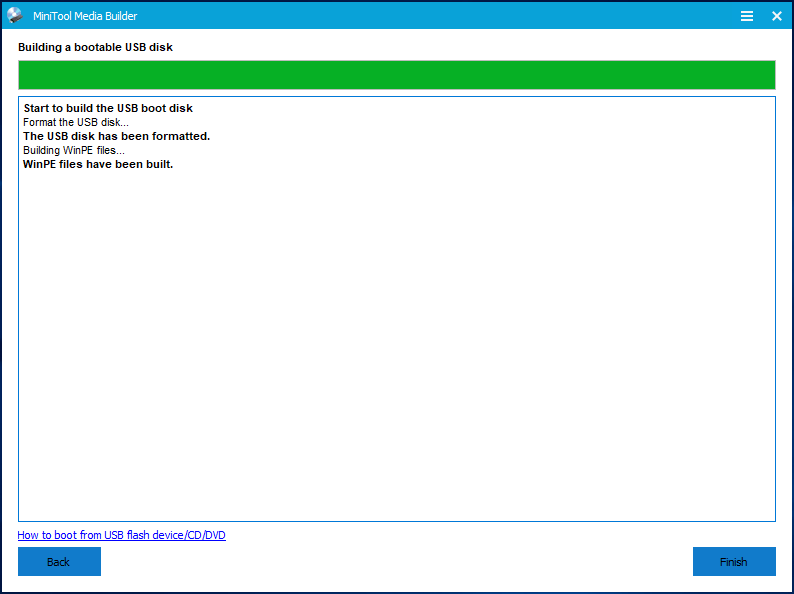
Now, you have successfully created your Windows recovery USB. You can plug out the USB drive, connect it to another computer (maybe dead), and boot the machine from the USB. Or, you can just reboot the current computer, enter its BIOS to change the boot order to put the USB drive at the first, and try to boot from the USB.
Windows 7 USB/DVD Download Tool is a program that enables you to create a copy of the Windows 7 ISO file and store the copy in a USB disk to make it a recovery device. Thus, besides a USB with enough disk space, you also need to prepare a Win7 ISO that you can download from Microsoft’s official website.
Download Windows 7 USB/DVD Download Tool >>
Step 1. Download, install, and launch the Windows 7 USB/DVD Download Tool on your computer.
Tip: This tool requires .NET framework 2.0 to install. You can download and install NET Framework 3.5, which includes NET framework 2.0.
Step 2. On the first screen, click Browse to select source Windows 7 ISO on your machine.

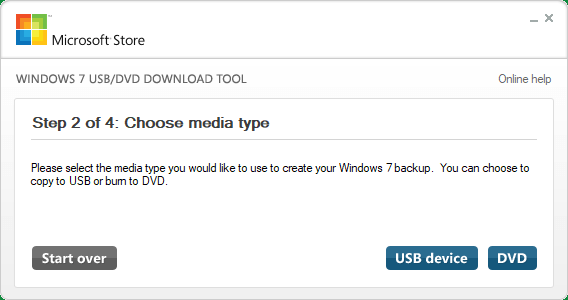
Step 3. Choose the USB device button.
Step 4. It will automatically detect and select your USB device as a target location. If not, click the Refresh icon. Finally, click Begin copying.
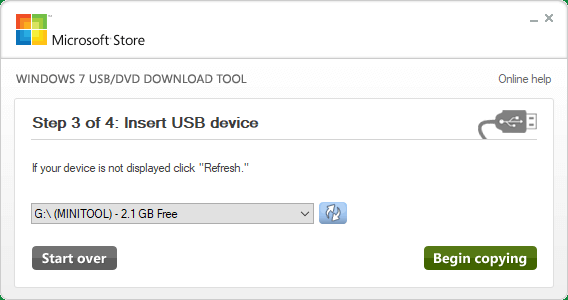
It will start copying the Windows 7 ISO file to the target USD drive. Take your patience and wait until it completes. You can do other non-related businesses during the copy process.
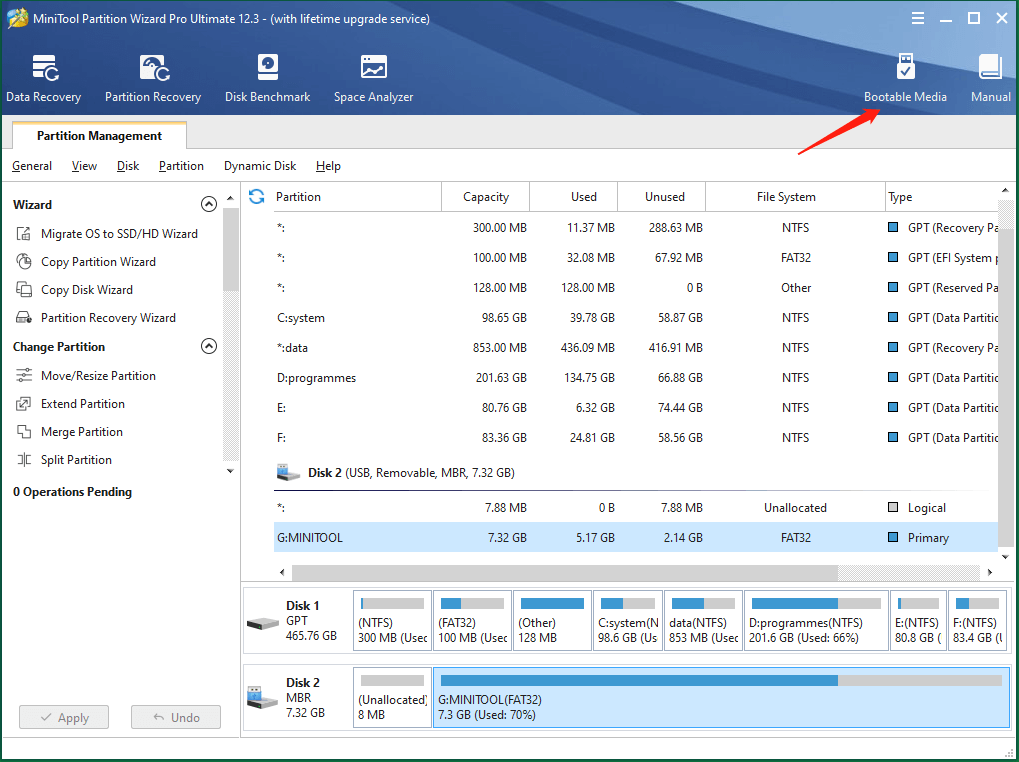
MiniTool Partition Wizard is a powerful and reliable disk partition manager. It can help you manage your hard disks with complete features like basic create/delete/extend/shrink/move/format/wipe/split/merge partitions, advanced convert disks between basic and dynamic, MBR and GPT, NTFS and FAT, as well as migrate OS from one disk to another.
Besides, it enables you to recover deleted or lost files. Moreover, it allows you to create a bootable USB disk as a recovery drive with its snap-in Media Builder utility that is the same as in MiniTool ShadowMaker.
MiniTool Partition Wizard DemoClick to Download100%Clean & Safe
The preparation work and precautions are also the same as mentioned above. Just download and install MiniTool Partition Wizard on your computer. Open it and click the Bootable Media option on the upper right to launch MiniTool Media Builder.
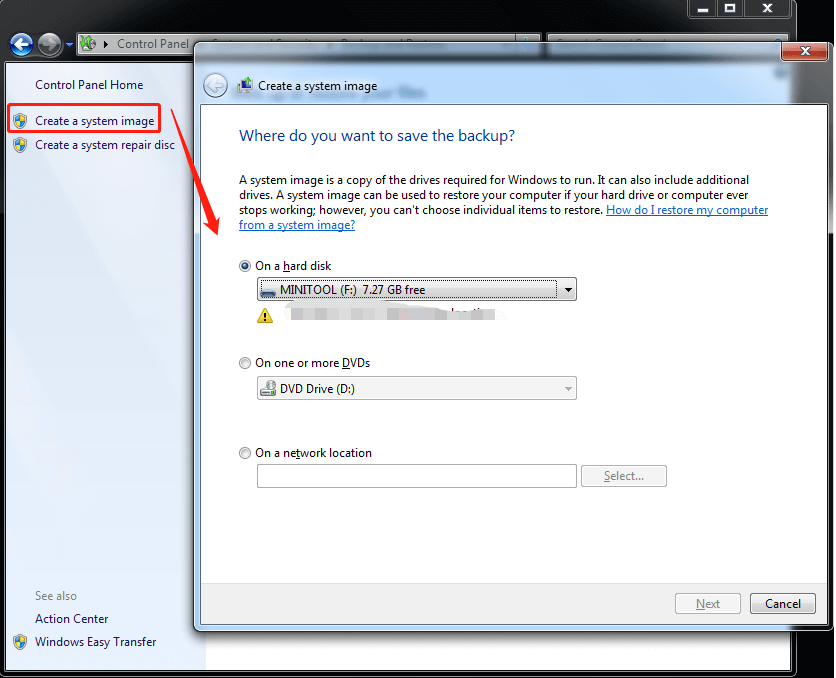
Solution 4. Create Windows 7 System Repair Image in Control Panel
There is a built-in feature that enables you to create Windows 7 repair disk USB without DVDs or CDs. Go to Start > Control Panel > System and Security > Backup and Restore and click Create a system image in the left panel. In the pop-up window, select your USB drive under the On a hard disk section and click Next. Then, just follow the guidance to finish the task.
Solution 5. Manually Copy Necessary Files into USB to Make It Bootable
Besides the above methods, you are also able to make a bootable USB recovery drive with copy and paste actions. The USB drive space you need here can be smaller than the above ones and it still needs to be at least 165 MB. Anyhow, the larger the better.
Within your blank USB device, create a folder named Win7 and two subfolders named Sources and Boot respectively. Then, copy some system boot and recovery-related files from your current Windows 7 to the Win7 folder.
Files need to be copied to the root location of the Win7 folder:
- C:\Windows\Boot\PCAT\bootmgr
Files need to be copied to the Sources subfolder of the Win7 folder:
- C:\Recovery\d1cd3dae-004a-11e7-9cac-f76e0d315310\winre.wim
Tip: The 32-character series of numbers and letters is different for different users.
Files need to be copied to the boot subfolder of the Win7 folder:
- C:\Windows\Boot\DVD\PCAT\en-US\bootfix.bin
- C:\Windows\Boot\DVD\PCAT\BCD
- C:\Windows\Boot\DVD\PCAT\boot.sdi
Tip: For the first file, if you are using other languages, just change the en-US into the language you use. For example, if you are using French, the first file you should copy is C:\Windows\Boot\DVD\PCAT\fr-FR\bootfix.bin.
Finally, in the target USB disk, rename the BCD file to bcd and the winre.wim to boot.wim.
Tip:
- To open the Recovery folder and copy the wim files within it, you need to take ownership and change permissions of the folder. By default, you have no right to access it even if you are the administrator.
- You may need to unhide the hidden files if you can’t find any of the above files. In Windows Explorer, click Organize in the upper left and select Folder and search options. In the popup, choose the View tab, select Show hidden files, folders and drives, and check Hide protected operating system files.
How to Use Windows 7 Recovery USB?
If your Win7 computer crash down due to a virus attack, software error, or wrong operation, you can rely on the created Win7 recovery USB flash drive to restore your system or reinstall Windows. Then, get your machine to work again.
Change Startup Settings in BIOS
No matter what task you will use the recovery disc for, first of all, you need to alter the startup settings and change the boot order in the BIOS of your computer. Procedures for accessing the BIOS and changing settings differ from different computers. So, check the info that came with your machine or go to the official website of your computer to find the process to access your BIOS.
Note: The BIOS is designed for advanced users. Your computer may not start up if you make some mistakes there. So, be careful when changing boot order in BIOS settings.
Though for different computers, the way to access and change boot settings is unlike, they are generally similar. Below is a usual guide for your reference.
Step 1. Plug the Windows 7 recovery USB into the target computer and power on the machine.
Step 2. Press a key (F2, F12, Delete, Esc, etc.) or a key combination (such as Alt + F10) immediately after you turn on your computer but before Windows starts.
Step 3. In most cases, a startup or boot menu will appear. On the menu, select BIOS related option.
Step 4. In the BIOS setup screen, select the Boot tab.
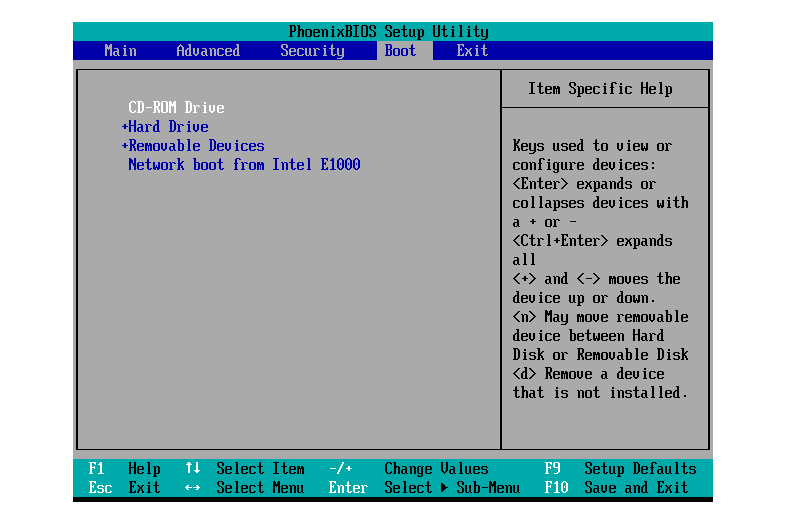
Since the mouse is unavailable in BIOS, you can only use a keyboard to operate. There are instructions on the screen.
Step 5. In the Boot tab, use the arrow keys to select your USB or Removable Devices or something similar and use the “+” or “–” key to move the option up or down to change the boot order of the computer.
Step 6. Press F10 or other keys to save the changes. If will pop up asking for your confirmation. Just select Yes to save changes and exit.
Then, restart your computer and it will boot from the Windows 7 recovery USB.
Restore Windows with Recovery USB Disk
When you boot up your computer from the Win7 USB recovery drive, your will be prompt to press a certain key to install Windows. When the Windows installation screen appears, just click the corresponding keys to install the system or repair your device. Then, follow the onscreen instructions to finish your task.
Tip: If you create your Windows 7 USB recovery disk with the recommended MiniTool ShadowMaker, after you boot from the USB and into the WinPE, the embedded MiniTool ShadowMaker will help you to finish your system recovery task with an easy graphic guide.
Conclusion
Finally, no matter which method you take to create Windows 7 recovery USB without DVD or CD, hope you can do it successfully and the created recovery disk is appliable. If you have any questions about the contents above, feel free to leave a comment below. Or, if you encounter some problem while using MiniTool ShadowMaker, you can contact its support team at [email protected].
Чтобы было из чего восстановить операционную системуWindows 7 при сбое, нужно сначала эти средства восстановления создать. Как?
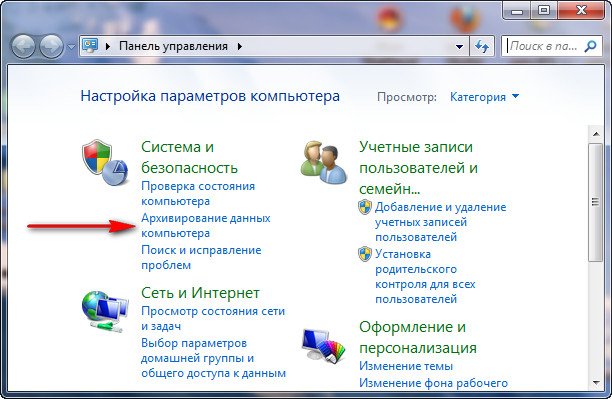
Нажимаем кнопку Пуск , затем кликаем «Панель управления», там открываем «Система и безопасность» и, наконец, добираемся до того, что ищем, а именно «Архивация и восстановление».
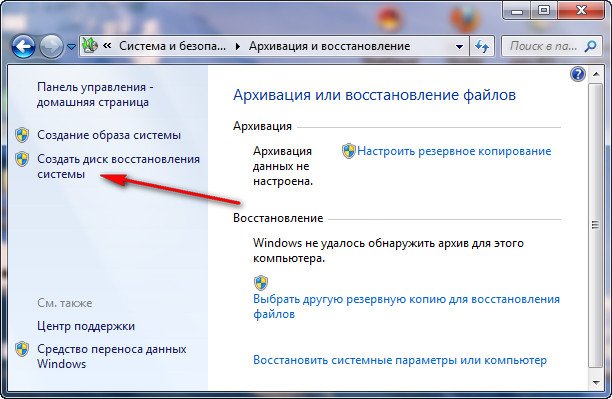
Далее запускаем программы Windows 7 «Архивация или восстановление файлов». И видим в основном окне программы следующие опции:
«Создание образа системы» и
«Создать диск восстановления системы».

Диск восстановления системы Windows 7 – это загрузочный диск, вставляешь его в CD-/DVD-дисковод, и компьютер загружается (!) с загрузочного диска, а не с диска C:, с которого загрузка почему-то не происходит.
С помощью загрузочного диска можно загрузить компьютер, если операционная система ПК не работает. После загрузки ПК с диска восстановления системы Windows 7 можно восстановить операционную систему ПК. А для этого уже понадобится образ системы.
Обращаю внимание, что для получения более подробной информации Вы можете подписаться на бесплатный электронный курс “Создаем средства восстановления Windows 7”, который состоит из десяти уроков.
Образ системы Windows 7 – это архив операционной системы в состоянии, которое было на момент ее архивации. То есть образ системы – это такая архивная копия ОС, которая позволяет впоследствии восстановить операционную систему, полностью совпадающую с операционной системой на момент архивации. Что архивировали, то и получили в результате восстановления системы!
Диск восстановления системы Windows 7 достаточно создать один раз. Чего не скажешь в отношении образа системы Windows 7. Так как операционная система постоянно изменяется и дополняется, чем чаще будем создавать образ системы Windows 7, тем точнее мы сможем восстановить систему из сохраненного в архиве образа.
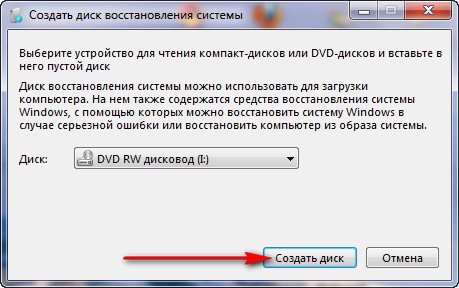
Нажимаем на предлагаемую опцию «Создать диск восстановления системы» и следуем инструкциям, выводимым на экране. Для создания диска восстановления системы нам понадобится CD-/DVD-устройство с возможностью записи на нем дисков, и понадобится одна чистая CD- или DVD-«болванка». Лучше для этого использовать не перезаписываемые диски, чтобы потом ненароком не стереть этот очень важный диск.
Созданный таким образом диск восстановления системы Windows 7 нужно аккуратно подписать, как это рекомендует программа «Архивация и восстановлении» и положить туда, откуда его можно будет извлечь в чрезвычайной ситуации.
Если Вы пользуетесь мобильным устройством (например, ноутбук или нетбук), то диск восстановления системы лучше возить с собой. Мало ли что может случиться в поездке?!
Если на ПК нет устройства для записи CD-/DVD-дисков, то нужно воспользоваться внешним, подключаемым через USB-порт, устройством. По-другому – никак!
Это же внешнее устройство понадобится и при восстановлении системы в случае ее сбоя. Поэтому такое внешнее устройство лучше возить с собой в поездки, если предполагается активная работа на ПК в пути и вне дома (или офиса) с возможными плачевными последствиям для операционной системы.
Создание образа системы Windows 7
Для создания образа системы Windows 7 нам понадобится внешний жесткий диск с файловой системой NTFS. Причем, это может быть тот же диск, на который создается архив данных пользователя. Главное, чтобы на этом внешнем жестком диске хватало место для размещения образа системы и архива данных пользователя.
Подключаете внешний жесткий диск, и нажимаете на опцию «Создание образа системы». После некоторой задумчивости компьютер предложит выбрать один из возможных дисков, на которые можно записать образ системы. Выбираем внешний жесткий диск (в нашем примере – это внешний диск E:), нажимаем «Далее»:

Затем появится окно подтверждения параметров архивации, в котором мы должны подтвердить выбранный диск для архивации образа системы. Подтверждение производится путем нажатия на кнопку «Архивировать»:

После подтверждения архивации начинается собственно создание образа системы на указанном внешнем жестком диске. В окне «Создание образа системы» «ползет» зеленый указатель «Выполняется сохранение архива», показывая насколько выполнена архивация:

Перед окончанием архивации образа системы будет задан вопрос о необходимости создания диска восстановления системы. Мы можем ответить «Нет», так как уже сделали диск восстановления системы, используя соответствующую опцию в основном окне «Архивация и восстановление».
Если же диск восстановления системы не был создан ранее, то полезно ответить «Да» на предлагаемый вопрос, чтобы этот диск создать.
Напомню, что образ системы, созданный на внешнем жестком диске, сам по себе не может быть восстановлен на ПК, где не загружается операционная система. Для этого как раз и нужен диск восстановления системы:

По окончании архивации образа системы в окне «Создание образа системы» появится надпись «Архивация выполнена успешно». Остается только закрыть окно создания образа системы, нажав на кнопку «Закрыть»:

Таким образом, мы создали один раз образ системы – архив операционной системы для возможного последующего восстановления ее в случае возможных сбоев.
Чтобы эта процедура создания образа системы выполнялась регулярно, необходимо при настройке автоматической архивации отметить галочку напротив опции «Включить образ системы», как это показано на следующем рисунке:

Теперь мы в безопасности. У нас есть диск восстановления системы, с которого можно запустить ПК случае отказа ОС. И у нас есть образ системы на внешнем жестком диске, из которого мы можем восстановить операционную систему на момент ее последней архивации.
Как выполняется восстановление операционной системы?
«Ты сейчас такое услышишь, что лучше бы тебе этого не слышать!» — говорил один из героев фильма «Человек с бульвара Капуцинов».
Это я про то, что каждому из нас лучше бы не встречаться с проблемой восстановления ОС. Но если уж придется, то будем знать, как это делается.
Итак, ПК «мертв», не загружается. Тогда берем диск восстановления системы Windows 7, вставляем его в CD-/DVD-устройство и пытаемся загрузить компьютер с этого диска. Не всегда получается так просто.
Иногда нужно еще залезть в BIOS ПК, чтобы указать там опцию «Первоначальная загрузка с CD-/DVD-диска». Как это делать, описывать не буду, так как в каждом конкретном случае, для каждого конкретного ПК это делается по-своему.
Это описывается в документации к ПК или в документации к материнской плате ПК, или в документации к BIOS. Так как меню BIOS чаще всего пишется на английском языке, то ключевым словом при поиске соответствующих опций меню должно быть английское слово «boot» (читается, как «бут» с длинным звуком «у», а переводится, как «загрузка»).
После загрузки ПК с помощью диска восстановления системы, подключаем внешний жесткий диск с сохраненным на нем образом системы к USB-порту ПК. После чего выбираем из предлагаемого меню по восстановлению системы из образа системы соответствующие опции. Указываем, что систему надо восстановить, что образ системы хранится на внешнем жестком диске таком-то. И все. Дальнейшую работу программа восстановления делает автоматически. Нужно только набраться терпения, и ни в коем случае не выключать ПК, пока восстановление не закончится.
По завершении восстановления системы из образа системы, нужно вынуть диск восстановления системы из CD-/DVD-устройства, мысленно его поблагодарить за оказанные услуги (!), и убрать его на прежнее место до следующего случая (лучше бы этого случая больше не было!).
И затем следует перезагрузить ПК. Если все прошло нормально, то к нашей радости и удовольствию система вернется к тому состоянию, в каком она была на момент создания архивной копии образа системы.
А если нет? Значит, не повезло…
«Закругление»
Закончить ремонт невозможно, его можно только прекратить – так гласит народная мудрость. Также и с вопросами архивации и восстановления системы и данных. Конца и края нет в методах и способах выполнения этих процедур.
Поэтому надо «закругляться».
А какие еще есть способы восстановления работоспособности операционной системы? Много чего есть.
Например, некоторые пользователи доходят до того, что устанавливают на свой ПК две операционные системы, например, Windows и Linux. И работают с Windows до тех пор, пока она не откажет. После отказа Windows они загружают Linux, и, пользуясь ее средствами, вручную восстанавливают Windows.
– Так можно?
– А почему бы нет. Если это помогает в восстановлении Windows.
Можно иметь два диска С: с предустановленными на них операционными системами Windows. Один – стоит внутри ПК, другой – лежит на полке (в ящике и т.п.) и дожидается своей очереди. Случись чего, вынимаем из ПК один диск и вставляем другой. Накладно? Да, но зато надежно и практично!
Для сохранности данных пользователей можно применять так называемые облачные технологии, позволяющие хранить данные пользователей (все или частично) на удаленном сервере. Доступ к этому удаленному диску на сервере осуществляется посредством Интернета. Все вопросы сохранности и восстановления данных в случае возможных сбоев берет на себя компания, предоставляющая доступ к «облаку».
Жаль, что нельзя таким образом хранить файлы операционной системы, хотя кто запрещает, например, записывать образ системы в процессе архивации на «облачный» диск? Пожалуйста…
Перечень способов и методов можно продолжать до бесконечности. Нам важно не столько понимание самих методов, сколько признание того факта, что и операционную систему, и данные пользователей нужно архивировать. Делать это нужно периодически, не забывать это делать, не лениться это делать.
И тогда можно быть почти уверенным в том, что система и данные будут в целости и сохранности. Почти? Да, почти, так как нельзя сбрасывать со счетов его величество случай. Может повезти, а может – и нет.
Тем, кто архивирует операционную систему и собственные данные, везет намного больше и значительно чаще. Проверено опытным путем миллионами пользователей ПК. Доказано на практике.
Предлагаю присоединиться к большинству везунчиков.
– Вы когда последний раз выполняли архивацию операционной системы и своих данных? Ни разу?! В прошлом году?! На прошлой неделе?! Вчера?!
– Сделаю сегодня!!!
Полезная ссылка
Что нам советует Microsoft (разработчик всех операционных систем Windows) по вопросу «Резервное копирование и восстановление системы компьютера», можно узнать, перейдя по ссылке:
https://support.microsoft.com/ru-ru/help/17127/windows-back-up-restore
Дополнительные материалы:
1. Почему не работает операционная система?
2. Три способа восстановления операционной системы Windows 7
3. Архивация данных средствами Windows 7
4. Восстановление данных из архива, созданного с помощью программы Windows 7 «Архивация и восстановление»
5. Как создать образ системы Windows 10
Создание диска восстановления системы
Создание диска восстановления системы в Windows 7 не слишком сложное занятие, это я понял, но может я создаю его неправильно? Дело в том, что бэкап созданный с помощью Архивирования данных компьютера, я случайно удалил, но есть ещё один, скопированный предварительно на флешку, она у меня 32 Гб, но флешку, Восстановление образа системы воспринимать не хочет, как мне быть?
Денис.
Создание диска восстановления системы
В нашей статье мы расскажем, как создать Диск восстановления операционной системы Windows, а затем покажем как им воспользоваться. Но сначала короткий совет нашему читателю.
- Папка с резервной копией WindowsImageBackup на вашей флешке, НЕ должна быть вложена в другую папку, если с этим всё нормально, значит самое простое решение для Вас Денис, воспользоваться любым Live CD, загрузиться с него и скопировать ваш архив с образом Windows 7, с флешки на жёсткий диск вашего компьютера, с которого вы не можете загрузиться, но только на раздел, где не установлена Windows 7. Далее загружайте ваш компьютер с Диска восстановления системы и ваш бэкап обязательно найдётся. Ну и я надеюсь, вы знаете, что восстановление будет полным и вся ваша информация с дисков, которые вы включили в бэкап удалится.
- Друзья, недавно я написал статью — Как создать резервный образ Windows 8 на дисках DVD, на флешке, на переносном жёстком диске USB, а самое главное — как с помощью этого образа восстановиться. Всё что написано в той статье, подойдёт и для Windows 7.
Ну а теперь создание диска восстановления системы, который нужно использовать для загрузки компьютера, он будет содержать в себе средства восстановления Windows 7, при помощи них можно восстановить неисправности загрузки операционной системы или восстановить её из архивной копии, что мы и сделаем.
- Примечание: Предварительно у вас должен быть создан бэкап Windows 7, это очень просто. Как это сделать? Можете почитать у нас->Как восстановить систему Windows 7, это статья о том как восстановить Windows 7 с помощью разнообразных средств восстановления встроенных в саму операционную систему, если у вас проблема с запуском или работой Windows, прочитайте сначала её, может быть всё обойдётся и без диска восстановления.
Так же нужно знать, что для диска восстановления важна архитектура системы, у вас получиться использовать 32-битный диск восстановления для любой 32-битной Windows 7, а 64-битный диск восстановления для любой 64-битной Windows 7.
Создаём диск восстановления системы, идём в Пуск->Панель управления->Архивирование данных компьютера,
выбираем Создать диск восстановления системы.
Вставляем в дисковод DVD-диск, нажимаем кнопку Создать диск
Происходит недолгий процесс создания диска восстановления системы. Теперь о том, как им воспользоваться.
Допустим у вас на компьютере тяжёлый сбой и вы совсем не можете загрузить Windows 7. Нажимаете F-8 на клавиатуре, сразу же после запуска компьютера, с намерением попасть в меню Устранение неполадок компьютера, но кроме чёрного экрана ничего.
Для восстановления работоспособности Windows 7 с Диска восстановления, вам нужно сменить в BIOS, приоритет загрузки на дисковод, затем вставить в него диск восстановления и восстановить с помощью бэкапа вашу Windows 7. Как сменить приоритет загрузки в BIOS, читайте наши статьи BIOS: Загрузка с диска и НОУТБУК: Загрузка с диска в BIOS.
Вставили Диск восстановления в дисковод, затем перезагрузились, запускается программа Параметры восстановления системы.
Нажимаем Enter или предложение загрузиться с диска пропадёт.
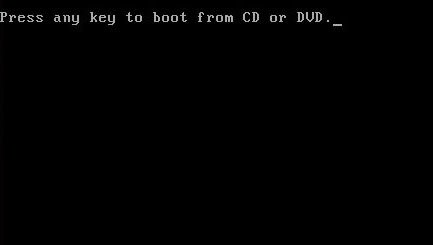
Происходит загрузка компьютера с Диска восстановления
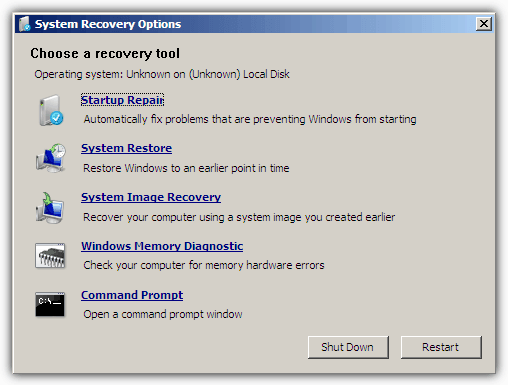
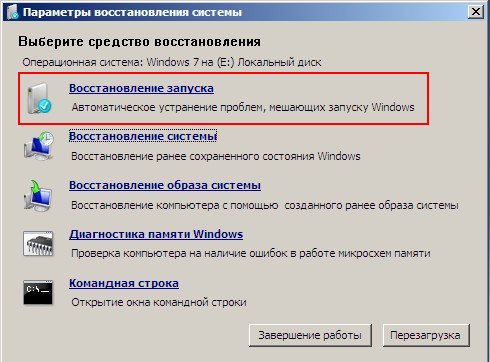
Средство восстановленияработающее с диска, может попытаться по вашему желанию восстановить запуск Windows 7, нажмите «Далее».
В первую очередь, примените Восстановление запуска (Автоматическое устанение проблем, мешающих запуску Windows)
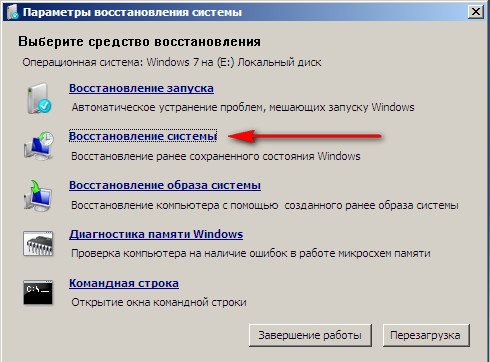
Во вторую, очередь можно применить «Восстановление системы»
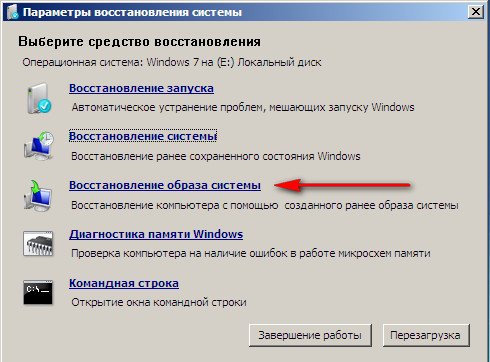
Если ничего не помогает, то можем выбрать, Восстановление образа системы, но образ системы должен быть сделан вами предварительно (смотри начало статьи).
Восстановление компьютера из образа находит последний доступный образ системы, нажимаем далее или указываем другой образ, если он у нас есть.
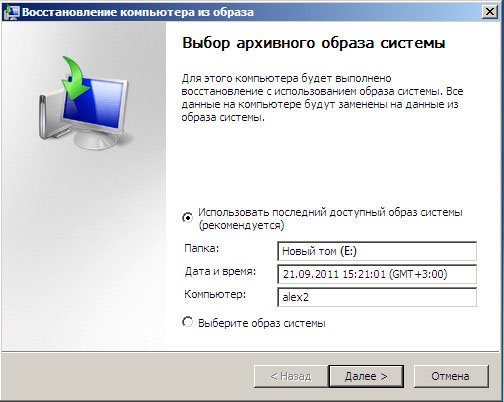
Далее и Windows 7, восстанавливается из резервной копии.

If you’ve encountered serious problems with your Windows 7 computer, or just want a fresh start, you’ll need a recovery or installation disc. A Windows installation disc will allow you to reformat your computer and reinstall a fresh copy of Windows 7. Some computer manufacturers allow you to create recovery discs, which will restore Windows with all of the essential drivers already installed. If you can’t create one of these, you can create your own custom installation disc that contains the drivers and programs you need.
-

A Windows 7 installation disc allows you to install Windows 7 from scratch using your product key. You can create a Windows 7 installation disc legally by downloading the necessary files from Microsoft. You can use the product key that came with your computer to reinstall Windows. The Windows 7 installation disc does not contain any drivers for your specific computer, but you’ll be able to download the drivers from the manufacturer’s website. You’ll be able to use this disc on any computer as long as you have a valid product key.
- If you want to create a recovery disc that contains all of the necessary drivers for your computer, see the next section.
-
In order to create an installation disc, you’ll need your Windows 7 product key. If you purchased a prebuilt computer or laptop, you can usually find the product key printed on a sticker affixed to the bottom of your laptop or on the back of your tower. It may be included with your computer’s documentation. If you purchased Windows 7 from a store, the key will be in the DVD case or in your confirmation email.
- If you can’t find the sticker, download ProduKey from NirSoft for free here. Unzip the file and run the program. Your Windows product key will be displayed in the ProduKey window.
-
Microsoft allows you to download the Windows 7 disc image file, or «ISO,» as long as you have your product key. You can download Windows 7 from Microsoft here.
-
You’ll need to verify your product key and then download the correct version. The download is several gigabytes large, and may take a while to complete.
- To determine if you need the 32-bit or 64-bit version, press ⊞ Win+Pause and check the «System type» entry.
-
This program will allow you to easily create a bootable DVD or USB drive that contains the Windows 7 ISO file. You can download the program for free from Microsoft.
-
Windows 7 is traditionally put onto a blank DVD, but you can also use a USB thumb drive, which is great for computers without a disc drive. The thumb drive will need to be at least 4 GB, and all of the data on it will be deleted.
-
Browse your computer to find the ISO file that you downloaded. It will usually be in your Downloads folder.
-
The ISO file will be burned to the blank disc or copied to the USB drive. This may take a little while to complete. Once the process is finished, you’ll have a fully-functional Windows 7 installation disc.


-
Major computer manufacturers such as HP, Dell, and Acer include programs in Windows that allow you to create recovery discs. If you built your own computer, or your manufacturer didn’t include recovery disc creation tools, move on to the next step to make your own.
-
HP/Compaq
- Gather four blank DVD-/+R discs; you cannot use DVD-RW discs. You may not need all four. You can also use a USB drive with at least 16 GB of storage.
- Click the Start button and type «recovery manager.» Select «Recovery Manager» from the list of results.
- Click «Recovery Media Creation» in the right-hand menu in the Recovery Manager window.
- Select the media type that you want to create. You can select either DVD or USB drive. Once you select one, you will be shown how many DVDs or how large a USB drive you need.
- Follow the prompts to create the discs. If you are burning the recovery discs, you’ll be prompted when to insert the next blank disc. Make sure you label the discs as you create them so you know which order they go in.
-
Dell
- Launch «Dell DataSafe Local Backup» from the «Dell Data» folder in the All Programs section of the Start menu.
- Click «Backup» and select «Create Recovery Media.»
- Select the media type you want to use. You can choose between blank DVDs or a USB drive. When you select one, you will be told how many discs you need or how large the USB drive will need to be. If using discs, you can use DVD+/-R, but not RW or DL.
- Follow the prompts to create your discs or USB drive. Label each of the discs as you create them so they don’t get out of order.
-
Acer/Gateway[1]
- Open the «Acer» folder in the Start menu and select «Acer eRecovery Management.»
- Click the «Backup» option and select «Create Factory Default Disc.»
- Insert your first blank DVD+/-R. You will need two blank discs. You cannot use DVD+/-RW or DL.
- Follow the prompts to create the recovery discs. Label them so that they don’t get out of order.
-
HP/Compaq
-
In order to create your own disc that contains all of the drivers you need for your computer, you’ll need either an ISO file for the Windows 7 installation disc, or an actual installation disc.
- You can download the Windows 7 ISO from Microsoft here. You’ll need your product key in order to download it. See the first section of this article for details.
-
You can create a new folder on your desktop and then just select and drag all of the files from the disc or ISO into it. To open an ISO file, you’ll need either 7-Zip (7-zip.org) or WinRAR (rarlab.com), both of which are free. Once installed, right-click on the ISO file and select «Extract.»[2]
-
This program is required in order to build your own Windows installation disc. You can download it for free from Microsoft here. The file is about 1.7 GB, so it may take a while to download.
-
This program was designed by the Windows enthusiast community to make creating an installation disc much easier. You can download NTLite for free from nliteos.com. You can leave all of the installation settings at their defaults.[3]
-
You’ll see your Windows 7 version appear in the «Source list.»
-
Convert the files into an image file if prompted. This will likely take a while to complete.
-
NTLite allows you to incorporate drivers into the installation, so that you don’t have to worry about reinstalling them after recovery. On the right side of the window, you’ll see a list of all the drivers that will be automatically included. Make note of the drivers that say «Missing.»
-
If you have the Premium version, you can simply import the drivers from your current computer by clicking «Import host.» For free users, you’ll need to download the driver files from the manufacturer and include them manually.
- Visit the support page for your computer and search for your computer’s model number. If you built the computer yourself, you’ll need to visit the Support page for each of your components.
- Download all of the «Missing» driver files from the Drivers or Downloads section. Driver files may be in INF or EXE format.
- Place all of your downloaded files into a single folder.
-
Select «Folder with multiple drivers» and then browse for the folder that contains all of the driver files that you want to add to your installation. This will add all of the INF format files.
-
Add all of the driver installers that came in EXE format. These installers will be run automatically once Windows Setup completes.
-
If you want, you can use NTLite to automate the entire Windows Setup process. This will allow you to start the install and then let your custom installation do the rest. This is optional, and if you don’t enable it your Windows installation will proceed normally.
- Click the «Unattended» section and then select «Enable.»
- Select each item in the list and then use the drop-down menu to the right to select your desired option.
- Click the «Add local account» option to have NTLite create accounts automatically as well.
- If you have the premium edition of NTLite, you can have it configure your disk partitions automatically as well.
-
Once you are satisfied with all of your settings, this section will allow you to finalize the new recovery image.
-
You’ll be prompted to give the new ISO file a name. This will automatically create the disc image file that you can burn after completing the process.
-
This will begin building your new image file, including any drivers and automation. This will likely take 20 or so minutes to complete.
-
Make sure that you have a blank DVD inserted in your burner. Windows will burn the ISO file to the disc, creating your custom recovery disc.


Add New Question
-
Question
I don’t have the Windows 7 operating system disc, which is asked for; what can I do to fix this?
You can download the official OS .iso file and burn it on a DVD, or create a bootable flash drive.
Ask a Question
200 characters left
Include your email address to get a message when this question is answered.
Submit
References
About this article
Thanks to all authors for creating a page that has been read 341,312 times.