
On Windows 10, a batch file typically has a «.bat» extension, and it is a special text file that contains one or multiple commands that run in sequence to perform various actions with Command Prompt.
Although you can type commands manually to execute a particular task or change system settings on Windows 10, a batch file simplifies the work of having to re-type the commands, saving you time and avoiding mistakes.
You can also use other tools like PowerShell to write even more advanced scripts. However, running batch files in Command Prompt is still relevant for executing commands to change settings, automate routines, and launch apps or web pages on your computer.
This guide will walk you through the steps to create and run a batch file on Windows 10. Also, we will outline the steps to create advanced scripts and rum them automatically on schedule using the Task Scheduler.
How to create a batch file on Windows 10
The process of writing a batch file is not complicated. You only need Notepad or another text editor and some basic knowledge of typing commands in Command Prompt. These instructions will help you create a basic and advanced batch file to query system settings.
Create basic Windows 10 batch file
To create a basic batch file on Windows 10, use these steps:
All the latest news, reviews, and guides for Windows and Xbox diehards.
- Open Start.
- Search for Notepad and click the top result to open the text editor.
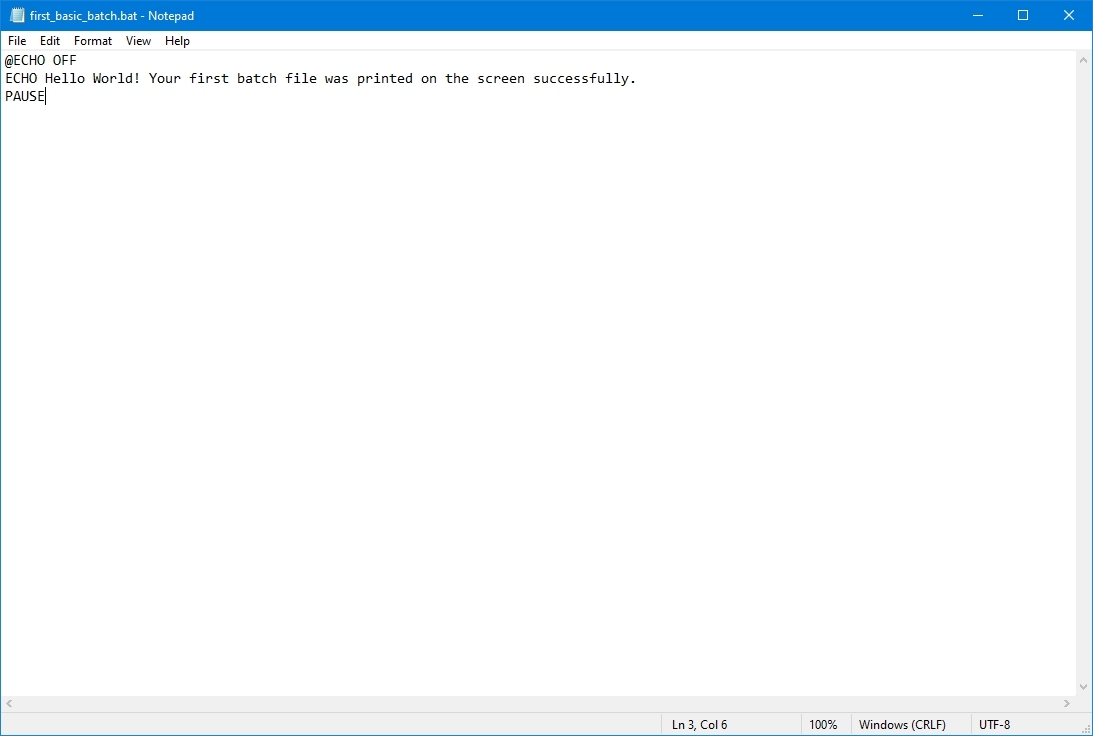
- Type the following lines in the text file to create a batch file:
@ECHO OFF
ECHO Hello World! Your first batch file was printed on the screen successfully.
PAUSE
The above script outputs the phrase, «Hello World! Your first batch file was printed on the screen successfully,» on the screen.
- @ECHO OFF — Shows the message on a clean line disabling the display prompt. Usually, this line goes at the beginning of the file. (You can use the command without the «@» symbol, but it’s recommended to include it to show a cleaner return.)
- ECHO — The command prints the text after the space on the screen.
- PAUSE — Allows the window to stay open after the command has been executed. Otherwise, the window will close automatically as soon as the script finishes executing. You can use this command at the end of the script or after a specific command when running multiple tasks and wanting to pause between each line.
- Click the File menu.
- Select the Save as option.
- Confirm a name for the script — for example, first_basic_batch.bat.
- Quick note: While batch files typically use the .bat file extensions, you can also find them using the .cmd or .btm file extensions.
Once you complete the steps, double-click the file to run it. Alternatively, you can use the steps below to learn how to run a batch file with Command Prompt, File Explorer, or Task Scheduler.
Create advanced Windows 10 batch file
To create an advanced Windows batch file with multiple commands, use these steps:
- Open Start.
- Search for Notepad and click the top result to open the text editor.
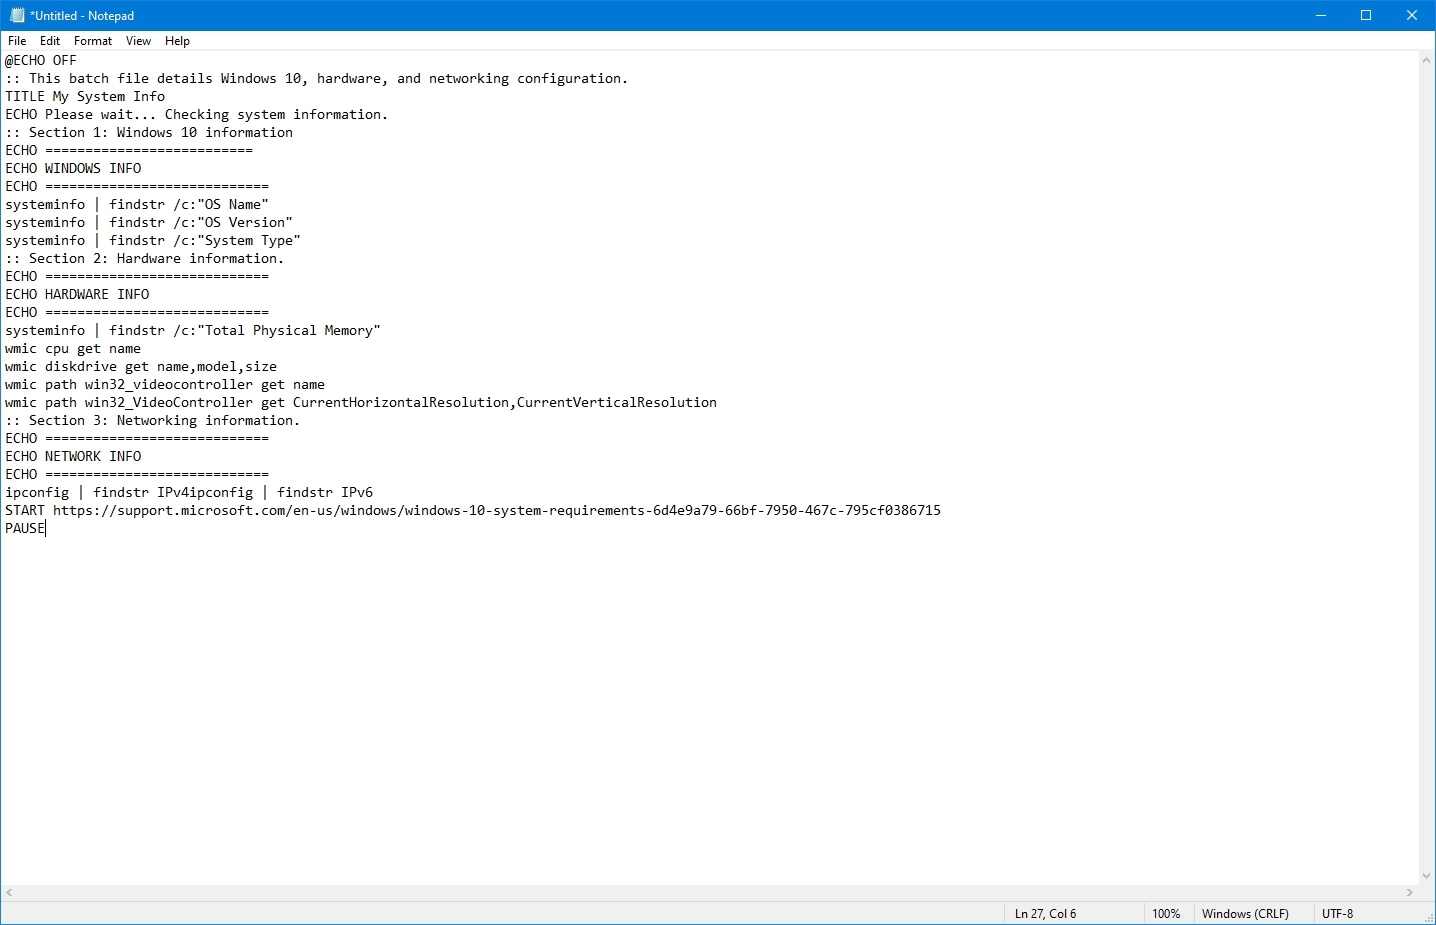
- Type the following lines in the text file to create a more advanced Windows 10 batch file:
@ECHO OFF
:: This batch file details Windows 10, hardware, and networking configuration.
TITLE My System Info
ECHO Please wait… Checking system information.
:: Section 1: Windows 10 information
ECHO ==========================
ECHO WINDOWS INFO
ECHO ============================
systeminfo | findstr /c:»OS Name»
systeminfo | findstr /c:»OS Version»
systeminfo | findstr /c:»System Type»
:: Section 2: Hardware information.
ECHO ============================
ECHO HARDWARE INFO
ECHO ============================
systeminfo | findstr /c:»Total Physical Memory»
wmic cpu get name
wmic diskdrive get name,model,size
wmic path win32_videocontroller get name
wmic path win32_VideoController get CurrentHorizontalResolution,CurrentVerticalResolution
:: Section 3: Networking information.
ECHO ============================
ECHO NETWORK INFO
ECHO ============================
ipconfig | findstr IPv4ipconfig | findstr IPv6
START https://support.microsoft.com/en-us/windows/windows-10-system-requirements-6d4e9a79-66bf-7950-467c-795cf0386715
PAUSE
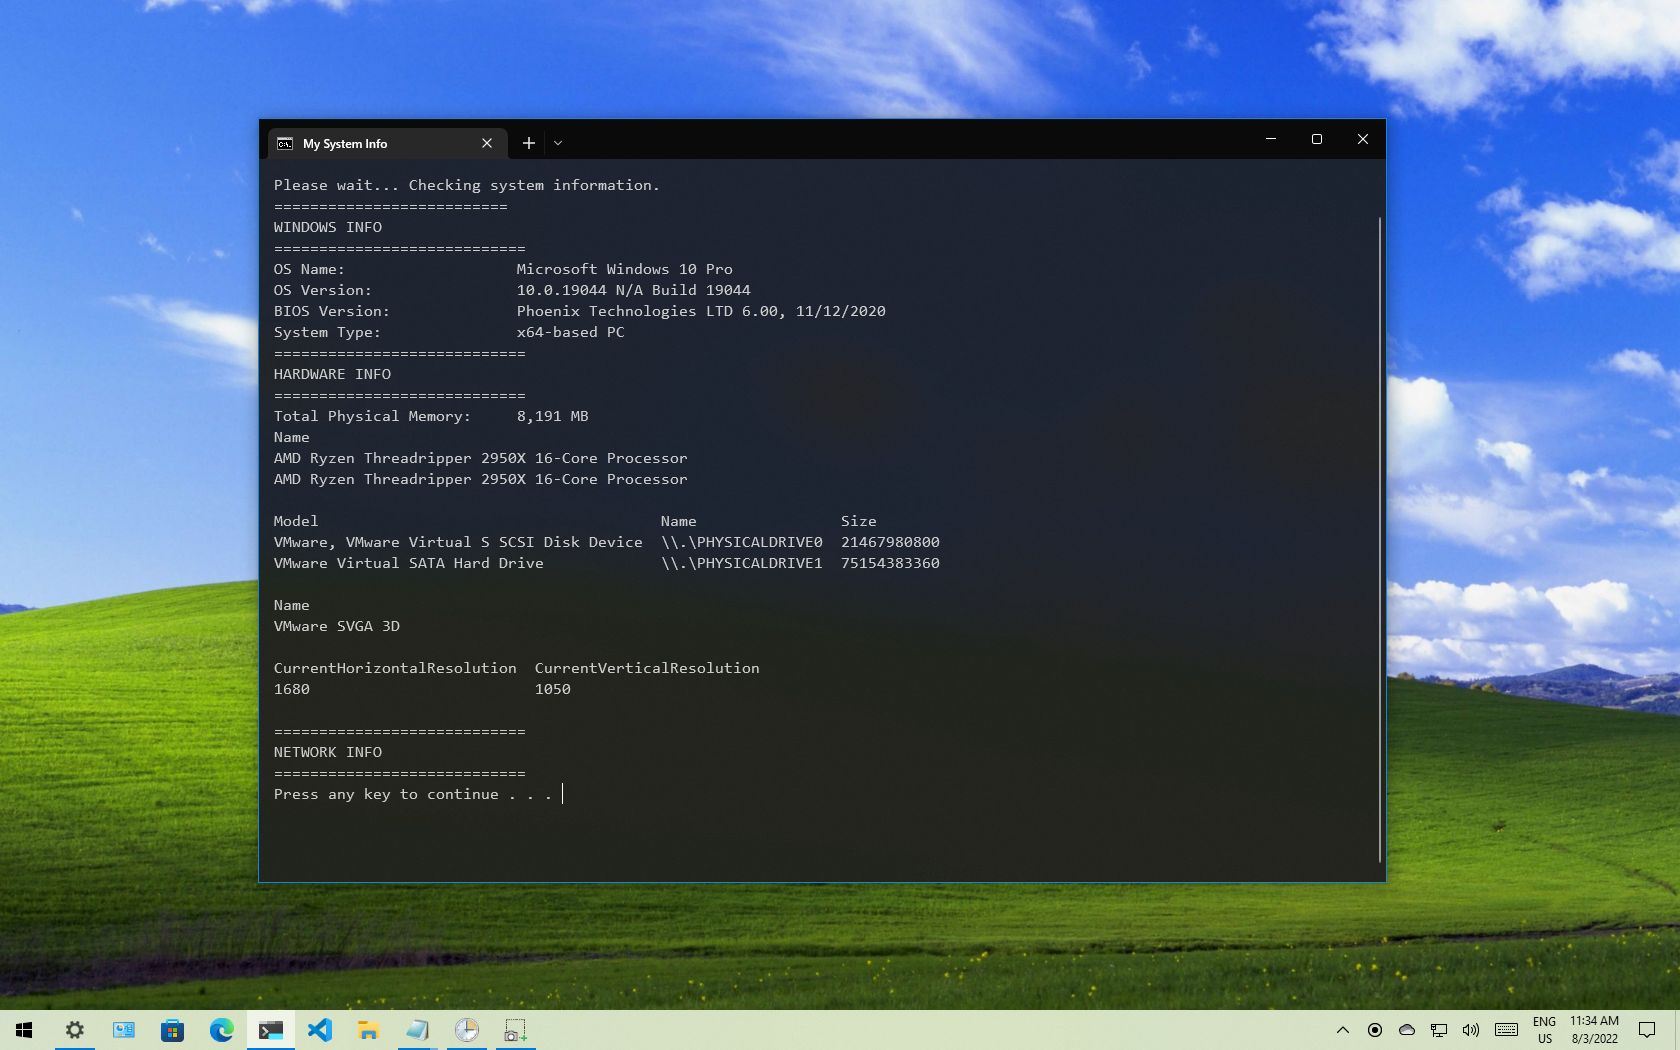
The above script runs each line to query a series of system details, and the result will be divided into three categories, including «WINDOWS INFO,» «HARDWARE INFO,» and «NETWORK INFO.» Also, the «START» command will open the web browser in the official support page outlining the Windows 10 system requirements, which you can check against your information.
- @ECHO OFF — Shows the message on a clean line disabling the display prompt. Usually, this line goes at the beginning of the file.
- TITLE — Prints a custom name in the title bar of the console window.
- :: — Allows writing comments and documentation information. These details are ignored when the system runs the batch file.
- ECHO — Prints the text after the space on the screen.
- START — Opens an app or website with the default web browser.
- PAUSE — Tells the console window to stay open after running the command. If you do not use this option, the window will close automatically as soon as the script finishes executing.
- Click the File menu.
- Select the Save as option.
- Type a name for the script — for example, first_advanced_batch.bat.
After you complete the steps, double-click the .bat file to run it or use the steps below to execute the script with Command Prompt, File Explorer, or Task Scheduler.
Create actionable Windows 10 batch file
You can also write batch scripts for any task that does not require user interaction. For instance, to map a network drive, install an application, change system settings, and more.
To create a non-interactive batch file on Windows 10, use these steps:
- Open Start.
- Search for Notepad and click the top result to open the text editor.
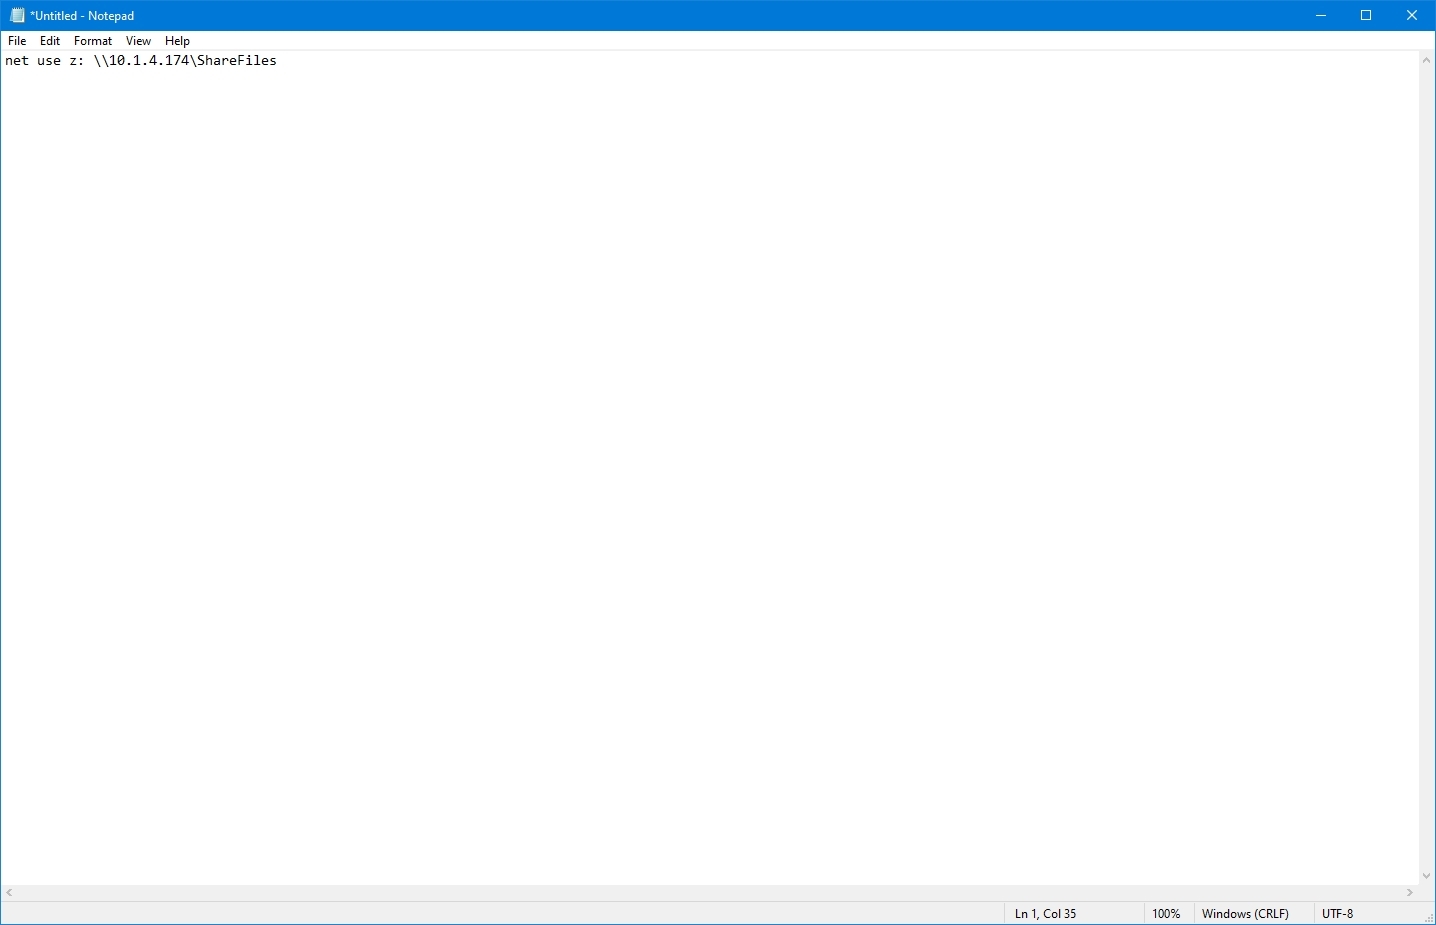
- Type the following command to map a network drive in the text file: net use z: \\PATH-NETWORK-SHARE\FOLDER-NAME /user:YOUR-USERNAME YOUR-PASSWORD
In the command, replace the «\\PATH-NETWORK-SHARE\FOLDER-NAME» for the folder network path to mount on the device and «YOUR-USERNAME YOUR-PASSWORD» with the username and password that authenticates access to the network share.
This example maps a network folder as a drive inside File Explorer using the «Z» drive letter: net use z: \\10.1.4.174\ShareFiles
- Quick note: If you are accessing the files from another computer that uses a specific username and password, do not forget to use the /user: option with the correct credentials.
- Click the File menu.
- Select the Save as option.
- Confirm a name for the script — for example, mount-z-network-drive.bat.
Once you complete the steps, the batch file will map the network folder without opening a Command Prompt window.
We only demonstrate a script with a single command, but you can include as many as you like, as long as you write them one per line.
How to run a batch file on Windows 10
Windows 10 has at least three ways to write batch files. You can run them on-demand using Command Prompt or File Explorer. You can configure the script using the Task Scheduler app to run it on schedule. Or you can save the batch files in the «Startup» folder to let the system run them as soon as you sign into the account.
Run batch file on-demand
If you want to run a script on-demand, you can use File Explorer or Command Prompt.
Command Prompt
To run a script file with Command Prompt on Windows 10, use these steps:
- Open Start.
- Search for Command Prompt, right-click the top result, and select the Run as administrator option.
- Type the following command to run a Windows 10 batch file and press Enter: C:\PATH\TO\FOLDER\BATCH-NAME.bat
In the command, make sure to specify the path and name of the script.
This example runs the batch file located in the «scripts» folder inside the «Downloads» folder: C:\Users\UserAccount\Downloads\first_basic_batch.bat
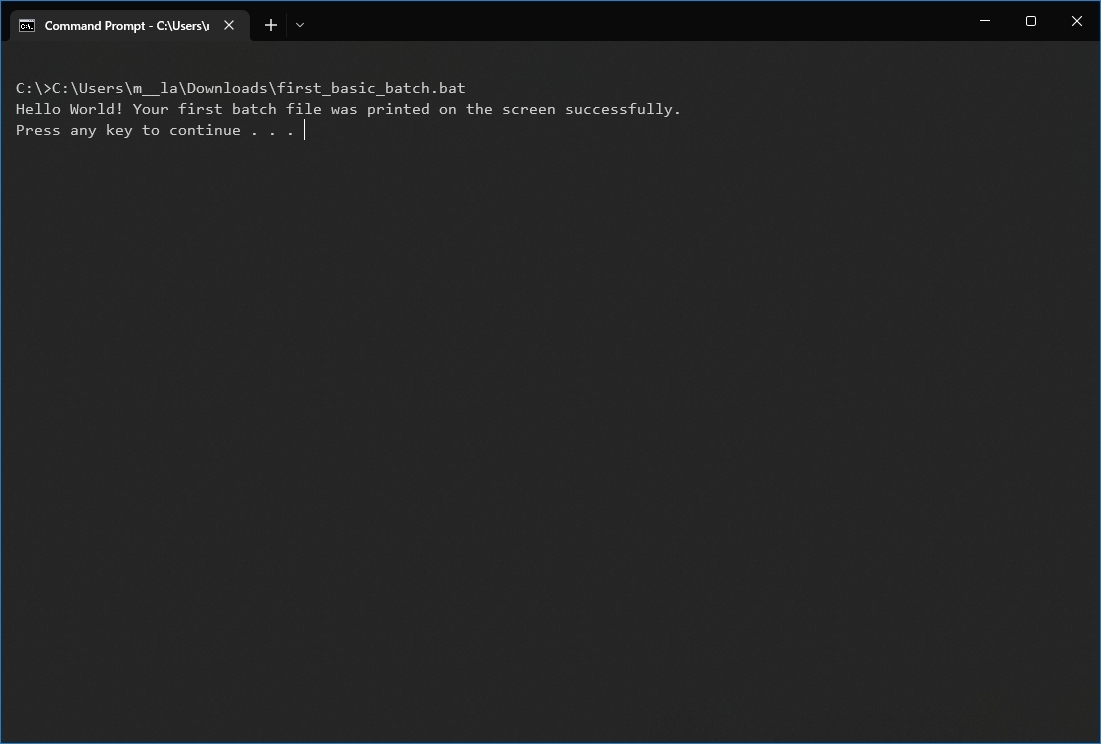
After you complete the steps, the console will return the results, and the window won’t close even if the script does not include the «PAUSE» command since you are invoking the script from within a console session that was already open.
File Explorer
To run a batch file with File Explorer, use these steps:
- Open File Explorer.
- Browse to the folder with the batch file.
- Double-click the script file to run it.
- (Optional) If a command in the batch file requires administrator privileges, you will have to run the script as an admin by right-clicking the file and selecting the Run as administrator option.
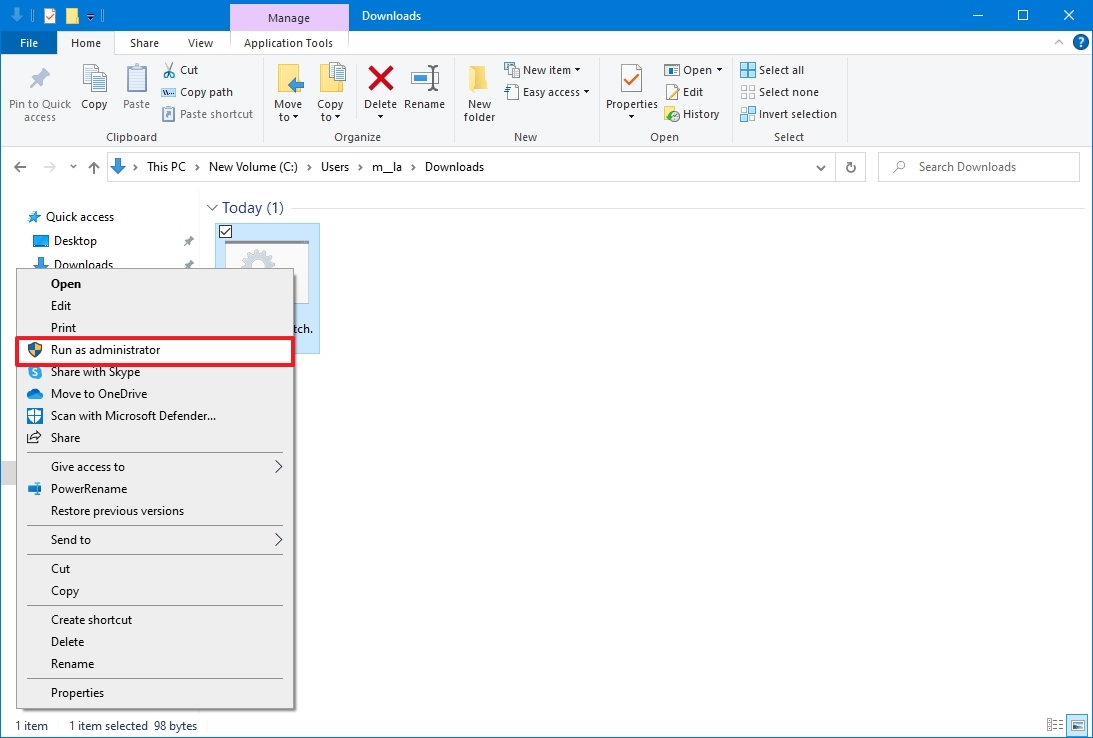
- Click the Yes button
Once you complete the steps, the script will run each command in sequence, displaying the results in the console window.
Run batch files on startup
Windows 10 also features a known folder called «Startup,» which the system checks every time it starts to run applications, shortcuts, and scripts automatically without the need for extra configuration.
To run a script on the Windows 10 startup, use these steps:
- Open File Explorer.
- Open the folder containing the batch file.
- Right-click the batch file and select the Copy option.
- Use the Windows key + R keyboard shortcut to open the Run command.
- Type the following command: shell:startup
- Click the OK button.
- Click the Paste option from the «Home» tab in the Startup folder. (Or click the Paste shortcut button to create a shortcut to the batch file.)
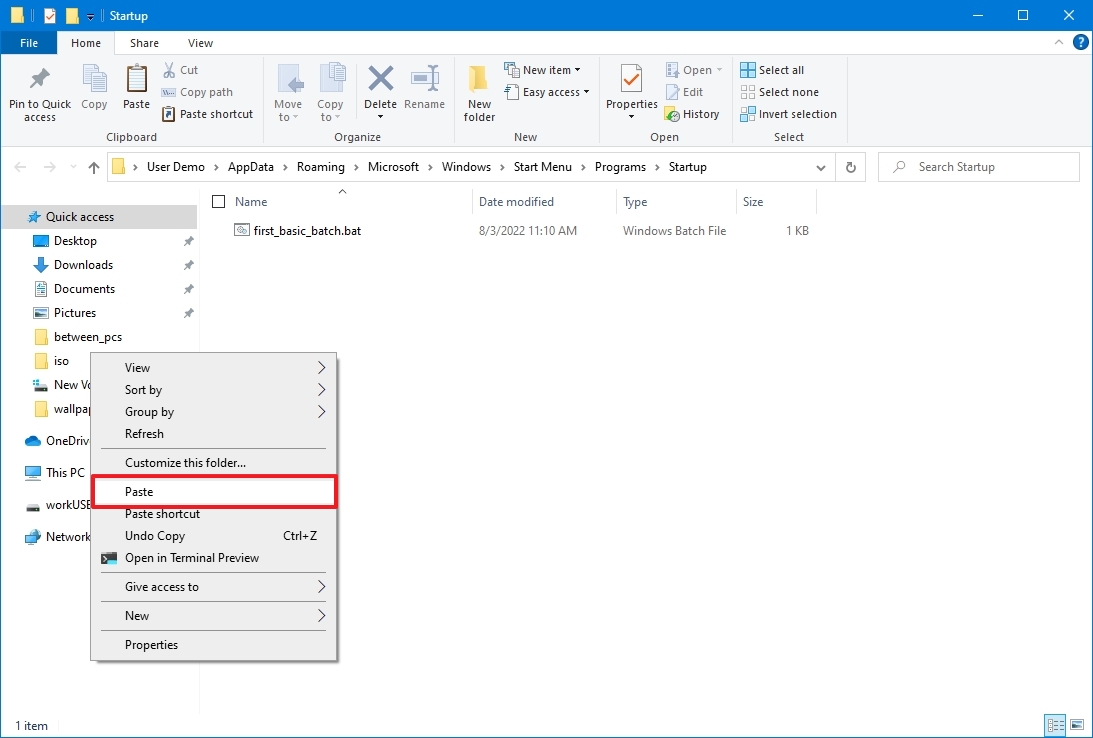
After you complete the steps, the batch file will execute automatically every time you log into your account.
Run batch file with Task Scheduler
To use Task Scheduler to run the batch file automatically at a specific time, use these steps:
- Open Start.
- Search for Task Scheduler and click the top result to open the app.
- Right-click the «Task Scheduler Library» branch and select the New Folder option.
- Confirm a name for the folder — for example, MyScripts.
- Quick note: You don’t need to create a folder, but keeping the system and your tasks separate is recommended.
- Click the OK button.
- Expand the «Task Scheduler Library» branch.
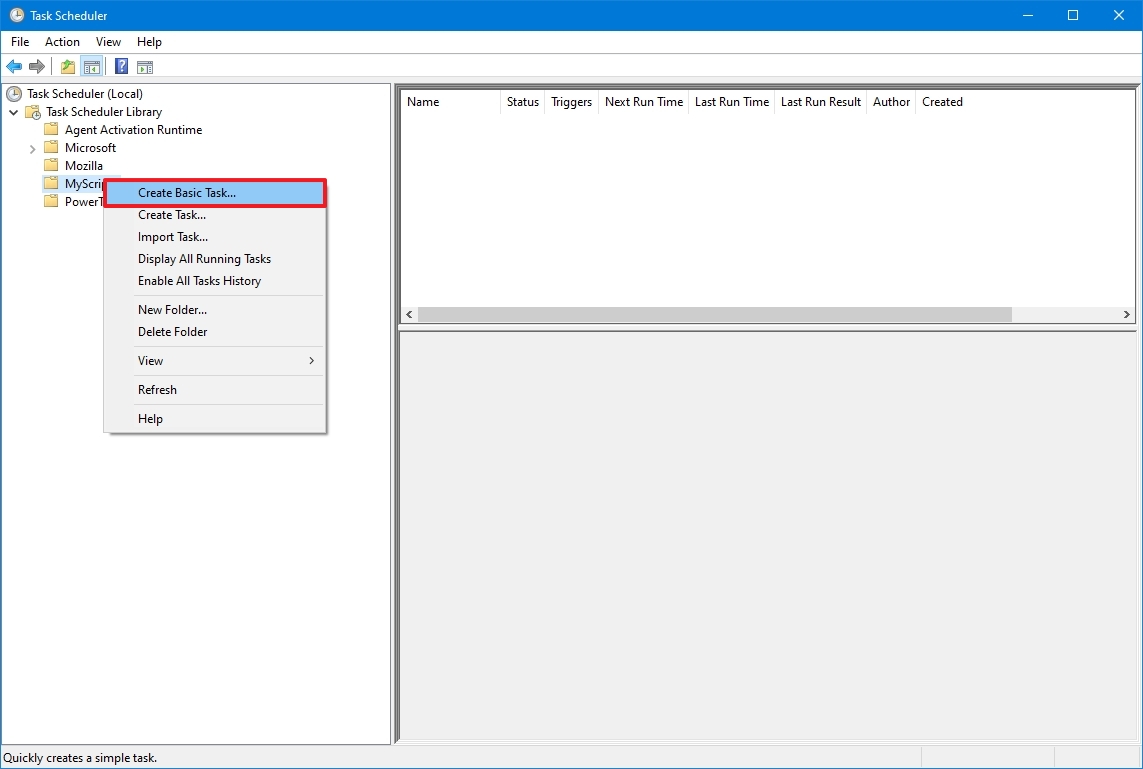
- Right-click the MyScripts folder.
- Select the Create Basic Task option.
- In the «Name» field, confirm a name for the task — for example, SystemInfoBatch.
- (Optional) In the «Description» field, write a description for the task.
- Click the Next button.
- Select the Monthly option.
- Quick note: Task Scheduler lets you choose from different triggers, including a specific date, during startup, or when a user logs in to the computer. In this example, we will select the option to run a task every month, but you may need to configure additional parameters depending on your selection.
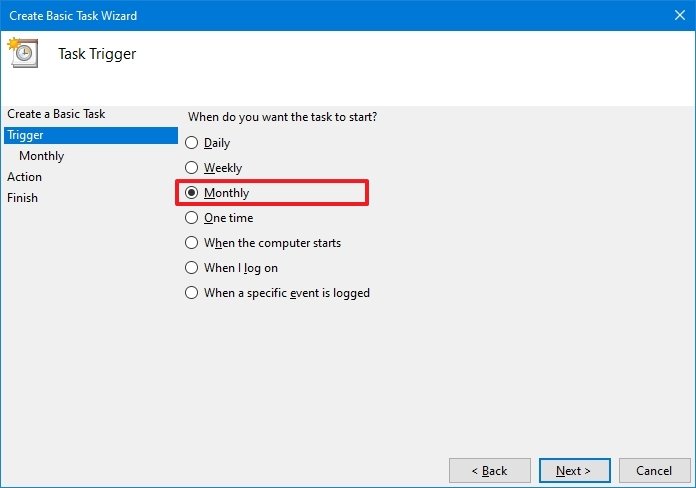
- Click the Next button.
- Use the «Start» settings to confirm the day and time to run the task.
- Use the «Monthly» drop-down menu to pick the months of the year to run the task.
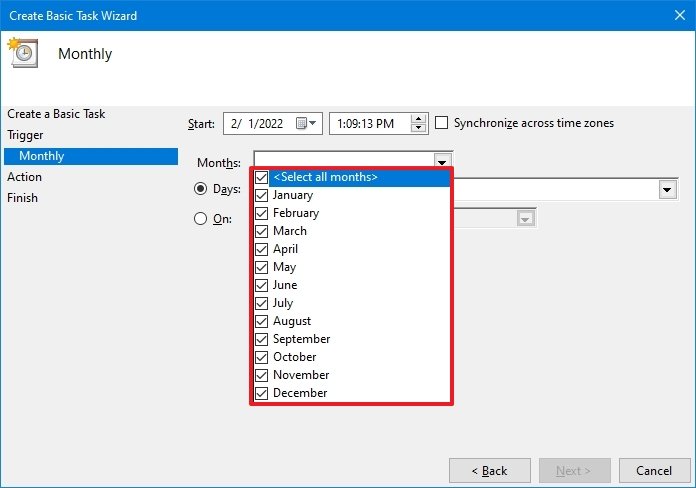
- Use the «Days» or «On» drop-down menu to confirm the days to run the task.
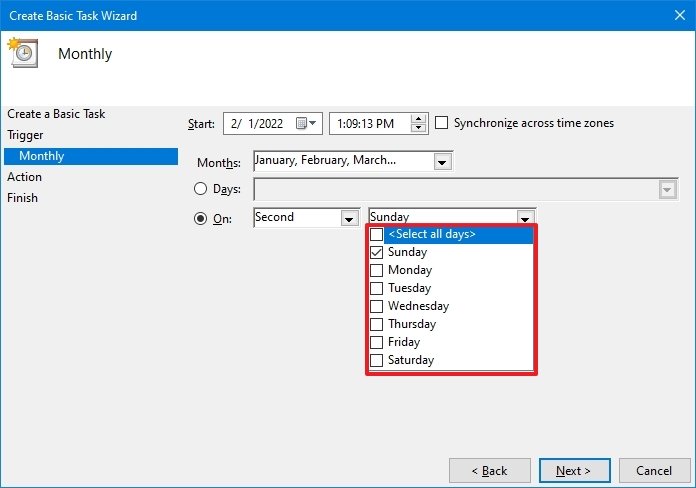
- Click the Next button.
- Select the Start a program option to run the batch file.
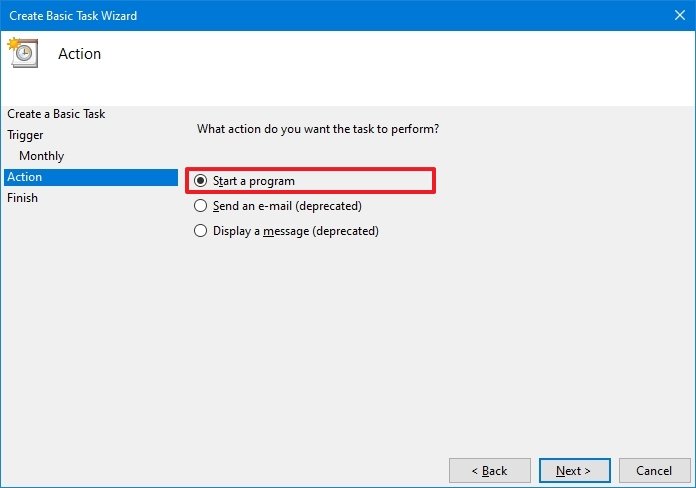
- In the «Program/script» field, click the Browse button.
- Select the batch file you want to execute.
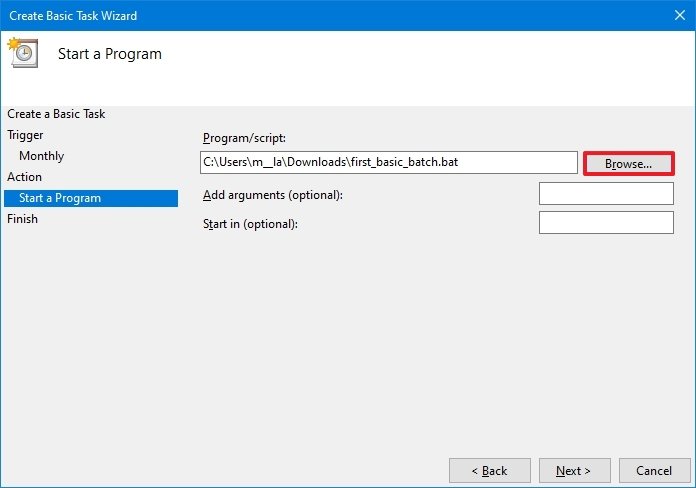
- Click the Finish button.
Once you complete the steps, the task will run the script during the configured time and date or action.
The above instructions are meant to schedule only a basic task. You can use these instructions to create a more customizable task with the Task Scheduler.
This guide focuses on Windows 10, but the same steps will also work for older versions, including Windows 8.1 and 7. Also, you can refer to these instructions if you have Windows 11 installed on your computer.
More Windows resources
For more helpful articles, coverage, and answers to common questions about Windows 10 and Windows 11, visit the following resources:
- Windows 11 on Windows Central — All you need to know
- Windows 10 on Windows Central — All you need to know
Mauro Huculak has been a Windows How-To Expert contributor for WindowsCentral.com for nearly a decade and has over 15 years of experience writing comprehensive guides. He also has an IT background and has achieved different professional certifications from Microsoft, Cisco, VMware, and CompTIA. He has been recognized as a Microsoft MVP for many years.
Introduction
One useful feature of batch files is being able to create files with them. This section shows how to create files using batch code.
Syntax
- echo (type here whatever you want in the to be) >> (filename)
- echo (variable name) >> (filename)
If a file exists, > will overwrite the file and >> will append to the end of the file. If a file does not exist, both will create a new file.
Also, the echo command automatically adds a newline after your string.
So
echo 1 > num.txt
echo 1 > num.txt
echo 2 >> num.txt
will create the following file:
1
2
Not this:
1 1 2
or
1 2
Furthermore, you cannot just modify a single line in a text file. You have to read the whole file, modify it in your code and then write to the whole file again.
Specifically for cmd.exe on Windows Operating Systems.
It is a common occurrence in the Programming Forum to see questions related to creating text files with a batch script, be it to create a secondary script or a particular format of text file. This “How-To” will attempt to outline all of the information needed to create files successfully.
Cmd/Bat scripting by default creates ANSI encoded text files unless cmd.exe was started with the “/U” switch, in which case in will create Unicode formatted text files(Without a byte-order-mark). It is only the output file that differs, the procedure to create the file is the same.
Redirection
Creating text files in batch is easy, there are two main operators:
“>” – Output the command to file, overwrite it if it already exists, otherwise create it.
“>>” – Output the command to file, append to the end of the file it if it already exist, otherwise create it.
Examples:
rem output the dir command to file, overwrite the file if it already exists.
dir > "somefile.txt"

rem Equivilant to above
> "somefile.txt" dir

rem output the dir command to file, append to the file if it already exists.
dir >> "somefile.txt"

rem Equivilant to above
>> "somefile.txt" dir
The syntax is very easy, but of course there are a few rules:
(I) The file name must come after the redirection symbol(s).
(II) The file name must be double quoted if it contains spaces or ampersands.
(III) Relative or full paths can be used; if only a file name is specified then the file is created in the current directory.
(IV) The act of redirection can be before or after the command.
Almost any command that outputs text, including other scripts and error streams, can be redirected to file. Programs that write directly to the console window can’t be redirected, though few programs actually do this.
Redirection of Grouped Commands
“Grouped commands” or “code blocks” can be redirected to file in a single step. This can save typing and generally make the script look much cleaner.
This means that if statements and for loops can be output in a single step, rather that redirecting each individual command. Again the redirection can come immediately before or after “code block”.
Examples:
rem "if"
if 1==1 (
   dir
   echo 1==1!
) >> "somefile.txt"

rem "if/else"
if 1==1 (
   dir
   echo 1==1!
) >> "somefile.txt" else (
   echo what
) >> "somefile.txt"

rem "for"
for %%a in (1 2 3) do (
    echo %%a
) >> "somefile.txt"

rem standalone codeblock
(
    Echo All of this
    echo only gets
    echo redirected once!
) >> "somefile.txt"
It is important to remember to take into account variable expansion issues when inside a “code block”.
Redirecting the Error Stream
Thus far we have only been redirecting the standard output of commands, but some commands will output errors in a different way. It is still possible to redirect this error stream to a file, in fact it’s possible to output only the error stream or even combine it with the standard output stream so both go to the same file.
In batch script streams are noted by the numbers 0 – 9, of which there are three usable streams(0 – 2). As far as output goes only stream “1” (standard output) and stream “2” (error) need to be considered.
When addressing a particular stream the number that denotes the stream must be immediately before the redirection operator, if omitted(as in the above examples) the standard stream is assumed.
Examples:
rem only errors into "somefile.txt"
find "" : 2>> "somefile.txt"

rem errors into "errors.txt"
rem and standard output to "somefile.txt"
dir /arashd 2>> "errors.txt" >> "somefile.txt"

rem errors and standard output to somefile.txt
dir /arashd >> "somefile.txt" 2>&1
As you can see above you simply insert a “2” in front of the redirection operator to output errors and that errors can go to one file with the standard output to another.
You may have noticed the strange looking “2>&1”, this redirects the error stream into the standard output stream. It always follows the same syntax “x>&y” where “x” is the stream to be mixed with stream “y”. This stream redirection must come after any file redirection, the changes are still reflected in the output.
Using the Echo Command
The “echo” command can be a very useful tool when creating files. It allows a whole line to be specified and can be partially or completely variable content. However there are a few key considerations when using echo.
Trailing Spaces
If you redirect after “echo” and leave a space between the last character and the redirection symbol you may be left with a trailing space in the output. It is possible to omit the space but it can lead to further problems(see “Accidental Stream Redirection”).
rem I don't recommend either of these methods

echo This will have a trailing space > "somefile.txt"

echo This won't, but could have other issues> "somefile.txt"
Leading Spaces
If you want the output text to contain leading spaces or tabs then a colon (:) needs to be added after “echo”. A side effect of this is that the usual space between “echo” and the output text is also output. The exact number of leading spaces/tabs required should be after the colon, do not add the usual space to delimit the command and text.
>> "somefile.txt" echo: - This line has leading spaces.
This form of echo also works without leading spaces, so it can be used generally; mixing forms is not required.
Empty Lines
Using “echo” with a colon also makes it possible to output empty lines. The following outputs an empty line into “somefile.txt”:
>> "somefile.txt" echo:
Accidental stream redirection
The catch with redirecting after echo and not leaving a space is that if the last character is a number and second last is a space cmd.exe thinks you want a particular stream redirected. This is also an issue with “standard” percentage sign(%) enclosed variables, as they are treated as plain text.
The easiest and most reliable method to avoid both trailing spaces and accidental redirection is to redirect before echo.
>> "somefile.txt" echo The best of both worlds!
Of course this can still result in trailing spaces, but only if the text you output has them.
Character Escapement
The final catch that echo has for us is dealing with characters that have special meaning to the command processor. The main problem is that most of the escaping is conditional.
To start out I will quickly go over the variable types. There are four variable types in batch script, two are treated as plain text, and thus not already escaped, the other two are already escaped.
%1 - Parameter, not escaped.
%var% - Standard Environment Variable, not escaped
%%a - For Variable, escaped.
!var! - Delayed Environment Variable, escaped
When used with echo the escaped variables can hold any characters(except possibly the exclamation mark(!)) without any issue, those that aren’t escaped must already contain the necessary escape sequence(s).
The percentage sign(%) always needs to be doubled.
Echo %%
If already inside a variable it is already escaped.
The exclamation mark(!) only needs to be escaped if Delayed Expansion is enabled. If it is then it must be escaped by two carets(^).
SetLocal EnableDelayedExpansion
echo ^^!
It is also worth noting that exclamation marks will either disappear or expand as variables inside of Parameters, Standard Environment Variables and For Variables, unless the variable has the right number of carets already in it(four or more depending on the circumstance).
The closing Parentheses character “)” needs to be escaped if the echo is inside a “code block”.
(
    echo ^)
)
The Greater-Than(>), Less-Than (<), Pipe (|), Ampersand(&) and Caret(^) symbols all need to be escaped by a caret(^) unless they are contained within “double quotes”.
echo ^> ^< ^| ^& ^^
Well that’s all for this “How-To”, I hope you have enjoyed!
What To Know
- Create a batch file in Windows 10 by typing your commands in a blank Notepad document, and saving it as .bat instead of .txt.
- Commands include PAUSE, COPY, and CLS (clear).
- To add comments, start a line with two colons and a space. Comments are useful to divide up a batch file into sections.
This article explains how to create a batch file in Windows 10 using the Notepad, how to add comments, and includes a list of common commands.
How to Create a Batch File in Windows 10
Creating a batch file in Windows 10 is as simple as typing the commands you want to run into a blank notepad document, then saving the document as a .bat file instead of a text document. You can then run the file by clicking on it, which will automatically launch the Windows command shell and execute your commands.
Here’s how to create a simple batch file in Windows 10:
-
Type Notepad into the search bar, and click the Notepad app when it appears in the results.
-
Type the following into a blank Notepad document to create a simple batch file:
 @ECHO OFF
ECHO If you're seeing this text, you've successfully created your first batch file in Windows 10. Congratulations!PAUSE
-
Click File in the upper left corner of the Notepad window.
-
Click Save as in the dropdown menu.
-
Type a name for the script, like test.bat, and click Save.
Make note of the location on your hard drive where the file is saved, as that’s where you’ll be able to find and execute it in the future.
-
Locate the file you just saved, and double click it.
-
If the file was created correctly, you will see a command window that looks like this:
Batch File Commands and Descriptions
A batch file is a special type of file that automatically opens a command window when activated. If you already know the commands that you need your file to execute, then you’re ready to go. Simply type the commands into Notepad in the manner outlined above, save as a .bat file, and open the batch file to execute the commands whenever you want.
If you’re not sure what to put in your file, keep in mind that a batch file is essentially an ordered list of commands that will execute via the Windows command prompt. Anything you could type manually into the command prompt, you can put in a batch file. The file will then execute each command, in order, from the top to the bottom.
Here are some useful commands to use in batch files, along with explanations of what they do:
- @ECHO OFF: Disables display of the prompt. This is usually used at the beginning of a batch file for a cleaner display. You don’t need the @, but including it hides the ECHO OFF command as well.
- ECHO: Prints the following text to the command window.
- PAUSE: Causes the command window to remain open after the batch file is finished, or allows text in the window to be read before proceeding.
- TITLE: Places a custom title in the title bar of the command window.
- CLS: Clears the command window.
- EXIT: Exits and closes the command window.
- COPY: Copy one or more files.
- REM: Record comments or remarks.
- IPCONFIG: Display detailed IP information for each network adapter connected to your system.
- PING: Sends an Internet Control Message Protocol (ICMP) echo request to an IP address or website.
- TRACERT: Check your connection to an IP or website using ICMP.
- SET: Used to set variables.
- IF: Perform a conditional function based on user input or another variable.
Inserting Comments Into Batch Files
If you start a line in your batch file with two colons and a space, it won’t be executed. This allows you to easily insert comments into your batch file. Comments are useful to divide up a batch file into sections with a brief explanation as to the purpose of the section.
Here’s an example of a batch file with comments:
 @ECHO OFF
:: This batch file is just an example to show how comments work.
TITLE Just a basic hello world example to show how comments work.
ECHO Hello world!
:: This is another comment, you won't see me unless you read the batch file!
ECHO Goodbye!
PAUSE
If you paste those commands into a batch file and run it, you’ll see an output like this:
Comments aren’t necessary, but it is a useful option that you’ll tend to need more when creating complicated batch files with lots of sections.
Here’s a slightly more complicated batch file that uses a variety of commands, comments, and actually performs a useful task:
 :: This batch file is designed to check for internet connectivity.
@ECHO OFF
TITLE Internet Status and Connectivity Checker
:: This command shows your network details.
ipconfig /all
PAUSE
:: This section checks to see if a specific website is available.
ping google.com
:: This section lets you choose whether or not to run tracert.
set "reply=y"
set /p "reply=Run traceroute now? [y|n]: "
if /i not "%reply%" == "y" goto :eof
tracert google.com
PAUSE
This file checks your internet connection using ipconfig and then pauses so you can examine it. It then pings google.com. Finally, it gives you the option to run the tracert command if you want. It then pauses a second time, allowing you to check the results before closing the window.
The final result looks like this:
You can use any command prompt commands you like in a batch file, including variables and user interaction like the above example, writing information to other files, and more.
Thanks for letting us know!
Get the Latest Tech News Delivered Every Day
Subscribe