
Несмотря на то, что этой операционной системе уже десять лет, вопрос о том, как создать загрузочную флешку Windows XP является более актуальным (судя по информации поисковиков), чем тот же вопрос для более новых версий Windows. Предполагаю, это вызвано тем, что большинство программ, предназначенных для создания загрузочных USB носителей, не создают таковые для Windows XP. Также, думаю, многие владельцы слабых нетбуков желают установить Windows XP на свои портативные компьютеры, а единственный способ сделать это — установить его с флешки.
См. также:
- Загрузочная флешка Windows 10
- Три способа создания загрузочной флешки Windows 8
- Загрузочная флешка Windows 7
- Лучшие бесплатные программы для создания загрузочной флешки
- Установка Windows XP с флешки и диска (описан сам процесс)
WinToFlash — пожалуй, самый простой способ создания загрузочной флешки Windows XP
Примечание: в комментариях сообщают, что WinToFlash может устанавливать дополнительное ненужное ПО. Будьте внимательны.
После первого запуска программы для создания загрузочной флешки Windows XP WinToFlash Вам будет предложено принять соглашение пользователя, покажут рекламу и после этого Вы увидите главное окно программы:

Создать загрузочную флешку Window XP можно либо с помощью мастера (в программе все на русском языке), который проведет Вас через весь процесс, либо следующим образом:
- Открыть вкладку «Расширенный режим»
- Выбрать пункт «Перенос программы установки Windows XP/2003 на накопитель (он и так выбран по умолчанию). Нажать «Создать».

- Указать путь к файлам Windows — это может быть смонтированный в системе образ диска с Windows XP, компакт-диск с операционной системой или же просто папка с файлами установки Windows XP (которую можно получив, например, открыв образ ISO в любом архиваторе и распаковав в нужное место).
- Указать, какую флешку будем превращать в загрузочную (Внимание! Все файлы на флешке будут удалены и, скорее всего, не будут подлежать восстановлению. Сохраните все важные данные).
- Ждать.


Таким образом, сделать флешку с дистрибутивом операционной системы Windows XP в программе WinToFlash одинаково легко как с помощью мастера, так и в расширенном режиме. Единственное отличие, в расширенном режиме Вы можете настроить другие параметры, выбрать тип загрузчика, установить исправление ошибки stop 0x6b session3_initialization_failed и многие другие. Для большинства пользователей никаких параметров менять не требуется, достаточно описанных выше действий.
Скачать WinToFlash можно скачать на официальном сайте разработчика http://wintoflash.com/home/ru/, но стоит быть внимательным — не используйте веб-установщик со страницы загрузки, а воспользуйтесь загрузкой по http или ftp с официального сайта с той же страницы.
WinSetupFromUSB — более функциональный способ

Несмотря на то, что вышеописанный способ изготовить установочную флешку с Windows XP является очень простым и удобным, лично я использую для этих и для многих других целей (например, для создания мультизагрузочной флешки) бесплатную программу WinSetupFromUSB.
Рассмотрим процесс создания загрузочной флешки XP с помощью WinSetupFromUSB.
- Запустите программу, флешка уже вставлена в USB порт компьютера
- В списке устройств выберите путь к Вашей флешки (если подключено несколько USB накопителей), нажмите кнопку Bootice.
- В появившемся окне Bootice нажмите «Perform format», выберите пункт USB-HDD mode (Single Partition) и подтвердите выполнение форматирования (все данные с флешки будут удалены).
- После завершения процесса форматирования нажмите кнопку «Process MBR» и выберите пункт «GRuB for DOS», затем нажмите кнопку «Install / Config». По завершении, закройте программу Bootice.
- В WinSetupFromUSB, в поле Windows 2000/XP/2003 укажите путь к файлам установки Windows XP (это может быть смонтированный образ ISO, диск с Win XP или папка с файлами установки). Нажмите кнопку «Go» и дождитесь окончания создания загрузочной флешки.
На самом деле, программа WinSetupFromUSB предлагает опытному пользователю значительно больше функций для создания загрузочных носителей. Здесь мы рассмотрели ее лишь в контексте темы инструкции.
Загрузочная флешка Windows XP в Linux
Если на Вашем компьютере установлен Linux в любой его версии, то описанные выше способы для создания загрузочной флешки с Windows XP не подойдут. Однако, решение имеется: воспользуйтесь бесплатной программой MultiSystem, предназначенной для создания загрузочных и мультизагрузочных флешек в ОС Linux. Скачать программу можно по ссылке http://liveusb.info/dotclear/
После установки программы, выполните следующие действия:
- В программе MultiSystem выберите флешку и нажмите «Validate», нажмите «Ок» для установки загрузчика GRUB, после чего Вы окажетесь в главном окне программы.
- Кликните «Non Free» — «Installing Non-Free part», затем — «Download PLoP Bootmanager»
- После этого кликните «Download firdisk.ima», «Close». В результате Вы снова перейдете в главное окно программы.
- И последнее: просто перенесите ISO образ с Windows XP на поле Drag/Drop ISO/img — вот и все, флешка для установки Windows XP готова.
Надеюсь, этих способов окажется достаточно для Ваших целей. Также можете прочесть: как установить загрузку с флешки в BIOS.
For a long time, Microsoft didn’t sell Windows install media in the form of bootable USB flash drives. Instead, it prefered to stick to old-school DVD media, despite the fact that many notebooks today are too small to even include an optical drive, and many DIYers are building PCs which forego one on purpose.
However, things have moved on, and for the first time, Microsoft has begun to sell Windows 10 on pre-configured USB drives. Previous versions of the OS (XP, 7 and 8.1), all require the user to create their own bootable USB drive.
Creating a bootable Windows USB drive used to be a chore, but today, one solution can pretty-well suit most people. However, there are times when a flash drive has some quirk that prevents it from working with a particular solution, so for that reason, this article takes a look at five different methods.
Guide Index:
- USB Installer Tools & Successes
- Acquiring a Disc Image (ISO)
- Method 1 – Using Rufus
- Method 2 – UNetbootin
- Method 3 – Using Microsoft diskpart
- Method 4 – Microsoft Windows 7 USB/DVD Tool
- Method 5 – Windows 10 Media Creation Tool
- Windows XP Notes
- Common Problems
Benefits of USB Install Media
Even if the target desktop or notebook has an optical drive, there are a couple of reasons to consider first creating a USB-based installer. Admittedly, the time and effort of creating the drive might make it best-suited for system builders, but for people like us, who juggle test machines, USB is a no-brainer.
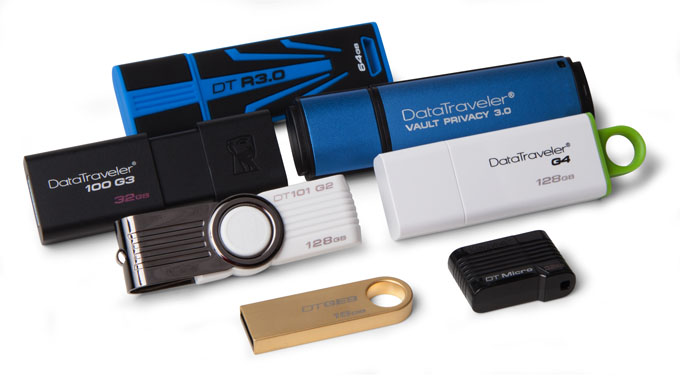
To start, USB media is more durable than disc-based media. Discs can be easily scratched, while well-built USB flash drives can generally handle a bit of abuse. Then, there’s the convenience. Ever walk around with a disc in your pocket? It looks a bit odd.
For us, performance and reliability are the key reasons why we’ve opted to use USB-based installers in lieu of discs, especially with USB 3.0 being much more common. Even if a DVD has been burned at the highest commercial speeds, it won’t be able to compete with flash memory which offers far improved IOPS performance (operations per second) – it’s the same reason why SSDs are much faster for booting an OS and loading applications than a mechanical hard drive; the seek times are minuscule in comparison.
While it’s beyond the scope of this article, those who truly want a fast install experience can slipstream USB 3.0 support into the install media, which on current chipsets and an SSD target can allow you to install Windows in under 4 minutes flat.
USB Installer Tools & Successes
Over the course of this article, we’re going to be looking at five different solutions that accomplish the exact same thing: Creating a USB-based Windows installer; if one doesn’t work, the next one should (at least, that’s the hope). To give an overview of what to expect from each solution, refer to this success table:
| Windows 10 | Windows 8 | Windows 7 | Windows XP | |
| Rufus | Yes* | Yes | Yes | Yes |
| UNetbootin | Yes | Yes | Yes | No |
| diskpart | Yes | Yes | Yes | No |
| Microsoft USB Tool | Yes | Yes | Yes | No |
| Media Creation Tool | Yes | No | No | No |
| * Requires Rufus 2.1.6 or later. |
Given the fact that Windows XP has reached end-of-life status and doesn’t officially support installation over USB, we have to outline a number of problems and conditions in order to get it working. Windows XP over USB is still temperamental, and there is a good chance that it just won’t work with your system, so please keep this in mind.
For starters, modern UEFI-equipped machines are not designed to support such an old OS, so chances are that it will not even install, or even be detected in the first place. If the motherboard in question happens to support a legacy BIOS mode, then it might work. Different version of Rufus (explained later) have better luck with the XP process than others. We strongly suggest you skip to the dedicated part of this article that explains the problems with Windows XP and USB support.
What about Windows Vista? Like Windows 7, 8, and 10, Vista too can be installed from USB media with these same methods, but due to that fact that most have moved on from it in favor of 10, it’s not a big focus.
We mentioned Rufus above, and that’s the tool we’re going to lead in here with, as we consider it to be the simplest to use, and the most effective. We discussed the same tool in an article from summer 2012 called ‘Creating a Bootable DOS Flash Drive the Easy Way‘, as it allows for simple creation of bootable MS-DOS flash drives, as the title suggests.
After the look at Rufus, we’ll continue on to UNetbootin, Microsoft’s diskpart (a tool built into Windows), a quick mention of another official Microsoft tool, but one the company no longer promotes for Windows 7 and 8, as well as the latest method, the Media Creation Tool. But first…
Acquiring a Disc Image (ISO)
Some solutions listed on this page require a Windows disc image (.iso) to be present. The exception is ‘diskpart’, as the disc’s files will need to be transferred over manually (it doesn’t matter if they come from a mounted ISO or a drive in an actual DVD-ROM). ISOs are available from a number of sources, but most people will acquire them after purchasing the OS online through Microsoft, or through some other related Microsoft service. If you don’t have an ISO, or a disc for that matter, you’ll need to acquire one from a friend or elsewhere on the web.
If you’re just looking to download Windows 10 as an ISO, you simply need to run the tool listed in step #5, and choose to save as ISO rather than to burn the image to a flash drive. Note that we can’t really provide an MD5 for a Windows 10 ISO, as it changes every time it’s downloaded through Microsoft’s tool. Only the ISOs directly supplied by Microsoft would have static hashes.
There are multiple editions of any given Windows version, but we’re going to list the exact ISOs we used along with their MD5 checksums in case they prove useful.
MD5 Checksums
- Windows XP Pro (Service Pack 3): F424A52153E6E5ED4C0D44235CF545D5
- Windows 7 Ultimate (Service Pack 1): 56A26636EC667799F5A7F42F142C772D
- Windows 8 Pro: 0E8F2199FAE18FE510C23426E68F675A
- Windows 8.1 (MSDN; multi-version): CDADC5A76634651770A365F457702803
Please be careful where you source your OS image from, as most online sources will be pirated copies and/or bundled with extra (sometimes malicious) software. How the image was captured as well will have an effect on how the final boot drive turns out, so stick to official sources where possible.
For those who have a Windows setup DVD, a free tool like CDBurnerXP or ImgBurn can be used to rip it into an .iso file. Other tools exist that accomplish the same thing, but these are the only ones we can personally recommend. For mounting an ISO image, we’d recommend Virtual CloneDrive, as it’s free, and not the “free but a total nag” kind of free.
NOTE: Some anti-virus applications might interfere with the USB creation process due to the autorun properties involved, so if issues are experienced, we’d recommend temporarily disabling the anti-virus until the process is complete.
Using Rufus
Both Rufus and UNetbootin are simple tools for this task, and outside of Rufus’ Windows XP support, both work just the same. However, we prefer Rufus because we find it loads a lot quicker, and feels a bit faster, too. For a great many reasons, this is still our preferred method of creating USB boot drives.
With Rufus loaded up, choose the appropriate device that you want to turn into a boot drive, under the “Device” menu, and make sure that the file system is NTFS (not FAT32). The other options shouldn’t matter too much, although if you’re planning to install Windows 8 as an official EFI OS, you may wish to peruse the options under the “Partition scheme and target system type” menu. For Windows XP, select MBR Partition only.
To load the Windows .iso file, the small CD icon to the right of “Create a bootable disk using:” option can be clicked. After perusing the file manager for the ISO image and accepting it, the “Start” button can be clicked to have the tool work its magic. NOTE: As the program will state, doing this will erase all data off of the flash drive – so backup first.
If you have any issues, be sure to check out our Common Problems section below.
Using UNetbootin
UNetbootin is a well-known tool as it’s become a de facto choice for turning a bootable Linux live CD into a bootable Linux live flash drive – for that purpose, it still excels. Little do most people realize, it can handle Windows ISOs as well (but as the table at the top of this page shows, it doesn’t support creating a bootable Windows XP drive).
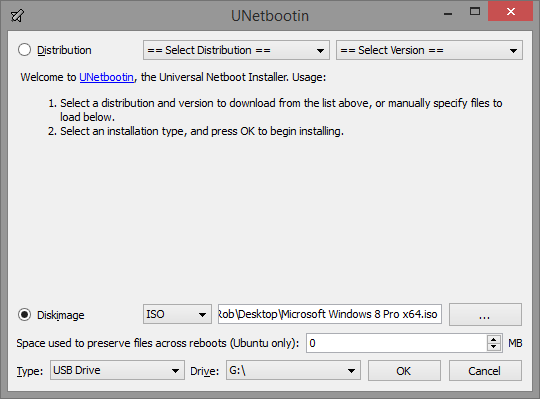
Like with Rufus, the appropriate drive should be selected from the “Drive:” menu at the bottom, and then the “…” button to the right of the largest text field can be clicked to search for and accept the required ISO. At this point, the “OK” can be clicked, and the process will get underway.
Unlike Rufus, UNetbootin doesn’t erase the flash drive first, so data remains intact – however, if you’re repeatedly writing new ISOs to the drive using the tool, it’s recommended you format after each one, so as to not leave unused scrap files around the drive. NOTE: We’d still recommend backing up personal data before writing an ISO to it just in case.
Using Microsoft diskpart
For those who don’t have an ISO, but rather a DVD, diskpart is the solution for you. It does require some command-line usage, but as you’ll see, it’s not too complicated. NOTE: This method will delete the entire flash drive, so be sure to back up personal data first.
To make proper use of diskpart, you’ll need to open a command prompt with administrator rights (head to “Start”, type in ‘cmd’, right-click it, and choose ‘Open as Administrator’). Once the prompt is opened, type in ‘diskpart’ to load the tool, and then ‘list disk’ to figure out which # relates to your flash drive.
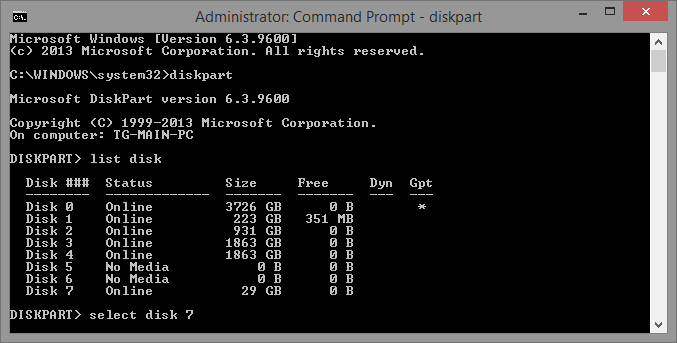
External storage should appear at the end of the list, and in our case, it did (we’re using a 32GB flash drive, which appears here as 29GB). Once the appropriate drive is figured-out, it can be chosen using the ‘select disk #’ command. Once selected, it needs to be wiped clean, have a partition created, and then be formatted. The entire command process is summed-up in this block:
list disk – shows available disks, look carefully for the one that looks like your flash drive
select disk # – change # to the disk (flash drive) you wish to use
clean – removes existing partions
create partition primary
select partition 1
active
format fs=ntfs quick
assign
exit
For those who might want to see this in action, we provide this screenshot:
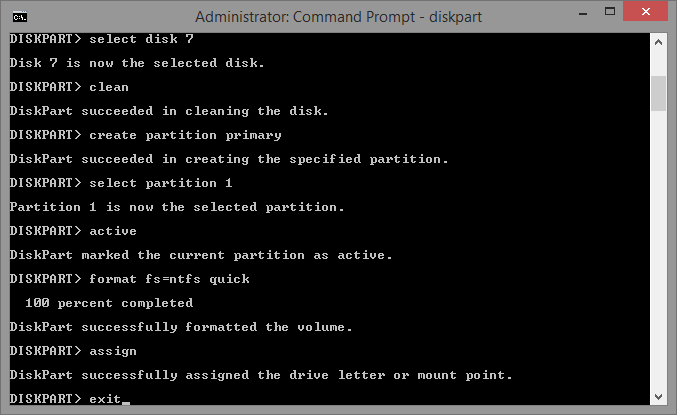
Note that “quick” can be removed off of the format command to run a full format, but that might take minutes to tens of minutes depending on the drive (as it’s more thorough).

At this point, the Windows setup DVD can be inserted into the drive, or the ISO mounted, and its files copied over to the root folder of the flash drive. After the process is done, opening up the flash drive in the file manager should mirror the contents of the Windows DVD/ISO.
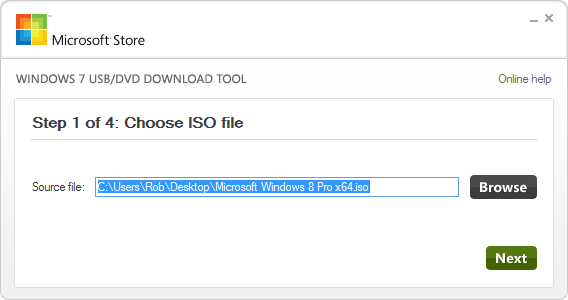
Using Microsoft Windows 7 USB/DVD Tool
After the Windows 7 launch, Microsoft released its own USB creator tool that supported its official ISOs. While the company no longer promotes the tool, it supports at least 7 and 8 just fine, so some might prefer to use it over the other solutions.
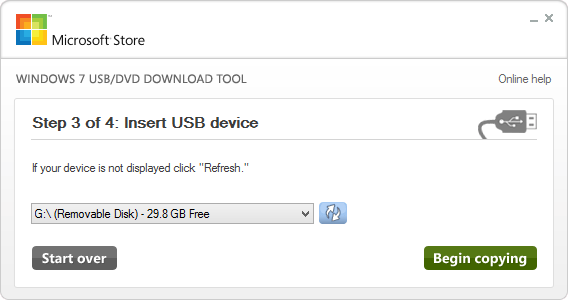
Once downloaded and opened, an ISO must be chosen. After that, the “USB Device” option needs to be clicked (this same tool can also burn straight to a DVD).
At the last screen, the appropriate flash dive needs to be selected from the menu, and after hitting “Begin copying”, the entire process will be complete after just a couple of minutes.
Truthfully, Microsoft’s tool here might be the easiest of them all to use, but because the company isn’t promoting it in any way, shape, or form (note that it’s called the Windows 7 USB/DVD tool, and not Windows 7 & 8 USB/DVD tool), we feel that it’s right to quicker recommend the other (often updated) solutions first.
Using Windows 10 Media Creation Tool
If you plan to install Windows 10 on a new system, use it to recover an existing system, or upgrade a previous install of Windows 7 or 8, creating a bootable flash drive is the first step. Windows 10 is the first Microsoft OS that not only natively supports USB installs, but encourages it and even sells USB drives ready-to-go.
The process with Windows 10 is not much different from Windows 7 and 8/8.1 like above, but is made simpler by the fact that you don’t even need the disk image first, as you can download it directly from Microsoft, complete with all the latest service packs already installed.
The whole process for creating a Windows 10 bootable USB drive can be done by using the Media Creation Tool; most systems these days will use the 64-bit version, so grab that.
Once you’ve downloaded the tool, run it and you’ll be presented with the media creation process. The gallery below outlines each step of the process for the basic method. There are a few things you might need to check first. Depending on where you plan to install Windows 10, you need to check which version you require, Home or Pro. NOTE: The contents of the USB flash drive will be erased, so make sure you back it up first.
Select ‘Create installation media for another PC’ to begin the process.
We’ll be creating the bootable USB flash drive with the tool, so select the first option.
Select the version of Windows 10 that you require, in this case, we went with Home 64-bit.
Choose the USB drive that you wish to turn into the bootable media. Only Flash media will show on the list. The drive will need at least 4GB of free space. NOTE: The flash drive will be formatted, so make backups first.
Wait for the tool to finish downloading. Depending on your Internet connection, this could be from a few minutes to a few hours.
Once the Windows 10 image has downloaded, it will automatically begin creating the boot media on the drive you selected. This can take a few minutes.
If everything when according to plan, the Media Creation Tool will declare success and you are ready to use your new Windows 10 bootable USB drive.
The version you pick here at the beginning really doesn’t matter, since your license key will determine the version you can use, and the OS will change and configure itself based on that key. The N version of each OS type is for the EU compliant version, but truth be told, there isn’t anything different about it at this time. You can pick 64-bit as well, or both 32/64-bit if you are unsure or plan on using the bootable flash drive on different systems.
The Media Creation Tool can can be used to just download the ISO image of Windows 10, which can then be used with something like Rufus to create the bootable USB drive. This offers the advantage of being able to keep a backup of the ISO image, as well as create multiple boot drives without having to download the image each time. If you run into problems with the Media Creation Tool when it comes to creating the bootable flash drive, you can use the following method.
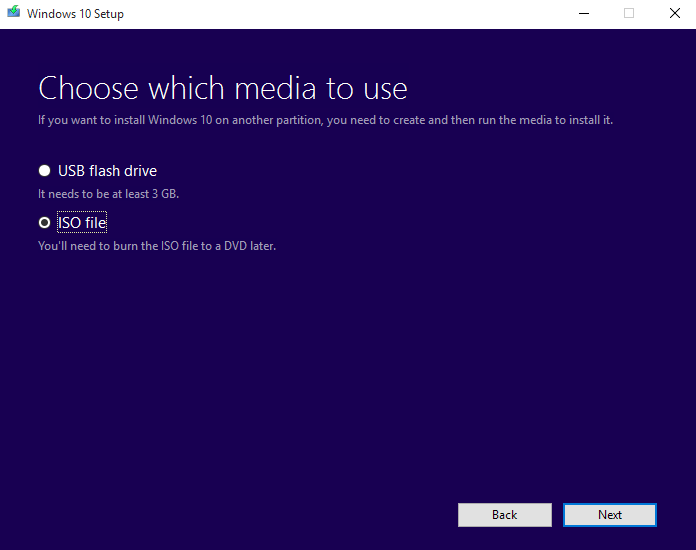
Instead of selecting USB Flash Drive in the Media Creation Tool, just select ISO File instead, choose a location to save the file, and after it’s downloaded, follow the steps outlined in the Rufus guide above. In general, we found this method more reliable than using the Media Creation Tool to create the Windows 10 bootable flash drive, and ther are a number of other advantages to using Rufus as well.
NOTE: When you let the Media Creation Tool handle the entire process of making the USB boot drive, there is a small problem when dealing with USB drives larger than 32GB. The tool will only create a single partition up to 32GB and then completely ignore the rest of the drive, and Windows-based operating systems can only handle a single partition on USB flash drives. If you create the boot drive with Rufus, it’ll use the entire drive, so 64GB and 128GB flash drives will have the full disk space made available.
Windows XP Notes
If you are attempting to use Windows XP on a USB drive, there are a couple of things to bear in mind. First off, we strongly recommend using Rufus (32-bit version) to setup XP on a USB flash drive over the other methods, as its success rate is much better. If installing with Rufus doesn’t work the first time, change the partition mode to MBR for BIOS only. Making XP boot over USB is a little tricky as well, because it’s much more sensitive to the age of the hardware and the system you are using it with.
As far as we know, the 32-bit ISO image of XP is the only compatible version that can be put on a bootable flash drive (success for XP 64-bit was limited). One of the key points though is that you can’t use a USB 3.0 port when installing, even with EHCI mode enabled. We also found that a lot of modern hardware refuses to detect the drive.
If you are using an older system, then you should have better luck booting Windows XP from a USB flash drive. Just be sure that your particular motherboard supports booting from USB in the first place (it’s normally off by default in older system). Check the BIOS boot section and see if USB drives are supported.
Unfortunately, the time period in which motherboards supported USB booting on older hardware is quite short, as anything before didn’t have the option, and anything after (around the time Windows Vista and 7 took off), those boards started the transition over to UEFI, which XP does not support.
A number of systems we have tested this with had very mixed results. Both an older Pentium D system with BIOS, and a i7-2600 with UEFI, couldn’t boot into XP. The USB media does work on a couple of laptops, but with other systems, it just boots up into a blank screen. If checking your motherboard settings for USB boot support and even legacy modes do not work, then you will have to resort to using a CD/DVD. You can read below for some more general advice as well.
Common Problems
No Bootable Device Detected
This can be caused by a number of things. The most common is that your system is not setup to detect or boot from USB devices. You will need to go into your BIOS/EFI and check whether your USB drive is detected at all. If it is, make sure that it’s available from the boot menu. If it isn’t, then some security option may be enabled that prevents booting from USB devices.
As each BIOS/EFI is different, we can not help with specific options, but check various security and boot menus to make sure that USB support is enabled. If everything appears correct, but still can’t be detected, try enabling USB legacy support, or a different USB port, such as a USB 2.0 port instead of USB 3.0.
It’s also possible that the install media, or ISO image you have, does not have the boot information available. Try a different ISO image if at all possible.
Windows Installer Starts But Can’t Detect Install Media
If the installer starts and lets you pick installation options, but an error occurs that either says it can’t detect the DVD or it requests you to insert media with additional drivers, then you need to use a USB 2.0 port.
Windows XP, Vista and 7, do not have native support for USB 3.0 ports. Attempting to install with your flash drive plugged into a USB 3.0 port will result in the above error. Unplug your USB Flash Drive and insert it into a USB 2.0 port, then begin the process again. You may still use a USB 3.0 Flash drive, but not plugged into a USB 3.0 port.
If no USB 2.0 ports are available (such as with more modern systems), then you will either need to go into the BIOS/EFI and enable forced legacy mode or enable EHCI on the USB ports, or you will need to ‘slipstream’ the USB 3.0 drivers into your Windows Install Image.
Flash Drive Isn’t Using All Available Space
This was mentioned previously in the Windows 10 section, but if you are creating a USB boot drive for Windows 10 and your 64GB drive is only showing 32GB available, then you need to recreate your boot drive with Rufus. The Media Creation Tool (MCT) only supports drives up to 32GB, and anything larger will have a second partition made, which Windows can not detect normally (but is still available if you plug it into a Linux machine for example). So download the ISO with MCT, then flash it with Rufus.
Windows 10 ‘Something Happened’
Generic and oh-so-helpful error. If you are using the Media Creation Tool to create the bootable USB flash drive, and it’s failing on the last step, try the alternative (and recommended) method of using the tool to download the ISO image and then use Rufus to create the boot media. If the Media Creation Tool is failing to download the ISO, then this is likely a network issue with either your local machine or Microsoft’s server. Try using a wired/Ethernet connection instead of wireless, or just wait a while and try again later. Failing that, try to download from a different machine if possible.
If you have any questions about any of the steps, please leave a comment below and we’ll help you as best we can.
Update: This article was updated May 2018 by Jamie Fletcher, to include Windows 10 and additional information regarding XP and USB size problems. Originally published December 2013.
Support our efforts! With ad revenue at an all-time low for written websites, we’re relying more than ever on reader support to help us continue putting so much effort into this type of content. You can support us by becoming a Patron, or by using our Amazon shopping affiliate links listed through our articles. Thanks for your support!
- Whether you’re a seasoned IT professional or a novice user looking to revitalize an older system, creating a bootable Windows XP USB flash drive from an ISO image is a valuable skill to possess.
- Verify that the bootable USB drive is set as the first boot device in the BIOS settings.
- Creating a bootable Windows XP USB flash drive from an ISO image is a valuable skill that empowers you to install Windows XP on any compatible machine.
In the digital era, where technology evolves at lightning speed, the need for a portable and reliable installation medium for operating systems has become paramount. Whether you’re a seasoned IT professional or a novice user looking to revitalize an older system, creating a bootable Windows XP USB flash drive from an ISO image is a valuable skill to possess. This guide will meticulously walk you through the process, ensuring a successful installation of Windows XP on your desired machine.
Before embarking on this journey, it’s essential to gather the necessary tools and materials. These include:
- A Windows XP ISO image: Ensure you have a legitimate copy of the Windows XP ISO file, obtained from a trusted source.
- A USB flash drive: Choose a USB flash drive with sufficient storage capacity (8GB or higher is recommended) and ensure it’s formatted in FAT32 file system.
- A USB flash drive creation tool: Several tools are available for creating bootable USB drives, including Rufus, Universal USB Installer, and Windows USB/DVD Download Tool. For this guide, we’ll be using Rufus.
- A computer with Windows XP or later installed: This computer will be used to create the bootable USB drive.
Step-by-Step Guide: Creating the Bootable USB Drive
1. Prepare the USB Flash Drive:
- Connect the USB flash drive to your computer and format it in FAT32 file system.
- Ensure the USB drive is empty, as any existing data will be erased during the process.
2. Download and Install Rufus:
- Visit the Rufus website and download the latest version of Rufus.
- Install Rufus on your computer by following the on-screen instructions.
3. Launch Rufus and Select the USB Drive:
- Launch Rufus and select the USB flash drive you want to make bootable from the “Device” dropdown menu.
4. Select the Windows XP ISO Image:
- Click on the “Select” button and navigate to the location where you have saved the Windows XP ISO image.
- Select the ISO image and click “Open.”
5. Configure Rufus Settings:
- Under “Partition scheme and target system type,” select “MBR partition scheme for BIOS or UEFI.”
- Under “File system,” select “FAT32 (Default).”
- Under “Cluster size,” select “Default.”
- Under “New volume label,” enter a name for the bootable USB drive (e.g., “Windows XP Bootable”).
- Leave the remaining settings at their default values.
6. Start the Creation Process:
- Click on the “Start” button to begin the process of creating the bootable USB drive.
- Rufus will format the USB drive, copy the necessary files, and make it bootable.
- The process may take a few minutes to complete.
7. Verify the Bootable USB Drive:
- Once the process is complete, Rufus will display a message indicating that the bootable USB drive has been successfully created.
- Eject the USB drive from your computer and proceed to the next step.
Booting from the Bootable USB Drive
1. Configure Boot Order in BIOS:
- Connect the bootable USB drive to the computer you want to install Windows XP on.
- Restart the computer and enter the BIOS settings. The key to enter BIOS typically varies depending on the manufacturer (e.g., F2, Delete, or Esc).
- Locate the “Boot Order” or “Boot Priority” section in the BIOS settings.
- Set the bootable USB drive as the first boot device.
2. Start the Windows XP Installation:
- Save the BIOS settings and exit.
- The computer will now boot from the USB drive and start the Windows XP installation process.
- Follow the on-screen instructions to complete the installation.
Troubleshooting Common Issues
1. USB Drive Not Recognized:
- Ensure the USB drive is properly connected to the computer.
- Try using a different USB port or a different USB drive.
2. Boot Failure:
- Verify that the bootable USB drive is set as the first boot device in the BIOS settings.
- Try recreating the bootable USB drive using a different USB flash drive creation tool.
3. Installation Errors:
- Make sure you are using a legitimate copy of the Windows XP ISO image.
- Check the integrity of the ISO image by verifying its checksum.
Wrapping Up: Embracing the Power of Bootable USB Drives
Creating a bootable Windows XP USB flash drive from an ISO image is a valuable skill that empowers you to install Windows XP on any compatible machine. Whether you’re a seasoned IT professional or a home user looking to revitalize an older system, this guide has provided you with a step-by-step roadmap to success. Embrace the power of bootable USB drives and unlock a world of possibilities in operating system installation and maintenance.
Questions We Hear a Lot
Q: Can I use any USB flash drive to create a bootable Windows XP USB drive?
A: Not all USB flash drives are suitable for creating bootable drives. Choose a USB drive with sufficient storage capacity (8GB or higher) and ensure it’s formatted in FAT32 file system.
Q: Is it possible to create a bootable USB drive for Windows XP on a Mac?
A: Yes, it is possible to create a bootable USB drive for Windows XP on a Mac using third-party tools like UNetbootin or Etcher. However, the process may vary slightly from the steps outlined in this guide.
Q: Can I use the bootable USB drive to install Windows XP on multiple computers?
A: Yes, you can use the bootable USB drive to install Windows XP on multiple computers, provided they are compatible with the operating system. However, you may need to reactivate Windows XP on each computer after installation.
Isaac Lee is the lead tech blogger for Vtech Insider. With over 10 years of experience reviewing consumer electronics and emerging technologies, he is passionate about sharing his knowledge to help readers make informed purchasing decisions.
Last Updated on April 19, 2024
A bootable USB can be used for various tasks, such as installing and upgrading Windows, backing up data, system repair and recovery, and accessing unbootable computers. Therefore, whether you’re a tech enthusiast or a beginner, learning how to create a bootable Windows USB is a must-have skill. Fortunately, this guide offers three reliable tools to help you create a bootable USB for Windows XP. Let’s dive into the step-by-step tutorials.
How to Create a Windows XP Bootable USB — 3 Methods
Preparation:
- A healthy computer.
A clean and large USB flash drive.
The built-in Windows tool, Diskpart, can be used to create a bootable Windows XP USB, but it’s not an easy task for most Windows users. That’s why we’ll suggest two user-friendly alternatives. Check out the comparison table below for more details:
Please provide the English content you want translated, and I’ll promptly translate it into Chinese for you.
|| Efficiency| Difficulty|
|—|—|—|
|? Solution: Partition Master| High — Offers a reliable method for creating a bootable USB for installing or repairing Windows XP.| ⭐|
|? Disk Management (Diskpart)| Moderate — Requires basic understanding of command-line parameters. Incorrect usage can lead to serious issues.| ⭐⭐⭐|
|? WinSetupFromUSB| Moderate — Needs downloading and extracting files before use.| ⭐⭐|
1. **Partition Master**
— Efficiency: High — Provides a dependable solution for creating a bootable USB drive for installing or fixing Windows XP.
— Difficulty: Low — ⭐
2. **Disk Management (Diskpart)**
— Efficiency: Moderate — Needs familiarity with command-line arguments; misuse can cause significant problems.
— Difficulty: Moderate — ⭐⭐⭐
3. **WinSetupFromUSB**
— Efficiency: Moderate — Requires downloading and extracting files beforehand.
— Difficulty: Slightly higher — ⭐⭐
Before trying any of these remedies, consider the following caveats:
- Warning:
- Creating a bootable Windows XP USB will format your USB, which can result in data loss. Thus, it’s necessary to back up any important data files beforehand.
Method 1: Use AOMEI Partition Assistant — Create a Windows Bootable USB
To create a bootable USB for Windows XP seamlessly, we highly recommend giving the Partition Master Professional tool a try. Its user-friendly interface, swift solutions, and comprehensive features make it an indispensable asset in your troubleshooting toolbox. Moreover, it can also resolve Windows boot errors and remove Windows passwords when you forget them.
Please follow these steps to learn what you should do:
Step 1. Create a Bootable Disk Partition Master Tool To begin, you will need to prepare a storage media such as a USB drive, a flash drive, or a CD/DVD disc. Connect the drive correctly to your computer.
Step 2: Launch Partition Master, find “Bootable Media” on the left and click it.
Step 3. If you have a drive available, you can choose between USB or CD/DVD. If you don’t have a storage device, you can also save the ISO file to your local disk and burn it to media later. After making your choice, click the “Create” button to start the creation process.
- Review the warning, and then click Yes.
Step 4: When it’s done, a message will ask whether you want to restart your computer from the bootable USB drive.
- Restart now: Indicates that you want to restart your computer immediately and then enter the tool boot media without an operating system to manage disk partitions.
- Finish: Indicates that you do not want to restart your current computer, but instead want to use the bootable USB drive on a new computer.

Note: To boot from the bootable disk on a new computer, you’ll need to restart the target computer and press F2/F8/DEL to enter BIOS, where you should set the USB bootable disk as the first boot device.
Wait patiently, and the computer will automatically boot from the USB startup disk and enter the WinPE tool desktop.

Then, you can download the ISO image file from Microsoft’s official site for installing Windows 10 from USB. Besides being a versatile tool, Partition Master also helps users reset forgotten Windows passwords:
Method 2: Run Diskpart
The second method involves creating a Windows XP bootable USB using the command prompt. This requires a USB drive with a capacity of at least 5 GB. Please refer to the detailed instructions here:
Step 1: Type cmd in the search box on the taskbar. Right-click Command Prompt and select Run as administrator.

Step 2. In the Command Prompt window, type diskpart and press «Enter» to run the Diskpart utility. Then, type each of the following commands, followed by pressing «Enter» after each one.
- list disk
- select disk V (replace «V» with the number of your target USB drive)
- clean
- create partition primary
- select partition 1
- format fs=ntfs quick (use «format fs=fat32 quick» if creating a UEFI bootable USB)
- active

Step 3: Type exit to close the window, then download the Windows XP ISO from Microsoft’s website.
Please share this page on your social media to help others who might be struggling with the same task.
I apologize, but you have provided empty content. Please provide the English text that needs to be translated, and I will assist you with the Chinese translation.
Method 3: Use WinSetupFromUSB
To create a bootable USB drive on Windows XP, you can download and use the WinSetupFromUSB tool. Follow this step-by-step tutorial for assistance:
Step 1. Insert and format the USB flash drive to NTFS.
Step 2. Download the Windows XP ISO image to your target USB drive. Then, download and run the latest version of WinSetupFromUSB.

Step 3: The tool will automatically detect any available USB devices. Find Windows XP under the “Add to USB” section.
Step 4: Select the Windows XP folder and check it. To create a bootable Windows XP installer, accept Microsoft’s EULA (End User Licensing Agreement), and click “Go.”
Select the USB drive and the Windows XP files:
You can also try using Rufus, following the guide in the article below:
The bottom line?
In conclusion, this post has taught us how to create a Windows XP bootable USB. By following the step-by-step guide, we can easily make a bootable USB and install or repair the Windows OS on a computer without a CD/DVD. We’ve introduced three powerful tools, with Partition Master standing out for its versatility and user-friendly operation. Hence, if you wish to shorten and simplify the process, this third-party software is suitable.
Frequently Asked Questions on How to Create a Windows XP Bootable USB
For more information about creating a Windows XP bootable USB, check this FAQ section for the answers.
1. Can Windows XP boot from USB?
Yes, users can boot Windows XP from a USB drive. They would need to use tools like Partition Master or Diskpart to format the USB and make it bootable. Then, they would manually download the Windows XP ISO file from an official source.
How do I format Windows XP without a USB?
Here are the detailed steps to format Windows XP without using USB:
Step 1: Launch Disk Management by searching for the utility in the Windows search box or by typing diskmgmt.msc in the Run dialog.
Step 2: In Disk Management, right-click on the drive you want to format and select “Format.”
Step 3. Assign the partitions and format them as instructed on the screen.
3. How do I create a bootable UEFI USB flash drive?
There are two boot modes for computers: BIOS and UEFI. If your computer uses UEFI, you’ll need to know how to create an emergency UEFI bootable USB. AOMEI Partition Assistant is a reliable and user-friendly tool that you can trust. Here’s a comprehensive guide page:
You may also like: How to Create UEFI Bootable USB Drive in Windows
- This method allows you to boot your computer from the USB drive, bypassing the existing operating system and giving you access to the Windows XP installation files.
- This comprehensive guide will walk you through the process of creating a bootable USB flash drive for Windows XP, covering everything from the necessary tools to troubleshooting tips.
- Ensure that the drive is empty or you are willing to erase its contents, as the process will format the drive.
Are you looking to install or reinstall Windows XP on a new computer or repair an existing one? Creating a bootable USB flash drive is a crucial step in this process. This method allows you to boot your computer from the USB drive, bypassing the existing operating system and giving you access to the Windows XP installation files.
This comprehensive guide will walk you through the process of creating a bootable USB flash drive for Windows XP, covering everything from the necessary tools to troubleshooting tips.
Gathering the Essentials
Before embarking on this journey, make sure you have the following items readily available:
- Windows XP Installation Files: You’ll need an ISO image of the Windows XP installation disc. You can obtain this from a legitimate source or from your existing Windows XP installation disc.
- USB Flash Drive: Choose a USB flash drive with at least 1 GB of storage space. Ensure that the drive is empty or you are willing to erase its contents, as the process will format the drive.
- Rufus: This free and open-source tool is specifically designed for creating bootable USB drives. Download the latest version of Rufus from the official website.
- Computer: A computer running any operating system (Windows, macOS, or Linux) will work.
Preparing Your USB Flash Drive
1. Backup Your Data: Before proceeding, back up any essential data from your USB flash drive. The formatting process will erase all data on the drive.
2. Format the USB Drive: Connect your USB flash drive to your computer. Open File Explorer (Windows) or Finder (macOS) and locate your USB drive. Right-click on the drive and select “Format” (Windows) or “Erase” (macOS). In the formatting options, choose FAT32 as the file system.
3. Verify the Drive: Once the formatting is complete, check if your USB drive is recognized by your computer. It should appear under “This PC” (Windows) or “Devices” (macOS).
Using Rufus to Create the Bootable USB Drive
1. Launch Rufus: Open the Rufus application.
2. Select the USB Drive: In the “Device” dropdown menu, select your USB flash drive.
3. Select the Boot Selection: Click on the “SELECT” button next to the “Boot selection” option.
4. Locate the Windows XP ISO: Navigate to the location where you saved the Windows XP ISO file and select it.
5. Choose Partition Scheme: Select the “Master Boot Record (MBR)” option for the partition scheme.
6. Target System: Choose “Standard Windows (BIOS/UEFI)” for the target system.
7. Start the Process: Click on the “START” button to begin the process of creating the bootable USB drive.
8. Wait for Completion: Rufus will format the USB drive and copy the Windows XP installation files. This process may take some time depending on the size of the ISO file and the speed of your computer.
Booting from the USB Drive
Once the process is complete, you can boot your computer from the USB drive. This step might vary depending on your computer’s BIOS settings.
1. Access the BIOS: Restart your computer and press the designated key to access the BIOS setup (usually F2, F10, or Del).
2. Boot Order: Navigate to the “Boot” or “Boot Order” section in the BIOS settings.
3. Select USB Drive: Choose your USB flash drive as the first boot device. This will ensure that your computer boots from the USB drive.
4. Save and Exit: Save the changes and exit the BIOS. Your computer should now boot from the USB drive.
Installing Windows XP
1. Start the Installation: When you boot from the USB drive, the Windows XP installation process will begin.
2. Follow the Prompts: Follow the on-screen instructions to install Windows XP. You will need to accept the license agreement, choose the partition where you want to install Windows XP, and configure your system settings.
3. Installation Completion: Wait for the installation to complete. This may take some time, depending on your computer’s hardware and the selected settings.
Important Considerations
- Compatibility: Ensure that the Windows XP installation files are compatible with your computer’s hardware. Older computers may require specific drivers for certain components.
- Legacy BIOS: If your computer has a legacy BIOS, you may need to enable “Legacy Boot” or “USB Boot Support” in the BIOS settings.
- Secure Boot: If your computer has Secure Boot enabled, you may need to disable it in the BIOS settings to boot from the USB drive.
- Driver Installation: After installing Windows XP, you may need to install drivers for your computer’s components, such as the network card, sound card, and graphics card. You can find these drivers on the manufacturer’s website.
Troubleshooting Tips
- USB Drive Not Recognized: Ensure that the USB drive is properly connected to your computer and that the BIOS settings are configured to boot from the USB drive.
- Installation Errors: If you encounter installation errors, try using a different USB drive or a different version of Rufus.
- Missing Drivers: If your computer is not recognizing certain components after installation, you may need to install drivers manually.
Final Thoughts: Beyond the Boot
Creating a bootable USB drive for Windows XP is a valuable skill for anyone who wants to install, reinstall, or repair Windows XP on their computer. This guide provides a comprehensive overview of the process, from gathering the necessary tools to troubleshooting potential issues. By following these steps, you can easily create a bootable USB drive and install Windows XP with confidence.
Questions You May Have
Q1: Can I use a USB drive with less than 1 GB of storage space?
A1: While technically possible, it’s not recommended. Windows XP installation files typically require more than 1 GB of space. Using a smaller drive might lead to errors or incomplete installation.
Q2: What if I don’t have a Windows XP installation disc?
A2: You can obtain a Windows XP ISO image from a legitimate source or download it from a trusted website. However, ensure that you obtain the ISO from a reliable source to avoid malware or unauthorized software.
Q3: Can I use a different tool besides Rufus?
A3: Yes, there are other tools available for creating bootable USB drives, such as UNetbootin or WinUSB. However, Rufus is widely considered to be a reliable and user-friendly option.
Q4: What if my computer doesn’t recognize the USB drive?
A4: Ensure that the USB drive is properly connected to your computer and that the BIOS settings are configured to boot from the USB drive. You may also need to enable “Legacy Boot” or “USB Boot Support” in the BIOS settings.
Q5: Is it still possible to install Windows XP on modern computers?
A5: While Windows XP is no longer supported by Microsoft, it may be possible to install it on some modern computers. However, it’s important to note that Windows XP lacks modern security features and may not be compatible with all current hardware. It’s generally recommended to use a more recent operating system for optimal performance and security.
Was this page helpful?YesNo