
Are you interested in working with shell scripts on Windows? Thanks to a recent addition by Microsoft, you can now use Windows Subsystem for Linux to make this happen.
Once you enable shell scripts in Windows 10, you can start creating shell scripts of your own. Shell scripts are great for automating simple tasks. You can also work on open-source Linux-based projects if that’s an area of interest to you. Finally, you’ll learn how to execute shell scripts on Windows 10. Continue reading to learn more.
What is Linux?
Linux is an open-source operating system that is highly popular among computer enthusiasts. Linux competes with other computer operating systems like Microsoft’s Windows, Apple’s macOS, and mobile operating systems like Android and iOS.
The Linux operating system was originally developed by Linus Torvalds back in 1991. The Linux kernel was designed as a Unix-like operating system. Unix was an early operating system created by Bell Labs in 1969. Today, modern Linux distributions are still Unix-like, meaning they retain the basic structure and properties that Unix had. An example of a non-Unix operating system would be Microsoft Windows.
The top Linux distributions have changed over the years, but as of 2022, Ubuntu, Debian, CentOS, Fedora, and Red Hat rank as the top 5 most popular options.
What is Bash?
When Linus Torvalds created Linux, he included a Unix shell called Bash. Bash had been created just two years before, in 1989 by Brian Fox. Bash has been the longtime default for Linux and was also the default for Apple macOS until it was replaced by Z shell in 2019.
Until 2016, Windows users could not use the Linux kernel or Bash at all. Windows first introduced the Windows Subsystem for Linux (WSL) beta with Windows 10 version 1607 update. About a year later, in October 2017, WSL was fully released in Windows 10 version 1709. Microsoft developed WSL for hobbyists and developers who want to work on open-source Linux-based projects.
It’s important to note that WSL is not preinstalled on Windows 10. If you would like access to create and run shell scripts on Windows 10, you will need to manually install WSL or join the Windows insider program.
What is a shell script?
A Shell script is a type of script that cannot be run without a Unix shell. Further, a shell script is a series of commands that are executed line by line by the command line.
You can use shell scripts to automate processes and avoid repetitive tasks. Instead of manually completing each step in a series, you can execute a script, and the command line will handle the rest.
For example, if you find yourself regularly stopping processes that are hogging your CPU, you can automate this process with a script. When you execute the script, it may be designed to find a set of processes using CPU resources and request to kill them.
Enabling shell scripts in Windows 10
- Click on the Start (Windows) button and enter “Control Panel” into the search bar. Click Open on the Control Panel result on the right-hand side.

- Within the Control Panel window, find and click on Programs.

- Now, from the Programs window, find Click Turn Windows features on or off underneath the Programs and Features header.

- In the Windows Features window, scroll to the very bottom of the window. Check the Windows Subsystem for Linux option. Then click OK.

- Windows will automatically install the necessary files. When the installation is complete, select Restart Now.

- When your computer restarts, you need to install Ubuntu from the Microsoft store.

- After installation, make sure you open Ubuntu and see it up. You are now ready to use scripts on your Windows 10 machine.
If you encounter any issues with Ubuntu or bash commands not working correctly, you may want to check that Virtualization is turned on in your BIOS. The most updated WSL version, WSL 2, runs the Linux kernel using virtualization technology. This means a virtual machine needs to be able to run on your system.
Now that Windows Subsystem for Linux and Ubuntu has been installed, you are ready to start creating shell scripts in Windows 10. You may be tempted to write bash scripts with Notepad, but this is not recommended. Because Notepad is designed for Windows/DOS systems, the line endings will differ from those that are found at the end of Unix/Linux line endings.
Text editors for shell scripts
You should use software that is designed to convert to Unix/OSX end-of-line characters. The best open-source software available for this is Notepad++. Amazingly, Notepad++ is lovingly maintained and developed by a single individual, Don Ho.
If you try Notepad++ and don’t like it, you can try another fan favorite, nano. Nano is a text editor for Unix/Linux systems. You can easily create shell scripts that will run in bash, using nano. Download nano to get started.
Example shell scripts
Let’s look at some basic shell scripts, so you can learn more about what you are going to be coding and see how some formatting and syntax work.
1. Hello World!
echo "Hello World!"This script will print out the infamous Hello World! Notice that echo can be used as a print command when not combined with any other modifiers. It will print the string on a new line. If you add the -n modifier, the output will print on the same line.
2. Sum two numbers
If you want to do some basic arithmetic, you might have a script that looks like:
# Add two numbers together
((sum=25+35))

# Print the sum of the numbers
echo $sum
Note that the # symbol is used to make comments that are not expressed. The output of this script will print the sum of 25+35, which is 60.
3. Take user input
The following script will ask for the user’s name and then use the read command to take the user’s input. Then the user’s name is passed into the following expression, ultimately welcoming you to Windows Subsystem for Linux.
echo "What is your name?"
read name
echo "Welcome $name to Windows Subsystem for Linux."
Write basic shell scripts in Windows 10
Continue reading to learn how to write basic shell scripts in Windows 10 using Notepad++.
- Click the Start button and search for “Notepad++” and click Run as administrator on the right-hand side.

- Now you can create your script.

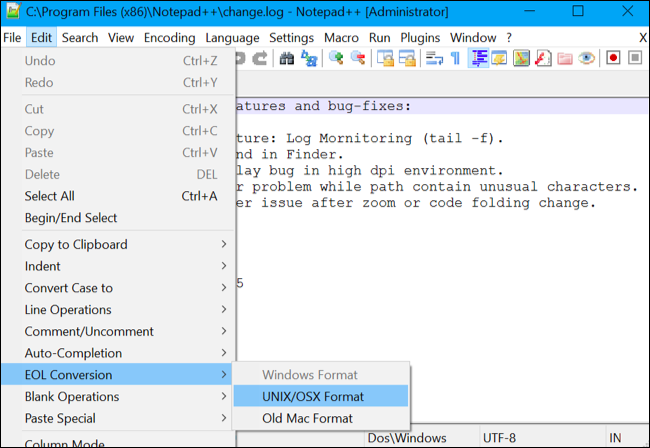
- Once your script is complete, you need to use the EOL Conversion option available in Notepad++. Click Edit and locate EOL Conversion from the dropdown menu. Hover over this option and then select UNIX/OSX Format from the next dropdown menu.

- Now select File and then Save As. Make sure to name your file something you will recognize and add .sh to make it a shell script file.

- Once the shell script is saved, continue to the next section to learn how to run your own shell scripts.
How to run shell scripts (.sh files) on Windows 10
You’ve created your first shell scripts, and it’s time to execute the sh file. Remember that when using WSL, you can only use Linux commands and utilities. Windows 10 programs will not work in bash scripts. To execute a script file, follow these step-by-step instructions:
- Click on the Start (Windows) button and enter “Command Prompt” into the search bar. Click Run as administrator on the Command Prompt result on the right-hand side.
- Navigate to the folder where the script file is saved. You move around in the command prompt using the cd command. For example, if you want to access the Documents folder, you would enter the following and press Enter:
cd C:\Users\Username\OneDrive\Documents
Note: Username would be the username that you set up for yourself when you registered your computer.

- Now enter bash file-name.sh, where file-name is the whatever you’ve named your script file.
bash file-name.sh
The script will execute, and if there are any outputs or print statements included in the script, the output will be returned.
Bash scripts running on Windows 10
You’ve made it far and learned a ton of information in one go. Command-line utilities, different operating systems, and learning to write and execute shell scripts can be difficult topics. In fact, these topics will take time to master. You have a ton of learning to do for scripting, but resources are available to help you all over the internet.
Within this guide, you learned the basics of Linux and Bash. You learned what shell scripts are and that you need to specifically enable Windows Subsystem for Linux (WSL) to use them. You learned how to create shell scripts using Notepad++ and how to execute the scripts in bash. Enjoy experimenting!
Quick Links
-
How to Write a Bash Script on Windows 10
-
Make the Script Executable and then Run It
-
How to Work With Windows Files in a Bash Script
-
How to Incorporate Bash Commands into a Batch or PowerShell Script
With the arrival of Windows 10’s Bash shell, you can now create and run Bash shell scripts on Windows 10. You can also incorporate Bash commands into a Windows batch file or PowerShell script.
Even if you know what you’re doing, this isn’t necessarily as simple as it seems. Windows and UNIX use different end-of-line characters, and the Windows file system is accessible in a different location in the Bash environment.
How to Write a Bash Script on Windows 10
When writing shell scripts on Windows, bear in mind that Windows and UNIX-like systems like Linux use different «end of line» characters in text files in shell scripts.
In other words, this means that you can’t simply write a shell script in Notepad. Save the file in Notepad and it won’t be interpreted properly by Bash. However, you can use more advanced text editors—for example, Notepad++ allows you to give a file UNIX end-of-line characters by clicking Edit > EOL Conversion > UNIX/OSX Format.
However, you’re better off just writing the shell script in the Bash environment itself. The Ubuntu-based Bash environment comes with both the vi and nano text editors. The vi editor is more powerful, but if you’ve never used it before, you may want to start with nano. It’s easier to use if you’re new.
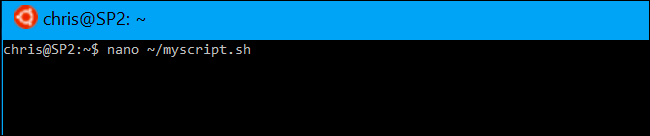
For example, to create a bash script in nano, you’d run the following command in bash:
nano ~/myscript.sh
This would open the Nano text editor pointed at a file named «myscript.sh» in your user account’s home directory. (The «~» character represents your home directory, so the full path is /home/username/myscript.sh.)
Start your shell script with the line:
#!/bin/bash
Enter the commands you want to run, each one on its own line. The script will run each command in turn. Add a «#» character before a line to treat it as a «comment», something which helps you and other people understand the script but which isn’t run as a command. For more advanced tricks, consult a more detailed guide to Bash scripts on Linux. The same techniques will work in Bash on Ubuntu on Windows.
Note that there’s no way to run Windows programs from within the Bash environment. You’re restricted to Linux terminal commands and utilities, just as you would be on a typical Linux system.
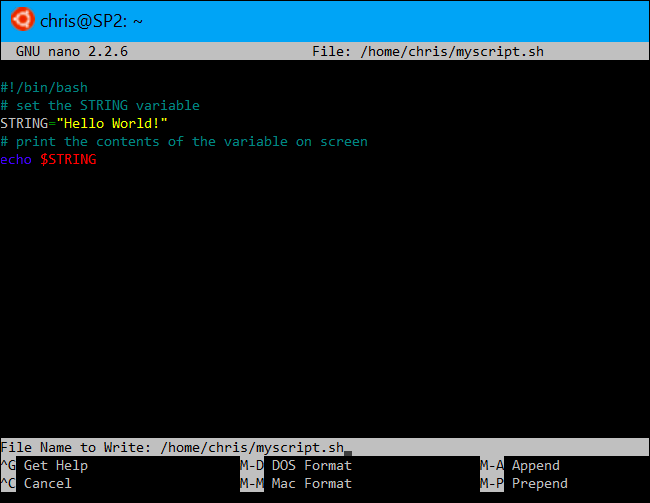
We’ll use a basic «hello world» script as an example here:
#!/bin/bash# set the STRING variable
STRING="Hello World!"
# print the contents of the variable on screen
echo $STRING
If you’re using the Nano text editor, you can save the file by pressing Ctrl+O and then Enter. Close the editor by pressing Ctrl+X.
Make the Script Executable and then Run It
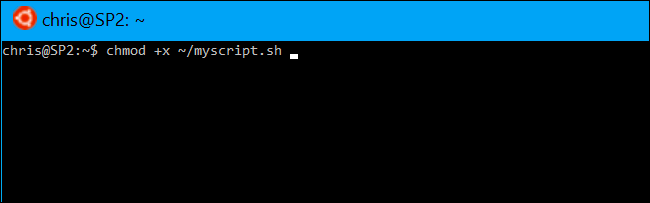
You’ll probably want the make the script executable so you can run it more easily. On Linux, that means you need to give the script file the executable permission. To do so, run the following command in the terminal, pointing it at your script:
chmod +x ~/myscript.sh
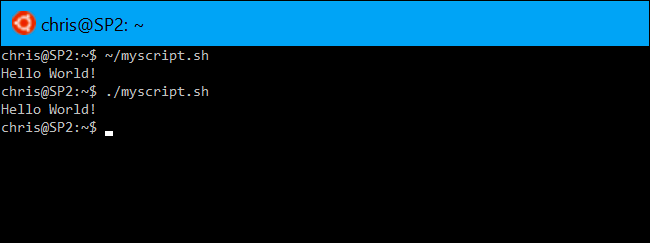
To run the script, you can now just run it in the terminal by typing its path. Whenever you want to launch the script in the future, just open the Bash shell and type the path to the script.
~/myscript.sh
(If the script is in the current directory, you can run it with ./myscript.sh)
How to Work With Windows Files in a Bash Script
To access Windows files in the script, you’ll need to specify their path under /mnt/c, not their Windows path. For example, if you wanted to specify the C:\Users\Bob\Downloads\test.txt file, you’d need to specify the /mnt/c/Users/Bob/Downloads/test.txt path. Consult our guide to file locations in Windows 10’s Bash shell for more details.
How to Incorporate Bash Commands into a Batch or PowerShell Script
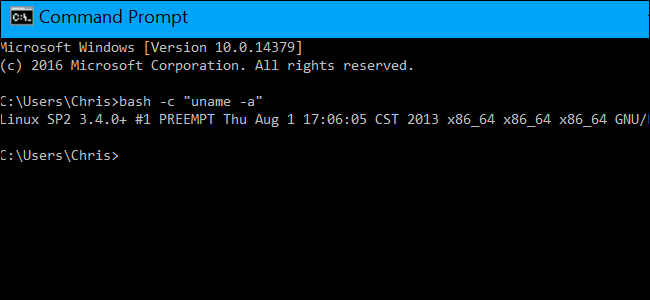
Lastly, if you have an existing batch file or PowerShell script you want to incorporate commands into, you can run Bash commands directly using the bash -c command.
For example, to run a Linux command in a Command Prompt or PowerShell window, you can run the following command:
bash -c "command"
This trick allows you to add Bash commands into batch files or PowerShell scripts. The Bash shell window will appear when a Bash command is running.
Update: If you have multiple Linux environments installed, you can use the wslconfig command to choose the default Linux environment used when you run the bash -c command.
To create a shortcut to a Bash script from within Windows, just create a shortcut like normal. For the shortcut’s target, use the bash -c command we outlined above and point it at the Bash script you created.
For example, you’d point a shortcut at » bash -c "~/myscript.sh" » to run the example script above. You can also just run this command from a Command Prompt or PowerShell window, too.
To create a new file in bash, you can use the `touch` command followed by the desired filename. Here’s how you can do it:
touch newfile.txt
Understanding Bash Commands
What is Bash?
Bash, short for «Bourne Again SHell,» is a command-line interface and scripting language widely used in Unix/Linux systems. It serves as a powerful tool for interacting with the operating system, enabling users to execute commands, automate tasks, and write scripts. Familiarity with Bash commands is essential for effective system management and efficiency.
Importance of File Management in Bash
File management via Bash is crucial because it lays the foundation for broader scripting and automation tasks. Understanding how to create, manipulate, and organize files correctly can significantly streamline workflows and increase productivity.
Strip New Line in Bash: A Quick Guide to Clean Outputs
Methods to Create a New File in Bash
Basic Method: Using `touch` Command
The simplest way to create a new file in Bash is by using the `touch` command. This command is primarily used to change file timestamps, but it can also create an empty file if it doesn’t already exist.
Usage:
To create a new file using `touch`, you can simply type:
touch filename.txt
Once executed, this command creates an empty file named `filename.txt` in the current directory. If the file already exists, `touch` updates its modified time without altering its content.
Using Redirection Operators
Standard Output Redirection (`>`)
Another straightforward method to create a new file is through output redirection. This technique involves directing the output of a command into a file.
Usage:
For example, if you want to create a file containing a specific string, you can use:
echo "Hello, World!" > hello.txt
This command creates a file named `hello.txt` and inserts «Hello, World!» as its content. If `hello.txt` already exists, this command will overwrite it, erasing the previous content.
Appending with Redirection (`>>`)
If you wish to add content to an existing file without deleting its contents, you can use the append redirection operator (`>>`).
Usage:
echo "This is a new line." >> hello.txt
This command adds «This is a new line.» to the end of the `hello.txt` file, preserving existing content. Utilizing the append operator is especially useful for logging or incrementally adding data.
Using `cat` Command to Create Files
The `cat` command, traditionally used for displaying the content of files, can also be utilized to create new files by allowing interactive input.
Usage:
To create a new file using `cat`, type:
cat > newfile.txt
After running this command, you can input text directly into the terminal. To save and exit, press Ctrl + D. This method is particularly useful for quickly entering text without opening a full-fledged text editor.
Creating Files with `nano` and Other Editors
Using `nano`
`Nano` is a user-friendly text editor that operates in the terminal. It is ideal for those uncomfortable with command-line interfaces.
Usage:
To create a new file with `nano`, type:
nano myfile.txt
This command opens `nano` with a new file named `myfile.txt`. You can then enter and edit your text easily. When you’re finished, press Ctrl + O to save and then Ctrl + X to exit.
Other Editors: `vim`, `gedit`
For users familiar with other text editors, you can create files using commands specific to those programs.
For Vim:
vim myfile.txt
This opens `myfile.txt` in Vim. To start editing, press Insert, make your changes, and save with `:wq`.
For Gedit:
gedit myfile.txt
This command launches a graphical interface where you can type your content and save it like a conventional text editor.
Create Bash Script: Quick Guide for Beginners
Advanced File Creation Techniques
Using `echo` for File Creation with Multiple Lines
If you wish to create a file with multiple lines of text right away, you can use the `echo` command with newline characters.
Example:
echo -e "Line 1\nLine 2\nLine 3" > multiline.txt
This command creates a file named `multiline.txt`, containing three separate lines. The `-e` flag enables interpretation of backslash escapes, providing flexibility.
Creating Files with Variables and Loops in Bash Scripts
For more dynamic file creation, you can utilize variables and loops in Bash scripts.
Example Script:
for i in {1..5}; do
    echo "This is file number $i" > "file_$i.txt"
done
This script creates five files named `file_1.txt`, `file_2.txt`, and so on, each containing a unique message. Such scripts can automate tasks, making them invaluable for repetitive file creation.
Split File Bash: Mastering File Division in Bash
Best Practices for File Creation in Bash
Naming Conventions
Creating meaningful and organized file names is crucial. Clear names help you and others identify the content easily. Avoid using spaces and special characters; instead, consider using underscores or hyphens.
Organizing Files in Directories
Organizing files into directories enhances file management. By creating structured folders, you can categorize your files based on projects, dates, or any other classification that suits your workflow.
Iterating New Lines in Bash: A Quick Guide
Troubleshooting Common Issues
Permission Denied Errors
One common issue when creating files in Bash is running into «Permission Denied» errors. This usually occurs when you try to create a file in a directory where you lack write permissions.
Solution: You can check and modify permissions with the `chmod` command. For example, to give yourself write permissions:
chmod +w directory_name
Disk Space Issues
Another potential roadblock is running out of disk space, preventing new file creation. Regularly monitoring disk usage can help you avoid this issue.
Commands for Disk Monitoring:
df -h   # Check disk space
du -sh *   # Check disk usage of current directory

Parallel Bash: Mastering Multi-Command Execution
Conclusion
In this guide, we covered several effective methods to create new files in Bash, understanding options such as `touch`, redirection, `cat`, and various text editors. Each method has its unique use cases, which cater to different needs. By following the best practices and troubleshooting tips provided, you can confidently manage your files via the command line.
Better LS Bash: Mastering the Listing Command
Further Learning and Resources
To deepen your knowledge of Bash, consider exploring online tutorials, books on Unix/Linux command line basics, and engaging with communities that focus on shell scripting and automation. Developing proficiency in Bash commands will greatly enhance your capabilities in file management and system administration.
Do While Bash: Mastering Looping with Ease
Call to Action
We invite you to share your experiences with file creation in Bash in the comments below! What methods do you prefer, and do you have any tips for creating files efficiently? Your insights can help others learn and improve their command-line skills.
Up to this point . . .
This is the third part in a series focused on getting familiar with Git for Windows developers. The series assumes little or no experience using the command line. If you missed the first few posts, here is what we have covered so far:
- Installing and configuring Git on your Windows machine
- Navigating directories (folders) from the Bash command line
- Examined a reference containing commonly-used (but basic) Git and Bash commands
In the previous post, we learned how to navigate directories within the Windows file system, create new directories, and delete directories. Now let’s look at creating files, and performing rudimentary (VERY rudimentary) text editing from the Bash command prompt.
Before We Proceed . . .
Let’s create a directory to use for the following examples. Open your Bash Command Line Interface (CLI) and make sure you are in your default Windows user folder. Create a new directory within your user folder called BashExcercises, and then move into that directory (Review the previous post if you are unsure how to do this):
Create a Directory for the Following Exercises

Also remember, when we are explaining syntax, we will often use square brackets to denote optional items, and angle brackets to denote use-provided content. In the following:
mkdir [options] <FileName>
We do not type the square brackets or angle brackets. The [options] are, well, optional, meaning there may be none or there may be many, and the <Filename> is required and provided by the user.
Bash: Create/Edit Files (touch/echo)
There are a couple of ways to create a new file using the Bash command prompt. The most basic is the touch command. The purpose of the touch command is ostensibly to change/modify the date/time stamps of files. However, it is commonly used to create new files as well, since, when used without any optional arguments, it does just that: creates a new file, with a date stamp.
Using the Touch Command to Create a New Text File
The syntax for the touch command is
Create a new file with a date stamp:
touch [options] <filename>
There are a number of options for use with the touch command, but for now, we are going to focus on simple file creation, and we won’t be using any of the options. If we want to create a simple text file, we can type:
Create a new Text File Named MyNewTextFile:
$ touch MyNewTextFile.txt
Type the above into your Bash window and hit enter:

Remember from the previous post that in many cases, when a Bash command executes successfully, we are rewarded with simply a new command prompt. However, we can use the ls command we learned from the last post to examine the contents of our directory:

What do you know? There is is. Now, you could open the new file using Notepad (or the text editor of your choosing), but you won’t see much. We have created an empty text file. To open the file using Notepad from the Bash prompt, simply type:
Open MyNewTextFile.txt in Notepad using Bash:
$ notepad MyNewTextFile.txt
Or, of course, you could open the file the old-fashioned way – by double clicking on it with your mouse!
Using the echo Command to Write Strings as Output
Before we look at using echo to create a new file, we should understand a little about what echo DOES.
The primary design purpose of echo is apparently to write strings to the standard output (usually, the Bash CLI).
The syntax for echo is:
Echo Command Syntax:
$ echo [options] <string>
Lets try that now. Type the following into Bash:
Output a line of Text to the Bash Screen:
$ echo show this line on the screen

We can also tell the echo command to write a line of text to a file, using the following syntax:
Syntax: Append text to the end of a file:
$ echo [options] <Text string> >> <FileName>
By using the >> (double right-hand angle-brackets) operator, we tell Bash to append the text to the end of the file. Type the following into the Bash window and hit enter:
$ echo This line was added to the end of the file >> MyNewTextFile.txt

Now, if we use our $ notepad MyNewTextFile.txt Command, we see the following:

Close that window, and let’s add another line. Type the following and hit enter:
Adding Another Line of Text:
$ echo This is another line of text >> MyNewTextFile.txt
Then use $ notepad MyNewTextFile.txt again:

Huh. Looks like it worked, kind of. Apparently, Bash isn’t kidding about appending the new text to the end of the file. Happily, we can use the > (a single right-hand angle bracket) operator to replace the text in the current file and get rid of that mess. Type this and hit enter. Then open the file in Notepad again:
Replace the Text in a File with a New Text String:
$ echo This line replaced the old mess > MyNewTextFile.txt
Your Bash window should look like THIS:

And you should see this in your Notepad window:

Use the Echo Command to Create a New File with Text Content:
Ok, back to the original subject – creating a new text file. We can use echo to create a new file, and include the specified text string as content. In fact, it works the same as when we appended or replaced the text in an existing file, because, lacking an option argument telling it not to, Bash will assume that if the file specified in our echo command does not exist, that we want to create one. Type the following and hit enter:
$ echo This is a new line in a new file >> DifferentTextFile.txt
Then use ls -1 to display the directory contents. This is what your Bash window should look like:

Note the presence of our new file. Let’s open it in Notepad, and see what there is to see:

Well, well well. Whadd’ya know!
Bash: Remove Files (rm)
Ok, now lets get rid of our first file. To remove (delete) files using Bash, we use the rm command. The syntax for removing files is as follows;
rm [options] <FileName>
SO now, let’s delete that first file, MyNewTextFile.txt. Type the following, hit enter, then use the ls -1 command to display the directory contents:
rm MyNewTextFile.txt
Your Bash window should look like this:

Remove a Directory and all Contents (rm -rf)
In the previous post, we discussed how to remove an empty directory. But what if we want to remove a direcory and all of its contents? We use the rm command with the -r and -f options:
Syntax for Removing a Directory and All of its Contents:
rm -rf <FolderName>
So now we are going to remove the BashExcercises directory we created at the beginning of this post. Of course, we can’t remove a directory if we are currently IN that directory. So first, let’s return to the directory above (in this case, our home folder) using the cd .. Comand (the cd Command, followed by a single space, followed by two periods in a row. This one means “move up one level”).
Next, type the following into your Bash window, hit enter, and then use the ls -d */ command to view the directories within the current directory (which should be, at this point, your Windows User folder):
$ rm -rf BashExcercises
When you are done, your Bash window should resemble this (note that the directories are organized alphabetically in columns, and the BashExcercises directory is no longer there. Also note that for obvious reasons, your user folder will contain different folders than mine!).

Now, let’s use everything we just learned in this post, plus we’ll add one final tidbit at the end which you may find useful. We’re going to step through this right quick. We will:
- Add one more new directory
- Add a file containing a line of text to the new directory
- Remove the directory and its contents
- Have Bash tell us what was removed.
1. Add a New Directory Named OneLastFolder to our current directory:
$ mkdir OneLastFolder
2. Add a New File Named OneLastFile.txt, containing the text “One more text line” to the new folder:
$ echo One more text line >> OneLastFolder/OneMoreFile.txt
Notice in the above, I did not navigate into the new folder to create the new file, but simply used the relative path from my current location.
3. Remove the directory and all its contents, and have Bash tell us what was done:
rm -rfv OneLastFolder
Notice in the above, I added one more optional argument, the -v option (for “verbose”). This tells Bash to print the actions it took to the output window.
When you have done all of that, your window should look like this:

There you have it. You now have the most basic set of tools for using the Bash Command Line Interface. From here, we are ready to examine the basic command line operations required to start using Git to manage our code. We’ll pick that up in the next post in this series.
Additional Resources:
- Part I in this series – Set up and configure Git on your Windows Machine
- Part II in this series – Basic file system navigation using Bash
- Basic Git and Bash Command Line Reference
- An A-Z Index of the Bash command line for Linux
- Git Reference
- The Pro Git Book by Scott Chacon (eBook)
- Pro Git (Expert’s Voice in Software Development)
- Git Cheat Sheet
- Github
- Help on Github
Skip to content
You will need to enable the Windows Linux Subsystem before creating a script
3 min. read
Updated on
updated on
Readers help support Windows Report. We may get a commission if you buy through our links.
Read our disclosure page to find out how can you help Windows Report sustain the editorial team. Read more
Key notes
- A shell script can help carry out repetitive automated tasks such as backup and software installations via the command line.
- It is possible to run a shell script file in Windows using the Windows Subsystem for Linux.

A shell script is a shell programming language program typically used on Linux and another Unix-based operating system. However, you can create and run shell scripts on Windows with additional steps.
Here in this guide, we have mentioned a step-by-step method to run a shell script on Windows. Let’s get started!
How can I create and run shell scripts on Windows?
1. Install the Windows Subsystem
- Press Windows + I to open Settings.
- Go to Privacy & Security, and click For developers.

- Click the toggle switch next to Developer mode. Now click Yes on the Use developer features window.
- Press the Windows button and type Turn Windows features. Next, select the option displayed and click Open.

- Locate Windows Subsystem Linux and place a checkmark next to it. Click OK.

- Follow the onscreen instructions and restart your PC to finish.


2. Download Ubuntu & Integrate it with WSL
- Press the Search button and type Microsoft Store.
- Launch the store app and type Ubuntu in the search bar.

- Click Ubuntu from the search and click on Get to download it.
- Search for the app and launch it.
- The Linux command prompt will install on your disk.

- The integration with WSL will also initiate.
- Enter the username and password and note it down for future use. The process might take some time to complete.


- Microsoft’s forced BitLocker encryption causing Windows 11 users lose their data
- Mail and Calendar app now stops syncing your Outlook/Hotmail account in Windows 11
- Windows 11 Start menu panel for Phone Link allows easy access to Android, iPhone
- WSUS blocks downloading Windows 11 24H2 update on 23H2 & 22H2 devices, leaving 0x80240069 error
- Microsoft updates Copilot app with guided tour for new users
3. Create a shell script
- Go to the desired location on your computer, press the Shift key, and right-click on the blank space.

- From the context menu, click the Open PowerShell window here.
- Type the following command to get redirected to the bash shell:
bash
- Next, copy and paste the following command after replacing the filename with the name of your file and press Enter to create a shell script file:
cat>filename.sh
- Check the created file and go back to PowerShell. Press Ctrl + C to terminate the process.
- To run the shell script, you need to add some data. On the PowerShell window, type the following command after replacing the filename with the name of the file and press Enter. This command will open a file for editing:
vi filename.sh
- Press the I key to access the file and start editing it.
- Type the following command in the file:
echo “Hello World”
- To save the contents of the file and close it, press the Esc key from the keyboard and type the following command, and press Enter
: wq


4. Run the Shell Script
4.1 Use the PowerShell
- Go to the location where your sh file is present, press the Shift key, and right-click the blank space.
- From the context menu, click the Open PowerShell window here.
- Type the following command and press Enter to go to the bash shell:
bash - Next, copy and paste the following command and press Enter:
sh filename.sh
- You will see the output.

4.2 Use Command Prompt
- Press the Windows key, type CMD and click Open.
- Type the following command and replace the E:/New folder with the path of your file, and press Enter:
cd /d E:/New folder. - Next, copy and paste the following command, replace the filename with the name of the file, and press Enter:
bash filename.sh
- You will get output on your command prompt window.

So, these are steps that you can follow to run shell script commands on Windows. Try this step-by-step guide and if you have any questions, let us know in the comments section below.
Vladimir Popescu
Being an artist his entire life while also playing handball at a professional level, Vladimir has also developed a passion for all things computer-related.
With an innate fascination for research and analysis, and realizing many other people share his passion for this subject, he delved into writing Windows-related articles, so other people can also benefit from the acquired information.
When not writing kick-ass articles, Vladimir likes to spend his time doing Crossfit and creating art.
Was this page helpful?
Let us know if you managed to solve your tech problem reading this article.
We’re happy to hear that!
You can subscribe to our newsletter to stay up to date with the latest news and best deals!
Do you have a suggestion?
We know how frustrating could be to look for an universal solution.
If you have an error which is not present in the article, or if you know a better solution, please help us to improve this guide.