
Точка восстановления Windows 7 применяется для отмены наших с вами ошибочных действий при работе на компьютере, приведших к его нестабильной работе. К нам в сервис по обслуживанию компьютеров, приходят за помощью люди, пользующиеся операционной системой Windows 7 много лет и только один из десяти знает про точки восстановления и один из пятидесяти про предыдущие версии файлов, но не умеет ими пользоваться правильно. При кажущейся простоте применения точек восстановления, у данной функции существует много особенностей, которые вам нужно знать. В этой статье изложена информация основанная на личном опыте автора, например мы узнаем почему при включенной Защите системы пропадают точки восстановления или не создаются вовсе. Как воспользоваться точкой восстановления при отсутствии запуска Windows 7 и многое другое, надеюсь мы поможем вам избежать многих ошибок.
Точка восстановления Windows 7
При выборе и применении точки восстановления вам нужно знать, что изменения обычно касаются только системных и программных настроек Windows 7. Все программы, установленные нами после создания выбранной нами точки восстановления, удалятся.
- Например, если вы создали точку восстановления 8 января, и 12 января хотите откатиться на состояние 8 января, то соответственно выберите точку восстановления 8 января. Все программы, установленные вами в промежуток времени с 8 января до 12 января удалятся.
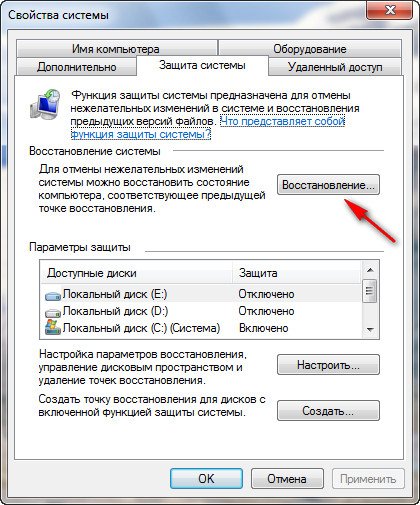
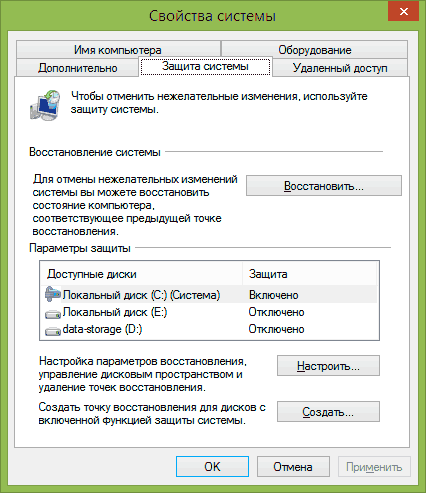
Что касается ваших личных данных, с ними не должно произойти никаких изменений. На данном скришноте, можно заметить, что Защита системы и создание точек восстановления включено по умолчанию только для диска С:\. Проверьте у себя Пуск->Панель управления->Система и безопасность->Система->Защита системы.
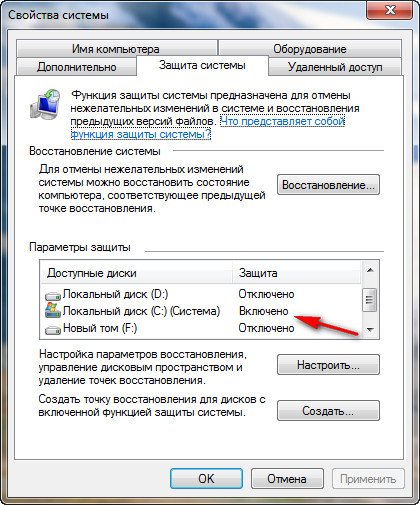
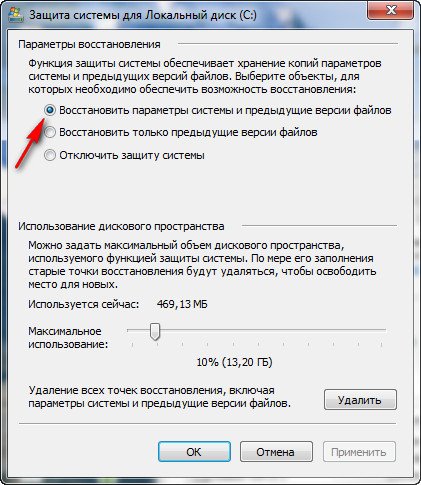
Так же нужно знать, что точка восстановления Windows 7, не поможет восстановить удалённые ранее файлы, но в этом случае вам можно воспользоваться функцией Предыдущие версии файлов, только если для данного диска была включена Защита системы и в Настройках параметров восстановления отмечен пункт Восстановить параметры системы и предыдущие версии файлов. В этом случае Защита системы Windows 7 архивирует личные данные пользователей с помощью теневых копий. Так же вы видите, что если нажать на кнопку Настроить, (верхняя иллюстрация) окна Защита системы, для локального диска (С:), появится окно, в котором видно, что для точек восстановления диска (С:) выделено 10% дискового пространства. Знайте, что лучше выделить 15%. Чем больше выделено места на жёстком диске для точек восстановления, тем дольше они хранятся. Если Windows 7 необходимо создать новую точку восстановления, а места для её создания недостаточно, то удалится старая точка и вместо неё создастся новая.
Примечание: если для какого-либо тома в операционной системе Windows 7 включена Защита системы, то пользовательские данные архивируются с помощью создания теневых копий и становятся доступны в Предыдущих версиях файлов. Теневые копии, не существуют вечно, для их хранения на жёстком диске выделено пространство, которое регулируется в настройках Защиты системы, как только оно заканчивается, при сознании новых копий старые удаляются.
Например у нас включена Защита системы для диска С:\, соответственно мы с вами сможем воспользоваться функцией Предыдущие версии файлов, щёлкнем на папке диска C:\Program Files правой кнопкой мыши и выберем Восстановить прежнюю версию,
откроется диалоговое окно Предыдущие версии, в котором будут перечислены все доступные версии предыдущих файлов. Файлы можно восстановить или просто скопировать, сохранив предыдущую и текущую версию.
Читайте статью полностью Предыдущие версии файлов.
При настройке Защиты системы для томов хранящих только ваши файлы, нужно выбрать в Параметрах восстановления пункт Восстановить только предыдущие версии файлов, так как ни каких системных параметров на них нет.
Если вы беспокоитесь о сохранении только личных данных, тогда вам лучше воспользоваться функцией Архивирование данных компьютера, это отдельная серьёзная тема, так же читайте её отдельно.
Точка восстановления Windows 7 планируется и создаётся один раз в неделю, по прошествии одинакового временного промежутка, такие точки ещё называют контрольными.
Так же точки восстановления Windows 7 создаёт перед установкой каких-либо программ, ну и наконец вы сами сможете создать точку восстановления руками перед установкой какого-нибудь приложения в диалоговом окне Защита системы.
Давайте сначала рассмотрим простой пример создания и применения точки восстановления, а затем разберём примеры посложнее.
Создаётся Точка восстановления Windows 7 таким образом->Пуск->Панель управления->Система и безопасность->Система->Защита системы. В этом диалоговом окне происходит Настройка и Создание точек восстановления. Например мы хотим самостоятельно установить серьёзную программу, но переживаем, вдруг мы что-то сделаем не так, давайте перестрахуемся и создадим точку восстановления вручную для диска С:\, на который мы будем устанавливать нашу программу.
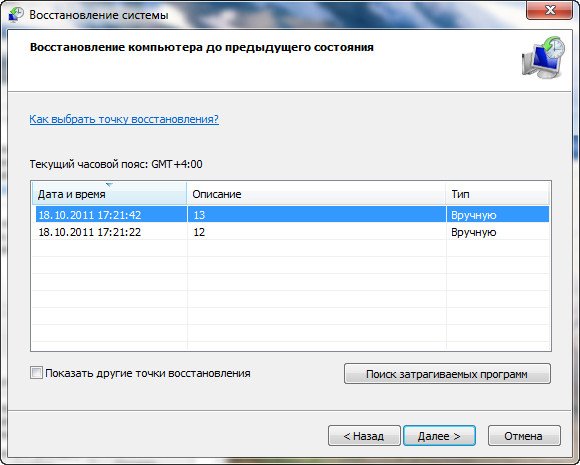
Пуск->Панель управления->Система и безопасность->Система->Защита системы->Создать, далее дадим название нашей точке, например 13.
Далее устанавливаем какую-либо программу, но что то пошло не так, например приложение не запускается и мы решили откатится назад с помощью точки восстановления на то время когда на нашем компьютере ещё не было установлено проблемной программы. Идем в Защиту системы и выбираем уже не Создать, а Восстановление, далее
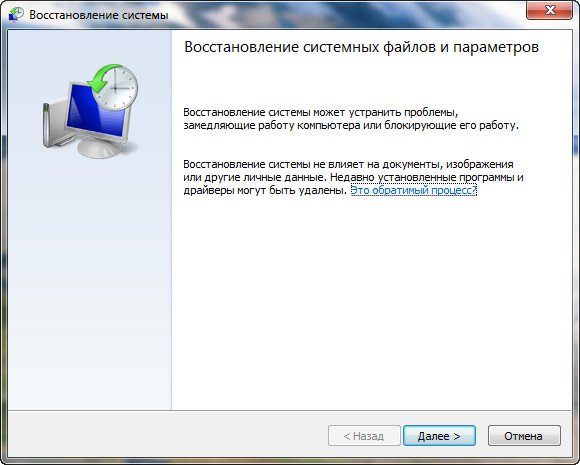
происходит запуск восстановления системных файлов, жмём далее и выбираем нашу точку восстановления 13, обратите внимание на пункт Показать другие точки восстановления, если там поставить галочку, Вам откроются другие более ранние точки восстановления.
Опять далее. Готово.
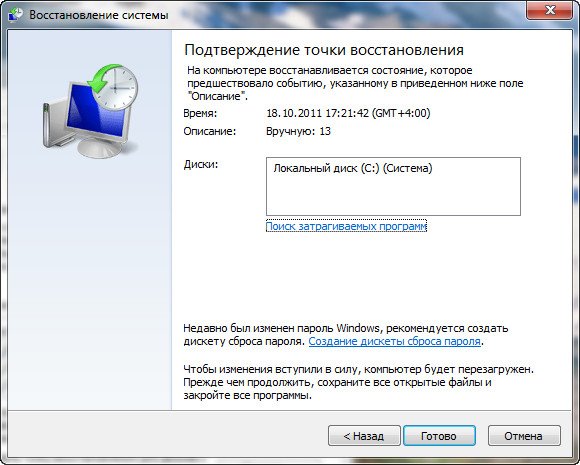
Предупреждение о том, что процесс восстановления будет невозможно прервать до его окончания, соглашаемся, далее перезагрузка.

Компьютер загружается и установленной нами программы, как не бывало. Вот так работают точки восстановления.
Точкой восстановления Windows 7, можно воспользоваться, если ваш компьютер не загружается, прибегнув к безопасному режиму, здесь невозможно создать точку восстановления, но откатиться с помощью неё к стабильному состоянию компьютера можно. Что бы попасть в Безопасный режим нужно нажать клавишу F-8 на клавиатуре сразу же после запуска компьютера. Перед вами откроется меню Дополнительные варианты загрузки: Устранение неполадок компьютера, далее Безопасный режим. Что бы в Безопасном режиме воспользоваться точкой восстановления Windows 7 нажмите Пуск->Панель управления->Восстановление, далее загрузится Восстановление системы и Запуск восстановления, выбирайте вашу точку восстановления и вперёд.
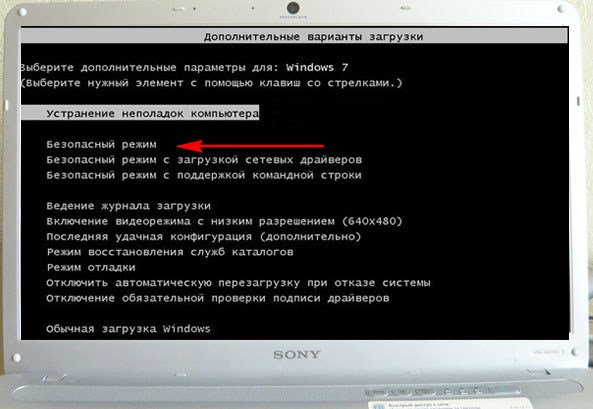

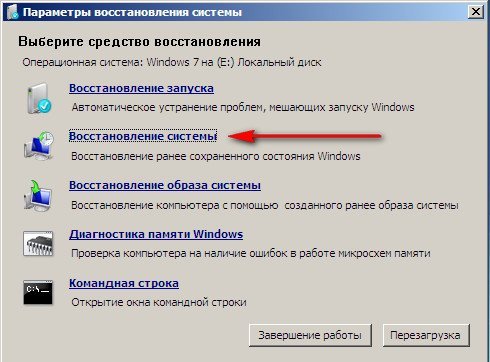
Если безопасным режимом мы воспользоваться по каким-то причинам не можем, то использовать точки восстановления Windows 7 можно, выбрав в Дополнительных вариантах загрузки->Устранение неполадок компьютера->Восстановление системы. Как это сделать. Можете почитать нашу статью Как восстановить систему Windows 7.
Важная информация: если вы изменяли после создания точки восстановления пароль, готовьтесь к тому, что вам вернётся старый, создайте диск восстановления пароля.
Точки восстановления Windows 7 занимают по умолчанию примерно 10%-15% (как я уже говорил выше), дискового пространства, регулировать дисковый объём, выделенный для точек восстановления можно в окне Настроить — Защита системы. Если места на жёстком диске для точек восстановления выделено много, храниться они будут долго. Для удаления всех точек восстановления, в данном окне нужно нажать кнопку Удалить и все точки восстановления удалятся.
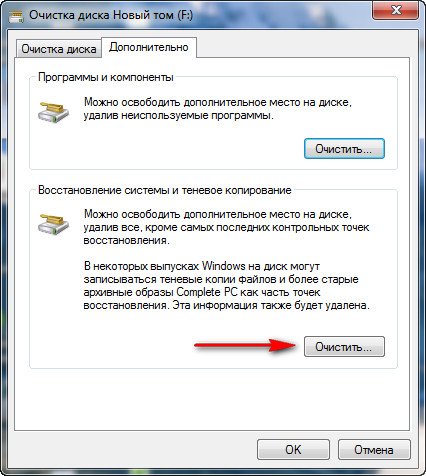
Как удалить все точки восстановления кроме последней? Пуск->В поле поиска вводим Очистка диска, далее выбираем диск, который нужно очистить, затем идём на вкладку Дополнительно->Восстановление системы и теневое копирование->Очистить.

Почему не создаются точки восстановления Windows 7?
- Удаляют точки восстановления многочисленные утилиты по очистке жёстких дисков и реестра. Например программа FreeSpacer, настроенная по умолчанию обязательно удаляет папку System Volume Information, содержащую в себе точки восстановления. Поэтому подобные программы нужно настраивать вручную, внося данную папку в исключения.
- Создание точек восстановления не будет производиться на вашем ноутбуке при отключенном питании, так настроено по умолчанию. Если у вас хватает зарядки на довольно длительное время, можно отключить данную настройку в Планировщике заданий Пуск->Выполнить->taskschd.msc.
Открываем ветку Библиотека планировщика заданий\Microsoft\Windows\SystemRestore, далее двойным щелчком левой мыши на пункте SR заходим в Свойства,
- Вкладка Триггеры отвечает за расписание создания точек восстановления, настраиваем так как нам нужно. На вкладке Условия отмечен по умолчанию пункт Запускать задачу при простое компьютера по истечению 10 мин, то есть создание точек восстановления не будет производиться, пока ваш компьютер не будет бездействовать 10мин, а если вы им пользуетесь постоянно, этот параметр тоже можно сбросить.
- Точки восстановления не создаются с файловыми системами FAT и FAT32 в частности. Данные файловые системы не поддерживают теневые копии, которые содержат информацию об изменениях в системных и пользовательских файлах. Windows 7 использует для создания точек восстановления теневые копии
- Если на вашем компьютере вы используете две операционные системы, например Windows XP и Windows 7, то при запуске более старшей версии Windows XP, все точки восстановления, созданные Windows 7, будут удалены.


Точка восстановления системы Windows 8 или Windows 7 — полезная функция, позволяющая отменить последние изменения, сделанные в системе при установке программ, драйверов и в других случаях, например, если необходимо отметить последние обновления Windows.
В этой статье речь пойдет о создании точки восстановления, а также о том, как решить различные проблемы, с ней связанные: что делать, если точка восстановления не создается, пропадает после перезагрузки компьютера, как выбрать или удалить уже созданную точку. См. также: Точки восстановления Windows 10, Что делать, если восстановление системы отключено администратором.
Создание точки восстановления системы
По умолчанию, Windows самостоятельно создает точки восстановления в фоновом режиме при внесении важных изменений в системе (для системного диска). Однако, в некоторых случаях функции защиты системы могут быть отключены или же может потребоваться сделать точку восстановления вручную.

Для всех этих действий и в Windows 8 (и 8.1) и в Windows 7 вам потребуется зайти в пункт Панели управления «Восстановление», после чего нажать по пункту «Настройка восстановления системы».
Откроется вкладка «Защита системы», на которой у вас есть возможность выполнить следующие действия:
- Восстановить систему до предыдущей точки восстановления.
- Настроить параметры защиты системы (включить или отключить автоматическое создание точек восстановления) отдельно для каждого диска (диск должен иметь файловую систему NTFS). Также в этом пункте вы можете удалить все точки восстановления.
- Создать точку восстановления системы.
При создании точки восстановления вам потребуется ввести ее описание и немного подождать. При этом, точка будет создана для всех дисков, для которых включена защита системы.

После создания, вы можете в любой момент в этом же окне восстановить систему с помощью соответствующего пункта:
- Нажимаете кнопку «Восстановить».
- Выбираете точку восстановления и ждете завершения операции.

Как видите, все очень просто, особенно когда работает как положено (а это бывает не всегда, о чем будет ближе к концу статьи).
Программа для управления точками восстановления Restore Point Creator
Несмотря на то, что встроенные функции Windows и так позволяют полноценно работать с точками восстановления, некоторые полезные действия все-таки недоступны (или же доступ к ним есть только с помощью командной строки).

Например, если вам требуется удалить одну выбранную точку восстановления (а не все сразу), получить детальную информацию о месте на дисках, занимаемом точками восстановления или настроить автоматическое удаление старых и создание новых точек восстановления, вам может пригодиться бесплатная программа Restore Point Creator, которая умеет делать все это и немного больше.
Программа работает в Windows 7 и Windows 8 (впрочем, XP тоже поддерживается), а скачать ее можно с официального сайта www.toms-world.org/blog/restore_point_creator (для работы требуется .NET Framework 4).
Решение проблем с точками восстановления системы
Если по какой-то причине точки восстановления не создаются или пропадают сами по себе, то ниже информация, которая поможет вам выяснить причину появления такой проблемы и исправить ситуацию:
- Для работы создания точек восстановления должна быть включена служба Windows «Теневое копирование тома». Для того, чтобы проверить ее состояние, зайдите в панель управления — администрирование — службы, найдите данную службу, при необходимости поставьте режим ее включения в «Автоматически».
- В случае, если на вашем компьютере установлено две операционные системы одновременно, создание точек восстановление может не работать. Способы решения различные (или их нет), в зависимости от того, какая именно у вас конфигурация.
И еще один способ, который может помочь, если точка восстановления не создается вручную:
- Загрузитесь в безопасном режиме без поддержки сети, откройте командную строку от имени Администратора и введите net stop winmgmt после чего нажмите Enter.
- Перейдите в папку C:\Windows\System32\wbem и переименуйте папку repository во что-то другое.
- Перезагрузите компьютер (в обычном режиме).
- Запустите от имени администратора командную строку и введите сначала команду net stop winmgmt, а затем winmgmt /resetRepository
- После выполнения команд попробуйте создание точки восстановления вручную снова.
Пожалуй, это все что я могу рассказать о точках восстановления на данный момент. Есть, что добавить или вопросы — приветствую в комментариях к статье.
You are here:
Home » Windows 7 Guides » How To Create A Manual System Restore Point In Windows 7
One of the best practises to keep your system stable and trouble-free is creating a manual system restore point before playing with system files or installing a new software. Although many of the programs out there automatically create a system restore point before the installation, the same can’t be said for all programs out there for Windows.
A restore point is a representation of a stored state of your computer’s system files. You can use a restore point to restore your computer’s system files to an earlier point in time. And the best thing is that when you restore your system to a previous date, Windows doesn’t delete saved files and documents. However, you will lose recently installed programs and settings.
Related: Reset Windows 8 to factory settings and how to use Refresh PC feature in Windows 8.
To restore Windows to a previous state, open up System Restore tool, select the restore point that you would like to use to restore your system to, and then click Next button. Windows will restart to begin restoring your PC.
To create a manual restore point in Windows 7 you need to complete the given below steps:
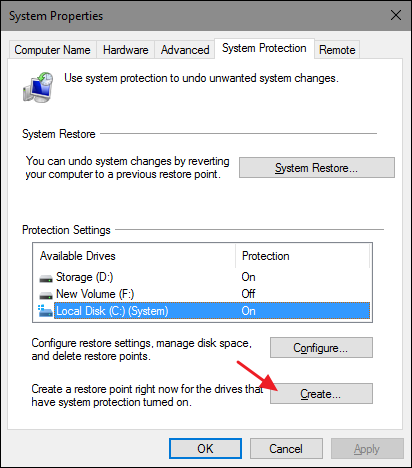
Step 1: Right-click on Computer icon and select Properties to open System Properties window. Alternatively, you can also use Windows key + Pause/Break shortcut to launch the System Properties.
Step 2: In the System Properties window, click on the System Protection link.

Step 3: Once the System Protection tab is opened, just click on the Create button to create a new manual restore point for the drives that have system protection turned on.
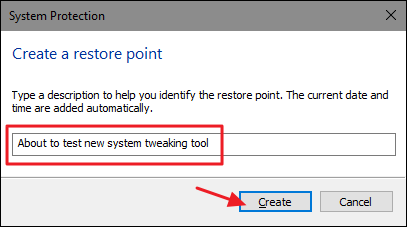
Step 4: You will be asked to enter a description for the new restore point. Type in the description and hit the Create button.
Step 5: Wait for a few seconds to see the “Restore Point was created successfully” message.
Step 6: You are done!
There are free programs available to quickly create and mange system restore points. Check out our list of 4 free tools to create and manage system restore points, delete all restore points to free up disk space, and how to delete individual restore points without affecting other restore points.
When System Restore was introduced in back in Windows ME, it helped save some major computer snafus for plenty of users. The feature is still included in Windows 7, 8, and 10, and is a useful tool for fixing a myriad of problems.
You can read more about how to use System Restore in our full guide. But if you’re just looking to create a quick Restore Point, the instructions below should help you out.
It is recommended that you create a restore point before installing new software or making any major changes to your computer. Oftentimes, when you install new software, you’re given the choice to create a point but if not you can do one manually as well.
Click on the Start menu, type «restore», and click «Create a Restore Point».
The System Properties dialog screen opens up. Click the Create button.
Type in a description for the restore point which will help you remember the point at which is was created.
The time it takes to create the restore point will depend on the amount of data, computer speed etc.
All done! Now if something goes wrong you have the satisfaction knowing that you can go back in time to the point before the changes were made.
If you’re seeking a simple and genuine method to create System Restore points on Windows 7, this article is tailored for you. In today’s world, we are virtually inseparable from technology. The manner in which it has transformed our lives is nothing short of miraculous. However, sometimes these technological operating systems can become corrupted, as they are not as flawless as we perceive them to be. To address such issues, we offer some engaging step-by-step instructions on how to create a System Restore point in Windows 7.
A Comprehensive Overview of System Restore Point
For example, if your system becomes corrupted and you’re unsure how to recover your files, there’s no need to worry. You’ve already found the right page.
- Tip
- Before beginning, it’s essential to have a basic understanding of System Restore Points. A System Restore Point is a backup of critical files and settings in the Windows operating system. These backups come in handy when the system isn’t functioning properly due to errors or instability. It serves as an ‘undo’ button for the system.
In Windows 7, it’s automatically enabled when you install certain drivers and Windows updates.
Do you require assistance when you wish to backup and restore the previous working state of your computers? Many individuals encounter this issue on a daily basis. You might not be aware of it until you become a victim yourself.
Let’s promptly follow the simplest methods to create a restore point on Windows 7.
3 Ways to Create a Windows 7 System Restore Point
It is recommended to always create a system restore point before installing any new software on your computer. While installing the software, you can create a restore point if the option is provided; if not, you should create one manually.
There are numerous approaches to system restoration, but two methods are particularly prominent nowadays.
The Todo Backup tools are the best for restoring all your lost data. It is the most efficient solution available. Additionally, every Windows operating system has a System Restore feature. However, creating a System Restore point can be more time-consuming and intricate.
| Method | Specifications | Difficulty level | Availability |
| Todo Backup Tool | Backup on demand, cloning, scheduling, encryption | Super easy to use | Easily available for Windows 10, 11, 7 |
| System Restore | Generally more secure | Easy to use | Especially for Windows 7 & 10 |
| Task Scheduler | Secure | Difficult | Especially for Windows 7 & 10 |
Method 1: Create a Windows System Restore Point using Backup and Recovery Software
Todo Backup for Win is primarily designed for Windows users, who appreciate its simplicity and effectiveness.
It boasts a lengthy yet comprehensive list of features, including disk imaging, bootable backup, encryption, support for various types of backup such as full and incremental backup, and even free cloud storage in its latest software iteration.
Although it possesses a substantial number of advantages, and here are some of them:
- Diverse pricing options to cater to different needs and usage scenarios.
- Robust backup features, including cloud storage, cloning, and backup encryption.
- AI-powered Smart Backup that performs weekly incremental backups using advanced tools.
- Todo Backup’s cloning feature (for both disks and partitions) allows you to create a new hard drive replicating the original disk.
- A reliable system with decent to excellent speed, depending on the chosen pricing plan.
Here’s what you should follow to back up your system:
Step 1. Launch Todo Backup on your computer, and click Create Backup on the home screen. Then, hit the large question mark to select backup contents.

Step 2. To back up your Windows operating system, click «OS» to start the backup task.

Step 3. Your Windows operating system information and all system-related files and partitions will be automatically selected, so you don’t need to make any manual selections here. Next, you’ll need to choose a location to save the system image backup by clicking on the highlighted area.

Step 4. The backup location can be another local drive on your computer, an external hard drive, a network, cloud, or NAS. Generally, we recommend using an external physical drive or cloud to store your system backup files.

Step 5. If interested, customization settings such as enabling an automatic backup schedule for daily, weekly, monthly, or event-based backups, and creating differential and incremental backups are available through the Options button. Click «Backup Now» to initiate the Windows system backup process. Once complete, the finished backup task will be displayed on the left side in a card format.

Method 2: Create a Windows 7 System Restore Point via System Restore
The System Restore feature in Windows 7 is widely recognized and generally considered secure. When you install new software or make changes to Windows settings, System Restore is enabled by default and creates restore points automatically.
Guidelines To Restore Windows 7 To A System Restore Point
1. **Access System Restore**: First, click on the ‘Start’ button located at the bottom left corner of your screen. In the search box, type «System Restore» and hit Enter.
2. **Run System Restore**: From the search results, choose «Create a restore point» or «System Restore». This will open the ‘System Properties’ dialog box.
3. **Select Restore Point**: Click on the «System Restore» button. A new window will appear asking you to confirm if you want to view restore points. Click «Next».
4. **Choose Restore Point**: You’ll see a list of available restore points. These points are created automatically by Windows at significant system events. Choose the one that precedes the issue you’re facing. If you’re unsure, select «Recommended restore» as it will restore your system to a point where no known problems existed.
5. **Review Settings**: After selecting a restore point, you’ll get a summary of your settings. Review it to ensure the date and description match the point you want to restore to.
6. **Start Restoration Process**: Click «Finish» to start the restoration process. A confirmation prompt will appear. Click «Yes» to proceed.
7. **Wait for Completion**: The computer will restart and begin the restore process. This may take some time depending on the size of your hard drive and the number of files being restored. Do not turn off your computer during this process.
8. **Completion and Reboot**: Once the restoration is complete, your computer will automatically restart. You’ll be prompted with a message confirming that the restore was successful.
Remember, System Restore does not affect personal files like documents, photos, music, or email messages, but it will remove any new programs or updates installed after the selected restore point.
Step 1: Type «System Restore» into the Start menu. Enter the key or click on the shortcut for the System Restore program.

Step 2: On the System Restore page, click Next. You will now be able to choose a previously created System Restore point. If you have multiple restore points available, select the fixed point that was created before any issues started occurring.

Step 3: Click Finish after verifying the restore point’s date and description.

What if Windows 7 fails to boot? Where can I locate the System Restore feature?
Upon resetting, you can access the Advanced Boot Options by repeatedly pressing the F8 key. The option to Repair Your Computer will be listed at the top.

Choosing this option from the System Recovery Options menu will initiate the Repair Boot mode. At this point, select System Restore and follow the instructions outlined above.

What happens if System Restore doesn’t work?
If your computer becomes corrupted, and the System Restore function fails to operate properly, you risk losing your vital files and data. Aside from a System Restore point, there is no other direct method to retrieve your data. To prevent such problems, it’s advisable to employ straightforward techniques for data recovery.
Method 3: Create a Windows 7 System Restore Point using Task Scheduler
In the event of an issue, we often create a System Restore point to revert to the previous functioning state. This is a duplicate of the operating system’s current working condition, similar to a system image. If we need to make such changes frequently, it’s essential to continuously create new restore points.
Doing this manually each time can be time-consuming and inconvenient. To circumvent this, we can set up an automated process to create System Restore Points. For instance, you might configure a task to generate restore points on your system on a weekly, monthly, or daily basis. In this post, let’s explore various methods to achieve this.
Step-by-Step Guidance for Task Scheduler
Step 1: Press and hold the Windows+r keys to open the Run window.
Step 2: Type taskschd.msc and then press Enter.

Step 3: Click Create Task in the Actions section on the right-hand side of the Task Scheduler window.

Step 4: Perform the following steps on the General tab of the Create Task window that appears:
- Give the task a name.
- Consider the option: Run whether or not the user is logged in.
- Consider the option: Run at the highest available privilege level.
- Select Windows 10 from the Configure for dropdown menu.

Step 5: In the Triggers tab, do the following
- 1. To open the New Trigger window, click the New button.
2. Select a schedule by choosing from the task dropdown menu.
3. Determine how often you want to perform the activity, for instance, daily.
4. Enter the Start Date and Time as shown in the image below.
5. Click OK.

Step 6: Under the «Actions» tab,
- 1. To open the New Action window, click on «New.»
2. From the Action dropdown menu, select «Start a Program.»
3. In the «Program/script» field, enter «powershell.exe.»
4. For the «Add arguments (optional)» command, enter the following:
-ExecutionPolicy Bypass -Command «Checkpoint-Computer -Description ‘/’ -RestorePointType ‘MODIFY_SETTINGS'»
For example, modify the command as follows if you want to name the restore point Restore_Point:
-ExecutionPolicy Bypass -Command «Checkpoint-Computer -Description ‘/Restore_Point/’ -RestorePointType ‘/MODIFY_SETTINGS/'»

Step 7: Under the Condition tab,
- Untick the box. If the computer unexpectedly switches to battery power, pause the process.
- Untick the box. Commence the task only if the PC is powered by AC.
- Enter OK.

Step 8: A popup requesting the system password appears. Type your password and press Enter.

With these modifications, the System will create a restore point that runs automatically every day.
Don’t forget to share this post with your fans if you find it helpful:
How to Restore Windows 7 System to a Previous State
1) Restore from Todo Backup Tools
- Besides the comprehensive Todo Backup tools for backing up files, folders, partitions, disks, and systems, you can perform a differential (incremental) backup based on a previous full backup.
- Should your computer become unbootable, WinPE provides an additional backup option that lets you create a bootable backup to safeguard your data.
2) Restore within Windows
Step 1: The System Properties window should be open. Scroll down and click the System Restore button.
Step 2: A pop-up window will appear. Confirm that the restore point listed under «Recommended restore» is working properly, and then click «Next.»

Step 3: If not, select an alternative restore point. The most recent option is listed among all available restore points. To initiate the restoration process, click Next and then Finish.

Notes:
- To view additional restore points, click Show More restore points.
- If you need clarification on whether the restoration might cause data loss for some of your programs, you can click Scan for Affected Programs to check.
3) Restore from Safe Mode
If you’re unable to access the Windows desktop, you must boot into Safe Mode and perform a System Restore.
Step 1: Press the F8 key or the Windows logo key immediately as your computer boots up.
Step 2: Click the Safe Mode with Command Prompt option in the Advanced Boot Options window.

Step 3: Type rstrui.exe in the Command Prompt window, then press Enter.

Step: Click Next after selecting the recommended restore point in the System Restore window that appears. Then, proceed with the System Restore process just as you would in Windows.
Could you please provide the text that needs to be translated into English?
Sum Up
Using the methods outlined above, you can quickly create a restore point in Windows 7 and perform a system restore if you install programs, drivers, system files, or settings.
However, certain issues, such as data loss and system restore points, might not be resolved. In light of this, it is recommended to create a permanent restore point instead of relying on the computer’s current status. This way, you can always revert your PC to its previous state.
While the optimal solution is to utilize Todo Backup tools for regular file backups on your home computer, extending to multi-server, enterprise-level backups, Todo Backup serves as an exceptional solution for all your backup needs. It also offers cloud storage and additional tools for managing, recovering, and securing your data.
Frequently Asked Questions on How to Create a System Restore Point in Windows 7
1. Why am I unable to create a restore point in Windows 7?
- 1. After the restoration, certain programs, like antivirus software, might not work properly. It’s advisable to check the affected programs before performing a System Restore.
2. Once the restore point is set, all Windows updates that occurred after that point will be undone.
3. This system restoration tool does not back up your files and other data, so it cannot be used to restore that information.
2. What happens if System Restore does not work?
If your computer becomes corrupted, and System Restore fails to function properly, you risk losing your vital files and data. Apart from a System Restore point, there is no direct means to retrieve your information. To prevent such problems, implement straightforward methods to recover your data.
3. How can I restore Windows 7 to an earlier point in time using Safe Mode?
To safely restore Windows 7 to a previous date, follow these steps:
1. **Restart your computer**: First, turn off all applications and programs running on your computer, then restart it.
2. **Access System Restore**: While your computer is starting up, press the `F8` key repeatedly until you see the Advanced Boot Options menu. Choose the «Safe Mode with Networking» option using the arrow keys and press `Enter`.
3. **Log in**: Enter your username and password (if applicable) to log into Windows 7.
4. **Open System Tools**: Once logged in, click on the Start button, type «System Restore» in the search box, and press `Enter`. This will open the System Restore wizard.
5. **Start System Restore**: In the System Restore window, click on the «Next» button. You’ll be prompted to choose a restore point. Select the date and time you wish to restore your system to, ensuring it’s before any issues occurred.
6. **Review settings**: Click «Next» again to review your chosen restore point. A summary will be displayed, detailing which files, settings, and programs will be affected.
7. **Confirm and restore**: Click «Finish» to start the restoration process. A confirmation dialog will appear, warning you that the process cannot be undone. If you’re sure, click «Yes.»
8. **Wait for the process to complete**: Windows 7 will now begin restoring your system to the selected date. This may take some time, so do not interrupt the process.
9. **Reboot after restoration**: Once the restore is complete, your computer will automatically reboot. You’ll be prompted to log in again.
10. **Verify system status**: After logging in, check if the issue has been resolved. If not, you might need to consider other troubleshooting options or seek professional assistance.
Remember, System Restore only affects system files and settings, not personal files like documents, photos, or music. However, it’s always a good idea to back up important data before performing any major system changes.
- 1. Click the Start button.
2. Type «System Restore» in the Start search box.
3. After processing, a window with two buttons at the bottom will open; click on «Next.»
4. The following screen often displays your latest significant update and a recent restore point.
5. If you know the exact day when the issue started, check the «Show more restore points» checkbox.
6. Select a restore point and then click «Next.»
7. Confirm your chosen restore point and click «Finish» to initiate the restoration process.