
Depending on the usage of your Windows 11/10 computer, you can configure processor scheduling, so that it gives you the best performance while using Programs or for Background Processes. You can make this adjustment easily via the Control Panel.
Windows automatically manages a number of foreground processes while a CPU is running. It has the built-in capability to manage the allocation of tasks. Windows do so by allotting a priority to tasks. Due to this reason, your computer is able to handle multiple processes on a single-core processor.
Optimize CPU Scheduling in Windows
In order to optimize your copy of Windows to meet your requirements, you can adjust the Processor by scheduling the task allocation which it deals with. Using these features, you can set up Windows, so that it is optimized to run programs or foreground services OR Background Services, like printing or backing up. At the same time, you work in another program, by adjusting Processor Scheduling. This way, Windows then knows how to distribute or allocate the available resources, to best perform these tasks. If you’re using Windows as the server, we recommend you adjust processor scheduling for background processes.
To begin the process, type sysdm.cpl in Run box and hit Enter to open the System Properties. Select the Advanced tab and under Performance, click on Settings. In the Performance Options box, select the Advanced tab again. You will see a section Processor Scheduling.

There are 2 settings you can choose from:
- Adjust for best performance of Programs
- Adjust for best performance of Background Services.
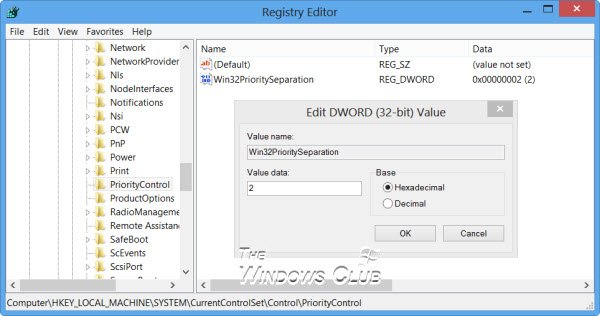
This setting changes the DWORD value of Win32PrioritySeparation under the following registry hive:
HKEY_LOCAL_MACHINE\SYSTEM\CurrentControlSet\Control\PriorityControl
Just in case you wish to know, the PriorityControl key defines the foreground vs. background priority differential. The possible default values for Win32PrioritySeparation REG_DWORD 0, 1, or 2, with the default being 0x2.
Optimize Windows for best performance for programs or background services
This default value specifies the priority to give to the application running in the foreground. This application receives more processor time relative to other applications running in the background, explains TechNet. The values here correlate to the following options in the Tasking dialog box: Value Meaning
- 0 Foreground and background applications equally responsive
- 1 Foreground application more responsive than background
- 2 Best foreground application response time.
Coming back, if you have NOT changed this setting at all, and you were to open the Windows Registry, you would see Win32PrioritySeparation have a value 2. These screenshots are from my Windows PC.
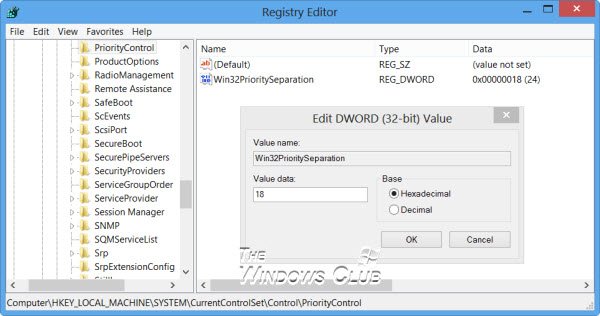
Now, if via the Control Panel, as shown above, you select Adjust for best performance of Background Services and click Apply, you will find that its sets Win32PrioritySeparation to 18 (decimal 24) for Background Services.
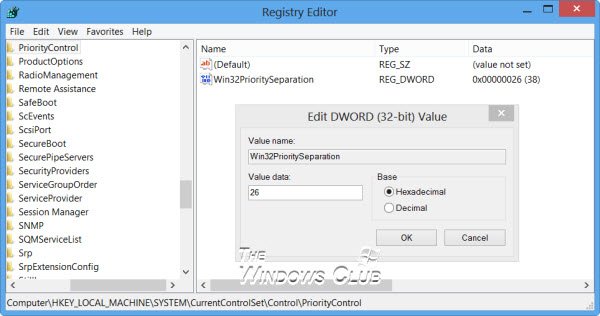
If you now select Adjust for best performance of Programs, you will find that it sets Win32PrioritySeparation to 26 (decimal 38) for Programs.
Using this feature, you can set up Windows, so that it is optimized to run programs or foreground services OR Background Services, like printing or backing up, while you work in another program, simply by adjusting Processor Scheduling. This way, Windows then knows how to distribute or allocate the available resources, to best perform these tasks.
If you are using a desktop, you may leave the setting at its default or choose Adjust for best performance of Programs. Let us know if this results in smoother, faster response time for your programs or foreground services.
TIP: You can also change Process Priority for running processes using the Command line.
However, if you use your PC as a Server or if you constantly have background services, such as printing or disk backup, that run while you work and you want them to respond faster, you can have Windows share processor resources equally between background and foreground programs by choosing the other option, ie. Adjust for best performance of Background Services.
So you see, Windows now gives you an easy way to set Processor Scheduling. If you are an advanced user and wish to set the values manually, you may use the follow the manual way in this post on how to get the best performance for programs or background services.
В параметрах графики Windows 11 и Windows 10 (начиная с обновления в мае 2020) присутствует функция «Планирование графического процессора с аппаратным ускорением», призванная снизить задержки в играх и других графически интенсивных приложениях.
В этом материале о том, что делает функция планирования GPU, включать ли её и как включить планирование графического процессора с аппаратным ускорением.
Что делает функция и стоит ли включать её
Планирование графического процессора с аппаратным ускорением призвано снять часть нагрузки с центрального процессора, что, в некоторых случаях, может улучшить общую производительность в играх, а главное — снизить инпут-лаг (задержку при вводе).
Стандартно (без использования функции) планирование команд и их отправка для GPU (видеокарты) выполняется процессором с помощью планировщика WDDM, при этом команды отправляются не по одной, а пакетами (буферизация кадров). Это позволяет улучшить частоту кадров, но может приводить к задержкам ввода в играх: то есть отклик на действие пользователя происходит при отправке следующего пакета.
Планирование графического процессора с аппаратным ускорением снимает часть выполняемых процессором задач и передает их на обработку планировщику видеокарты. В случае, если узкое место вашего компьютера — это процессор, либо какие-то из игр нагружают его на 100%, включение рассматриваемой функции может быть полезным: но для каждого конкретного случая изменения будут заметными. Это лучше проверить самостоятельно, результат может отличаться в зависимости от игры и конкретной системы: например, тесты показывают, что результат тем лучше, чем мощнее используемая видеокарта.
Эффект от включения функции может проявиться не только в снижении инпут-лага и производительности в играх: в некоторых случаях этого можно и не наблюдать, но получить снижение нагрузки на процессор и его температуры в играх.
Как включить планирование графического процессора с аппаратным ускорением в Windows 11 и Windows 10
Для того, чтобы функция была доступна для включения, должны выполняться следующие условия:
- Установлена Windows 11 или Windows 10 с обновлением компонентов от мая 2020 года.
- Компьютер оборудован видеокартой NVIDIA GeForce 10-й или более новой серии, AMD Radeon RX 5600 или более новой.
- Установлены драйверы видеокарты, желательно — новые.
Параметры
Для того, чтобы включить планирование графического процессора с аппаратным ускорением в Параметрах, достаточно выполнить следующие шаги:
- Нажмите правой кнопкой мыши по рабочему столу и выберите пункт «Параметры экрана».
- В Windows 11 нажмите «Графика» в разделе «Сопутствующие параметры», а в Windows 10 — «Настройки графики» ниже раздела «Несколько дисплеев».

- В Windows 11 дополнительно перейдите в раздел «Изменение стандартных параметров».
- Включите опцию «Планирование графического процессора с аппаратным ускорением».


Если переключатель для включения функции отсутствует, это может говорить о том, что на компьютере отсутствует подходящее оборудование с её поддержкой, либо не установлены актуальные драйверы дискретной видеокарты NVIDIA или AMD.
Редактор реестра
Ещё одна возможность включить функцию — реестр Windows:
- Нажмите клавиши Win+R на клавиатуре, введите regedit и нажмите Enter.
- В открывшемся редакторе реестра перейдите к разделу
HKEY_LOCAL_MACHINE\SYSTEM\CurrentControlSet\Control\GraphicsDrivers
- Нажмите правой кнопкой мыши в правой панели редактора реестра и создайте новый параметр DWORD (32-бит) с именем HwSchMode
- Дважды нажмите по параметру и задайте значение 2 для него, сохраните изменения.
- Закройте редактор реестра и перезагрузите компьютер.
Подводя итог: если вы не знаете, стоит ли включать планирование GPU с аппаратным ускорением в Windows, лучший способ определить это — попробовать включить и посмотреть, как изменится отзывчивость игры на ввод, а также нагрузка на процессор и его температура. Если окажется, что выгоды от включения заметны, стоит оставить функцию включенной. Кроме этого, следует учитывать, что в разных играх результат может отличаться.
This article will help you to adjust Processor Scheduling for Best Performance in Windows 10. Windows Operating systems utilize the resources of a computer’s CPU for performing various tasks among one or some of the processors of a computer, provided the processor is multi-core. For best performance processor scheduling is set to foreground programs, but if your machine is functioning as a server, choosing background services is the best option to perform the scheduling functions quickly. There are certain functions like system backup which are preferred to be run while setting the scheduling to background services. So when you have to perform such function, you can change the default setting for the time being and once this processing is over, switch back to the default settings.
Adjusting processor scheduling can ameliorate your PC’s audio drivers.
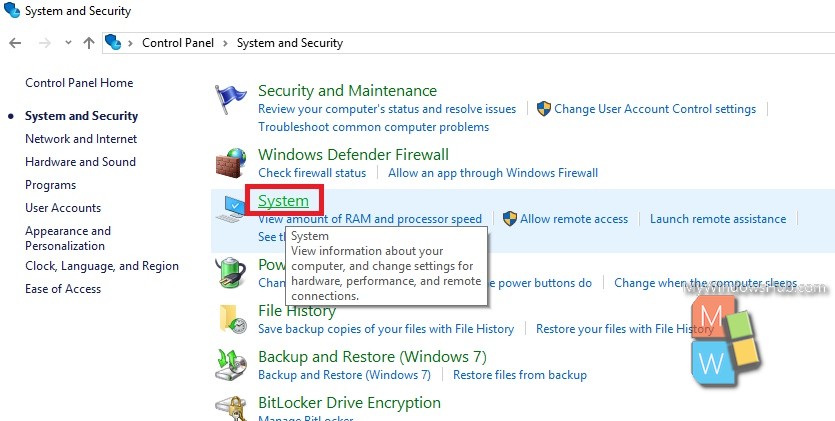
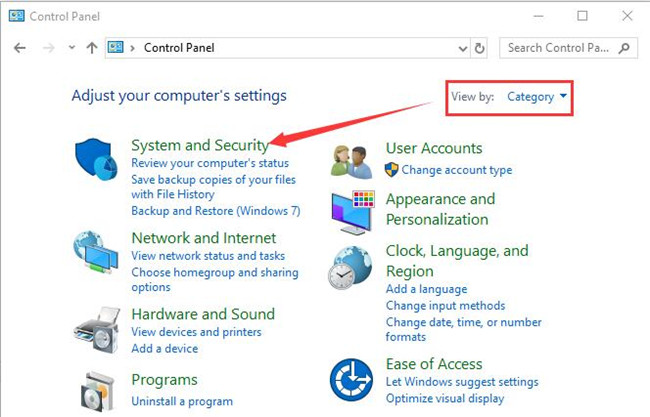
1. First of all, open Control Panel. For Windows 10, you can simply search Control Panel in Cortana search panel.
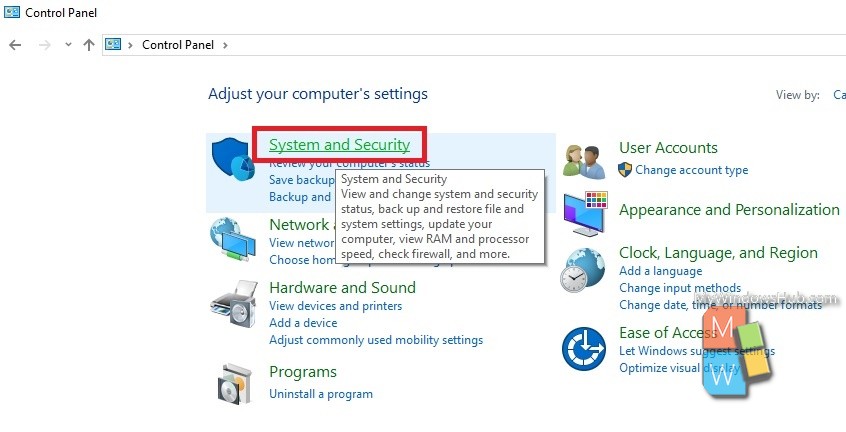
2. Now go to System and Security.
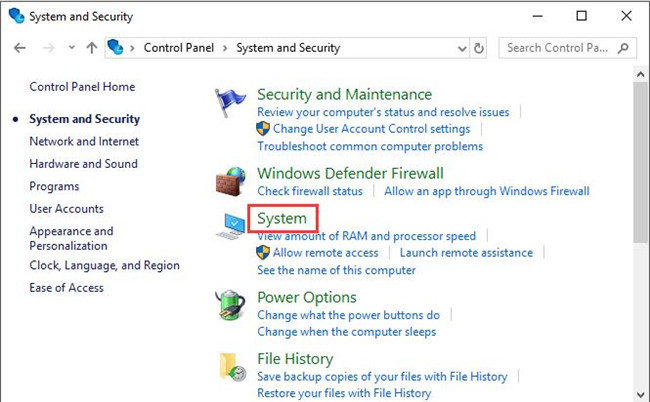
3. Go To System.
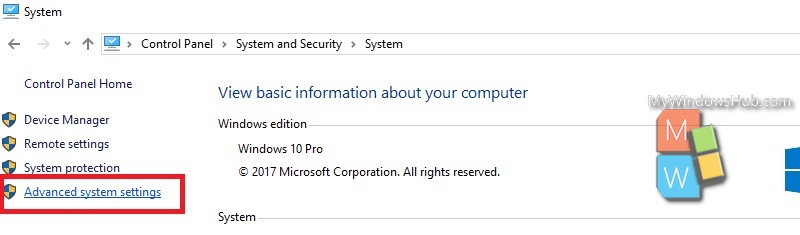
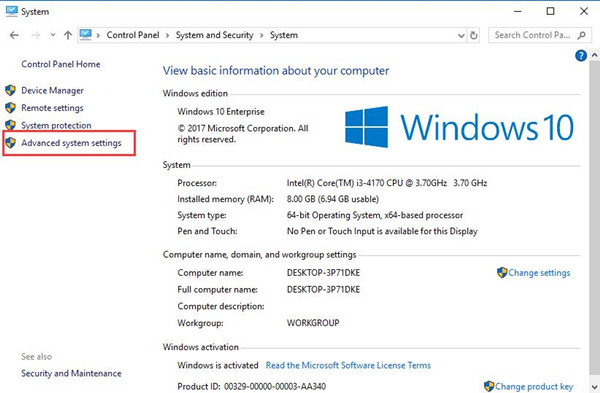
4. Next, tap on Advanced System Settings in the left panel.
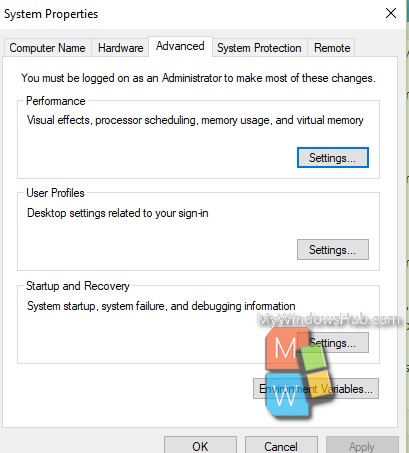
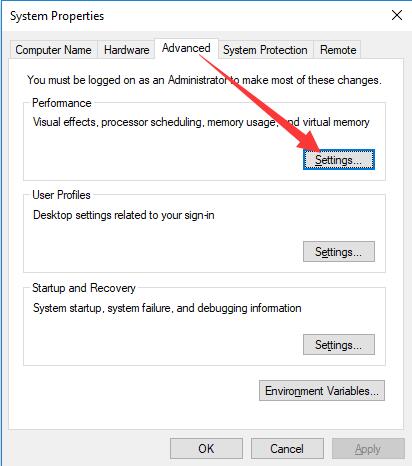
5. As the Advanced System Settings open, go to The Advanced tab. Now click on the Settings option under Performance. Performance options will pop up.
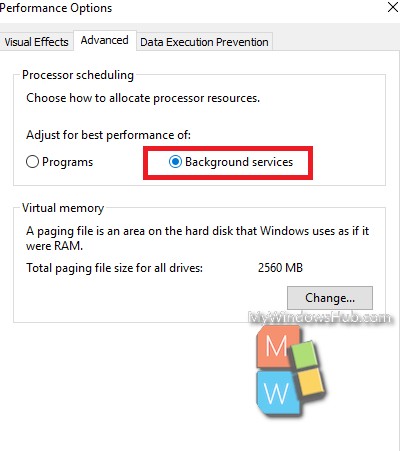
6. Tap on the Advanced tab. Under processor, check the background services radio button. Click on Apply and then OK.
That’s all!
Contents:
What is Processor Scheduling?
How to Set Priority to Prefer Foreground Applications on Windows 10/11?
It is common that when running many programs or applications on Windows 10 or Windows 11, your PC goes to be slow or freezing.
Generally speaking, the programs you use on Windows 10 can either be foreground or background.
In this way, to improve the PC performance, you need to do processor scheduling, which is to say, to change CPU priority to prefer foreground applications.
What is Processor Scheduling?
Why are you advised to Processor (CPU) scheduling foreground and background programs on Windows 10 or Windows 11? For the Processor Scheduling is the service managing the priorities between foreground and background programs.
The more programs you would like to process, the slower the preferred applications are running on your PC. So to let the foreground applications have priority, you are to allocate processor resources for the foreground software in order to optimize the performance of applications for Windows 10.
How to Set Priority to Prefer Foreground Applications on Windows 10/11?
There are two ways to change the CPU priority for Windows 7, 8, 10, namely, changing settings in Control Panel and in the registry editor. You can move on to offer better performance to the foreground applications on Windows 10.
Methods:
1: Change CPU Priority in Control Panel
2: Set CPU Priority to Preferred Applications Automatically
3: Modify Win32ProipritySeparation to Setup CPU Priority
Method 1: Change CPU Priority in Control Panel
It is accessible for you to adjust performance for preferred software or programs in control panel. Though it may set as default, it is necessary to check if you have carelessly changed it.
1. Open Control Panel.
2. In Control Panel, choose to View by Category and then click System and Security.
3. In System and Security, select System.
4. In System, pick out Advanced system settings.
5. In System Properties, under the Advanced tab, click Settings.
6. In Performance Options window, under the Advanced tab, tick the box for Programs to Adjust the best performance of it.
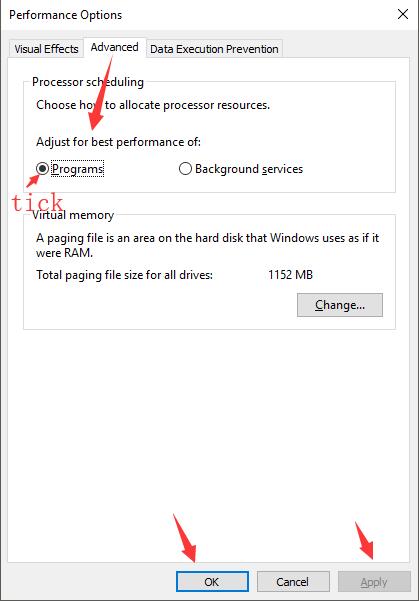
7. Then hit Apply and OK one by one.
As you can see from the screenshot above, you can also decide to adjust the performance of the Background services. It will make Windows 10 allocate processor resources to background services.
Now you will have set processor priority for the foreground applications in Windows 10 in Control panel.
Now that you are free to run some programs, even Avast smoothly. In fact, to adjust CPU priority to prefer foreground applications is to change the DWORD value of Win32PrioritySeparation in the registry editor. So you would better try to alter Win32ProipritySeparation to set CPU priority for some programs.
Method 2: Set CPU Priority to Preferred Applications Automatically
If you are not computer savvy, it is wise and feasible to turn to a professional tool to help prioritize the foreground applications. Advanced SystemCare is an all-in-one system and application optimizer, which will automatically set high, low, and normal priority for programs.
In Advanced SystemCare, you are capable of viewing clearly what application enjoys what degree of priority on Windows 11, 10, 8 and 7. And then bring the background process to the foreground in Windows 10.
1. Download, install and run Advanced SystemCare.
2. Then under Toolbox, find out and click Process Manager.
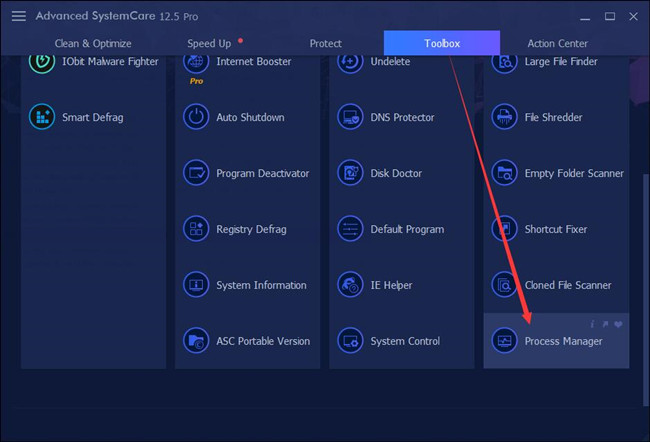
You will observe that Advanced SystemCare is installing Process Manager directly for you.
3. In IObit Process Manager, under Processes, right click the application to Set Priority High for it.

Here you can obviously see how much CPU and what the priority these foreground and background apps have on Windows 10. Just manage to let Advanced SystemCare change the priority automatically.
Method 3: Modify Win32ProipritySeparation to Setup CPU Priority
To change the value for PriorityControl key in registry editor is another way for you to allow the foreground programs to have the priority.
Different DWORD value for this key can greatly affect the performance of both the preferred applications and the background services on Windows 10. For instance, value 26 means the best performance for the foreground programs.
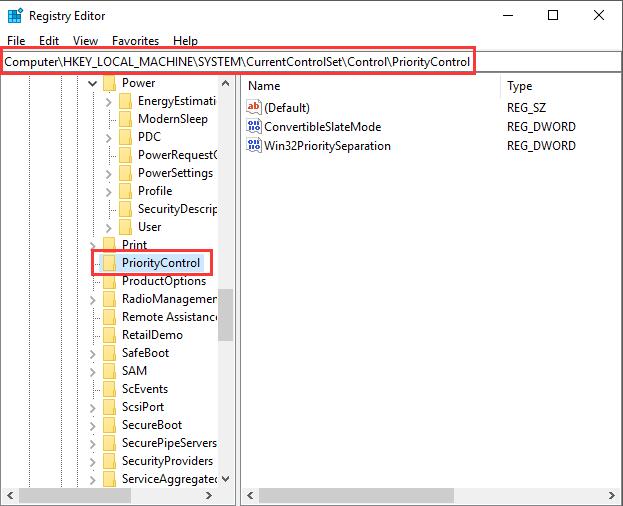
1. Hit the combination key Windows + R to open the Run box.
2. Type in regedit in the box and click OK to go to the Registry Editor.
3. In Registry Editor, follow the path below to find the PriorityControl HKEY_LOCAL_MACHINE\SYSTEM\CurrentControlSet\Control\PriorityControl
4. Under PriorityControl, on the right pane, right click the Windows32PrioritySeparation to Modify.
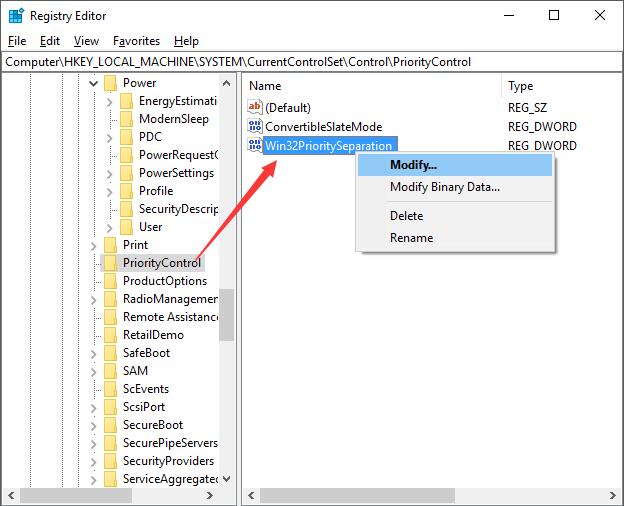
5. In Edit DWORD Value, set the Value data as 26 (38 for Decimal) and then hit OK to save the change.
Here if you make the value date for Win32PrioritySeaparation as 26, it is to set priority for the foreground applications. But if you would like to make a priority for the background software, just set the value as 18(24 for Decimal). For this moment, it is obvious that your preferred foreground applications can enjoy the priority.
In a word, no matter you would like to change CPU priority for the prefer foreground or background services, these two ways are always available for you.
Related Articles:
How to Set a Program to High Priority on Windows 11/10
Fixed: Modern Setup Host High CPU Usage
Fixed: Your Hardware Settings Have Changed
What are hybrid CPUs? Hybrid CPUs are CPUs which have fast, but power hungry cores and slower but less energy consuming cores integrated into a CPU. All consumer grade desktop CPUs from Intel since Alder Lake (CPU number 12xxx or greater which was released in 2022) are hybrid CPUs. If you have recently bought an Intel CPU the chances are nearly 100% that you have bought a hybrid CPU.
In theory, everything should run faster with newer CPUs. But in practice, there are issues, if you want to run software which was not prepared for hybrid CPUs. E.g. if you need to replace old machines with newer ones which run your software on hybrid CPUs which still needs Windows 10.
There are many great reviews online which talk about the performance of hybrid CPUs on Windows. Some have also noticed that there are issues with processes with below normal priority:
Intel gave an example of a content creator, exporting a video, and while that was processing going to edit some images. This puts the video export on the efficiency cores, while the image editor gets the performance cores. In my experience, the limiting factor in that scenario is the video export, not the image editor – what should take a unit of time on the P-cores now suddenly takes 2-3x on the E-cores while I’m doing something else. This extends to anyone who multi-tasks during a heavy workload, such as programmers waiting for the latest compile. Under this philosophy, the user would have to keep the important window in focus at all times. Beyond this, any software that spawns heavy compute threads in the background, without the potential for focus, would also be placed on the E-cores.
Personally, I think this is a crazy way to do things, especially on a desktop. Intel tells me there are three ways to stop this behavior:
- Running dual monitors stops it
- Changing Windows Power Plan from Balanced to High Performance stops it
- There’s an option in the BIOS that, when enabled, means the Scroll Lock can be used to disable/park the E-cores, meaning nothing will be scheduled on them when the Scroll Lock is active.
From https://www.anandtech.com/show/17047/the-intel-12th-gen-core-i912900k-review-hybrid-performance-brings-hybrid
Many CPU hungry number crunchers like compilers, video editing, ray tracing and other software are trying to be nice to the user and lower the priority of their threads or computation child processes to let the user experience a still fluent system, although the CPU is doing hard work on all cores. That approach has worked for a long time pretty well, but it has some unintended side effects which are not well understood when hybrid CPUs enter the game.
Let’s do a simple experiment. We will use Windows 10 and CPU Stress from Sysinternals where we create 7 threads which run inside a Below Normal process. I use 7 because some things might already be running, so I give it some headroom on the 8th E-Core.

When we observe the CPU load in Task Manager we find that all threads of a Below Normal process run on the E-Cores only (the last 8 ones for I7-13700). If we raise the process priority back to normal, the load is scheduled on the P cores and all is fast if the load was e.g. an expensive compile or video editing step.
But we can achieve the same effect by simply selecting the CPU Stress window. That will cause Windows to raise the CPU priority of the foreground process, and suddenly mitigation option 1 mentioned by Dr. Ian Cutress makes sense. If the application has multiple processes which form a UI you might just put the focus on the right one to speed up things again.
Disabling the E-Cores (Mitigation 3) is possible in some but, not in all BIOS versions. What most offer is that you can forcefully park the E-cores, so no work is scheduled to them. In my BIOS this is called Legacy Game Mode which is activated with the Scroll Lock hot key.
That fix does work but you will need to remember always to toggle the hotkey to turn off the E-Cores. Besides the usability issue the main problem is that real multithreaded applications which utilize e.g. all cores will experience large slowdowns because they suffer now from thread oversubscription. The application sees 20 cores (e.g. I5-13600K) but due to core parking 20 threads are squeezed on 12 cores which means that 8 threads will compete to run on the same cores leading to thread contention.
Power Plans
Switching to the High Performance Power Plan (Mitigation option 2) works. What is not explained why this works. Or what are the differences between the Power plans on Windows? On the surface it looks easy. You have 3 default plans
- Power Saver
- Balanced
- High Performance
and you can choose one of them.
By default there are only two settings visible in the UI
- Minimum/Maximum Processor State
and that’s it. But in reality on a current Windows 11 (23H2) machine you have 75 different settings. Are all of them relevant? No. By far most of the settings are from Intel which configure SpeedStep/SpeedShift settings for quicker voltage/frequency changes than the OS is able to do when the CPU load changes.

That are many settings. What are the differences between the three main power plans? I have updated ETWAnalyzer to answer that question.
To dump all files with the file name Win10 printing only the properties which have differences
ETWAnalyzer -dump power -fd win10 -diffThen you get a nice list of the changes. Now we also know why changing the Power profile from Balanced to High Performance will solve the E-Core oversubscription issue:

The High Performance Profile has as Hetero Thread Scheduling Policy PreferPerformantProcessors enabled instead of Automatic which apparently means prefer E-cores. That’s the setting which fixes the Low priority process CPU problem on Windows 10.
Since we can compare power profiles it is now also easy to compare them between Windows 10 and 11 by exporting the data to CSV with ETWAnalyzer. After having a lot of columns I just needed to transpose the table and arrived at this:

Orange marked entries are new on Windows 11 which did not exist on Windows 10. Red fields are values which have changed in Windows 11. There are quite a few changes visible, but only a few of them make a measurable difference with simple load tests.
E.g. the main settings which changes everything between Balanced and Power Saver is the MaxThrottleFrequency % Class 1 or Maximum processor state for Processor Power Efficiency Class 1 which defines how high the P-Cores can boost. The Power Saver profile sets that to 75%. Similar is the MaxEfficiencyFrequency MHz Class 1 or Maximum Processor frequency for Processor Power Efficiency Class 1 setting, which let’s you control the P-core frequency directly. If set, it will override the MaxThrottleFrequency % setting.
Windows 10/11 Scheduling Differences
The main knobs in the power profile are
- Heterogenous policy in effect
- Values 0-4
- Default is 4 on Windows 10
- 0 Windows 11, except for Power Saver profile where it is 4.
- Heterogenous thread scheduling policy
- Values 0-5
- Default is Automatic on Windows 11
- PreferPerformantProcessors or Automatic on Windows 10 depending on used Power Profile
- 0=AllProcessors
- 1=PerformantProcessors
- 2=PreferPerformant
- 3=EfficientProcessors
- 4=PreferEfficient
- 5=Automatic
- Values 0-5
I have created a simple load test which runs on 12 cores for 10s which runs at 3 process priorities (BelowNormal, Normal, AboveNormal). Then I configure in a script all possible combinations for both polices and let them run. Here is the code of my simple LoadStress app:
namespace LoadStress
{
    internal class Program
    {
        static void Main(string[] args)
        {
            var total = Stopwatch.StartNew();
            Action acc = () =>
            {
                var sw = Stopwatch.StartNew();
                while (sw.Elapsed.TotalSeconds < 10)
                {
                }
            };            if( args.Length < 2 )
            {
                Console.WriteLine("LoadStress [Idle, BelowNormal,Normal, AboveNormal, High] nThreads");
                return;
            }            string prio = args[0];
            if( !Enum.TryParse(prio, true, out ProcessPriorityClass prioEnum) )
            {
                Console.WriteLine("Process Priority can be Idle, BelowNormal, Normal, AboveNormal, High");
                return;
            }            Process.GetCurrentProcess().PriorityClass = prioEnum;            int threads = int.Parse(args[1]);            var delegates = Enumerable.Repeat(acc, threads).ToArray();            Parallel.Invoke(delegates);
            total.Stop();
            Console.WriteLine($"Did start {threads} threads in process with priority {prioEnum} in {total.Elapsed.TotalSeconds:F1} s");
        }
    }
}
The key insight I did use was that I want to measure CPU scheduling and not CPU performance. I simply start n threads and do a while < 10s busy loop which is independent of the CPU frequency and type. That way I will always consume the same amount of CPU time regardless on which CPU type I am running I know that one thread will have consumed, if no thread contention did show up, 10 s.
One run will modify the current power profile (I did use Balanced) and ran the LoadStress application.
powercfg /SETACVALUEINDEX SCHEME_CURRENT SUB_PROCESSOR HETEROPOLICY 3
powercfg /SETACVALUEINDEX SCHEME_CURRENT SUB_PROCESSOR SCHEDPOLICY 1
powercfg /SETACTIVE SCHEME_CURRENT
LoadStress.exe BelowNormal 12
The test application consumes 120 s of CPU. Both tested CPUs (I5 13600 and I7 13700) have 8 E-cores and 8 and 6 P-cores with Hyper Threading enabled resulting in a total core count of 20 and 24. What is the most performant thread scheduling for 12 threads? In that case 8 P-cores should be used and 4 E-cores, or just P-cores are preferred then the load goes completely on 12 P-cores. Since E-cores are by a factor 2-3x slower than the P-cores, but if you put concurrent load on Hyper threaded P-cores then you are also not getting much faster than on a single P-core. In the end it depends on the specific load type if you gain anything from mixed P/E-core scheduling or not.
Based on that I would expect a total CPU consumption of 120 s if all is optimal 80 s load on the P-Cores and up to 40 s on the E-cores if the hyper threaded cores are skipped in favor of the E-cores.
If the combined CPU consumption of P/E-cores is below 120 s we have thread starvation issues because OS schedules multiple threads onto the same core leading to thread contention. If you are reading this you are usually aiming at 80-120 s of CPU spent on the P-cores and the remaining 40-0 s spent on the E-cores. Let’s check how Windows 10 and 11 behave when we change the settings and use either the Balanced or the High Performance profile as base profile while we are switching Hetero Policy and Hetero Thread Policy and Process Priority. This is already quite a matrix of 5*6*3*2 = 180 combinations which is difficult to visualize with any chart type. In the end I opted for a simple table with embedded graphs over the actual values which gives most insights.

If you aim to force the workload on Windows 10 of Below Normal processes on the P-cores you should use Hetero 3 which prefers Below Normal processes on the P-cores with the highest value of 110s/120s.
Using the High Performance profile as it was suggested by Dr Ian Cutress solves the problem only partially which use Hetero 4 and Hetero Thread scheduling PerformantProcessors. The many other configuration knobs did not make a measurable difference for our synthetic non spiked load.
Normally we would expect a total CPU of 120 s running on 12 or more cores whic is nicely visualized in WPA by logical CPU number.

But sometimes on Windows 10 strange things happen when we confine Hetero Thread scheduling to Efficiency or Performance cores. In this case not 12 cores were used but only 2 during the 10s runtime with 12 threads:

Why this is happening I am not sure. If you use the default Windows 10 policy Hetero 4 and confine the load via Hetero Thread scheduling on specific core types you can be penalized by Windows 10 scheduler. See Windows 10 – Hetero 4 – PerformantProcessors for AboveNormal and Normal processes where we get in the worst case only one core assigned during application runtime. Why is this an issue?
Because these are the standard settings for the High Performance Power Profile, which is the recommended solution as mitigation for the E-core preference in the Balanced Power profile! My tests prove that the recommended solution might make matters worse on Windows 10.
The used Hetero Profiles 0-4 are not documented by MS, but Intel did publish for 0 and 4 some documentation:
Setting Value: 0 (i.e., Standard Parking or Favored Core
Parking)
In this configuration, the optimum set of compute cores are unparked starting with the most
performant cores first.SettingValue: 4 (i.e., Hetero Parking)
In this configuration, based off utilization, a combination of most performant or most efficient cores
are unparked first.
In certain scenarios like low power envelope SKUs or better battery life goals, it can be more efficient
to run low utilization work on cores with higher efficiency capability at efficient frequency. This policy
is used in these scenarios in combination with optimal performance state engine settings.https://www.intel.com/content/dam/develop/external/us/en/documents-tps/348851-optimizing-x86-hybrid-cpus.pdf
Based on my measurements we can summarize the scheduling behavior of the 5 Hetero Profiles on Windows 10 with
- Hetero 0 Distribute load accross all cores with a preference on P-cores (Default on Windows 11).
- Hetero 1 Same as 0.
- Hetero 2 Confine work entirely to E-cores
- Hetero 3 Distribute load on P-cores stronger than Hetero 0, but allow E-core usage.
- Hetero 4 Prefer E-cores for low priority tasks and constrain load on some core types when PerformantProcessors or EfficientProcessors are used as Hetero Thread scheduling option (Default on Windows 10).
So what is best? Hetero Thread Scheduling Automatic will load our Below Priority process to the E-cores which is the default in Balanced Power Profile. The numbers look stable, just the wrong cores are used:

Now go back to the High Performance Profile defaults

We get P-cores but erratic scheduling where due to unkown reasons not all needed 12 P-cores are utilized. This issue happens sporadically and not all the time. If you have short running tests all will look fine but if you let the 10s LoadTester run 20 times you find erratic scheduling. Based on measurments I would say this is a bug in the Kernel Scheduler which is affecting CPU heavy workloads which use many cores. If the load is constant then it will settle after some time but the ramp up phase until the kernel gives all needed cores is many seconds as the tests have shown. This issue should hurt short lived processes which employ many threads on Windows 10 on hybrid CPUs with the High Performance Power profile.
Solution
Currently the best way out seems to use
- Hetero Policy 3
- Hetero Thread Policy AllProcessors
This will schedule first all P-cores and then will overflow the rest to the E-cores which should give you a better mix than the default random shuffling which sometimes happens with the default profiles. Background processes are not unimportant to the user just because they have lowe priority. Perhaps they are running the video AI enhancement or compile step in the background just because they do not want to freeze your machine and lower the process priority.
Windows 11
So far I have talked mostly about Windows 10. What about Windows 11? The results are much less dramatic thanks to the Intel Thread Director. From the numbers it looks like there is not much difference between the Hetero settings at all. The only impactful setting which is strictly adhered to is the Hetero Thread Policy EfficientProcessors which will confine the load entirely on the E-cores. A deeper inspection will need to wait for another day. Since this beast is quite smart, it detects specific cpu instructions like pause/mwait and other things which consume cycles but do not need to be fast which can safely be put to E-cores, a lot of different workloads would need to be tested which is outside the scope for a simple blog post.
Conclusions
I do not want to believe. I want to measure things and verify if the claims are true. Profiling with ETW is extremely helpful to find later what did cause unexpected anomalies during measurements. In total I did generate 600 ETW files with a size of 90 GB. After extraction with ETWAnalyzer 800 MB of Json files were left, which are much quicker to query than to open and look at 600 files with WPA. To find e.g. all .etl files which have scheduling issues with specific settings I just need to query all LoadStress processes and filter for processes which have CPU > 115 s. All files with smaller CPU will show up as 0 CPU which are the interesting ones. Good naming of the files is essential to make such an approach work. But once you have the data it is easy:
EtwAnalyzer -dump CPU -pn LoadStress -ShowTotal Total -fd *_Normal* -MinMaxCPUMs 115s 
That simple query immediately shows that the Windows 11 thread scheduling is rather unspectacular in terms of thread contention. The only case where thread contention happens is when the load is confined to efficient processors. That would be the case for our load because we use 12 threads, but we have only 8 E-cores.
Power profile settings are a deeply underexplored topic where are many myths are circulating in the (gaming) forums. I hope that the provided tooling will serve as a foundation for future quantitative measurements performed by other people. Many people seem to like to change some switches and believe they have solved a performance problem. Without measuring you will never be able to tell. Your gut feeling is not exact enough to serve as foundation to solve performance issues. Only by measuring and visualizing the previously unknown, you will find new patterns and correlations which will help to understand your system better. Your mental performance model is always too simple compared to what is really happening inside your computer.
That’s all for today. Now start measuring at your own!