
I have installed UltraISO, 32-bit,
under Win11 24H2, 64-bit.
When I include an ISO and start an executable file (e.g. *.exe) with a double click,
an error message appears: “…exe could not be found…”
UltraISO or PowerISO is not started in this case.
Instead, I click with the right mouse button on the virtual drive
that was created during the installation of UltraISO (e.g. E:\),
then on further options, UltraISO, Load, and then load the ISO,
and then double-click on e.g. “setup.exe” (run as administrator).
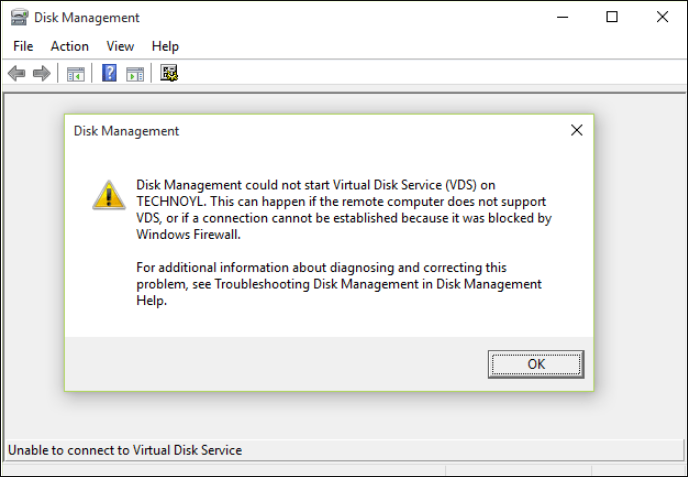
The error message shown in the picture will then appear.
However, all files themselves can be changed, copied from the virtual drive,
or accessed, e.g. documents, etc., from the virtual drive.
The same also applies to PowerISO.
If I integrate the ISO via “Deploy” with Win11, it works,
i.e. you can start executable files without any problems.
If I use UltraISo or PowerISO in Win11 23… in this respect, everything still works,
But no longer with Win11 24H2, although it doesn’t matter,
whether inplace, new installation, Insider Dev version, etc.
Are there any changes in this regard in Win11 24H2 !?
Or is it a bug !?
Do you frequently receive prompts showing «unable to connect to virtual disk service» on Windows 10 or 11? Also, When attempting to access Disk Management in Windows 7, it may become stuck in «connecting to the virtual disk service» or «loading disk configuration information.»
Here, we outline the steps you can take to solve this issue, as it is a Windows service that controls and makes information available on the virtual disk.
Why Unable to Connect to Virtual Disk Service
You are wondering why your Disk Management cannot connect to the virtual disk service. Here are some of the reasons why.
- The remote computer does not support VDS.
A computer won’t connect to a virtual disk service if it doesn’t support it. So always check to know if the laptop supports it before connecting.
- The connection is blocked by Windows Firewall.
The Windows Firewall monitors network traffic into and out of the computer and determines which network traffic to block or allow based on the security rules. So, the Windows Firewall may be responsible for the coming errors.
- Other reasons, such as faulty devices.
You could check on external storage devices like an external hard drive, a card reader, or a USB drive, as they could be faulty and responsible for the errors. These devices could also be incompatible with Disk Management.
To get this virtual disk service error fixed, look at the next part of this article. The fixes would help with the error on either a Windows PC or a Windows Server.
How Do I Fix the «Unable to Connect to Virtual Disk Service» Error
Outlined here are the possible ways you can get the «unable to connect to virtual disk service» prompt fixed. We present to you six ways to fix the error. They are as follows:
Fix 1. Use Alternative Software for Disk Management
Fix 2. Disable Windows Defender
Fix 3. Enable Virtual Disk Service
Fix 4. Use SFC or DISM to Fix the Error
Fix 5. Unblock Windows Firewall
Fix 6. Check All External Storage Devices
Now, let’s learn the fixes in detail and start with the first one.
Fix 1. Use Alternative Software for Disk Management
What if I told you that you could use an alternative software for Disk Management that would serve the same purpose without any issues? Interesting right? EaseUS Partition Master Free serves this purpose well, and yes, it can completely replace disk management in all aspects.
It is more efficient and safer than disk management and has other exciting features. Here are some reasons why it is an ideal alternative.
- Create/Delete partition: You can delete/create partitions on USB drive, SD cards, and other drives.
- Resize/Move partition: This tool can resize encrypted partition or move unallocated space to C drive
- Extend system partition: You can make the most of available or unallocated space. To speed up the PC, use the «Extend» feature.
- Merge partitions: With its help, it is easy to merge partitions on SSD or a USB.
- Format/Wipe Partition: You can format a disk or delete a partition using the free EaseUS Partition Manager.
You can’t wait to try it out with the features listed. You can click the button below to download.
Fix 2. Disable Windows Defender
Sometimes disabling the built-in Windows Defender antivirus can prevent the error from occurring.
To disable them, follow these steps.
Step 1: Press the «Windows + R» keys and type in «gpedit.msc» in order to open Local Group Policy Editor.
Step 2: Navigate to Computer Configuration > Administrative Templates > Windows Components > Windows Defender Antivirus.
Step 3: Highlight Windows Defender Antivirus and double click Turn off Windows Defender Antivirus.
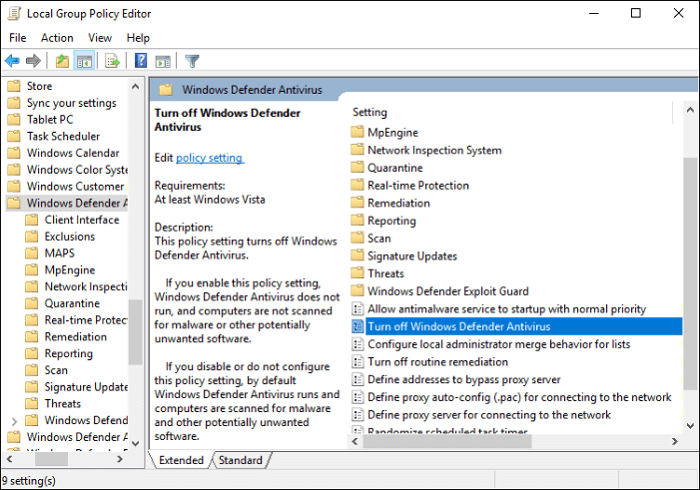
Step 4: Mark «Enabled,» then «Apply,» and «OK» to save the changes.
Step 5: Reboot the computer to effect the changes.
Fix 3. Enable Virtual Disk Service
The virtual disk services might not be enabled; to enable them, follow this guide.
Step 1: Press the «Windows + R» keys simultaneously to call out the Run box.
Step 2: Type «services.msc» in the Run box, and after, press Enter to open Windows Services Manager.
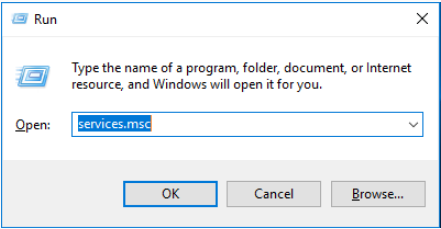
Step 3: Scroll down to find the Virtual Disk Service. Double-click this service to open it.
Step 4: Choose Automatic/Manual for the startup type. Then, click «OK» to save the changes.
Fix 4. Use SFC or DISM to Fix the Error
Step 1: Open the Command Prompt window. Enter «command prompt» in Search. Right-click the Command Prompt icon and Run as administrator.
Step 2: Type «sfc /scannow» and press the Enter key. Then, wait until the procedure ends.
You can start Disk Management to see if it can be loaded as usual. If the SFC command fails to fix this problem, you can try the DISM command.
The steps for running the DISM command are given below.
- Similarly, launch Command Prompt as an administrator.
- Type this:
exe /Online /Cleanup-image /Scanhealth
exe /Online /Cleanup-image /Restorehealth
- Close the Command Prompt window after the procedure ends and test whether the error is solved.
Fix 5. Unblock Windows Firewall
Based on its security rules, the Windows Firewall often acts as an obstacle. Follow the steps below to unblock the Windows Firewall.
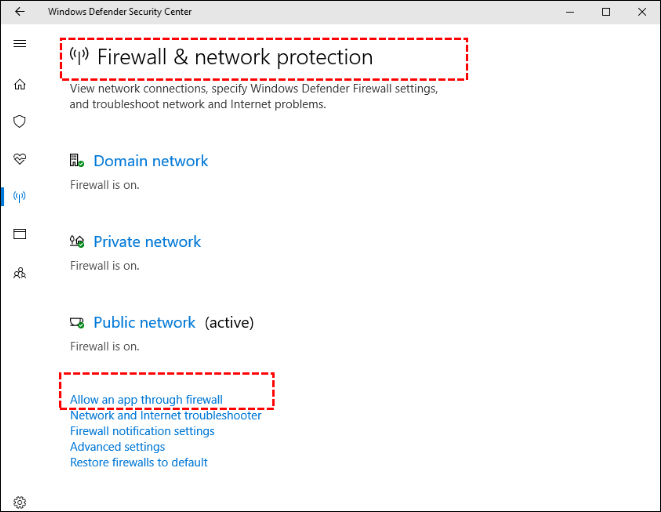
Step 1: Select the Start button > Settings > Update & Security > Windows Security and then Firewall & network protection
Step 2: Select «Windows Defender» and click «Open Windows Defender Security Center.»
Step 3: Click «Firewall & network protection» and «Allow an app through firewall.»
Step 4: In the new window, click «Change settings.»
Step 5: Find «Remote Volume Management» and tick both squares, then click the «OK» button to save changes.
Fix 6. Check All External Storage Devices
Troubleshooting external storage devices can sometimes fix this. removing all external devices one by one to determine if any are defective. The external storage devices can be a card reader, a USB drive, or a hard drive. Also, the universal serial bus drivers should be updated.
Conclusion
With the virtual disk service, it is possible to execute management functions for disks, file systems, volumes, and storage arrays, and mistakes would be prevalent.
The causes of this have been covered in this article; now, we need to determine whether the remote computer is capable of using it, whether any external storage devices are broken, or whether the Windows firewall has blocked the connection. There are six ways to resolve the issues, regardless of whether a Windows PC or Windows Server is involved.
There are some other disk partition issues you may run into when you use Disk Management. Click the links to help:
FAQs Related to Unable to Connect to Virtual Disk Service
Some of the frequently asked questions with answers related to being unable to connect to virtual disk service are provided here.
1. What is the Virtual Disk Service?
This Microsoft Windows service performs queries, configuration tasks, and volume and disk management functions as end users, scripts, and programs are requested.
2. How do I enable virtual disk services?
Information on how to enable virtual disk services has been given in this article.
3. Can I restart the virtual disk service?
Yes, you can. Below are a few steps to do this.
Step 1. Press the Windows key + R on the Keyboard.
Step 2. Type services.MSC and hit Enter.
Step 3. In the Services Window, look for Virtual Disk service and stop it.
Step 4. Restart the computer, Start the Virtual Disk Service, and set it to Automatic.
VMDK (Virtual Machine Disk) is a file format that represents a virtual hard disk drive used in virtual machines such as VMware Workstation and VirtualBox. VMDK is an open format developed by VMware, generally used for services for virtualization and cloud computing.
There are times when a virtual machine cannot be started due to corrupted OS, malware attacks, accidental registry or file deletion, or other issues. At such times, you may be unable to boot into the VM to retrieve the data and files. However, you may still be able to access the data stored on a virtual disk used by the VM by accessing the contents of the VMDK virtual disk file.
There are several methods to open and access a VMDK file and view the contents in it. In this guide, we will show you how to open a .vmdk extension file in Windows 11 using VMware Workstation or 7-Zip file archiver.
How to mount a VMDK file in Windows 11 using VMware Workstation
The most viable method to access the content in a VMDK file is by mounting the .vmdk extension virtual disk file using VMware Workstation. This is assuming you already have VMware Workstation installed. If you don’t, you can download and install the VMware Workstation Player to enable the option to map a VMDK virtual disk file in Windows 11. To mount and open a VMDK file using VMware Workstation, follow the steps below.
1. Right-click the .vmdk extension file you want to open, select Show more options > Map Virtual Disk. This option will only be available if you have installed VMware Workstation in Windows.
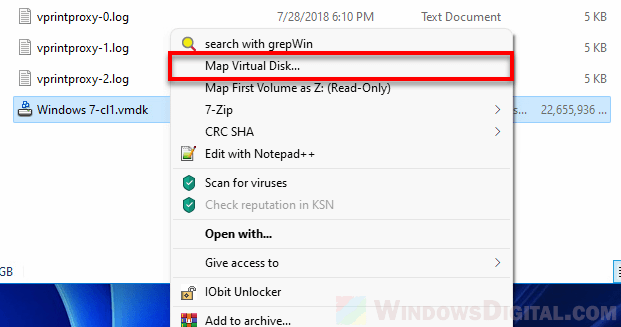
On a side note, the “Map First Volume as Z: (Read-Only)” option will mount and open only the first volume of the VMDK file. Since we are likely not sure what is the first volume (in most cases, it would be a system reserved disk), the option will not be always helpful. It’s just better to select the Mount Virtual Disk option to open all partitions.
2. Select the partition you would like to mount in the Volume section. Next, select if you want to open the VMDK file in Read-only mode. Finally, select a drive letter you want to map this partition to and click OK to proceed.
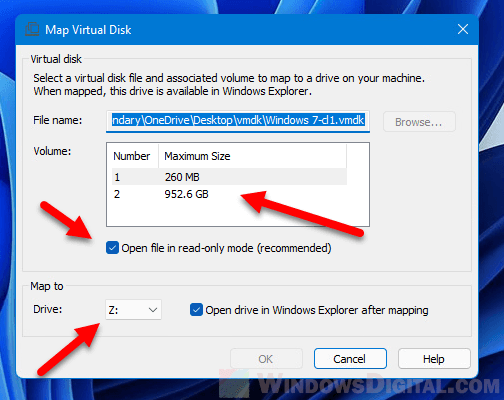
It is recommended that you enable the read-only mode to prevent any accidental and unwanted modification of files in the virtual disk. If you know what you are doing, you can remove the option and make the virtual disk writable while opening it on your host computer.
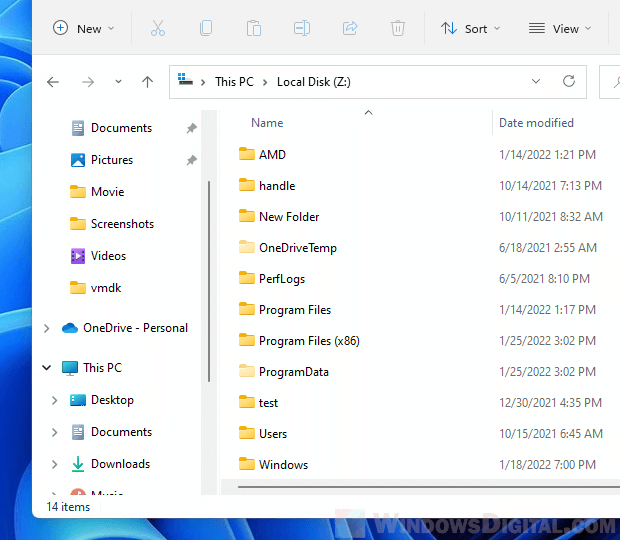
3. Once the VMDK file is successfully mapped, you can access the virtual disk by going to This PC > Local Disk (Z:) or whatever drive you map the virtual disk to via File Explorer. You can now copy any data and files you want from the virtual hard disk drive (VMDK).
How to open a VMDK file in Windows 11 using 7-Zip
Other than using VMware Workstation to mount the VMDK file, you can explore the contents in a VMDK file by opening it with a file archiver software such as 7-Zip and WinZip. We will use 7-Zip in this case since it is free to use and open-source. The steps to open a VMDK file using 7-Zip is pretty straight-forward. Follow the steps below to do so.
1. Download and install 7-Zip if you don’t already have the software.
2. Once installed, right-click the .vmdk extension file and select Show more options > 7-Zip > Open archive.
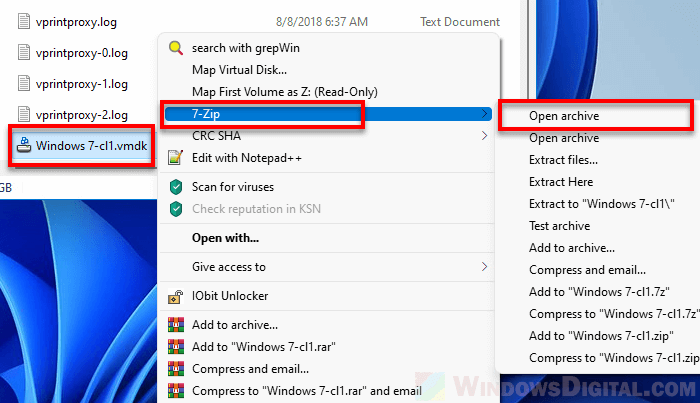
3. The VMDK file will then be open in 7-Zip archive window where you can explore like how you would in File Explorer.
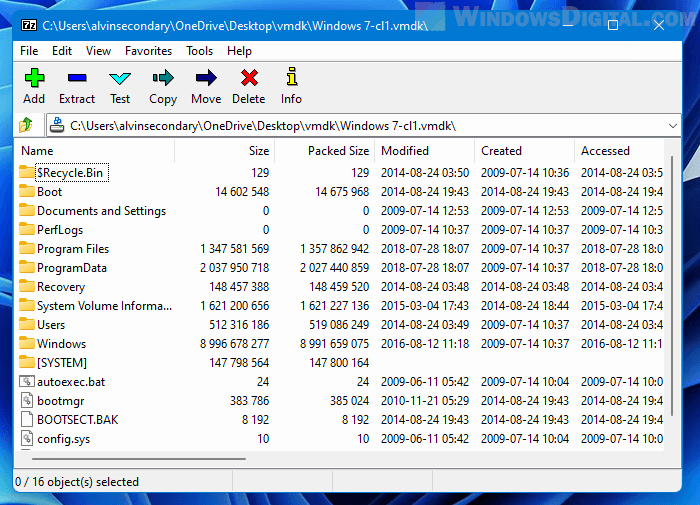
4. To copy files or folders from the VMDK virtual disk, simply select the files or folders in the 7-Zip archive window and select Extract to extract them to your local disk. Alternatively, you can extract files or folders by dragging and dropping them from the archive window to anywhere you want.
VMDK file open in 7-Zip will always be read-only mode. This means that you cannot alter or delete the files or folders in the VMDK virtual disk open via 7-Zip archive window. When you do so, you will receive error messages such as “Can not update file” or “Error deleting file or folder, operation is not supported”, because the files are in read-only mode.
,
This guide contains instructions to resolve the following error in Hyper-V Manager when trying to import a virtual machine: «Hyper-V did not find virtual machines to import from location…Virtual machine could not be found. You might not have permissions to access it».

The error «Hyper_V did not find virtual machines to import from…», usually appears for one of the following reasons:
1. Missing or corrupted files: The virtual machine configuration files are missing or could not be read (e.g. when they are corrupted).
2. Lack of permissions: You do not have enough rights to import the virtual machine or you don’t have permission on the folder where the virtual machine files are stored.
3. Unsupported Hyper-V configuration version: The virtual machine you are trying to import has been exported from a Hyper-V host running a newer version or Hyper-V. This typically means that you cannot import a virtual machine from a Windows 11 Hyper-V host to a Windows 10 host, or from a Server 2019 host to a Server 2016 host.
To troubleshoot the error «Hyper-V No virtual Machine files found», follow the steps below.
How to FIX: Hyper-V No virtual Machine files found from location.
Step 1. Export Virtual Machine again.
To import a virtual machine to another Hyper-V host, you must have exported the following virtual machine’s files from the old host:
- Virtual Hard Disk:
(C:\ProgramData\Microsoft\Windows\Virtual Hard Disks) - Configuration files:
(C:\ProgramData\Microsoft\Windows\Hyper-V\Virtual Machines) - Checkpoints: (C:\ProgramData\Microsoft\Windows\Hyper-V\Snapshots)
So make sure you have moved in the new Hyper-V host the following folders:
- Virtual Hard Disks
- Virtual Machines
- Snapshots
If you have done this, try re-exporting the virtual machine from the old Hyper-V host and then doing the import again to make sure the files are intact.
Step 2. Verify Permissions.
Make sure you have administrative rights on the new Hyper-V host to import the virtual machine and you have enough permissions on the exported folder.
Step 3. Create a New VM and attach the Virtual Disk file (.VHD)
As mentioned above, you can import a virtual machine to a Hyper-V host running a newer version of Hyper-V, but you cannot import a virtual machine created on a newer version of Hyper-V to an older version of Hyper-V.
For example, if you have exported the virtual machine from a Windows 11 Hyper-V host and try to import it into Windows 10, you will get the error «Hyper_V could not find any virtual machines to import». You will also get the same error when trying to import into Server 2016 a virtual machine exported from Server 2016 or Server 2022.
To work around this problem, create a new virtual machine and attach to it the disk file of the virtual machine you want to import. To do that:
1. Copy all the contents of the «Virtual Hard Disks» folder of the virtual machine you want to import, to the following location/folder on the new host:
- C:\ProgramData\Microsoft\Windows\Virtual Hard Disks\
2. Then, open Hyper-V Manager and click New > Virtual Machine to create a new VM.

3. Click Next on the first screen, then type a name for the new virtual machine and click Next again.

4. On the next screen choose the machine’s generation e.g. «Generation 1» in this example and click Next again.

5. Then specify the amount of memory to allocate to this virtual machine and click Next.

6. Now select Default Switch for networking and click Next.

7a. In ‘Connect Virtual Hard Disk’ screen, select Use an existing virtual disk and then click Browse.

7b. Now choose the VM’s virtual disk file (.VHD or .VHDX) and click Open.

7c. Then click Next to continue.

8. Finally click Finish.

9. Finally, start the virtual machine and you’re done!
That’s it! Let me know if this guide has helped you by leaving your comment about your experience. Please like and share this guide to help others.
If this article was useful for you, please consider supporting us by making a donation. Even $1 can a make a huge difference for us in our effort to continue to help others while keeping this site free:
- Author
- Recent Posts
Konstantinos is the founder and administrator of Wintips.org. Since 1995 he works and provides IT support as a computer and network expert to individuals and large companies. He is specialized in solving problems related to Windows or other Microsoft products (Windows Server, Office, Microsoft 365, etc.).
При чистой установке Windows 11 с флешки на компьютере или ноутбуке после выбора раздела установки и нажатия кнопки «Далее» вы можете столкнуться с сообщением об ошибке «Нам не удалось создать новый или найти существующий раздел».
В этой инструкции подробно о том, чем вызвана ошибка при установке системы и способах её исправить. Подробно о процессе установки и решении других проблем в статье: Как установить Windows 11 с флешки.
Причина ошибки
Для работы Windows 11, помимо раздела, представляющего системный диск C с файлами Windows, необходимы дополнительные системные разделы: в частности, ОС пробует найти имеющийся от предыдущей установки или, при его отсутствии, создать раздел FAT32 с EFI-загрузчиком, а также создает небольшой размер раздел MSR при наличии места.
Если на диска отсутствуют эти разделы и нет свободного пространства, под которым подразумевается не свободное место на диске, а место не занятое какими-либо разделами, вы получите сообщение «Нам не удалось создать новый или найти существующий раздел».
Как можно увидеть на скриншоте ниже — есть два физических диска (Диск 0 и Диск 1), на каждом из них есть по одному разделу (но ни один из них не является системным), а незанятого пространства (которое, при наличии, отображалось бы как «Незанятое пространство на Диске») нет. В результате ни найти, ни создать нужные разделы не представляется возможным.

Внимание: описанное выше — самая распространенная, но не единственная возможная причина, иногда та же ошибка возникает в случае, если программа установки не может выполнить запись на диск из-за его неисправности или его перехода в режим защиты от записи.
Способы исправить ошибку «Нам не удалось создать новый или найти существующий раздел»
В зависимости от ситуации, количества и порядка подключенных жестких дисков и SSD, наличия важных данных на них, можно использовать несколько различных подходов для решения проблемы.
Удаление всех или отдельных разделов диска и продолжение установки
Если физический диск (в программе установки отображается как один или более разделов, находящихся на диске с одним номером), на который вы хотите установить Windows 11 не содержит никаких важных для вас данных ни на одном из разделов, достаточно выполнить следующие действия:
- С помощью ссылки «Удалить» выполнить удаление всех разделов на физическом диске, на который планируется выполнять установку: например, всех разделов на «Диск 0» или «Диск 1».
- Выбрать единственное незанятое пространство на физическом диске, разделы с которого были удалены, нажать кнопку «Далее».

- Программа установки сообщит о том, что для корректной работы будут созданы дополнительные разделы для системных файлов — согласитесь с этим.
- Установка должна будет продолжаться как обычно.
- При необходимости создания своих разделов для данных вы можете сделать это уже в установленной системе — Как разбить диск на разделы в Windows 11.


Два дополнительных нюанса:
- В ситуации, когда вы устанавливаете систему не на «Диск 0», а на один из следующих дисков при этом его очистка вам не подходит, при желании можно очистить от разделов физические диск, предшествующий ему и программа установки сможет создать нужные разделы на нём. Но в этом случае система у вас окажется на одном диске, а загрузчик — на другом и в случае отключения диска с загрузчиком Windows перестанет загружаться (но при желании можно будет восстановить загрузчик).
- Если этот подход не помог, при этом все действия были выполнены верно, возможно, есть какие-то проблемы с записью данных на диск в программе установки.
Выделение места для системного раздела на диске при наличии важных данных
Второй вариант — на разделах физического диска, который планируется использовать для установки Windows 11 есть важные данные. В этом случае мы можем выделить место под системные разделы на нем, шаги будут следующими:
- Прямо в программе установки нажмите клавиши Shift+F10 (на некоторых ноутбуках — Shift+Fn+F10).
- Откроется командная строка, для изменения языка ввода используйте комбинацию клавиш Alt+Shift и введите по порядку команды:
diskpart
list volume

- В результате отобразится список разделов с номерами. Нас интересует номер раздела на диске, который будет использоваться для установки Windows и на котором есть свободное место: 100 Мб будет достаточно. Учитывайте, что буквы дисков в этот момент могут быть не теми, которые были в Windows. Используем следующие команды, заменив N на номер раздела.
select volume N
shrink desired=100 minimum=100
exit
- Закройте командную строку и нажмите «Обновить» в окне выбора разделов. Вы увидите, что появилось незанятое пространство на диске, которое программа установки сможет использовать для своих целей. Выберите раздел, на который нужно установить Windows и нажмите кнопку «Далее».
- При отсутствии проблем с диском и точно выполненных инструкциях установка продолжится в обычном режиме.


Работа с разделами и запуск установки с LiveCD
Если выполнить нужные действия в программе установки не удается, при этом вы уверены в исправности диска, можно использовать LiveCD (в этом примере — WinPE10 от Sergei Strelec, сайт: sergeistrelec.name) для подготовки разделов и запуска установки системы.
- Скачайте образ диска WinPE, запишите его на флешку с помощью Rufus или Ventoy.
- На тот же накопитель скопируйте образ Windows 11 или его содержимое в отдельную папку.
- Загрузитесь с флешки в WinPE Sergei Strelec.
- В меню «Пуск» используйте «Программы WinPE» — «Жесткий диск», чтобы найти утилиты для работы с разделами дисков. Я буду использовать Acronis Disk Director.
- Нажмите правой кнопкой мыши по разделу диска, на котором мы будем выделять место под системные разделы, лучше если это будет первый раздел диска, на который планируется установка Windows. Выберите пункт «Изменить размер тома».

- В следующем окне вы сможете либо вручную отрегулировать размер выделяемого место мышью вверху в графическом представлении, либо указать размер незанятого пространства, рекомендую 100 Мб перед томом. Нажмите «Ок».

- Нажмите «Применить ожидающие операции» вверху главного окна программы чтобы записать новую структуру разделов.
- Закройте Acronis Disk Director и запустите «Установка Windows» на рабочем столе.
- Выберите образ ISO или файл install.esd/install.wim в папке Sources файлов установки Windows (при наличии на флешке должны найтись автоматически, иначе выберите их вручную) и нажмите «Установить».

- При появлении запроса о варианте установщика, выберите нужный на свое усмотрение, если система соответствует требованиям Windows 11 — можно выбрать установщик из дистрибутива (Distributive).

- Продолжите установку Windows в обычном режиме.


Надеюсь, один из предложенных вариантов помог решить проблему и избавиться от ошибки. Если остаются вопросы — задавайте их в комментариях ниже, постараюсь помочь.