Если вы купили новый жесткий диск или твердотельный SSD накопитель для своего компьютера, очень вероятно, что большого желания заниматься переустановкой Windows, драйверов и всех программ у вас нет. В этом случае вы можете клонировать или, иначе, перенести Windows на другой диск, причем не только саму операционную систему, но и все установленные компоненты, программы и прочее. Отдельная инструкция для 10-ки, установленной на GPT диск в UEFI системе: Как перенести Windows 10 на SSD.
Существует несколько платных и бесплатных программ для клонирования жестких дисков и SSD, некоторые из которых работают с дисками только определенных марок (Samsung, Seagate, Western Digital), некоторые другие — с почти любыми дисками и файловыми системами. В этом коротком обзоре я опишу несколько бесплатных программ, перенос Windows с помощью которых будет наиболее простым и подойдет почти для любого пользователя. См. также: Настройка SSD для Windows 10.
Acronis True Image
Acronis True Image является официальной утилитой для SSD и жестких дисков следующих производителей: WD, Kingston, SanDisk, Crucial, A-Data. Это означает, что приобретя диск этой марки вы имеете право использовать специальную бесплатную версию Acronis True Image для переноса Windows 10, 8.1 или Windows 7 на SSD. После несложной установки и запуска программы, в главном окне выберите пункт «Клонирование диска. Копирование разделов одного диска на другой.» Действие доступно как для жестких дисков, так и в том случае, если вам требуется перенести ОС на SSD.
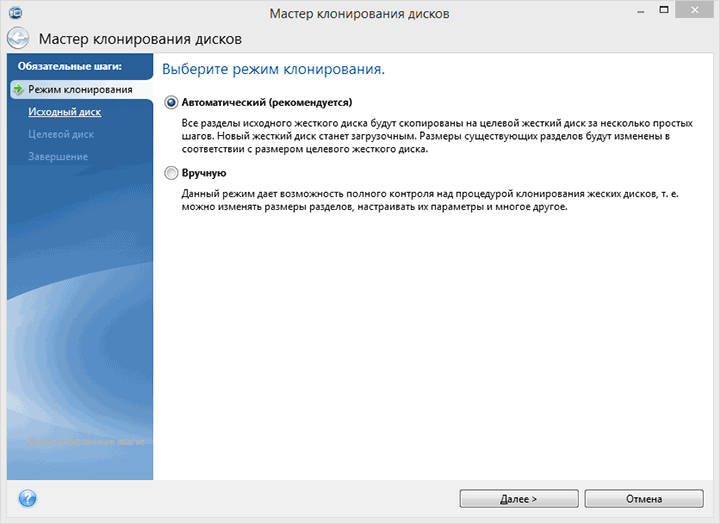
В следующем окне вам потребуется выбрать режим клонирования — автоматический или ручной, для большинства задач подходит автоматический. При его выборе, все разделы и данные с исходного диска копируются на целевой (если на целевом диске что-то было, то оно будет удалено), после чего целевой диск делается загрузочным, то есть с него будет запускаться Windows или другие ОС, как и раньше. После выбора исходного и целевого диска начнется перенос данных с одного диска на другой, который может занять достаточно продолжительное время (все зависит от скорости диска и объема данных).
Пошаговая подробная инструкция по использованию программы и где скачать фирменные бесплатные версии для разных производителей SSD — Как перенести Windows 10, 8.1 или Windows 7 на SSD в Acronis Ture Image.
Seagate DiscWizard
По факту, Seagate DiscWizard — это полная копия предыдущей программы, только для работы ей требуется наличие хотя бы одного жесткого диска Seagate на компьютере.
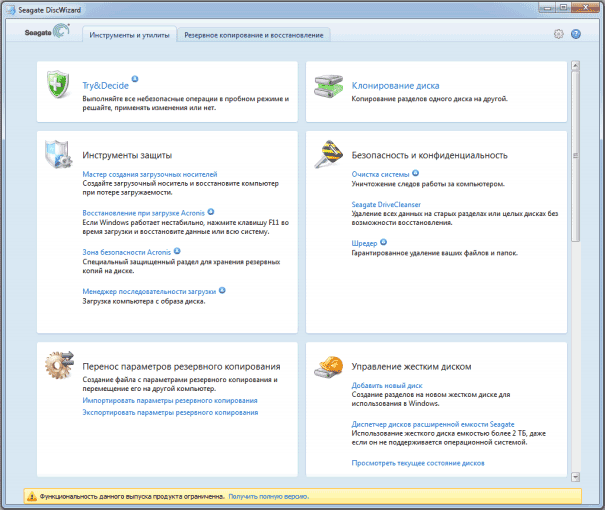
Все действия, позволяющие перенести Windows на другой диск и полностью клонировать его аналогичны Acronis True Image WD Edition (по сути, это та же программа), интерфейс тот же самый.
Скачать программу Seagate DiscWizard вы можете с официального сайта (в настоящее время, похоже, заблокирован в РФ) https://www.seagate.com/support/downloads/discwizard/
Samsung Data Migration
Программа Samsung Data Migration предназначена специально для переноса Windows и данных на SSD марки Samsung с любого другого диска. Так что, если вы обладатель такого твердотельного накопителя — это то, что вам нужно.
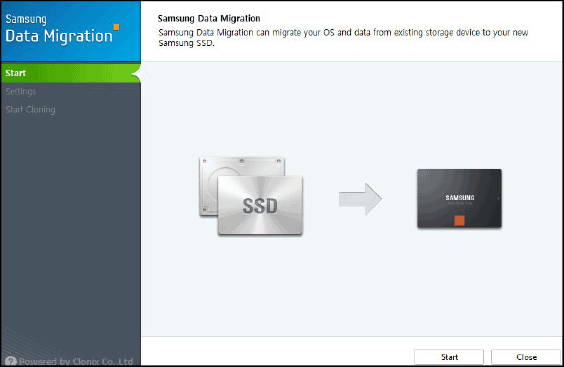
Процесс переноса выполнен в виде мастера из нескольких шагов. При этом, в последних версиях программы возможно не только полное клонирование диска с операционными системами и файлами, но и выборочных перенос данных, что может быть актуально, учитывая, что размеры SSD все-таки меньше, чем современных жестких дисков.
Программа Samsung Data Migration на русском языке доступна на официальном сайте https://www.samsung.com/semiconductor/minisite/ssd/download/tools/
Важно: такие же утилиты переноса Windows на другой диск есть и у других производителей SSD и HDD. Обычно, из можно найти, задав запрос, состоящий из марки и фразы «Data Migration», так вы найдете, например, Intel Data Migration Tool и аналогичные программы для других марок дисков.
Как перенести Windows с HDD на SSD (или другой HDD) в Aomei Partition Assistant Standard Edition
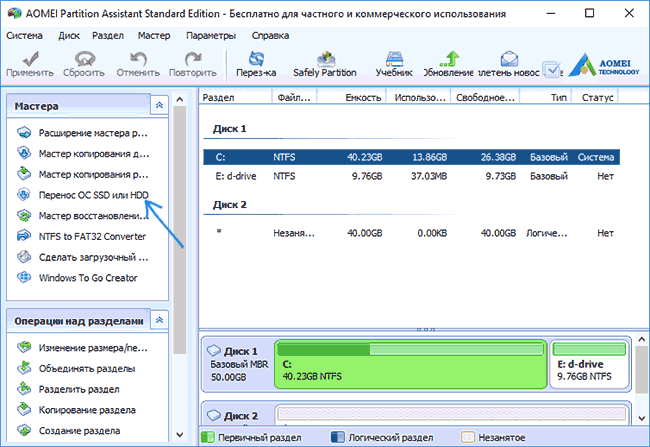
Еще одна бесплатная программа, к тому же на русском языке, позволяющая удобно выполнить перенос операционной системы с жесткого диска на твердотельный накопитель или на новый HDD — Aomei Partition Assistant Standard Edition.
Примечание: данный способ работает только для Windows 10, 8 и 7, установленных на MBR диск на компьютерах с БИОС (или UEFI и Legacy загрузкой), при попытке переноса ОС с GPT диска, программа сообщает о том, что сделать этого не может (возможно, тут сработает простое копирование дисков в Aomei, но поэкспериментировать не удалось — сбои при перезагрузке для выполнения операции, несмотря на отключенный Secure Boot и проверку цифровой подписи драйверов).
Шаги для копирования системы на другой диск просты и, думаю, будут понятны даже начинающему пользователю:
- В меню Partition Assistant, слева, выберите «Перенос ОС SSD или HDD». В следующем окне нажмите «Далее».
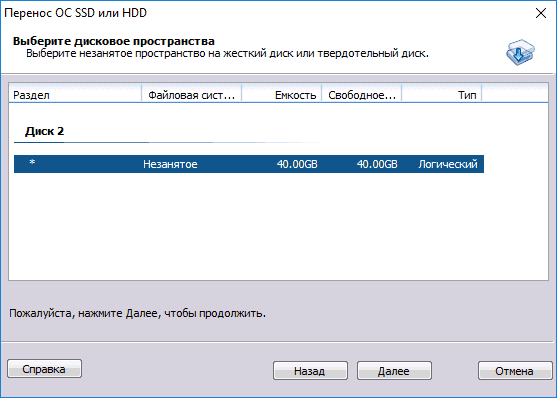
- Выберите тот диск, на который будет осуществляться перенос системы.
- Вам будет предложено изменить размер раздела, на который будет перенесена Windows или другая ОС. Тут можно не выполнять изменений, а настроить (при желании) структуру разделов уже после завершения переноса.
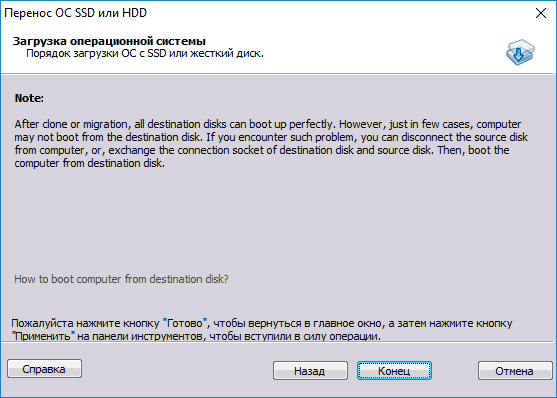
- Вы увидите предупреждение (почему-то на английском) о том, что после клонирования системы, можно будет загрузиться с нового жесткого диска. Однако, в некоторых случаях, компьютер может загружаться не с того диска с которого нужно. В этом случае, вы можете отключить исходный диск от компьютера или поменять шлейфы исходного и целевого диска. От себя добавлю — можно поменять порядок следования дисков в БИОС компьютера.
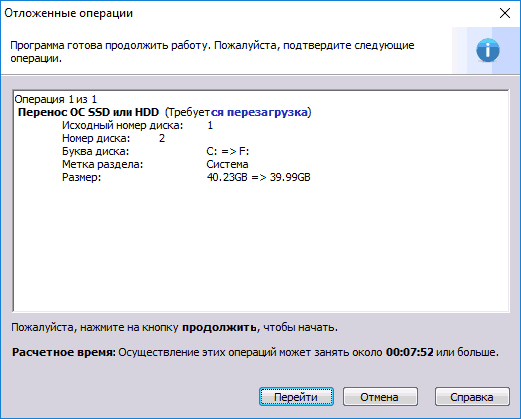
- Нажмите «Конец», а затем, кнопку «Применить» слева вверху главного окна программы. Последнее действие — нажать «Перейти» и дождаться завершения процесса переноса системы, которое начнется автоматически после перезагрузки компьютера.
Если всё пройдет успешно, то по завершении вы получите копию системы, которую можно загрузить с вашего нового SSD или жесткого диска. Скачать Aomei Partition Assistant Standard Edition вы можете бесплатно с официального сайта https://www.disk-partition.com/free-partition-manager.html
Перенос Windows 10, 8 и Windows 7 на другой диск в Minitool Partition Wizard Bootable
Обновление: для переноса с помощью MiniTool Partition Wizard рекомендую использовать новую инструкцию: Как перенести Windows на SSD или другой диск в MiniTool Partition Wizard Free.
Minitool Partition Wizard Free, наравне с Aomei Partition Assistant Standard, я бы отнес к одним из лучших бесплатных программ для работы с дисками и разделами. Одно из преимуществ продукта от Minitool — доступность полностью работоспособного загрузочного ISO образа Partition Wizard на официальном сайте (бесплатный Aomei дает возможность создать демо-образ с отключенными важными функциями).
Записав данный образ на диск или флешку (для этого разработчики рекомендуют использовать Rufus) и загрузив ваш компьютер с него, вы можете перенести систему Windows или другую на другой жесткий диск или SSD, причем в данном случае нам не будут мешать возможные ограничения ОС, так как она не запущена.
Примечание: мною клонирование системы на другой диск в Minitool Partition Wizard Free было проверено только без EFI загрузки и только на MBR дисках (переносилась Windows 10), за работоспособность в системах EFI/GPT не ручаюсь (мне не удалось заставить работать программу в данном режиме, несмотря на отключенный Secure Boot, но похоже это баг конкретно моего оборудования).
Процесс переноса системы на другой диск состоит из следующих шагов:
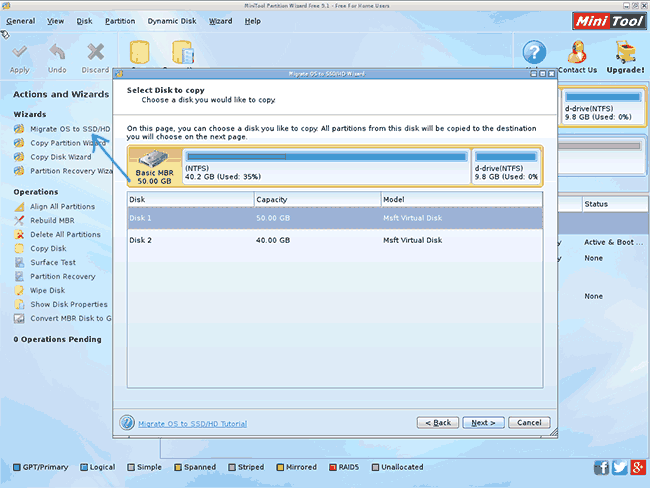
- Загрузившись с флешки и войдя в Minitool Partition Wizard Free, слева выберите пункт «Migrate OS to SSD/HDD» (Перенести ОС на SSD/HDD).
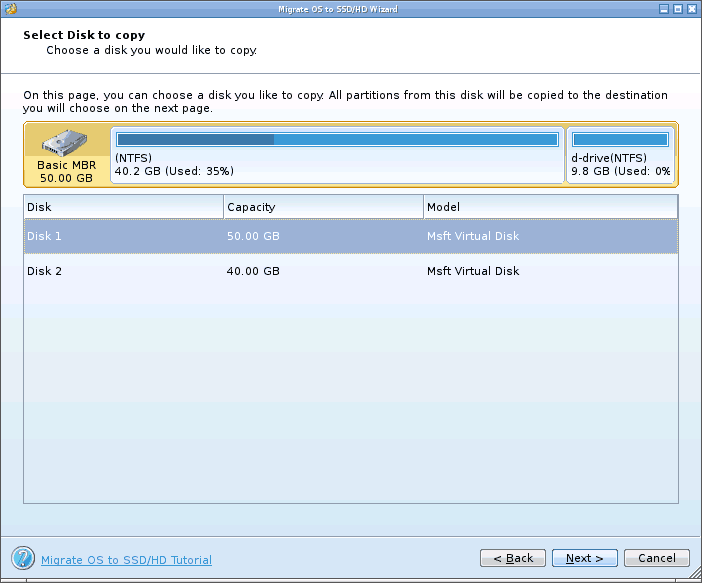
- В открывшемся окне нажмите «Next» (Далее), а на следующем экране выберите тот диск, с которого будет выполняться перенос Windows. Нажмите «Next».
- Укажите диск, на который будет выполняться клонирование (если их всего два, то он будет выбран автоматически). По умолчанию включены параметры, изменяющие размеры разделов при переносе в случае если второй диск или SSD меньше или больше исходного. Обычно достаточно оставить эти параметры (второй пункт копирует все разделы без изменения их разделов, подойдет, когда целевой диск более объемен чем исходный и после переноса вы сами планируете настроить незанятое пространство на диске).
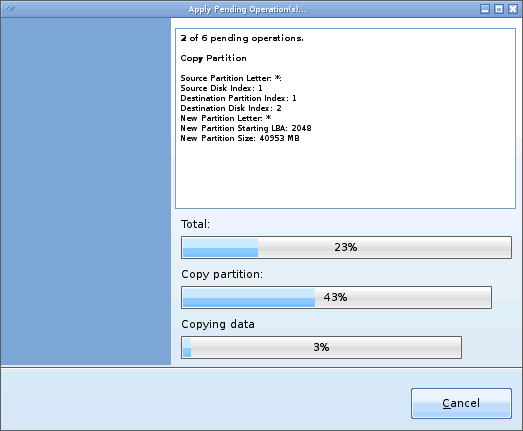
- Нажмите Next, действие по переносу системы на другой жесткий диск или твердотельный накопитель будет добавлено в очередь заданий программы. Чтобы начать перенос, нажмите кнопку «Apply» вверху слева главного окна программы.
- Дождитесь завершения переноса системы, продолжительность которого зависит от скорости обмена данными с дисками и объема данных на них.
По завершении вы можете закрыть Minitool Partition Wizard, перезагрузить компьютер и установить загрузку с нового диска, на который была перенесена система: в моем тесте (как я уже упоминал, BIOS+MBR, Windows 10) все прошло успешно, и система загрузилась как ни в чем не бывало с отключенным исходным диском.
Скачать бесплатно загрузочный образ Minitool Partition Wizard Free можно с официального сайта https://www.partitionwizard.com/partition-wizard-bootable-cd.html
Macrium Reflect
Бесплатная программа Macrium Reflect позволяет клонировать целые диски (как жесткие, так и SSD) или отдельные их разделы, причем независимо от того, какой марки ваш диск. Кроме этого, вы можете создать образ отдельного раздела диска (в том числе с Windows) и позже использовать его для восстановления системы. Также поддерживается создание загрузочных дисков восстановления на базе Windows PE.
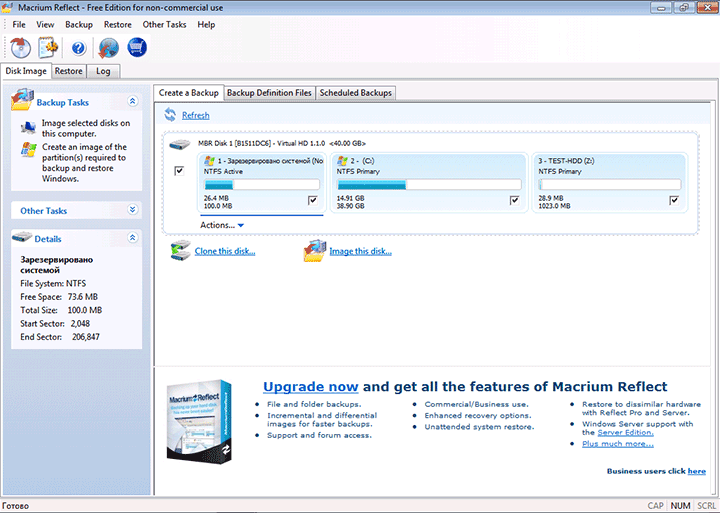
После запуска программы в главном окне вы увидите список подключенных жестких дисков и SSD. Отметьте диск, на котором находится операционная система и нажмите «Clone this disk» (Клонировать этот диск).
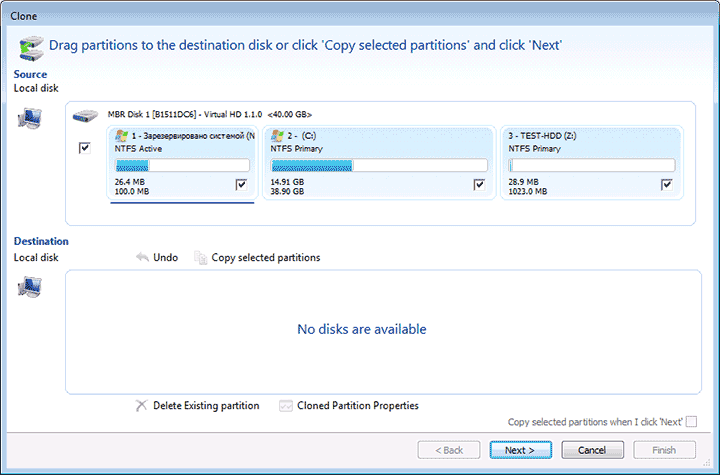
На следующем этапе в пункте «Source» уже будет выбран исходный жесткий диск, а в пункте «Destination» потребуется указать тот, на который нужно перенести данные. Также вы можете выбрать только отдельные разделы на диске для копирования. Все остальное происходит автоматически и не сложно даже для начинающего пользователя. Подробная инструкция доступна здесь: Перенос Windows на SSD или другой диск в Macrium Reflect.
Дополнительная информация
После того, как вы перенесли Windows и файлы, не забудьте либо поставить загрузку с нового диска в BIOS или отключить старый диск от компьютера.
Updated on Apr 28, 2025
How can I clone my operating system to a new drive without reinstalling Windows 11, 10, 8, or 7? Sometimes this can be difficult because it is different from copying other data. You cannot clone the operating system with a simple Ctrl+C and Ctrl+V. You can get an efficient way on this page.
| ⏱️Duration: | 3-5 minutes of reading |
| 🎯Goal: | Assist Windows beginners and non-technicals to clone Windows to another drive with ease. |
| 🧰Tools: | An empty hard drive or SSD; target PC, Windows cloning software, BIOS settings |
| 🔢Procedure: |
|
But how can we clone Windows to a new drive since Windows doesn’t offer built-in tools to help with this issue? Don’t worry. This article provides a detailed guide on cloning Windows and covers a professional tool to help. Continue to read.
Feel free to share this tutorial guide to help more of your friends upgrade their Windows disk by cloning the system to a new drive:
Full Guide to Clone Windows to New Drive [With Pictures]
Note that the new target disk shall contain equal or bigger storage space than the OS disk so to ensure a smooth and successful OS cloning and migration. Here is the complete procedure of what to do for cloning Windows to a new disk:
1. Back Up New Drive Content (Optional)
If the target disk contains vital data you plan to clone the Windows OS to, back it up to an external disk first. Note that the cloning process will overwrite the target disk, and it’s wise for you to back up the valuable disk content before moving forward.
For a reliable tool, you can easily use EaseUS Todo Backup Free to back up a hard drive to an external hard drive.
2. Clone Windows to Another New Drive via Third-Party Software
To copy the operating system to the new hard drive and ensure it will work successfully, you can try a professional operating system cloning program, EaseUS Partition Master Professional. It comes with the «Clone OS disk» feature, which allows you to clone the operating system and its associated partitions to the new drive. Moreover, the whole process is so simple that even a novice can easily complete it.
Download it and follow the guide below.
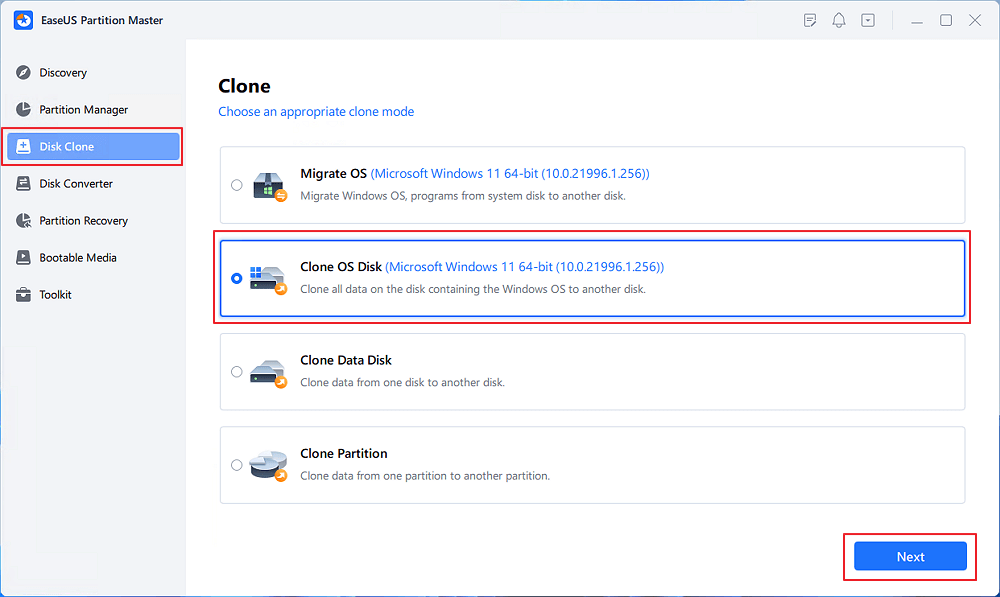
Step 1. Launch EaseUS Partition Master, go to the Disk Clone tab, select «Clone OS Disk» and click «Next».
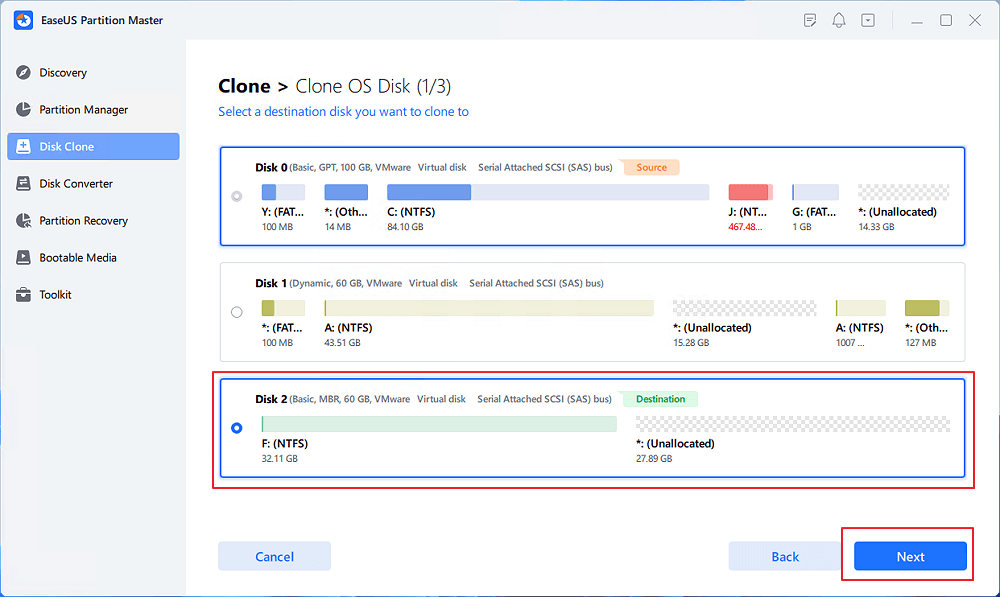
Step 2. Select the target new drive where you want to clone the OS to, and click «Next».
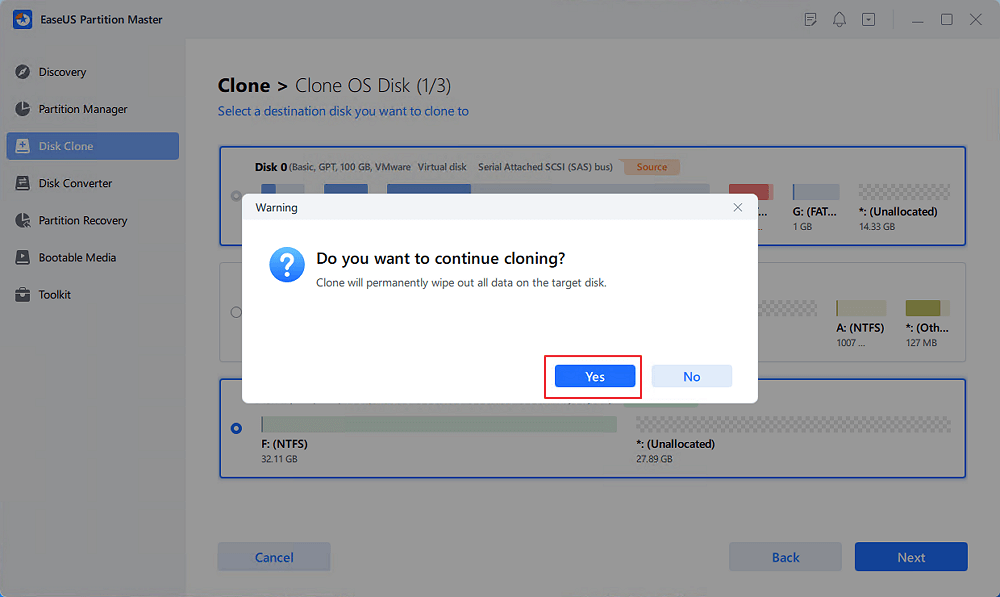
Click «Yes» to confirm that you want to continue the OS disk cloning process.
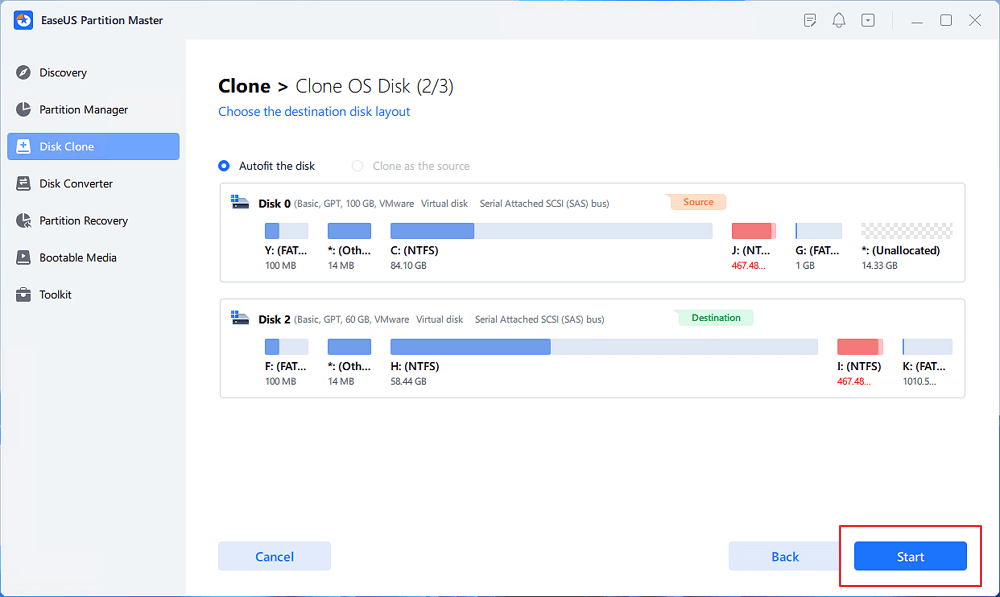
Step 3. View the disk layout, and click «Start» to begin the OS cloning process.
Step 4. When the process completes, you’ll see a confirming message, asking «if you want to start up computer from the clone target disk».
- Reboot Now means to reboot your PC and configure the computer to boot OS from the new disk immediately.
- Done means you want to make the changes later.
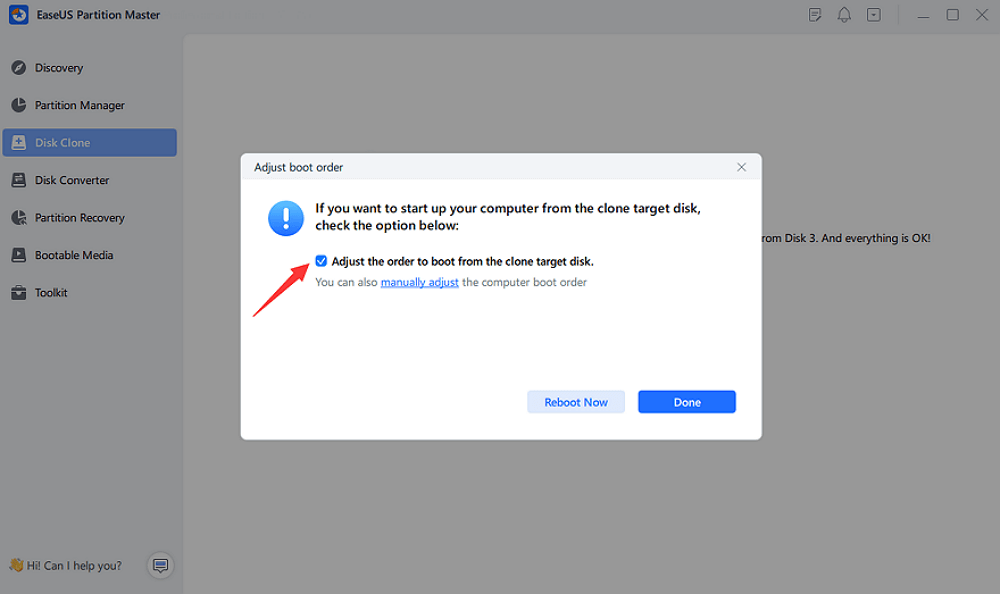
If you didn’t configure the computer to reboot immediately, move to the next guide to set the new disk with cloned Windows as the boot drive. If you have a clone error during the cloning process, expert help is available through the link provided below。
EaseUS experts are available to provide you with one-on-one manual services (24*7) and help solve system or disk cloning startup issues. Our experts will offer you free evaluation services and efficiently diagnose and resolve disk cloning or system disk boot problems using their decades of experiences.
- 1. Target disk becomes unbootable or SSD won’t boot after clone.
- 2. Target disk is unable to boot after performing customized partition operations.
- 3. To seamlessly clone OS disk to new drive and boot PC without any issues.
3. Set the New Drive as the Boot Disk (Optional)
Step 1. Restart your computer and hit the F2/F8/Del keys to access BIOS.
Step 2. In the Boot menu, set the new hard drive with cloned OS as the boot drive under the Boot Priority or Boot Order section.
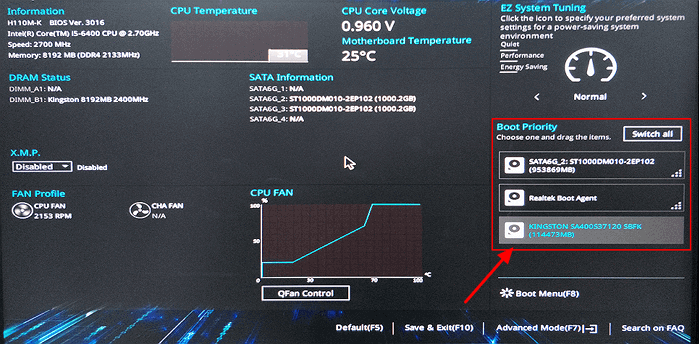
Step 3. Exit after saving all your changes.
If you like this whole guide in cloning Windows to a new disk drive, share this tutorial to help more of your friends who are looking for a solution to copy partition to another drive online:
Bonus Tip: What to Do with Old OS Disk After Cloning Window
Apart from cloning Windows to a new disk, here in this part, we’d like to show you some additional tips for managing the old OS disk. As a professional disk management tool, EaseUS Partition Master can do far more than clone the operating system.
Also, you can apply it to re-manage and set the old system disk for new usage with the tips here:
1. Set the Old OS Disk as the Second Data Drive
Suppose you want to use the old system drive to store data on your computer. In that case, you can apply the «Delete All Partitions» and «New Disk Guide» features in EaseUS Partition Master to quickly delete all existing data and repartition the hard drive in simple clicks.
For a step-by-step guide, follow these two tutorials for help:
2. Wipe the Old Disk for Selling
If you don’t need the old disk anymore and want to get rid of its content for resale, you can apply EaseUS Partition Master with its Wipe Disk feature to clean up the entire disk completely. Refer to the next tutorial for a clear guide:
We’ve set two options for you to wipe data. Choose the one you need.
Option 1. Wipe Partition
- Right-click the partition you want to erase data from, and choose «Wipe».
- In the new window, set the time for which you want to wipe your partition, then click «OK».
- Click the «Execute 1 Task(s)» button in the lower right corner, check the changes, then click «Apply».
Option 2. Wipe Disk
- Select the HDD/SSD. And right-click to choose «Wipe Disk».
- Set the number of times to wipe data. (You can set to 10 at most.) Then Click «OK».
- Click «Execute 1 Task(s)» and then click «Apply».
Aside from the above features, EaseUS Partition Master So let’s learn more about it:
Other Features of EaseUS Partition Master
- Migrate OS to SSD
- Clone larger HDD to Smaller SSD
- Clone SD card to external hard drive
- Clone HDD to SSD for Free
- Check disk speed, health
- Clone SD card, USB, or external hard drives
Let’s figure out why we need to copy Windows to a new drive here. Cloning Windows to a new drive means creating a copy of your computer, including the operating system, essential programs, installed drivers, etc. Cloning the Operating system is very helpful in many crucial moments. Let’s learn why you should clone Windows to a new drive. Generally, the reasons are as follows:
- To avoid manually reinstalling: You can clone Windows from an old one to a new one without reinstalling the operating system and all applications.
- To get more space on the original drive: After cloning the Windows to a new drive, you can format or completely wipe hard drive to get more usable space.
- Clone the operating system to a new hard drive as a backup: When the OS crashes one day, you don’t have to reinstall the OS and programs; you can clone the OS back to the hard drive.
However, no matter why you are trying to clone Windows to a new hard drive. Cloning Windows directly is time-saving compared to copying Windows programs and files one by one.
Conclusion
Do you know how to clone Windows to a new hard drive using EaseUS Partition Master? This article tells you more about the reasons to clone Windows to a new drive and introduces you to the professional cloning software EaseUS Partition Master.
With this tool, cloning Windows to another new hard drive is not a difficult task. After finishing the cloning, you can boot Windows from the cloned new drive. Besides that, it allows you to migrate your OS to HDD or SSD with simple clicks. Download it to manage your disk partition.
You may also like the following:
Clone Windows to New Drive FAQs
There are some other frequently asked questions about cloning Windows to another new hard drive. Please check out the short answers below. I hope they can help.
1. How to clone a hard drive Windows 11/10?
Do you know how to clone a hard drive Windows 11/10? EaseUS Partition Master can help, so follow the steps:
Step 1. Download EaseUS Partition Master.
Step 2. Click «Clone Data Disk» or «Clone OS Disk» and click «Next.»
Step 3. Select the target disk in the clone section and click «Next.»
Step 4. Check the disk layout and edit the target disk partition size.
Step 5. Click «Start» to clone.
2. Does cloning a hard drive copy the OS?
If you clone the hard drive where the operating system is installed, you are cloning the OS, programs, and other data on the hard drive.
3. How do I clone my Windows operating system to a new SSD?
You can turn to a professional third-party tool, such as EaseUS Partition Master. Follow the steps below:
Step 1. Download EaseUS Partition Master.
Step 2. In the «Clone» section, choose «Clone OS Disk» and locate your source disk in the next window.
Step 3. Choose your new SSD as the target disk.
Step 4. Click «Start» to clone.
Quick Tips
- Transferring your operating system is a process that either requires a backup or third-party software.
- Disk Genius is a free tool that allows for easy migration of Windows.
- You can also create a backup of Windows on your target drive via system image, then reinstall the operating system on it.
Perhaps your old hard drive is starting to slow down and fail, or maybe you’re looking to migrate your files to a disk with much more space. There are plenty of reasons to migrate Windows from one drive to another, and just as many solutions.
In this article, we’ll be covering easier ways of how to transfer Windows to another drive to get this job done.
How to Transfer Windows to Another Drive Depends on Purpose
If you’re looking to clone Windows along with all the content on your hard drive, the process will differ slightly from simply migrating the operating system alone. In fact, the former option doesn’t come with any real support from Microsoft, while the latter does. To clone your entire hard drive to another, you’ll need the help of third-party tools.
Just remember that in both cases, the drive and partition you’re copying your files to need to be either the same size or bigger than the one you’re copying from.
Migrate Windows via Third-Party Software
If you’re looking to move your OS or your entire drive’s contents to another, you’re in luck. There are plenty of software options available out there. Unfortunately, most of them will cost you. For our demonstration, we’re going to be using a free (yet still very reliable) program called Disk Genius. Don’t be fooled by the dated interface. Under the hood, Disk Genius is very powerful. Here’s how to use it:
1. Download Disk Genius from its website. The download is free, but you can pay for more powerful versions.

2. Install the software anywhere but the drive you’re planning to migrate to, as this would erase all your data.
3. Open the software and you’ll see a list of all your connected drives and their partitions.

4. Click on the “OS Migration” button in the top panel. A new window will pop up with the best possible option and its free space.

5. Ensure you have enough free space and click the OK button.
6. A warning window will pop up reminding you that all existing data on the target drive will be overwritten. If you’re sure, click OK.
7. A new window will pop up, showing the two disks. You can choose whether your machine will boot from your new disk on startup or enter the BIOS first.

8. Click “Start” and the process will begin.
9. Once done, you’ll be prompted to restart your machine. Hit the “Yes” button.
Once you’ve migrated your OS, you may be prompted to reactivate your copy of Windows. Depending on your setup and agreement, you might be able to do this by entering your details. If your system detects different hardware, you may be required to contact Microsoft directly.
Backup via System Image
Windows can back up your current system as a system image should things ever go wrong. You’ll need to create the image first on your target drive. Here’s how:
1. Open Settings (Win + I) and choose “Files backup” from the sidebar.

2. Click the “Add Drive” button and choose your target drive.
3. Follow the steps and your drive will begin the backup process.
With your system image in place, it’s time to use it to reinstall Windows. Here’s what to do:
1. Shut down your machine and attach the drive with the system image.
2. Boot into your machine’s BIOS. This varies by manufacturer but it is typically done with one of the Function keys.
3. Choose your target disk to proceed.
4. You’ll also need your Windows 10 or 11 install disk in the machine. When the option pops up to install Windows, choose the “Repair your computer” option at the bottom.
5. Choose “System Image Recovery” from Advanced options.

6. Your disk should be shown. Follow the steps and Windows will begin to install on your new drive.
Was this helpful?
Thanks for your feedback!
The article above may contain affiliate links which help support Guiding Tech. The content remains unbiased and authentic and will never affect our editorial integrity.
,
If you want to move Windows to another drive, continue reading below. Over time, computer hardware (like everything else) wears out. This of course also happens with hard drives, which over time their performance decreases and need to be replaced.
The hard disk is probably the most important device on the computer because it is used to store your work (documents, photos, videos, confidential data, etc.). Therefore, it is advisable to replace it after 3-5 years to avoid possible data loss and to extend the life and performance of the computer.
If you want to replace your Windows hard disk drive (HDD) with another HDD or SSD (Solid State Drive – which is at least 14 times faster than an average hard disk), you can do so in one of the following ways:
- Way 1: Backup your files to an external disk, and then proceed to a clean installation of Windows. After installation, install the necessary programs, restore your files and personalize your computer as before.
- Way 2: Move Windows and all your data (Files, Programs and Settings) to another HDD, without any hassle to reinstall your programs and restore your files and settings.
Of the above methods, as you can understand, the second one is the easiest, because it allows you to move Windows to another drive without the stress of reinstalling the operating system, programs and settings or to restore your files back!
In this tutorial you will find detailed instructions on how to transfer Windows along with your programs, files and settings to another drive.
How to Migrate Windows to Another Hard Drive (Windows 11/10/8.1).
To move (migrate) Windows to another drive, you can either use the built-in Windows Backup and Restore tool to create a System Image and then to restore that image to the new drive (Method-1), or to use a third-part disk cloning utility to copy your Windows disk to a new one (Method-2). Both methods are described below. *
* Important:
Before you start the process of moving Windows to another drive, apply the following steps:
1. Backup your personal files and data to another external storage device (e.g. USB Drive) in order to have a copy of your files if something goes wrong.
2. Perform a disk cleanup to delete the useless files and free up storage space.
- Method 1. Clone Disk using a System Image.
- Method 2. Clone Disk with a Third-Party tool.
Method 1. How to Clone/Migrate a Disk to a Larger Disk Using a System Image in Windows 10/11.
The built-in Windows System Image creation tool is the first and recommended method for transferring Windows, files, applications, and settings to another drive equal to or larger than the current drive. For example, if the current drive is 256GB, to use the System Image on Windows, the new drive must be larger than 256GB or equal in size. *
* Note: If the contents of your current disk (used space), can fit on a disk smaller in size than the current disk, follow the instructions on Method-2 to clone the drive by using a disk-cloning utility.
Requirements:
-
- A New Drive with Equal or Largest size (in Gigabytes) to the current Drive.
The process of moving Windows to another hard drive using Windows built-in system image tool require that the new drive must be larger in size or equal to the current drive. - A Secondary drive/disk (internal or external), to store the System Image. If you don’t own a secondary drive, follow the instructions on Method-2 below.
- A USB Windows installation media.
In order to restore Windows to a new drive you have to start your PC from a USB installation media. If you don’t own a Windows Installation media, follow these instructions to create one.
- A New Drive with Equal or Largest size (in Gigabytes) to the current Drive.
Step 1. Create a System Image.
To create a full backup of your Windows disk, (aka «System Image» backup):
1. Get a portable USB hard drive with enough free space and plug it into the PC. When done, ensure that it appears in Windows Explorer.
2. Click the Start menu, then type Control panel and select Open.

3. Select Backup and Restore (Windows 7)
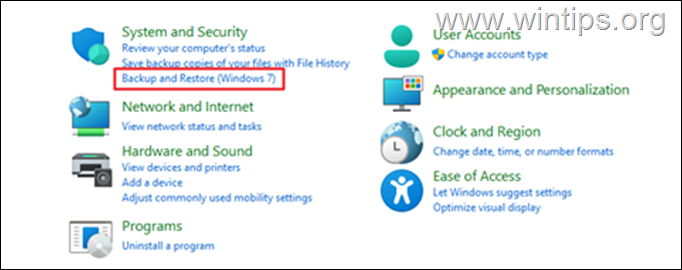
4. Click Create a system image
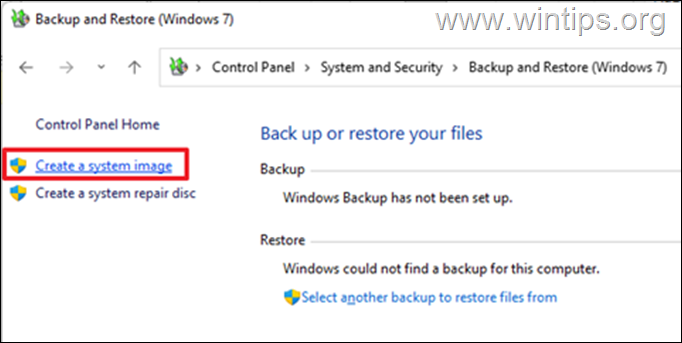
5. A dialog box will appear scanning your PC for backup devices. Click on the drop down below On a hard disk and select the USB hard drive you plugged in, then click Next.

6. A window will appear with the size of the data that will be migrated to the USB hard drive. Select Start Backup to proceed.
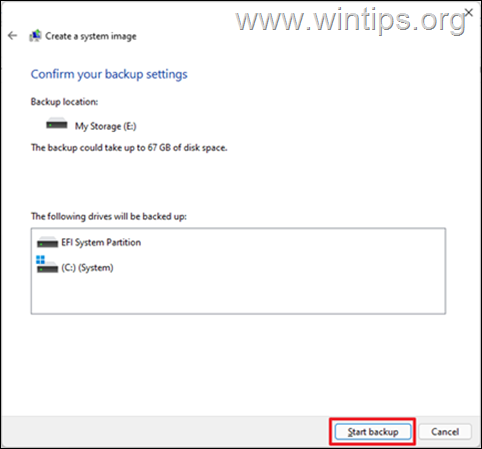
7. A progress bar will appear indicating the duration of the process. Be patient until Windows saves the system image to the external disk. (This process will take some time depending on the size of the data and the speed of the hardware).
8. When the system image completes, you will be prompted to create a system repair disk. Click No to proceed and close all windows.

Step 2. Replace Hard Drive.
Once you have saved the system image and have the Windows USB installation media, proceed to restore Windows to the new disk as follows:
1. Shutdown your PC.
2. Remove the current Windows hard disk and disconnect (unplug) any other secondary disks (if any), to avoid mistakes.
3. Install the new hard disk.
4. Plug the external USB drive with the System Image.
Step 3. Restore System Image.
1. Turn on your PC and boot from the USB Windows Installation Media. (The common keys to access the boot order options are the Del, F9, F12)
2. At the Windows Setup screen choose Next and then click Repair your computer.
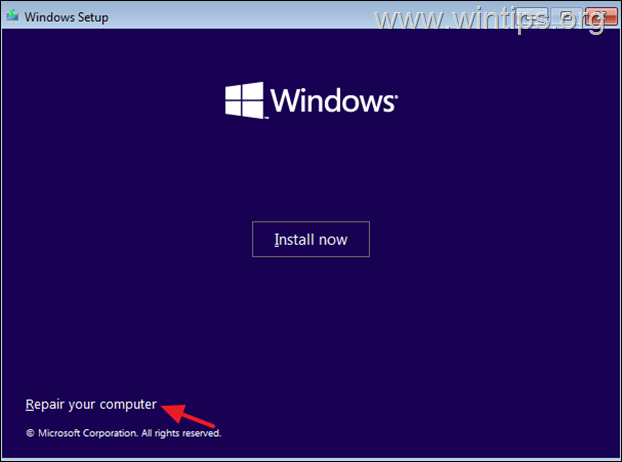
3. Select Troubleshoot, then click System Image Recovery.

4. When the System Recovery tool detects the image you created, leave the «Use the latest available system image» option selected and click the Next button.
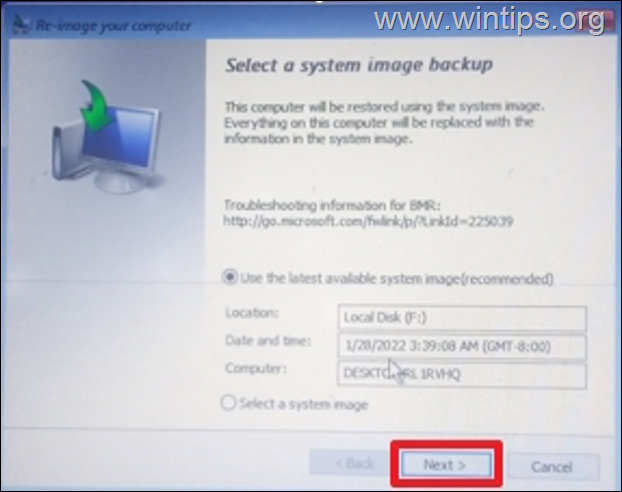
5. Ensure that Format and repartition disk* checkbox is checked and click Next.
* Attention: This will delete any existing partitions and data on the new hard drive and reformat it to match the layout of the system image.
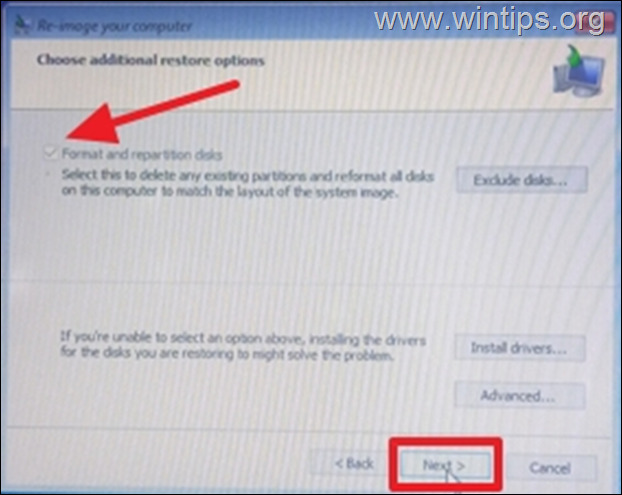
6. Finally click Finish and then select Yes to confirm that you want to proceed with system image restoration. The process will take some minutes to complete depending on the volume of data on the system image.
7. Once the restoration is complete, the PC will automatically restart in 60 seconds. At this point, remove the USB Installation media and let the system to boot from the new drive. (In some cases you may need to go to BIOS/UEFI to set the computer to boot from the new hard disk).
Quick Tip: If the new hard is the same size as the previous hard drive, all the disk space will be allocated. However, if the new hard drive is larger than the previous hard drive, there will be unallocated space. In this case, you must expand the volume to take advantage of all available space on the new hard disk.
Method 2. How to Clone Hard Disk using a Third-Part Disk Cloning Utility.
The second method to copy your Windows drive to another, is by cloning your main disk to a new one, by using a third-party Disk Cloning Software/Utility. For this task, you can use one of the following reliable and FREE Disk Cloning Tools: *
- AOMEI Backupper Standard
- EaseUs ToDo BackUp Home
- MiniTool Partition Wizard Free 12.6.
* Note: For the purposes of this tutorial we demonstrate on how to clone a HDD to another (HDD or SSD), with EaseUs ToDo BackUp.
Requirements:
-
- A New Disk/Drive with Smaller,* Equal or Largest size (in Gigabytes) to the current Drive.
* Note: If you want to use a smaller disk to move the current Windows disk, you must ensure that the data (used space), on the current disk will fit on the new disk.
How to Clone your Hard Drive with EaseUs ToDo BackUp:
1. Download EaseUs ToDo BackUp Home. (Click the Free Trial button and click Download.)
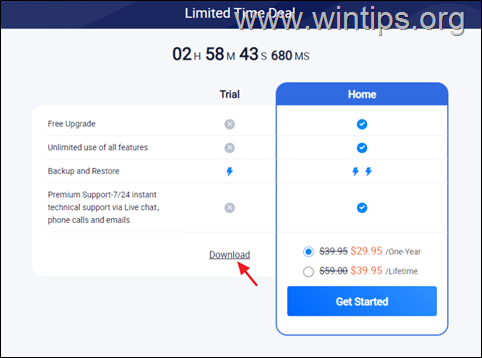
2. When the download completes, go ahead and install the program.
3. Shutdown your PC.
4. Connect the new disk and disconnect (unplug) any other secondary disks (if any), to avoid mistakes. *
* Note: If you own a laptop, get a USB hard drive enclosure and insert the new drive and then plug it to your PC.
5. Turn on your PC and boot to Windows.
6. Launch EaseUs ToDo BackUp Home, and select Later at License screen.
7. From the Menu select Clone
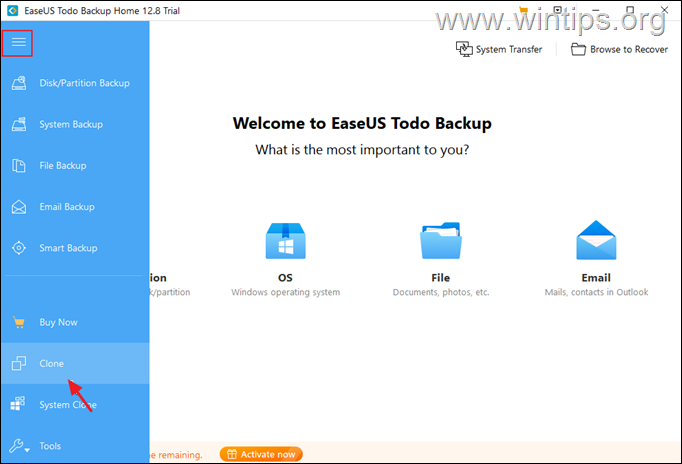
2. Check the Source disk (with the Operating System), and click Next.

3. Now check the Target disk which in this case is the new hard drive. Click Next to proceed.
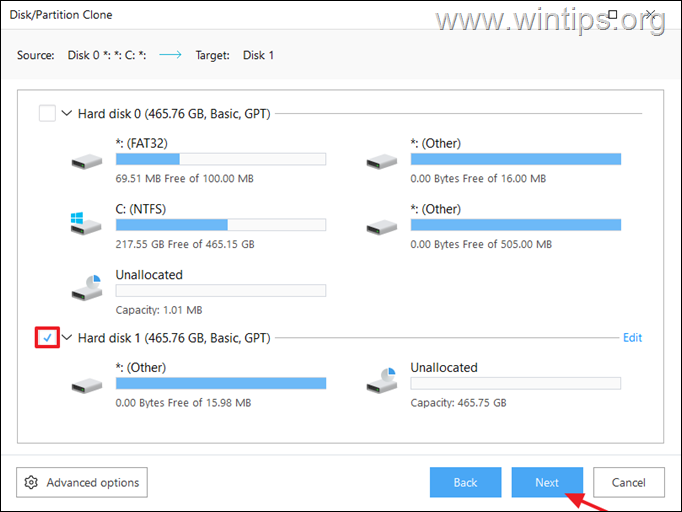
4a. Select Proceed.
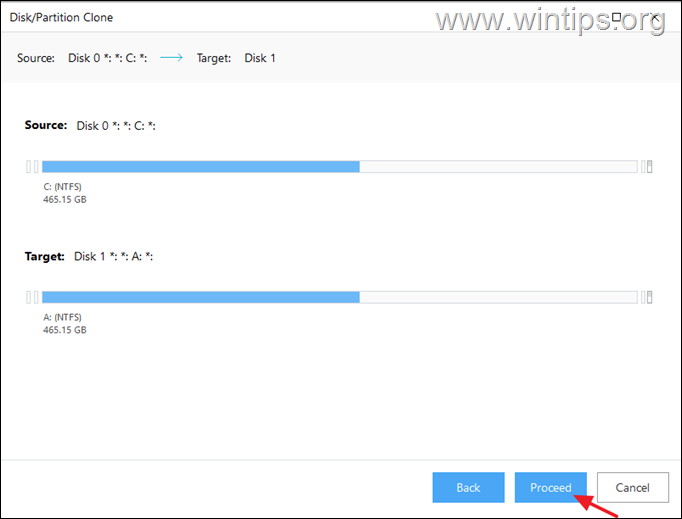
4b. Now you will get a warning that all the data on the target drive will be erased. Click Continue to start cloning the drive.

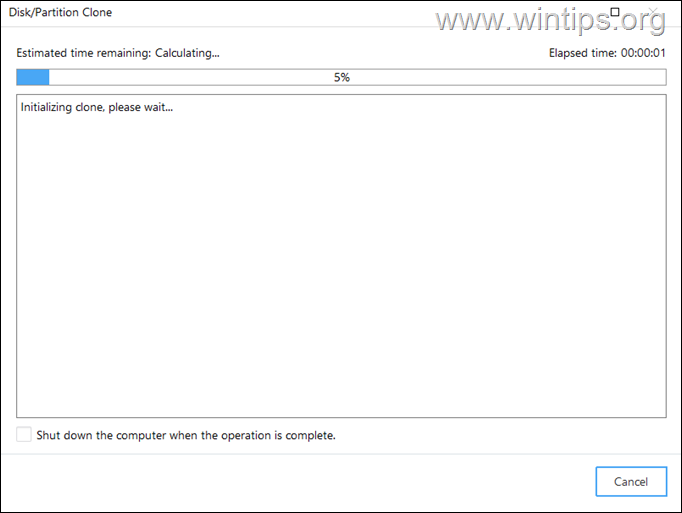
5. The cloning process will start and you will be able to see the progress on the screen. (Be patient until the process to complete).
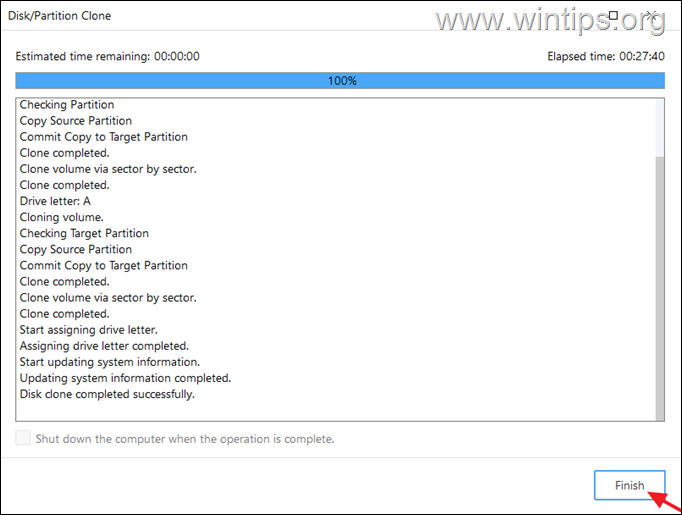
6. When the cloning process in completed, click Finish and close Easeus ToDo Backup.
7. Shut down the PC.
8. Remove the current hard drive from the computer and replace it with the cloned drive.
9. Finally power on your PC and let it to boot to Windows. If everything has gone well, the computer will boot into the Windows desktop just like it did with the old drive. *
* Note: If you PC can’t boot to Windows enter BIOS setup and change the boot priority to the new drive.
That’s it! Which method worked for you?
Let me know if this guide has helped you by leaving your comment about your experience. Please like and share this guide to help others.
If this article was useful for you, please consider supporting us by making a donation. Even $1 can a make a huge difference for us in our effort to continue to help others while keeping this site free:
- Author
- Recent Posts
Konstantinos is the founder and administrator of Wintips.org. Since 1995 he works and provides IT support as a computer and network expert to individuals and large companies. He is specialized in solving problems related to Windows or other Microsoft products (Windows Server, Office, Microsoft 365, etc.).
Вопрос
«Недавно я решил обновить свой компьютер, купив SSD для замены старого жесткого диска (HDD). Хотя я был не уверен, как перенести свою текущую операционную систему Windows 10 с HDD на SSD без переустановки системы с нуля. Реально ли успешно загрузиться с нового диска после переноса?»
Это руководство объясняет, как переместить Windows на другой диск – процесс, известный как «клонирование диска». Этот процесс позволяет обновить жесткий диск или перенести Windows на новый компьютер. В нем рассказывается о необходимой подготовке перед началом работы, процессе клонирования диска и процедурах, которые нужно выполнить после перемещения, чтобы убедиться, что ваша система работает правильно. Мы также дадим советы по управлению хранением вашей установки Windows, с советами о том, как переместить Windows на другой диск, не потеряв данные. С помощью этого руководства вы сможете безопасно и успешно перенести вашу установку Windows, будь то с старого жесткого диска на новый или с одного компьютера на другой. Так что, если вы купили новый жесткий диск или планируете переместить свою Windows на новый компьютер, читайте далее, чтобы узнать, как это сделать.
- Часть 1: Можно ли Перенести Windows с Одного Диска на Другой?
- Часть 2: Как Переместить Windows на Другой Диск Без Потери Данных?HOT
- Часть 3: Как Перенести Windows на Другой Диск через Инструмент Системного Образа Windows?
-
Часто задаваемые вопросы:
- 1. Как Перенести Windows с Диска C на Диск D?
- 2. Как Перенести Windows 10 на Новый SSD?
- 3. Можно ли Перенести Только Windows на Новый SSD?
Вы можете перенести Windows с одного диска на другой, используя утилиту для клонирования дисков. Процесс включает в себя:
- Создание образа вашей текущей установки Windows.
- Сохранение его на новый диск.
- Восстановление точного образа на новый диск.
Это действие скопирует все файлы и настройки с оригинального диска на новый, позволяя использовать ту же установку Windows на новом диске. Важно отметить, что этот процесс будет работать только в случае, если новый диск такого же типа (например, HDD или SSD) и как минимум такого же размера, как оригинальный диск. Если новый диск меньше оригинального, вам нужно будет вручную удалить некоторые файлы, чтобы образ поместился на новый диск. Кроме того, если вы перемещаете систему с HDD на SSD, вам следует выполнить чистую установку Windows, чтобы воспользоваться увеличенной скоростью SSD. Читайте далее, чтобы узнать, как переместить Windows 10 на другой жесткий диск.
Часть 2: Как Переместить Windows на Другой Диск Без Потери Данных?
4DDiG Partition Manager – это мощное и надежное программное обеспечение для управления разделами жесткого диска, которое позволяет пользователям быстро и легко управлять своими разделами жесткого диска. Оно предлагает широкий спектр функций, что делает его идеальным выбором для пользователей, которые ищут решение «как перенести Windows с одного диска на другой».
Основные Функции:
- Управление разделами: 4DDiG Partition Manager позволяет пользователям создавать, удалять, изменять размер, перемещать, форматировать, разделять, объединять и копировать разделы.
- Резервное копирование и восстановление: Он также предоставляет простую и эффективную функцию резервного копирования и восстановления.
- Клонирование диска: Эта функция позволяет пользователям легко клонировать разделы жесткого диска на другой диск.
- Диагностика жесткого диска: 4DDiG Partition Manager включает мощный инструмент для диагностики жесткого диска, который может обнаружить и исправить любые потенциальные проблемы с разделами жесткого диска. Он также может обнаруживать и исправлять поврежденные секторы и восстанавливать потерянные данные.
- Загрузочный носитель: Он может создавать загрузочные носители, такие как USB-накопители или CD, чтобы гарантировать, что процесс разделения может быть выполнен, даже если компьютер не может загрузиться с жесткого диска.
Вот как скопировать Windows на другой диск:
Buy Now
- Установите 4DDiG Partition Manager на свой компьютер и подключите новый диск. Затем запустите приложение и нажмите «Начать» для продолжения.
- Выберите новый диск в качестве целевого диска и нажмите «Начать», чтобы продолжить. Исходный диск будет выбран по умолчанию.
- Всплывающее окно сообщит вам, что разделы и файлы на целевом диске будут перезаписаны во время переноса системы. Чтобы продолжить, нажмите «Да» и «Начать».
- Перенос системы начнется под управлением 4DDiG Partition Manager и займет некоторое время в зависимости от размера дисков. Вы можете просматривать скорость переноса, прошедшее время и другие данные, связанные с этим процессом.
- Теперь вы успешно перенесли свою операционную систему на целевой диск.
Примечание:не забудьте создать резервную копию данных на целевом диске перед переносом системы.
Часть 3: Как Перенести Windows на Другой Диск через Инструмент Системного Образа Windows?
Не уверены, как перенести Windows на другой диск? Следуйте приведенным далее инструкциям:
1. Создайте образ системы вашей текущей установки Windows:
- Откройте «Панель управления».
- Перейдите в «Система» в меню «Панель управления»
- Выберите опцию «Резервное копирование и восстановление».
- Нажмите «Создать образ системы».
- Выберите диск, на котором хотите сохранить образ системы, и нажмите «Далее».
- Выберите диски для создания образа системы.
- Нажмите «Начать резервное копирование».
2. Перенесите образ системы на новый диск:
- Подключите новый диск к ПК.
- Откройте «Панель управления».
- Перейдите в опцию «Система» и выберите «Резервное копирование и восстановление».
- Нажмите «Восстановление моих файлов» и затем «Выберите другую резервную копию для восстановления файлов».
- Выберите созданный образ системы и нажмите «Далее».
- Выберите каждый диск, для которого вы хотите создать образ, и нажмите «Далее».
- Нажмите «Начать восстановление».
3. Загрузитесь с нового диска:
- Перезагрузите компьютер и перейдите в меню загрузки.
- Выберите новый диск в качестве загрузочного устройства.
- Следуйте инструкциям, появляющимся на экране ПК, чтобы завершить настройку.
Недостатки этого метода:
- Этот метод требует резервного копирования текущей установки Windows.
- Настройка нового диска требует времени и усилий.
- Всегда существует риск потери или повреждения данных в процессе переноса.
Часто задаваемые вопросы:
1. Как Перенести Windows с Диска C на Диск D?
Шаг 1: Создайте резервную копию данных: Самый важный шаг перед перемещением вашей операционной системы Windows — создание резервной копии ваших данных. Это включает файлы, документы, фотографии, музыку и т. д.
Шаг 2: Создайте образ системы: Следующий шаг — создать образ системы вашей текущей установки Windows. Это позволит вам восстановить систему, если что-то пойдет не так во время перехода.
Шаг 3: Установите новый жесткий диск: Если у вас еще нет нового жесткого диска, установите его. Убедитесь, что он достаточно большой, чтобы вместить количество данных, которые вы переносите.
Шаг 4: Используйте инструмент для клонирования диска: Вам нужно использовать инструмент для клонирования диска, чтобы перенести установку Windows с диска C на диск D. Существует несколько открытых инструментов, которые могут быть полезны.
Шаг 5: Загрузите компьютер с нового диска: После завершения процесса клонирования вам нужно загрузить компьютер с нового диска. Это можно сделать в настройках BIOS вашего компьютера.
Шаг 6: Настройте порядок загрузки: Убедитесь, что порядок загрузки был настроен таким образом, чтобы новый диск был первым в списке загрузки.
Шаг 7: Обновите драйверы: Наконец, вам нужно обновить драйверы, чтобы убедиться, что они совместимы с новым диском. Это можно сделать вручную или с помощью автоматического инструмента обновления драйверов.
2. Как Перенести Windows 10 на Новый SSD?
- Создайте Резервную Копию Системы: используйте резервное копирование Windows, чтобы создать образ системы вашей текущей установки Windows 10. Это сохранит ваши настройки, приложения и файлы на внешний жесткий диск.
- Установите новый SSD: физически установите новый SSD в ваш компьютер и убедитесь, что он правильно подключен.
- Восстановите резервную копию системы: используйте образ системы, который вы создали, чтобы восстановить вашу установку Windows 10 на новый SSD.
- Установите новые драйверы: установите все необходимые драйверы для нового оборудования.
- Оптимизируйте SSD: наконец, используйте инструмент, такой как Intel SSD Toolbox, чтобы оптимизировать ваш новый SSD для лучшей производительности.
3. Можно ли Перенести Только Windows на Новый SSD?
Да, можно, но вам нужно будет создать резервную копию образа вашей текущей установки Windows и затем использовать программное обеспечение для клонирования, чтобы передать образ на новый диск. Затем вам нужно будет переустановить все ваши приложения и настройки, но процесс должен быть достаточно простым.
Заключение
В заключении этого руководства хотелось бы сказать, что мы представили исчерпывающий обзор как перенести Windows на другой диск. Мы рассмотрели подготовку, необходимую перед началом работы, процесс клонирования диска и процедуры после переноса, чтобы убедиться, что система работает правильно. Мы также дали рекомендации по управлению хранением установленной Windows и дали советы о том, как перенести Windows 10 на другой диск без потери данных. Если вы хотите перенести Windows на новый диск, мы рекомендуем использовать 4DDiG Partition Manager. С помощью этого инструмента вы сможете легко и безопасно перенести систему на новый диск без потери данных.
4DDiG Partition Manager
4DDiG Partition Manager – это простой и безопасный профессиональный инструмент для переноса системы, который может перенести ОС Windows на SSD в один клик без необходимости переустанавливать систему, эффективно клонировать весь жесткий диск для резервного копирования данных и многое другое. Он поддерживает безопасное перемещение установленных приложений, системных обновлений, драйверов, пользовательских настроек с одного ПК на другой.
СКАЧАТЬ БЕСПЛАТНО
КУПИТЬ СЕЙЧАС
СКАЧАТЬ БЕСПЛАТНО
КУПИТЬ СЕЙЧАС

