
on November 25, 2010
Windows has two command line utilities to copy files/directories from command line. Copy command can be used to copy files from one folder to another folder. It can’t be used to copy a complete folder to another location on the disk. Xcopy allows us to do this. Let’s see how we can copy a directory along with all the files and sub directories to another location.
Xcopy /E /I SourceFolder DestinationFolder
Let’s say we need to copy a directory called C:\dir1\sourcedir to a location named D:\data\destinationdir.
Now you can run the below command to copy the complete sourcedir to D:\data\destination
Xcopy /E /I C:\dir1\sourcedir D:\data\destinationdir
In the above command we can also use relative paths of the folders with respect to the current directory.
Understanding the command
/E – This option makes sure that empty subfolders are copied to the destination.
/I – Avoids prompting if the destination is a folder or file. Not required if you are adding a trailing ‘\’ to the destination folder, like below.
Xcopy /E C:\dir1\sourcedir D:\data\destinationdir\
/S – This option is not required if you are using /E. /E ensures that all subfolders are also copied to the destination.
To copy a directory and its contents in Windows Command Prompt, you can use the following command:
xcopy "C:\source_directory" "D:\destination_directory" /E /I
In this command, `C:\source_directory` is the path of the directory you want to copy, and `D:\destination_directory` is where you want to copy it to, with `/E` ensuring that all subdirectories are copied, including empty ones, and `/I` indicating that the destination is a directory.
Understanding Windows CMD Commands
What is CMD?
Command Prompt (CMD) is a command-line interpreter available in most Windows operating systems. It allows users to execute commands to interact with the system, automating tasks, and accessing advanced functionalities. Mastering CMD can significantly enhance your efficiency and control over Windows, especially for repetitive tasks.
Why Use CMD for Copying Directories?
Using CMD for copying directories has several advantages over graphical user interfaces (GUIs). CMD allows for:
- Speed: Copying directories through CMD is often faster than using Windows Explorer, particularly for large batches of files.
- Automation: It opens the possibility to automate files and directory management through scripts.
- Batch Processing: CMD enables you to execute multiple commands in a single go, making it ideal for advanced users.
Navigate Your Windows Cmd Home Directory Effortlessly
Basic Syntax of the Copy Command in CMD
Overview of the COPY Command
The basic structure of the CMD copy command is as follows:
`COPY [source] [destination]`
It is essential to understand the syntax of this command to utilize it effectively.
Difference Between COPY and XCOPY
While the COPY command can handle basic file copying tasks, it lacks the capability to copy entire directories with their subdirectories. For advanced copying tasks, including copying folders, XCOPY is the preferred command, as it provides additional options and functionality.
Windows Cmd Repair Commands: A Quick Guide
Using Windows CMD to Copy Directories
Basic Command to Copy a Directory
To copy a directory and its contents using CMD, you would typically use:
xcopy source_dir destination_dir
This command tells the system to copy everything from the source_dir to the destination_dir.
Code Example: Copying a Folder
An example command might look like this:
xcopy C:\SourceFolder C:\DestinationFolder /E /I
In this example:
- C:\SourceFolder is the path of the folder you want to copy.
- C:\DestinationFolder is where you want to place the copy.
- /E indicates that all subdirectories should be copied, including empty ones.
- /I tells the command to treat the destination as a directory if it does not exist.
Common Switches Used with XCOPY
When using XCOPY, various switches enhance functionality. Some of the most commonly used ones include:
- `/E`: Copies all subdirectories, including empty ones. This is crucial when you want an exact replicate of the folder structure.
- `/I`: If the destination does not exist, this switch assumes it is a directory, streamlining the process.
- `/Y`: Suppresses the prompt that asks for confirmation when overwriting existing files in the destination.
Using CMD to Copy a Folder with Attributes
In some cases, you may want to preserve file attributes (e.g., read-only status). You can achieve this with an additional switch:
xcopy source_dir destination_dir /E /I /K
Here, /K copies the attributes, ensuring that important file properties are retained after the copy.
Windows Cmd Clear: Refresh Your Command Line Effortlessly
Detailed Steps for Copying a Directory in Windows CMD
Opening the Command Prompt
Before you can use the `xcopy` command, you need to access the Command Prompt. Here’s how:
- Press Windows Key + R to open the Run dialog.
- Type cmd and press Enter.
Step-by-Step Copy Process
Once you have CMD open, you can enter the `xcopy` command. For example, to copy a folder:
- Navigate to the folder you want to copy by typing `cd path_to_the_folder`.
- Enter the command with the necessary flags.
Verifying the Copy
After executing the copy command, it’s essential to verify that the files have been copied correctly. You can use the following CMD commands:
- `dir`: Lists files in the directory to check contents.
- `tree`: Displays a graphical representation of the directory structure, making it easy to see if the copying was successful.
Windows Cmd Repair: Quick Fixes You Need to Know
Troubleshooting Common Issues
Permission Denied Errors
One common issue when attempting to copy directories is encountering permission denied errors. This typically occurs due to insufficient permissions for the source or destination directories. To resolve this:
- Ensure you have administrative privileges.
- If necessary, run CMD as an administrator by right-clicking the CMD icon and selecting Run as administrator.
Directory Not Found Errors
If you receive a «Directory Not Found» error:
- Double-check the paths you entered in your command.
- Ensure there are no typos or missing directories in the specified paths.
Handling Large Directories
Copying large folders can be tricky due to timeouts or system limitations. To enhance performance, consider using the /J switch with your XCOPY command, which uses unbuffered I/O, like this:
xcopy source_dir destination_dir /J

Mastering Cmd Directory Navigation Made Simple
Advanced CMD Copying Techniques
Using Robocopy for Enhanced Functionality
For more advanced directory copying tasks, consider using Robocopy (Robust File Copy), which is included in Windows Vista and later. Its syntax is:
robocopy source_dir destination_dir
Robocopy is particularly useful for its resilience against interruptions and can handle more complex copying scenarios.
Example of Robocopy
To mirror a directory, you can use Robocopy as follows:
robocopy C:\SourceFolder C:\DestinationFolder /MIR
Here, /MIR mirrors the source directory, ensuring that the destination is an exact copy, including files and subfolders.
Automating Directory Copying with Batch Files
For users who frequently copy directories, creating a batch file can save time. A simple batch file might include commands like:
@echo off
xcopy C:\SourceFolder C:\DestinationFolder /E /I
This script can be saved with a `.bat` extension and executed whenever you need to perform the copy operation.
Mastering Windows Cmd Route: A Concise Guide
Conclusion
Recap of the CMD Copy Directory Process
In summary, mastering the use of Windows CMD to copy directories provides users with enhanced efficiency and control over file management tasks. From the basic `xcopy` command to advanced options like `Robocopy`, CMD offers powerful capabilities beyond what typical GUI tools can accomplish.
Additional Resources for Learning CMD
To continue enhancing your CMD skills, explore various online coding resources, tutorial sites, and forums dedicated to mastering command line operations.
Windows Cmd Grep: Your Essential Guide to Text Searching
Call to Action
Now that you have a comprehensive understanding of how to use Windows CMD to copy directories, it’s time to practice! Try executing these commands in your own Windows environment, and consider subscribing to our updates for more CMD tips and tricks to improve your command-line skills.
Указанные при описании команды COPY проблемы можно решить с помощью команды XCOPY, которая предоставляет намного больше возможностей при копировании. Необходимо отметить, правда, что XCOPY может работать только с файлами и каталогами, но не с устройствами.
Синтаксис этой команды:
XCOPY источник [результат] [ключи]Команда XCOPY имеет множество ключей, мы коснемся лишь некоторых из них. Ключ /D[:[дата]] позволяет копировать только файлы, измененные не ранее указанной даты. Если параметр дата не указан, то копирование будет производиться только если источник новее результата. Например, команда
XCOPY "C:\Мои документы\*.*" "D:\BACKUP\Мои документы" /Dскопирует в каталог ‘D:\BACKUP\Мои документы’ только те файлы из каталога ‘C:\Мои документы’, которые были изменены со времени последнего подобного копирования или которых вообще не было в ‘D:\BACKUP\Мои документы’.
Ключ /S позволяет копировать все непустые подкаталоги в каталоге-источнике. С помощью же ключа /E можно копировать вообще все подкаталоги, включая и пустые.
Если указан ключ /C, то копирование будет продолжаться даже в случае возникновения ошибок. Это бывает очень полезным при операциях копирования, производимых над группами файлов, например, при резервном копировании данных.
Ключ /I важен для случая, когда копируются несколько файлов, а файл назначения отсутствует. При задании этого ключа команда XCOPY считает, что файл назначения должен быть каталогом. Например, если задать ключ /I в команде копирования всех файлов с расширением txt из текущего каталога в несуществующий еще подкаталог TEXT,
XCOPY *.txt TEXT /Iто подкаталог TEXT будет создан без дополнительных запросов.
Ключи /Q, /F и /L отвечают за режим отображения при копировании. При задании ключа /Q имена файлов при копировании не отображаются, ключа /F — отображаются полные пути источника и результата. Ключ /L обозначает, что отображаются только файлы, которые должны быть скопированы (при этом само копирование не производится).
С помощью ключа /H можно копировать скрытые и системные файлы, а с помощью ключа /R — заменять файлы с атрибутом «Только для чтения». Например, для копирования всех файлов из корневого каталога диска C: (включая системные и скрытые) в каталог SYS на диске D:, нужно ввести следующую команду:
XCOPY C:\*.* D:\SYS /HКлюч /T позволяет применять XCOPY для копирования только структуры каталогов источника, без дублирования находящихся в этих каталогах файлов, причем пустые каталоги и подкаталоги не включаются. Для того, чтобы все же включить пустые каталоги и подкаталоги, нужно использовать комбинацию ключей /T /E.
Используя XCOPY можно при копировании обновлять только уже существующие файлы (новые файлы при этом не записываются). Для этого применяется ключ /U. Например, если в каталоге C:\2 находились файлы a.txt и b.txt, а в каталоге C:\1 — файлы a.txt, b.txt, c.txt и d.txt, то после выполнения команды
XCOPY C:\1 C:\2 /Uв каталоге C:\2 по-прежнему останутся лишь два файла a.txt и b.txt, содержимое которых будет заменено содержимым соответствующих файлов из каталога C:\1. Если с помощью XCOPY копировался файл с атрибутом «Только для чтения», то по умолчанию у файла-копии этот атрибут снимется. Для того, чтобы копировать не только данные, но и полностью атрибуты файла, необходимо использовать ключ /K.
Ключи /Y и /-Y определяют, нужно ли запрашивать подтверждение перед заменой файлов при копировании. /Y означает, что такой запрос нужен, /-Y — не нужен.
In this tutorial, we will learn how to copy files and folders in the Windows Command prompt.
We are going to look at two cmd commands: Copy and Xcopy.
Note that the copy command has some limitations compared to the xcopy. For example, to copy directories or hidden files, you have to use the xcopy command.
Copy Command
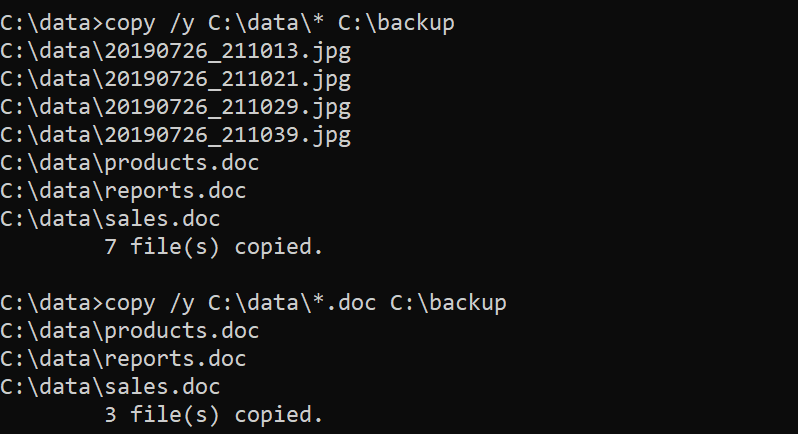
On Windows, we can use the copy command to copy one or more files from one location to another:
copy C:\data\sales.doc C:\backupThe preceding command will copy sales.doc from C:\data\ to C:\backup.
Use the /y switch to overwrite duplicate files without confirmation:
copy /y C:\data\sales.doc C:\backupWe can also save a file to a different name. For example, the following command saves file1.txt as file2.txt in the same directory:
copy file1.txt file2.txtYou can also use wildcards to copy multiple files:
copy /y C:\data\* C:\backup
copy /y C:\data\*.doc C:\backup
The first command copies all files in the C:\data\ directory to C:\backup. The second command copies all files with a .doc extension to the C:\backup.
We can also combine several files into one:
copy file1+file2 file3
copy error* C:\backup\report.txt
In the first line, file1 and file2 are combined to make one file named file3. In the second line, all files whose names start with «error» are copied to the C:\backup, as a single file called report.txt.
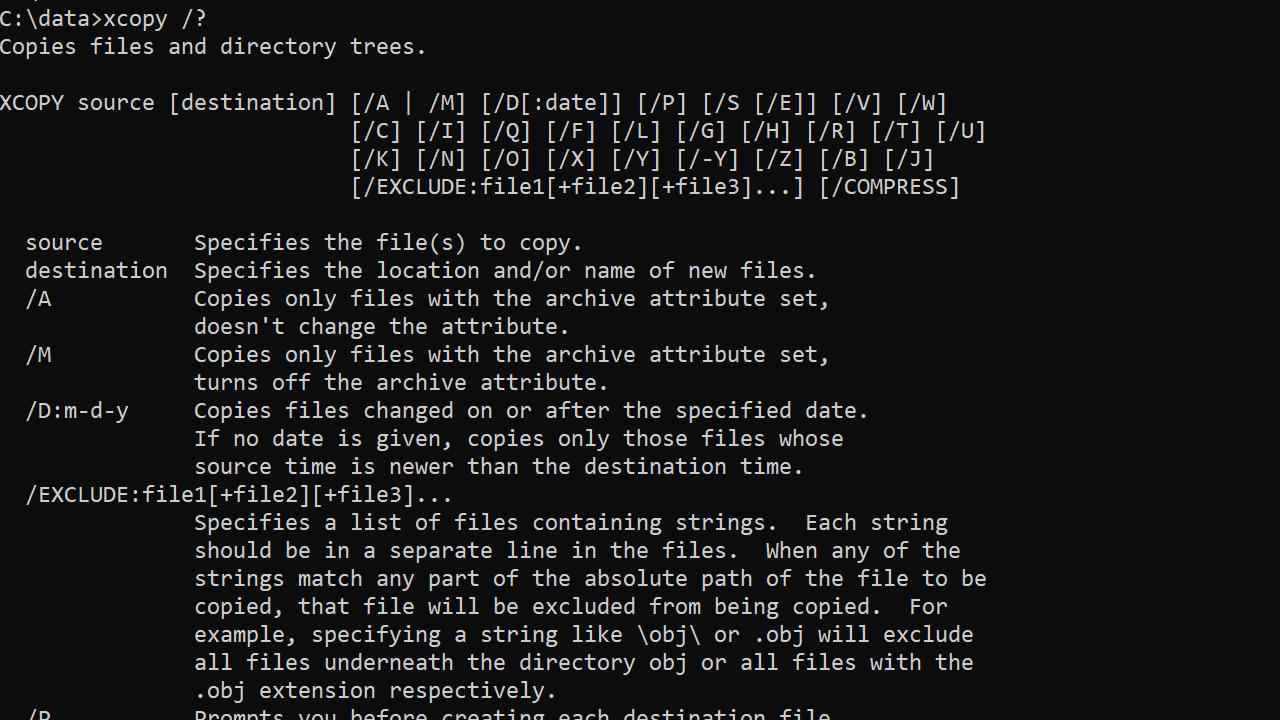
You can get a list of all available options with the copy /? command.
Xcopy Command
The xcopy command offers more features. For example, with xcopy, we can copy directories and subdirectories, as well as hidden files.
Command Options
| /Y | Prompt before overwriting an existing file. |
| /H | Copy hidden files/system files. |
| /S | Copy directories and subdirectories. Empty directories are not included by default (use /e for that). |
| /E | Include empty directories. |
| /I | Create the destination folder if it does not exist. Use this option when you want to copy the parent folder itself. |
| /T | Copy directory tree without files. Empty directories are not included by default. Use /e option to include empty folders. |
| /P | Prompt for confirmation before creating each file. |
| /Q | Quiet mode. |
| /exclude | Specify a text file that contains a list of files to exclude. See the examples. |
| /Z | Resume mode. Use this option when copying files over a network. |
| /D:m-d-y | Copies files changed on or after the specified date. |
Examples of Using the Xcopy Command
Copy sales.doc from the current directory to C:\backup:
xcopy sales.doc C:\backupCopy C:\data\accounts (all files including subdirectories) to C:\backup:
xcopy /s /e /h /i /y C:\data\accounts C:\backup\accounts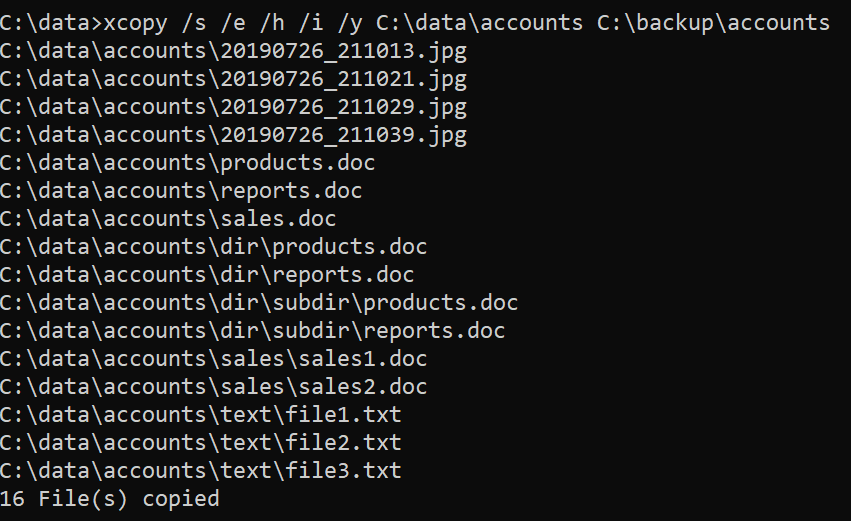
In the following example (without /I switch), the contents of the folder are copied but not the folder itself:
xcopy /s /e /h /y C:\data\accounts C:\backup\Copy the directory structure of C:\OneDrive to the backup directory:
xcopy /s /e /t /y C:\OneDrive C:\backup\You can use wildcard characters to match patterns. The following command copies all files with a .jpg extension:
xcopy /s /h /y C:\data\*.jpg C:\backupUsing for loop to copy multiple files:
for %i in (sales.doc, products.doc) do xcopy /y %i C:\backupExcluding files with xcopy
With the /exclude, we can provide a text file that contains items we want to exclude.
xcopy /s /e /h /y /exclude:C:\Users\user1\files-to-exclude.txt C:\data\ C:\backup\The files-to-exclude.txt may look like the following:
.doc
sales*
In this example, we exclude items with the .doc extension and files whose name starts with sales.
You can get a list of all available options with the xcopy /? command.
You can use the following syntax in Command Prompt (CMD) to copy a directory and its contents:
xcopy source_directory destination_directory /E /I
This example will copy the specified directory and all its contents to the new location.
Note: The /E flag copies all subdirectories, including empty ones, and the /I flag assumes the destination is a directory if it does not exist.
The following example shows how to use this syntax in practice.
Example: Copying a Directory in CMD
Suppose that we want to copy a directory named my_app to my_demoApp in the following path:
C:\Users\admin\Documents\cmd_script
We can type the following command to copy the directory:
xcopy C:\Users\admin\Documents\cmd_script\my_app C:\Users\admin\Documents\cmd_script\my_demoApp /E /I
The following screenshot shows how to use this syntax in practice:
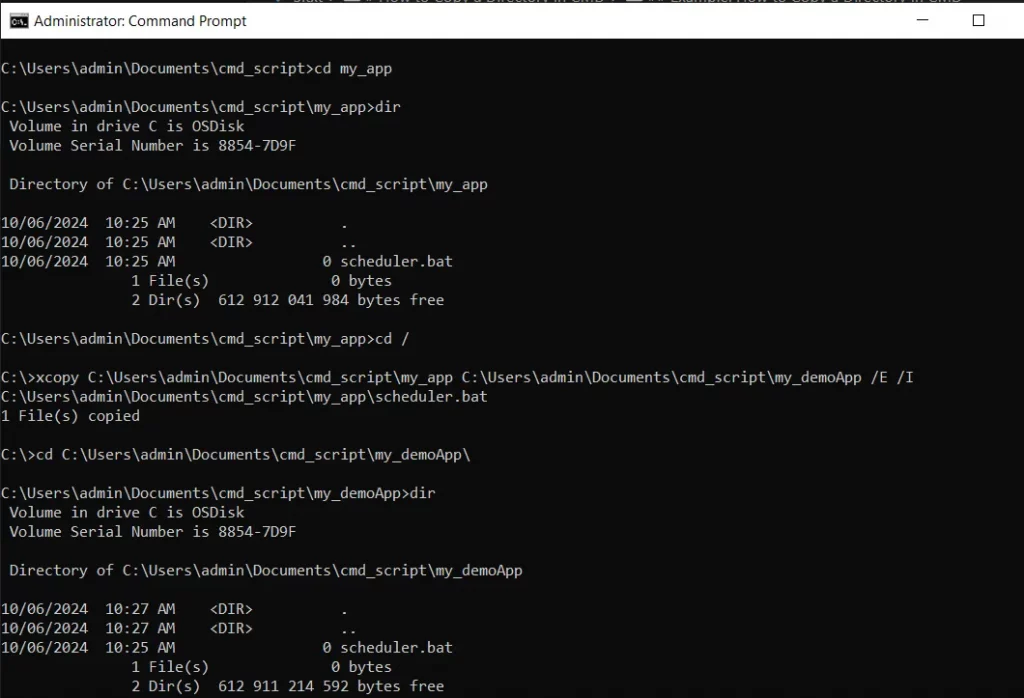
We can see that the directory my_app and all its contents (scheduler.bat file) have been copied to my_demoApp in C:\Users\admin\Documents\cmd_script.
Conclusion
We can use the xcopy command followed by the path to copy any directory and its contents on the system.
You can find more topics about Active Directory tools and PowerShell basics on the ActiveDirectoryTools home page.