
Are you looking for an easy VM migration solution? Try Vinchin Backup & Recovery!↘ Download Free Trial
The invention of server virtualization technology has greatly optimized the utilization of hardware resources and work efficiency of IT environment. After several years, there are many kinds of virtualization solutions in the market.
To move VM or migrate data between different platforms, IT administrators often need V2V converter. Although some platforms can directly accept the files from another platform, sometimes VM conversion is still needed.
In the following sections, you will know the way to convert vmdk to qcow2.
Vmdk and qcow2
VMware vSphere is the leading virtualization solution in the world. With ESXi hypervisor installed on the server, users can easily create virtual machines for all kinds of business systems.
Although virtual machine is a small part of the server, it is still as complete as the physical machine which has CPU, storage, network adapter, etc. Physical machine will save application data to hard disks. When it is needed to clone or migrate data, hard disk data is important. In virtual machine, there are virtual hard disks which also contain applications and data. Because of server virtualization technology, virtual hard disks are just files on the server.
In VMware virtual machine file system, the file format of virtual hard disk is .vmdk, short for Virtual Machine Disk. A VMDK file represents a physical hard drive.
Some VM management tools like XenCenter can accept vmdk file without preconversion.
Generally speaking, vmdk. file is often very large, more than several GB. It will be updated whenever user data or server configuration is modified. There is no feature for acquiring incremental data in VMDK so the entire file needs to be backed up again when any file is modified.
To use the powerful features of VMware, vmdk files are often stored in shared storage. You can copy vmdk files to another datastore for later use. To locate the vmdk files of a VM, you can right-click the VM in vSphere client > select Edit Settings > expand Hard disk to see where they are stored.
Qcow2, short for QEMU copy-on-write format 2, is the successor of the first-generation qcow, which has barely satisfying performance, but still cannot be compared with raw format. After optimization to the first generation of qcow, it is close to raw format in performance. Now, qcow2 is one of the mainstream image formats.
To better use data from VMware, you can change the format of virtual hard disk to let it better work in QEMU/KVM environment like Proxmox, oVirt, RHV, OLVM, OpenStack, etc.
How to convert vmdk to qcow2 with qemu-img?
Qemu-img is an image converter which supports multiple image formats including vhd, qcow2,raw, vhdx, qcow, vdi, qed, zvh and zvhd2. It is needed to add the directory to environment variables like JDK or Python.
In Windows environment:
1. Download the installation package and install it
2. After installation, add the directory to path environment variables
3. Verify the installation by typing the command below:
qemu-img —help
If the version information of qemu-img is presented in the output, the installation is successful
4. Converting the image by typing the command below:
qemu-img convert -p -f vmdk -O qcow2 my_centos7.vmdk my_centos7.qcow2
-p: presenting the conversion progress
-f: format of the source image
-O: format of the target image
In Linux environment:
1. Select the command to install it according to your operating system
For Ubuntu/Debian, type the command below:
apt install qemu-img
For CentOS/Red Hat/Oracle, type the command below:
yum install qemu-img
For SUSE/OpenSUSE, type the command below:
zypper install qemu-img
2. Verify the installation by typing the command below:
qemu-img -v
If the version information of qemu-img is presented in the output, the installation is successful
3. Converting the image by typing the command below:
qemu-img convert -p -f vmdk -O qcow2 ./my_centos7.vmdk ./my_centos7.qcow2
Qemu-img convert can be also used to convert qcow2 to vmdk.
How to Directly Migrate VM with Vinchin Backup & Recovery?
If you would like to migrate VM with a professional solution, you can choose Vinchin Backup & Recovery to migrate VM without converting virtual disk.
Vinchin Virutal Machine Convert Engine supports V2V migration between virtualization platforms like VMware, Proxmox, Hyper-V, Red Hat Virtualization, oVirt, Oracle Linux KVM, OpenStack, etc. (Native KVM is not supported for now)
You don’t need to install agent on every VM, but use the backup and restore features to directly migrate VM. For example, there are just 4 steps to migrate VMware VM to Proxmox in a user-friendly web console.
1. Select the VMware VM

2. Select the Proxmox host
3. Setect the restore strategies or skip this step

4. Submit the job

Vinchin Backup & Recovery has helped many companies migrate VM without losing data and you can also start a 60-day full-featured free trial here to see how convenient it is for VM migration. If you need any help, contact us at any moment. If you would like to do a local business, you can select a local partner here.
Vmdk to qcow2 FAQs
1. Can you convert vmdk to qcow2 on different operating systems?
Yes. With QEMU-convert can be installed on both Windows and Linux OS so you can choose a proper one to convert the virtual disk.
2. Will the virtual disk size grow after conversion?
It is possible that the coverted virtual disk is bigger than the original one so you can use the professional VM migration solution Vinchin Backup & Recovery to avoid that.
Sum Up
There are many virtualization platforms in the world. To migrate data to another platform, IT administrators often need to do conversion job to the source VM. In this post, the methods of converting vmdk to qcow2 are introduced for IT administrators.
Vinchin Backup & Recovery is a convenient tool for you to import VMDK to KVM without complicated commands. Don’t miss the free trial.
[yasr_overall_rating] [yasr_visitor_votes]
This post talks about two software to convert VMDK to QCOW2 in Windows for free. The software I have added here takes a healthy VMDK file from you and produces the corresponding QCOW2 file. The generated QCOW2 files can be used in the dedicated software such as Qemu as a virtual hard drive for the machine. Also, there are other Linux tools that can mount QCOW2 files, you can use it in those as well. However, currently there is no way in Windows to mount them as virtual drives. But you can create QCOW2 files in Windows using a couple of free software that you will see in the post below.
There are quite a number of virtual machine software out there. Some of them are popular and some of them are not. Those virtual machine software use a virtual hard disk file of different formats. The most popular format for the disk of virtual machines are VMDK and VHD but there are some that use other raw formats as well. And one such formats is QCOW2. This format is not supported in Windows and nor you can mount in Windows OS as of now. But you can access its content using free archiver software such as 7-Zip.
If you have a VMDK file and want to use that in another virtual machine that uses QCOW2 format for hard disks then you will have to convert the VMDK file. And the software I have mentioned here lets you do that easily and in just a few minutes. And not only VMDK but the following software can convert the other type of disk images to QCOW2 such as from VHD, VHDX, etc.
qemu-img
qemu-img is a Linux tool but luckily available for Windows as well. This tool comes with a CLI and there is a simple command to convert a VMDK file to QCOW2. It analyzes the given VMDK file and creates the corresponding QCOW2 file that you can use wherever you want. Basically, this tool allows you to convert different kind of virtual hard disk images from one format to other. It supports VMDK, VJD, VHDX, IMG, QCOW2, RAW, and IMG like formats and you can convert them among one another easily, including VMDK to QCOW2. In some Linux distros, you will find this tool pre-installed but in Windows you will have to manually install it.
You can get the Windows binary of this tool from above and then save it somewhere safe. Next, you can add the folder where the binary files of qemu-img are to the system PATH environment variable. If you don’t know what that is then you can see this post. After you’re done with setting the PATH variable, you can start using this tool. Open command prompt or any other CMD emulator and then run this command.
qemu-img.exe convert -f vmdk "Source_VMDK_Image" -O qcow2 "Destination_QCOW2_File"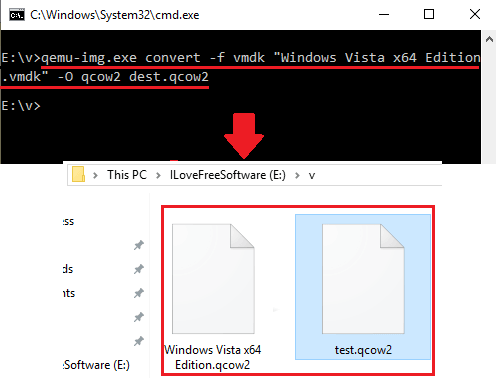
Change the colored parameters in the above command and execute it. It will start processing the input VMDK file after it is done, it will leave the converted QCOW2 file in the same folder. The time it takes for the conversion of the VMDK file depends on its size. In my case, it took around 4 minutes to convert a VMDK of size 2GB to QCOW2. But if you have VMDK of large size, then you will have to be patient during the conversion process.
StarWind V2V Image Converter
StarWind V2V Image Converter is another free software that allows you to painlessly convert a VMDK file to QCOW2 and then you can use that in the virtual machine software that use QCOW format for the virtual disk. This is quite a powerful software that you can use in Windows to convert different type of virtual machine hard disk files to variety of formats including QCOW2. In just a few clicks, you can easily convert a VMDK file to QCOW2 and it even supports the reverse conversion as well. Recently, I uses the same software for VMDK to VHD conversion and now you can use it for VMDK to QCOW2 disk as well.
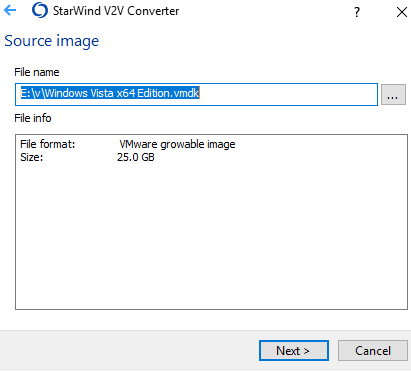
To download this software on your PC, you will have to fill a short form and enter your email address to get the download link. Next, you install the software and then open it up and its wizard like interface. Actually have to specify the different parameters for the conversion in different steps. In the first form, select the “Local File” option and then give it the path to the source VMDK file.
Now, specify the QCOW2 as the target format and location in your PC where it will save the final QCOW2 file.

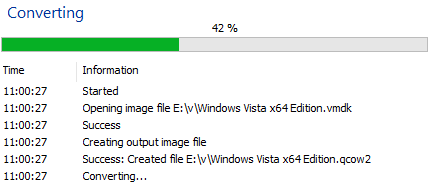
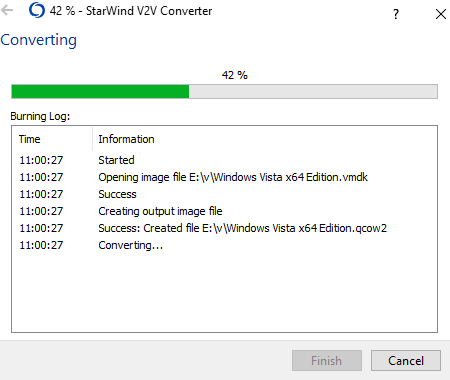
Now, you have specified all the parameters and it is time to start the conversion. So, start the conversion process and you can see its progress on its interface. When it fully converts the VMDK file to QCOW2, you can access or use it in the software or other applications that support QCOW2.
In this way, you can use this simple and handy software to easily convert a VMDK file. And not just VMDK but it supports various other kind of virtual hard disk files such as VMDK, VHD, VHDX, etc. Also, you can even use this software to convert an existing hard drive to virtual machine hard disk file.
Closing Thoughts
QCOW2 is not really a very popular format in the context of virtual machines. And this is why these are the only free software I could find to convert a VMDK file to QCOW2 in Windows. If you are on Linux, there are more advantages for you as you can mount QCOW2 images there easily but this is not the case with Windows. So, if you are looking for some free software to convert VMDK to QCOW2 then you have come to the right place. If you can handle command line tools pretty well then you can use qemu-img. Or, if you want to use simple GUI based software then you can use StarWind V2V Image Converter. And this post will help you in getting started with these free software.
Not your computer? Use Guest mode to sign in privately. Learn more about using Guest mode
Перейти к содержимому
Инструкция по конвертации образов виртуальных машин VMWare для использования на гипервизоре KVM (чистом или Proxmox VE). Дополнительные пакеты не требуются, если конвертация производится на самом KVM, в противном случае требуется установить пакет qemu-utils:
$ apt-get install qemu-utilsПроверить поддерживаемые форматы можно следующей командой:
$ qemu-img -h | grep "Supported formats"
Supported formats: blkdebug blklogwrites blkreplay blkverify bochs cloop copy-on-read dmg file ftp ftps host_cdrom host_device http https iscsi iser luks nbd null-aio null-co nvme parallels qcow qcow2 qed quorum raw rbd replication sheepdog ssh throttle vdi vhdx vmdk vpc vvfat
Если в наличии образ ВМ в формате OVA, разархивируйте его.
$ tar -xvf appliance.ova
box.ovf
box.mf
box-disk.vmdk
Теперь, когда у нас появился файл в формате VMDK, можно провести конвертацию образа.
$ qemu-img convert -O qcow2 box-disk.vmdk box-disk.qcow2Проверяем, что файл появился.
$ ls -1
box-disk.qcow2
box-disk.vmdk
box.mf
box.ovf
Теперь переместим созданный образ в директорию с виртуальными машинами KVM.
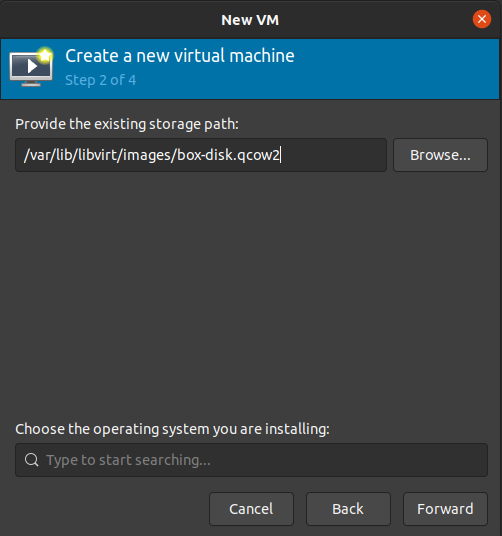
$ mv box-disk1.qcow2 /var/lib/libvirt/images/Теперь в Virtual Machine Manager создадим новую машину, выбрав импорт существующего образа.

Указываем путь к файлу qcow2 и тип ОС:
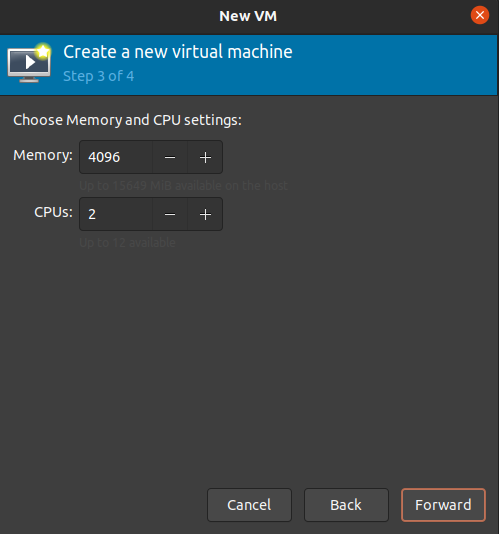
Выделяем ресурсы для новой ВМ:
Вводим имя ВМ и настройки сетевого адаптера.
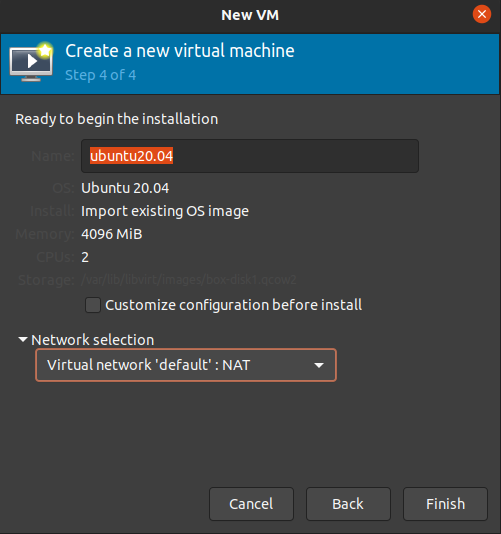
ВМ создана с импортированным образом и готова к работе.
How to: Use qemu-img command to convert between vmdk, raw, qcow2, vdi, vhd, vhdx formats/disk images (qemu-img create, snapshot, resize etc.)
-
First we need to have qemu installed on the system, for most of Linux systems, we can install “qemu-utils” for Windows we can download QEMU disk image utility from here
-
Other related questions
How to open raw disk from VMware
How to open qcow2 disk from VMware
How to open vdi disk from VMware
How to open raw disk from Hyper-V
How to open qcow2 disk from Hyper-V
How to open vdi disk from Hyper-V
How to open raw disk from VirtualBox
How to open qcow2 disk from VirtualBox
How to open vhdx disk from VirtualBox
How to open vmdk disk from VirtualBox
How to open vdi disk from kvm, Xen
How to open vmdk disk from kvm, Xen
How to open vhdx disk from kvm, Xen
How to open vmdk disk from kvm, Xen
- For all those questions, we can just convert the exiting virtual disk/disk image to the correct format by following the guide, then attach to the correct format to the software
qemu-img command supported formats:
Image format Argument for -f and -O options
QCOW2 (KVM, Xen) qcow2
RAW raw
VMDK (VMware) vmdk
VHD (Hyper-V) vpc
VHDX (Hyper-V) vhdx
VDI (VirtualBox) vdi
- qemu-img command supported formats
Convert from raw to qcow2:
qemu-img convert -f raw -O qcow2 /data/source.raw /data/output.qcow2 -p
–f: Source file format (Can be omitted, the command will recognize the format automatically)
-O: Output format
-p: Show the progress bar (Optional)
We can also use following command:
qemu-img convert -f raw -O qcow2 /data/source.img /data/output.qcow2 -p
Convert from qcow2 to raw:
qemu-img convert -O raw /data/source.qcow2 /data/output.raw
Convert vmdk, vhd, vhdx, vdi to raw:
qemu-img convert -O raw /data/source.vmdk /data/output.raw
qemu-img convert -O raw /data/source.vpc /data/output.raw
qemu-img convert -O raw /data/source.vhdx /data/output.raw
qemu-img convert -O raw /data/source.vdi /data/output.raw
Convert raw, vmdk, vpc, vhdx, vdi to qcow2:
qemu-img convert -O qcow2 /data/source.raw /data/output.qcow2
qemu-img convert -O qcow2 /data/source.vmdk /data/output.qcow2
qemu-img convert -O qcow2 /data/source.vpc /data/output.qcow2
qemu-img convert -O qcow2 /data/source.vhdx /data/output.qcow2
qemu-img convert -O qcow2 /data/source.vdi /data/output.qcow2
Convert qcow2, raw, vpc, vhdx, vdi to vmdk:
qemu-img convert -O vmdk /data/source.qcow2 /data/output.vmdk
qemu-img convert -O vmdk /data/source.raw /data/output.vmdk
qemu-img convert -O vmdk /data/source.vpc /data/output.vmdk
qemu-img convert -O vmdk /data/source.vhdx /data/output.vmdk
qemu-img convert -O vmdk /data/source.vdi /data/output.vmdk
Convert qcow2, raw, vmdk, vhdx, vdi to vpc:
qemu-img convert -O vpc /data/source.qcow2 /data/output.vpc
qemu-img convert -O vpc /data/source.raw /data/output.vpc
qemu-img convert -O vpc /data/source.vmdk /data/output.vpc
qemu-img convert -O vpc /data/source.vhdx /data/output.vpc
qemu-img convert -O vpc /data/source.vdi /data/output.vpc
Convert qcow2, raw, vmdk, vpc, vdi to vhdx:
qemu-img convert -O vhdx /data/source.qcow2 /data/output.vhdx
qemu-img convert -O vhdx /data/source.raw /data/output.vhdx
qemu-img convert -O vhdx /data/source.vmdk /data/output.vhdx
qemu-img convert -O vhdx /data/source.vpc /data/output.vhdx
qemu-img convert -O vhdx /data/source.vdi /data/output.vhdx
Convert qcow2, raw, vmdk, vpc, vhdx to vdi:
qemu-img convert -O vdi /data/source.qcow2 /data/output.vdi
qemu-img convert -O vdi /data/source.raw /data/output.vdi
qemu-img convert -O vdi /data/source.vmdk /data/output.vdi
qemu-img convert -O vdi /data/source.vpc /data/output.vdi
qemu-img convert -O vdi /data/source.vhdx /data/output.vdi
- Bonus
Create a virtual disk:
qemu-img create -f raw -o size 10G /data/disk.raw
-f: Disk format
-o: Options, list of format specific options, name1=value1, name2=value2 etc. e.g. size=10G
Get into about a virtual disk:
qemu-img info source.qcow2
Check virtual disk consistency (Only supports qcow2, vdi as of writing):
qemu-img check source.qcow2
Take Snapshot:
qemu-img snapshot /data/source.qcow2 - /data/source.qcow2.snapshot
Note: raw format does not support snapshot, qcow2 does support snapshot
List snapshot:
qemu-img snapshot /data/source.qcow2 -l
Delete snapshot:
qemu-img snapshot -d /data/source.qcow2
Delete specific snapshot with snapshot ID (2 in this example):
qemu-img snapshot -d 2 /data/source.qcow2
Resize:
qemu-img resize /data/disk +1G
Note: We can increase and decrease size on raw format, size of qcow2 format can only be increased
To convert Windows 7 hard drive from Parallels to qcow2 format follow these procedures:
- Uninstall parallels tools from the machine and shut down the machine.
- Extract the
.hdsfile to a working folder. The.hdsfile is located in:
/Users/<user name>/Parallels/Windows 7.pvm/Windows 7-0.hdd/Windows 7-0.hdd.0.{5fbaabe3-6958-40ff-92a7-860e329aab41}.hds
- Issue this command to convert the parallels hard drive to raw image. Be careful the raw image size may be 5 times bigger than parallels hdd:
qemu-img convert -f parallels /Users/<user name>/Parallels/Windows 7.pvm/Windows 7-0.hdd/Windows 7-0.hdd.0.{5fbaabe3-6958-40ff-92a7-860e329aab41}.hds -O raw image.raw
- Convert the raw file to qcow2 image:
qemu-img convert -f raw -O qcow2 image.raw Windows7.qcow2
- Create a new UTM machine and select the
.qcow2drive as a machine drive. Be careful when setting up the machine. Parallels creates a legacy Windows 7 installation so uncheck UEFI boot in the new UTM machine. - After booting install the qemu guest drivers. For Windows 7 I used this drivers version