
Reading time3 min
Views13K
The most depressing thing for me is to connect to Windows hosts. I’m not an opponent or a fan of Microsoft and their’s products. Every product has its own purpose. But it is really painful for me to connect to Windows servers, because of 2 points: it is hard to configure (Hi WinRM with HTTPS), and it is really unstable (Hello RDP to VMs across the ocean).
Fortunately, I found the project Win32-OpenSSH. I realized that I want to share my experience with it. I believe it will help somebody and save a lot of nerves.

Installation ways:
- Manually
- Via Chocolatey package
- Via Ansible, let us say the role jborean93.win_openssh
I will explain the manual way because other ones are obvious.
I must note, this project is on beta stage and it isn’t recommended to use it in production.
Well, let’s download latest release. Currently it is 7.9.0.0p1-beta. It also has 32 and 64 bit versions.
Then unpack it to C:\Program Files\OpenSSH.
Important: It is necessary to grant write access to SYSTEM and Administers group only.
Futher, install services via shell script install-sshd.ps1 which is located in the OpenSSH directory
powershell.exe -ExecutionPolicy Bypass -File install-sshd.ps1Let’s allow incoming connections on 22 port:
New-NetFirewallRule -Name sshd -DisplayName 'OpenSSH Server (sshd)' -Enabled True -Direction Inbound -Protocol TCP -Action Allow -LocalPort 22Note: applet New-NetFirewallRule is for Windows Server 2012 and above only. For older or desktop OS, you can use the following command:
netsh advfirewall firewall add rule name=sshd dir=in action=allow protocol=TCP localport=22
Start the service:
net start sshdThis will automatically generate host keys under %programdata%\ssh if they don’t already exist.
You can set up the service auto-start by command:
Set-Service sshd -StartupType AutomaticAlso, you can change default shell (it is cmd by default after install):
New-ItemProperty -Path "HKLM:\SOFTWARE\OpenSSH" -Name DefaultShell -Value "C:\Windows\System32\WindowsPowerShell\v1.0\powershell.exe" -PropertyType String -ForceNote: you must define absolut path.
What’s next?
We can configure sshd_config, which is located in C:\ProgramData\ssh.
E.g.:
PasswordAuthentication no
PubkeyAuthentication yes
Then we create .ssh directory inside the user directory (C:\Users\<user_directory>) and authorized_keys file inside it. We can paste public keys into this file.
Important: the only user in which directory it is, must have write permissions for this file.
By the way, if you can’t fix it, you can disable permissions check via config:
StrictModes noAlso, directory C:\Program Files\OpenSSH contains 2 scripts (FixHostFilePermissions.ps1, FixUserFilePermissions.ps1), which should
but not obliged
fix permissions, including authorized_keys permissions, but they don’t.
Don’t forget to restart sshd service to apply changes.
ru-mbp-666:infrastructure$ ssh Administrator@192.168.1.10 -i ~/.ssh/id_rsa
Windows PowerShell
Copyright (C) 2016 Microsoft Corporation. All rights reserved.

PS C:\Users\Administrator> Get-Host

Name             : ConsoleHost
Version          : 5.1.14393.2791
InstanceId       : 653210bd-6f58-445e-80a0-66f66666f6f6
UI               : System.Management.Automation.Internal.Host.InternalHostUserInterface
CurrentCulture   : en-US
CurrentUICulture : en-US
PrivateData      : Microsoft.PowerShell.ConsoleHost+ConsoleColorProxy
DebuggerEnabled  : True
IsRunspacePushed : False
Runspace         : System.Management.Automation.Runspaces.LocalRunspace

PS C:\Users\Administrator>
Personal pros/cons.
Pros:
- Standart way to connect to any server (Windows/Linux)
When you have a few Windows host, it’s inconvenient:
So, here we go via ssh, but here via RDP,
and generally speaking, it is the best-practice with bastions, firstly ssh-tunnel, then RDP via the tunnel. Oh kill me baby one more time. - Easy to configure
I think it is obvious. - Connection speed to remote host
Without GUI we save up host resources, and size of transmitted data
Cons:
- It can’t replace RDP in some cases.
Not the all things you can do via PowerShell. I mean the cases when GUI is required.
Links:
Project on Github
Ansible docs
The latest Windows versions include a built-in OpenSSH server which allows to remotely connect Windows hosts over the an encrypted SSH connection. This article describes how to enable and configure an SSH server on Windows 10/11 and connect to it using SSH clients.
How to Install SSH Server on Windows
OpenSSH Server is available as an optional feature in all new versions of Windows starting with Windows 10 (build 1809) and Windows Server 2019. This means you don’t need third-party SSH server software to access Windows remotely via SSH.
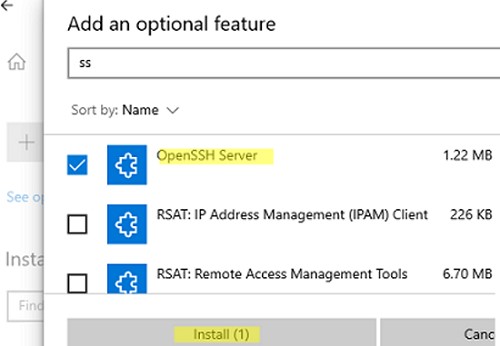
The OpenSSH server feature can be installed on Windows 10 and 11 via the Settings app.
- Go to Settings > System > Optional features (or run the command: ms-settings:optionalfeatures)

- Click View Feature, select OpenSSH Server (OpenSSH-based secure shell (SSH) server, for secure key management and access from remote machines), and click Install.


Or, use this PowerShell command to install the SSH server:
Add-WindowsCapability -Online -Name OpenSSH.Server~~~~0.0.1.0

Check if the OpenSSH server is installed:
Get-WindowsCapability -Online | ? Name -like 'OpenSSH.Server*'

The OpenSSH components are downloaded from the Internet. In an offline (disconnected) environment, you can add the OpenSSH server from the Features on Demand (FoD) ISO image.
- Download the FoD ISO image for your version of Windows from the Volume Licensing Service Centre (VLSC) or from the My Visual Studio portal (requires active subscription).
- Mount the FoD ISO image on Windows to a virtual DVD drive;
- Install the OpenSSH.Server from virtual drive with the command:
Add-WindowsCapability -online -name OpenSSH.Server~~~~0.0.1.0 -source -Source "E:\" -LimitAccess
Note. For previous Windows versions, you can manually install the Win32-OpenSSH port from the GitHub repository.
The OpenSSH binaries are located in the C:\Windows\System32\OpenSSH\ folder.

How to Enable and Configure OpenSSH Server on Windows
OpenSSH service is stopped by default on Windows. Use the PowerShell Get-Service command to check its status:
Get-Service -Name sshd

Start the sshd service and enable the automatic startup:
Start-Service sshd

Set-Service -Name sshd -StartupType 'Automatic'
Then enable the inbound Windows Defender firewall rule that allows remote connections to the SSH server (on TCP port 22):
Get-NetFirewallRule -Name OpenSSH-Server-In-TCP |Enable-NetFirewallRule

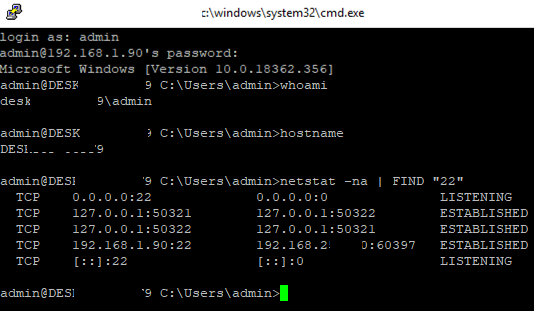
Check that the sshd service is running and listening on port TCP/22:
netstat -nao | find /i '":22"'

Several configuration files containing OpenSSH server settings can be used in Windows.
- Global (system-wide) configuration file: %programdata%\ssh\sshd_config
- A user’s configuration file in the user profile folder: %userprofile%\.ssh\config
You can open and edit the sshd_config file using Notepad:
Notepad.exe $env:PROGRAMDATA\ssh\sshd_config

By default, most of the configuration options in the sshd_config file are disabled. To enable and configure the OpenSSH option, remove the # character at the beginning of the line to uncomment it.
Let’s look at some of the sshd_config directives:
- Enable the SSH key-based authentication: PubkeyAuthentication yes
- Disable password auth: PasswordAuthentication no
- Change the SSH port number (from the default TCP 22): Port 22
The AllowGroups, AllowUsers, DenyGroups, and DenyUsers directives allow to specify which users and groups are allowed or denied to connect to Windows via SSH. For example:
- DenyUsers theitbros\jbrown@192.168.1.15 — deny connection to username jbrown from 192.168.1.15 host;
- DenyUsers theitbros\* — prevent all users from theitbros domain from connecting to the host via SSH;
- AllowGroups theitbros\ssh_allow theitbros\admins— Only allow users from specified groups to SSH to the host;
- AllowUsers mylocaluser1@192.168.31.100 – allow SSH access under the mylocaluser1 account from the 192.168.31.100 host.
Note. The allow and deny rules of sshd are processed in the following order: DenyUsers, AllowUsers, DenyGroups, and AllowGroups.
Restart the sshd service after making changes to the sshd_config file:
Get-Service sshd| Restart-Service –force

Change the default OpenSSH shell from cmd.exe to PowerShell using the command:
New-ItemProperty -Path "HKLM:\SOFTWARE\OpenSSH" -Name DefaultShell -Value "C:\Windows\System32\WindowsPowerShell\v1.0\powershell.exe" -PropertyType String -Force
Connect to Windows via SSH
Now you can use any OpenSSH-compatible client, from either a Linux or Windows host, to connect to an SSH-enabled Windows computer.
For example, on Linux, run the command:
ssh admin@192.168.1.90
- admin is a local Windows user that you want to connect as. This account must be a member of the built-in Administrators group.
- 192.168.1.90 is an IP address or DNS name of the remote Windows host.

Enter the password of a Windows user and an SSH shell with a remote host will be started.
On Windows 10 and 11, you can use the built-in OpenSSH client (ssh.exe, which is installed by default) to establish a remote SSH session. Check if it is enabled with the command:
Get-WindowsCapability -Online | ? Name -like 'OpenSSH.Client*'

You can connect to a remote SSH host from the Windows command prompt:
ssh user123@192.168.13.202
The first time you connect to a remote SSH host, you must add its public key to the list of known hosts by typing yes -> Enter.

If you want to SSH host under an AD domain account, use the following username format:
ssh theitbros\kirill@192.168.13.202
Enter the user’s password and a command prompt should appear:

To copy files to a remote Windows host via an SSH session, use the command:
scp.exe D:\PS\test1.log root@192.168.13.202:c:\temp
Configure Key-Based Authentication for OpenSSH on Windows
The Windows OpenSSH server supports the password and publickey authentication methods. By default, only password authentication is enabled on Windows OpenSSH server.
Let’s look at how to enable and configure OpenSSH key-based authentication instead of username/password pair auth.
Generate public/private key pairs using the Ed25519 algorithm on a Windows client, run the command:
ssh-keygen -t ed25519

Note. For additional key protection, you can set a passphrase.
The ssh-keygen tool will generate two key files and save them in the current user’s profile (C:\Users\%username%\.ssh):
- id_ed25519 – private key
- id_ed25519.pub – public key
The next step is to add the generated public key to the authorized_keys file on the OpenSSH server. Copy the public key from the id_ed25519.pub file and paste it into the administrators_authorized_keys file on the SSH server:
Notepad.exe $env:PROGRAMDATA\ssh\administrators_authorized_keys

Note. The administrators_authorized_keys file is used if the user belongs to the administrator group. For non-privileged Windows users, add the public key to the .ssh/authorised_keys file in the user profile.
Open the file C:\ProgramData\ssh\sshd_config and enable key-based authentication:
PubkeyAuthentication yes
Restart the sshd service:
Get-service sshd|Restart-Service
The ssh-agent will now automatically use the private key for authentication when connecting to a remote host.
Or you can manually specify the path to the key file:
ssh username1@192.168.13.202 -i "C:\Users\user\.ssh\id_ed25519"
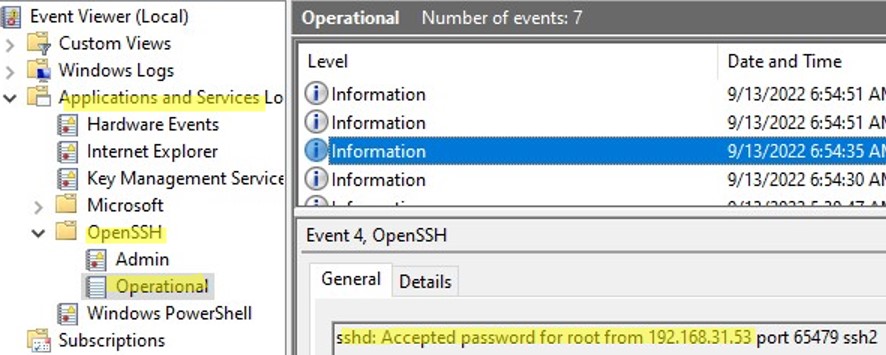
On Windows, SSH logs can be viewed using the Event Viewer console (eventvwr.msc). Expand Application and Services Logs > OpenSSH > Operational.

Cyril Kardashevsky
I enjoy technology and developing websites. Since 2012 I’m running a few of my own websites, and share useful content on gadgets, PC administration and website promotion.
The latest builds of Windows 10 and Windows 11 include a build-in SSH server and client that are based on OpenSSH.
This means now you can remotely connect to Windows 10/11 or Windows Server 2019 using any SSH client, like Linux distros.
Let’s see how to configure OpenSSH on Windows 10 and Windows 11, and connect to it using Putty or any other SSH client.
OpenSSH is an open-source, cross-platform version of Secure Shell (SSH) that is used by Linux users for a long time.
This project is currently ported to Windows and can be used as an SSH server on almost any version of Windows.
In the latest versions of Windows Server 2022/2019 and Windows 11, OpenSSH is built-in to the operating system image.
How to install SSH Server on Windows 10?
Make sure our build of Windows 10 is 1809 or newer. The easiest way to do this is by running the command:
Note. If you have an older Windows 10 build installed, you can update it through Windows Update or using an ISO image with a newer version of Windows 10 (you can create an image using the Media Creation Tool). If you don’t want to update your Windows 10 build, you can manually install the Win32-OpenSSH port for Windows with GitHub.
Enable feature
We can enable OpenSSH server in Windows 10 through the graphical Settings panel:
-
Go to the
Settings>Apps>Apps and features>Optional features(or run thecommand ms-settings:appsfeatures)
-
Click Add a feature, select
OpenSSH Server(OpenSSH-based secure shell (SSH) server, for secure key management and access from remote machines), and clickInstall
Install using PowerShell
We can also install sshd server using PowerShell:
Add-WindowsCapability -Online -Name OpenSSH.Server*
Install using DISM
Or we can also install sshd server using DISM:
dism /Online /Add-Capability /CapabilityName:OpenSSH.Server~~~~0.0.1.0
If you want to make sure the OpenSSH server is installed, run the following PS command:
Get-WindowsCapability -Online | ? Name -like 'OpenSSH.Server*'
How to uninstall SSH Server?
Use the following PowerShell command to uninstall the SSH server:
Remove-WindowsCapability -Online -Name OpenSSH.Server~~~~0.0.1.0
How to Install SSH Server on Windows 11?
Also, you can add the OpenSSH Server on Windows 11.
- Go to Settings > Apps > Optional features;
- Click View Features;
Select OpenSSH Server from the list and click Next > Install;
Wait for the installation to complete.
The OpenSSH binaries are located in the C:\Windows\System32\OpenSSH\ folder.
Configuring SSH Service on Windows 10 and 11
Check the status of ssh-agent and sshd services using the PowerShell command Get-Service:
As we can see, both services are in a Stopped state and not added to the automatic startup list. To start services and configure autostart for them, run the following commands:
Start-Service sshd
Set-Service -Name sshd -StartupType 'Automatic'

Start-Service 'ssh-agent'
Set-Service -Name 'ssh-agent' -StartupType 'Automatic'
We also need to allow incoming connections to TCP port 22 in the Windows Defender Firewall. We can open the port using netsh:
netsh advfirewall firewall add rule name=”SSHD service” dir=in action=allow protocol=TCP localport=22
Or we can add a firewall rule to allow SSH traffic using PowerShell:
New-NetFirewallRule -Name sshd -DisplayName 'OpenSSH Server (sshd)' -Enabled True -Direction Inbound -Protocol TCP -Action Allow -LocalPort 22
Now we can connect to Windows 10 using any SSH client. To connect from Linux, use the command:
ssh -p 22 admin@192.168.1.90
Here, the admin is a local Windows user under which we want to connect. 192.168.1.90 is an IP address of your Windows 10 computer.
After that, a new Windows command prompt window will open in SSH session.
Hint. To run the PowerShell.exe cli instead of cmd.exe shell when logging in via SSH on Windows 10, we need to run the following command in Windows 10 (under admin account):
New-ItemProperty -Path "HKLM:\SOFTWARE\OpenSSH" -Name DefaultShell -Value "C:\Windows\System32\WindowsPowerShell\v1.0\powershell.exe" -PropertyType String -Force
Now, we change the default OpenSSH shell. From here, when connecting to Windows via SSH, you will immediately see PowerShell prompt instead of cmd.exe.
If you want to use key-based ssh authentication instead of password authentication, you need to generate a key using ssh-keygen on your client.
Then, the contents of the id_rsa.pub file must be copied to the c:\users\admin\.ssh\authorized_keys file in Windows 10.
After that, you can connect from your Linux client to Windows 10 without a password. Use the command:
ssh -l admin@192.168.1.90
Configuration
We can configure various OpenSSH server settings in Windows using the %programdata%\ssh\sshd_config configuration file.
For example, we can disable password authentication and leave only key-based auth with:
PubkeyAuthentication yes
PasswordAuthentication no
Here we can also specify a new TCP port (instead of the default TCP 22 port) on which the SSHD will accept connections. For example:
Using the directives AllowGroups, AllowUsers, DenyGroups, DenyUsers, you can specify users and groups who are allowed or denied to connect to Windows via SSH:
DenyUsers theitbros\jbrown@192.168.1.15— blocks connections to username jbrown from 192.168.1.15 hostsжDenyUsers theitbros\*— prevent all users from theitbros domain to connect host using sshжAllowGroups theitbros\ssh_allow— only allow users from theitbtos\ssh_allow connect hostю- The allow and deny rules of sshd are processed in the following order:
DenyUsers,AllowUsers,DenyGroups, andAllowGroups.
After making changes to the sshd_config file, you need to restart the sshd service:
Get-Service sshd | Restart-Service –force
In previous versions of OpenSSH on Windows, all sshd service logs were written to the text file C:\ProgramData\ssh\logs\sshd.log by default.
On Windows 11, SSH logs can be viewed using the Event Viewer console (eventvwr.msc). All SSH events are available in a separate section Application and Services Logs > OpenSSH > Operational.
For example, the screenshot shows an example of an event with a successful connection to the computer via SSH. You can see the ssh client’s IP address (hostname) and the username used to connect.
sshd: Accepted password for jbrown from 192.168.14.14. port 49833 ssh2
In today’s digital landscape, remote access to servers and devices is not just a convenience—it’s a necessity. Secure Shell (SSH) protocols enable users to connect securely to servers over a network, making remote work feasible and secure. While using SSH is seamless on UNIX-based systems, Windows users might initially find the connection process challenging. In this guide, we’ll walk you through how to connect via SSH on Windows, elucidating various methods, tools, and tips for optimizing your experience.
Understanding SSH: The Foundation of Remote Connectivity
Before diving into the practical steps of connecting via SSH, let’s understand what SSH is and why it’s crucial for remote access.
What is SSH?
SSH, or Secure Shell, is a cryptographic network protocol that allows secure data communications over an unsecured network. Originally designed to replace Telnet, SSH provides a secure channel for command execution, file transfer, and communication between networked devices.
Why Use SSH?
Strong points to consider when opting for SSH include:
- Security: SSH employs encryption, protecting against eavesdropping and man-in-the-middle attacks.
- Remote Management: System administrators can manage servers effectively from anywhere in the world.
- Port Forwarding: SSH enables tunneling to secure other traffic and improve security for various services.
Preparing Your Windows Environment for SSH
To get started with SSH on Windows, you need to ensure that your system supports the necessary tools. Here’s how to set it up.
Step 1: Install Windows Subsystem for Linux (WSL)
Windows 10 and later versions allow users to install the Windows Subsystem for Linux, enabling a more UNIX-like environment.
- Search for “Turn Windows features on or off” in the Start menu.
- Find and check the “Windows Subsystem for Linux” option.
- Click “OK” and restart your computer when prompted.
After the reboot, you’ll need to install a Linux distribution from the Microsoft Store, such as Ubuntu or Debian.
Step 2: Installing an SSH Client
While Windows now comes with a built-in SSH client, many prefer using third-party tools, notably PuTTY. Here’s how to install both methods:
Using Built-In OpenSSH Client
Windows 10 and later versions include the OpenSSH client by default. To check if it’s installed:
– Open the Command Prompt and type ssh.
– If it responds with a set of SSH commands, you’re ready to go.
If not, install it through:
– “Manage Optional Features” found in Settings.
– Click on “Add a feature” and search for “OpenSSH Client.”
Using PuTTY
PuTTY is a well-regarded SSH client for Windows. Here’s how to install it:
– Visit the official PuTTY download page.
– Download the appropriate version for your system (32-bit or 64-bit).
– Run the installer and follow the prompts to complete the installation.
Connecting via SSH: The Practical Guide
Now that you’ve prepared your environment, let’s delve into the step-by-step process to connect via SSH.
Method 1: Using the Built-In OpenSSH Client
With the OpenSSH Client installed, follow these steps:
Step 1: Open Command Prompt or PowerShell
- Press Win + R, type
cmdorpowershell, and hit Enter.
Step 2: Run the SSH Command
To connect to a server, use the following syntax:
ssh username@hostname
Replace username with your actual user name and hostname with either the IP address or domain name of the server.
For example:
ssh [email protected]
Step 3: Enter Your Password
You’ll be prompted to enter your password. Type it in (note that no characters will appear as you type) and press Enter.
Step 4: Verify the Host Key
The first time you connect, you’ll be prompted to verify the server’s fingerprint. If it matches the expected key (you should verify this with your server admin), type “yes.”
Method 2: Using PuTTY
If you opted for PuTTY, here’s how to connect using this popular client:
Step 1: Launch PuTTY
After installing PuTTY, open the application.
Step 2: Configure the Session
In the “Host Name (or IP address)” field, enter the hostname or IP address of your server. Ensure the port is set to 22 and the connection type is set to SSH.
Step 3: Save the Session (Optional)
If you plan to use this connection regularly, you can save it. Enter a name under “Saved Sessions” and click “Save.”
Step 4: Connect to Your Server
Click Open to initiate the connection. A terminal window will appear requesting your username. Enter your username and press Enter.
Step 5: Enter Your Password
As with the built-in client method, you will be prompted for your password. Enter it and hit Enter to access the server.
Enhancing Your SSH Experience
Once connected, there are a few enhancements and practices to make your SSH experience more efficient and secure.
Generating SSH Keys
Using SSH keys is a more secure alternative to passwords. Here’s how to generate a key pair:
Using OpenSSH
- Open the Command Prompt or PowerShell.
- Type the following command:
ssh-keygen - Follow the prompts to save the key pair to the default location.
The public key can be copied to the server’s ~/.ssh/authorized_keys file.
Using PuTTYgen
- Open PuTTYgen, which is included with your PuTTY installation.
- Click Generate and move the mouse around to generate randomness.
- Save the public and private keys. You can add the public key to your server as mentioned earlier.
Using SSH Configurations
Configuring the SSH client can streamline the process. For example, with OpenSSH, you can create or edit an ~/.ssh/config file on your local machine to store configurations for different servers.
Example configuration:
Host myserver

HostName example.com

User username

IdentityFile ~/.ssh/my_private_key
After saving this configuration, you can connect by simply typing:
ssh myserver
Troubleshooting Common SSH Issues
While connecting via SSH is generally straightforward, there can be obstacles. Here are some common issues and their solutions:
Issue 1: Connection Timeout
A timeout often indicates network issues or a server that isn’t reachable. Check your internet connection and ensure the server is online.
Issue 2: Permissions Denied
If you encounter “Permission denied,” verify your username and password. If using SSH keys, ensure the public key is placed correctly on the server and has the right permissions.
Issue 3: Host Unreachable
This generally points to network issues. Double-check the server address and ensure that no firewalls or routing issues are blocking your connection.
Conclusion
Connecting via SSH on Windows is a vital skill for anyone who manages or interacts with remote servers. By equipping yourself with the right tools—be it the built-in OpenSSH client or a third-party application like PuTTY—you’ll be well on your way to mastering this valuable technology. Always remember to follow security practices, like using SSH keys and keeping your software updated.
Embrace this essential skill in today’s tech landscape, and you’ll enhance your productivity, streamline remote management, and, most importantly, ensure secure connections to meet your professional needs. Happy SSHing!
What is SSH and why is it used for remote access?
SSH, or Secure Shell, is a protocol used to securely connect to remote systems over a network. It encrypts the data being transferred between the client and server, which helps protect against eavesdropping and other forms of data interception. SSH is commonly used for managing servers and systems remotely, allowing users to execute commands and manage files securely from anywhere.
In addition to its encryption capabilities, SSH also offers features like secure file transfer and secure tunneling, making it a versatile tool for many network configurations. This protocol is especially valuable for system administrators and developers who need to maintain systems or access files on remote machines without exposing themselves to the risks posed by unencrypted connections.
How do I install an SSH client on Windows?
To connect to an SSH server from a Windows machine, you typically need an SSH client. One of the most popular options is PuTTY, which can be downloaded directly from its official website. The installation process is straightforward; you simply need to download the installer and follow the setup instructions. Once installed, PuTTY provides a user-friendly interface for connecting to remote servers.
Alternatively, Windows 10 and later versions come with a built-in OpenSSH client, which can be enabled through the Windows Settings. To do this, go to ‘Settings’, select ‘Apps’, then ‘Optional features’, and check for the OpenSSH Client. If it’s not installed, you have the option to add it from this menu. This built-in client allows you to use the command prompt or PowerShell for SSH connections without needing to download external software.
What are the basic commands to connect via SSH on Windows?
When using an SSH client like PuTTY, you will typically enter the IP address or hostname of the remote server in the ‘Host Name’ field. After setting the connection type to SSH, simply click ‘Open’ to initiate the connection. You will then be prompted to enter your username and password for authentication. Once the credentials are verified, you will access the command line of the remote server.
If you are using the built-in OpenSSH client, you can open the Command Prompt or PowerShell and type the command ssh username@hostname to connect. Replace ‘username’ with your actual username and ‘hostname’ with the server’s IP address or domain name. After pressing enter, you’ll be prompted for your password. If this is your first time connecting to a particular server, you might be asked to confirm the server’s authenticity by accepting its host key.
How can I improve security when using SSH?
Improving security for SSH connections involves several best practices. First, it’s advisable to use key-based authentication rather than password-based authentication. SSH keys are cryptographically secure, and they eliminate the risk involved with using passwords, which can be guessed or stolen. You can generate an SSH key pair and add the public key to the server’s authorized_keys file to set this up.
Additionally, consider configuring your SSH server to disable root login and change the default SSH port from 22 to another value. This reduces the chances of automated attacks targeting SSH ports. Regularly updating your software and using firewalls to limit access to your SSH server can also help bolster security against unauthorized access.
What if I encounter a timeout or connection error while using SSH?
Connection issues such as timeouts or errors may be caused by several factors, including network problems, firewall settings, or incorrect SSH configurations. First, check your internet connection to ensure that your computer is connected to the network. Additionally, verify that the SSH server is running and that you are attempting to connect to the correct IP address and port.
If you suspect a firewall might be blocking the connection, check both your local firewall settings and any firewalls on the server side. Ensure that the port you’re trying to use for SSH is allowed through the firewalls. Also, check the server’s SSH configuration file to confirm that it’s set to accept connections on the specified port and has no misconfigurations that could hinder access.
How do I transfer files using SSH?
To transfer files securely over SSH, you can use the SCP (Secure Copy Protocol) or SFTP (SSH File Transfer Protocol). If you have installed an SSH client like PuTTY, you can use its companion tool called WinSCP for SFTP transfers. After installing WinSCP, you simply enter your SSH credentials and connect to your server, allowing you to drag and drop files between your local system and the remote server.
If you prefer using the command line with the OpenSSH client, you can use the SCP command in the format scp localfile username@hostname:/path/to/remote/directory. Replace ‘localfile’ with the path to the file you want to transfer, and ‘username’, ‘hostname’, and the remote path accordingly. This command can also be inverted to copy files from the remote server to your local machine, making it a flexible option for file transfers.
Can I use SSH to create a secure tunnel for remote access?
Yes, SSH can be used to create secure tunnels, which are extremely valuable for protecting data when accessing remote services. This capability can help circumvent firewalls or network restrictions by forwarding network ports through an SSH connection. For example, you can use the -L option to forward a local port to a remote server through SSH, which allows access to a remote application securely.
To set up local port forwarding, use the following syntax: ssh -L localPort:remoteHost:remotePort username@hostname. This command routes all traffic from localPort on your machine through the SSH connection to the specified remoteHost and remotePort. After establishing this connection, you can access the remote service as if it were running locally, ensuring that data exchanged is encrypted.
SSH-server based on the OpenSSH package is part of the operating system in all modern versions of Windows. In this article, we’ll show you how to install and configure the OpenSSH server on Windows 10/11 and Windows Server 2022/2019 and connect to it remotely via a secure SSH connection (just like in Linux 🙂).
Contents:
- How to Install OpenSSH Server on Windows
- Configuring SSH Server on Windows
- Sshd_config: OpenSSH Server Configuration File
- How to Connect to a Remote Windows Computer via SSH?
- Checking SSH Connection Logs in Windows
How to Install OpenSSH Server on Windows
The OpenSSH Server package is a part of all modern versions of Windows 10 (starting with 1803), Windows 11, and Windows Server 2022/2019 as a Feature on Demand (FoD). To install the OpenSSH server, open the elevated PowerShell prompt and run the command:
Get-WindowsCapability -Online | Where-Object Name -like ‘OpenSSH.Server*’ | Add-WindowsCapability –Online
Or using DISM:
dism /Online /Add-Capability /CapabilityName:OpenSSH.Server~~~~0.0.1.0
If your computer is directly connected to the Internet, the OpenSSH.Server package will be downloaded and installed on Windows.
You can also install OpenSSH on Windows 10/11 through the modern Settings panel (Settings -> Apps and features -> Optional features -> Add a feature). Find Open SSH Server in the list and click Install.
On computers in disconnected (offline) environments, you can install the OpenSSH Server from the Feature on Demand ISO image (available in your account on the Microsoft websites: MSDN or my.visualstudio.com). Download the ISO and extract its contents to the E:\FOD folder (you can only extract the file OpenSSH-Server-Package~31bf3856ad364e35~amd64~~.cab) and install the Windows feature from the local repository:
Add-WindowsCapability -Name OpenSSH.Server~~~~0.0.1.0 -Online -Source E:\FOD
An MSI installer for OpenSSH for Windows is also available in the official Microsoft repository on GitHub (https://github.com/PowerShell/Win32-OpenSSH/releases/). For example, for Windows 10 x64, you need to download and install the OpenSSH-Win64-v8.9.1.0.msi package. The following PowerShell command will download the MSI file and install the OpenSSH client and server on your computer:
Invoke-WebRequest https://github.com/PowerShell/Win32-OpenSSH/releases/download/v8.9.1.0p1-Beta/OpenSSH-Win64-v8.9.1.0.msi -OutFile $HOME\Downloads\OpenSSH-Win64-v8.9.1.0.msi -UseBasicParsing
 msiexec /i $HOME\Downloads\OpenSSH-Win64-v8.9.1.0.msi

You can install an OpenSSH server in previous Windows versions as well (Windows 8.1, Windows Server 2016/2012R2/2012). Check the example on how to install and configure Win32-OpenSSH in the article “How to Configure SFTP Server (SSH FTP) on Windows?”.
To make sure the OpenSSH server has been installed, run the command:
Get-WindowsCapability -Online | ? Name -like 'OpenSSH.Ser*'
State : Installed

Configuring SSH Server on Windows
After installing the OpenSSH server on Windows, two services are added:
- ssh-agent (OpenSSH Authentication Agent) – can be used to manage private keys if you have configured SSH key authentication;
- sshd (OpenSSH SSH Server).
You need to change the startup type of the sshd service to automatic and start the service using PowerShell:
Set-Service -Name sshd -StartupType 'Automatic'
 Start-Service sshd

Use the netstat command to make sure that the SSH server is running and waiting for the connections on TCP port 22:
netstat -na| find ":22"

Make sure that Windows Defender Firewall allows inbound connections to Windows through TCP port 22:
Get-NetFirewallRule -Name *OpenSSH-Server* |select Name, DisplayName, Description, Enabled
Name DisplayName Description Enabled
---- ----------- ----------- -------
OpenSSH-Server-In-TCP OpenSSH SSH Server (sshd) Inbound rule for OpenSSH SSH Server (sshd) True

If the rule is disabled (Enabled=False) or missing, you can create a new inbound rule using the New-NetFirewallRule cmdlet:
New-NetFirewallRule -Name sshd -DisplayName 'OpenSSH Server (sshd)' -Enabled True -Direction Inbound -Protocol TCP -Action Allow -LocalPort 22
By default, key OpenSSH components are located in these folders:
- OpenSSH Server executables:
C:\Windows\System32\OpenSSH\(sshd.exe, ssh.exe, ssh-keygen.exe, sftp.exe, etc.) - The sshd_config file (created after the first service start of the service):
C:\ProgramData\ssh - The authorized_keys file and keys can be stored in the user profile folder:
%USERPROFILE%\.ssh\
Sshd_config: OpenSSH Server Configuration File
You can change your OpenSSH server settings in the config file: %programdata%\ssh\sshd_config. This is a plain text file with a set of directives. You can use any text editor for editing:
start-process notepad C:\Programdata\ssh\sshd_config
For example, to deny SSH connection for a specific domain user account (or all users in the specified domain), add these directives to the end of the file:
DenyUsers woshub\[email protected]
DenyUsers corp\*
To allow SSH connection to the specific domain security group only:
AllowGroups woshub\sshadmins
You can allow access to a local user group:
AllowGroups sshadmins
By default, all Windows users can connect to OpenSSH. Directives in the sshd_config files are processed in the following order: DenyUsers, AllowUsers, DenyGroups, AllowGroups.
You can deny SSH login for the accounts with administrator privileges. In this case, if you need to perform any privileged actions in your SSH session, you will have to use runas.
DenyGroups Administrators
The following directives allow you to access Windows using SSH private keys or a password.
PubkeyAuthentication yes
PasswordAuthentication yes
You can change the default TCP/22 port on which OpenSSH Server connections are accepted in the sshd_config configuration file using the Port directive.
After making any changes to the sshd_config file, you need to restart the sshd service
restart-service sshd
How to Connect to a Remote Windows Computer via SSH?
Now you can try to connect to your Windows 10 computer using the SSH client (I’m using putty in this example).
You can use the built-in Windows SSH client to connect to a remote host. To do this, open the command prompt and run the following command:
ssh [email protected]
In this example, max is the username on the remote Windows computer, and 192.168.13.12 is the IP address or DNS name of the computer.
Note that you can use the following username formats when connecting to Windows via SSH:
max@server1– local Windows user[email protected]@server1– Active Directory user or Microsoft/Azure account (use the UserPrincipalName format)woshub\max@server1– NetBIOS name format
In an Active Directory domain, you can use Kerberos authentication in SSH. To do this, you need to enable the following directive in sshd_config:
GSSAPIAuthentication yes
You can now transparently connect to an SSH server from a domain-joined Windows machine with a domain user session. In this case, the user’s password will not be requested, and SSO authentication via Kerberos will be performed:
ssh -K server1
The first time you connect, you will be prompted to add the host to the list of known SSH hosts (C:\Users\your_user\.ssh\known_hosts).
Click Yes, and login under your Windows user account.
If the SSH connection is successful, you will see the cmd.exe shell prompt.
admin@win10pc C:\Users\admin>

You can run different commands, scripts, and apps in the SSH command prompt.
I prefer working in the PowerShell console. To start it, run:
powershell.exe

In order to change the default cmd.exe shell in OpenSSH to PowerShell, make changes to the registry using the following PowerShell command:
New-ItemProperty -Path "HKLM:\SOFTWARE\OpenSSH" -Name DefaultShell -Value "C:\Windows\System32\WindowsPowerShell\v1.0\powershell.exe" -PropertyType String –Force

Restart your SSH connection and make sure that PowerShell is now used as a default SSH shell (this is indicated by the prompt PS C:\Users\admin>).

The PowerShell prompt has been started in my SSH session, where the usual functions work: tab autocomplete, PSReadLine syntax highlighting, command history, etc. If the current user is a member of the local administrators’ group, all session commands are executed elevated even if UAC is enabled.
OpenSSH server on Windows can be used in various SSH tunneling scenarios.
Checking SSH Connection Logs in Windows
By default in Windows SSH server connection logs are written not to text files, but to a separate event log via Event Tracing for Windows (ETW). Open the Event Viewer console (eventvwr.msc ) and navigate to Application and services logs -> OpenSSH -> Operational.
If you successfully connect to the SSH server using a password, an event will appear in the log:
EventID: 4
sshd: Accepted password for root from 192.168.1.53 port 65749 ssh2
If SSH key authentication was performed, you will see the following event:
sshd: Accepted publickey for locadm from 192.168.1.53 port 61426
ssh2: ED25519 SHA256:FEHDEC/G42FS23209C2KMb4335923pigN31s3qMK322lGibD
If you want the SSH connection logs to be written to a local text file, you need to enable the following parameters in the sshd_config file:
SyslogFacility LOCAL0
LogLevel INFO
Restart the sshd service and make sure that the SSH server logs are now written to a plain text file C:\ProgramData\ssh\logs\sshd.log
You can use a secure SSH connection with PSRemoting to manage remote computers via WinRM.