
I recently upgraded one of my computers to Windows 10 and setup a shared folder so that I could easily transfer files from my MacBook Pro and Windows 7 machines to Windows 10 over the home network. I did a clean install of Windows 10, created a shared folder and attempted to connect to my shared folder from OS X.
Unfortunately, I was not able to connect and it took me a little time to figure it out. In this article, I’ll walk you through the steps to connect to a shared folder on Windows 10 from OS X.
Step 1 – Configure Windows 10 for Sharing
Obviously, the first thing you’ll need to do is create a shared folder on Windows 10. Right-click on the folder, go to Properties and click on the Sharing tab. Go ahead and share the folder and set the permissions to whatever you desire in terms of access.

I suggest clicking on Advanced Sharing as you have more fine-grain control over everything. Check the Share this folder box and then give the share a name. Click on Permissions and then add groups or users that you want to give access.
If you want to make it easy and the folder doesn’t have sensitive data, just add the Everyone group and give them Full Control. This way, you’ll be able to access the folder from any computer or device without having to worry about entering credentials.
The next thing you need to do is make sure that File and Printer Sharing is turned on and allowed through the Windows Firewall in Windows 10. Go to Control Panel and click on Windows Defender Firewall. Then click on Allow an app or feature through Windows Firewall.

Scroll down until you see File and Printer Sharing and make sure that it is checked for the Private network. You may have to first click on the Change settings button at the top before you can select a box.

Lastly, you can decide how you want users to access the folder on Windows 10. By default, when connecting from another machine, you have to enter the username and password of an account that has access to that shared folder on Windows 10. If you setup a Windows 10 user account without adding a password, you won’t be able to connect to the shared folder.
You’ll first have to add a password and then you could connect. However, if you feel your home network is super secure, you can always turn off password protected sharing, which means anyone can connect to the shared folder without having to type in a username or password.

You can do that by going to Control Panel, Network and Sharing Center, Advanced sharing settings and then expanding All Networks. Here you will see an option called Password protected sharing, which you can turn off. I personally keep it turned on, but if you really hate having to type in a username and password to connect, this is an option.
Also, if you use Windows 10 without a password, this would save you from having to setup a password on your account. Note that even if you have a Windows account with a password, if you turn off password protected sharing, then people can still connect without typing any credentials.
Finally, on the Mac, open Finder and look under the Shared section for the Windows 10 PC. If Shared is not in the sidebar, you have to add it. With Finder open, click on Finder and then Preferences at the top. Click on Sidebar and check all the items under Shared.
Now go back to Finder and wait till your computer shows up. Note that it can take a little while until the Windows 10 PC shows up. If it doesn’t show up after 5 minutes, try restarting the PC once.
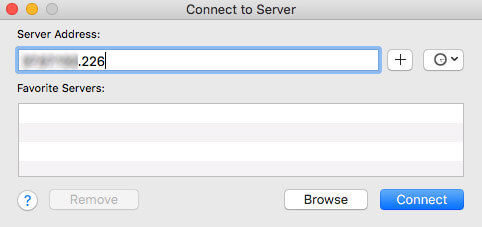
If your Windows PC refuses to show up in the Shared devices list in Finder, you can try connecting manually using SMB. To do that, open Finder and click on Go and then Connect to Server.
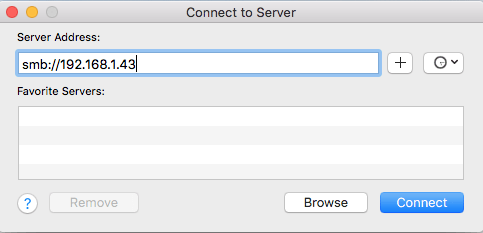
Now type in the following as shown, replacing the IP address below with the IP address of your Windows 10 PC.
smb://192.168.1.43
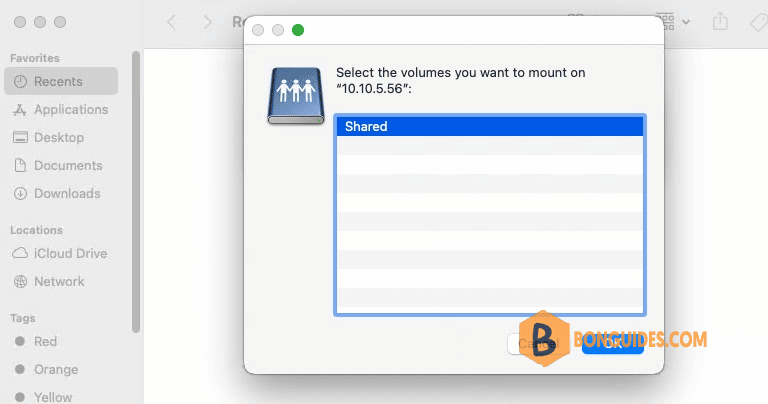
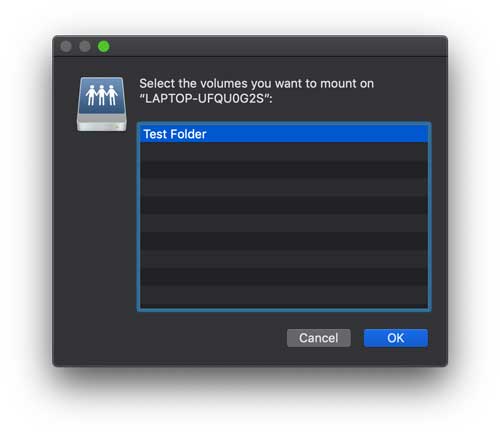
Click the Connect button and you’ll be asked to type in credentials again. If that is entered correctly, you’ll be asked which volume you want to mount.

If you’re still not able to connect using SMB, then there is some issue on your Windows PC. You have to make sure the firewall is configured properly.
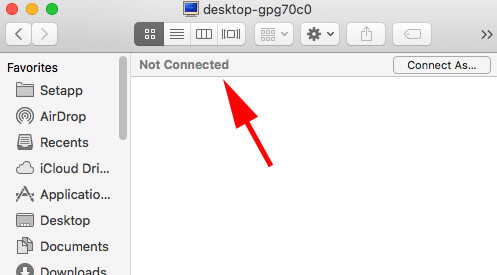
Once it shows up in the sidebar, go ahead and click on it. When you click on it, it will try to connect and you may get a message saying Connection Failed or Not Connected.
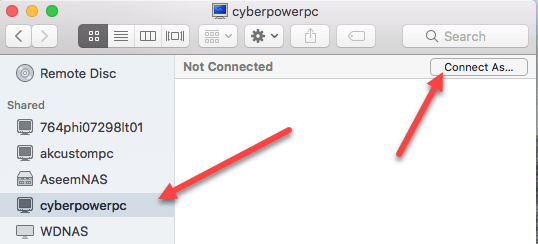
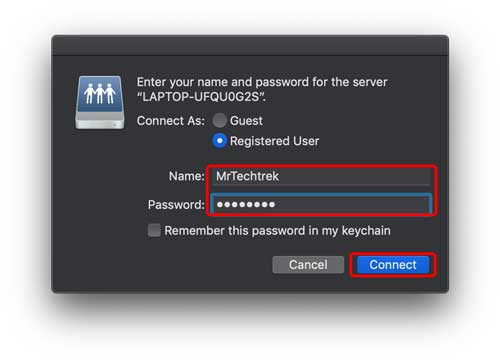
That’s OK! That’s where that password protected folder setting in Windows 10 comes into play. If it’s turned on, you need to connect using the Windows 10 account credentials. You can do that by clicking the Connect As button at the top right.
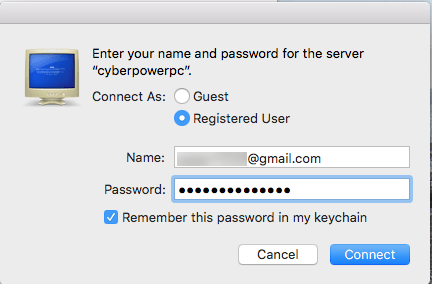
Go ahead and type in your credentials and then click OK. Note that if it’s a Microsoft account you have setup on Windows 10, you’ll need to type in the full email address and the same password that you use to login to your Microsoft account.
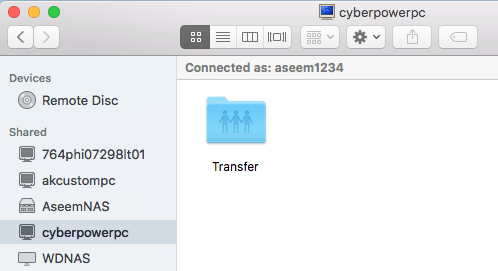
That’s about it! Now you should see the Windows 10 shared folders in Finder on your Mac. If you have any questions about connecting to Windows 10 PC from a Mac, post a comment here and I’ll try to help out. Enjoy!
Related Posts
- How to Connect Xbox Controllers to Your Mac
- How to Chromecast From Mac to Your TV
- How to Install and Run Linux on Mac
- How to Turn Off or Delete Siri Suggestions (iPhone and Mac)
- How to Take Pictures on Mac
Table of Contents
In some cases, Mac users need to access to a shared folder from Windows computer.
Connect to a Windows shared folder on Mac
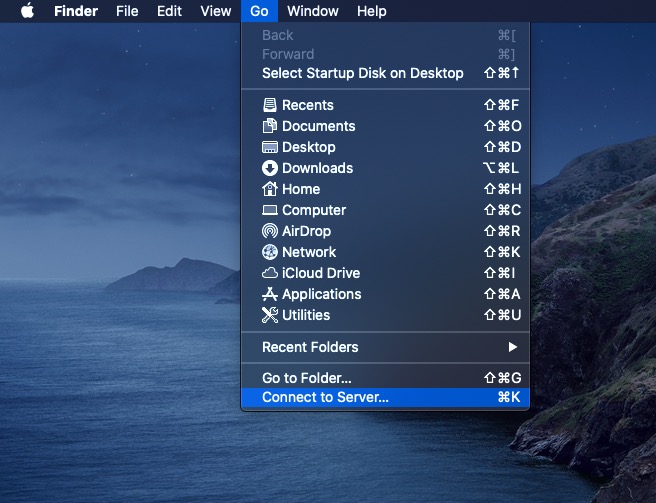
1. In the Finder on your Mac, choose Go > Connect to Server.
2. Type the network address for the computer in the Server Address field using one of these formats:
- smb://DNSname/sharename
- smb://IPaddress/sharename
3. Follow the onscreen instructions to type the workgroup name and a user name and password, then choose the shared folder you want to access.
To make it easier to connect to the computer in the future, select “Remember this password in my keychain” to add the user name and password for the computer to your keychain.
Note
Note: You must enter the username and password of a Windows computer user.
4. Select volumes or shared folders on the server to connect to.
Now, you’ve connected to the shared folder from a Windows machine. You can read-only or write to this folder depending on the permission you have.
Accessing shared folders across different operating systems is a common necessity in today’s integrated work environments. For users who wish to connect a Mac to Windows shared folders, either for personal use or within a corporate setting, the process is surprisingly straightforward, yet it can sometimes present challenges due to differing system architectures and protocols. This article will provide a comprehensive guide on how to access Windows shared folders from a Mac, detailing various methods, troubleshooting tips, and best practices.
Understanding Network Shares
Before diving into the specifics of accessing Windows shared folders, it’s important to understand what network sharing is. A shared folder on a Windows PC allows other computers on the same local network to access its contents without needing to copy files over. This can be particularly useful for file sharing, collaboration on projects, or simply accessing media files from different devices.
Windows uses the Server Message Block (SMB) protocol to enable sharing. Macs can utilize this protocol, which simplifies the process of accessing shared resources on Windows machines.
Prerequisites for Accessing Windows Shared Folders from a Mac
-
Network Connectivity: Ensure both your Mac and Windows PC are connected to the same local network. This can be via Ethernet or Wi-Fi.
-
Windows Sharing Settings: The Windows machine must have file sharing enabled, and the specific folders should be shared with the proper permissions.
-
User Credentials: If the shared folder is protected, you will need the username and password of an account that has access to the folder.
-
macOS Compatibility: Make sure your macOS is updated to a version that has stable support for SMB protocols.
Step-by-Step Guide to Access Windows Shared Folders from a Mac
Step 1: Preparing the Windows Machine
-
Enable File Sharing:
- Open the Control Panel.
- Navigate to Network and Sharing Center > Change advanced sharing settings.
- Turn on file and printer sharing and ensure the network profile is set to Private.
-
Share a Folder:
- Right-click on the folder you wish to share and select Properties.
- Go to the Sharing tab and click on Share.
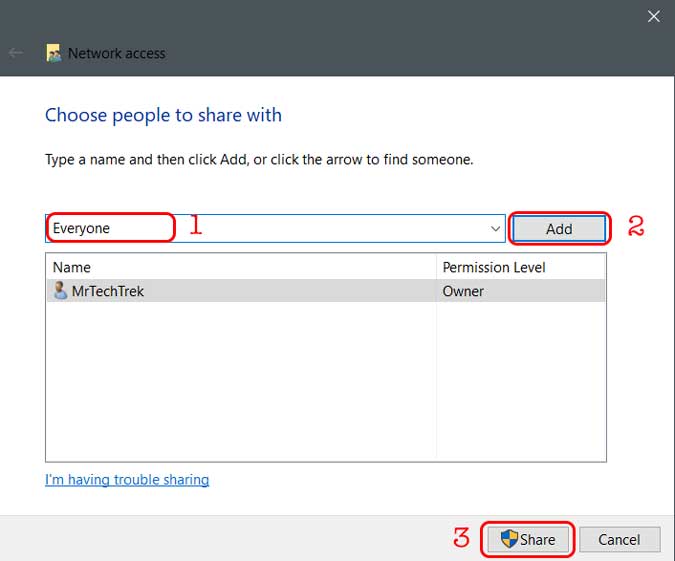
- Choose users to share with or select «Everyone» if you want to make it accessible for anyone on the network. Click Add and set permissions as needed.
- Click Share and then Done to save your changes.
-
Note the Share Path:
- You will find a network path in the sharing options. This usually looks like
\COMPUTERNAMESharedFolderName.
- You will find a network path in the sharing options. This usually looks like
Step 2: Connecting from Your Mac
-
Open Finder:
- Click on the Finder icon in the Dock (the smiley face).
-
Use Go to Connect to Server:
- In the Finder menu bar at the top, click Go and then select Connect to Server (or press
Command + K).
- In the Finder menu bar at the top, click Go and then select Connect to Server (or press
-
Enter the Server Address:
- In the dialog box that appears, type the network path noted earlier (e.g.,
smb://COMPUTERNAME/SharedFolderName).
- In the dialog box that appears, type the network path noted earlier (e.g.,
-
Authenticate:
- Click Connect. You will be prompted to enter your credentials: the username and password for the Windows account that has access to the shared resource.
-
Choose Volumes to Mount:
- If there are multiple shared folders, you may be prompted to select which folder you would like to mount. Select the appropriate one and click OK.
-
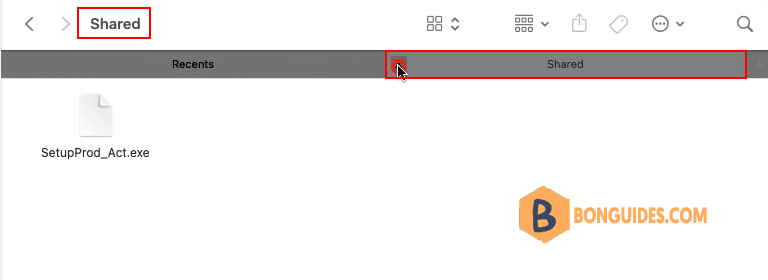
Access the Mounted Shared Folder:
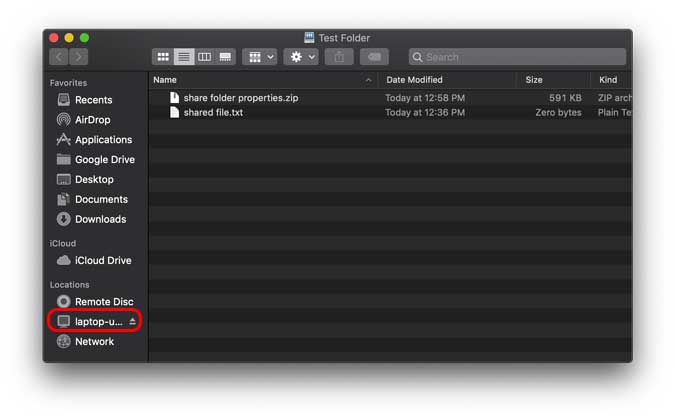
- The shared folder should now appear in the Finder sidebar under the Shared section, and you can browse, modify, and interact with files just as you would with local files.
Step 3: Creating a Shortlink for Future Access
If you anticipate needing to access this shared folder frequently, it is a good idea to create a permanent shortcut.
-
Favorite the Shared Folder:
- Once the shared folder is mounted in Finder, simply drag it to the Favorites section in the sidebar. This makes subsequent access easier.
-
Reconnect at Startup:
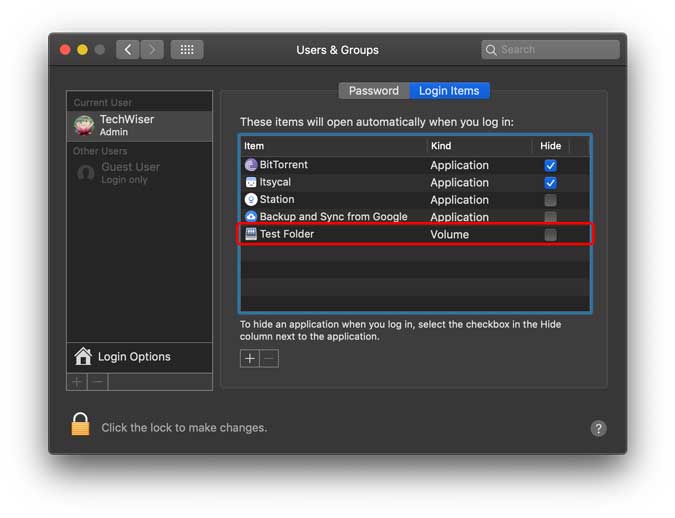
- In Finder, click on Finder > Preferences > General and check the box for «Open whole disk when connecting,» or add the shared folder directly in your login items by going to System Preferences > Users & Groups > Login Items and dragging the folder into that list.
Troubleshooting Common Issues
Although accessing Windows shared folders from a Mac is generally straightforward, you may encounter some challenges. Here are common issues and their solutions:
1. Unable to Connect
Symptoms:
- An error message appears stating that the Mac cannot connect to the server.
Solutions:
- Double-check the network path. Ensure it’s correctly spelled and formatted.
- Make sure the Windows machine is powered on and connected to the network.
- Verify that file sharing is enabled and that the folder’s permissions allow access.
2. Permissions Denied
Symptoms:
- You can see the shared folder, but cannot open it due to permission issues.
Solutions:
- Confirm that the Windows account you’re using has the necessary permissions to access the folder.
- Check the sharing settings on the Windows machine again and ensure that the account is listed under shared permissions.
3. Network Not Found
Symptoms:
- The shared folder is not visible in Finder or when trying to connect.
Solutions:
- Verify that both devices are on the same network.
- Restart the router or modem if needed.
4. SMB Protocol Not Supported
Symptoms:
- An error message about SMB not being supported or requires additional configuration.
Solutions:
- Ensure you are using the correct SMB version. Macs support SMB1, SMB2, and SMB3. You may need to enable SMB1 on the Windows machine or update the SMB settings in the macOS.
Alternative Methods to Access Windows Shared Folders from a Mac
If the standard method does not meet your needs or preferences, there are alternative ways to access Windows shared folders from a Mac.
Using Third-Party Applications
Various third-party applications allow more advanced file sharing and access functionalities. Here are a couple of notable options:
-
Commander One: This is a dual-pane file manager for macOS that provides an easy way to connect and manage files on Windows shared drives.
-
ForkLift: A robust alternative to Finder that supports connecting to various network protocols, including FTP, SFTP, and SMB.
Setting Up a VPN Connection
Using a VPN (Virtual Private Network) can help if you need to access shared folders over the internet instead of a local network. This is particularly useful for remote work scenarios.
- Set up a VPN connection on your Mac that connects to the same network as the Windows machine.
- Once connected, follow the steps previously mentioned to connect to shared folders.
Utilizing FTP/sFTP Options
If the Windows machine supports FTP or secure FTP (sFTP), you can access the shared folders using an FTP client like FileZilla or Cyberduck.
- Open the FTP client and input the Windows machine’s IP address, along with the necessary credentials.
- Browse and manipulate files similar to how you might use Finder.
Best Practices for File Sharing Between Windows and Mac
To maintain efficiency and security in a mixed OS environment, consider the following best practices:
-
Regular Updates: Always ensure that both Windows and macOS are updated to the latest versions for security and compatibility.
-
User Roles and Permissions: Assign user roles and permissions judiciously. Limit access to sensitive folders to only those who truly require it.
-
Backup Important Data: Always keep backups of important files, especially if you are frequently sharing data between different operating systems.
-
Data Security: Use strong, unique passwords for shared folders. Consider using encryption for particularly sensitive files.
-
Manage Network Settings: Regularly review your network settings and permissions on both systems, especially after updates or changes to your network environment.
Conclusion
Accessing Windows shared folders from a Mac is a practical skill for anyone working in mixed-OS environments. By following the outlined steps and employing best practices, you can facilitate straightforward and efficient file sharing across platforms. Whether you are in an office setting, collaborating with friends, or simply managing files between devices, understanding how to navigate these networking challenges will enhance your productivity and streamline your digital experience. By troubleshooting common issues and exploring alternative methods where necessary, you’ll be well-equipped to handle any situation that arises in your cross-platform interactions.
While there are numerous ways to share files between Windows and Mac, probably the easiest one is to use SMB sharing which is built-in on both Windows and Mac. All you need is both computers under the same WiFi network. In this article, we’ll set up shared folders on Windows and access it from a Mac. Let’s begin.
After following this article, you will be able to share the folders from your Windows computer and access it from a Mac. You would also be able to copy and delete the files directly from your Mac without needing to get up from your table. Alternatively, if you want to share the files from your Mac and access on Windows, follow this guide on how to Access Mac Shared folders from Windows.
Access Windows Shared folders from a Mac
Step 1. Enable File Sharing On Windows 10
The first thing you need to do is enable File sharing on your Windows which will allow everyone on your Network access to those. You can either plug in a LAN cable or connect your devices to the same Wi-Fi network to ensure high-speed data transmission. Sure, the speeds won’t be as high as the ethered connection but it would still be better than using Google Drive or flash drives.
The first step is to turn on File Sharing on your Windows computer, you can skip to the next step if it is already enabled. Go Settings and open ‘Network and Sharing Center’.
Pro Tip: Keep all the devices on the same network for easy access in the future.
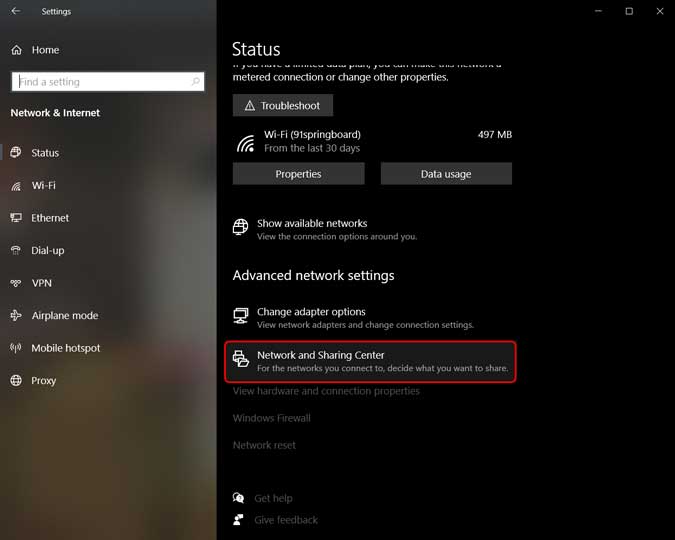
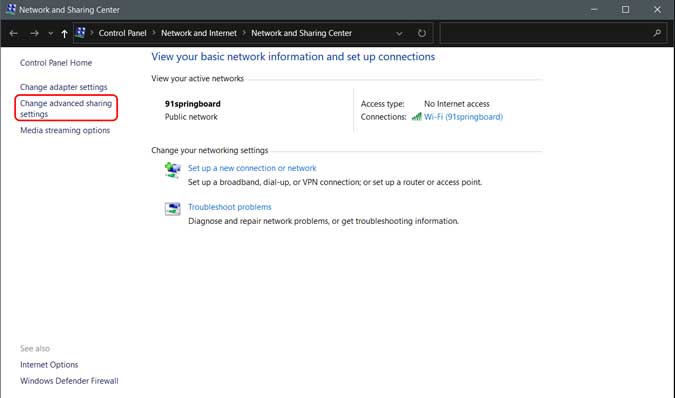
It would open a new window, look on the left pane and click ‘Advanced Sharing Settings‘ to open Sharing Settings.
Read: How to install Chrome OS on any Windows computer
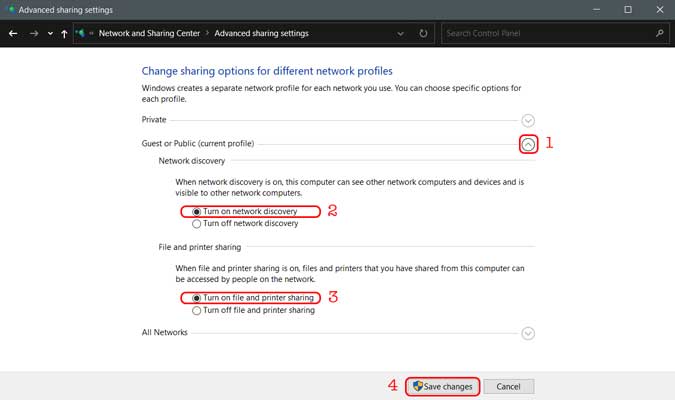
On this page, you’ll see three different Network Profiles; Private, Public, and All Networks. Turn Network Discovery and File Sharing on all the three profiles. If you’re worried about your privacy then you can do this on your current profile and it should still work. Click ‘Save Changes‘.
Unfortunately, it doesn’t work if your Windows PC has no password on it. In such case, you will have to set a new password by going to a user account in the Settings of your Windows.
Also Read: 12 Best Photo Viewer for Windows 10 (2020 Edition)
Step 2. Share a Folder on Windows
Now that the File Sharing is turned on, we’ll share a folder. Open your Windows computer and navigate to the directory which you want to be shared. To demonstrate, I’ll share a folder from C drive but you can share any folder of your choice.
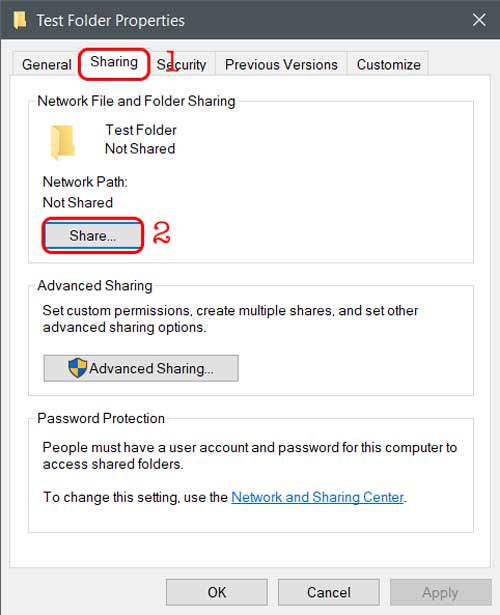
Right-click on the folder, and click Properties.

Go to the Sharing tab and click the Share button under Network File and Folder Sharing.
Here you can add people who can access the shared folder. If the folder you want to share doesn’t have sensitive data, type “Everyone“, click ‘Add‘ and then click ‘Share‘. Your folder is now shared with every user on the network.
Make sure you’ve allowed reading and writing to the shared folder in Windows. That way, you can save and delete files to it from your Mac later on.

You can see the folder is shared in the image below. The phrase underlined in red is the hostname for your Windows computer. Note it down somewhere because we’ll need it later on to establish a connection.

Must Read: How to Share Hotel Wi-Fi With Multiple Devices
Step 3. Access Shared folder On Mac
To access the shared folder on a Mac computer, open Finder and on the menu bar on the top, click on Go > Connect to Server. Press CMD+K on the keyboard.
Enter the hostname we note down earlier while sharing the folder on the Windows. Type “smb://WINDOWS-HOSTNAME” and press enter.

It would prompt you to enter the credentials, enter the username and password of your Windows computer and click ‘Connect‘.
It would show you all the folders that are shared, choose one that you want to mount of your Mac.
There you go, you can now access all the files of the shared folder. Simply open up your finder and look for your Windows PC name in Finder’s sidebar. Clicking on it will bring up your Windows folder. However, you will get an error message if the Windows Computer is locked or powered off.

You will see your Windows folder where you can drag and drop files or even delete it, depending on the permission you have set while setting up Windows sharing for that folder.
If you want to mount other folders, simply repeat the Second portion of this article. To make it even more seamless, just add the mounted folder to login items so that the Network Drive is automatically mounted every time you restart your computer.
Go to System Preferences> Users and Groups> Login Items> Add the Mounted Drive.
Wrapping Up: Sharing Folders
That was a quick way to set up sharing and accessing Windows shared folders from a Mac. It is a convenient and reliable way of accessing large files over the network when you don’t move around a lot. We use it for sharing Rendered video files that reduce the dependency on Google Drive and flash drives. Alternatively, there are plenty of apps that let you share files over the local network. Go ahead map the drives and let me know if you face any problems. You can comment down below or reach me on Twitter.
Kaushal
Works as an in-house Writer at TechWiser and focuses on the latest smart consumer electronics. Closely follows the latest trends in consumer IoT and how it affects our daily lives. You can follow him on Twitter. Yes, he sometimes speaks in Third Person.
Do you have a Windows PC at home or work and a brand new Mac as well? That’s great! That is until you need to access a Windows folder and have no idea how to make your Mac behave in a friendly manner.
The good news is that it’s not difficult to do as long as both devices are connected to the same local network. You don’t need to set up an SSH server any more or even an FTP because transferring files between a Mac and Windows computer is easy.
Let’s find out how you can share a Windows folder with a computer running Mac OS X or macOS.
Step 1: Configure a Shared Folder on Windows to Transfer Files
You need to enable the file-sharing options to set up a shared folder on Windows by performing the following steps.
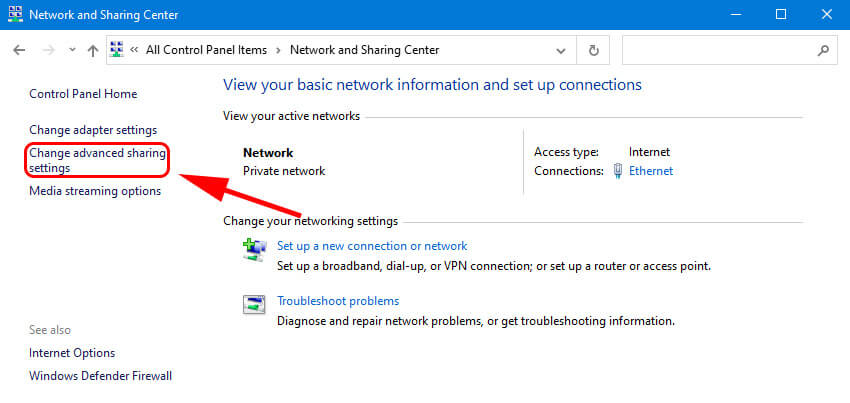
- Go to the Control Panel and select Network and Sharing. The Network and Sharing panel enables you to set up new network sharing connections. You can access all settings as well as troubleshoot problems that might arise during configuration.
- Navigate to Change Advanced Sharing settings in the left column. Here you will find all the network sharing settings in Windows.

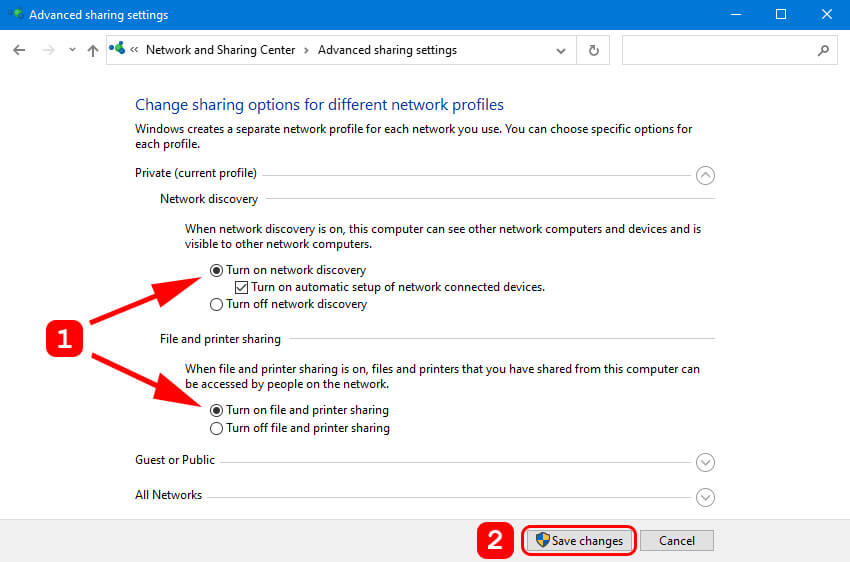
- Select network discovery and turn it on to allow other computers on the network to access the Windows PC.
- Once you enable network discovery, turn on File and Printer Sharing, and save changes.

Accessing the shared folder from Windows
Once you have set up the shared folder, access it from Windows. To do that, select the Network pane in Windows Explorer to see all the computers attached to your network.
In this window you will find the Mac computer you want to connect to and a list of other computers accessible on the network.
To share files between Mac and PC, you can easily connect to the Mac computer if you know the name or its IP address. All you need to do is type the computer’s name in the location bar of Windows Explorer and press Enter.
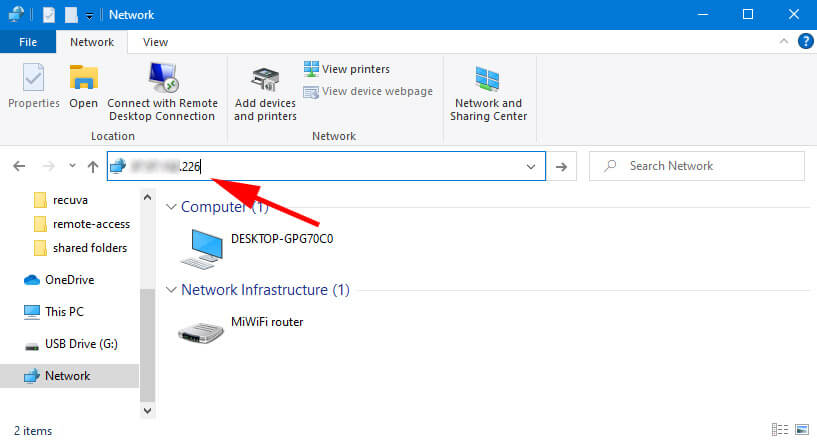
You can also enter the computer’s IP address if you do not know its name.
Step 2: Access the Windows Shared Folder From macOS
Now you need to access the shared folder from the Mac computer. Use the following steps to connect to the shared folder with macOS.
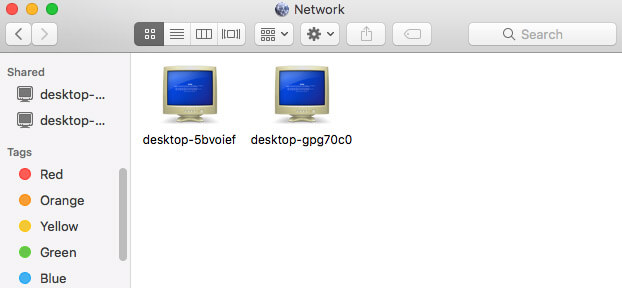
- Open Finder and navigate to the Shared section. Locate the Windows computer to which you want to connect.

- Click on the Windows PC. If you get a Connection failed message it may indicate that the shared folder is password protected. In that case, click the Connect As button, type the credentials, and click OK.

- If the Windows PC does not appear in the sidebar you can connect to it manually by selecting Connect to Server from within Finder. Provide the Windows computer’s IP address and click Connect.

At this point you can access the shared folder on the Windows machine from your Mac.
Reasons Why You Need to Access a Windows Shared Folder Using Mac
There are multiple reasons why you might need to access a shared Windows folder from your Mac:
- Transfer files from an old PC to a new Mac;
- Access files from a work machine on your home Mac computer.
- Directly share files with family members of colleagues on the same network.
FAQs
-
How to determine your PC’s or Mac’s IP address?
To determine your PC’s IP address, enter “ipconfig” on the command line. On a Mac, go to System Preferences and look in Network for the machine’s IP address.
-
Can I connect Windows shared folders directly via the IP address?
Yes, you can connect to Windows shared folders using the IP address. Click the WiFi connection button and then go to Properties of the connected network to access the shared folders.
-
Can I share and access an external hard drive or USB flash drive?
Yes, you can share to an external hard drive or USB flash drive, but you need to ensure that both machines support the storage media.
-
Can I share/use Microsoft Onedrive on Windows and Mac at the same time?
Yes, you can use Microsoft Onedrive on Windows and Mac simultaneously to share and transfer files.
Conclusion
Once you connect your Mac machine with your Windows computer, you will see the shared files every time to log in to your PC.
Now that you know how to access a Windows shared folder from Mac OS X, you can increase your productivity by easily sharing files across operating systems, it’s time for you to go and practice this unique skill.