
Connecting to a Database
psql is a regular PostgreSQL client application. In order to connect to a database you need to know the name of your target database, the host name and port number of the server, and what database user name you want to connect as. psql can be told about those parameters via command line options, namely -d, -h, -p, and -U respectively. If an argument is found that does not belong to any option it will be interpreted as the database name (or the database user name, if the database name is already given). Not all of these options are required; there are useful defaults. If you omit the host name, psql will connect via a Unix-domain socket to a server on the local host, or via TCP/IP to localhost on Windows. The default port number is determined at compile time. Since the database server uses the same default, you will not have to specify the port in most cases. The default database user name is your operating-system user name. Once the database user name is determined, it is used as the default database name. Note that you cannot just connect to any database under any database user name. Your database administrator should have informed you about your access rights.
When the defaults aren’t quite right, you can save yourself some typing by setting the environment variables PGDATABASE, PGHOST, PGPORT and/or PGUSER to appropriate values. (For additional environment variables, see Section 32.15.) It is also convenient to have a ~/.pgpass file to avoid regularly having to type in passwords. See Section 32.16 for more information.
An alternative way to specify connection parameters is in a conninfo string or a URI, which is used instead of a database name. This mechanism give you very wide control over the connection. For example:
$psql "service=myservice sslmode=require"$psql postgresql://dbmaster:5433/mydb?sslmode=require
This way you can also use LDAP for connection parameter lookup as described in Section 32.18. See Section 32.1.2 for more information on all the available connection options.
If the connection could not be made for any reason (e.g., insufficient privileges, server is not running on the targeted host, etc.), psql will return an error and terminate.
If both standard input and standard output are a terminal, then psql sets the client encoding to “auto”, which will detect the appropriate client encoding from the locale settings (LC_CTYPE environment variable on Unix systems). If this doesn’t work out as expected, the client encoding can be overridden using the environment variable PGCLIENTENCODING.
Entering SQL Commands
In normal operation, psql provides a prompt with the name of the database to which psql is currently connected, followed by the string =>. For example:
$ psql testdb
psql (17.5)
Type "help" for help.

testdb=>
At the prompt, the user can type in SQL commands. Ordinarily, input lines are sent to the server when a command-terminating semicolon is reached. An end of line does not terminate a command. Thus commands can be spread over several lines for clarity. If the command was sent and executed without error, the results of the command are displayed on the screen.
If untrusted users have access to a database that has not adopted a secure schema usage pattern, begin your session by removing publicly-writable schemas from search_path. One can add options=-csearch_path= to the connection string or issue SELECT pg_catalog.set_config('search_path', '', false) before other SQL commands. This consideration is not specific to psql; it applies to every interface for executing arbitrary SQL commands.
Whenever a command is executed, psql also polls for asynchronous notification events generated by LISTEN and NOTIFY.
While C-style block comments are passed to the server for processing and removal, SQL-standard comments are removed by psql.
Advanced Features
Variables
psql provides variable substitution features similar to common Unix command shells. Variables are simply name/value pairs, where the value can be any string of any length. The name must consist of letters (including non-Latin letters), digits, and underscores.
To set a variable, use the psql meta-command \set. For example,
testdb=> \set foo bar
sets the variable foo to the value bar. To retrieve the content of the variable, precede the name with a colon, for example:
testdb=> \echo :foo
bar
This works in both regular SQL commands and meta-commands; there is more detail in SQL Interpolation, below.
If you call \set without a second argument, the variable is set to an empty-string value. To unset (i.e., delete) a variable, use the command \unset. To show the values of all variables, call \set without any argument.
Note
The arguments of \set are subject to the same substitution rules as with other commands. Thus you can construct interesting references such as \set :foo 'something' and get “soft links” or “variable variables” of Perl or PHP fame, respectively. Unfortunately (or fortunately?), there is no way to do anything useful with these constructs. On the other hand, \set bar :foo is a perfectly valid way to copy a variable.
A number of these variables are treated specially by psql. They represent certain option settings that can be changed at run time by altering the value of the variable, or in some cases represent changeable state of psql. By convention, all specially treated variables’ names consist of all upper-case ASCII letters (and possibly digits and underscores). To ensure maximum compatibility in the future, avoid using such variable names for your own purposes.
Variables that control psql‘s behavior generally cannot be unset or set to invalid values. An \unset command is allowed but is interpreted as setting the variable to its default value. A \set command without a second argument is interpreted as setting the variable to on, for control variables that accept that value, and is rejected for others. Also, control variables that accept the values on and off will also accept other common spellings of Boolean values, such as true and false.
The specially treated variables are:
AUTOCOMMIT#-
When
on(the default), each SQL command is automatically committed upon successful completion. To postpone commit in this mode, you must enter aBEGINorSTART TRANSACTIONSQL command. Whenoffor unset, SQL commands are not committed until you explicitly issueCOMMITorEND. The autocommit-off mode works by issuing an implicitBEGINfor you, just before any command that is not already in a transaction block and is not itself aBEGINor other transaction-control command, nor a command that cannot be executed inside a transaction block (such asVACUUM).Note
In autocommit-off mode, you must explicitly abandon any failed transaction by entering
ABORTorROLLBACK. Also keep in mind that if you exit the session without committing, your work will be lost.Note
The autocommit-on mode is PostgreSQL‘s traditional behavior, but autocommit-off is closer to the SQL spec. If you prefer autocommit-off, you might wish to set it in the system-wide
psqlrcfile or your~/.psqlrcfile. COMP_KEYWORD_CASE#-
Determines which letter case to use when completing an SQL key word. If set to
lowerorupper, the completed word will be in lower or upper case, respectively. If set topreserve-lowerorpreserve-upper(the default), the completed word will be in the case of the word already entered, but words being completed without anything entered will be in lower or upper case, respectively. DBNAME#-
The name of the database you are currently connected to. This is set every time you connect to a database (including program start-up), but can be changed or unset.
ECHO#-
If set to
all, all nonempty input lines are printed to standard output as they are read. (This does not apply to lines read interactively.) To select this behavior on program start-up, use the switch-a. If set toqueries, psql prints each query to standard output as it is sent to the server. The switch to select this behavior is-e. If set toerrors, then only failed queries are displayed on standard error output. The switch for this behavior is-b. If set tonone(the default), then no queries are displayed. ECHO_HIDDEN#-
When this variable is set to
onand a backslash command queries the database, the query is first shown. This feature helps you to study PostgreSQL internals and provide similar functionality in your own programs. (To select this behavior on program start-up, use the switch-E.) If you set this variable to the valuenoexec, the queries are just shown but are not actually sent to the server and executed. The default value isoff. ENCODING#-
The current client character set encoding. This is set every time you connect to a database (including program start-up), and when you change the encoding with
\encoding, but it can be changed or unset. ERROR#-
trueif the last SQL query failed,falseif it succeeded. See alsoSQLSTATE. FETCH_COUNT#-
If this variable is set to an integer value greater than zero, the results of
SELECTqueries are fetched and displayed in groups of that many rows, rather than the default behavior of collecting the entire result set before display. Therefore only a limited amount of memory is used, regardless of the size of the result set. Settings of 100 to 1000 are commonly used when enabling this feature. Keep in mind that when using this feature, a query might fail after having already displayed some rows.Tip
Although you can use any output format with this feature, the default
alignedformat tends to look bad because each group ofFETCH_COUNTrows will be formatted separately, leading to varying column widths across the row groups. The other output formats work better. HIDE_TABLEAM#-
If this variable is set to
true, a table’s access method details are not displayed. This is mainly useful for regression tests. HIDE_TOAST_COMPRESSION#-
If this variable is set to
true, column compression method details are not displayed. This is mainly useful for regression tests. HISTCONTROL#-
If this variable is set to
ignorespace, lines which begin with a space are not entered into the history list. If set to a value ofignoredups, lines matching the previous history line are not entered. A value ofignorebothcombines the two options. If set tonone(the default), all lines read in interactive mode are saved on the history list.Note
This feature was shamelessly plagiarized from Bash.
HISTFILE#-
The file name that will be used to store the history list. If unset, the file name is taken from the
PSQL_HISTORYenvironment variable. If that is not set either, the default is~/.psql_history, or%APPDATA%\postgresql\psql_historyon Windows. For example, putting:\set HISTFILE ~/.psql_history-:DBNAME
in
~/.psqlrcwill cause psql to maintain a separate history for each database.Note
This feature was shamelessly plagiarized from Bash.
HISTSIZE#-
The maximum number of commands to store in the command history (default 500). If set to a negative value, no limit is applied.
Note
This feature was shamelessly plagiarized from Bash.
HOST#-
The database server host you are currently connected to. This is set every time you connect to a database (including program start-up), but can be changed or unset.
IGNOREEOF#-
If set to 1 or less, sending an EOF character (usually Control+D) to an interactive session of psql will terminate the application. If set to a larger numeric value, that many consecutive EOF characters must be typed to make an interactive session terminate. If the variable is set to a non-numeric value, it is interpreted as 10. The default is 0.
Note
This feature was shamelessly plagiarized from Bash.
LASTOID#-
The value of the last affected OID, as returned from an
INSERTor\lo_importcommand. This variable is only guaranteed to be valid until after the result of the next SQL command has been displayed. PostgreSQL servers since version 12 do not support OID system columns anymore, thus LASTOID will always be 0 followingINSERTwhen targeting such servers. LAST_ERROR_MESSAGELAST_ERROR_SQLSTATE#-
The primary error message and associated SQLSTATE code for the most recent failed query in the current psql session, or an empty string and
00000if no error has occurred in the current session. ON_ERROR_ROLLBACK#-
When set to
on, if a statement in a transaction block generates an error, the error is ignored and the transaction continues. When set tointeractive, such errors are only ignored in interactive sessions, and not when reading script files. When set tooff(the default), a statement in a transaction block that generates an error aborts the entire transaction. The error rollback mode works by issuing an implicitSAVEPOINTfor you, just before each command that is in a transaction block, and then rolling back to the savepoint if the command fails. ON_ERROR_STOP#-
By default, command processing continues after an error. When this variable is set to
on, processing will instead stop immediately. In interactive mode, psql will return to the command prompt; otherwise, psql will exit, returning error code 3 to distinguish this case from fatal error conditions, which are reported using error code 1. In either case, any currently running scripts (the top-level script, if any, and any other scripts which it may have in invoked) will be terminated immediately. If the top-level command string contained multiple SQL commands, processing will stop with the current command. PORT#-
The database server port to which you are currently connected. This is set every time you connect to a database (including program start-up), but can be changed or unset.
PROMPT1PROMPT2PROMPT3#-
These specify what the prompts psql issues should look like. See Prompting below.
QUIET#-
Setting this variable to
onis equivalent to the command line option-q. It is probably not too useful in interactive mode. ROW_COUNT#-
The number of rows returned or affected by the last SQL query, or 0 if the query failed or did not report a row count.
SERVER_VERSION_NAMESERVER_VERSION_NUM#-
The server’s version number as a string, for example
9.6.2,10.1or11beta1, and in numeric form, for example90602or100001. These are set every time you connect to a database (including program start-up), but can be changed or unset. SHELL_ERROR#-
trueif the last shell command failed,falseif it succeeded. This applies to shell commands invoked via the\!,\g,\o,\w, and\copymeta-commands, as well as backquote (`) expansion. Note that for\o, this variable is updated when the output pipe is closed by the next\ocommand. See alsoSHELL_EXIT_CODE. SHELL_EXIT_CODE#-
The exit status returned by the last shell command. 0–127 represent program exit codes, 128–255 indicate termination by a signal, and -1 indicates failure to launch a program or to collect its exit status. This applies to shell commands invoked via the
\!,\g,\o,\w, and\copymeta-commands, as well as backquote (`) expansion. Note that for\o, this variable is updated when the output pipe is closed by the next\ocommand. See alsoSHELL_ERROR. SHOW_ALL_RESULTS#-
When this variable is set to
off, only the last result of a combined query (\;) is shown instead of all of them. The default ison. The off behavior is for compatibility with older versions of psql. SHOW_CONTEXT#-
This variable can be set to the values
never,errors, oralwaysto control whetherCONTEXTfields are displayed in messages from the server. The default iserrors(meaning that context will be shown in error messages, but not in notice or warning messages). This setting has no effect whenVERBOSITYis set toterseorsqlstate. (See also\errverbose, for use when you want a verbose version of the error you just got.) SINGLELINE#-
Setting this variable to
onis equivalent to the command line option-S. SINGLESTEP#-
Setting this variable to
onis equivalent to the command line option-s. SQLSTATE#-
The error code (see Appendix A) associated with the last SQL query’s failure, or
00000if it succeeded. USER#-
The database user you are currently connected as. This is set every time you connect to a database (including program start-up), but can be changed or unset.
VERBOSITY#-
This variable can be set to the values
default,verbose,terse, orsqlstateto control the verbosity of error reports. (See also\errverbose, for use when you want a verbose version of the error you just got.) VERSIONVERSION_NAMEVERSION_NUM#-
These variables are set at program start-up to reflect psql‘s version, respectively as a verbose string, a short string (e.g.,
9.6.2,10.1, or11beta1), and a number (e.g.,90602or100001). They can be changed or unset.
SQL Interpolation
A key feature of psql variables is that you can substitute (“interpolate”) them into regular SQL statements, as well as the arguments of meta-commands. Furthermore, psql provides facilities for ensuring that variable values used as SQL literals and identifiers are properly quoted. The syntax for interpolating a value without any quoting is to prepend the variable name with a colon (:). For example,
testdb=>\set foo 'my_table'testdb=>SELECT * FROM :foo;
would query the table my_table. Note that this may be unsafe: the value of the variable is copied literally, so it can contain unbalanced quotes, or even backslash commands. You must make sure that it makes sense where you put it.
When a value is to be used as an SQL literal or identifier, it is safest to arrange for it to be quoted. To quote the value of a variable as an SQL literal, write a colon followed by the variable name in single quotes. To quote the value as an SQL identifier, write a colon followed by the variable name in double quotes. These constructs deal correctly with quotes and other special characters embedded within the variable value. The previous example would be more safely written this way:
testdb=>\set foo 'my_table'testdb=>SELECT * FROM :"foo";
Variable interpolation will not be performed within quoted SQL literals and identifiers. Therefore, a construction such as ':foo' doesn’t work to produce a quoted literal from a variable’s value (and it would be unsafe if it did work, since it wouldn’t correctly handle quotes embedded in the value).
One example use of this mechanism is to copy the contents of a file into a table column. First load the file into a variable and then interpolate the variable’s value as a quoted string:
testdb=>\set content `cat my_file.txt`testdb=>INSERT INTO my_table VALUES (:'content');
(Note that this still won’t work if my_file.txt contains NUL bytes. psql does not support embedded NUL bytes in variable values.)
Since colons can legally appear in SQL commands, an apparent attempt at interpolation (that is, :name, :'name', or :"name") is not replaced unless the named variable is currently set. In any case, you can escape a colon with a backslash to protect it from substitution.
The :{? special syntax returns TRUE or FALSE depending on whether the variable exists or not, and is thus always substituted, unless the colon is backslash-escaped.name}
The colon syntax for variables is standard SQL for embedded query languages, such as ECPG. The colon syntaxes for array slices and type casts are PostgreSQL extensions, which can sometimes conflict with the standard usage. The colon-quote syntax for escaping a variable’s value as an SQL literal or identifier is a psql extension.
Prompting
The prompts psql issues can be customized to your preference. The three variables PROMPT1, PROMPT2, and PROMPT3 contain strings and special escape sequences that describe the appearance of the prompt. Prompt 1 is the normal prompt that is issued when psql requests a new command. Prompt 2 is issued when more input is expected during command entry, for example because the command was not terminated with a semicolon or a quote was not closed. Prompt 3 is issued when you are running an SQL COPY FROM STDIN command and you need to type in a row value on the terminal.
The value of the selected prompt variable is printed literally, except where a percent sign (%) is encountered. Depending on the next character, certain other text is substituted instead. Defined substitutions are:
%M#-
The full host name (with domain name) of the database server, or
[local]if the connection is over a Unix domain socket, or[local:, if the Unix domain socket is not at the compiled in default location./dir/name] %m#-
The host name of the database server, truncated at the first dot, or
[local]if the connection is over a Unix domain socket. %>#-
The port number at which the database server is listening.
%n#-
The database session user name. (The expansion of this value might change during a database session as the result of the command
SET SESSION AUTHORIZATION.) %/#-
The name of the current database.
%~#-
Like
%/, but the output is~(tilde) if the database is your default database. %##-
If the session user is a database superuser, then a
#, otherwise a>. (The expansion of this value might change during a database session as the result of the commandSET SESSION AUTHORIZATION.) %p#-
The process ID of the backend currently connected to.
%R#-
In prompt 1 normally
=, but@if the session is in an inactive branch of a conditional block, or^if in single-line mode, or!if the session is disconnected from the database (which can happen if\connectfails). In prompt 2%Ris replaced by a character that depends on why psql expects more input:-if the command simply wasn’t terminated yet, but*if there is an unfinished/* ... */comment, a single quote if there is an unfinished quoted string, a double quote if there is an unfinished quoted identifier, a dollar sign if there is an unfinished dollar-quoted string, or(if there is an unmatched left parenthesis. In prompt 3%Rdoesn’t produce anything. %x#-
Transaction status: an empty string when not in a transaction block, or
*when in a transaction block, or!when in a failed transaction block, or?when the transaction state is indeterminate (for example, because there is no connection). %l#-
The line number inside the current statement, starting from
1. %digits#-
The character with the indicated octal code is substituted.
%:name:#-
The value of the psql variable
name. See Variables, above, for details. %`command`#-
The output of
command, similar to ordinary “back-tick” substitution. %[…%]#-
Prompts can contain terminal control characters which, for example, change the color, background, or style of the prompt text, or change the title of the terminal window. In order for the line editing features of Readline to work properly, these non-printing control characters must be designated as invisible by surrounding them with
%[and%]. Multiple pairs of these can occur within the prompt. For example:testdb=> \set PROMPT1 '%[%033[1;33;40m%]%n@%/%R%[%033[0m%]%# '
results in a boldfaced (
1;) yellow-on-black (33;40) prompt on VT100-compatible, color-capable terminals. %w#-
Whitespace of the same width as the most recent output of
PROMPT1. This can be used as aPROMPT2setting, so that multi-line statements are aligned with the first line, but there is no visible secondary prompt.
To insert a percent sign into your prompt, write %%. The default prompts are '%/%R%x%# ' for prompts 1 and 2, and '>> ' for prompt 3.
Note
This feature was shamelessly plagiarized from tcsh.
Command-Line Editing
psql uses the Readline or libedit library, if available, for convenient line editing and retrieval. The command history is automatically saved when psql exits and is reloaded when psql starts up. Type up-arrow or control-P to retrieve previous lines.
You can also use tab completion to fill in partially-typed keywords and SQL object names in many (by no means all) contexts. For example, at the start of a command, typing ins and pressing TAB will fill in insert into . Then, typing a few characters of a table or schema name and pressing TAB will fill in the unfinished name, or offer a menu of possible completions when there’s more than one. (Depending on the library in use, you may need to press TAB more than once to get a menu.)
Tab completion for SQL object names requires sending queries to the server to find possible matches. In some contexts this can interfere with other operations. For example, after BEGIN it will be too late to issue SET TRANSACTION ISOLATION LEVEL if a tab-completion query is issued in between. If you do not want tab completion at all, you can turn it off permanently by putting this in a file named .inputrc in your home directory:
$if psql
set disable-completion on
$endif
(This is not a psql but a Readline feature. Read its documentation for further details.)
The -n (--no-readline) command line option can also be useful to disable use of Readline for a single run of psql. This prevents tab completion, use or recording of command line history, and editing of multi-line commands. It is particularly useful when you need to copy-and-paste text that contains TAB characters.
Connecting to a PostgreSQL database through the command line in Windows can initially feel daunting, especially for beginners. Yet, mastering this skill is essential for database management, data analysis, and application development. In this comprehensive guide, we’ll walk you through the entire process of connecting to PostgreSQL from the command line on a Windows platform. By the end, you’ll have a solid understanding of the tools available, the connection process, and best practices to ensure efficient database interaction.
Understanding PostgreSQL and Command Line Basics
Before diving into the connection process, let’s understand what PostgreSQL is and why the command line is crucial.
What is PostgreSQL?
PostgreSQL is an open-source relational database management system (RDBMS) known for its strong support of advanced data types, ACID compliance, and a wealth of features designed for high availability, performance, and scalability. This system is particularly favored by developers and data analysts due to its flexibility and robust community support.
The Importance of the Command Line
While graphical user interfaces (GUIs) make database management accessible, the command line offers several benefits:
- Efficiency: Command-line operations can be faster than using a GUI, especially for repetitive tasks.
- Automation: Commands can be scripted for batch processing, enabling automated management tasks.
To get started, you’ll need to ensure that PostgreSQL is installed on your Windows machine.
Installing PostgreSQL on Windows
If you don’t have PostgreSQL installed, follow these steps:
Step 1: Download PostgreSQL Installer
- Visit the official PostgreSQL website at https://www.postgresql.org/download/windows/.
- Click on the link for the PostgreSQL Windows installer provided by EnterpriseDB.
Step 2: Run the Installer
- Launch the downloaded installer and follow the prompts to complete the installation.
- During the installation process, make sure to note the port number, default username (usually ‘postgres’), and the password you set.
Step 3: Add PostgreSQL to System PATH
To use PostgreSQL from the command line, add PostgreSQL’s bin directory to your system’s PATH variable. This step allows you to call PostgreSQL commands from any command prompt without specifying the full path.
- Right-click on ‘This PC’ or ‘Computer’ and select ‘Properties.’
- Click on ‘Advanced system settings.’
- Click on ‘Environment Variables,’ and in the ‘System variables’ section, find the ‘Path’ variable. Click on ‘Edit.’
- Add the path to your PostgreSQL
bindirectory (usuallyC:\Program Files\PostgreSQL\<version>\bin).
Now that you have PostgreSQL installed and configured, let’s connect to it through the command line.
Step 1: Open Command Prompt
To open the Command Prompt:
- Press
Win + R, typecmd, and hitEnter. - Alternatively, search for ‘Command Prompt’ in the Start menu.
Step 2: Use psql Command
The psql command-line utility is your tool for connecting to PostgreSQL databases. Using this utility, you can execute SQL commands, manage databases, and perform administrative tasks directly from the command line.
Basic psql Connection Syntax
The basic syntax for connecting to a PostgreSQL database is as follows:
bash

psql -h <hostname> -p <port> -U <username> -d <database_name>
Connection Parameters
- -h : This specifies the database server’s hostname. Using ‘localhost’ connects to the local workstation.
- -p : The port number PostgreSQL listens on. The default is 5432.
- -U : Your PostgreSQL username, typically ‘postgres.’
- -d : The name of the database you want to connect to.
Connecting to the Database
To establish a connection, replace the placeholders with actual values. For instance, if you want to connect to a database named mydatabase on your local machine, use the following command:
bash

psql -h localhost -p 5432 -U postgres -d mydatabase
Entering Your Password
Upon executing the command, you will be prompted to enter your password. Type in your PostgreSQL user password and hit Enter. If everything is correct, you should see a prompt indicating you are connected to the database.
Working with PostgreSQL in Command Line
Once connected, you can interact with your PostgreSQL database. Here are a few important commands you should know.
Basic Commands
-
List databases: To see a list of all databases:
sql

\l -
Connect to a different database:
sql

\c <database_name> -
List all tables in the current database:
sql

\dt -
Describe a table’s structure:
sql

\d <table_name>
Executing SQL Queries
You can execute SQL queries directly from the psql prompt. For example, to create a new table, you might use:
sql

CREATE TABLE employees (

id SERIAL PRIMARY KEY,

name VARCHAR(100),

position VARCHAR(100)

);
To retrieve data from the table:
sql

SELECT * FROM employees;
Exiting psql
When you are done working with your database, you can exit the psql environment by typing:
sql

\q
Best Practices for Command Line Database Management
Working with databases via the command line can be powerful and efficient, but it does require attention to detail. Here are some best practices to consider:
Use Clear Naming Conventions
Develop a consistent naming scheme for your databases, tables, and columns. This makes it easier to manage and query them later. For instance, consider prefixes that denote the purpose or type of data (e.g., sales_, user_).
Backup Your Data Regularly
Regular backups are crucial. Use the pg_dump command to create backups of your databases, allowing you to restore them if necessary.
bash

pg_dump -U <username> <database_name> > <backup_file>.sql
Keep Your PostgreSQL Updated
Ensure regular updates to your PostgreSQL installation to leverage the latest features and security patches. Following the community’s recommendations for updates helps maintain a secure and efficient database.
Troubleshooting Connection Issues
If you encounter problems connecting to PostgreSQL, consider the following common issues:
Check PostgreSQL Service Status
Ensure that the PostgreSQL service is running. To check this, you can open the Services application in Windows and look for PostgreSQL. If it’s not running, right-click it and select ‘Start.’
Verify Your Connection Parameters
Ensure that you are using the correct hostname, port number, username, and password. A typo in any of these can prevent a successful connection.
Firewall Settings
Make sure that your firewall is not blocking access to PostgreSQL. You may need to create an exception for the PostgreSQL port (default is 5432).
Check pg_hba.conf File
The pg_hba.conf file determines the host-based authentication for your PostgreSQL installation. Ensure it allows connections from your client machine for the specified user.
Conclusion
Connecting to PostgreSQL from the command line on Windows is an invaluable skill that opens the door to powerful database management capabilities. Throughout this guide, you have learned how to install PostgreSQL, connect using the command line, execute basic SQL commands, and apply best practices for effective and secure database management.
Armed with this knowledge, you are now ready to explore the depths of PostgreSQL and harness its full potential. As you practice and refine your skills, you will find that working with PostgreSQL via the command line offers unmatched efficiency and flexibility in managing your data. Happy querying!
What is the command line, and why should I use it to connect to PostgreSQL on Windows?
The command line is a text-based interface that allows users to interact with their computer by typing commands instead of using a graphical user interface (GUI). Using the command line to connect to PostgreSQL on Windows can be advantageous because it provides more control and flexibility. It’s especially useful for automation and scripting, enabling you to run batch files and scripts seamlessly.
Additionally, many developers and database administrators prefer the command line for its efficiency and speed. Once you’re familiar with the commands, you can execute tasks more quickly than using a GUI. For those who are comfortable with coding and scripting, utilizing the command line can become an indispensable skill for database management.
How do I install PostgreSQL on Windows?
To install PostgreSQL on Windows, you first need to download the installer from the official PostgreSQL website. Choose the version that matches your system architecture (32-bit or 64-bit) and follow the installation prompts. The installer will guide you through the process, including setting up a new user and password, which are crucial for connecting to your PostgreSQL database.
After the installation is complete, it’s essential to add PostgreSQL to your system’s PATH variable. This step enables you to use the psql command directly from the command line without specifying the full path to its directory. Once PostgreSQL is in your PATH, you’ll be ready to connect to your database using the command line interface.
What are the basic commands to connect to PostgreSQL using the command line?
To connect to PostgreSQL via the command line, you’ll typically use the psql command followed by various parameters. The simplest form of the command is psql -U username -d dbname, where “username” is your PostgreSQL user, and “dbname” is the name of the database you wish to access. This command will prompt you for your password, allowing you to securely log in.
After successfully logging in, you can explore your database using various commands. For example, typing \l will list all databases, while \c dbname lets you connect to a specific database. Familiarizing yourself with these basic commands will greatly enhance your ability to navigate and manage your PostgreSQL instance effectively.
How can I list all databases and tables in PostgreSQL using the command line?
Once you’re logged into PostgreSQL through the command line using psql, you can list all databases by typing the command \l. This command will display a list of databases along with their owners and access privileges. It’s an efficient way to get an overview of what databases are available within your PostgreSQL server.
To see the tables in a specific database, first connect to that database by using the command \c dbname. After connecting, you can issue the command \dt to list all tables in the current database. This command will show you the table names along with their schema and type, helping you understand the structure of your database quickly.
What should I do if I experience connection issues to PostgreSQL?
If you’re experiencing connection issues when trying to reach PostgreSQL, the first step is to check that the PostgreSQL service is running. On Windows, you can do this by searching for “Services” in the Start menu and checking the status of the PostgreSQL service. If it isn’t running, you can start it there. Troubleshooting permissions and user configurations is also crucial, as incorrect settings can prevent successful connections.
Another common issue might involve firewall settings that block your connection attempts. Ensure that your firewall allows traffic through the PostgreSQL port, usually port 5432, or depending on your configuration. Checking the connection string and ensuring that you use the correct username, password, and database name can also help resolve many connectivity problems.
Are there any alternatives to using the command line to connect to PostgreSQL?
Yes, there are several graphical user interface (GUI) tools available that allow users to connect to PostgreSQL without needing to use the command line. Tools like pgAdmin, DBeaver, or DataGrip offer user-friendly environments for managing databases, providing interfaces for executing queries, and visualizing database schemas. These tools are particularly helpful for those who prefer a visual approach to database management.
While GUI tools can simplify many tasks, it’s still beneficial to learn and master command line operations. Having a command-line proficiency can provide greater flexibility and enable you to perform complex operations more efficiently. It’s advisable to use a combination of both methods depending on your specific needs and tasks for optimal database management.
UPDATE on 23.02.2023: This post explains how to install PostgreSQL on WSL2 for Windows, apply the necessary changes to PostgreSQL settings, and access the database from the Windows host. Even though this knowledge can be found in different bits and pieces spread out all over the internet, I want to compile a short and straightforward how-to article. I want you to be able to complete all the steps from scratch, without having to skip all over the place.
Why do I need PostgreSQL on WSL2?
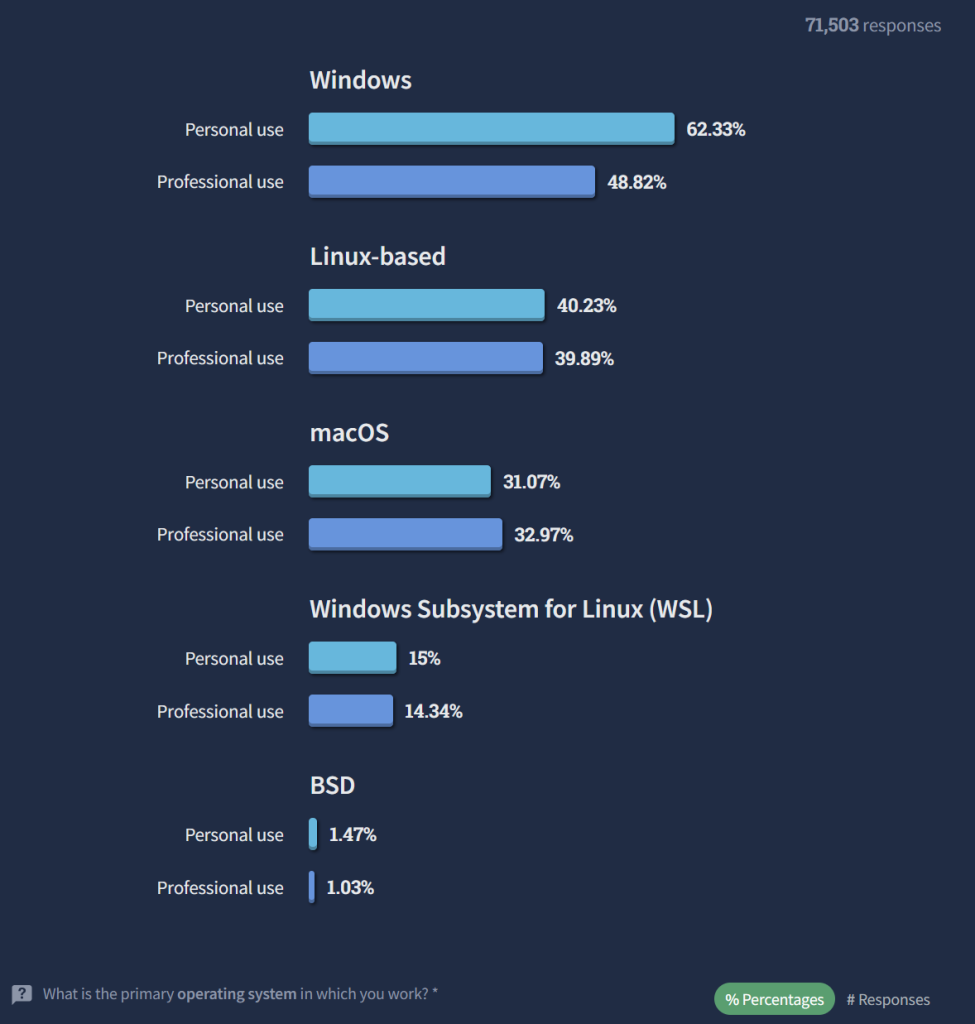
Although there is a strong feeling that a true programmer uses Linux in their work, this statement is not really close to the truth. At least according to this Stack Overflow survey 2022:
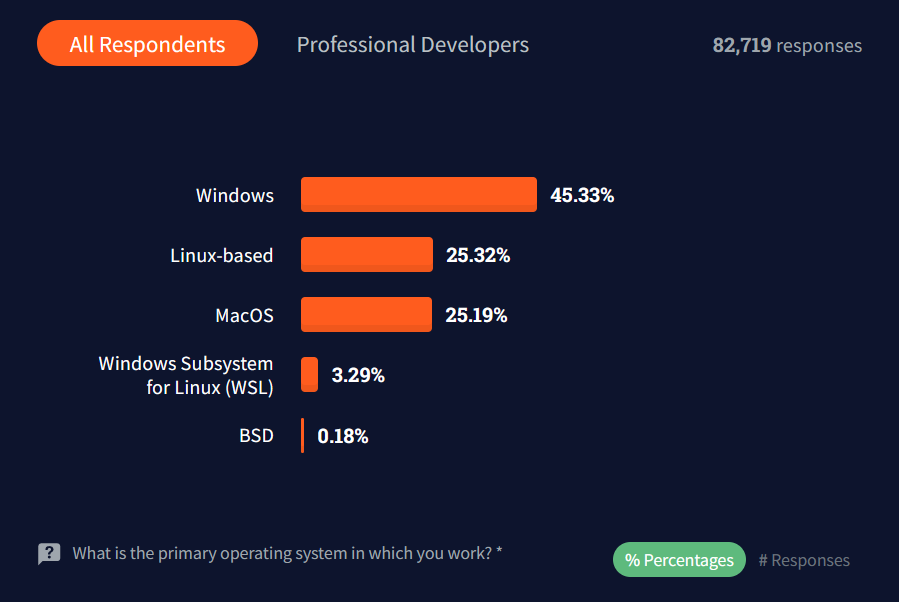
Even more, it seems like Windows’ popularity increases with time. Take a look at this Stack Overflow survey from 2021:
There are a ton of reasons why a developer might want to use WSL2 with PostgreSQL onboard, but let’s name a few:
psqlis the standard tool for learning and working with PostgreSQL. However, there are some limiting issues under Windows, e.g., the lack of tab completion, issues with encoding, etc. Runningpsqlunder WSL2 will provide you with a smoother experience.- It’s a good idea to test and debug your application in a remote environment rather than on a local host. That way, you can immediately find issues with client authentication, or with connection settings. Since WSL2 is a standalone virtual machine under the hood, using it might be the easiest way to achieve this.
- WSL2 will provide the environment for advanced developers to build and test different PostgreSQL extensions not available in binary form or created exclusively for Linux, e.g., pg_squeeze, pg_show_plans, pg_crash, pg_partman, etc.
Install WSL2
To install WSL2 from PowerShell or the Windows Command Prompt, just run:
From the manual:
- This command will enable the required optional components, download the latest Linux kernel, set WSL2 as your default, and install a Ubuntu distribution for you by default.
- The first time you launch a newly installed Linux distribution, a console window will open and you’ll be asked to wait for files to de-compress and be stored on your machine. All future launches should take less than a second.
Supposing you prefer to change the distribution installed, you have the option to choose among those available. To list the known distros, run:
|
PS> wsl —list —online The following is a list of valid distributions that can be installed. Install using ‘wsl.exe —install <Distro>’. NAME FRIENDLY NAME Ubuntu Ubuntu Debian Debian GNU/Linux kali—linux Kali Linux Rolling Ubuntu—18.04 Ubuntu 18.04 LTS Ubuntu—20.04 Ubuntu 20.04 LTS Ubuntu—22.04 Ubuntu 22.04 LTS OracleLinux_8_5 Oracle Linux 8.5 OracleLinux_7_9 Oracle Linux 7.9 SUSE—Linux—Enterprise—Server—15—SP4 SUSE Linux Enterprise Server 15 SP4 openSUSE—Leap—15.4 openSUSE Leap 15.4 openSUSE—Tumbleweed openSUSE Tumbleweed |
After that, you can install the chosen Linux distribution on WSL2 by running the command:
|
PS> wsl —install -d Ubuntu-22.04 |
Here in this post, I will use the Ubuntu distribution for demonstration purposes.
⚠️ All further commands are supposed to be executed in the Ubuntu WSL2 session.
I strongly suggest using Windows Terminal to work with console sessions.
Install PostgreSQL on WSL2 Ubuntu
Please follow the instructions on the official site:
|
$ sudo sh -c ‘echo ‘deb http://apt.postgresql.org/pub/repos/apt $(lsb_release -cs)-pgdg main‘ > /etc/apt/sources.list.d/pgdg.list’ $ wget —quiet -O — https://www.postgresql.org/media/keys/ACCC4CF8.asc | sudo apt-key add — $ sudo apt—get update $ sudo apt—get -y install postgresql postgresql—contrib $ psql —version psql (PostgreSQL) 15.2 (Ubuntu 15.2—1.pgdg22.04+1) $ sudo service postgresql status 15/main (port 5432): down $ sudo service postgresql start * Starting PostgreSQL 15 database server |
Please take note: we are not using systemctl because WSL2 doesn’t use systemd to operate:
|
$ sudo systemctl status postgresql System has not been booted with systemd as init system (PID 1). Can’t operate. Failed to connect to bus: Host is down |
Set up PostgreSQL on WSL2
Now we need to set up PostgreSQL so it will:
- accept connections from the Windows host;
- have custom-created users;
- allow authentication from remote hosts.
By the way, let me recommend my friend Lætitia Avrot’s blog to you, where all these topics are covered.
How do I accept connections from the Windows host for PostgreSQL on WSL2?
🔔 I’m aware that the newest WSL2 version allows localhost forwarding, but I think this topic is essential to know, especially in constructing a development environment!
By default, every PostgreSQL installation listens on 127.0.0.1 only. That means you cannot access the database instance from a remote host, including the Windows host. This is not a bug. This is a security feature.
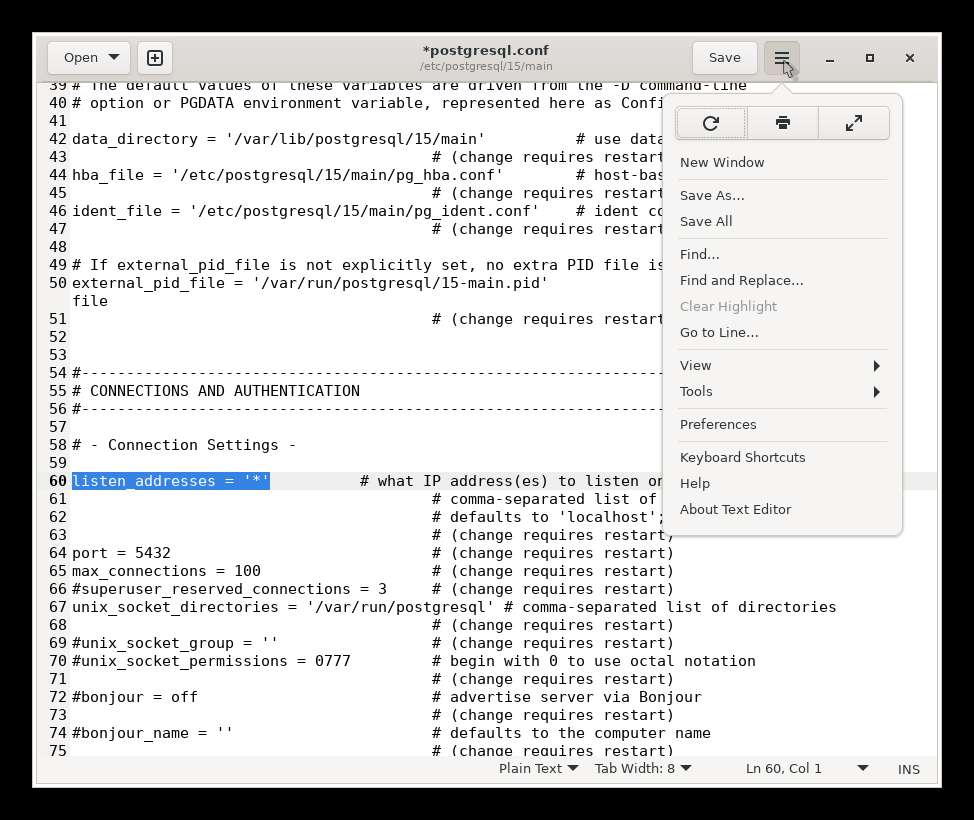
To change this setting, we need to:
- edit
postgresql.conf; - uncomment (sic!)
listen_addressline; - change it to
listen_address = '*'for every available IP address or comma-separated list of addresses; - restart the PostgreSQL instance, so the new settings take effect.
Depending on your distro, the location of the postgresql.conf file may differ. The easiest way to know where it is is to ask the server itself. However, there is one catch here.
Right now, there is only one user available in our fresh PostgreSQL installation: postgres. And there is only one way to connect to the instance: peer authentication.
That means the operating system (Ubuntu on WSL2) should provide a user name from the kernel and use it as the allowed database user name:
|
$ sudo -u postgres psql -c ‘SHOW config_file’ config_file —————————————— /etc/postgresql/15/main/postgresql.conf (1 row) |
🔔 If you are struggling to understand what this command does, I suggest you visit the fantastic explainshell.com site!
Now let’s do something fun!
The latest WSL2 is so cool that it allows you to run GUI Linux applications! So instead of using a TUI editor like nano or vim, we will use Gedit!
|
$ sudo apt install gedit -y $ sudo gedit /etc/postgresql/15/main/postgresql.conf $ sudo service postgresql restart |
How do I add users to a PostgreSQL cluster?
As I said, by default, there is only one user available: postgres. I strongly recommend creating a separate user.
Here we will use the same trick to connect to PostgreSQL with psql, and execute the CREATE USER command:
|
$ sudo -u postgres psql psql (15.2 (Ubuntu 15.2—1.pgdg22.04+1)) Type ‘help’ for help. postgres=# CREATE USER dev PASSWORD ‘strongone’ CREATEDB; CREATE ROLE postgres=# q |
Now we can specify our newly created user dev and connect to PostgreSQL using password authentication.
Please note that I explicitly used the -h 127.0.0.1 parameter to force password authentication instead of peer authentication.
|
$ psql -U dev -h 127.0.0.1 -d postgres Password for user dev: psql (15.2 (Ubuntu 15.2—1.pgdg22.04+1)) SSL connection (protocol: TLSv1.3, cipher: TLS_AES_256_GCM_SHA384, compression: off) Type ‘help’ for help. postgres=>q |
How can I allow authentication from remote hosts for PostgreSQL on WSL2?
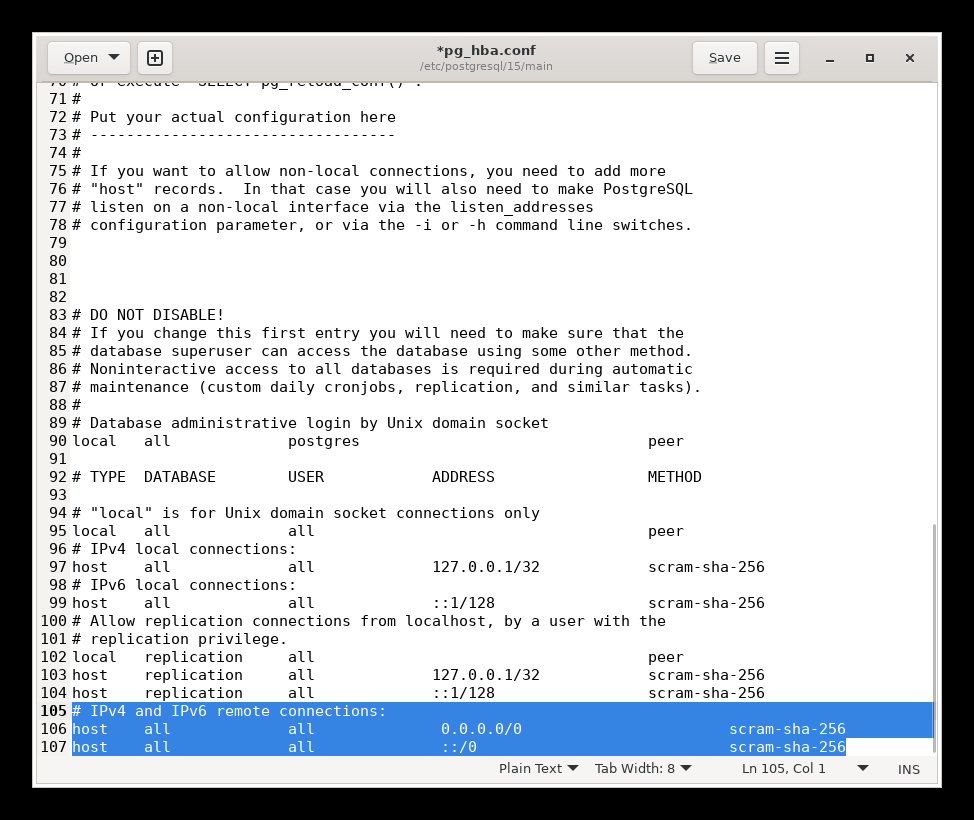
The easiest way would be to add additional lines to the pg_hba.conf file:
|
… host all all 0.0.0.0/0 scram—sha—256 host all all ::/0 scram—sha—256 |
This change will apply scram-sha-256 password authentication for all IPv4 and IPv6 connections.
|
$ sudo -u postgres psql -c ‘SHOW hba_file’ hba_file ————————————- /etc/postgresql/15/main/pg_hba.conf (1 row) $ sudo gedit /etc/postgresql/15/main/pg_hba.conf $ sudo service postgresql restart |
How do I connect to PostgreSQL on WSL2 from a Windows host?
With the latest WSL2 version, you can access PostgreSQL from a Windows app (like psql or pgAdmin) using localhost (just like you usually would):
|
PS> psql -U dev -d postgres Password for user dev: psql (13.0, server 15.2 (Ubuntu 15.2—1.pgdg22.04+1)) WARNING: psql major version 13, server major version 15. Some psql features might not work. WARNING: Console code page (65001) differs from Windows code page (1251) 8—bit characters might not work correctly. See psql reference page ‘Notes for Windows users’ for details. SSL connection (protocol: TLSv1.3, cipher: TLS_AES_256_GCM_SHA384, bits: 256, compression: off) Type ‘help’ for help. postgres=> q |
⚠️ But if you have conflicts with, for example, a local (Windows) PostgreSQL installation, you might want to use the specific WSL2 IP address. The same applies if you are running an older version of Windows 10 (Build 18945 or less).
As I mentioned earlier, the WSL2 system is a standalone virtual machine with its own IP address. So first, we need to know the IP address to connect. There are several ways to do so. Choose whatever you prefer.
You can run such a command in the WSL2 session:
|
$ ip addr show eth0 6: eth0: <BROADCAST,MULTICAST,UP,LOWER_UP> mtu 1500 qdisc mq state UP group default qlen 1000 link/ether 00:15:5d:69:71:24 brd ff:ff:ff:ff:ff:ff inet 192.168.66.217/20 brd 192.168.79.255 scope global eth0 valid_lft forever preferred_lft forever inet6 fe80::215:5dff:fe69:7124/64 scope link valid_lft forever preferred_lft forever |
Or even shorter— if you don’t need all those details:
|
$ hostname -I 192.168.66.217 |
Alternatively, you can run one of these commands from PowerShell, or from the Command Prompt session in the Windows host:
|
PS> bash -c ‘hostname -I’ 192.168.66.217 PS> wsl — hostname -I 192.168.66.217 |
Now that we know the IP address, we can connect to PostgreSQL on WSL2 with psql:
|
PS> psql -U dev -d postgres -h 192.168.66.217 Password for user dev: psql (13.0, server 15.2 (Ubuntu 15.2—1.pgdg22.04+1)) WARNING: psql major version 13, server major version 15. Some psql features might not work. WARNING: Console code page (65001) differs from Windows code page (1251) 8—bit characters might not work correctly. See psql reference page ‘Notes for Windows users’ for details. SSL connection (protocol: TLSv1.3, cipher: TLS_AES_256_GCM_SHA384, bits: 256, compression: off) Type ‘help’ for help. postgres=> q |
Or connect with any GUI you prefer, for example, with HeidiSQL:
The only drawback is that the WSL2 machine IP address cannot be made static! That means you will need to check the IP address after each restart or set up some startup script to update the system environment variable of some file content with the current IP. Since there is no universal solution, I will leave that as homework for the reader. 😉
Conclusion
In this post, we learned:
- how to install WSL2;
- the way to install PostgreSQL on the default WSL2 distro Ubuntu;
- how to set up PostgreSQL to listen on all IP addresses;
- how to set up PostgreSQL to authenticate users from all IP addresses;
- some tricks, software, and services.
Let me know if this topic is interesting for you and the issues we should highlight in the follow-up articles.
Here’s where you can find more Windows-specific posts you may find helpful.
In conclusion, I wish you all the best! ♥️
Look forward to meeting you in person at one of the conferences, meetups, or training sessions!
In order to receive regular updates on important changes in PostgreSQL, subscribe to our newsletter, or follow us on Twitter, Facebook, or LinkedIn.
In this article, we show how to connect to a PostgreSQL server from a windows computer.
There are several programs that you can use to accomplish this.
These programs include the windows command prompt (cmd), SQL shell (psql), and pgadmin.
With any of these programs, you can establish contact with a PostgreSQL database server.
Let’s start with the windows command prompt.
In order to use it, you will need the postgresql software installed on your computer.
You can download the postgresql software at the following link:
https://www.postgresql.org/download/
After you download the postgresql software, then you need add the path of this software to your computer’s environment variables.
The 2 paths to add to the windows environment variables are shown below.
You may need to slightly modify the above, depending on where the software is installed on your computer and what version of postgresql you are using.
On my computer, I have postgresql 16 installed. But the most current version as of this writing is postgresql 17. So you just have to make sure you have the right version specified.
Once this is set up, you just be able to go to the command prompt and type in, psql
Typing this in now should not result in the message,
‘psql’ is not recognized as an internal or external command,
operable program or batch file.
You should get prompted to enter in the password for a user.
This user may or may not be the right user.
So what you need to do is type in the following line shown below.
By default, when you first install postgresql on your computer, the default database is named postgres, the default user is postgres, and the password is postgres.
Of course, later, you can change any of these names. You should definitely change the password if you are going into a production environment.
Once you log in successfully, you gain entrance into psql, as shown below.

You can now run various SQL commands to find out information about the
database such as its version. You can also do things such as create tables, etc.
To show all databases, type in, \list
To show the current database that is selected, type in,
SELECT current_database();
To show all tables of the database, type in, \dt
Below, we show the current selected database.

You can change this database to another by typing in the line,
\connect Databasename or, for short, \c Databasename
So this is one method, using the windows command prompt software.
The next method is to use the SQL shell (psql).
This can be seen in the following image:
SQL Shell in Windows
So we have to log into the postgresql database.
By default, the host is localhost. The database is postgres. The user is postgres. The password is postgres.
Once you log in successfully, you should see, the psql with the version shown, as can be seen below.

So now you can run SQL commands such as seeing the database that is currently selected.

So this is the way of doing it with the SQL shell in windows.
Another way is through pgadmin.
And this way is probably the simplest of them all.
Once you open the software and type in the password, you gain access to the database.

After that, you can go to the database, right click on it, and then click on ‘PSQL Tool’

Once you click on it, it brings you to a now familiar screen.

On this page, you can enter in any SQL command, such as again getting the current
selected database.

So these are various ways we can connect and interact with a postgresql database server
in windows.
Related Resources
Home » KB » Databases » How to Connect to a PostgreSQL Database from Linux or Windows
PostgreSQL is an open-source relational database management system. Users can access PostgreSQL databases via an interactive terminal program, psql, or a graphical interface called pgAdmin.
These tools enable administrators to edit, automate, and execute database queries within PostgreSQL. Both programs are compatible with Linux and Windows.
Follow the steps in this guide to learn how to connect to a PostgreSQL database and start managing your tables and data sets.
Prerequisites
- PostgreSQL installed.
- pgAdmin4 installed.
- Access to a command line/terminal window.
- Sudo or root privileges on Linux.
How to Access a PostgreSQL Database from Linux
PostgreSQL creates a default user account called postgres during the installation. Users can switch to this account to access PostgreSQL databases.
The examples in this guide are presented using Ubuntu 22.04. The same commands work in other Linux distributions.
Connect to PostgreSQL Database via SQL Shell (psql)
Enter the following command to open a bash shell and switch the current user context to the default postgres user:
sudo -i -u postgresThe same command applies if you have created a different user. Simply substitute the postgres user account name with the name of your existing user.
Use the following command to access psql, a terminal-based front-end to PostgreSQL:
psql
To retrieve information about the current connection and user, type:
\conninfo
The output helps you determine which user and database you are currently interacting with.
PostgreSQL can support and maintain multiple databases and users simultaneously. Enter the following command to list available users and databases:
\l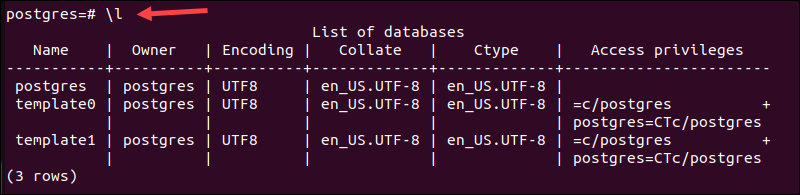
Use the \c command and the database name to connect to a different database owned by the postgres user:
\c template1In this example, the name of the database is template1. Enter the name of the database you want to connect to.
To exit the psql prompt, enter:
\qUse the exit command to leave the postgres Linux command prompt and return to your regular system user:
exit
The logout message confirms the action.
Connect to PostgreSQL Database from Terminal
If all the components of your databases and users are correctly configured, you can bypass the intermediary bash shell and connect to PostgreSQL directly.
Use the following command to log into psql directly from the Linux terminal window:
sudo -u postgres psqlThe -u (user) option causes sudo to run the specified command as a user other than root, specifically the postgres user.

As with the previous method, you can now work on databases by executing queries interactively. Enter \q to exit the prompt.
Connect to PostgreSQL Database via pgAdmin
PgAdmin 4 is a graphical front-end tool for PostgreSQL. It provides a visual, user-friendly environment with many practical database management solutions.
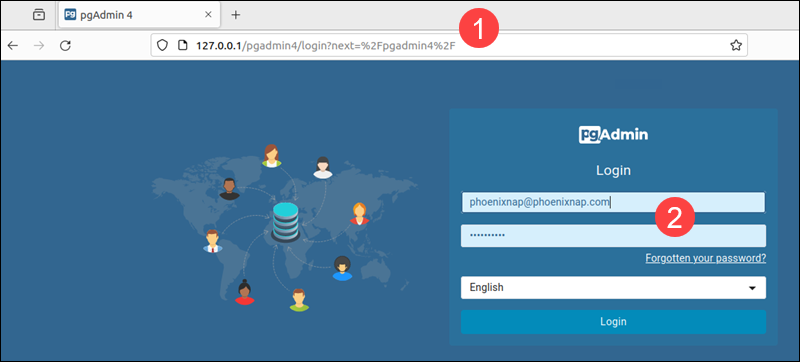
1. Open a web browser and enter the pgAdmin 4 instance URL. For example, if pgAdmin 4 is installed locally, type:
http://127.0.0.1/pgadmin4or
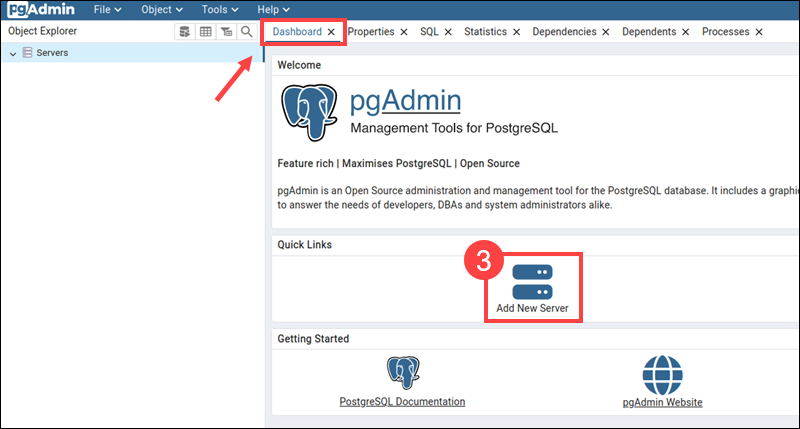
http://localhost/pgadmin42. Enter your credentials to access the pgAdmin 4 dashboard.
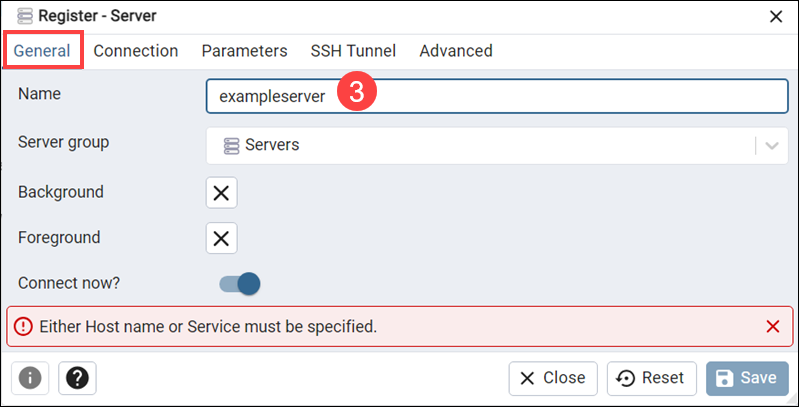
3. Click Add New Server on the Dashboard tab.
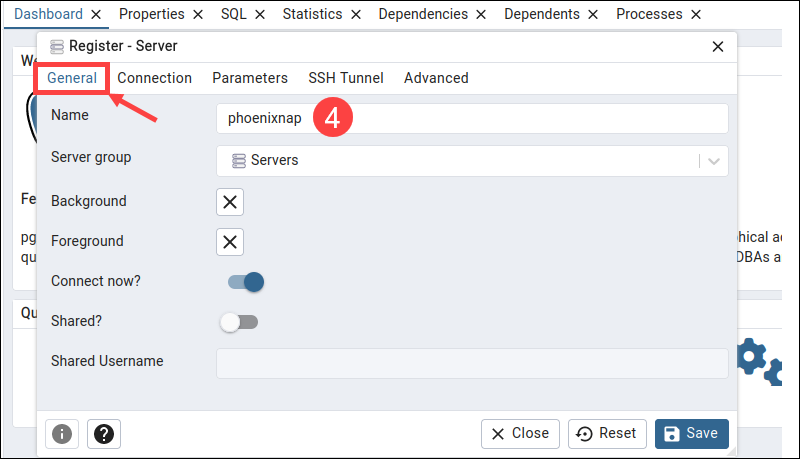
4. Open the General tab and enter a server name in the Name field.
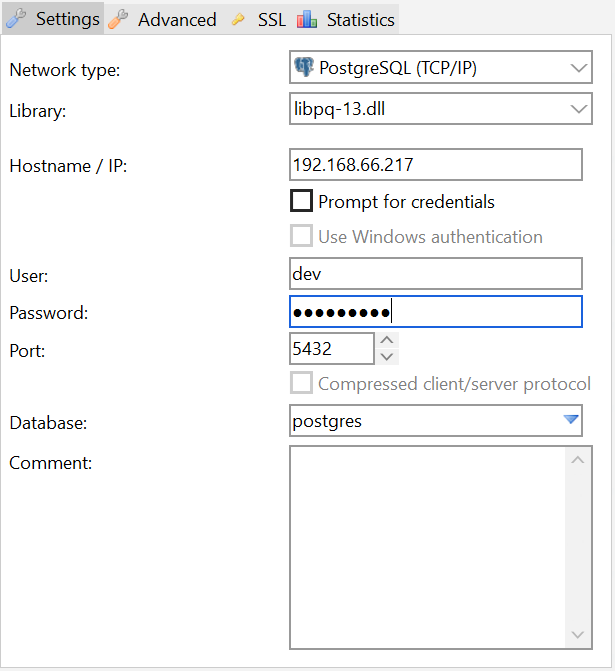
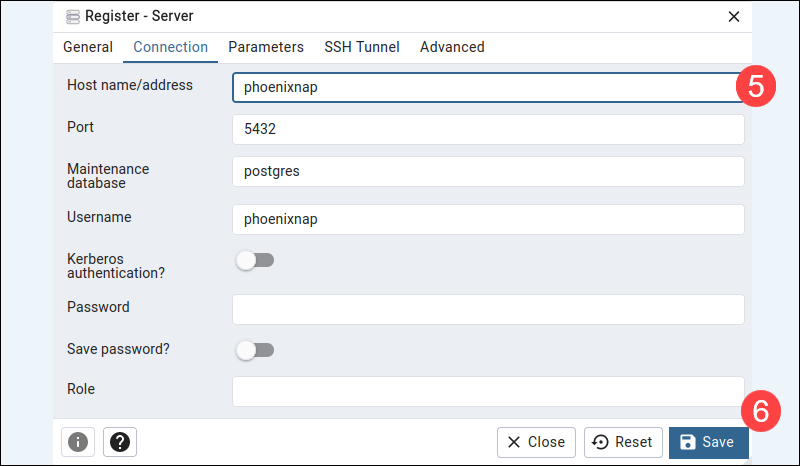
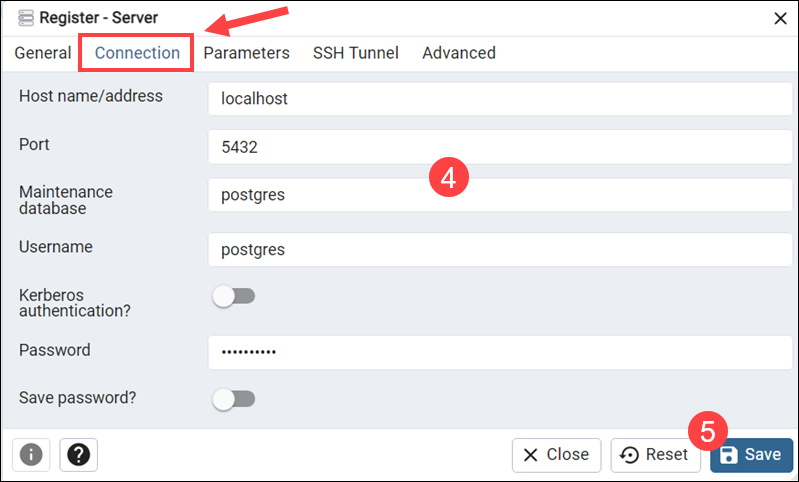
5. Access the Connection tab and enter the server’s hostname and database user credentials.
Note: The Host name/address is the location of the machine where the PostgreSQL server is running.
6. Click Save to establish a database connection.
7. The interface provides an overview of the databases that your user account has access to. Press ALT+Shift+Q within the current database to enter and execute queries.
How to Access PostgreSQL Database from Windows
On headless servers, the most common way to access PostgreSQL from Windows is to use a terminal-based solution like psql.
In environments that support graphical tools, users can utilize pgAdmin 4 or other GUIs like DBeaver and Navicat.
Connect to PostgreSQL Database via PowerShell
PowerShell is a built-in Windows shell capable of running standard psql commands. It also has advanced scripting capabilities that allow users to automate database management tasks.
1. Type PowerShell in the Windows Start menu and open the app.

2. Enter the psql command and specify the database name, username, and host:
psql -U [username] -d [database_name] -h [host]Replace:
[username]with your PostgreSQL database username.[database_name]with the name of the database you want to connect to.[host]with the hostname or IP address of the PostgreSQL server.
If the database is on a local machine, you can enter localhost. For example, to connect to a local database called phoenixnap, using the postgres user, enter:
psql -U postgres -d phoenixnap -h localhostIf the database is password protected, psql prompts for the password.
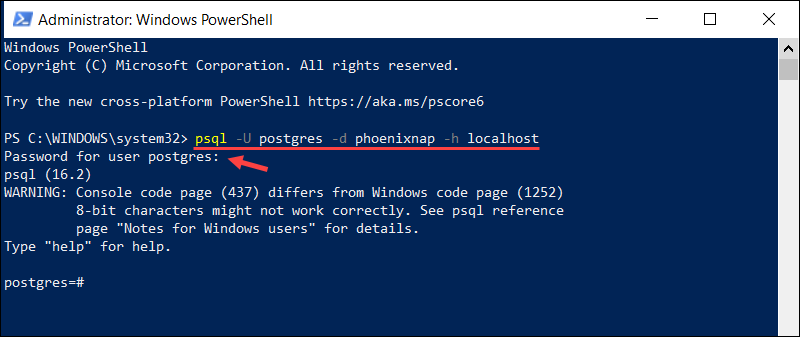
You can now use standard psql commands to manage the database.
Note: The PostgreSQL server uses port 5432 by default. If your server is configured to use a custom port, add the -p [port] option to the psql command to specify the port number.
Type \q to close the connection and exit the psql session.
Connect to PostgreSQL Database via CMD
To connect to a PostgreSQL database from the Windows Command Prompt (CMD):
1. Type Command Prompt in the Windows search bar and launch the app.
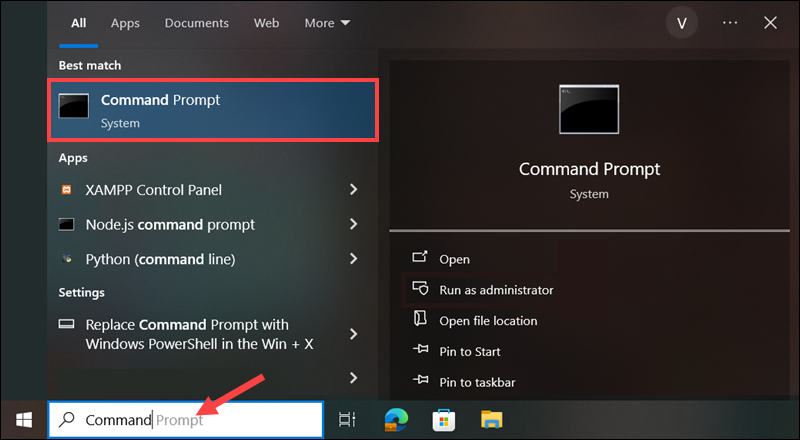
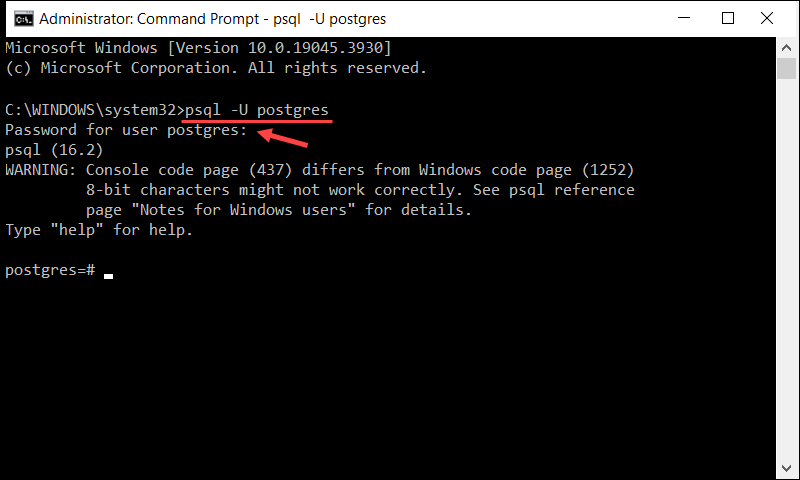
2. Enter the following command to initiate a session as the postgres user:
psql -U postgresThe system prompts you to enter the password for the postgres user. If you already created a different user, replace postgres in the command above with your PostgreSQL username.
3. To list existing databases, use the \l meta-command:
\l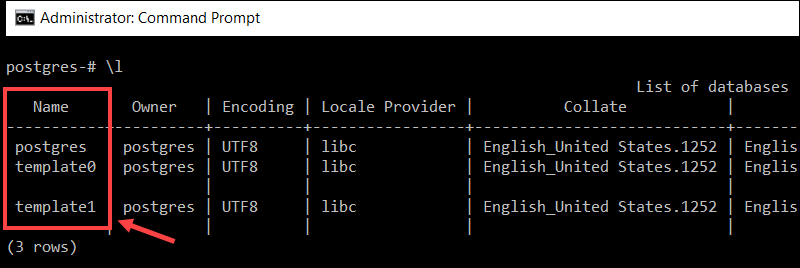
4. To switch to a different database, type \c followed by the database name. For example, to connect to the template1 database, enter:
\c template1
Replace template1 with the name of the database you wish to connect to.
Use the \q command to exit psql and return to the main CMD interface.
Access PostgreSQL Database via pgAdmin
When installing PostgreSQL on Windows, pgAdmin 4 is often included in the installation bundle.
This graphical interface provides an easy and user-friendly way to log in, administer, and shape databases to fit your requirements.
To access a database using pgAdmin 4:
1. Launch pgAdmin 4 from the Start Menu or double-click the desktop shortcut.
2. Select Add New Server in the Dashboard tab.

3. Enter the server name in the Name field in the General tab.
4. Add the necessary server information and credentials to the Connection tab. These include the PostgreSQL hostname/address, port, maintenance database, username, and password.
5. Click Save to establish a connection.
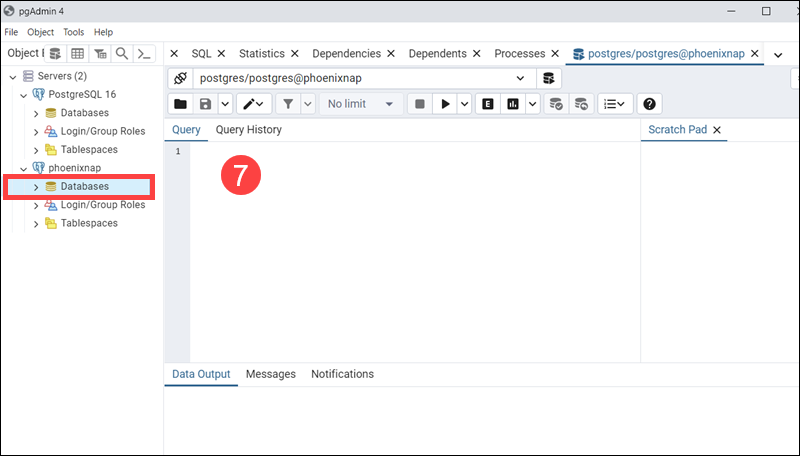
A list of servers and databases appear in the left navigation panel. To start querying a database, right-click a database and select the Query Tool option.
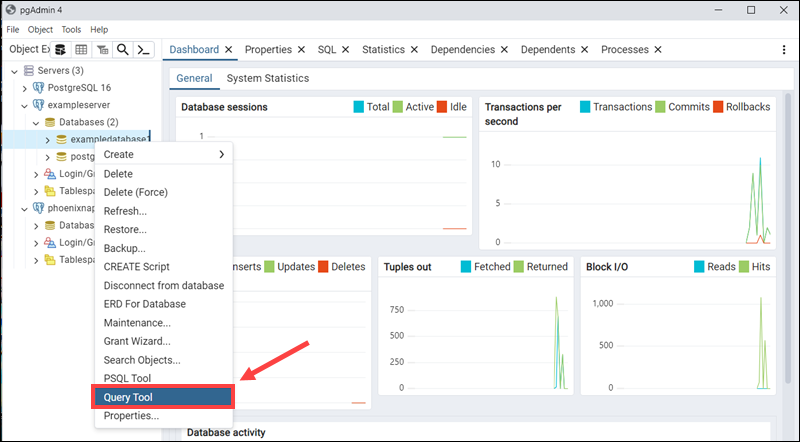
The central field can be used to enter the SQL query.
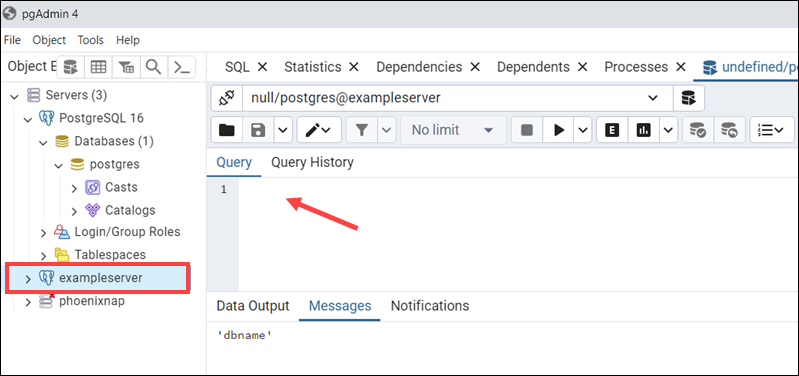
You can also press ALT+Shift+Q to start writing queries for the selected server.
Conclusion
This guide showed you how to connect to your PostgreSQL database on both Linux and Windows servers.
Establishing a connection is an essential first step. Next, explore querying and viewing data within databases using the PostgreSQL SELECT statement.
Was this article helpful?
YesNo