
Remote Desktop Protocol (RDP) enables users to establish a secure connection to remote computers over a network, allowing them to access files, applications, and system resources as if they were physically present.
Microsoft developed RDP primarily for Windows, but it also works for Linux, macOS, Android, and iOS devices, making it a versatile solution for remote access across different operating systems.
This article will show you how to connect to an Ubuntu system from Windows using RDP.
Prerequisites
- A client Windows machine.
- A host machine with Ubuntu installed.
- Sudo or root privileges on the host machine.
How to Connect to Ubuntu Remote Desktop From Windows
The RDP client is preinstalled on Windows. However, the Ubuntu system must be configured before it accepts incoming RDP connections.
Follow the steps in the sections below.
Install xrdp on Ubuntu
xrdp is an RDP server for Linux that listens for and accepts RDP connections from clients. Ubuntu systems usually do not have xrdp installed by default.
To install xrdp on Ubuntu, take the following steps:
1. Update the Ubuntu packages list:
sudo apt update2. Install xrdp with the following command:
sudo apt install xrdp -y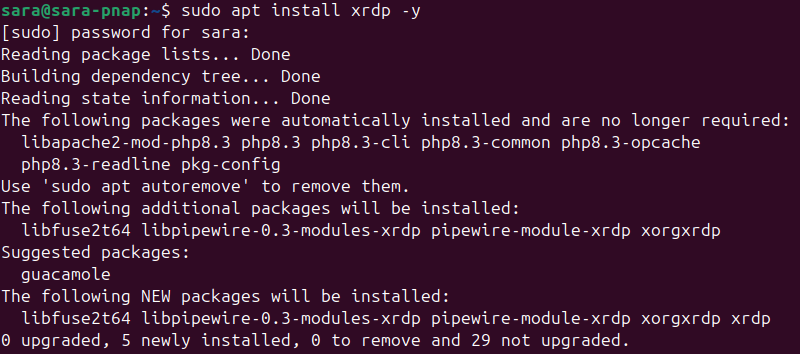
3. Check the xrdp server status:
sudo systemctl status xrdp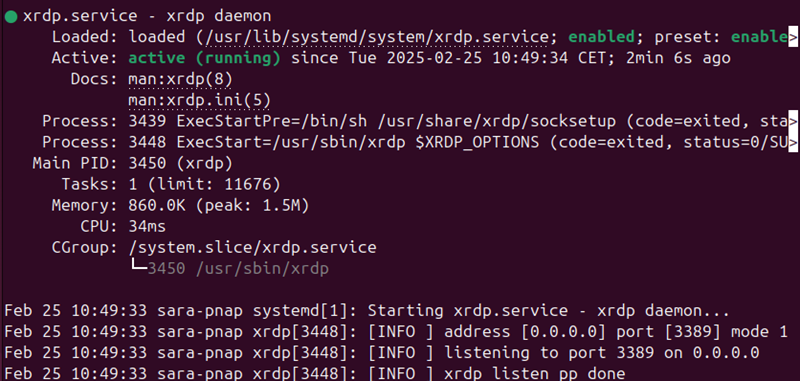
The output confirms the xrdp is active.
Configure xrdp Port (Optional)
The <strong>xrdp</strong> server listens for incoming RDP connections on port number 3389. Using a non-standard port for RDP connection is a form of protection through obscurity. It is not a robust security measure, but it protects a system from rudimentary brute-force attacks.
To instruct xrdp to listen on a different port, take the following steps:
1. Use a text editor, like Vim, to edit the xrdp configuration file, xrdp.ini:
sudo vim /etc/xrdp/xrdp.ini2. Locate the port directive in the [Globals] section and set the desired value. In this example, the RDP port is 49952:
port=49952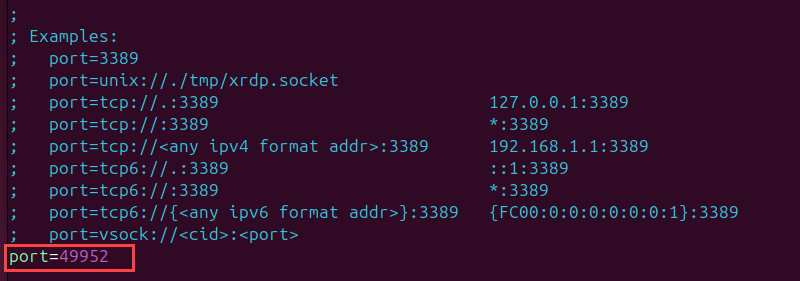
3. Save the changes and exit the file.
4. Restart the xrdp server to apply the changes:
sudo systemctl restart xrdpThere is no confirmation message after the server restarts.
Open a Port for Incoming Traffic in ufw
An active firewall on the Ubuntu system, such as ufw, can block traffic on specific ports. Configure the firewall and allow traffic on the desired port to ensure successful RDP connections.
Take the following steps:
1. Check the ufw firewall status:
sudo ufw status
If the firewall is inactive, use the following command to turn on ufw:
sudo ufw enable2. Allow traffic on port 3389 or choose a different port for your RDP connection. The following command allows RDP connections on port 49952:
sudo ufw allow 49952/tcp
Modify the command to open a different port number for RDP connections.
3. Reload the ufw firewall tool to apply the changes:
sudo ufw reload
Note: If you want to access the Ubuntu machine from outside its local network, configure port forwarding on the router or adjust external firewalls.
Configure Remote Desktop Connection on Windows
To initiate an RDP connection to a remote Ubuntu system from Windows, take the following steps:
1. Type rdp in the Windows search box.
2. Open the Remote Desktop Connection app.
3. Enter the IP address or name of the remote Ubuntu system in the Computer field.

If you change the default port number for RDP connections on Ubuntu, enter the port number after the IP address in the following format:
IP_address:port_number4. Type the username of the Ubuntu user for the RDP connection.
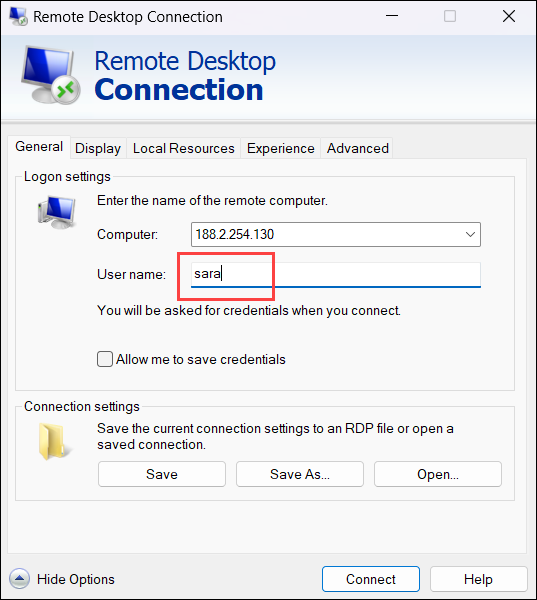
5. (Optional) Save the connection details for future use.
6. (Optional) The Remote Desktop Connection (RDP) app in Windows enables users to configure the RDP session. The main configuration options are split into several sections:
- Display. Adjust the size and color settings of the remote desktop window.
- Local Resources. Decide which local devices (keyboards, audio, and printers) to share with the remote system.
- Experience. Modify visual effects like desktop background and font smoothing based on network speeds.
- Advanced. Fine-tune server authentication settings, set up a Remote Desktop Gateway server, and more.
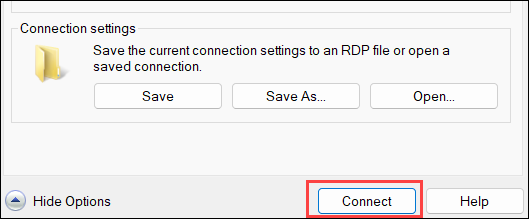
7. Click Connect.
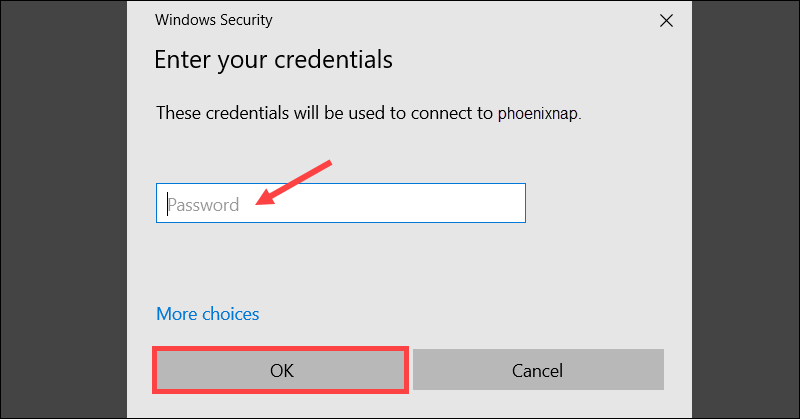
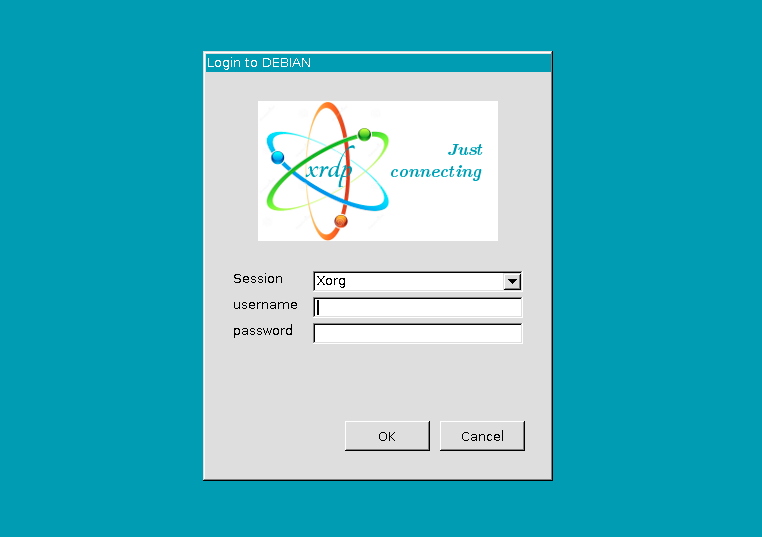
Log in to Ubuntu System
Enter the password for the Ubuntu RDP user and click OK.
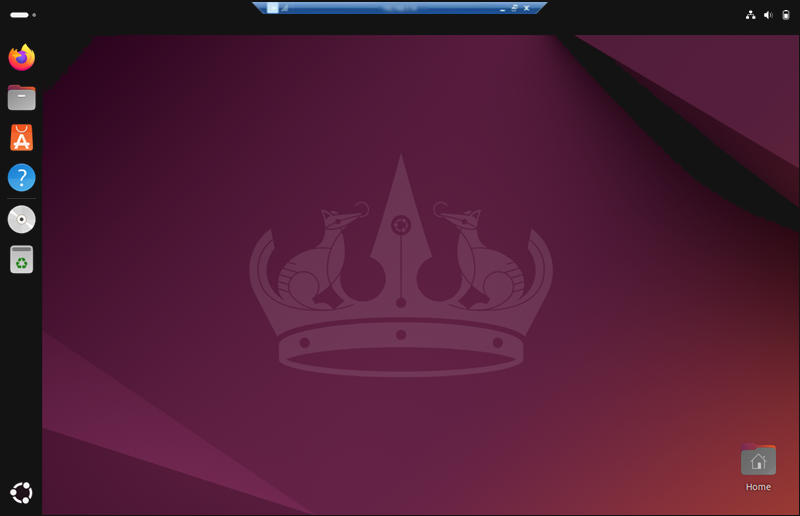
You are now able to interact with the Ubuntu machine via the established RDP session.
Ubuntu RDP From Windows: Extra Tips + Best Practices
To set up a smooth and secure RDP connection from Windows to Ubuntu, focus on more than basic configuration. Optimize hardware, internet speed, and security settings to improve performance and responsiveness.
The following text explains best practices and useful tips for RDP from Windows to Ubuntu.
Minimum vs. Optimal Hardware Requirements
The RDP connection quality from Windows to Ubuntu depends on the system’s hardware capabilities and the type of tasks and applications running on the Ubuntu system.
The Ubuntu system should meet the following requirements:
| REQUIREMENTS | MINIMAL | RECOMMENDED |
|---|---|---|
| CPU | Single-core 1 GHz+ | Dual-core 2 GHz+ |
| RAM | 2 GB+ | 8 GB+ |
| Storage | 25 GB+ | 50 GB+ (SSD) |
| Network | Basic NIC | Stable broadband (Ethernet NIC) |
| Graphics | Integrated graphics or entry-level GPU | Dedicated GPU |
Ideal Internet Speed for RDP Connections
Certain tasks require a minimal level of responsiveness and visual quality. The table offers an overview of minimal and recommended bandwidth per connection for general RDP tasks:
| Tasks | LOCAL NETWORK | INTERNET |
|---|---|---|
| Text editing | 1 Mbps | 1 Mbps |
| Web browsing | 5 Mbps | 2-5 Mbps |
| Video streaming | 10-15 Mbps | 5-10 Mbps |
Beyond bandwidth, factors such as server load, network latency, and packet loss impact RDP performance. For the best experience, prioritize low-latency connections and stable network conditions.
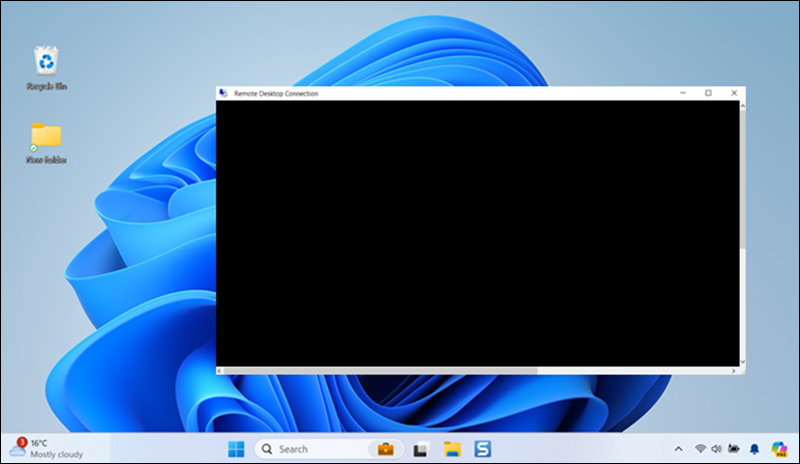
xrdp Black Screen Issue Troubleshooting
Users sometimes encounter a black screen when using xrdp with specific Ubuntu configurations. The screen appears after establishing an RDP session and prevents users from interacting with the Ubuntu system.
To try and resolve the black screen issue, use the tips from the sections below.
Check Log Files
Log files provide valuable information about potential errors. Access the /var/log/xrdp.log using the following command:
sudo vim /var/log/xrdp.log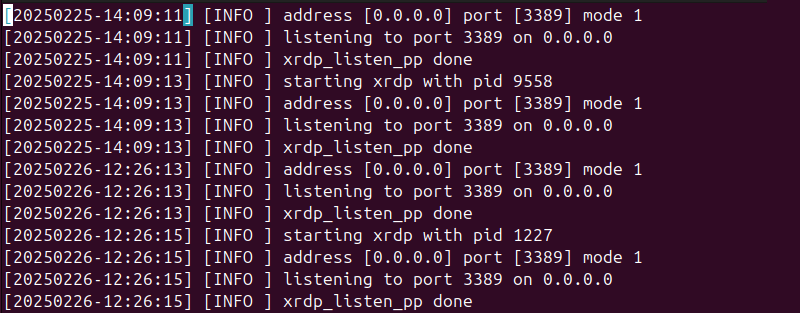
Look for warnings and error messages on the log timeline.
The /var/log/xrdp-sesman.log file contains entries about session startups and shutdowns, operational messages, and warnings. Use the following command to access the log:
sudo vim /var/log/xrdp-sesman.log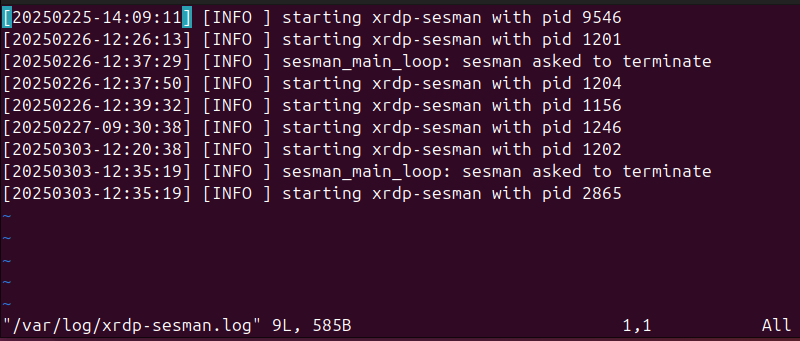
Check for errors occurring when a new session is initiated and for other backend-related issues.
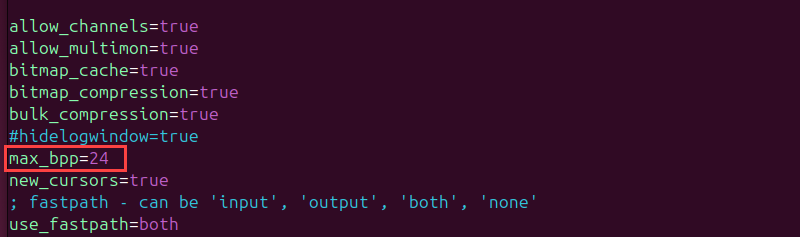
Set max_bpp in xrdp.ini File
The bits per pixel (bpp) value defines the number of bits used to represent the color of a single pixel. High bpp values increase the data that needs to be transferred, which affects performance and causes compatibility issues.
Use the following command to access the xrdp.ini configuration file and check the max_bpp value:
sudo vim /etc/xrdp/xrdp.iniSet the max_bpp value in the [Globals] section to 24, as the default value of 32 bpp sometimes causes issues. If there are other max_bpp values under individual sections, adjust them as well.
Save the changes and restart the xrdp service to ensure the changes take effect.
Reinstall xrdp
A straightforward way to resolve configuration or compatibility issues is to reinstall xrdp.
Run the following to remove the xrdp package and delete its configuration files:
sudo apt remove --purge xrdp -yInitiate a fresh xrdp installation from Ubuntu repositories with:
sudo apt install xrdp -yAfter the installation, modify the xrdp configuration files again.
Install a Different Desktop Environment
The default Ubuntu GNOME desktop occasionally has compatibility issues with xrdp. Install an alternative Ubuntu GUI, such as the XFCE desktop environment, and attempt to establish an RDP connection.
Security Measures
Secure an RDP session from Windows to Ubuntu to prevent unauthorized access and data breaches. Proper security measures include hardening the Windows client and Ubuntu host, restricting network access, and enforcing strong authentication policies.
The following sections present key steps to enhance security.
Windows
- Update Windows regularly to ensure the Remote Desktop Connection app is up-to-date with the latest security patches.
- Limit the number of simultaneous active RDP sessions.
- Disconnect from an RDP session when it is not being used and set timeouts for idle sessions.
Network
- Use a firewall to restrict RDP access to specific IP addresses.
- Change the default RDP port (3389) to a non-standard port number.
- Use a VPN to encrypt the data transfer between client and host machines.
- Alternatively, use SSH port forwarding to create an encrypted tunnel for the RDP session if a VPN is not an option.
Linux
- If you use xrdp, edit the /etc/xrdp/sesman.ini file to specify which users can establish an RDP connection.
- Create dedicated accounts for RDP to restrict access to critical systems or data.
- Implement two-factor authentication for RDP sessions. xrdp does not natively support 2FA but can be integrated with other authentication tools.
- Temporarily lock user accounts after multiple unsuccessful login attempts.
- Enforce strong password policies for RDP user accounts.
Reduce Resolution and Color Depth for Performance Boost
Enhance the RDP session performance by adjusting the color depth and screen size from the Windows RDP client.
To reduce the resolution and color depth, access the Remote Desktop Connection app and:
1. Open the Display tab.
2. Drag the Display configuration slider left to reduce the resolution. For optimal performance on slower connections, 1280×720 resolution is a good choice.
3. Expand the dropdown in the Colors section and choose High Color (16-bit) to reduce the color depth.
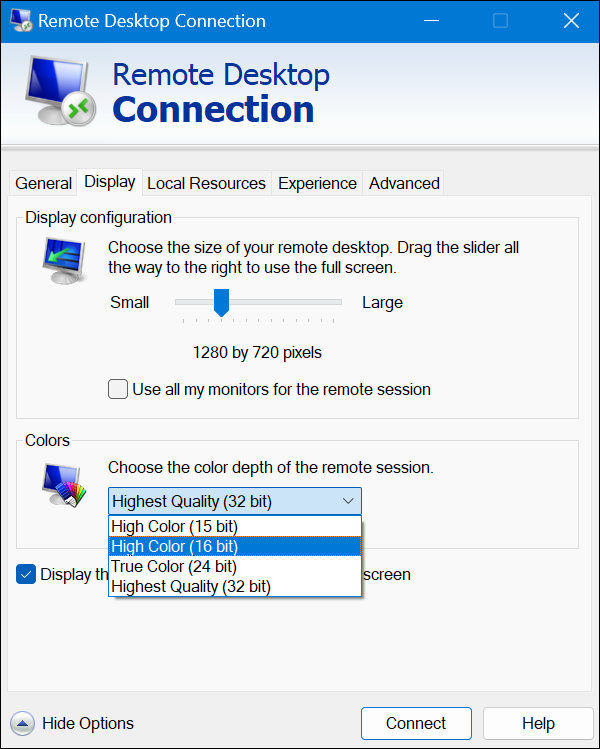
Reducing the screen size and color depth is especially beneficial for low-bandwidth or unreliable network connections.
Conclusion
This tutorial explained how to initiate an RDP session from your Windows system to a remote Ubuntu machine. It also elaborated on useful tips and best practices for a high-quality and secure connection.
Next, learn how to SSH to a remote server from Windows, Linux, or Mac.
Was this article helpful?
YesNo
Безлимитные тарифы интернета с высокой скоростью соединения упростили администрирование компьютеров. Сегодня все чаще помощь пользователям оказывается удаленно. Это удобно, ведь не надо тратить время на поездки и возможность подключиться есть практически круглосуточно.
Сегодня поговорим об удаленном подключении к Ubuntu из ОС Windows.
Зачем удаленно подключаться из Windows к Ubuntu
Не так важно, где находится удаленный компьютер – в соседней комнате или в другом регионе. Интернет убирает подобные ограничения, главное – чтобы связь оставалась стабильной на все время настройки. Это одинаково относится к машинам, работающим хоть на операционной системе Windows, хоть на Ubuntu. Последние используются, например, для развертывания сервера CS или Minecraft.
Причины, по которым требуется удаленное подключение:
- ручной запуск обновлений на компьютере с Ubuntu;
- настройка системы без подключения локального монитора, клавиатуры;
- работа с машиной, расположенной по другому адресу.
Пользователю доступно три варианта коннекта с компьютеров, работающих на ОС Windows. Выбор зависит от удобства и предпочтений: SSH через приложение PuTTY, встроенная поддержка RDP и виртуальная сеть VNC (понадобится предварительная настройка клиента). В любом случае перед работами понадобится выяснить IP-адрес компьютера, к которому предстоит подключаться.
Комьюнити теперь в Телеграм
Подпишитесь и будьте в курсе последних IT-новостей
Подписаться
Как выяснить IP-адрес компьютера с установленной ОС Ubuntu
Если есть физический доступ к компьютеру с установленной Ubuntu, на нем открывается терминал (комбинация клавиш Ctrl+Alt+T) и вводится команда ifconfig. В отображенном перечне данных имеет значение строка, начинающаяся с inet addr. Если используется подключение через Wi-Fi, то рядом будет его маркер в виде «wlan0». При проводном соединении фраза будет заменена на «eth0». Рядом отображается актуальный IP-адрес машины.
Второй способ заключается в применении функций графического интерфейса. Последовательность действий: найти значок подключения на панели, кликнуть правой кнопкой мышки, выбрать пункт «Сведения о подключении». Там и указан постоянный IP-адрес компьютера. Если доступа к нему нет, то можно выяснить данные через маршрутизатор. В панели управления отображаются активные пользователи вместе с их «контактами».
Подключение к Linux через SSH
Перед подключением на компьютер с Windows устанавливается приложение PuTTY. Это популярный инструмент для организации SSH-соединения, которое предоставит удаленный доступ к командной строке Ubuntu. Важно понимать, что этот режим требует определенного опыта в управлении, ведь здесь нет привычной мыши и «окошек», а все команды передаются в текстовом виде. Отчеты предоставляются в таком же виде.
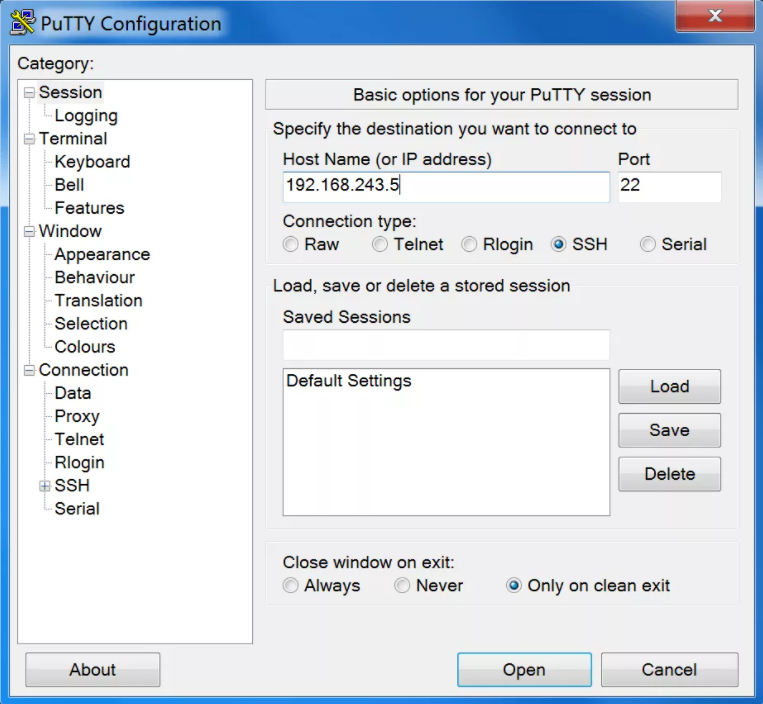
По умолчанию возможность коннекта через SSH в Ubuntu отключена. Так что предварительно эту систему требуется настроить. Активация функции выполняется вводом команды sudo apt install openssh-server (в той же консоли, где ранее был взят IP-адрес). Логин и пароль подключения будут те же, что используются при входе в операционную систему.
Из-за неудобства управления в текстовой среде этот вариант востребован для удаленной активации более удобных инструментов. Например, тех же протоколов RDP или VNC. В них также пригодится IP-адрес, поэтому получить минимальные навыки работы в консоли все равно рекомендуется. Это упростит решаемые задачи, если по каким-то причинам не удается соединение в других режимах.
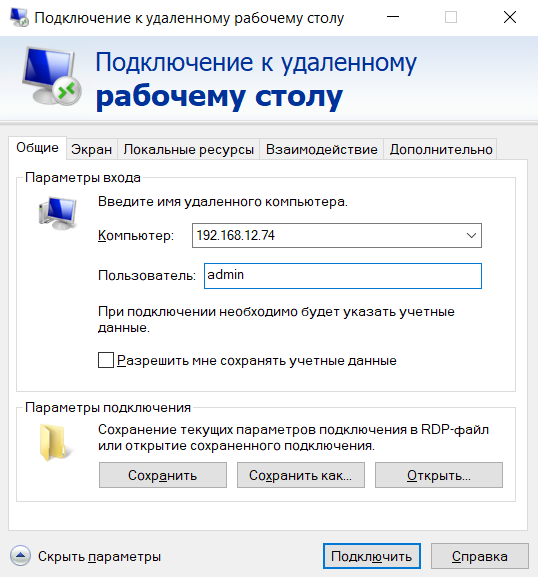
Подключение из Windows через RDP
Способ подключения через службу Remote Desktop Protocol (RDP) распространен при работе с машинами на платформе Windows. Популярность инструмента объясняется просто – его поддержка встроена во все виды и версии операционных систем. Все, что понадобится для подключения, уже известно: это IP-адрес, логин и пароль от Ubuntu. Запускается утилита через поиск, называется она «Подключение к рабочему столу».
На компьютере-клиенте требуется установка приложения xrdp.
- Необходимо открыть окно термина нажатием комбинации клавиш Ctrl+Alt+T.
- Ввести текстовую команду sudo apt install xrdp и нажать «Ввод».
- Провести активацию программы командой sudo systemctl enable xrdp.
После установки надо ввести на компьютере-сервере данные доступа и нажать кнопку «Подключить». Если поставить галочку «Разрешить мне сохранять учетные данные», последующие входы будут выполняться без дополнительных вопросов. Но в первый раз пароль всегда вводится вручную. При желании создается отдельный конфигурационный файл (востребовано, когда много компьютеров с удаленным управлением).
После подключения пользователь видит рабочий стол компьютера на Ubuntu. Работа с его окнами не отличается от локального управления – функционируют все настроенные горячие клавиши, перетаскивание мышью. В некоторых версиях Ubuntu, например, 18.04 LTS, RDP не работает, пока не выйдешь из текущего пользователя. Подобные фишки обычно известны системным администраторам.
Подключение через VNC
Есть другой вариант удаленного рабочего стола – сеть Virtual Network Computing (VNC). Она тоже требует предварительной настройки обеих машин. Так, на компьютер с Ubuntu инсталлируется ПО, открывающее доступ к управлению.
Последовательность действий:
- Открыть окно терминала.
- Ввести команду sudo apt update.
- Установить сервер: sudo apt install tightvncserver.
- Активировать его: sudo tightvncserver.
Система предложит ввести пароль для подключения. Он понадобится при активации удаленного соединения, поэтому стоит записать (запомнить) внесенные данные.
На этом все! TightVNC Server готов к работе, остается следом настроить компьютер на Windows. Программа доступна на официальном сайте разработчика в двух версиях: 32 и 64-бит.
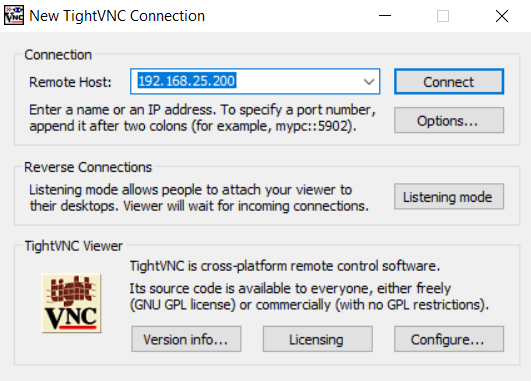
После инсталляции и запуска достаточно ввести IP-адрес хоста и пароль доступа, введенный после активации сервера на Ubuntu. Схема работы VNC аналогична предыдущему примеру: пользователь видит перед собой удаленный рабочий стол и управляет функциями операционной системы, как будто сидит за компьютером локально.
How to Connect to Linux Server from Windows Using Remote Desktop Protocol (RDP) can significantly enhance productivity and streamline workflows, especially in environments where both operating systems are in use. This guide will walk you through the steps necessary to establish a remote desktop connection from a Windows computer to a Linux server, ensuring a seamless and efficient remote work experience.
Why Use Remote Desktop?
Remote Desktop Protocol (RDP) is a proprietary protocol developed by Microsoft, which provides a graphical interface to connect to another computer over a network connection. Using RDP to connect to a Linux server from Windows allows you to:
- Access a graphical interface: Work with a Linux graphical user interface (GUI) directly from your Windows machine.
- Increase productivity: Perform administrative tasks and access applications on the Linux server without needing to switch physical devices.
- Simplify management: Easily manage your Linux server using familiar tools and interfaces.
Prerequisites
Before you starts, ensure you have the following:
- A Linux server with a GUI installed (e.g., GNOME, KDE).
- A user account on the Linux server with administrative privileges.
- The IP address or hostname of the Linux servers.
- A Windows computer with Remote Desktop Connection installed (available by default on most Windows versions).
1. Install a Remote Desktop Server on Linux
First, you need to install a remote desktop server on your Linux machine. One of the most commonly used servers for this purpose is xrdp, which provides a fully functional RDP server for Linux.
Install xrdp on Ubuntu/Debian
Open a terminal on your Linux server and run the following commands:
sh  Copy code
sudo apt update
sudo apt install xrdp -y
Install xrdp on CentOS/RHEL
For CentOS/RHEL, use the following commands:
sh  Copy code
sudo yum -y install epel-release
sudo yum -y install xrdp
2. Start and Enable xrdp
After installing xrdp, you need to start the service and enable it to start on boot.
sh  Copy code
sudo systemctl start xrdp
sudo systemctl enable xrdp
3. Configure Firewall Rules
Ensure that the firewall allows traffic on the default RDP port (3389). You may need to adjust firewall settings depending on your distribution.
For Ubuntu/Debian with UFW:
sh  Copy code
sudo ufw allow 3389/tcp
For CentOS/RHEL with firewalld:
sh  Copy code
sudo firewall-cmd --permanent --add-port=3389/tcp
sudo firewall-cmd --reload
4. Check xrdp Status
Verify that xrdp is running correctly by checking its status:
sh  Copy code
sudo systemctl status xrdp
You should read a message indicating that the service is active & running.
5. Install a Desktop Environment
If your Linux server does not have a desktop environment installed, you need to install one. For example, to install GNOME on Ubuntu, use the following command:
sh  Copy code
sudo apt install ubuntu-desktop -y
For CentOS/RHEL, you can install GNOME with:
sh Copy code
sudo yum groupinstall “GNOME Desktop” -y
6. Connect from Windows
Now that your Linux server is set up to accept RDP connections, you can connect to it from your Windows machine.
Open Remote Desktop Connection
- Press Win + R to open the Run dialog.
- Type mstsc and press Enter to open the Remote Desktop Connection application.
Enter the Linux Server’s IP Address
In the Remote Desktop Connection window, enter the IP address or hostname of your Linux server and click Connect.
Authenticate
A login screen will appear. Enter your Linux server credentials (username and password) to authenticate.
7. Troubleshooting Connection Issues
If you encounter issues connecting to your Linux server, here are some common troubleshooting steps:
- Check xrdp service: Ensure the xrdp service is running on the Linux server.
- Firewall settings: Verify that the firewall is not blocking port 3389.
- SELinux/AppArmor: If SELinux or AppArmor is enabled, ensure they are not restricting xrdp.
- Network connectivity: Ensure your Windows machine can reach the Linux server over the network.
Additional Tips
Using Different Desktop Environments
If you prefer a different desktop environment, such as KDE or Xfce, you can install them and configure xrdp to use them. For example, to use Xfce, install it with:
sh Copy code
sudo apt install xfce4 -y
Then, create a .xsession file in your home directory with the following content:
sh Copy code
echo xfce4-session > ~/.xsession
Securing Your RDP Connection
For enhanced security, consider tunneling your RDP connection through SSH. This adds an extra layer of encryption and helps protect your data.
- Install OpenSSH server on your Linux machine if it’s not already installed.
- Create an SSH tunnel from your Windows machine using an SSH client like PuTTY.
In PuTTY, configure an SSH tunnel as follows:
- In the “SSH” section, expand “Tunnels”.
- Set “Source port” to 3389.
- Set “Destination” to localhost:3389.
- Click “Add”.
Connect to your Linux server using PuTTY, and then use the RDP client to connect to localhost:3389.
Using RDP Clients for Linux
While Windows comes with an RDP client by default, there are several third-party RDP clients available for Linux that you can use for a more customized experience, such as Remmina or FreeRDP.
Conclusion
How to connect to Linux Server from Windows using Remote Desktop can greatly enhance your productivity and flexibility, allowing you to manage your Linux systems with ease. By following the steps outlined in this guide, you can set up a reliable and secure remote desktop connection, enabling you to access your Linux server’s graphical interface from anywhere. Whether you’re an IT professional, a developer, or a hobbyist, mastering RDP connections between Windows and Linux is a valuable skill that can streamline your workflows and open up new possibilities for remote management.
Connecting to a Linux system remotely from a Windows device can open up a world of flexibility, efficiency, and convenience. Whether you’re managing servers, running development environments, or troubleshooting systems, remote desktop access allows you to accomplish tasks without being physically present. In this comprehensive article, we will explore various methods for connecting to a Linux remote desktop from a Windows operating system, equipping you with the skills to enhance your productivity and streamline your workflow.
Understanding Remote Desktop Connections
Before diving into the methods, it’s crucial to understand what a remote desktop connection is. A remote desktop allows a computer user to connect to another computer and use it as if they were sitting right in front of it. The connection is established through a network, enabling users to interact with both the desktop environment and application software from differing machines.
For Linux, there are numerous Desktop Environment options such as GNOME, KDE, XFCE, and more, each offering unique features and functionalities. Similarly, Windows also comes with its own suite of tools, which can interface effectively with a variety of Linux systems.
Pre-requisites for Remote Desktop Connection
Before you attempt to connect to a Linux machine from a Windows device, ensure you meet the following pre-requisites:
- Linux Distribution: Ensure your Linux machine is running and has a desktop environment installed (e.g., GNOME, Xfce).
- Remote Desktop Protocol (RDP): Many Linux distributions do not come configured with an RDP server by default. You may need to install one, such as xrdp.
- Network Accessibility: Ensure both computers are on the same network or that you have internet access to the Linux machine.
- Firewall and Security: Make sure that any firewall on the Linux system allows traffic on the ports used by the remote desktop service.
- Windows RDP Client: Ensure you have access to the built-in Windows Remote Desktop Connection client, or consider alternative software if needed.
Installing XRDP on Linux
One of the most common methods to enable remote desktop connections to a Linux system is by using XRDP, which implements the Microsoft RDP protocol. Here is how you can install it:
- Open Terminal: Access the terminal window on your Linux system.
- Update Package Index: First, update the package index of your Linux distribution:
sudo apt update - Install XRDP: Install XRDP through the package manager. For Debian or Ubuntu-based distributions, run:
sudo apt install xrdpFor Red Hat or CentOS, use:
sudo yum install epel-release sudo yum install xrdp - Start and Enable XRDP: After installation, start the XRDP service and enable it to start on boot:
sudo systemctl start xrdp sudo systemctl enable xrdp - Configure the Firewall: Adjust the firewall settings to allow RDP connections. A common port used by XRDP is 3389:
sudo ufw allow 3389
Configuring the Desktop Environment
While XRDP supports various desktop environments, additional configuration may be required depending on your setup. For instance, if you are using the Xfce desktop, the configuration can be as follows:
- Light Desktop Environment: Install Xfce if it is not already installed:
sudo apt install xfce4 - Configure XRDP to use Xfce: You then need to set XRDP to use it as the session for remote connections. Create or edit the
.xsessionfile in your home directory:echo "xfce4-session" > ~/.xsession
Connecting to the Linux Remote Desktop from Windows
Now that you have your Linux system configured to accept connections, let’s move on to connecting to it from Windows.
- Open Remote Desktop Connection: On your Windows computer, open the Remote Desktop Connection client. You can do this by searching for «Remote Desktop» in the Start menu.
- Enter the Linux Machine’s IP Address: In the ‘Computer’ field, enter the IP address of the Linux machine. You can find your Linux machine’s IP address by running:
ip aTake note of the
inetaddress under your active network interface. - Set the Credentials: Click on «Show Options» to enter your username and destination Linux user credentials. The default username is typically your Linux username.
- Connect: Click on «Connect». If you see a warning about the remote identity, it can usually be safely ignored unless this setup is for a production environment.
- Log In: Enter your password when prompted, and voilà! You should now be connected to your Linux remote desktop.
Troubleshooting Common Connection Issues
Being connected to a remote desktop isn’t always seamless. Here are some common issues you might encounter and how to troubleshoot them:
-
Connection Refused Error: This might indicate that XRDP is not running or that there is a firewall blocking the connection.
- Check if XRDP is running using:
sudo systemctl status xrdp - Ensure your firewall allows connections on port 3389.
- Check if XRDP is running using:
-
Black Window on Connection: If you are able to connect but can only see a black screen, it might be related to displaying issues with the desktop environment.
- Verify that you have configured the right desktop session in your
.xsessionfile.
- Verify that you have configured the right desktop session in your
-
Authentication Failure: Ensure you are using the correct username and password, and that the user has permission to log in through XRDP.
Alternative Remote Desktop Solutions
While XRDP is a popular option, there are several other remote desktop software that can be used in conjunction with Linux systems:
-
VNC (Virtual Network Computing): Provides a graphic desktop sharing system; it can be a great alternative to XRDP, particularly for users who require only a lightweight solution. Software like TightVNC or TigerVNC can be installed for this purpose.
-
TeamViewer: A proprietary solution that allows you to control computers remotely; it is quite user-friendly and offers cross-platform support.
-
AnyDesk: Provides fast remote access and is particularly noted for its low latency.
-
SSH with X11 Forwarding: For users who only want to run individual applications without needing full desktop access. X11 allows GUI applications from Linux to run on a Windows machine.
Conclusion
Connecting to a Linux remote desktop from a Windows machine is a simple yet powerful way to manage systems efficiently. Through the use of XRDP, remote desktop clients, and alternative solutions, you can access files, applications, and system settings seamlessly.
Ultimately, building comfort with these tools encourages productivity and provides the flexibility to work from any location—whether you’re managing a server, assisting a colleague, or just accessing your files. With a bit of setup and troubleshooting, you can expand your capabilities and control your environment just like your physical workspace, even when on the go.
We hope this guide has provided you with a comprehensive understanding and the necessary steps to connect to a Linux remote desktop from a Windows device. As remote work becomes increasingly prevalent, mastering these connection techniques is invaluable. Happy remote working!
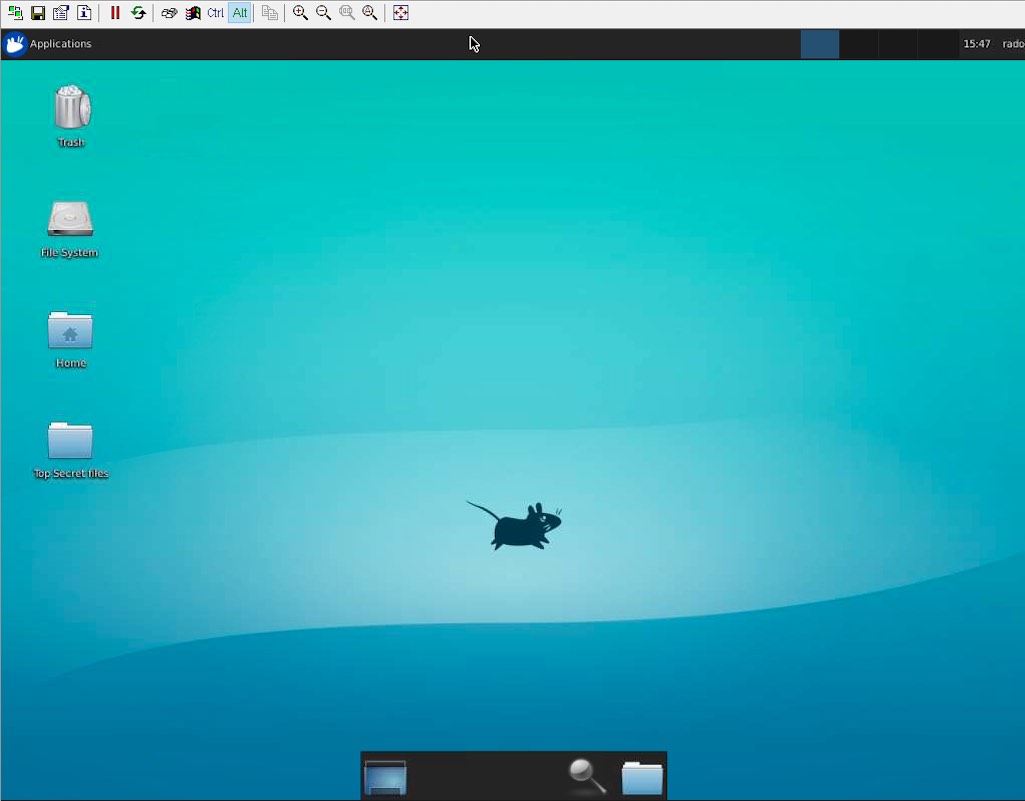
Table of Content
In this article, we’ll discuss how to remotely access your Linux or Ubuntu desktop GUI from Windows using RDP, making it easier than ever to manage your Linux server from anywhere in the world.
One of the most powerful features of the Linux is its ability to be accessed remotely, allowing you to control and interact with your Linux server or Ubuntu over the internet from outside network.
And when it comes to remote desktop access on a Linux server, xrdp (X Remote Desktop Protocol) is the go-to solution.
With xrdp, you can unlock a world of possibilities, from setting up a headless Linux server to accessing your Linux server’s graphical desktop from any machine, be it a Windows, macOS, or Linux machine.
What is RDP
Remote Desktop Protocol (RDP) is a network protocol developed by Microsoft and is widely used by users to remotely access and interact with the graphical user interface of a remote machine such as Windows Server, Mac, or Linux machine including Linux server.
RDP follows the client-server model, where an RDP client is installed on a local machine, and an RDP server is installed on the remote server or Linux server.
What is xrdp
xrdp is an open-source software package that allows for remote desktop access to Linux-based operating systems, including Linux server.
xrdp stands for “X Remote Desktop Protocol” and is a protocol that enables users to connect to a Linux-based desktop environment from a remote device, such as a Windows, macOS, or another Linux machine.
xrdp uses the Remote Desktop Protocol (RDP) developed by Microsoft.
xrdp is often used as an alternative to other remote desktop solutions, such as Virtual Network Computing (VNC), as it provides a more seamless and integrated experience for connecting to Linux-based systems.
It allows users to access their Linux desktop environment remotely, run applications, edit files, and perform other tasks using a graphical interface, making it convenient for remote administration, support, and other use cases.
Linux server Remote Desktop Access using xrdp
In this blog article, we will delve into the fascinating concept of Linux server remote desktop access using xrdp.
We will guide you through the step-by-step process of setting up xrdp on your Linux server, exploring its features and configuration options, and providing tips and tricks to optimize your remote desktop experience.
So, grab your Linux server, and let’s embark on an exciting journey of unlocking the true potential of remote desktop access with xrdp!
Recommended for you: How to securely remote access Linux Servers using SSH from Windows.
Step 1: Setting up a Desktop environment on Linux server
Before you can remotely connect to your Linux server via xrdp, you need to make sure your Linux server is set up and running.
This includes installing an operating system (such as Ubuntu) and connecting your Linux server to a display, keyboard, and mouse.
Additionally, make sure your Linux server is connected to the internet via an Ethernet cable or Wi-Fi.
For this tutorial we will assume that your Linux server doesn’t have a GUI desktop environment installed. We will install XFCE desktop environment, to have the actual desktop accessible on the Linux server.
Note: If your Linux server already has a desktop environment set up, say Ubuntu Desktop, then you can skip this step and jump to the next step.
sudo apt install -y xfce4 xfce4-goodies
Next, we will install xrdp to access this GUI desktop environment from a different machine.
Step 2: Install and setup xrdp on Linux server
Following the below instructions to install xrdp on your Linux server:
-
Open a terminal window.
-
Update the package list on your system by running the following command:
sudo apt update
-
Install xrdp by running the following command:
sudo apt install xrdp
-
Once the installation is complete, start the xrdp service by running the following command:
sudo systemctl start xrdp
-
Optionally, you can enable the xrdp service to start automatically at boot by running the following command:
sudo systemctl enable xrdp
-
It’s important to configure your firewall settings in your Linux server to allow incoming RDP traffic to your Linux server on TCP port 3389 using the following command:
sudo ufw allow 3389/tcp
Now you can access your Linux server desktop via xrdp from your Windows or Mac PC in a local network. You can jump to Step #4 if you want to access Linux server remote desktop using an RDP client from a local network.
But our goal is to connect to Linux server desktop remotely over the internet.
For this, we’ll use the SocketXP Linux Server Remote Access solution as shown in the next step.
Step 3: Install SocketXP Linux Server Remote Access Agent
We need to install SocketXP Linux Server Remote Access Agent to run in two different places:
- Linux server — in IoT Master Mode (Default Mode)
- Laptop or PC — in IoT Slave Mode
Follow the SocketXP download and install instructions to install the SocketXP Remote Access agent on the Linux server and the access devices.
To make SocketXP agent to run in IoT Master Mode (which is the default mode of SocketXP agent) use the below command.
$ socketxp  connect tcp://localhost:3389

Connected to SocketXP Cloud Gateway.
Access the TCP service securely using the SocketXP agent in IoT Slave Mode.
where localhost port 3389 is the RDP server port, on which xrdp is listening for connections from a RDP client such as RDC.
Next, to access the Linux server device from your Windows laptop or PC, install SocketXP Agent for Windows and run the below command:
$ ./socketxp.exe connect tcp://localhost:3000 --iot-slave --peer-device-id "2233-abcdefgh-2342abc" --peer-device-port 3389 --authtoken <auth token>
Listening for TCP connections at:
Local URL -> tcp://localhost:3000
where 3000 is a local port on your PC at which you want to access the Linux server. You can choose to use any free local port instead of port 3000.
You shall find the device ID of your Linux server device from the SocketXP Portal page in the IoT Devices section. For our illustration, we assume 2233-abcdefgh-2342abc is the device ID of your IoT device.
Step 4: Connect to Linux server remote desktop using RDP Client
With xrdp up and running on your Linux server, you can now connect to it using an RDP client such as Remote Dekstop Connection (RDC) in Windows or Remmina in Linux.
If you are using Linux, use the following command to install Remmina on your Ubuntu Linux based access device such as your laptop:
sudo apt update
sudo apt install remmina
Connecting from Local Network
To access the remote desktop GUI of your Linux server connected to your local network, simply open the Windows Remote Desktop Client(RDC), enter the IP address or hostname of your Linux server, and click “Connect”. Enter your Linux server’s username and password when prompted.
If you are using Linux, you can use the Remmina Remote Desktop Client, which is a popular RDP client for Linux. Open Remmina, click on “New” to create a new connection, select “RDP” as the protocol, and enter your Linux server’s IP address or hostname, username, and password. Click “Connect” to establish the remote desktop connection.
Connecting from Outside Network Over the Internet
If you want to remotely access Linux server desktop from Windows over the internet using SocketXP Linux Server Remote Access solution, then enter localhost or 127.0.0.1 as the IP address and port 3000 on the RDC client.
This is the IP address and port on which SocketXP agent configured to run in iot-slave mode, in Step#3 above, is listening for local proxy connections.
Once connected, you will be able to see and interact with your Linux server’s desktop environment, just as if you were physically sitting in front of it. You can run applications, edit files, and perform other tasks remotely.
Conclusion:
With xrdp, remote access to your Linux server desktop GUI has never been easier.
SocketXP Linux Server Remote Access Solution is a highly scalable solution that uses secure SSL/TLS tunnel to remotely connect and access Linux server VNC server from a Windows Laptop or a Mac Book.
By following the steps outlined in this article, you can quickly set up xrdp on your Linux server and establish a secure and convenient remote desktop connection from anywhere, anytime.
Whether you’re managing a Linux server remotely or accessing your Linux server for troubleshooting or maintenance purposes, xrdp is a powerful tool that enables you to stay connected to your Linux server with ease.
Happy remote controlling your Linux server!
Recommended Suggestions
Based on your interest, you may also be interested in:
- How to securely remote access Linux Server using SSH from Windows.