
Ранее я загрузил и установил сервер (продукт) СУБД «MySQL» версии 8.0 (бесплатной, со словом «Community» в названии) к себе на компьютер. Об этом у меня есть три поста: часть 1, часть 2, часть 3. Во время установки сервера этой СУБД (при его настройке) я выбрал способ работы с исполняемым файлом сервера «mysqld.exe» как с программой, которую нужно запускать и останавливать вручную.
Более популярной альтернативой такой настройки является способ запуска и останова сервера «mysqld.exe» как службы (service) «Windows» (этот способ тоже может быть запуском соответствующей службы вручную или автоматическим, при начале работы операционной системы). В данном посте речь пойдет о том, как настроить СУБД «MySQL» для работы в качестве службы «Windows».
Такая настройка может быть выполнена по-разному, в зависимости от того, в какой ситуации находится пользователь: СУБД уже установлена для работы не в качестве службы «Windows» (мой случай), СУБД еще не установлена.
1. СУБД «MySQL» уже установлена для работы НЕ службой «Windows»
В первую очередь я выполнил останов сервера «mysqld.exe», который у меня был запущен на данный момент как самостоятельная программа, а не как служба «Windows». Перед созданием запуска сервера в качестве службы «Windows» этот останов требуют сделать и в соответствующем разделе документации СУБД (про запуск и останов сервера как самостоятельной программы я писал в части 3 серии постов про установку этой СУБД).
Службы в операционных системах «Windows» можно создавать несколькими способами (например, с помощью командлета New-Service в языке «PowerShell» или с помощью утилиты «sc.exe»). Я выбрал способ, предоставляемый самим исполняемым файлом «mysqld.exe», с помощью параметра --install (создание службы с автоматическим запуском) или с помощью параметра --install-manual (создание службы с запуском вручную).
Важно: как я уже описывал ранее в другом посте, запускать сервер «mysqld.exe» следует от имени пользователя с административными правами, так как этот сервер пишет логи в папку C:\ProgramData\MySQL\MySQL Server 8.0\Data\, для чего ему нужны административные права. По крайней мере, так это работает у меня в системе.
Запуск «mysqld.exe» только с этим параметром, например, такой (из программы-оболочки «PowerShell»):
(админ) PS C:\Program Files\MySQL\MySQL Server 8.0\bin> .\mysqld --install-manual
у меня сообщает в консоль, что «Service successfully installed.» (служба успешно установлена).
Действительно, служба с названием «MySQL» (это название службы, создаваемой вышеприведенной командой по умолчанию, но в этой команде можно указать другое название) успешно появляется в списке служб «Windows». Этот список можно открыть из диспетчера задач (этот диспетчер можно вызвать сочетанием клавиш «Ctrl+Shift+Esc»), на вкладке «Службы» внизу, щелкнув мышью по ссылке «Открыть службы» (если этот список уже открыт, то может потребоваться его обновить).
Вышеприведенная команда не запускает службу, а только добавляет (устанавливает) ее в список служб. Добавленную службу можно запустить из списка служб (это только один из ряда способов запустить службу).
Запуск службы «MySQL», добавленной вышеприведенной командой, у меня приводит к следующей ошибке («Служба «MySQL» на «Локальный компьютер» была запущена и затем остановлена. Некоторые службы автоматически останавливаются, если они не используются другими службами или программами.»):
Служба, очевидно, остается не запущенной. Эта ошибка может быть вызвана разными причинами. В данном случае причина в том, что команда добавления (установки) службы является неполной (см. пояснения и правильный вариант ниже).
Чтобы ввести более полную команду, я удалил службу из списка служб с помощью следующей команды (из программы-оболочки «PowerShell»):
(админ) PS C:\Program Files\MySQL\MySQL Server 8.0\bin> .\mysqld --remove
Эта команда одинакова хоть для службы, добавленной ранее с параметром --install, хоть для службы, добавленной ранее с параметром --install-manual. Если название службы отличается от умолчательного «MySQL», то его следует указать в команде. Эта команда при успешном удалении службы выдает в консоль сообщение «Service successfully removed.».
Правильно будет (для нашего случая) задать при запуске добавления (установки) службы параметр --defaults-file с путем к файлу «my.ini», в котором содержатся настройки СУБД «MySQL», выполненные при установке этой СУБД программой-установщиком. Вот как у меня выглядит эта команда:
(админ) PS C:\Program Files\MySQL\MySQL Server 8.0\bin> .\mysqld --install-manual MySQL --defaults-file="C:\ProgramData\MySQL\MySQL Server 8.0\my.ini"
Эта команда у меня срабатывает успешно, служба добавляется в список служб. После этого я выполнил запуск службы и он прошел удачно. Служба «MySQL» запустилась, процесс сервера «mysqld.exe» появился в списке процессов и я смог начать работать в программе-клиенте «mysql.exe».
В вышеприведенной команде отмечу два момента. Во-первых, порядок параметров важен. Если параметр --defaults-file будет идти в команде раньше параметра --install-manual, то будет произведена попытка запуска сервера СУБД, а не добавление (установка) службы в список служб. Во-вторых, важно обязательно указать название службы, даже если оно является умолчательным «MySQL», как в данном случае. Без этого у меня запуск вышеприведенной команды выдает ошибку и служба не добавляется в список служб.
Еще одно важное замечание. При добавлении (установке) службы в список служб имеет значение, от имени какой учетной записи операционной системы будет производиться вход в систему (запуск) данной службы. После добавления службы в список служб это можно посмотреть, открыв свойства данной службы. Вот как эти свойства выглядят у меня (вкладка «Вход в систему» окна свойств):

Под «системной учетной записью» у меня в данном случае подразумевается учетная запись «Локальная система», она же просто «СИСТЕМА».
Учетная запись, от имени которой запускается служба, должна обладать определенным набором прав и разрешений, иначе служба не будет запущена успешно. В нашем случае учетная запись должна обладать правом запуска служб, а также разрешением на запуск исполняемого файла «mysqld.exe», разрешением на полный доступ к папке логов и данных C:\ProgramData\MySQL\MySQL Server 8.0\Data\, разрешением на чтение файла с настройками C:\ProgramData\MySQL\MySQL Server 8.0\my.ini (пути приведены для моего компьютера, вообще они могут отличаться от указанных).
Учетная запись «СИСТЕМА» обладает всеми нужными правами и разрешениями, поэтому в данном случае мне не пришлось заниматься настройкой этих прав и разрешений.
Перенастройка (Reconfigure). Я пытался выполнить перенастройку установленной у меня на компьютере СУБД «MySQL» через программу-установщик «MySQL Installer — Community». В программе-установщике есть такая возможность. Но на шаге перенастройки, касающемся запуска сервера СУБД как службы «Windows» после указания новых настроек не получается продвинуться дальше: кнопка «Next» остается неактивной. Если не пытаться выполнить эту перенастройку, а просто полностью удалить установку СУБД «MySQL» (вместе с папкой данных) через эту же программу-установщик, а затем установить СУБД «MySQL» заново, но теперь выбрав способ работы сервера СУБД в качестве службы «Windows» (с запуском вручную или с автоматическим запуском при запуске операционной системы), то всё получается успешно.
2. Установка СУБД «MySQL» для работы службой «Windows» изначально
Про установку этой СУБД я уже рассказывал подробно и пошагово ранее в трех постах (часть 1, часть 2, часть 3). Но там я на шаге выбора способа работы сервера «mysqld.exe» выбирал способ работы с сервером как с самостоятельной программой, а не в качестве службы «Windows». Теперь вернемся к установке СУБД «MySQL», но на этом шаге выберем вариант работы в качестве службы «Windows»:

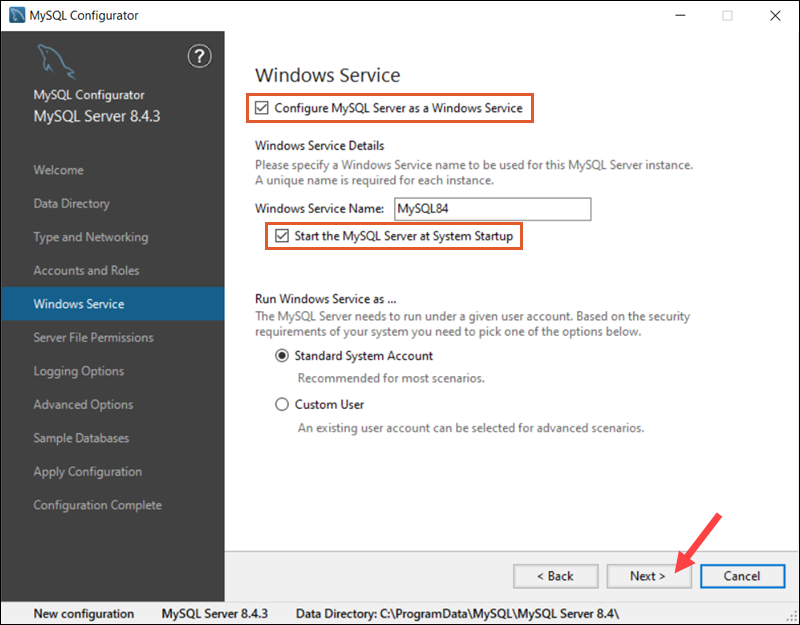
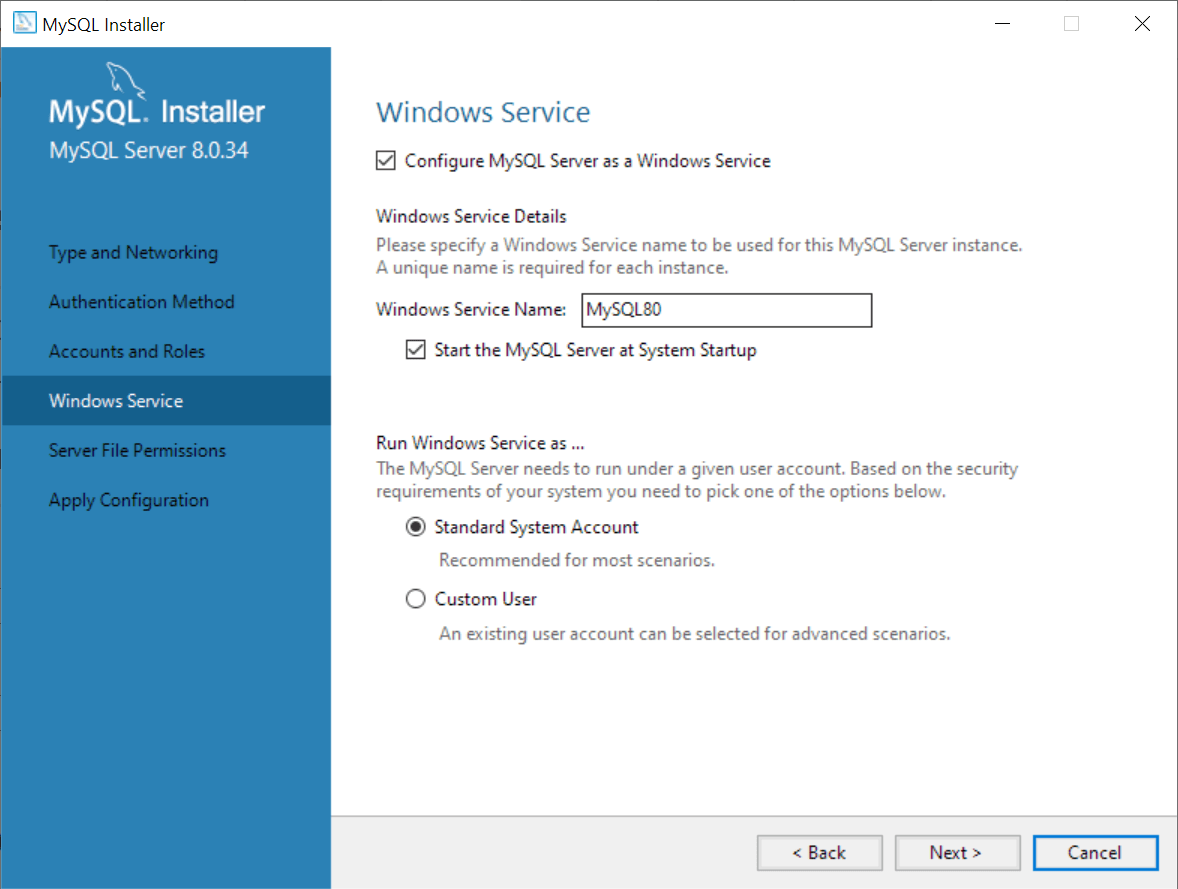
Как видно на иллюстрации выше, теперь я оставил установленной галку «Configure MySQL Server as a Windows Service» (в прошлый раз я ее снимал).
Также я снял галку «Start the MySQL Server at System Startup»; это значит, что служба, добавляемая в список служб, будет с запуском вручную (если эту галку оставить установленной, то служба будет с автоматическим запуском при запуске операционной системы). Мне не нужно, чтобы процесс сервера «mysqld.exe» постоянно болтался запущенным в списке процессов, отъедая ресурсы моего компьютера. Я устанавливаю СУБД «MySQL» для изучения и экспериментов, а не для постоянной работы (production).
В первой половине этого поста я показывал, как добавить службу с названием «MySQL» (название по умолчанию) в список служб. В данном случае программа-установщик, как видно на иллюстрации выше, предлагает назвать службу «MySQL80». Ничего не имею против, я оставил эту настройку как есть.
Как видно на иллюстрации выше, я оставил учетную запись, от имени которой будет запускаться наша служба, по умолчанию: «Standard System Account». В соответствующем разделе документации СУБД, однако, сказано, что в данном случае под этой фразой подразумевается учетная запись «Network Service» (у меня в компьютере имя этой учетной записи написано большими буквами: «NETWORK SERVICE», еще ее называют «Сетевой службой»), цитата:
When Standard System Account is selected (default), the service logs on as Network Service.
Установку СУБД «MySQL» я закончил успешно (остальные шаги установки и настройки выполняются так же, как было описано в предыдущих постах). Служба «MySQL80» (с запуском вручную) запускается и останавливается успешно, можно работать с сервером СУБД.
Вот как выглядит вкладка «Вход в систему» окна свойств службы «MySQL80», добавленной программой-установщиком в список служб:

На иллюстрации выше видно, что выбрана учетная запись «Сетевая служба», о чем было сказано ранее. Этот пароль я не вводил, в этом окне всё настроено программой-установщиком. Учетная запись «NETWORK SERVICE» получила полный доступ к папке данных (это тоже настроено программой-установщиком).
Perfect! You just connected to your MySQL server. You can use explore the several features offered by the most complete MySQL database client on the market, including the explain plain to optimize your queries, native support for BLOB data, and much more! Also, note that you now have a new “MySQL 8” connection on the left tab.
Conclusion
In this article, you understood how to install the MySQL server on Windows. Specifically, you started from scratch and saw how to download the MySQL installer, use it to set up the MySQL server service on Windows, start it, and connect to DbVisualizer. This is a popular database client that comes with full assistance for MySQL, supporting all its data types and characterizing features. Download DbVisualizer for free!
FAQ about mysqld
What is mysqld?
mysqld is a multithreaded process that does most of the work in a MySQL database. In other words, it represents the MySQL server, which is responsible for storing and retrieving data, handling user authentication, and ensuring database security. The mysqld process generally runs in the background to ensure that MySQL is always available to process queries and perform database operations.
How to run MySQL from the command line on Windows?
To run MySQL from PowerShell, you must first add the MySQL executable files to the Windows environment variables. Follow the steps below to do so:
-
Open the Windows Start menu and type «Environment Variables» in the search bar.
-
Click on «Edit the system environment variables» from the search results.
-
In the System Properties window, click on the «Environment Variables…» button.
-
Under the System Variables section, scroll down and find the «Path» variable. Select it and click on «Edit».
-
Click on «OK» to add MySQL to the environment variables
Now, you can use the mysql command from the Windows terminal.
How to start the MySQL server from the Windows command line?
There are two ways to start the MySQL server from the Windows command line:
Method 1: Using the net start command.
-
Right-click on the Windows logo and select “Terminal (Admin)” to launch PowerShell as an administrator.
-
Start the MySQL server with the command below:
MySQL is a well-established relational database management system (RDBMS). It is fully compatible with Windows operating systems, including desktop and server editions.
Learn how to install and configure MySQL on a Windows server using the MySQL MSI Installer and MySQL Configurator, tools designed to simplify the setup of MySQL products.
Prerequisites
- Windows operating system.
- Administrator privileges on the Windows server.
How to Install MySQL on Windows
Instead of downloading and installing MySQL manually, you can use the MSI Installer to streamline the process.
Step 1: Download MySQL MSI Installer for Windows
To download a free Community MySQL Server for Windows:
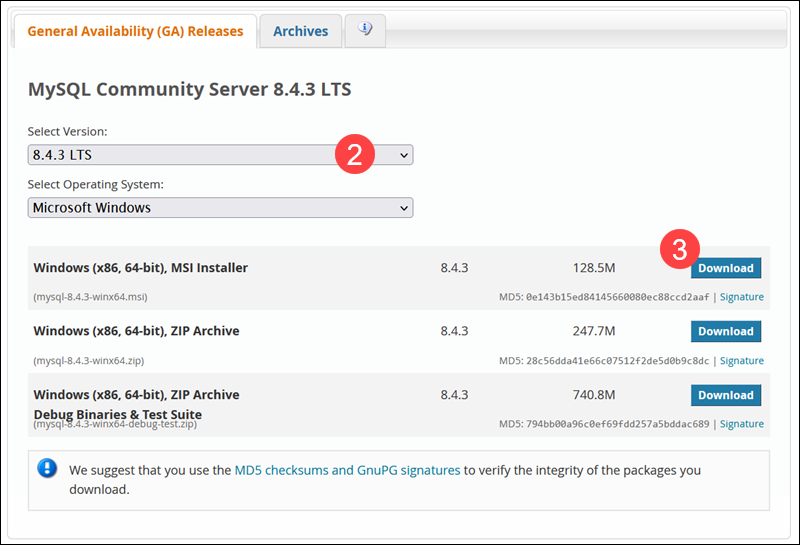
1. Connect to your Windows server and navigate to the official MySQL downloads page.
2. Use the dropdown menu to select the latest MySQL Server version. At the time of writing, the latest stable MySQL Community Server version is 8.4.3 LTS.
3. Download the MSI Installer.
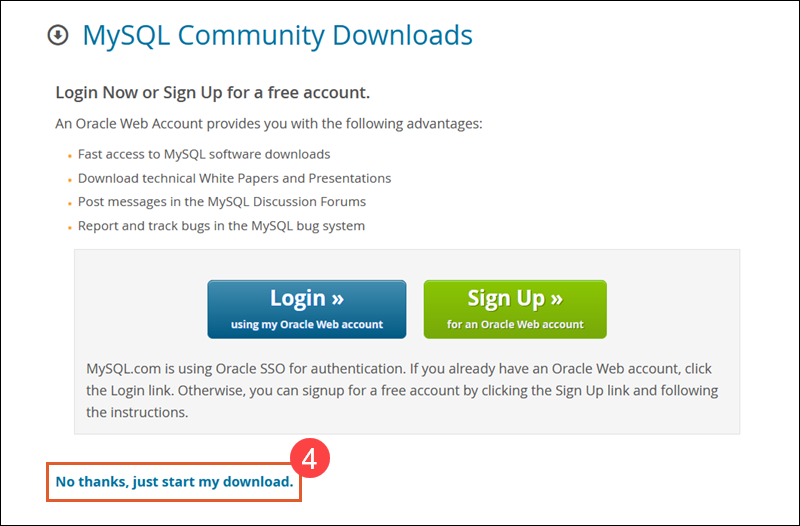
4. If you do not want to sign up for an Oracle Web Account, click No thanks, just start my download.
Once the download is complete, run the MySQL Installer file from the download folder. It can take a few moments while Windows prepares the installation and configuration process.
Step 2: Install MySQL Server on Windows
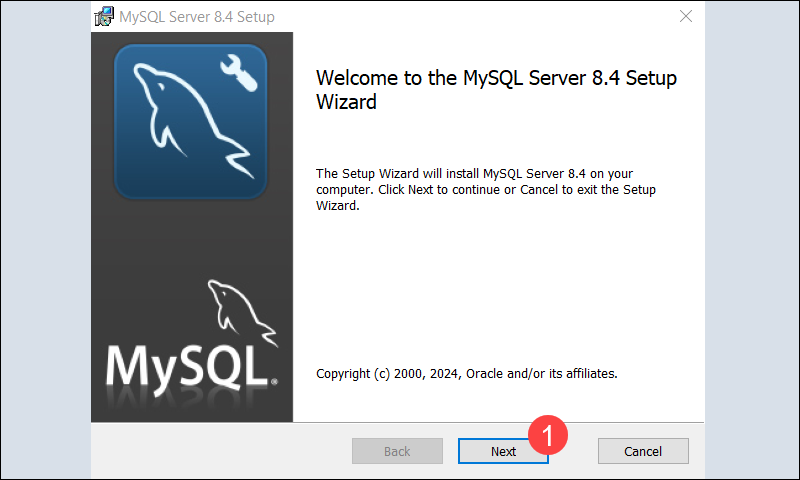
To install MySQL Server on Windows:
1. Click Next to start the MySQL installation process in the Setup Wizard.
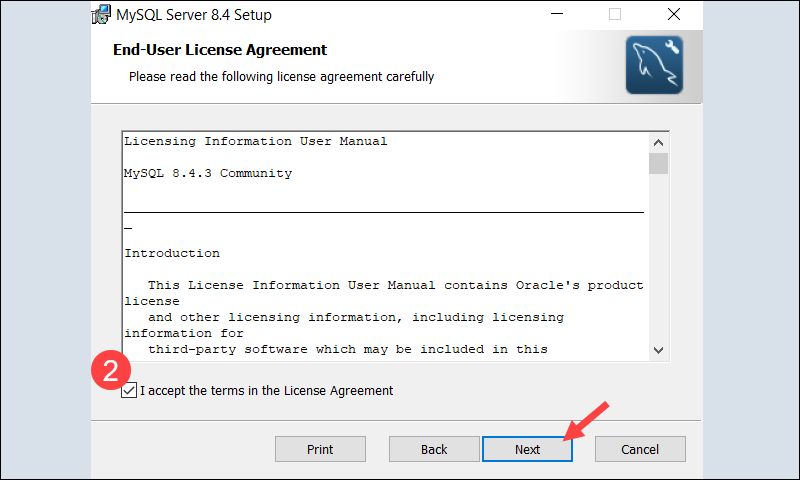
2. Review and accept the License Agreement terms and click Next.
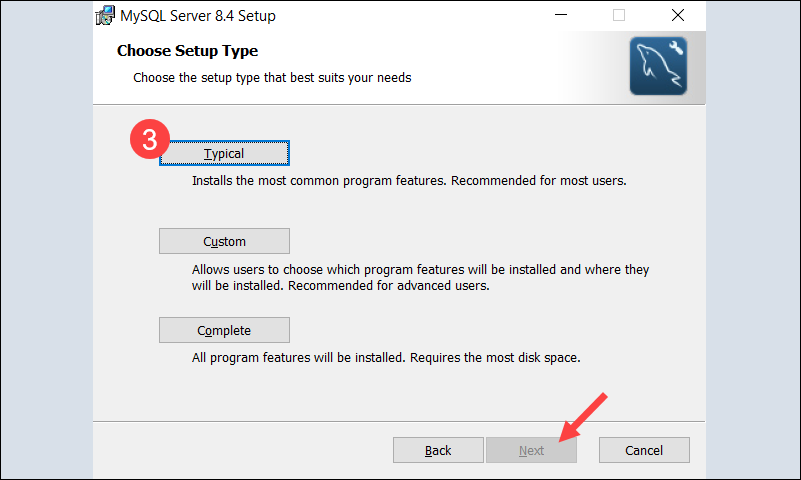
3. Before proceeding with the installation, define which features to install by selecting a Setup Type. Select one of the predefined options or create your custom setup:
- Typical. Deploy an instance of the MySQL Server and skip most other features. Typically used for deploying servers in a production environment.
- Custom. Manually select the elements to be installed and modify default settings.
- Complete. Install MySQL Server and all available features, including sample databases and examples. Provides a complete environment for development and server management.
For this tutorial, we selected the Typical setup type. After making your selection, click Next to proceed.
Note: The setups are tailored for specific use cases, primarily to streamline the installation. You can always customize the preconfigured setups post-installation.
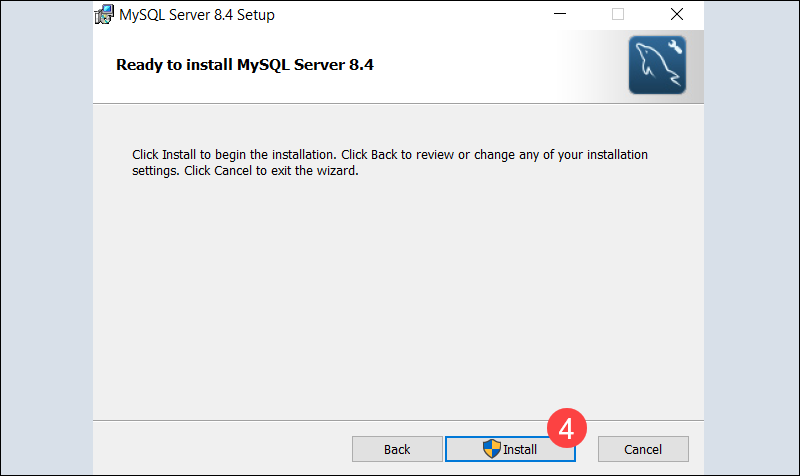
4. Click Install to initiate the MySQL Server installation.
5. Confirm the Run MySQL Configurator option is checked and click Finish.
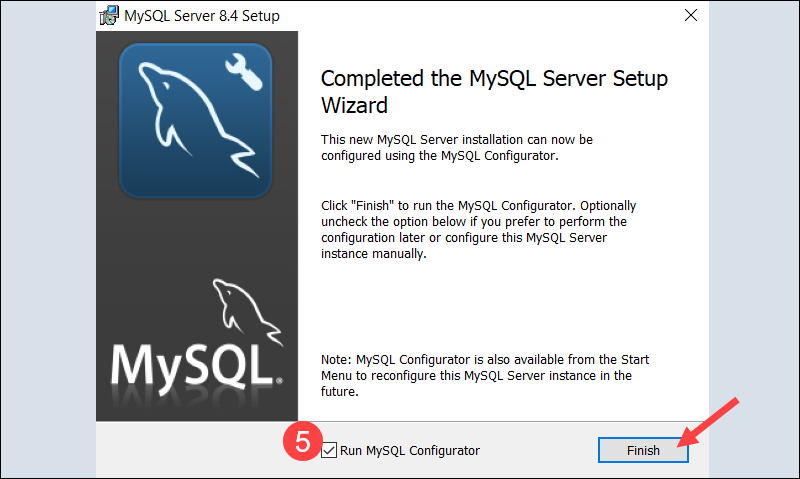
This launches the MySQL Configurator app to assist you in configuring MySQL Server 8.4.3.
Step 3: Configure MySQL Server on Windows
The following section explains how to set up MySQL Server on Windows using the MySQL Configurator.
Note: The MySQL Configurator is part of the MySQL bundle and does not need to be installed separately. It automates the MySQL Server setup, provides a consistent interface across all supported Windows platforms, and resolves software dependencies.
The tool starts automatically if the Run MySQL Configurator option is selected during installation. If it does not launch, open the tool manually from the Windows Start menu.
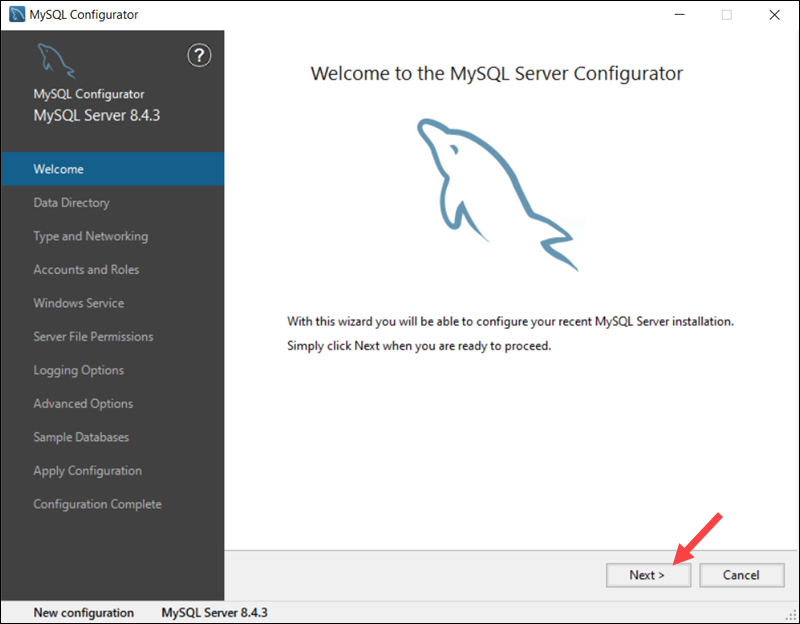
Once the tool is launched, click Next to begin the configuration process.
Data Directory
Select the directory where MySQL Server will store its data.
Use the default path, C:\ProgramData\MySQL\MySQL Server 8.4\, or specify a custom directory and click Next.
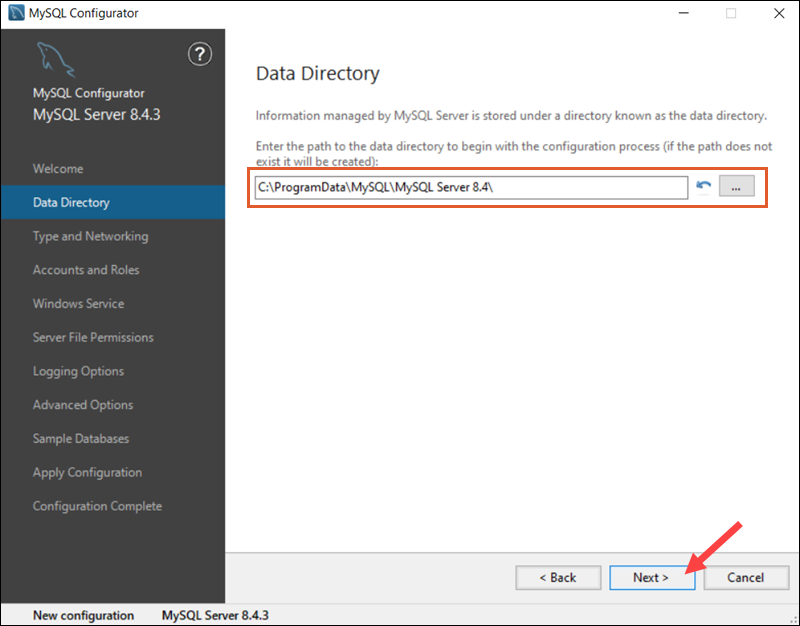
Note: To avoid path conflicts during the installation, remove previous MySQL versions from the system or select a new installation directory.
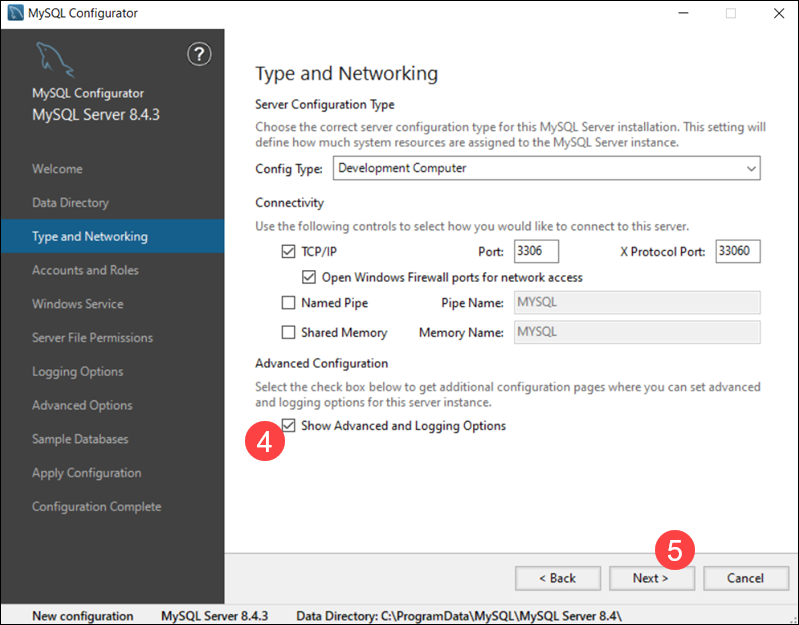
Type and Networking
In the Type and Networking section:
1. Choose one of three server configuration types in the Config Type dropdown:
- Development Computer. Select this option if the Windows server is a testing and development environment where MySQL needs to share resources with other applications.
- Server Computer. This configuration balances resource sharing and server performance. The Windows server can host multiple applications, including MySQL, as part of a multi-purpose server setup.
- Dedicated Computer. MySQL utilizes all system resources with minimal resource sharing. This option is best used for dedicated MySQL servers and is optimized for production environments.
2. (Optional) Define the MySQL server port. The default port is 3306, but it can be changed if, for example, another application already uses this port number.
3. Ensure the Open Windows Firewall ports for network access option is checked to allow MySQL traffic through the firewall.

4. (Optional) Check the Show Advanced and Logging Option box to configure additional logging options later.
5. Click Next to continue.
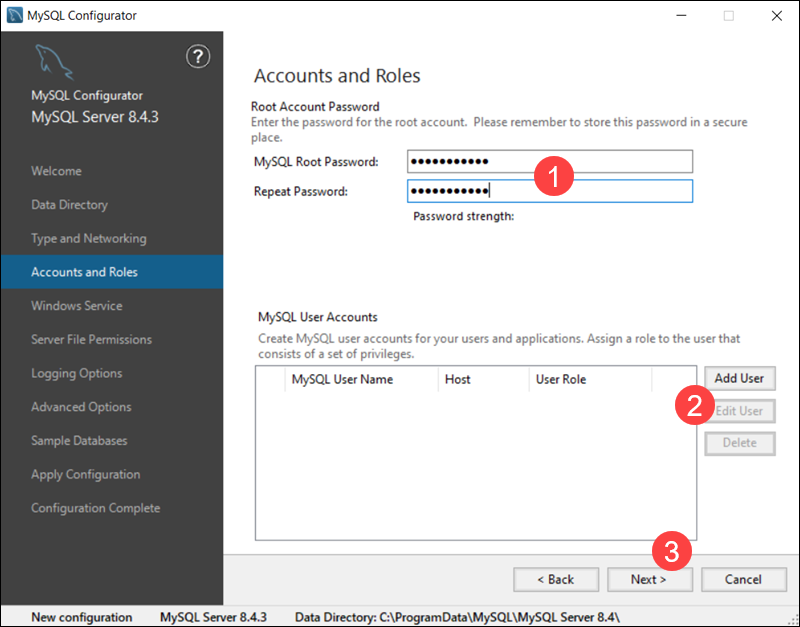
Accounts and Roles
The Accounts and Roles section allows you to configure MySQL user accounts. This is only an initial setup, and you can change the MySQL root password after the installation.
1. Enter and confirm a strong password for the MySQL root user.
2. (Optional) Click Add User to create additional roles and set privileges for various users and purposes.
3. Select Next to continue with the server configuration.
Windows Service
A Windows Service is registered with the operating system and starts automatically when Windows boots. Configuring MySQL Server as a Windows Service ensures it runs continuously in the background and is available for applications.
Confirm the Configure MySQL Server as a Windows Service and Start the MySQL Server as System Startup options are checked, then click Next to proceed.
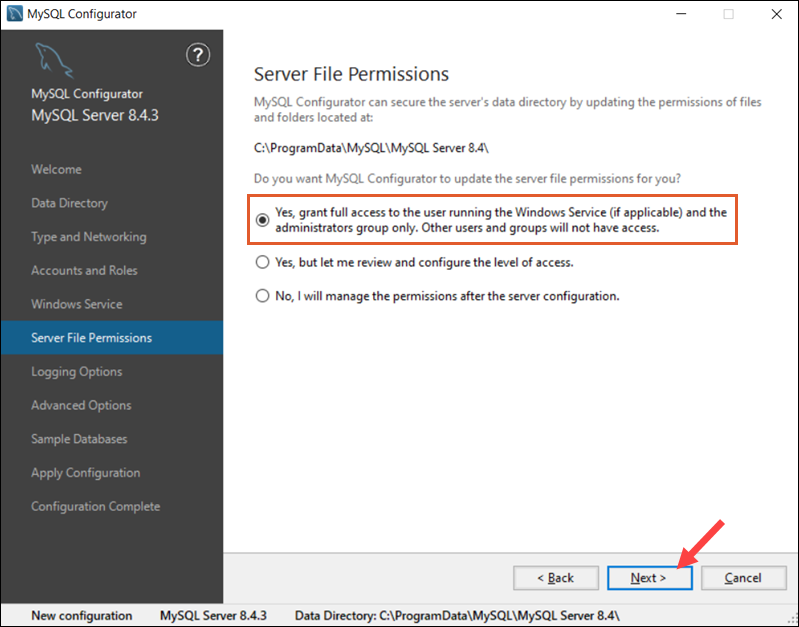
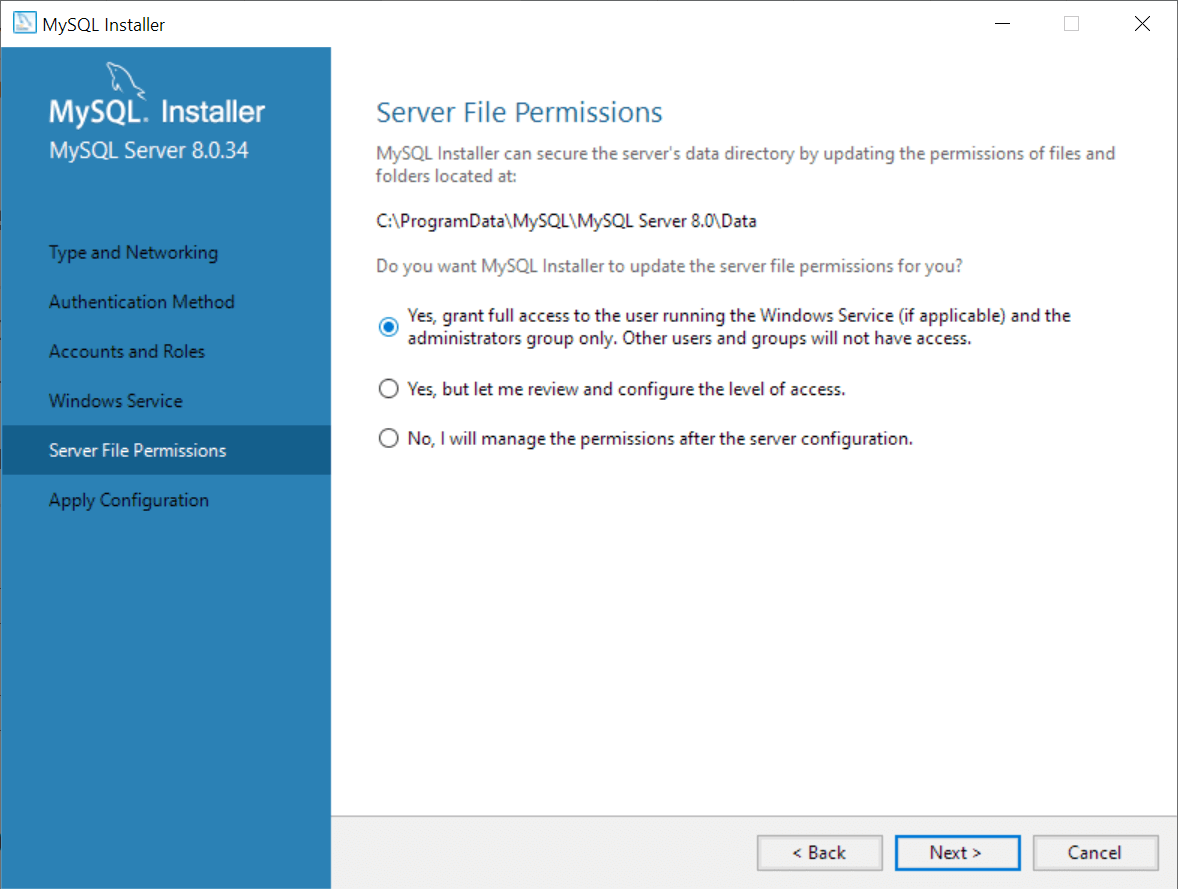
Server File Permissions
File permissions determine how users access and interact with MySQL server files. To define file permissions for previously created MySQL users, you can:
- Allow the MySQL Installer to configure user permissions automatically.
- Manually set specific file access levels for each user (recommended).
- Modify the server permissions manually after the installation is complete.
The recommended option is the safe choice for most setups. When ready, click Next to continue.
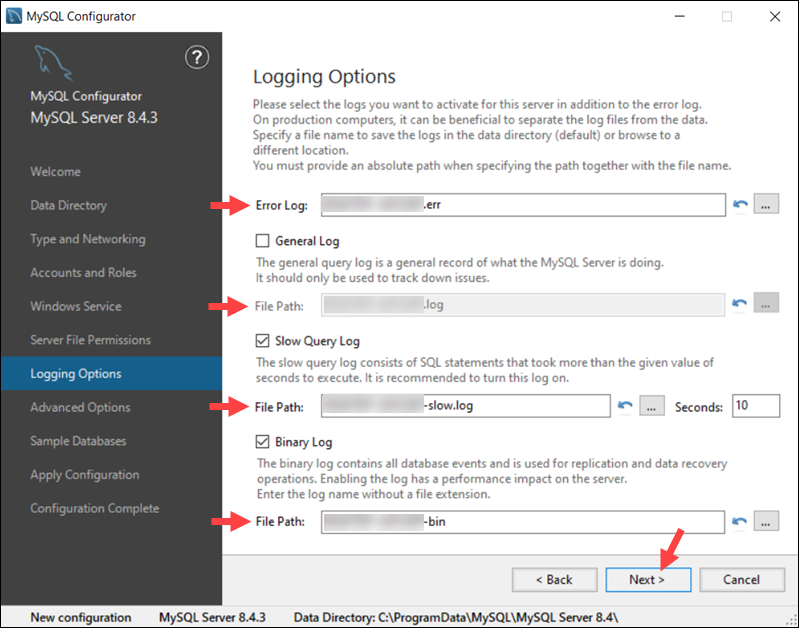
Logging Options (Optional)
If you have selected the Show Advanced Logging option in the Type and Networking tab, you can set up MySQL log preferences.
Select the types of logs you want to activate and define the log directories for:
- Error Log. Logs critical errors and warnings encountered by the MySQL server.
- General Log. Tracks server activity and connections.
- Slow Query Log. Identifies queries that take longer than expected to execute.
- Bin Log. Records all changes to the database data.
Click Next to proceed to the Advanced Options section.
Advanced Options (Optional)
The Advanced Options are available only if you have checked Show Advanced Options in the Type and Networking tab.
The Server ID setting allows you to set a unique server identifier, which is useful for distinguishing servers in multi-server environments.
You can also configure Table Names Case sensitivity. In Windows, MySQL treats table names as lowercase (case-insensitive) by default. Uppercase names are rarely used but can be set to align with specific cross-platform requirements.
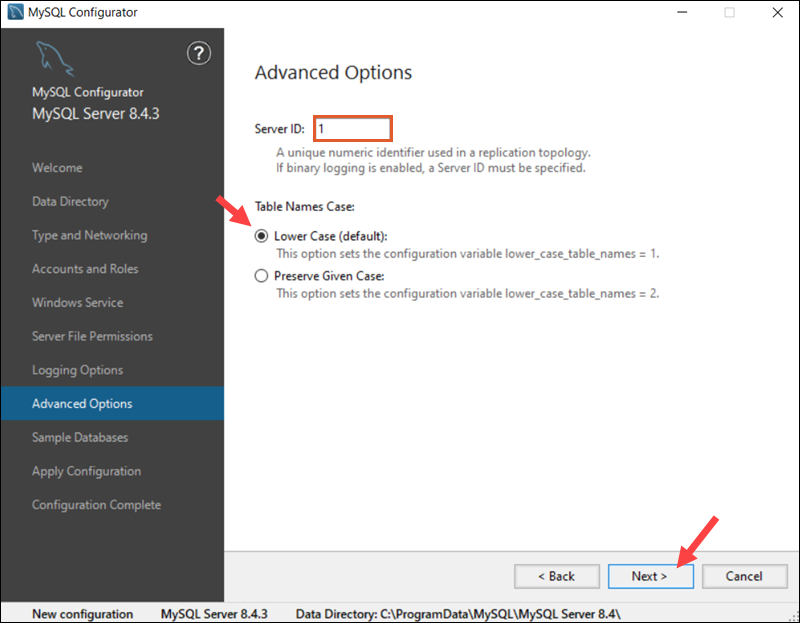
Click Next to finalize the MySQL Server configuration.
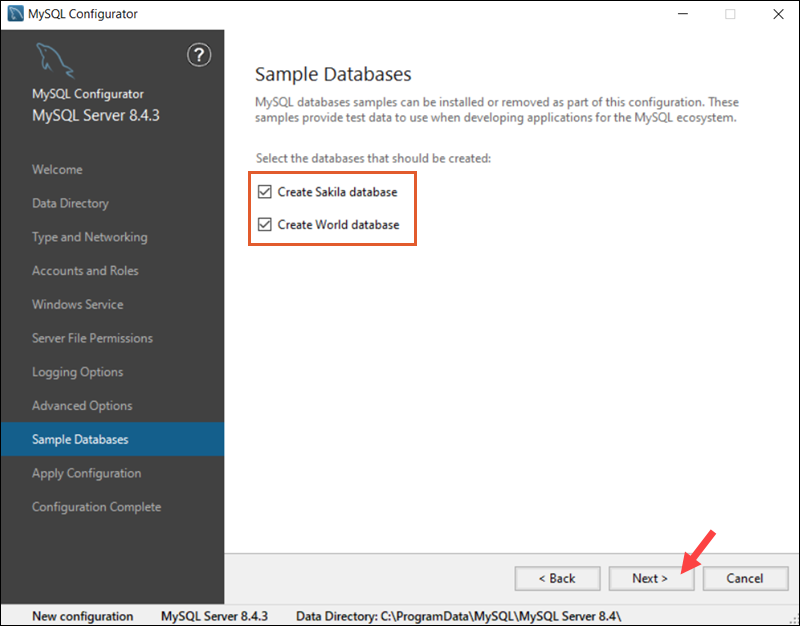
Sample Databases
The Sample Databases tab allows you to create predefined sample databases and example code, which are useful for learning, testing, and development purposes.
Select the Sakila or World database (or both) and click Next.
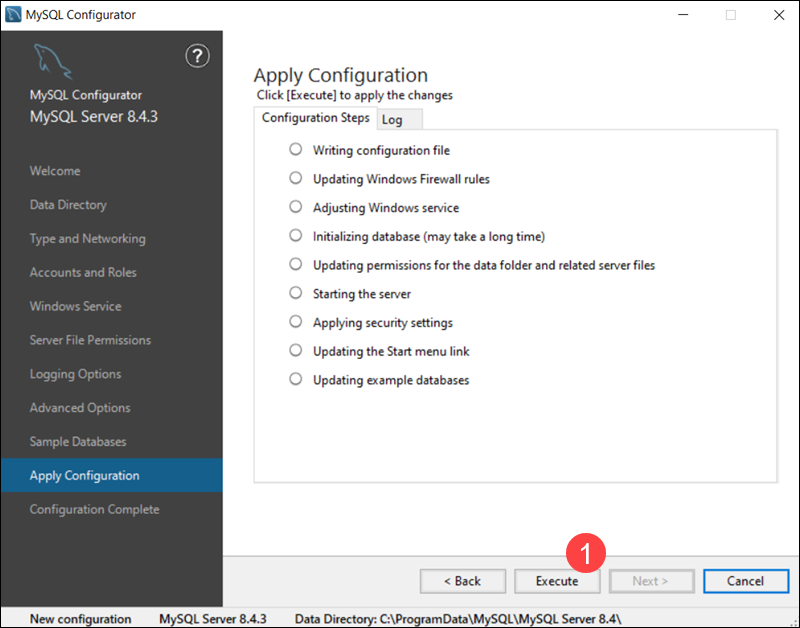
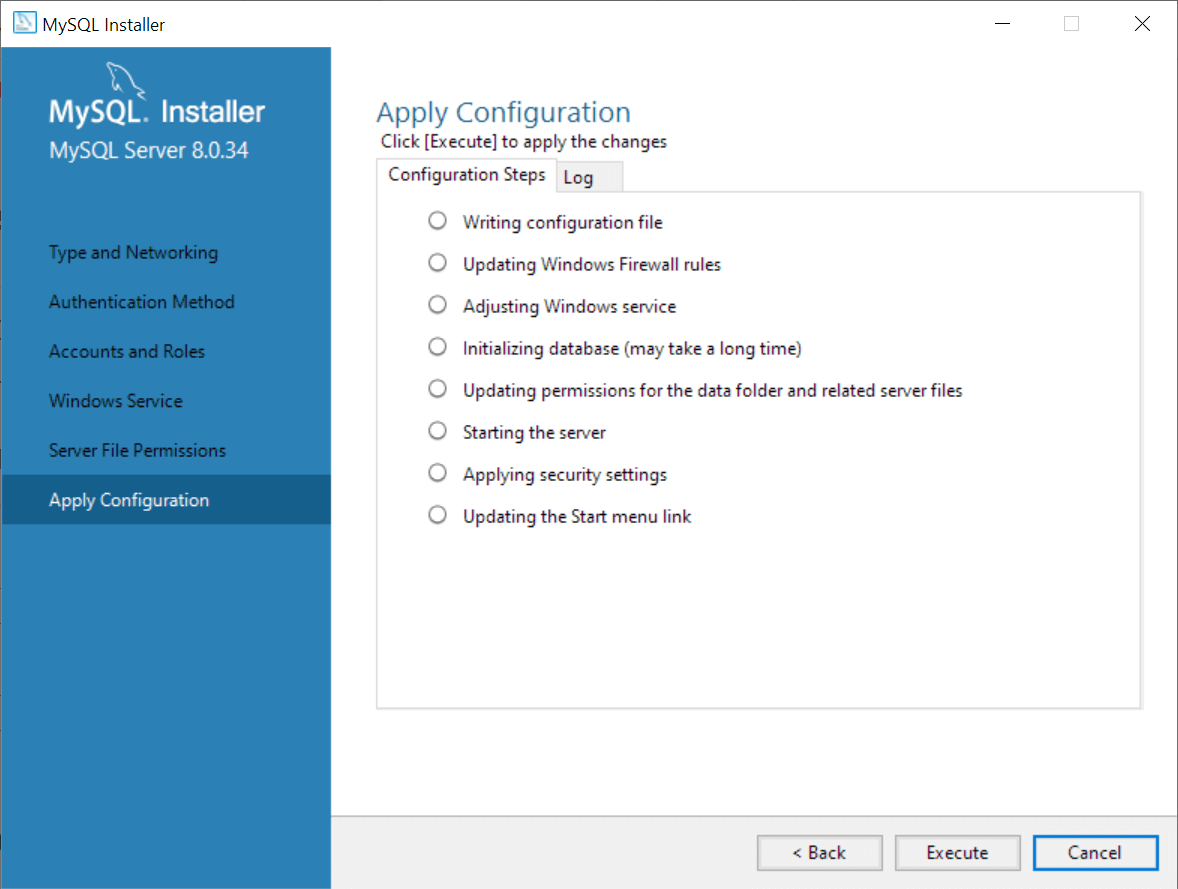
Apply Server Configuration
To complete the MySQL Server configuration:
1. Review the steps and click Execute to apply the configuration.
2. The system informs you the MySQL Server configuration process is complete and displays a summary of the completed configuration steps. Select Next to continue the installation process.
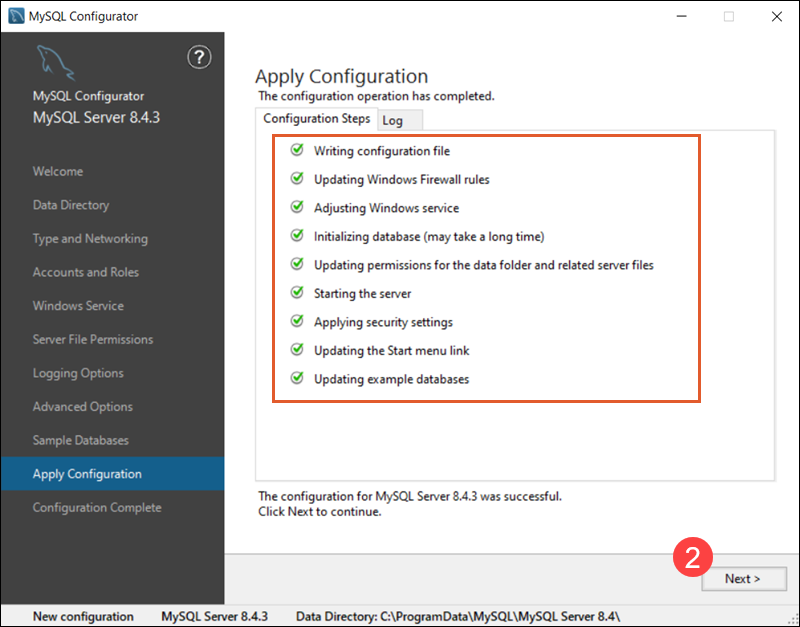
3. (Optional) Copy the installation process log to the Windows Clipboard.
4. Click Finish to complete the MySQL server installation on Windows.

Step 4: Verify MySQL Installation on Windows
If you configured MySQL as a Windows service, it starts automatically. To verify that the server is running:
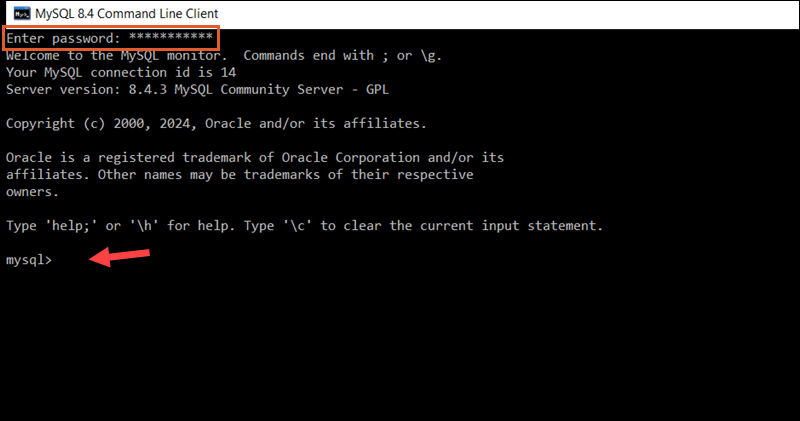
1. Open the MySQL Command Line Client from the Windows Start menu.
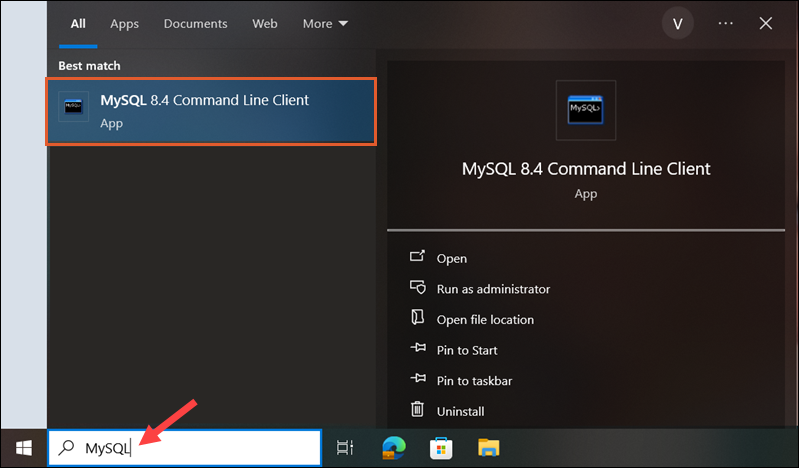
2. Enter the root password created during setup to access the MySQL server.
3. Use the following command to list the current databases:
SHOW DATABASES;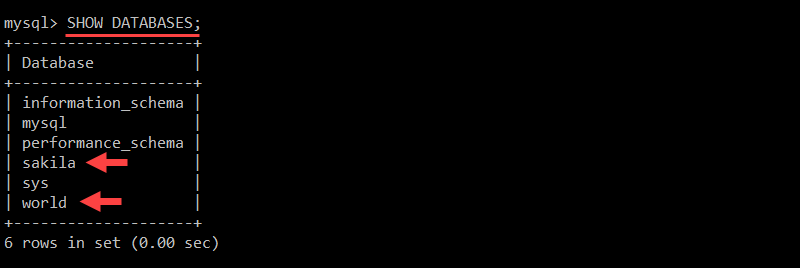
The output shows that the example databases, Sakila and World, were successfully created during the setup process.
Restart MySQL Service on Windows
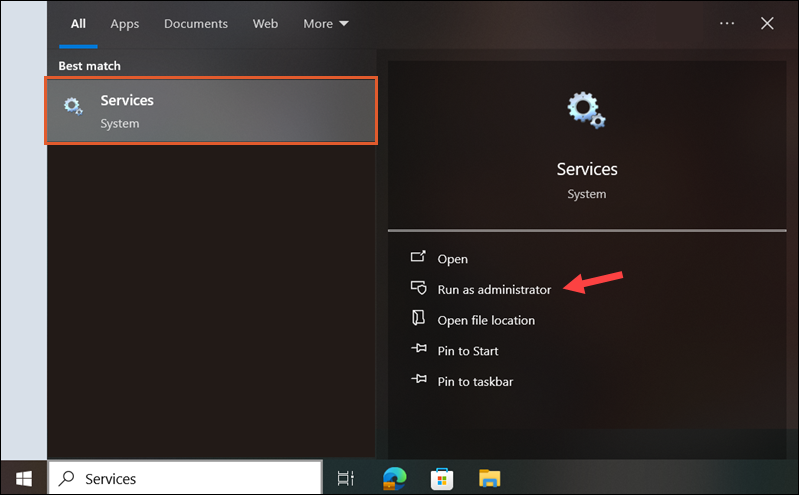
If MySQL does not start automatically on boot:
1. Type Services in the Start menu and select Run as administrator.
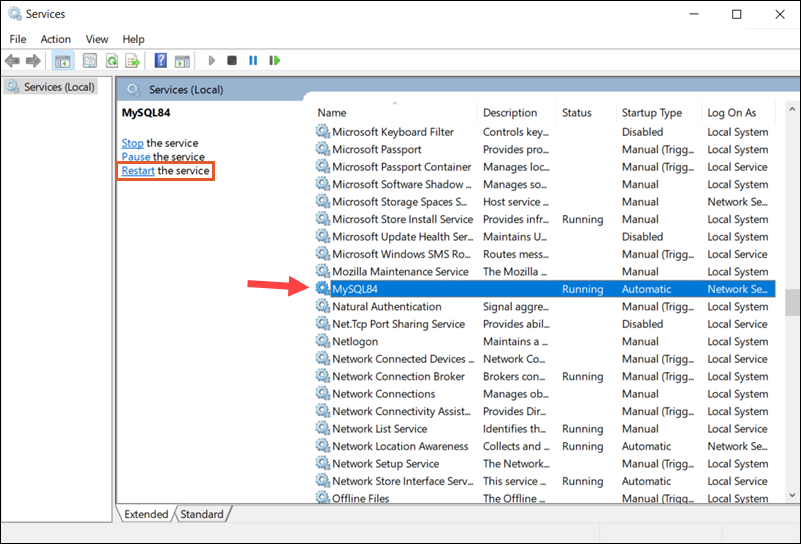
2. Locate the MySQL service in the list. In this example, the service is listed as MySQL84.
3. Select the service and click Start or Restart, depending on its status.
4. To ensure the MySQL service always starts on boot, right-click the service and select Properties.
5. In the Startup Type dropdown, select Automatic and click OK to save the changes.

The changes take effect immediately.
Conclusion
You have successfully installed MySQL on a Windows server. The setup options were significantly easier to navigate using the MySQL MSI Installer and the MySQL Configurator.
Aside from using the MySQL Client, there are several different ways to connect to a MySQL database in Windows.
Was this article helpful?
YesNo
Summary: in this tutorial, you will learn how to install MySQL server and its related products on Windows using the MySQL Installer.
After the tutorial, you will have a MySQL server and its tools up and running on your system for learning and practicing.
Note that for other operating systems like Linux and Ubuntu, refer to the following tutorials:
- Install MySQL 8 on CentOS 7
- Install MySQL 8 on Ubuntu
Download MySQL Installer
If you want to install MySQL on Windows, you can use the MySQL Installer. The MySQL Installer provides you with an easy-to-use wizard that helps you to install MySQL with the following main products:
- MySQL Server
- MySQL Workbench
- MySQL Shell
- MySQL Documentation
- All Available Connectors
To download the MySQL installer, go to the following link http://dev.mysql.com/downloads/installer/.
We’ll use the MySQL Installer 8.0.34 to install the MySQL Server and related products such as MySQL Workbench and MySQL Shell.
Install MySQL Server & related products using MySQL Installer
To install MySQL using the MySQL installer, double-click on the MySQL Installer file and follow the steps below:
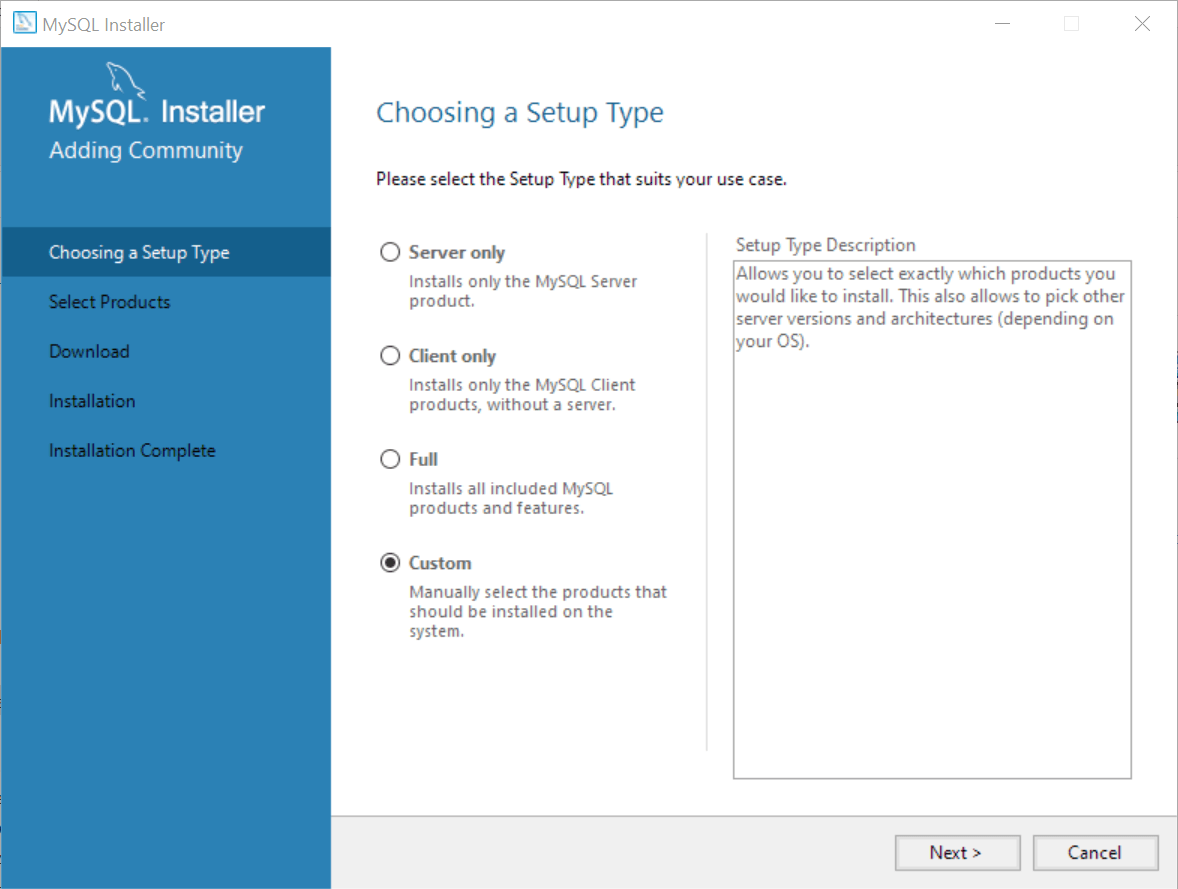
Step 1: Choosing a setup type
In this step, you need to choose the setup type that suits your use case. For tutorial purposes, you can select the last option which is Custom setup type:
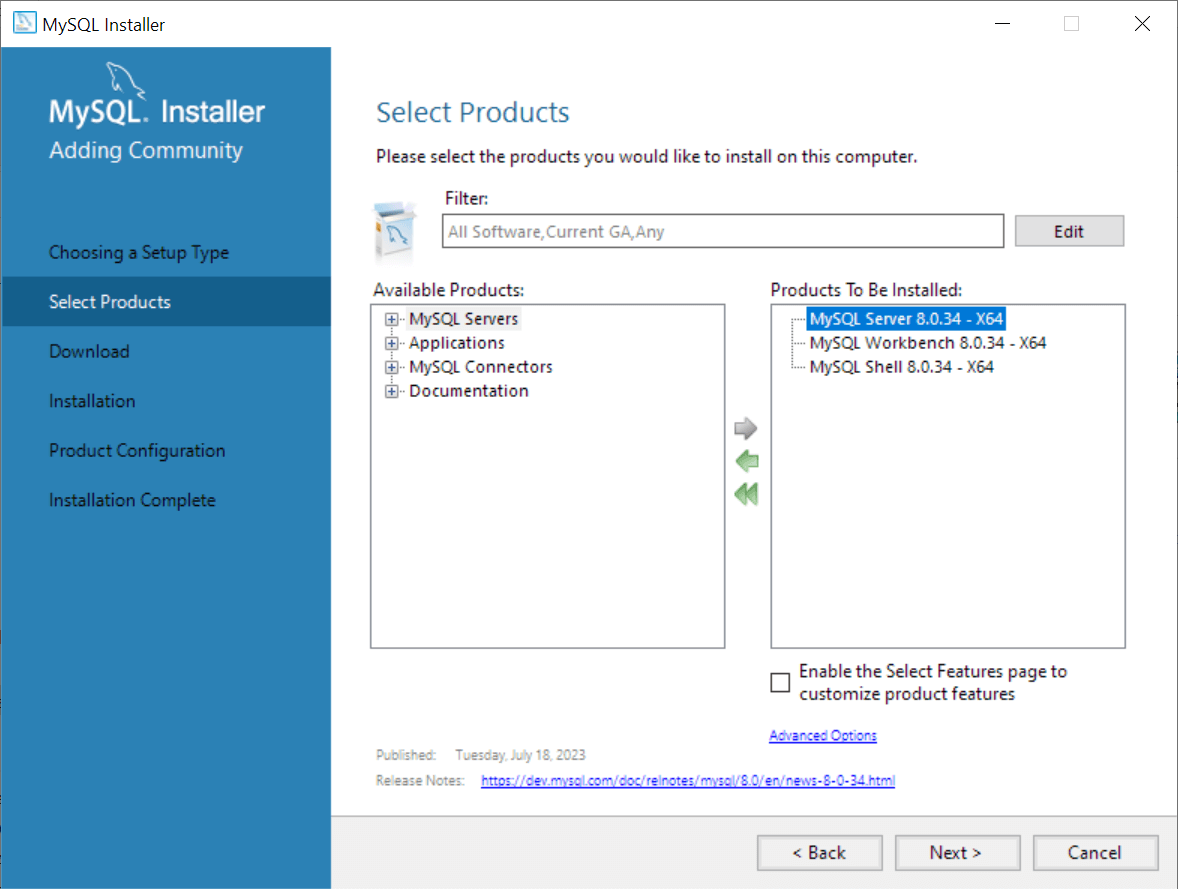
Step 2. Selecting products
Since we chose the Custom setup type, the MySQL Installer displays available products for us to select to install.
We’ll install the following products:
- MySQL Server – This is the MySQL Database Server.
- MySQL Workbench – This is the client tool for interacting with the MySQL Database Server via GUI.
- MySQL Shell – This is an interactive Javascript, Python, or SQL interface supporting development and administration for the MySQL Server.
To select these products, you click the + icon on the left pane, select the product, and click the right arrow button.
Here are the paths to the selected products:
- MySQL Servers > MySQL Server > MySQL Server 8.0 > MySQL Server 8.0.34 – x64
- Applications > MySQL Workbench > MySQL Workbench 8.0 > MySQL Workbench 8.0.34 – X64
- Applications > MySQL Shell > MySQL Shell 8.0 > MySQL Shell 8.0.34 – X64
Once you select the products, you click the Next button to continue.
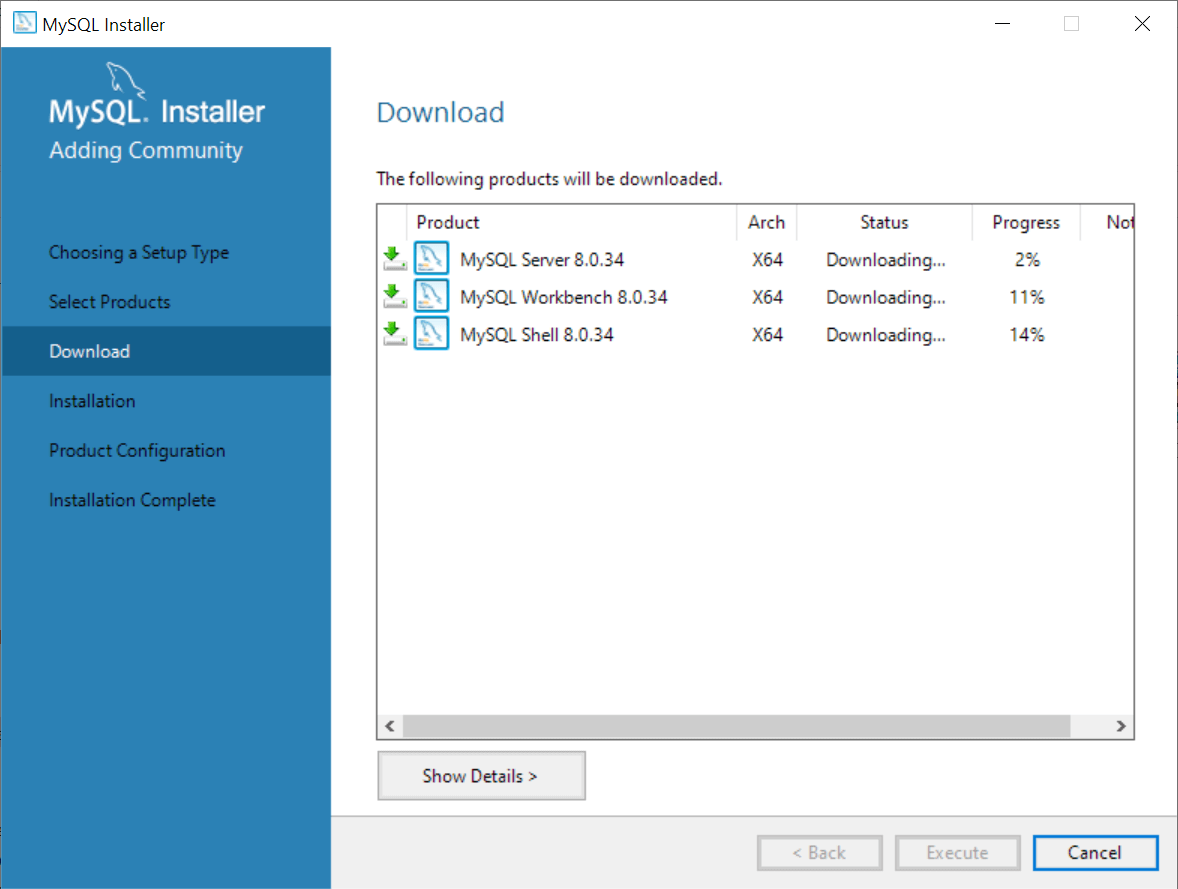
Step 3. Downloading the selected products
The MySQL Installer will download the selected products from the internet. Please ensure you have an active internet connection and wait for a few minutes for the download to complete.
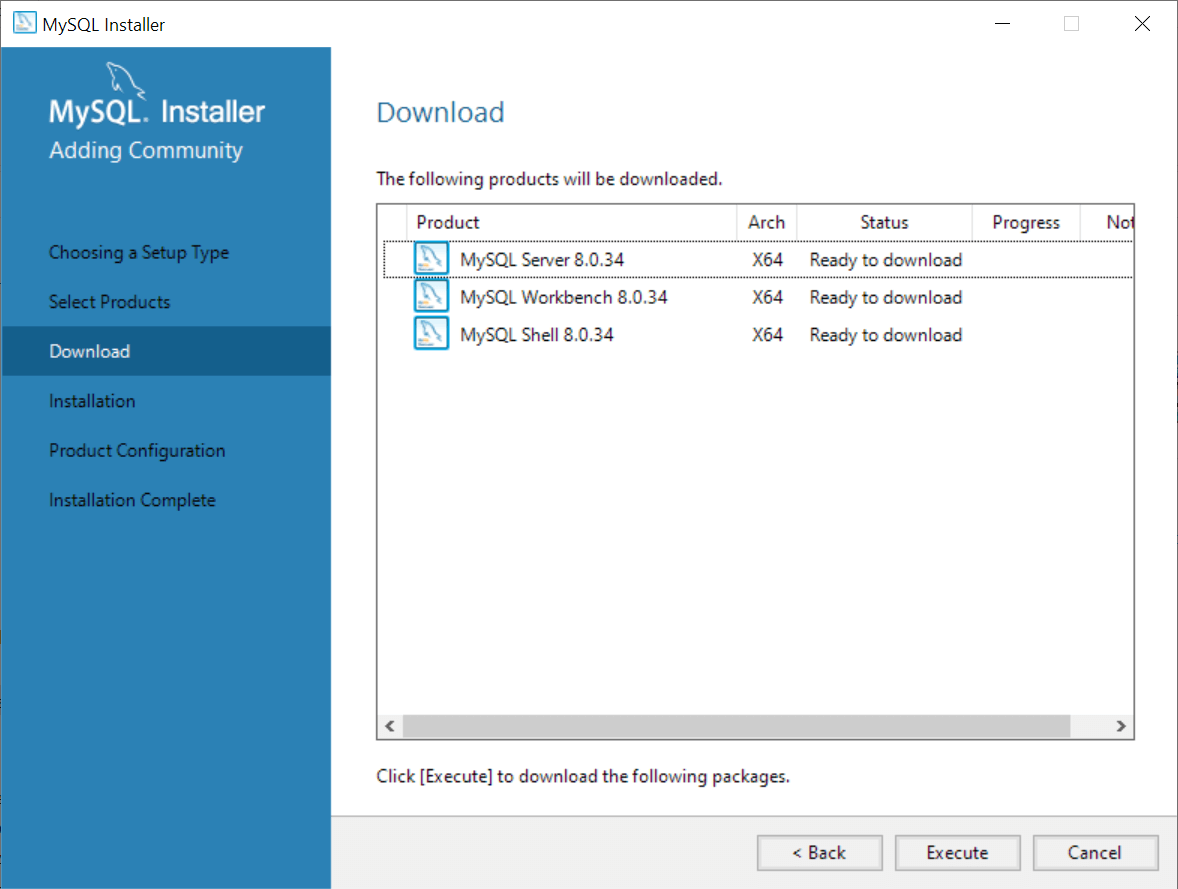
After the download is complete, click the Execute button to start the installation.

Step 4. Installing the selected products
The MySQL Installer will install the selected products and this process may some time.
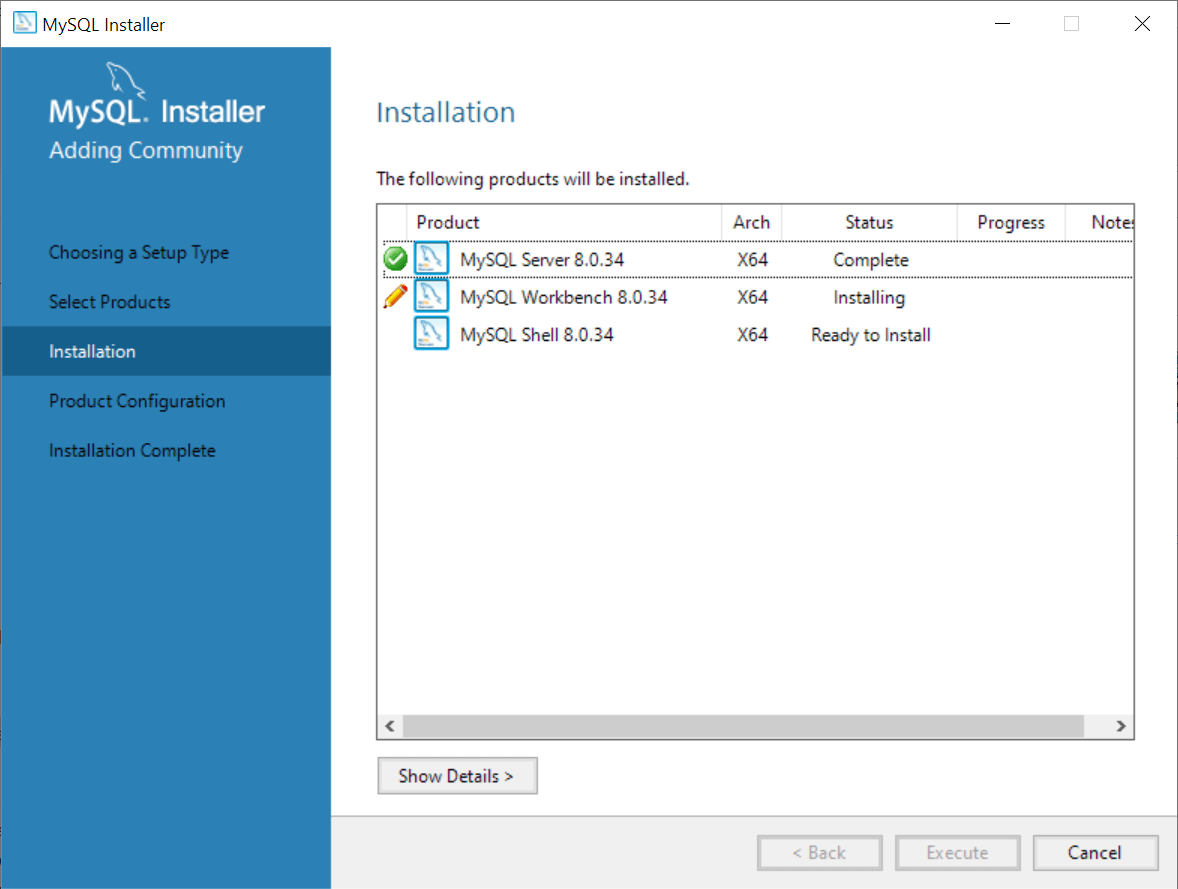
After the installation is complete, click the Next button to proceed to the Product Configuration.

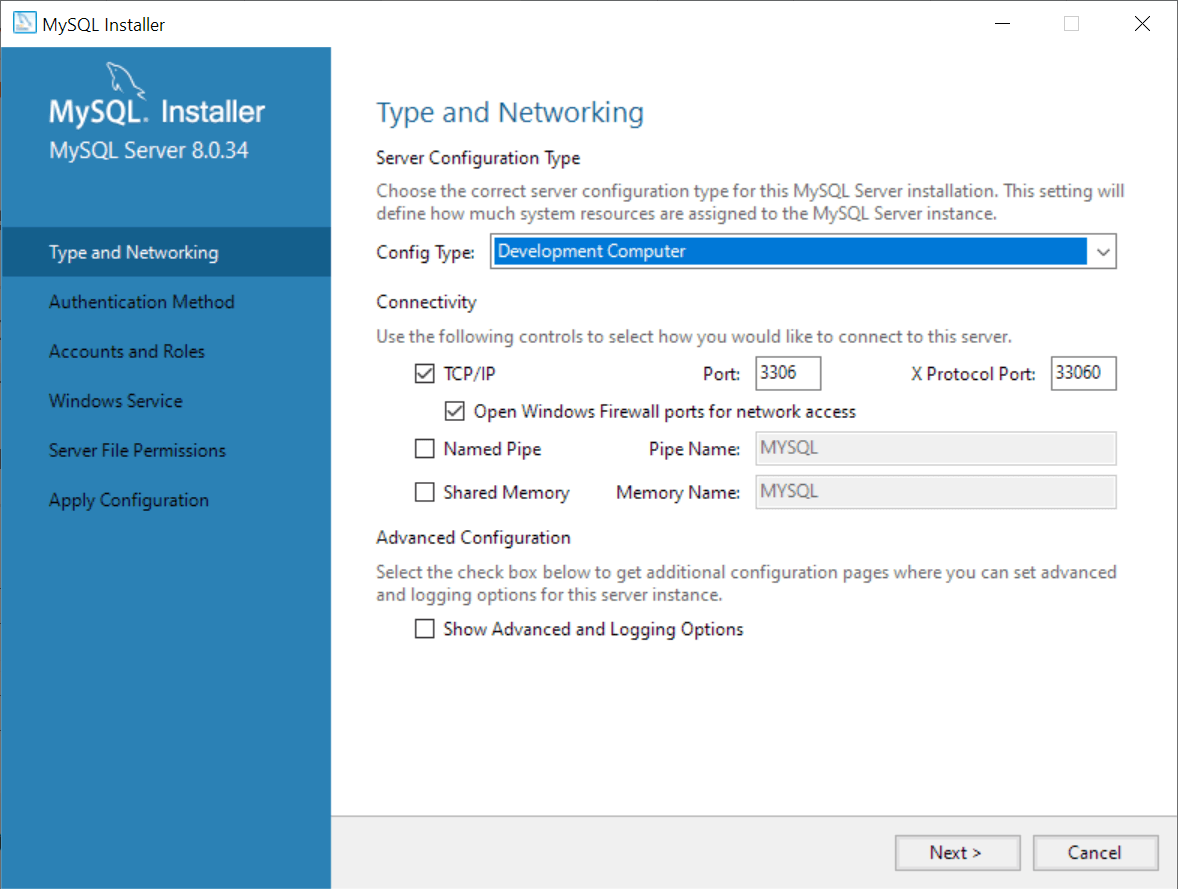
Step 5. Configuring the MySQL Server
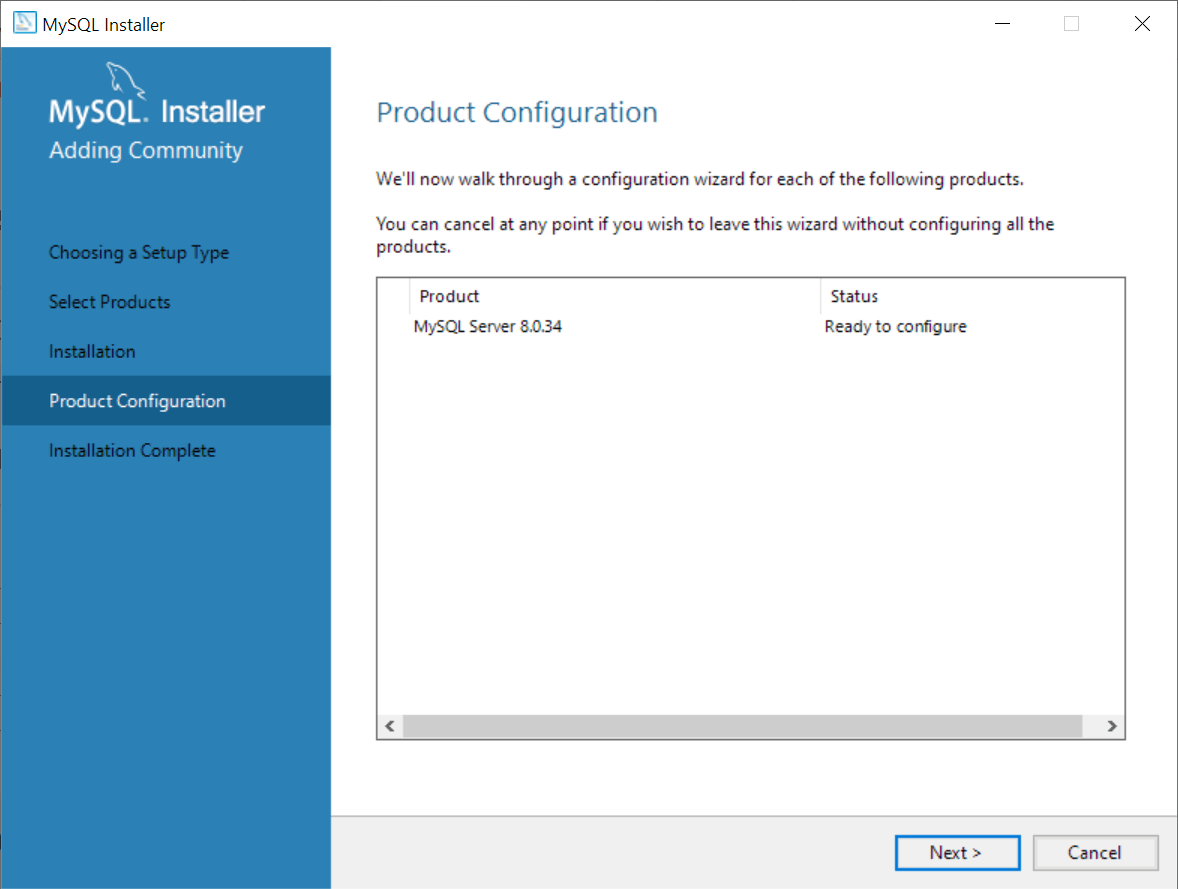
In this step, configure the MySQL Server. Choose the Development Computer for the server configuration type, leave the other options as they are, and click the Next button.
Step 6. Choosing an authentication method
It’s recommended to use strong password encryption for authentication, which is the first option.

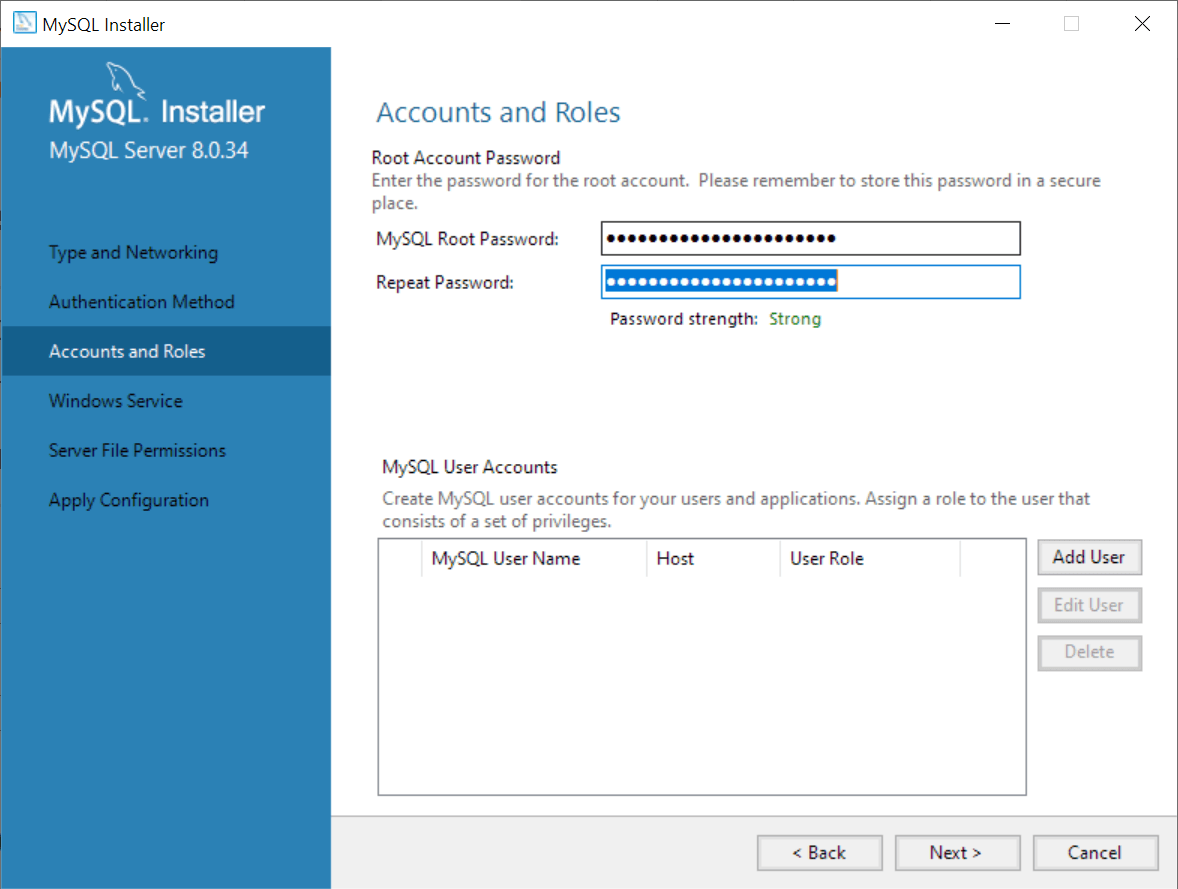
Step 7. Entering a password for the root account
Enter a secure password for the root account, which has full administrative privileges.
Be sure to store it safely and use it for connecting to the MySQL Server in the future.
Step 8. Configuring MySQL Server as a Windows Service
In this step, you can configure the MySQL Server as a Windows service, specify a service name, and choose whether to start the MySQL Server during the operating system startup.
Step 9. Granting file permissions
In this step, you grant permission to MySQL to access the data directory.
Step 10. Displaying the selected configuration
The MySQL Installer displays a window with the configuration steps. Click the Execute button to apply the configuration.
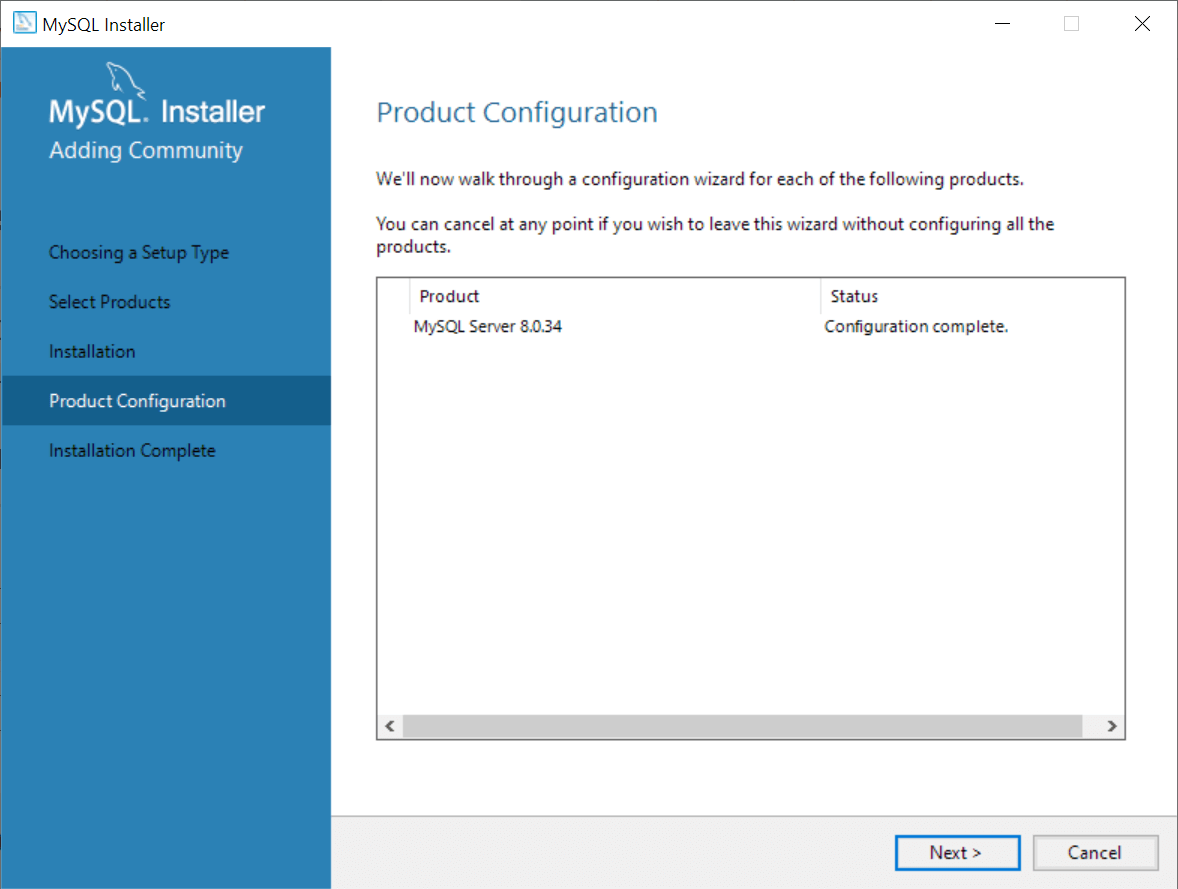
Step 11. Completing configuration
After applying the configuration, the MySQL Installer displays the following window to indicate whether the MySQL Server has been configured successfully.
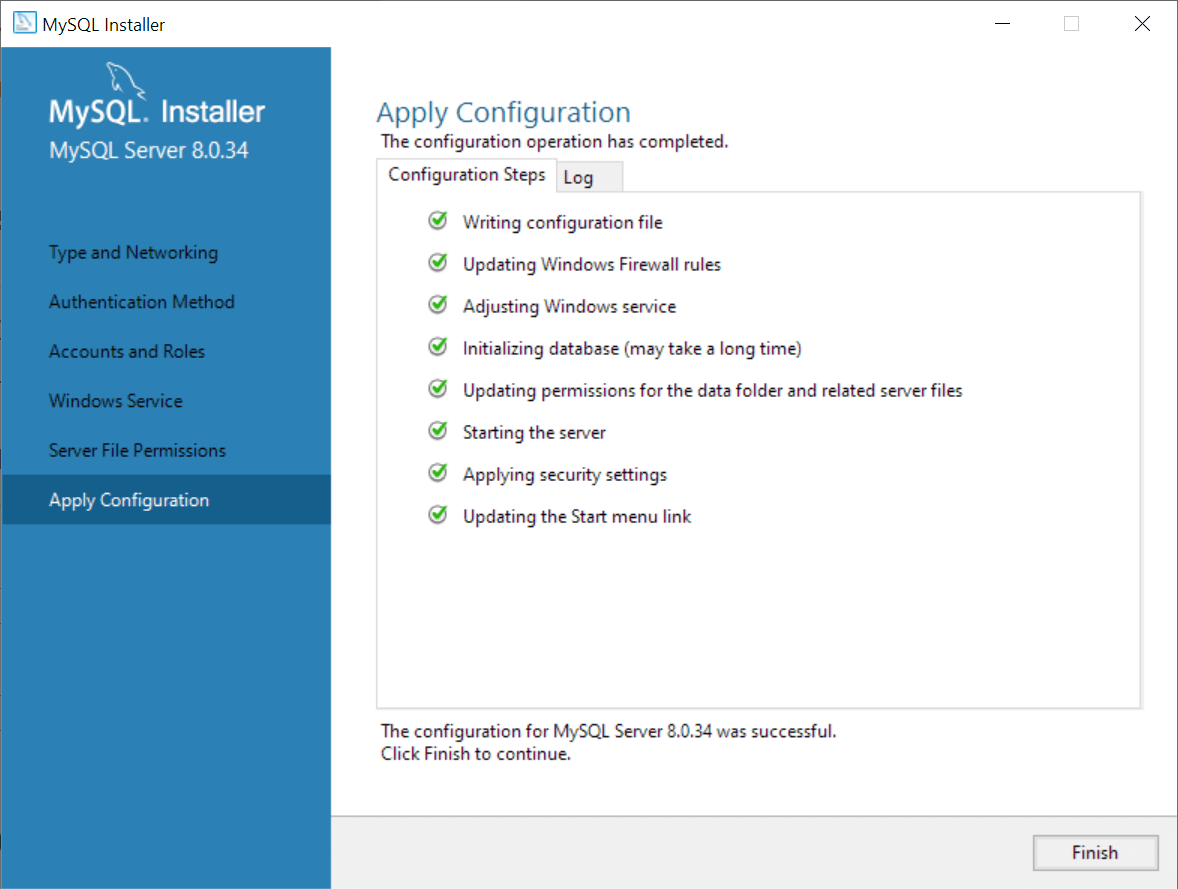
After completing the configuration, click the Next button to confirm and finish.
Step 12. Completing installation
The MySQL Installer displays a window to notify you that the installation is complete. Click the Finish button to close the installer.
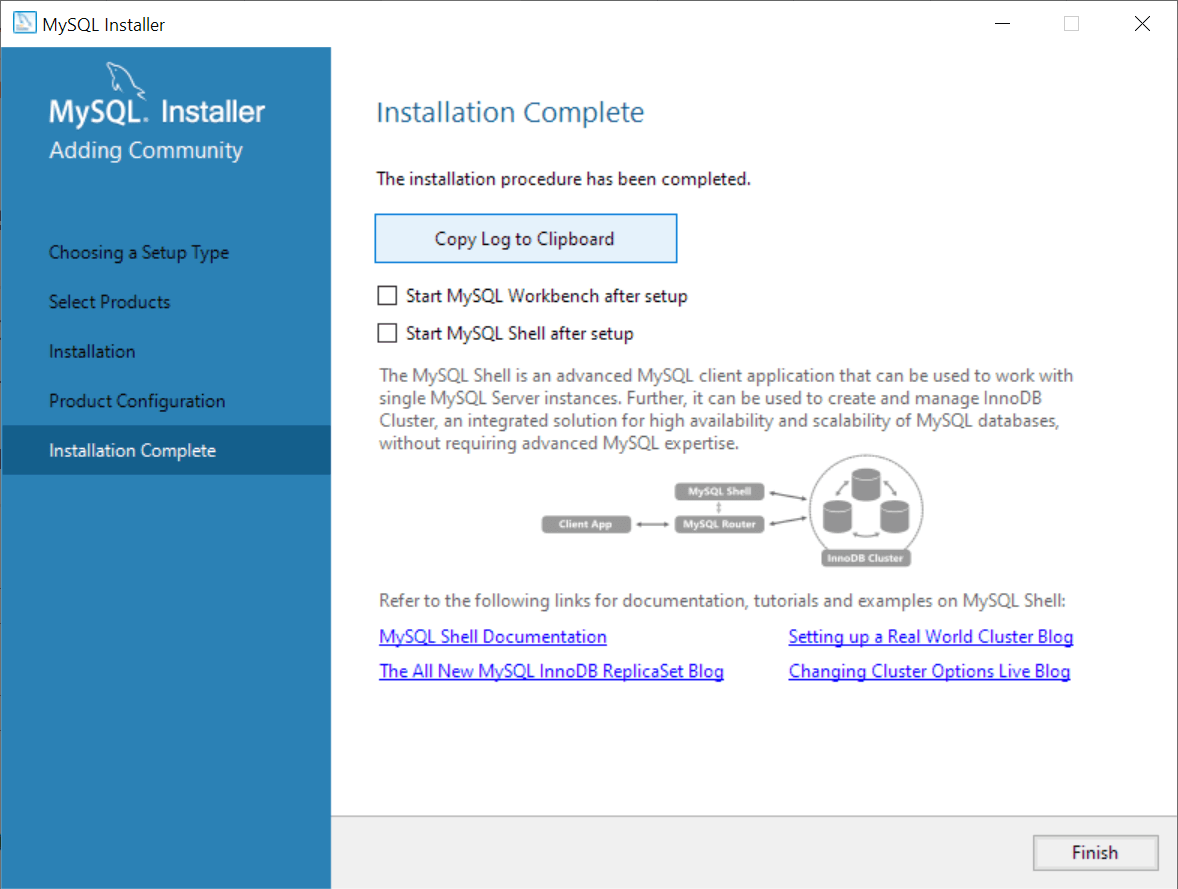
In this tutorial, you have learned how to install MySQL on your Windows using the MySQL installer.
Was this tutorial helpful?
Start MySQL Server on Windows 11
This tutorial will teach you how to start MySQL Server on a Windows 11 machine. First, we can configure MySQL Server as a Windows service during installation. Steps to Install MySQL Server on Windows 11 OS:
- Install MySQL on Windows 11
Start MySQL Server
There are multiple ways to start the MySQL server. In this tutorial, we will look at some of them.
- Windows Service App
- Command Line
- MySQL Workbench
- Using XAMPP
Windows Services App
If you have installed MySQL using the MySQL Installer, you can start the MySQL server as a Windows service.
Go to the Run dialog prompt. Press Windows Key + R to launch the Run prompt.
(Windows + R)
Type services.msc and press Enter to launch the Windows 11 Services App.
Open Windows services. Look for MySQL service in the services list. Locate the MySQL service.

Start Server
Check the server’s running status. If it is not running, right-click on the service and click Start.
The server process would be started.
Stop MySQL Server
To stop MySQL, right-click on the service and click Stop.
The MySQL Server process would be stopped.
Restart MySQL Server
To restart MySQL, right-click on the service and click Restart.

The MySQL Server process would be restarted on the machine.
Command Line
To start the MySQL server using the command line, follow the below steps:
Open Command Prompt with Administrator privileges. Navigate to the MySQL bin directory.
For Example:
cd C:\Program Files\MySQL\MySQL Server <version>\bin
Replace <version> with your MySQL version.
Start the server by typing mysqld command.
The mysqld is the MySQL Server daemon process, that manages the databases and handles all database requests. On Windows, it’s an executable .exe file named: mysqld.exe
MySQL Workbench
MySQL Workbench is a graphical tool that allows database administrators and developers to manage databases.
- Launch the MySQL Workbench tool.
- Choose the server instance that you want to start.
- In the left Navigator choose: Instance >> Startup / Shutdown option
- Click on the Start Server button to start the server.
That’s it. The MySQL server is now started on the machine.
Using XAMPP
With a button click, you can start the MySQL server using the XAMPP control panel. Launch the XAMPP control panel.
Click on the Start button against the MySQL component.

The following tutorial will teach you how to start a MySQL client.
- Start MySQL Client on Windows 11
MySQL Tutorials
MySQL Tutorials on this website:
- https://www.testingdocs.com/mysql-tutorials-for-beginners/