
With conda, you can create, export, list, remove, and update
environments that have different versions of Python and/or
packages installed in them. Switching or moving between
environments is called activating the environment. You can also
share an environment file.
There are many options available for the commands described
on this page. For a detailed reference on all available commands,
see commands.
Creating an environment with commands#
Use the terminal for the following steps:
-
To create an environment:
conda create --name <my-env>
Replace
<my-env>with the name of your environment. -
When conda asks you to proceed, type
y:This creates the myenv environment in
/envs/. No
packages will be installed in this environment. -
To create an environment with a specific version of Python:
conda create -n myenv python=3.9
-
To create an environment with a specific package:
conda create -n myenv scipy
or:
conda create -n myenv python
conda install -n myenv scipy
-
To create an environment with a specific version of a package:
conda create -n myenv scipy=0.17.3
or:
conda create -n myenv python
conda install -n myenv scipy=0.17.3
-
To create an environment with a specific version of Python and
multiple packages:conda create -n myenv python=3.9 scipy=0.17.3 astroid babel
Tip
Install all the programs that you want in this environment
at the same time. Installing one program at a time can lead to
dependency conflicts.
To automatically install pip or another program every time a new
environment is created, add the default programs to the
create_default_packages section
of your .condarc configuration file. The default packages are
installed every time you create a new environment. If you do not
want the default packages installed in a particular environment,
use the --no-default-packages flag:
conda create --no-default-packages -n myenv python
Tip
You can add much more to the conda create command.
For details, run conda create --help.
Creating an environment from an environment.yml file#
Use the terminal for the following steps:
-
Create the environment from the
environment.ymlfile:conda env create -f environment.yml
The first line of the
ymlfile sets the new environment’s
name. For details see Creating an environment file manually. -
Activate the new environment:
conda activate myenv -
Verify that the new environment was installed correctly:
You can also use
conda info --envs.
Specifying a different target platform for an environment#
By default, conda will create environments targeting the platform it’s
currently running on. You can check which platform you are currently on by running
conda info and checking the platform entry.
However, in some cases you might want to create an environment for a
different target platform or architecture. To do so, use the
--platform flag available in the conda create and
conda env create commands. See --subdir, --platform
in conda create for more information about allowed values.
For example, a user running macOS on the Apple Silicon platform
might want to create a python environment for Intel processors
and emulate the executables with Rosetta. The command would be:
conda create --platform osx-64 --name python-x64 python
Note
You can’t specify the --platform flag for existing environments.
When created, the environment will be annotated with the custom configuration and
subsequent operations on it will remember the target platform.
This flag also allows specifying a different OS (e.g. creating a Linux
environment on macOS), but we don’t recommend its usage outside of
--dry-run operations. Common problems with mismatched OSes include:
-
The environment cannot be solved because virtual packages are missing.
You can workaround this issue by exporting the necessary
CONDA_OVERRIDE_****environment variables. For example, solving
for Linux from macOS, you will probably needCONDA_OVERRIDE_LINUX=1
andCONDA_OVERRIDE_GLIBC=2.17. -
The environment can be solved, but extraction and linking fails due
filesystem limitations (case insensitive systems, incompatible paths,
etc). The only workaround here is to use--dry-run --jsonto obtain
the solution and process the payload into a lockfile that can be shared
with the target machine. See Create explicit lockfiles without creating an environment for more details.
Specifying a location for an environment#
You can control where a conda environment lives by providing a path
to a target directory when creating the environment. For example,
the following command will create a new environment in a subdirectory
of the current working directory called envs:
conda create --prefix ./envs jupyterlab=3.2 matplotlib=3.5 numpy=1.21
You then activate an environment created with a prefix using the same
command used to activate environments created by name:
Specifying a path to a subdirectory of your project directory when
creating an environment has the following benefits:
-
It makes it easy to tell if your project uses an isolated environment
by including the environment as a subdirectory. -
It makes your project more self-contained as everything, including
the required software, is contained in a single project directory.
An additional benefit of creating your project’s environment inside a
subdirectory is that you can then use the same name for all your
environments. If you keep all of your environments in your envs
folder, you’ll have to give each environment a different name.
There are a few things to be aware of when placing conda environments
outside of the default envs folder.
-
Conda can no longer find your environment with the
--nameflag.
You’ll generally need to pass the--prefixflag along with the
environment’s full path to find the environment. -
Specifying an install path when creating your conda environments
makes it so that your command prompt is now prefixed with the active
environment’s absolute path rather than the environment’s name.
After activating an environment using its prefix, your prompt will
look similar to the following:
(/absolute/path/to/envs) $
This can result in long prefixes:
(/Users/USER_NAME/research/data-science/PROJECT_NAME/envs) $
To remove this long prefix in your shell prompt, modify the env_prompt
setting in your .condarc file:
conda config —set env_prompt ‘({name})’
This will edit your .condarc file if you already have one
or create a .condarc file if you do not.
Now your command prompt will display the active environment’s
generic name, which is the name of the environment’s root folder:
$ cd project-directory
$ conda activate ./env
(env) project-directory $
Updating an environment#
You may need to update your environment for a variety of reasons.
For example, it may be the case that:
-
one of your core dependencies just released a new version
(dependency version number update). -
you need an additional package for data analysis
(add a new dependency). -
you have found a better package and no longer need the older
package (add new dependency and remove old dependency).
If any of these occur, all you need to do is update the contents of
your environment.yml file accordingly and then run the following
command:
conda env update --file environment.yml --prune
Note
The --prune option causes conda to remove any dependencies
that are no longer required from the environment.
Cloning an environment#
Use the terminal for the following steps:
You can make an exact copy of an environment by creating a clone
of it:
conda create --name myclone --clone myenv
Note
Replace myclone with the name of the new environment.
Replace myenv with the name of the existing environment that
you want to copy.
To verify that the copy was made:
In the environments list that displays, you should see both the
source environment and the new copy.
Building identical conda environments#
You can use explicit specification files to build an identical
conda environment on the same operating system platform, either
on the same machine or on a different machine.
Use the terminal for the following steps:
-
Run
conda list --explicitto produce a spec list such as:# This file may be used to create an environment using: # $ conda create --name <env> --file <this file> # platform: osx-64 @EXPLICIT https://repo.anaconda.com/pkgs/free/osx-64/mkl-11.3.3-0.tar.bz2 https://repo.anaconda.com/pkgs/free/osx-64/numpy-1.11.1-py35_0.tar.bz2 https://repo.anaconda.com/pkgs/free/osx-64/openssl-1.0.2h-1.tar.bz2 https://repo.anaconda.com/pkgs/free/osx-64/pip-8.1.2-py35_0.tar.bz2 https://repo.anaconda.com/pkgs/free/osx-64/python-3.5.2-0.tar.bz2 https://repo.anaconda.com/pkgs/free/osx-64/readline-6.2-2.tar.bz2 https://repo.anaconda.com/pkgs/free/osx-64/setuptools-25.1.6-py35_0.tar.bz2 https://repo.anaconda.com/pkgs/free/osx-64/sqlite-3.13.0-0.tar.bz2 https://repo.anaconda.com/pkgs/free/osx-64/tk-8.5.18-0.tar.bz2 https://repo.anaconda.com/pkgs/free/osx-64/wheel-0.29.0-py35_0.tar.bz2 https://repo.anaconda.com/pkgs/free/osx-64/xz-5.2.2-0.tar.bz2 https://repo.anaconda.com/pkgs/free/osx-64/zlib-1.2.8-3.tar.bz2
-
To create this spec list as a file in the current working
directory, run:conda list --explicit > spec-file.txt
Note
You can use
spec-file.txtas the filename or replace
it with a filename of your choice.An explicit spec file is not usually cross platform, and
therefore has a comment at the top such as# platform: osx-64
showing the platform where it was created. This platform is the
one where this spec file is known to work. On other platforms,
the packages specified might not be available or dependencies
might be missing for some of the key packages already in the
spec.To use the spec file to create an identical environment on the
same machine or another machine:conda create --name myenv --file spec-file.txt
To use the spec file to install its listed packages into an
existing environment:conda install --name myenv --file spec-file.txt
Conda does not check architecture or dependencies when installing
from a spec file. To ensure that the packages work correctly,
make sure that the file was created from a working environment,
and use it on the same architecture, operating system, and
platform, such as linux-64 or osx-64.
Activating an environment#
Activating environments is essential to making the software in the environments
work well. Activation entails two primary functions: adding entries to PATH for
the environment and running any activation scripts that the environment may
contain. These activation scripts are how packages can set arbitrary
environment variables that may be necessary for their operation. You can also
use the config API to set environment variables.
Activation prepends to PATH. This only takes effect
when you have the environment active so it is local to a terminal session,
not global.
Note
When installing Anaconda,
you have the option to “Add Anaconda to my PATH environment variable.”
This is not recommended because it appends Anaconda to PATH.
When the installer appends to PATH, it does not call the activation scripts.
Note
On Windows, PATH is composed of two parts, the system PATH and the
user PATH. The system PATH always comes first. When you install
Anaconda for «Just Me», we add it to the user PATH. When you install
for «All Users», we add it to the system PATH. In the former case,
you can end up with system PATH values taking precedence over
your entries. In the latter case, you do not. We do not recommend
multi-user installs.
To activate an environment: conda activate myenv
Note
Replace myenv with the environment name or directory path.
Conda prepends the path name myenv onto your system command.
You may receive a warning message if you have not activated your environment:
Warning:
This Python interpreter is in a conda environment, but the environment has
not been activated. Libraries may fail to load. To activate this environment
please see https://conda.io/activation.
If you receive this warning, you need to activate your environment. To do
so on Windows, run: c:\Anaconda3\Scripts\activate base in a terminal window.
Windows is extremely sensitive to proper activation. This is because
the Windows library loader does not support the concept of libraries
and executables that know where to search for their dependencies
(RPATH). Instead, Windows relies on a dynamic-link library search order.
If environments are not active, libraries won’t be found and there
will be lots of errors. HTTP or SSL errors are common errors when the
Python in a child environment can’t find the necessary OpenSSL library.
Conda itself includes some special workarounds to add its necessary PATH
entries. This makes it so that it can be called without activation or
with any child environment active. In general, calling any executable in
an environment without first activating that environment will likely not work.
For the ability to run executables in activated environments, you may be
interested in the conda run command.
If you experience errors with PATH, review our troubleshooting.
Conda init#
Earlier versions of conda introduced scripts to make activation
behavior uniform across operating systems. Conda 4.4 allowed
conda activate myenv. Conda 4.6 added extensive initialization
support so that conda works faster and less disruptively on
a wide variety of shells (bash, zsh, csh, fish, xonsh, and more).
Now these shells can use the conda activate command.
Removing the need to modify PATH makes conda less disruptive to
other software on your system. For more information, read the
output from conda init --help.
One setting may be useful to you when using conda init is:
This setting controls whether or not conda activates your base
environment when it first starts up. You’ll have the conda
command available either way, but without activating the environment,
none of the other programs in the environment will be available until
the environment is activated with conda activate base. People
sometimes choose this setting to speed up the time their shell takes
to start up or to keep conda-installed software from automatically
hiding their other software.
Nested activation#
By default, conda activate will deactivate the current environment
before activating the new environment and reactivate it when
deactivating the new environment. Sometimes you may want to leave
the current environment PATH entries in place so that you can continue
to easily access command-line programs from the first environment.
This is most commonly encountered when common command-line utilities
are installed in the base environment. To retain the current environment
in the PATH, you can activate the new environment using:
conda activate --stack myenv
If you wish to always stack when going from the outermost environment,
which is typically the base environment, you can set the auto_stack
configuration option:
conda config --set auto_stack 1
You may specify a larger number for a deeper level of automatic stacking,
but this is not recommended since deeper levels of stacking are more likely
to lead to confusion.
Environment variable for DLL loading verification#
If you don’t want to activate your environment and you want Python
to work for DLL loading verification, then follow the
troubleshooting directions.
Warning
If you choose not to activate your environment, then
loading and setting environment variables to activate
scripts will not happen. We only support activation.
Deactivating an environment#
To deactivate an environment, type: conda deactivate
Conda removes the path name for the currently active environment from
your system command.
Note
To simply return to the base environment, it’s better to call conda with no environment specified, rather than to try to deactivate. If
activate
you run conda deactivate from your base environment, you may lose the
ability to run conda at all. Don’t worry, that’s local to this shell — you can
start a new one. However, if the environment was activated using --stack
(or was automatically stacked) then it is better to use conda deactivate.
Determining your current environment#
Use the terminal for the following steps.
By default, the active environment—the one you are currently
using—is shown in parentheses () or brackets [] at the
beginning of your command prompt:
If you do not see this, run:
In the environments list that displays, your current environment
is highlighted with an asterisk (*).
By default, the command prompt is set to show the name of the
active environment. To disable this option:
conda config --set changeps1 false
To re-enable this option:
conda config --set changeps1 true
Viewing a list of your environments#
To see a list of all of your environments, in your terminal window, run:
OR
A list similar to the following is displayed:
conda environments:
myenv                 /home/username/miniconda/envs/myenv
snowflakes            /home/username/miniconda/envs/snowflakes
bunnies               /home/username/miniconda/envs/bunnies
If this command is run by an administrator, a list of all environments
belonging to all users will be displayed.
Viewing a list of the packages in an environment#
To see a list of all packages installed in a specific environment:
-
If the environment is not activated, in your terminal window, run:
-
If the environment is activated, in your terminal window, run:
-
To see if a specific package is installed in an environment, in your
terminal window, run:conda list -n myenv scipy
Using pip in an environment#
To use pip in your environment, in your terminal window, run:
conda install -n myenv pip
conda activate myenv
pip <pip_subcommand>
Issues may arise when using pip and conda together. When combining conda and pip,
it is best to use an isolated conda environment. Only after conda has been used to
install as many packages as possible should pip be used to install any remaining
software. If modifications are needed to the environment, it is best to create a
new environment rather than running conda after pip. When appropriate, conda and
pip requirements should be stored in text files.
We recommend that you:
- Use pip only after conda
-
-
Install as many requirements as possible with conda then use pip.
-
Pip should be run with
--upgrade-strategy only-if-needed(the default). -
Do not use pip with the
--userargument, avoid all users installs.
-
- Use conda environments for isolation
-
-
Create a conda environment to isolate any changes pip makes.
-
Environments take up little space thanks to hard links.
-
Care should be taken to avoid running pip in the root environment.
-
- Recreate the environment if changes are needed
-
-
Once pip has been used, conda will be unaware of the changes.
-
To install additional conda packages, it is best to recreate
the environment.
-
- Store conda and pip requirements in text files
-
-
Package requirements can be passed to conda via the
--fileargument. -
Pip accepts a list of Python packages with
-ror--requirements. -
Conda env will export or create environments based on a file with
conda and pip requirements.
-
Setting environment variables#
If you want to associate environment variables with an environment,
you can use the config API. This is recommended as an alternative to
using activate and deactivate scripts since those are an execution of
arbitrary code that may not be safe.
First, create your environment and activate it:
conda create -n test-env
conda activate test-env
To list any variables you may have, run conda env config vars list.
To set environment variables, run conda env config vars set my_var=value.
Once you have set an environment variable, you have to reactivate your environment:
conda activate test-env.
To check if the environment variable has been set, run
echo $my_var (echo %my_var% on Windows) or conda env config vars list.
When you deactivate your environment, you can use those same commands to see that
the environment variable goes away.
You can specify the environment you want to affect using the -n and -p flags. The -n flag allows you to name the environment and -p allows you to specify the path to the environment.
To unset the environment variable, run conda env config vars unset my_var -n test-env.
When you deactivate your environment, you can see that environment variable goes away by rerunning
echo my_var or conda env config vars list to show that the variable name
is no longer present.
Environment variables set using conda env config vars will be retained in the output of
conda env export. Further, you can declare environment variables in the environment.yml file
as shown here:
name: env-name
channels:
  - conda-forge
  - defaults
dependencies:
  - python=3.7
  - codecov
variables:
  VAR1: valueA
  VAR2: valueB
Saving environment variables#
Conda environments can include saved environment variables.
Suppose you want an environment «analytics» to store both a
secret key needed to log in to a server and a path to a
configuration file. The sections below explain how to write a
script named env_vars to do this on Windows and macOS or Linux.
This type of script file can be part of a conda package, in
which case these environment variables become active when an
environment containing that package is activated.
You can name these scripts anything you like. However, multiple
packages may create script files, so be sure to use descriptive
names that are not used by other packages. One popular option is
to give the script a name in the form
packagename-scriptname.sh, or on Windows,
packagename-scriptname.bat.
Windows#
-
Locate the directory for the conda environment in your
terminal window by running in the command shell%CONDA_PREFIX%. -
Enter that directory and create these subdirectories and
files:cd %CONDA_PREFIX% mkdir .\etc\conda\activate.d mkdir .\etc\conda\deactivate.d type NUL > .\etc\conda\activate.d\env_vars.bat type NUL > .\etc\conda\deactivate.d\env_vars.bat
-
Edit
.\etc\conda\activate.d\env_vars.batas follows:set MY_KEY='secret-key-value' set MY_FILE=C:\path\to\my\file
-
Edit
.\etc\conda\deactivate.d\env_vars.batas follows:
When you run conda activate analytics, the environment variables
MY_KEY and MY_FILE are set to the values you wrote into the file.
When you run conda deactivate, those variables are erased.
macOS and Linux#
-
Locate the directory for the conda environment in your terminal window by running in the terminal
echo $CONDA_PREFIX. -
Enter that directory and create these subdirectories and
files:cd $CONDA_PREFIX mkdir -p ./etc/conda/activate.d mkdir -p ./etc/conda/deactivate.d touch ./etc/conda/activate.d/env_vars.sh touch ./etc/conda/deactivate.d/env_vars.sh
-
Edit
./etc/conda/activate.d/env_vars.shas follows:#!/bin/sh export MY_KEY='secret-key-value' export MY_FILE=/path/to/my/file/
-
Edit
./etc/conda/deactivate.d/env_vars.shas follows:#!/bin/sh unset MY_KEY unset MY_FILE
When you run conda activate analytics, the environment
variables MY_KEY and MY_FILE are set to the values you wrote into
the file. When you run conda deactivate, those variables are
erased.
Sharing an environment#
You may want to share your environment with someone else—for
example, so they can re-create a test that you have done. To
allow them to quickly reproduce your environment, with all of its
packages and versions, give them a copy of your
environment.yml file.
Exporting the environment.yml file#
Note
If you already have an environment.yml file in your
current directory, it will be overwritten during this task.
-
Activate the environment to export:
conda activate myenvNote
Replace
myenvwith the name of the environment. -
Export your active environment to a new file:
conda env export > environment.yml
Note
This file handles both the environment’s pip packages
and conda packages. -
Email or copy the exported
environment.ymlfile to the
other person.
Exporting an environment file across platforms#
If you want to make your environment file work across platforms,
you can use the conda env export --from-history flag. This
will only include packages that you’ve explicitly asked for,
as opposed to including every package in your environment.
For example, if you create an environment and install Python and a package:
conda install python=3.7 codecov
This will download and install numerous additional packages to solve
for dependencies. This will introduce packages that may not be compatible
across platforms.
If you use conda env export, it will export all of those packages.
However, if you use conda env export --from-history, it will
only export those you specifically chose:
(env-name) ➜  ~ conda env export --from-history
name: env-name
channels:
  - conda-forge
  - defaults
dependencies:
  - python=3.7
  - codecov
prefix: /Users/username/anaconda3/envs/env-name
Note
If you installed Anaconda 2019.10 on macOS, your prefix may be
/Users/username/opt/envs/env-name.
Creating an environment file manually#
You can create an environment file (environment.yml) manually
to share with others.
EXAMPLE: A simple environment file:
name: stats
dependencies:
  - numpy
  - pandas
EXAMPLE: A more complex environment file:
name: stats2
channels:
  - javascript
dependencies:
  - python=3.9
  - bokeh=2.4.2
  - conda-forge::numpy=1.21.*
  - nodejs=16.13.*
  - flask
  - pip
  - pip:
    - Flask-Testing
Note
Using wildcards
Note the use of the wildcard * when defining a few of the
versions in the complex environment file. Keeping the major and
minor versions fixed while allowing the patch to be any number
allows you to use your environment file to get any bug fixes
while still maintaining consistency in your environment. For
more information on package installation values,
see Package search and install specifications.
Specifying channels outside of «channels»
You may occasionally want to specify which channel conda will
use to install a specific package. To accomplish this, use the
channel::package syntax in dependencies:, as demonstrated
above with conda-forge::numpy (version numbers optional). The
specified channel does not need to be present in the channels:
list, which is useful if you want some—but not all—packages
installed from a community channel such as conda-forge.
You can exclude the default channels by adding nodefaults
to the channels list.
channels:
  - javascript
  - nodefaults
This is equivalent to passing the --override-channels option
to most conda commands.
Adding nodefaults to the channels list in environment.yml
is similar to removing defaults from the channels
list in the .condarc file. However,
changing environment.yml affects only one of your conda
environments while changing .condarc affects them all.
For details on creating an environment from this
environment.yml file, see Creating an environment from an environment.yml file.
Restoring an environment#
Conda keeps a history of all the changes made to your environment,
so you can easily «roll back» to a previous version. To list the history of each change to the current environment:
conda list --revisions
To restore environment to a previous revision: conda install --revision=REVNUM
or conda install --rev REVNUM.
Note
Replace REVNUM with the revision number.
Example:
If you want to restore your environment to revision 8, run conda install --rev 8.
Removing an environment#
To remove an environment, in your terminal window, run:
conda remove --name myenv --all
You may instead use conda env remove --name myenv.
To verify that the environment was removed, in your terminal window, run:
The environments list that displays should not show the removed
environment.
Create explicit lockfiles without creating an environment#
@EXPLICIT lockfiles allow you to (re)create environments without invoking the solver.
They consist of an @EXPLICIT header plus a list of conda package URLs, optionally followed
by their MD5 or SHA256 hash.
They can be obtained from existing environments via conda list --explicit, as seen in
Building identical conda environments.
But what if you only need the lockfile? Would you need create to a temporary environment first just
to delete it later? Fortunately, there’s a way: you can invoke conda in JSON mode and then
process the output with jq.
Tip
You’ll need jq in your system. If you don’t have it yet, you can install it via
conda (e.g. conda create -n jq jq) or via your system package manager.
The command looks like this for Linux and macOS (replace MATCHSPECS_GO_HERE with the relevant
packages you want):
echo "@EXPLICIT" > explicit.txt
CONDA_PKGS_DIRS=$(mktemp -d) conda create --dry-run MATCHSPECS_GO_HERE --json | jq -r '.actions.FETCH[] | .url + "#" + .md5' >> explicit.txt
The syntax in Windows only needs some small changes:
echo "@EXPLICIT" > explicit.txt
set "CONDA_PKGS_DIRS=%TMP%\conda-%RANDOM%"
conda create --dry-run MATCHSPECS_GO_HERE --json | jq -r '.actions.FETCH[] | .url + "#" + .md5' >> explicit.txt
set "CONDA_PKGS_DIRS="
The resulting explicit.txt can be used to create a new environment with:
conda create -n new-environment --file explicit.txt
Environments in conda are self-contained, isolated spaces where you can install specific versions of software packages, including dependencies, libraries, and Python versions. This isolation helps avoid conflicts between package versions and ensures that your projects have the exact libraries and tools they need.
Why should I create a new environment?
There are several reasons you might want to create a new environment:
Isolation of dependencies — Environments isolate software and their dependencies from the rest of the software installed on your machine. This means you can have both Python 3.9 and Python 3.10 installed on your machine and use both versions without encountering issues.
Reproducibility — By creating an environment for each project, you can ensure that your code runs consistently across different machines. Lock your environment to ensure that it remains reproducible indefinitely, then share the environment configuration to allow others to replicate your setup.
Ease of management — Conda provides tools to easily create, manage, and delete environments. You can quickly switch between environments, making it simple to manage multiple projects with different requirements.
Testing and development — Environments are perfect for testing new packages or libraries without affecting your stable development setups. You can experiment freely and remove the environment if things don’t work out, without impacting your other projects.
Why shouldn’t I work in the base environment?
When first installing and using conda, you probably saw references to something called base or a “base environment”. This environment is where conda itself is installed, and should only be used for installing anaconda, conda, and conda-related packages, such as anaconda-client or conda-build.
For your projects, however, Anaconda strongly recommends creating new environments to work in. This protects your base environment from breaking due to complex dependency conflicts and allows you to easily manage and reproduce your environment on other machines.
Working with environments
For convenience, the most common actions users take when managing environments are detailed here. For a full list of actions and more comprehensive guide, see Manage environments in the official conda documentation. Alternatively, follow along with our Getting started with conda environments tutorial on Anaconda.com.
Creating an environment
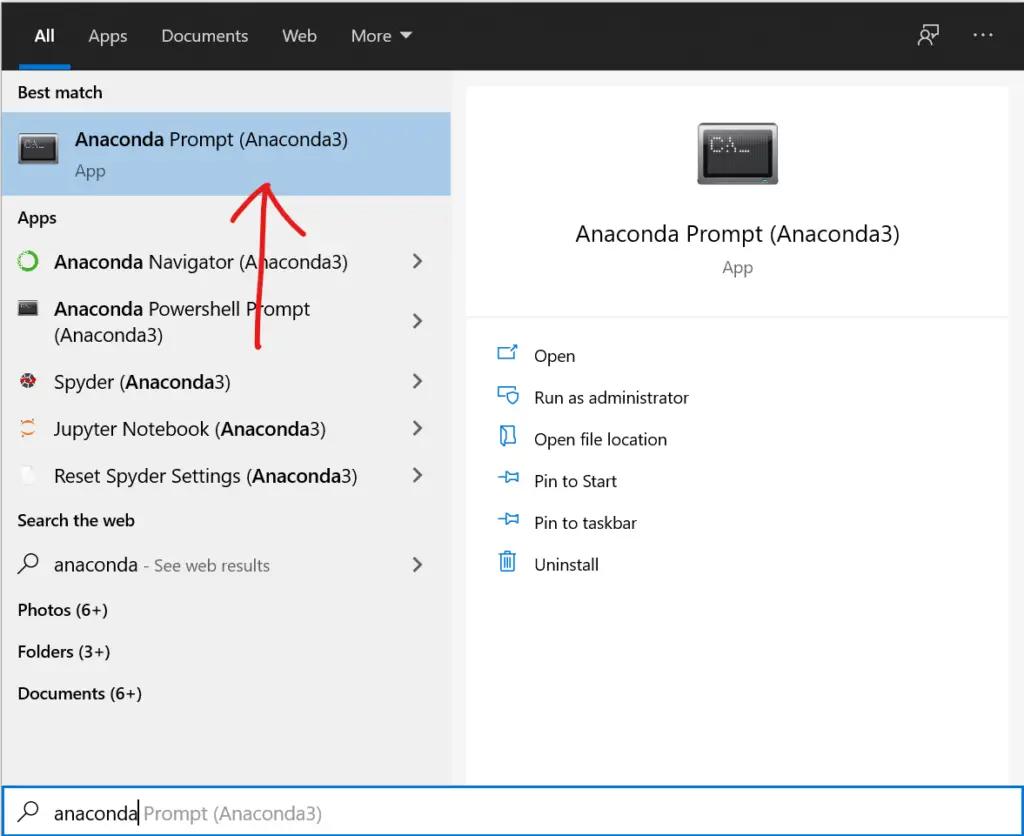
Create a conda environment by opening Anaconda Prompt (Terminal on macOS/Linux) and following the steps for your use case below:
The following command creates a new environment and downloads the specified packages and their dependencies:
Example:
Activating an environment
Because environments are isolated spaces, you can only work with one at a time. Selecting an environment to work with is called activating it.
Activate an environment by running the following command:
Switching between environments
When you’re ready to switch between projects, simply activate the environment of your other project. Activating a different environment will deactivate your current one.
-
(Optional) View a list of all your environments by running the following command:
-
To switch to a different environment, activate it by running the following command:
Locking an environment
The most reliable way to ensure your project remains reproducible indefinitely is to “lock” its environment. Locking an environment creates a fully specified environment, one that has all packages used in the project and their dependencies configured to a specific version. This ensures that your project will be reproduced exactly as it was initially configured, because there will never be an unexpected update or change if new package dependencies are released.
Locking your project requires the conda-project package to be installed in the environment you want to lock. Install the package by running the following commands:
If your project doesn’t contain an environment.yml file, create one by running the following command:
You can then lock your project’s environment by running the following command:
Locking your project produces a conda-lock.default.yml file that you can export to share with others.
Sharing an environment
Sharing your environment with someone else allows them to use conda to recreate your environment on their machine.
To share an environment and its software packages, you must export your environment’s configurations into a .yml file.
Exporting the environment configuration .yml file
-
Activate the environment you want to export by running the following command:
-
Export the environment by running the following command:
-
Share the exported environment configuration
.ymlfile with another user.
Deactivating an environment
It is best practice to deactivate your environment when you are finished working in it.
To deactivate your active environment, run the following command:
Introduction
Let us try to understand the need for virtual environments with an example. Assume that you are working on three projects Project_1, Project_2, and Project_3 in the same system/machine. Project_1 requires Python 3.6, Project_2 requires Python 3.7 and Project_3 requires Python 3.8. How do you handle such a situation?
If you are thinking to install everything in the base environment then be assured that you will get into issues sooner or later. The best approach is to create separate virtual environments for each project and use it accordingly.
Many of the beginners don’t understand the importance of using virtual environments. In this article, we’ll go through 7 most commonly used conda commands for managing virtual environments.

Virtual Environment
The main purpose of a Python virtual environment is to create separate environments for each project so that you will not run into dependency issues later in the project.
When discussing virtual environments, we come across the terms pip, conda, and venv a lot. So, let’s understand these terms before we continue further.
pip
Pip is Python’s standard package manager. When you install Python or Anaconda only some of the packages come pre-installed. If you need to install any package you will use the pip command such as pip install pandas to install the required packages. Note that pip is not used for managing the environments.
conda
Conda is both a package and environment manager. It means that you can use conda commands to install Python packages and also used for managing the virtual environments. When you install Anaconda/Miniconda, conda will get installed by default.
venv
The venv is a Python package that was added from Python 3.3 and it is used for managing the virtual environments. The venv is used only for managing the environments and is can’t be used for installing the packages.
To run these commands, use the Anaconda command prompt.
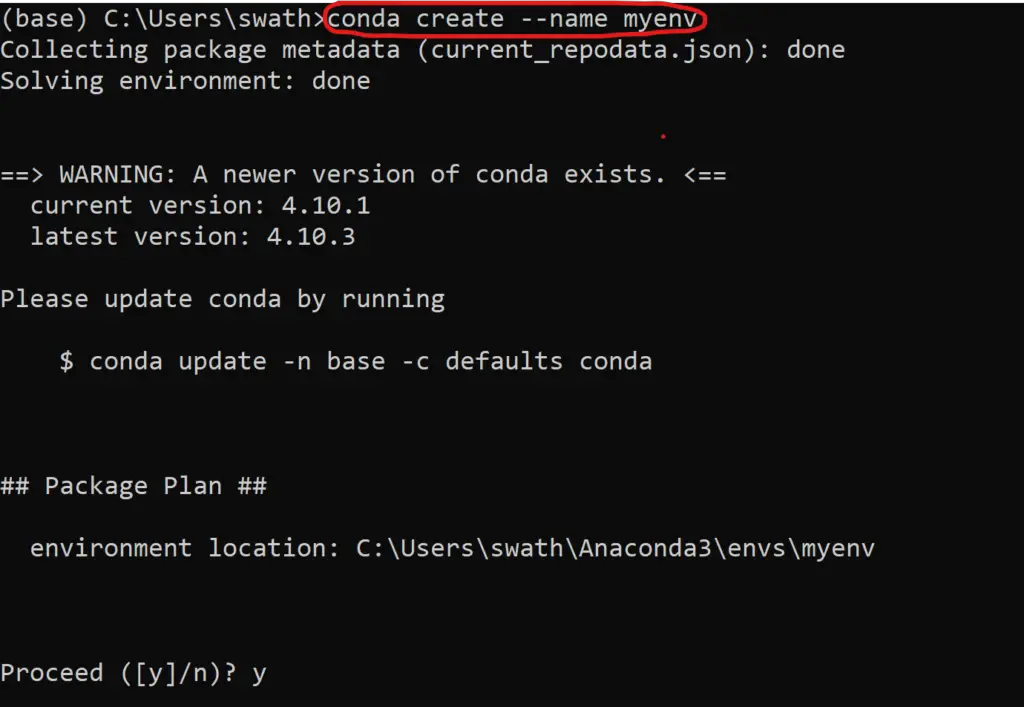
Creating an environment
The below command will create an environment named myenv. You can use any environment name as you wish. By default, in Windows machines, all the environments will be stored in C:\Users\<user-name>\.conda\envs.
conda create — name myenv
When you open the anaconda command prompt, by default you will see the base environment. If you install any packages they will be installed in the base environment.

Create an environment with a specific version of Python
This will create an environment myenv with python 3.6 installed. After activating the environment, you can start installing any packages you need.
conda create --name myenv python=3.6
Create an environment with a specific package
This will create an environment myenv with spacy latest version. If you need to install a specific version of the package, you can replace spacy with spacy=2.3.0.
conda create --name myenv python=3.6
Create an environment with a specific version of Python & package
This command will create the environment python 3.6 and spacy 2.3.0. You can use as many packages as you need. If you need to install a lot of packages, the best practice is to use yml file which is discussed next.
conda create -n myenv python=3.6 spacy=2.3.0
Create an environment from an environment.yml file
If you have a long list of packages that need to be installed when creating the environment, you can create a yml file by including a list of packages that need to be installed and use it when creating the environment.
					environment.yml
name: myenv
dependencies:
- spacy>=2.3.0
- pandas
- seaborn
- scikit-learn
Once you have the yml file, run the below command will create an environment named myenv with all the packages from the yml file installed in the environment. You can create this file manually or you can also conda prompt to create a yml file which is discussed later.
conda env create -f environment.yml
Activating & Deactivating an environment
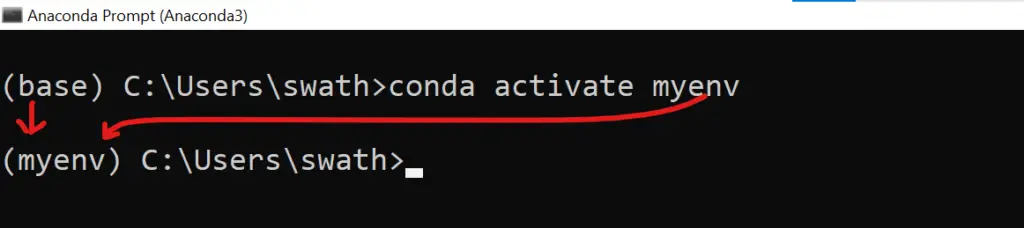
Activate
Once you have created the environment, to activate and start using, run the below command.
As you notice, after activating the new myenv environment, you will notice that (base) is replaced with (myenv) as highlighted below.
Note
Only after activating the environment you must install the new Python packages that you want to be part of the new environment. You can either install manually one by one or you could yml file. Both are discussed in the below sections.
Deactivate
To deactivate, simply run the command –
After deactivating the current environment, you can see that myenv is switched back to the base environment.

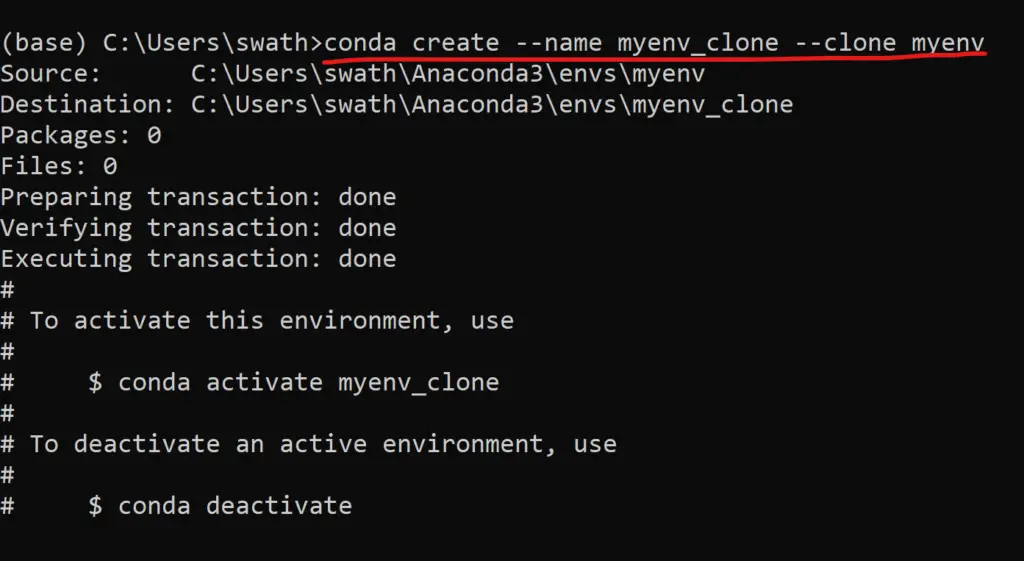
Cloning an environment
For any reason, if you need to clone the existing environment, the below command can be used. This will create a new environment named myenv_new by cloning myenv. This will clone all the packages including the python version.
conda create --name myenv_new --clone myenv
Adding virtual environment to Jupyter notebook
When creating a new Jupyter Notebook, by default, you are allowed to create using the base instance. What if you want to use the new environment for your jupyter notebook. Use the following two commands that will add a new environment (in this case myenv) to the Jupyter notebook. Refer to the screenshot below.
					conda install -c anaconda ipykernel
python -m ipykernel install --user --name=myenv
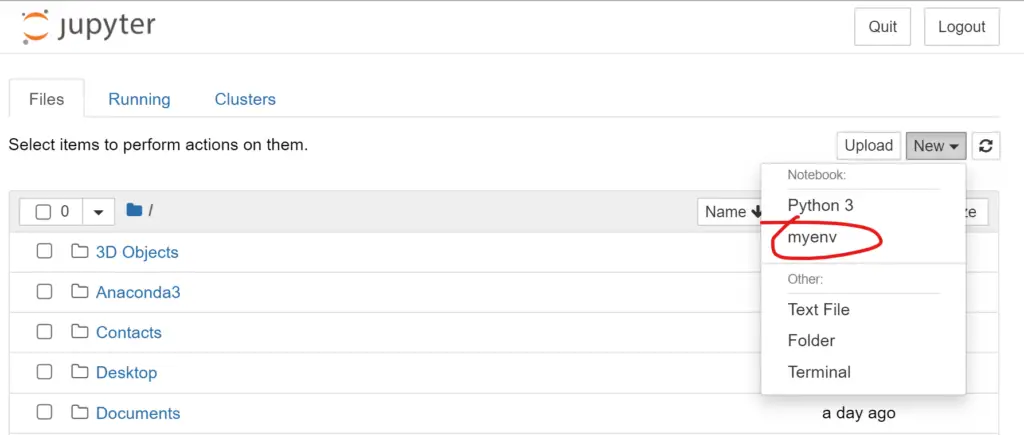
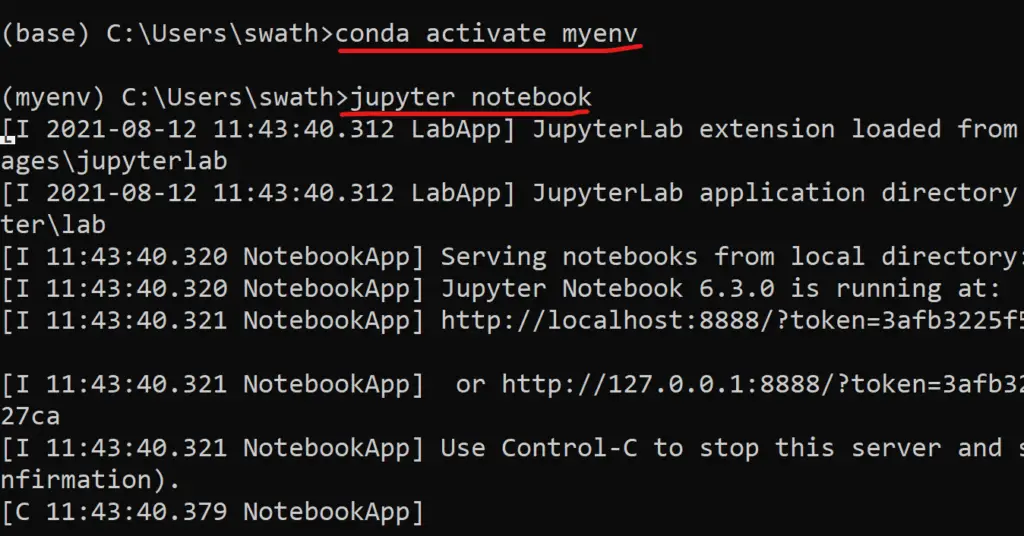
Another hack would be to activate the virtual environment first from the anaconda prompt and then running the jupyter notebook command that initiates the jupyter notebook with the current environment.
					conda activate myenv
jupyter notebook
Determining & Viewing your current environment
Lorem ipsum dolor sit amet, consectetur adipiscing elit. Ut elit tellus, luctus nec ullamcorper mattis, pulvinar dapibus leo.
					conda info --envs
    OR
conda env list
The below screenshot shows that there are 5 virtual environments.
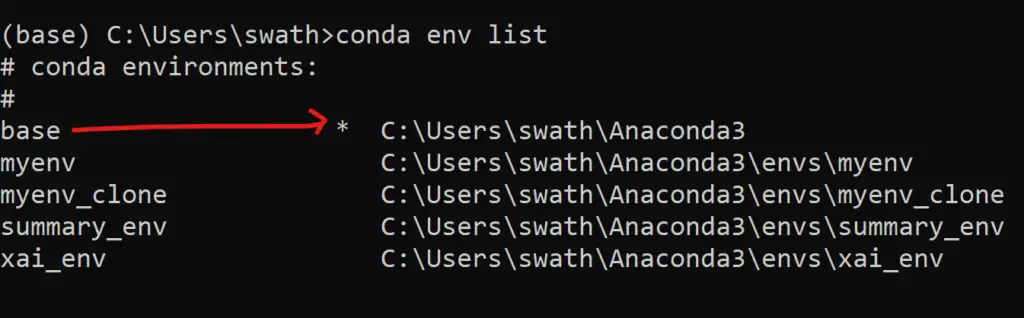
The asterisk indicates the current environment which is active at the time of running this command. In the above screenshot, you notice that the base environment is active.
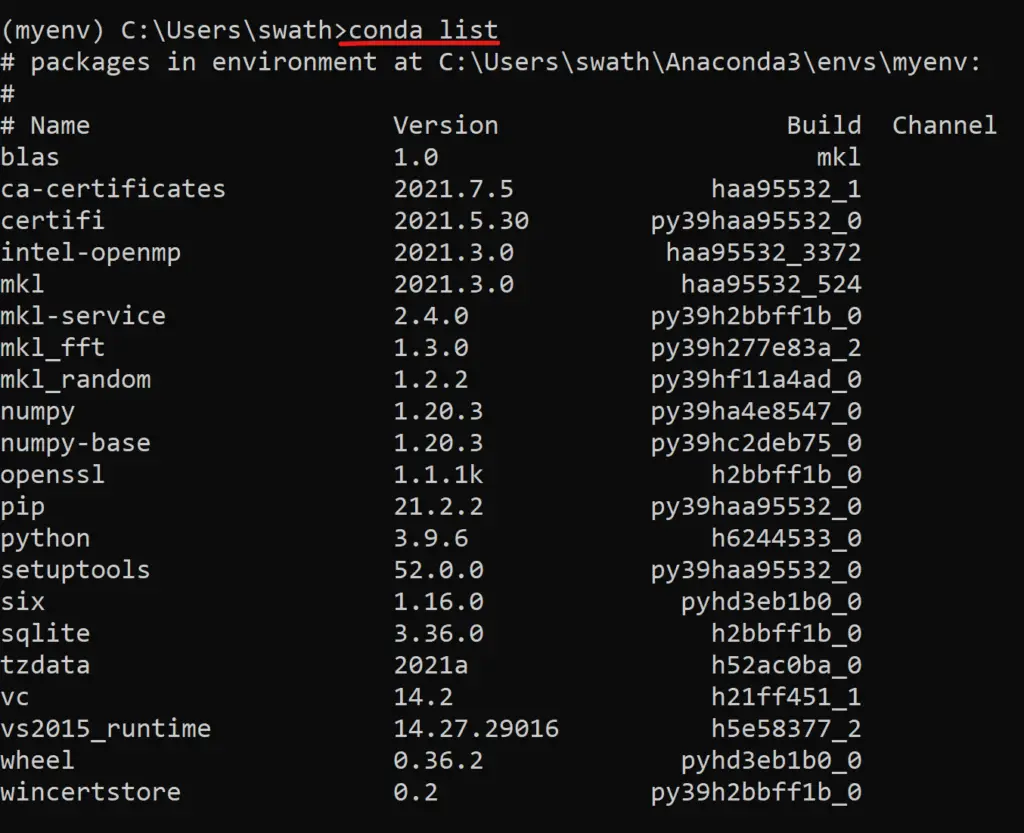
List of packages installed in an environment
At times you may want to see the list of all the packages that are installed in the current environment. In such a case, you can use the below command that displays all the packages installed as shown in the screenshot.
Sharing an environment
If you want to set up the same environment in your colleagues’ system, you can export environment details into yml file and then you that file to set up a similar environment in your colleague’s system.
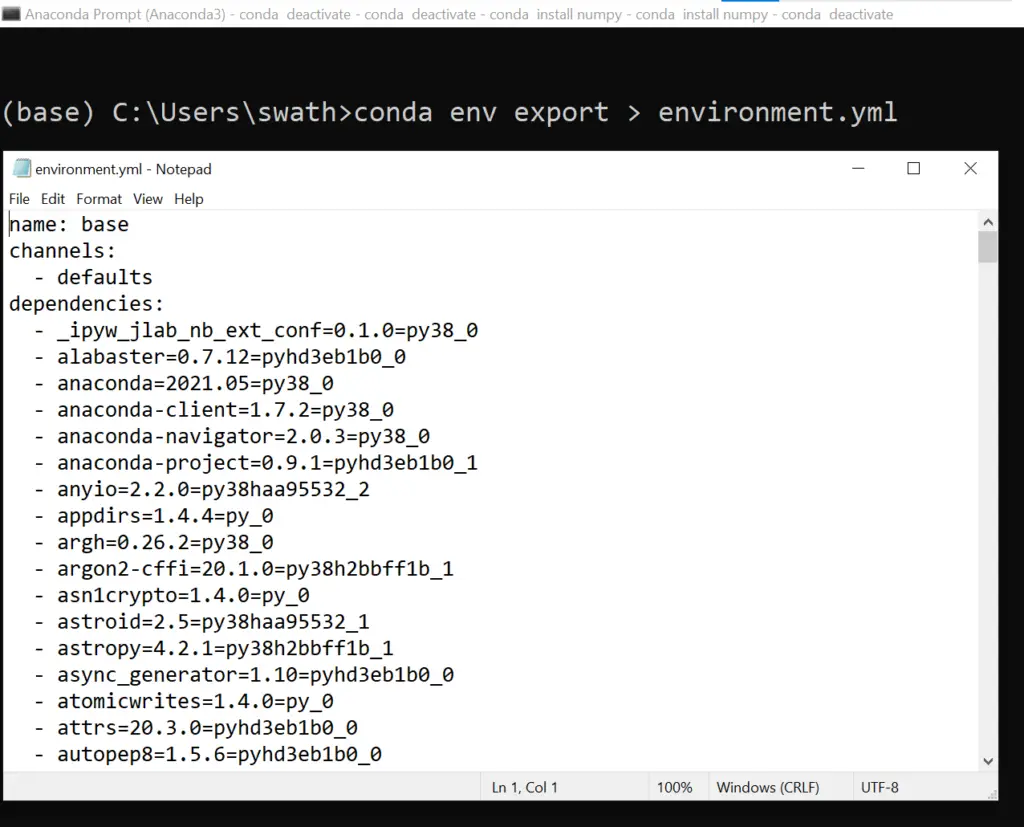
First, you need to activate the environment and then run the export command to create the yml file with environment details as shown below.
					conda activate myenv
conda env export > environment.yml
You can locate the environment.yml file in the folder C:\Users\<<your_name>>.
In the below screenshot, you can see that we are able to execute the conda export command successfully for the base environment, and also you are seeing the content of the yml file.
Restoring an environment
Conda keeps track of all the changes to the environment so that you can easily roll back to the previous versions. The first command lists the history of each change to the environment and the second command is used to roll back to the specific version.
					conda list --revisions

conda install --revision=<> #replace <> with number
Removing an environment
The below command will remove the myenv environment. You can verify if the environment is removed by checking the result of conda info — envs.
conda remove --name myenv --all
Conclusion
These are the most commonly used commands used by all the data scientists and Python developers for managing different Python environments using Conda. Hope you find this article useful.
Overview
Teaching: 60 min
Exercises: 15 minQuestions
What is a Conda environment?
How do I create (delete) an environment?
How do I activate (deactivate) an environment?
How do I install packages into existing environments using Conda (+pip)?
Where should I create my environments?
How do I find out what packages have been installed in an environment?
How do I find out what environments that exist on my machine?
How do I delete an environment that I no longer need?
Objectives
Understand how Conda environments can improve your research workflow.
Create a new environment.
Activate (deactivate) a particular environment.
Install packages into existing environments using Conda (+pip).
Specify the installation location of an environment.
List all of the existing environments on your machine.
List all of the installed packages within a particular environment.
Delete an entire environment.
Workspace for Conda environments
If you haven’t done it yet, create a new
introduction-to-conda-for-data-scientistsdirectory on your Desktop in order to maintain a consistent workspace for all your conda environment.On Mac OSX and Linux running following commands in the
Terminal will create the required directory on the Desktop.$ cd ~/Desktop $ mkdir introduction-to-conda-for-data-scientists $ cd introduction-to-conda-for-data-scientistsFor Windows users you may need to reverse the direction of the slash and run
the commands from the command prompt.> cd ~\Desktop > mkdir introduction-to-conda-for-data-scientists > cd introduction-to-conda-for-data-scientistsAlternatively, you can always “right-click” and “create new folder” on your Desktop. All the
commands that are run during the workshop should be run in a terminal within the
introduction-to-conda-for-data-scientistsdirectory.
What is a Conda environment
A Conda environment
is a directory that contains a specific collection of Conda packages that you have installed. For
example, you may be working on a research project that requires NumPy 1.18 and its dependencies,
while another environment associated with an finished project has NumPy 1.12 (perhaps because
version 1.12 was the most current version of NumPy at the time the project finished). If you
change one environment, your other environments are not affected. You can easily activate or
deactivate environments, which is how you switch between them.
Avoid installing packages into your
baseConda environmentConda has a default environment called
basethat include a Python installation and some core
system libraries and dependencies of Conda. It is a “best practice” to avoid installing
additional packages into yourbasesoftware environment. Additional packages needed for a new
project should always be installed into a newly created Conda environment.
Creating environments
To create a new environment for Python development using conda you can use the conda create
command.
$ conda create --name python3-env python
For a list of all commands, take a look at Conda general commands.
It is a good idea to give your environment a meaningful name in order to help yourself remember
the purpose of the environment. While naming things can be difficult, $PROJECT-NAME-env is a
good convention to follow. Sometimes also the specific version of a package why you had to create a new environment is a good name
The command above will create a new Conda environment called “python3-env” and install the most recent version of Python. If you wish, you can specify a particular version of packages for conda to install when creating the environment.
$ conda create --name python36-env python=3.6
Always specify a version number for each package you wish to install
In order to make your results more reproducible and to make it easier for research colleagues to
recreate your Conda environments on their machines it is a “best practice” to always explicitly
specify the version number for each package that you install into an environment. If you are not
sure exactly which version of a package you want to use, then you can use search to see what
versions are available using theconda searchcommand.$ conda search $PACKAGE_NAMESo, for example, if you wanted to see which versions of
Scikit-learn, a popular Python library for machine learning,
were available, you would run the following.$ conda search scikit-learnAs always you can run
conda search --helpto learn about available options.
You can create a Conda environment and install multiple packages by listing the packages
that you wish to install.
$ conda create --name basic-scipy-env ipython=7.13 matplotlib=3.1 numpy=1.18 scipy=1.4
When conda installs a package into an environment it also installs any required dependencies.
For example, even though Python is not listed as a packaged to install into the
basic-scipy-env environment above, conda will still install Python into the environment
because it is a required dependency of at least one of the listed packages.
Creating a new environment
Create a new environment called “machine-learning-env” with Python and the most current versions
of IPython, Matplotlib,
Pandas, Numba and
Scikit-Learn.Solution
In order to create a new environment you use the
conda createcommand as follows.$ conda create --name machine-learning-env \ ipython \ matplotlib \ pandas \ python \ scikit-learn \ numbaSince no version numbers are provided for any of the Python packages, Conda will download the
most current, mutually compatible versions of the requested packages. However, since it is best
practice to always provide explicit version numbers, you should prefer the following solution.$ conda create --name machine-learning-env \ ipython=7.19 \ matplotlib=3.3 \ pandas=1.2 \ python=3.8 \ scikit-learn=0.23 \ numba=0.51However, please be aware that the version numbers for each packages may not be the latest available and would need to be adjusted.
Renaming a conda environment
As of conda version 4.14.0 you can rename a conda environment with the
conda renamecommand.
conda rename supports renaming your current environment, or any of your existing environments.conda rename -n old_env_name new_env_name
Activating an existing environment
Activating environments is essential to making the software in environments work well (or
sometimes at all!). Activation of an environment does two things.
- Adds entries to
PATHfor the environment. - Runs any activation scripts that the environment may contain.
Step 2 is particularly important as activation scripts are how packages can set arbitrary
environment variables that may be necessary for their operation. You activate the
basic-scipy-env environment by name using the activate command.
$ conda activate basic-scipy-env
You can see that an environment has been activated because the shell prompt will now include the
name of the active environment.
Deactivate the current environment
To deactivate the currently active environment use the Conda deactivate command as follows.
(basic-scipy-env) $ conda deactivate
You can see that an environment has been deactivated because the shell prompt will no longer
include the name of the previously active environment.
Returning to the
baseenvironmentTo return to the
baseConda environment, it’s better to callconda activatewith no
environment specified, rather than to usedeactivate. If you runconda deactivatefrom your
baseenvironment, you may lose the ability to runcondacommands at all. Don’t worry if
you encounter this undesirable state! Just start a new shell.
Activate an existing environment by name
Activate the
machine-learning-envenvironment created in the previous challenge by name.Solution
In order to activate an existing environment by name you use the
conda activatecommand as
follows.$ conda activate machine-learning-env
Deactivate the active environment
Deactivate the
machine-learning-envenvironment that you activated in the previous challenge.Solution
In order to deactivate the active environment you use the
conda deactivatecommand.(active-environment-name) $ conda deactivate
Installing a package into an existing environment
You can install a package into an existing environment using the conda install command. This command accepts a list of package specifications (i.e., numpy=1.18) and installs a set of packages consistent with those specifications and compatible with the underlying environment. If full compatibility cannot be assured, an error is reported and the environment is not changed.
By default the conda install command will install packages into the current, active environment.
The following would activate the basic-scipy-env we created above and install
Numba, an open source JIT compiler that translates a subset of Python
and NumPy code into fast machine code, into the active environment.
$ conda activate basic-scipy-env
$ conda install numba
As was the case when listing packages to install when using the conda create command, if version
numbers are not explicitly provided, Conda will attempt to install the newest versions of any
requested packages. To accomplish this, Conda may need to update some packages that are already
installed or install additional packages. It is always a good idea to explicitly provide version
numbers when installing packages with the conda install command. For example, the following would
install a particular version of Scikit-Learn, into the current, active environment.
$ conda install scikit-learn=0.22
Freezing installed packages
To prevent existing packages from being updating when using the
conda installcommand, you can
use the--freeze-installedoption. This may force Conda to install older versions of the
requested packages in order to maintain compatibility with previously installed packages. Using
the--freeze-installedoption does not prevent additional dependency packages from being
installed.
Remove a package from an environment
To remove a package from an environment you can run the command.
$ conda uninstall PKGNAME --name ENVNAME
For example to remove the scikit-learn package from the basic-scipy-env environment run
$ conda uninstall scikit-learn --name basic-scipy-env
Installing a package into a specific environment
Dask
provides advanced parallelism for data science workflows enabling performance at scale for the
core Python data science tools such as Numpy Pandas, and Scikit-Learn. Have a read through the
official documentation
for theconda installcommand and see if you can figure out how to install Dask into the
machine-learning-envthat you created in the previous challenge.Solution
You can install Dask into
machine-learning-envusing theconda installcommand as follow.$ conda install --name machine-learning-env dask=2020.12You could also install Dask into
machine-learning-envby first activating that environment
and then using theconda installcommand.$ conda activate machine-learning-env $ conda install dask=2020.12
Where do Conda environments live?
Environments created with conda, by default, live in the envs/ folder of your miniconda3 (or anaconda3) directory the absolute path to which will look something the following: /Users/$USERNAME/miniconda3/envs or C:\Users\$USERNAME\Anaconda3.
You can see the location of your conda environments by running the command.
conda config --show envs_dirs
Running ls (linux) / dir (Windows) on your anaconda envs/ directory will list out the directories containing the existing Conda environments.
Location of Conda environments on Binder
If you are working through these lessons using a Binder instance, then the default location of
the Conda environments is slightly different.Running
ls /srv/conda/envs/from a terminal will list out the directories containing any
previously installed Conda environments.
How do I specify a location for a Conda environment?
You can control where a Conda environment lives by providing a path to a target directory when
creating the environment. For example the following command will create a new environment in a
sub-directory of the current working directory called env.
$ conda create --prefix ./env ipython=7.13 matplotlib=3.1 pandas=1.0 python=3.6
dot-slash, ./
In unix the dot-slash, ./, is a relative path a file or directory in the current directory.
You activate an environment created with a prefix using the same command used to activate
environments created by name.
It is often a good idea to specify a path to a sub-directory of your project directory when
creating an environment. Why?
- Makes it easy to tell if your project utilizes an isolated environment by including the
environment as a sub-directory. - Makes your project more self-contained as everything including the required software is
contained in a single project directory.
An additional benefit of creating your project’s environment inside a sub-directory is that you
can then use the same name for all your environments; if you keep all of your environments in
your ~/miniconda3/env/ folder, you’ll have to give each of them a different name.
Conda environment sub-directory naming convention
In order to be consistent with the convention used by tools such as
venvandPipenv, I
recommend usingenvas the name of the sub-directory of your project directory that contains
your Conda environment. A benefit of maintaining the convention is that your environment
sub-directory will be automatically ignored by the default Python.gitignorefile used on
GitHub.Whatever naming convention you adopt it is important to be consistent! Using the same name for
all of your Conda environments allows you to use the sameactivatecommand as well.$ cd my-project/ $ conda activate ./env
Creating a new environment as a sub-directory within a project directory
First create a project directory called
project-dirusing the following command.$ mkdir project-dir $ cd project-dirNext, create a new environment inside the newly created
project-dirin a sub-directory called
envan install Python 3.6, version 3.1 of Matplotlib, and version 2.0 of
TensorFlow.Solution
project-dir $ conda create --prefix ./env \
python=3.6 \
matplotlib=3.1 \
tensorflow=2.0
Placing Conda environments outside of the default ~/miniconda3/envs/ folder comes with a couple of minor drawbacks. First, conda can no longer find your environment with the --name flag; you’ll generally need to pass the --prefix flag along with the environment’s full path to find the environment.
Second, an annoying side-effect of specifying an install path when creating your Conda
environments is that your command prompt is now prefixed with the active environment’s absolute path rather than the environment’s name. After activating an environment using its prefix your prompt will look similar to the following.
(/absolute/path/to/env) $
As you can imagine, this can quickly get out of hand.
(/Users/USER_NAME/research/data-science/PROJECT_NAME/env) $
If (like me!) you find this long prefix to your shell prompt annoying, then there is a quick fix:
modify the env_prompt setting in your .condarc file, which you can do with the following
command.
$ conda config --set env_prompt '({name})'
This will either edit your ~/.condarc file if you already have one or create a ~/.condarc file
if you do not. Now your command prompt will display the active environment’s generic name.
$ cd project-directory
$ conda activate ./env
(env) project-directory $
For more on modifying your .condarc file, see the
official Conda docs.
Activate an existing environment by path
Activate the environment created in a previous challenge using the path to the
environment directory.Solution
You can activate an existing environment by providing the path the the environment directory
instead of the environment name when using theconda activatecommand as follows.Note that the provided path can either be absolute or relative. If the path is a relative path
then it must start with./on Unix systems and.\when using PowerShell on Windows.
Conda can create environments for R projects too!
First create a project directory called
r-project-dirusing the following command.cd ~/ mkdir r-project-dir cd r-project-dirNext, take a look through the list of R packages available by
default for installation usingconda. Create a new environment inside the newly created
r-project-dirin a sub-directory calledenvand installr-base,r-tidyverse.Solution
 conda create --prefix ./env \
 r-base \
 r-tidyverse
Listing existing environments
Now that you have created a number of Conda environments on your local machine you have probably
forgotten the names of all of the environments and exactly where they live. Fortunately, there is
a conda command to list all of your existing environments together with their locations.
Listing the contents of an environment
In addition to forgetting names and locations of Conda environments, at some point you will
probably forget exactly what has been installed in a particular Conda environment. Again, there is
a conda command for listing the contents on an environment. To list the contents of the
basic-scipy-env that you created above, run the following command.
$ conda list --name basic-scipy-env
If you created your Conda environment using the --prefix option to install packages into a
particular directory, then you will need to use that prefix in order for conda to locate the
environment on your machine.
$ conda list --prefix /path/to/conda-env
Listing the contents of a particular environment.
List the packages installed in the
machine-learning-envenvironment that you created in a
previous challenge.Solution
You can list the packages and their versions installed in
machine-learning-envusing the
conda listcommand as follows.$ conda list --name machine-learning-envTo list the packages and their versions installed in the active environment leave off
the--nameor--prefixoption.
Deleting entire environments
Occasionally, you will want to delete an entire environment. Perhaps you were experimenting with
conda commands and you created an environment you have no intention of using; perhaps you no
longer need an existing environment and just want to get rid of cruft on your machine. Whatever
the reason, the command to delete an environment is the following.
$ conda remove --name python36-env --all
If you wish to delete and environment that you created with a --prefix option, then you will
need to provide the prefix again when removing the environment.
$ conda remove --prefix /path/to/conda-env/ --all
Delete an entire environment
Delete the entire “machine-learning-env” environment.
Solution
In order to delete an entire environment you use the
conda removecommand as follows.$ conda remove --name machine-learning-env --all --yesThis command will remove all packages from the named environment before removing the
environment itself. The use of the--yesflag short-circuits the confirmation prompt (and
should be used with caution).
Key Points
A Conda environment is a directory that contains a specific collection of Conda packages that you have installed.
You create (remove) a new environment using the
conda create(conda remove) commands.You activate (deactivate) an environment using the
conda activate(conda deactivate) commands.You install packages into environments using
conda install; you install packages into an active environment usingpip install.You should install each environment as a sub-directory inside its corresponding project directory
Use the
conda env listcommand to list existing environments and their respective locations.Use the
conda listcommand to list all of the packages installed in an environment.
Let us start our journey to Conda, a versatile and indispensable tool for data scientists, analysts, and developers. This sophisticated tool goes beyond the limitations of traditional management systems, delivering a holistic solution that simplifies the process of configuring, managing, and deploying software packages and dependencies life is hassle-free in the world of technology.
In this article, we will cover topics like installation, environment management, package handling, advanced usage, how to troubleshoot, its comparison to other tools out there, and integration with third-party applications.
Table of Content
- What is Conda?
- Conda Installation
- Environment Management
- Package Handling in Conda
- Advanced Uses of Conda
- Troubleshooting Conda
- Conda Comparison With Other Tools
- Conda Integration With Other Tools
- Conclusion
- Frequently Asked Questions
What is Conda?
Conda is an open-source package management and environment management system that is widely used in the scientific computing and data science communities. It helps users manage software packages, dependencies, and environments, making it easier to install, run, and maintain different software tools and libraries.
Here are some key features and aspects of Conda:
- Cross-Platform Compatibility: Conda works on Windows, macOS, and Linux, making it a versatile tool for developers and researchers across different operating systems.
- Package Management: Conda allows users to easily install, update, and remove software packages. It supports a wide range of software, including Python packages, R packages, and even non-Python libraries and tools.
- Environment Management: Conda enables the creation of isolated environments. This means you can create separate environments for different projects, each with its own specific set of packages and dependencies. This isolation helps prevent conflicts between packages and makes it easier to manage project-specific requirements.
- Version Control: By using Conda environments, you can ensure that your projects are using specific versions of packages, which helps in maintaining reproducibility and consistency in your work.
- Dependency Management: Conda automatically handles package dependencies, ensuring that all required packages are installed and compatible with each other.
Conda Installation
Installation of Conda is quite simple. Just follow these steps and you will be able to install and run Conda on your system.
Select the Distribution of Conda
First, you must choose between the Anaconda and Miniconda Conda distributions before starting the installation.
- Anaconda: An extensive feature set makes this full-featured Conda distribution ideal for users who need a lot of tools and libraries right out of the box. There is a vast array of pre-installed features included with it.
- Miniconda: Simply the Conda package manager and its dependencies are included in this lightweight Conda distribution. This compact approach is more appropriate for users who prefer a more customized environment because it allows them to install only the packages that they need.
In this article, we will be installing Miniconda.
Install the Installer
Visit the official Conda distribution website after selecting the one that best meets your needs and download the appropriate installer for your operating system (Windows, macOS, or Linux).
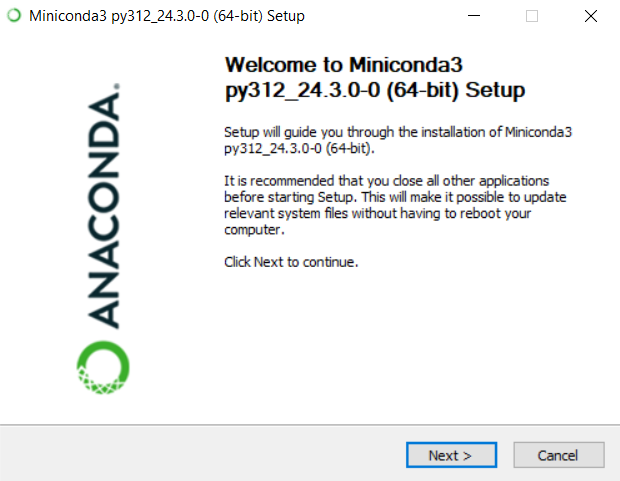
Launch the Installer
Find the installer file in your file explorer after downloading it, and double-click to launch the installation wizard. To continue with the installation, follow the on-screen instructions.
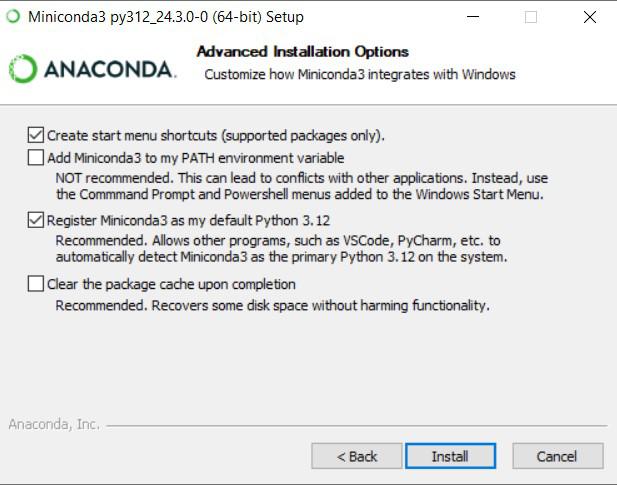
Select Installation Options
You will be given various options to personalize your Conda installation during the installation process. These are some important decisions you might have to make:
- Installation Location: Select the directory on your computer where Conda should be installed. For most users, the default location is usually fine.
- Add to PATH: You can use Conda commands from any directory in your terminal or command prompt by choosing to add Conda to your system’s PATH environment variable.
- Set Anaconda up as the Python system: When installing Anaconda, you will possess the chance to register Conda as the default Python interpreter. Make this choice based on your preferences.
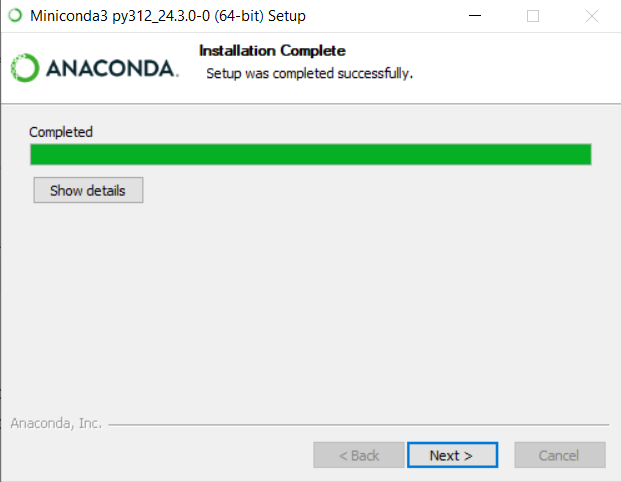
Finish the Installation
Continue with the installation procedure after you’ve customized the installation options to your preference. The installer will set up Conda correctly and copy the required files to your system.
Verify Conda Installation
Once the installation is finished, you can run the following command in a new terminal or command prompt window to confirm that Conda has been installed correctly:
conda --version
The version number of Conda should show up in the terminal or command prompt if the installation went well.
Set up Conda
Conda must be initialized by executing the following command before you can use it. By using this command, you can set your shell to automatically activate the base Conda environment and recognize Conda commands.
conda init
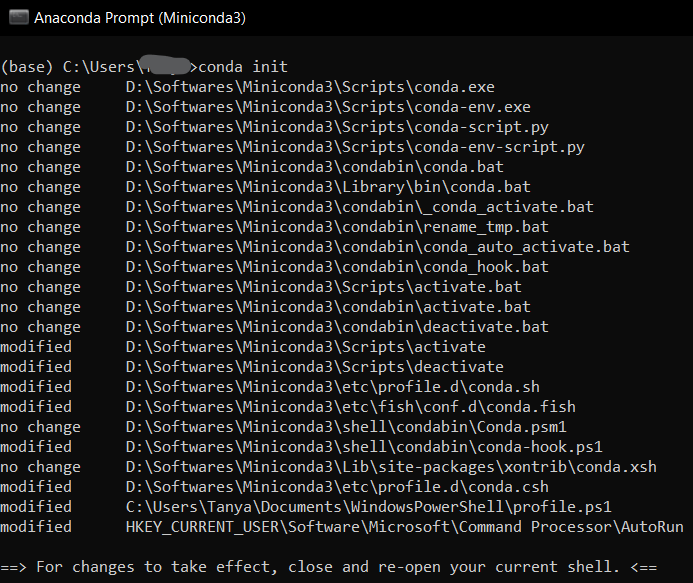
You can use Conda to manage your environments and install packages now that it has been installed and initialized. Simple Conda commands like conda create, conda activate, and conda install allow you to create a new environment, activate it, and start installing packages.
Environment Management
Conda shines in data science and software development because it offers a strong environmental strategy. It allows users to configure sites, each with its own dependencies and packages, so you can work on multiple projects at once without worrying about incompatibilities or conflict of interest.
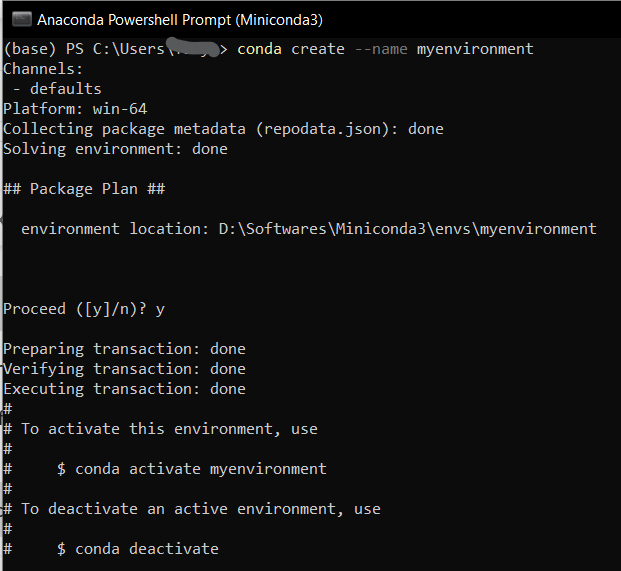
Create Environment
In Conda, creating a new environment is a simple process. Just type the following command in the miniconda prompt.
conda create -- name myenvironment
This command creates an environment with the name myenvironment.
Users can also add commands to install specific packages in the environment by adding the names in the above command.
conda create -- name myenvironment python=3.8 numpy
This creates the environment myenvironment with Python 3.8 interpreter and numpy loaded in as well.
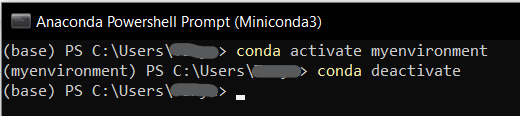
Activate Environment
The conda activate command and the environment name is used to activate a newly created environment. The myenvironment environment will be launched upon execution of this command, and it will be used for any further Python executions or package installations.
conda activate myenvironment

Deactivate Environments
The conda deactivate command can be used to end an active environment and resume the base environment. By using this command, you will go back to the base environment and deactivate the current environment.
conda deactivate
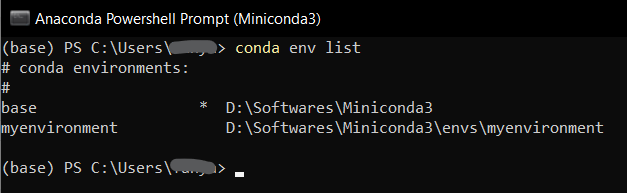
List Available Environments
The conda env list command can be used to see a list of all environments that are available on your system. The names of all current environments and their corresponding disk locations will be shown by this command.
conda env list
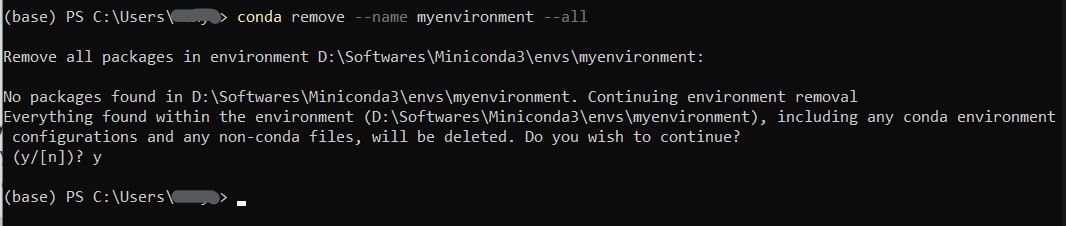
Remove Existing Environments
The conda env remove command, followed by the environment name, can be used to remove an environment if it is no longer needed. By running this command, you can clean up disk space and get rid of all packages and dependencies along with the myenvironment environment.
conda remove --name myenvironment --all
Export and Sharing Environments
Conda allows you to export an environment’s specifications to a YAML file that you can share or use to duplicate the environment on another computer. Use the conda env export command and the environment name to export the environment specs to a YAML file. he myenvironment environment’s specifications will be exported with this command and saved in a file called myenvironment.yml.
conda env export > myenvironment.yml
This command will create yml file in the directory from where this command is executed. You can further share this file via email or Git.

As you can see, users can easily create, manage, and share isolated environments thanks to Conda’s environment management features allowing you to simplify dependency management, optimize workflow, and concentrate on what really matters—creating amazing software.
Package Handling in Conda
In the intricate world of data science and software development, managing dependencies is essential. Conda’s powerful package handling capabilities make this process simpler. Let us look at the basic features Conda provides in handling packages:
Install Packages
Conda makes package installation simple. The package name you wish to install should be followed by the conda install command. The numpy package will be installed in the active environment by using this command.
conda install numpy
By adding the version number after the package name, you can additionally indicate which version of the package you wish to install.
conda install numpy=1.21.0
The numpy package version 1.21.0 will be installed using this command.

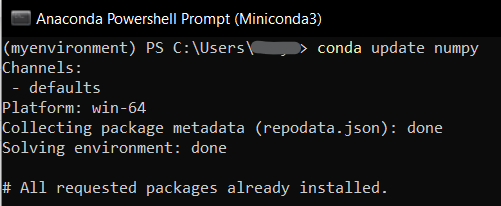
Package Updates
Updating your packages is crucial to preserving compatibility and security. The conda update command in Conda makes it simple to update packages to the most recent versions.
conda update numpy
With this command, the numpy package will be updated to the most recent version that is available in the Conda repository.
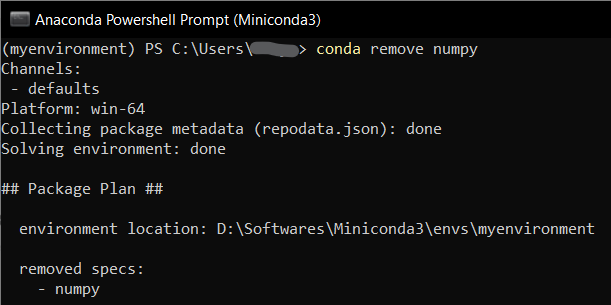
Remove Packages
Use the conda remove command and the package name to remove a particular package from your environment if you no longer need it.
conda remove numpy
By removing the numpy package from your environment, you’ll clear up disk space and get rid of any dependencies that came with it.
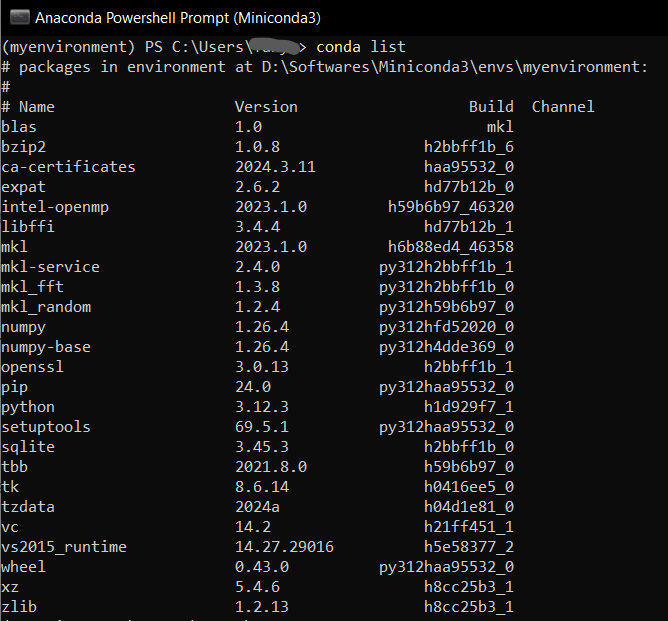
Displaying Packages Installed
Use the conda list command to see a list of every package installed in your environment. All installed packages’ names, versions, and corresponding channels will be shown by this command.
conda list
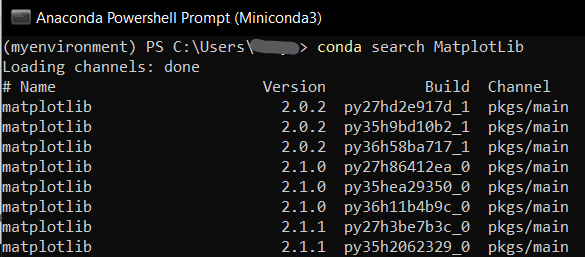
Searching for Packages
Use the conda search command to look for packages by keyword if you are unsure of a package’s exact name. The packages that are connected to the keyword «matplotlib,» along with their versions and channels, will be shown by this command.
conda search MatplotLib
Create Personalised Packages
You can make personalized packages with Conda and distribute them to other users. Packages can be built from source code or recipes using tools such as conda build, then uploaded to your own package repository. This makes it possible for you to share your dependencies and software with others and promotes teamwork.
To sum up, Conda’s package handling features make software development processes more efficient and make dependency management simpler. Now, let us look at some advanced uses of Conda.
Advanced Uses of Conda
Conda offers many sophisticated features for power users in addition to a user-friendly interface for managing environments and packages. Users can tailor their environments and workflows to meet their unique requirements with Conda’s advanced usage capabilities, which include version control, dependency pinning, environment freezing, and reproducibility.
Dependency Pinning and Version Control
With version numbers or version specifiers, Conda enables you to define precise versions of dependencies and packages. You can pin a package to a particular version.
conda install numpy=1.21.0
This command installs the numpy package version 1.21.0. Version specifiers can also be used to define an acceptable version range.
conda install "numpy>=1.20,<1.22"
Here, any version of Numpy between 1.20 (inclusive) and 1.22 (exclusive) can be installed with this command.
Freezing an Environment
In order to preserve the current state of an environment for later use, freezing entails saving all installed packages and their dependencies in a file. This guarantees that the environment can be precisely recreated as it was at a given time. The conda list —export command can be used to freeze an environment in the manner described here:
conda list --export > environment.yml
The installed packages and their versions are exported by this command to a YAML file called environment.yml. Then, using the conda env create command, you can use this file to replicate the environment on a different machine.
Sharing of the Environment and Reproducibility
Conda makes it simple to replicate environments from YAML files and share them with others, which promotes reproducibility and environment sharing. The conda env create command can be used to create a new environment from a YAML file in the following manner:
conda env create --file environment.yml
By using the parameters in the environment.yml file, this command builds a new environment. At that point, you can turn on the environment and begin working in it.
Using YAML Files to Manage Environments
Conda also offers an easy way to share and work together on environments: it lets you manage environments straight from YAML files. With the conda env export command, you can export the current state of an environment to a YAML file, make any necessary modifications to the file, and then use the conda env update command to recreate the environment from the modified file.
Particular Channels and Package Storage Facilities
Users can distribute their own packages and dependencies using Conda’s support for custom channels and package repositories. With the conda index command, you can make your own channel, and the anaconda upload command allows you to upload packages to it. After you’ve configured your channel, users can add it to their Conda configuration and install packages.
Therefore, Conda helps you to ensure reproducibility and consistency across your projects by streamlining your development process, whether you’re freezing environments, managing custom channels, or pinning dependencies. Now, what if we face issues despite these features? Let us look at how to troubleshoot some common problems you might face in your experience with Conda.
Troubleshooting Conda
Although Conda aims to offer a flawless package and environment management experience, users might occasionally run into problems and errors. In this section, we’ll examine typical issues users might run into with Conda and offer fixes.
Update Conda
Outdated Conda installations are one common problem that users might run into. You can use the following command to update Conda and make sure you have the most recent version of both it and its dependencies. The Conda package manager will be updated to the most recent version via this command.
conda update conda
Resolving Conflicts of Dependency
Installing or updating packages can lead to dependency conflicts, particularly in complex environments where there are many dependencies. You can try updating or installing a specific version of the package, or you can try removing conflicting packages from your environment, to resolve dependency conflicts.
Cache Cleaning
Disk space problems could arise from Conda’s cache directory accumulating extra files over time. Disk space will be freed up by running this command to remove unnecessary packages and cached files from the Conda cache directory. The following command can be used to clear the Conda cache:
conda clean --all
Reinstalling Packages
You can attempt to fix errors related to particular packages by reinstalling them. You can use the following command to reinstall a package. The specified package will be reinstalled using this command, overwriting any previous dependencies and files.
conda install --force-reinstall <package-name>
Examining Repositories and Channels
Problems with package channels or repositories can sometimes result in package installation errors. Make sure the packages you’re trying to install are available in the Conda channels that you have set up correctly.
Conda Environment Updating
Make sure your Conda environment is up to date with the most recent specifications if you’re working in a shared workspace or collaborating with others. With the following command, you can update your environment from a YAML file. Your environment will be updated with this command to conform to the details in the environment.yml file.
conda env update --file environment.yml
For troubleshooting advice, solutions, and support from knowledgeable users and developers, the Conda documentation, forums, and community channels are excellent resources available in the Conda Community.
You can overcome difficulties and guarantee a flawless Conda experience by using the troubleshooting methods described in this guide and the community’s support when required. Recall that troubleshooting frequently entails trial and error until the problem is fixed, so be patient and persistent.
Conda’s unique features and functionality set it apart from other package managers. However, it is important to understand how Conda compares to other package managers and integrates with pre-existing tools and ecosystems.
Conda vs PIP
- Environment Mangement: Configuring isolated environments with particular package dependencies is made possible by Conda’s powerful environment management features. In contrast, Pip lacks native environment management features and is primarily focused on package installation.
- Package Dependencies: Conda installs binary packages that have already been precompiled, which simplifies the installation of complex packages on various platforms. Pip depends on system-level dependencies and installs packages from the Python Package Index (PyPI), which could cause compatibility problems.
- Package Availability: Conda provides a large selection of pre-built packages, both Python and non-Python, in its default channels. Conda has a wider range of packages available than PyPI, which makes it more appropriate for data science and scientific computing even though PyPI has a greater selection of Python packages.
Conda vs Apt
- Compatibility with Multiple Platforms: Conda is compatible with Linux, macOS, and Windows. Conversely, Apt is exclusive to Linux-based distributions like Ubuntu and Debian.
- Package Management: On Linux distributions, Apt is mostly used for software installation and system-level package management. Conda, on the other hand, is primarily concerned with the management of non-Python packages as well as Python packages and their dependencies.
- Environment Isolation: Conda is a good tool for managing project dependencies and reproducibility because it lets users create isolated environments with particular package dependencies. Native environment isolation features are not available in Apt.
This section will explain how it integrates with other tools and environments.
Integration with IDEs
Conda has integrations with a number of well-known integrated development environments (IDEs), including VS Code, PyCharm, and Jupyter Notebook. Installing packages straight from the IDE and switching between environments is made simple by the built-in support for managing Conda environments that these IDEs offer.
Integration with Version Control Systems
Git and other version control systems can be used to version and share Conda environments. You can guarantee consistency and reproducibility between various development environments by including environment specification files (like environment.yml) in your project repository.
Integration with Cloud Platforms
Conda is compatible with cloud platforms, including Microsoft Azure, Google Cloud Platform, and Amazon Web Services. These platforms provide cloud application deployment and management environments and tools that are compatible with Conda.
Conda, in summary, differs from other package managers with its special features and capabilities. For Python developers, data scientists, and researchers, its strong environment management, package dependency resolution, and platform compatibility make it a desirable option. Users can fully utilize Conda to optimize their development workflows and increase productivity by learning how it stacks up against other package managers and how it works with their current tools and environments.
Conclusion
For software development and data science, Conda offers all-inclusive and environmental solutions. It gives users the freedom to create, manage and share environments thanks to a simple installation process, sophisticated usage features and troubleshooting. Its robust package control capabilities, reproducibility and environment isolation make it a valuable tool for researchers, data scientists and developers to continuously improve. This way, users can use their focus is on building better software by leveraging Konda’s features and capabilities to increase performance, guarantee repeatability and compatibility.