
Wondering how to enable or disable Microsoft Defender Antivirus in Windows 10?
Security software is not fun to buy, and only a little fun to experiment with. We already pay a subscription for the videos we watch or the games we play, and protecting our computers should not come with an extra cost.
If you agree with this, then you most likely appreciate having a free antispyware application (aka Microsoft Defender Antivirus) on your Windows.
Microsoft Defender Antivirus has come a long way in terms of its efficiency and capabilities. It was once regarded as one of the poorest means of protecting your PC from malware but fortunately, it has built itself a better reputation over time. Considering its recent performance, we wouldn’t mind saying that it’s pretty darn good.
However, there can be situations where you would want to disable it temporarily. For instance, when it acts overly protective and alarms you falsely.
Fortunately, Windows allows you to enable or disable it according to your preferences and in this guide, we will show you how you can do that in a few easy steps.
Let’s get started!
1. Use Windows Registry.
For users with advanced skills, Windows Registry is a powerful tool that can help them better control their operating system. Registry entries contain information about low-level Windows processes and programs. When Windows performs a relevant operation, it looks up this information.
Windows Registry information is stored in the form of Registry keys. Modifying the appropriate Registry keys will allow us to make the desired changes.
With this method, we’ll modify the keys associated with Microsoft Defender Antivirus. It’s important to follow these steps carefully, since even a slight error can lead to major issues within the Registry.
Here is what you need to do:
- Press Windows + R keys simultaneously to open a Run dialogue box.
- In the text field of the dialogue box, type ‘regedit‘ and hit Enter. This will open Windows Registry on your PC.

- Once you are inside the Registry Editor, navigate to the location mentioned below.
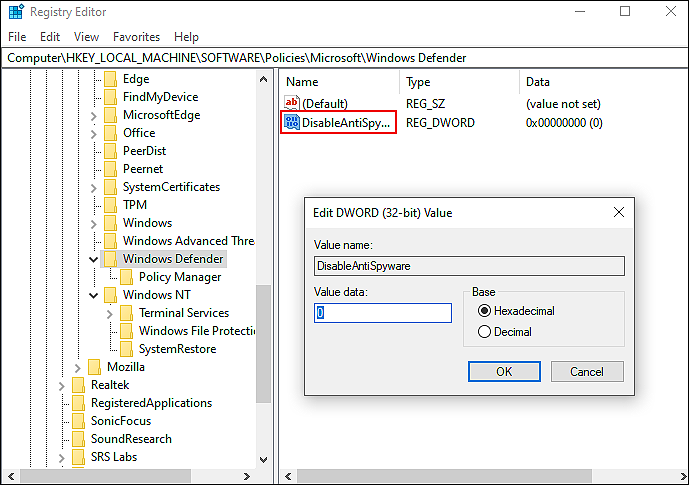
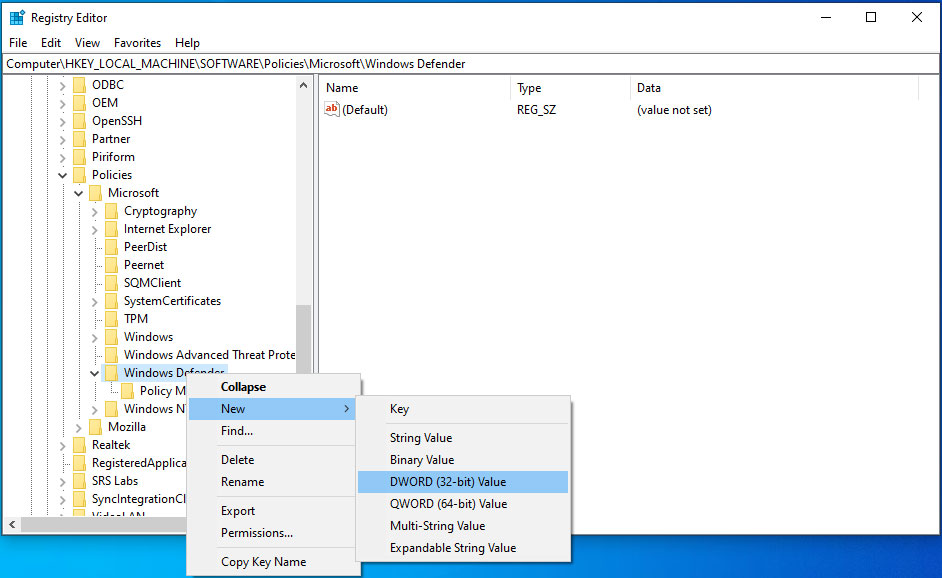
HKEY_LOCAL_MACHINE\SOFTWARE\Policies\Microsoft\Windows Defender
- Right-click in the right pane and select the New > DWORD (32-bit) Value option.
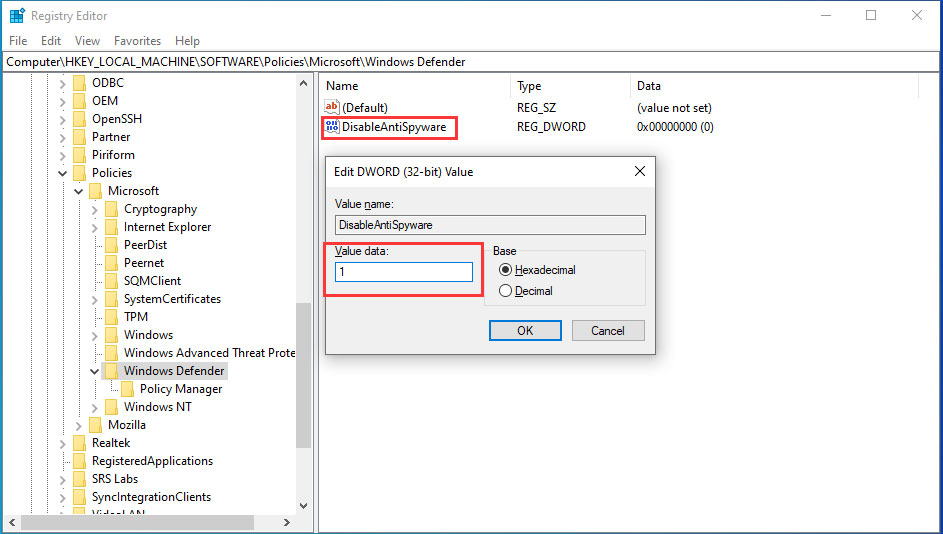
- Rename this newly created value as DisableAntiSpyware and double-click on it.
- Under Value data, type 1 and hit Enter.
- Now right-click on the Windows Defender (folder) key and select the New > Key option.
- Rename this key as Real-Time Protection and press Enter.
- Double-click on the Real-Time Protection key and select the New > DWORD (32-bit) Value option.
- Rename this value as DisableBehaviorMonitoring and press Enter.
- Next, double-click on DisableBehaviorMonitoring, and under Value data, type 1.
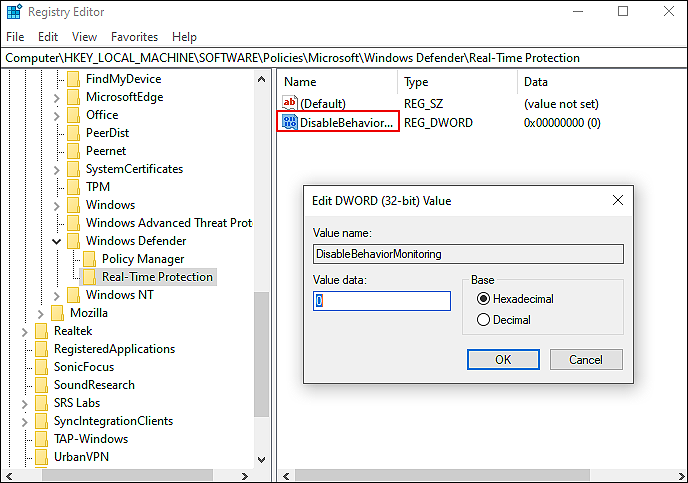
- Hit Enter.
- Now repeat the 9th step and this time, rename the value as DisableOnAccessProtection.
- Double-click on the newly created value and under Value data, type 1.
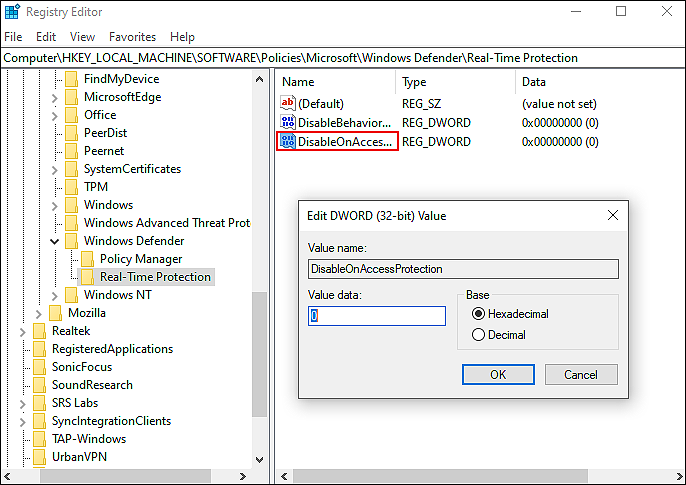
- Finally, hit Enter and restart your PC.
This should make the desired changes in no time.
2. Use Group Policy Editor.
In the event that Windows Registry does not work, you may try the Group Policy Editor.
Group Policy Editor (GPE) is also a utility provided to help users customize the behavior of their operating systems from an administrative level. The information in GPE is stored in policies, and by modifying the relevant policies, you can make the changes you desire.
Here is what you need to do:
- Press Windows + R keys on your keyboard simultaneously to open a Run dialogue box.
- Inside the text field of the dialogue box, type ‘gpedit.msc‘ and hit Enter. This will launch the Group Policy Editor on your PC.
- In the newly launched window, navigate to the location mentioned below.
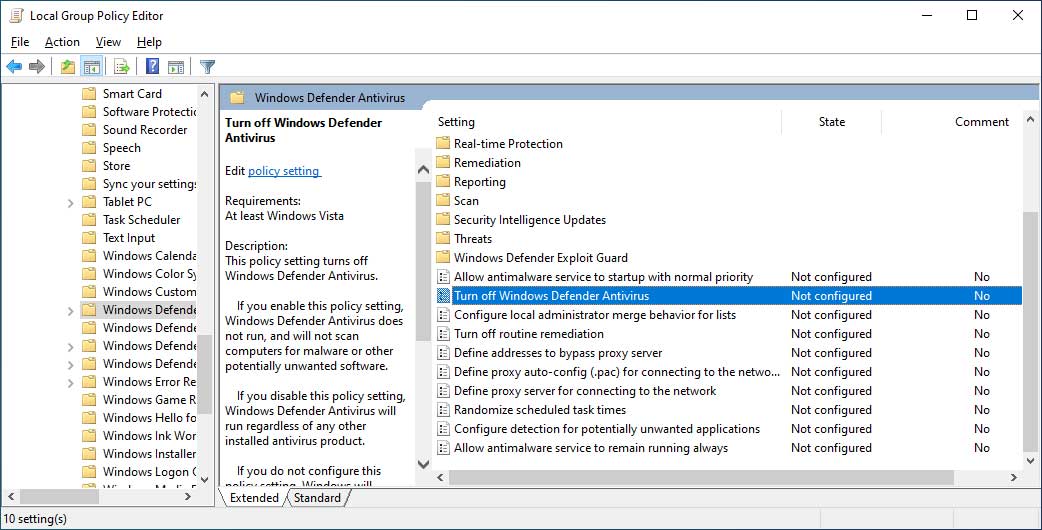
Computer Configuration > Administrative Templates > Windows Components > Windows Defender Antivirus
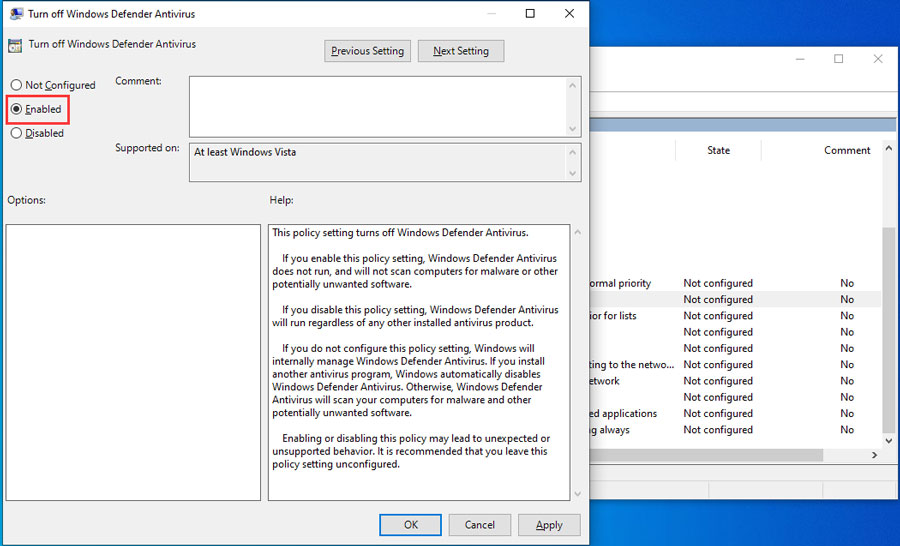
- In the right pane, locate and double-click on Turn off Windows Defender Antivirus policy.
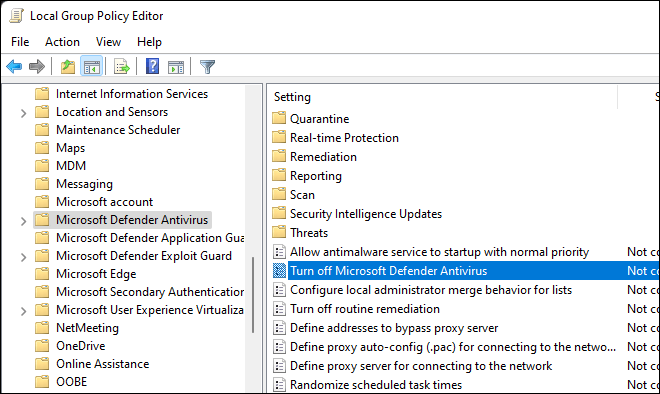
- Select Enabled and hit Enter.
- Now navigate to the following path in the Group Policy Editor.
Computer Configuration > Administrative Templates > Windows Components > Windows Defender Antivirus > Real-time Protection
- In the right pane, locate and double-click the following three policies one-by-one.
Turn on behavior monitoring policy

Monitor file and program activity on your computer

Turn on process scanning whenever real-time protection is enabled
- For all three, select Disabled and hit Apply.
- Restart your PC to save the changes.
Hopefully, following the steps mentioned above will help you make the desired changes.
3. Try Using CleanMyPC.
In the event that you have not cleaned your PC recently, it may be worth removing any junk system files since they may be contributing to the issue.
Even though junk files may seem harmless, they can cause serious issues with the operating system and its programs, like Microsoft Teams. Using a PC cleaning program is your best bet for removing junk files on your system, in which case we recommend CleanMyPC.

With CleanMyPC, any errors on your computer will be detected and automatically repaired. In our experience, it has greatly enhanced PC performance by optimizing storage and removing junk files.
There are a wide range of tools provided by CleanMyPC that can optimize your PC’s performance. In addition, the user-friendly interface allows you to use it without spending hours learning how it works.
Install CleanMyPC now and get your PC up and running like new!
Try CleanMyPC Now!
4. Use Windows Security Center.
The last method to turn on or off Microsoft Defender Antivirus is by modifying Windows Settings.
This method is fairly simple, but if you want to enable/disable the feature under consideration as an administrator for all users, then use Windows Registry or Group Policy Editor to do so.
Here is how you can modify relevant Windows Settings:
- Type Windows Defender Security Center in the search bar and click on Open.
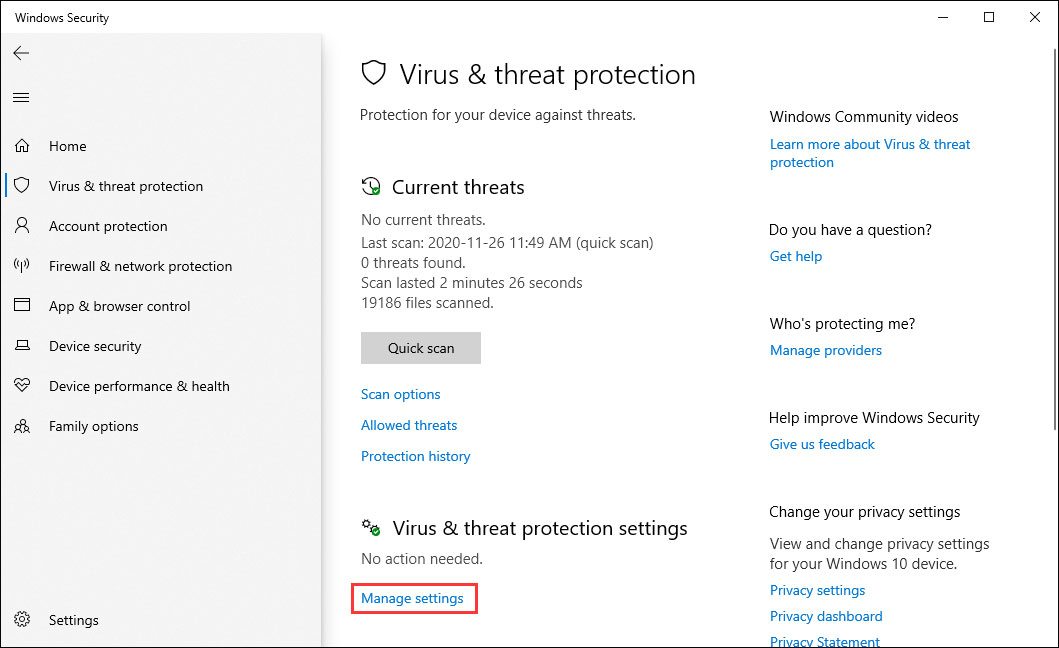
- Click on Virus & threat protection and select Manage settings under the Virus & threat protection settings option.
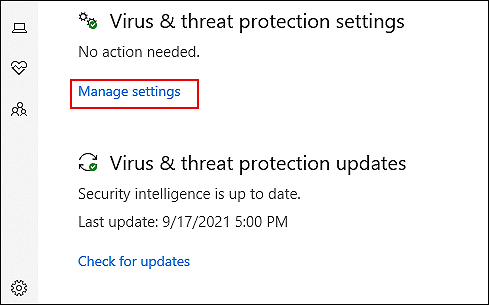
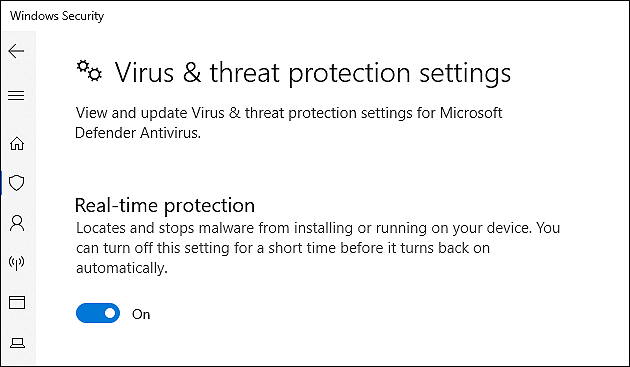
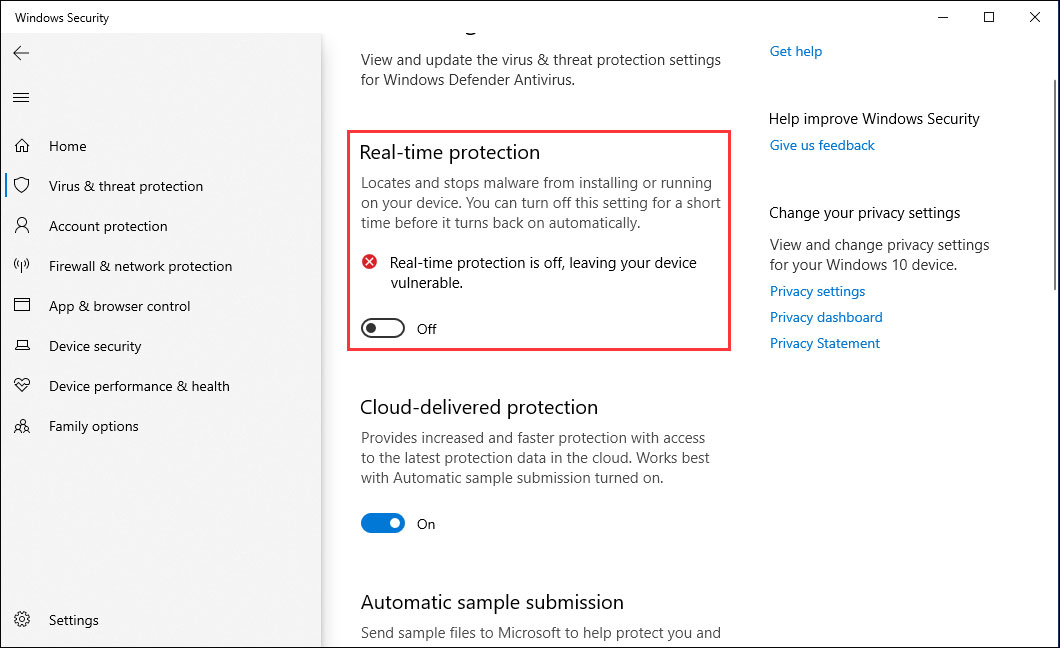
- Turn on/off the Real-time protection toggle switch.
That is it. You can always revert the changes by following the steps mentioned above again.
This brings us to the end of our guide on ways to enable or disable Microsoft Defender Antivirus in Windows 10. We hope that one of the methods mentioned above did the trick for you. If you have any questions regarding the methods mentioned in this guide, please let us know in the comment section below.
If this guide helped you, please share it. 🙂
-
Zainab Falak is a staff writer for Saint and an expert in Microsoft Windows, having authored more than 200 posts. She has a Bachelors in Actuarial Sciences and her passion for computers extends to exploring various aspects, from UI customization to the Windows registry and exploring error codes. Twitter
LinkedIn
View all posts

This tutorial will show you how to enable or disable real-time protection for Microsoft Defender Antivirus in Windows 10 and Windows 11.
Microsoft Defender Antivirus is an antivirus software that is included in Windows 10/11 and can help protect your device from viruses, malware, and other threats.
Real-time protection consists of always-on scanning with file and process behavior monitoring and heuristics. When real-time protection is on, Microsoft Defender Antivirus detects malware and potentially unwanted software that attempts to install itself or run on your device, and prompts you to take action on malware detections.
While real-time protection is off, files you open or download won’t be scanned for threats.
You must be signed in as an administrator to turn on/off or enable/disable real-time protection for Microsoft Defender Antivirus.
Controlled Folder Access requires turning on Real-time Protection.
Contents
- Option One: Turn On or Off Real-time Protection for Microsoft Defender Antivirus in Windows Security
- Option Two: Turn On or Off Real-time Protection for Microsoft Defender Antivirus using Command
- Option Three: Enable or Disable Real-time Protection for Microsoft Defender Antivirus in Local Group Policy Editor
- Option Four: Enable or Disable Real-time Protection for Microsoft Defender Antivirus using REG file
EXAMPLE: Real-time protection disabled when third party antivirus program installed
If another antivirus product is installed, registered, and working correctly, Microsoft Defender Antivirus will disable itself. The Windows Security app will change the Virus & threat protection section to show status about the AV product, and provide a link to the product’s configuration options. A setting will appear that will allow you to enable limited periodic scanning for Microsoft Defender Antivirus.
Real-time protection will always remain disabled even with periodic scanning enabled when a third party antivirus program is installed.

Option One
Turn On or Off Real-time Protection for Microsoft Defender Antivirus in Windows Security
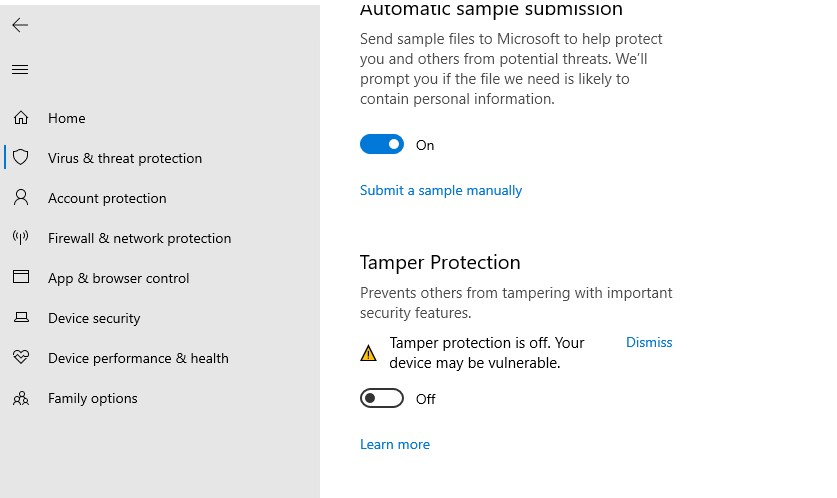
If you turn off real-time protection, it will automatically turn back on after a short delay unless you turn off Tamper Protection first.
1 Open Windows Security.
2 Click/tap on Virus & threat protection. (see screenshot below)

3 Click/tap on the Manage settings link under Virus & threat protection settings. (see screenshot below)

4 Turn On (default) or Off Real-time protection for what you want. (see screenshots below)


5 If prompted by UAC, click/tap on Yes to approve.
6 You can now close Windows Security if you like.
Option Two
Turn On or Off Real-time Protection for Microsoft Defender Antivirus using Command
This option will not work unless Tamper Protection is turned off first.
If you are turning on real-time protection using this option, then you can turn on Tamper Protection afterwards if wanted.
1 Open Windows Terminal (Admin), and select either Windows PowerShell or Command Prompt.
2 Copy and paste the command below you want to use into Windows Terminal (Admin), and press Enter. (see screenshots below)
(Turn On Real-time Protection)
PowerShell Set-MpPreference -DisableRealtimeMonitoring 0
OR
PowerShell Set-MpPreference -DisableRealtimeMonitoring $false
OR
(Turn Off Real-time Protection)
PowerShell Set-MpPreference -DisableRealtimeMonitoring 1
OR
PowerShell Set-MpPreference -DisableRealtimeMonitoring $true
3 You can now close Windows Terminal (Admin) if you like.

Option Three
Enable or Disable Real-time Protection for Microsoft Defender Antivirus in Local Group Policy Editor
This option will not work unless Tamper Protection is turned off first.
If you are enabling real-time protection using this option, then you can turn on Tamper Protection afterwards if wanted.
The Local Group Policy Editor is only available in the Windows 11 Pro, Enterprise, and Education editions.
All editions can use Option Four for the same policy.
1 Open the Local Group Policy Editor (gpedit.msc).
2 Navigate to the policy location below in the left pane of the Local Group Policy Editor. (see screenshot below)
Computer Configuration>Administrative Templates>Windows Components>Microsoft Defender Antivirus>Real-time Protection

3 In the right pane of Real-time Protection in the Local Group Policy Editor, double click/tap on the Turn off real-time protection policy to edit it. (see screenshot above)
4 Do step 5 (enable) or step 6 (disable) below for what you would like to do.
5 Enable Real-time Protection for Microsoft Defender Antivirus
This is the default setting to allow using Option One and Option Two.
A) Select (dot) Not Configured. (see screenshot below)
B) Click/tap on OK, and go to step 7 below.

6 Disable Real-time Protection for Microsoft Defender Antivirus
This will disable and prevent using Option One and Option Two.
A) Select (dot) Enabled. (see screenshot below)
B) Click/tap on OK, and go to step 7 below.
7 You can now close the Local Group Policy Editor if you like.
Option Four
Enable or Disable Real-time Protection for Microsoft Defender Antivirus using REG file
This option will not work unless Tamper Protection is turned off first.
If you are enabling real-time protection using this option, then you can turn on Tamper Protection afterwards if wanted.
1 Do step 2 (enable) or step 3 (disable) below for what you would like to do.
2 Enable Real-time Protection for Microsoft Defender Antivirus
This is the default setting to allow using Option One and Option Two.
A) Click/tap on the Download button below to download the file below, and go to step 4 below.
Enable_Real-time_Protection_for_Microsoft_Defender_Antivirus.reg
(Contents of REG file for reference)
Code:
Windows Registry Editor Version 5.00

[HKEY_LOCAL_MACHINE\SOFTWARE\Policies\Microsoft\Windows Defender\Real-Time Protection]
"DisableRealtimeMonitoring"=-
3 Disable Real-time Protection for Microsoft Defender Antivirus
This will disable and prevent using Option One and Option Two.
A) Click/tap on the Download button below to download the file below, and go to step 4 below.
Disable_Real-time_Protection_for_Microsoft_Defender_Antivirus.reg
(Contents of REG file for reference)
Code:
Windows Registry Editor Version 5.00

[HKEY_LOCAL_MACHINE\SOFTWARE\Policies\Microsoft\Windows Defender\Real-Time Protection]
"DisableRealtimeMonitoring"=dword:00000001
4 Save the .reg file to your desktop.
5 Double click/tap on the downloaded .reg file to merge it.
6 When prompted, click/tap on Run, Yes (UAC), Yes, and OK to approve the merge.
7 You can now delete the downloaded .reg file if you like.
That’s it,
Shawn Brink
Related Tutorials
- Enable or Disable Microsoft Defender Antivirus in Windows 11
- Enable or Disable Periodic Scanning in Microsoft Defender Antivirus in Windows 11
- Turn On or Off Tamper Protection for Microsoft Defender Antivirus in Windows 11
- Enable or Disable Cloud-delivered Protection for Microsoft Defender Antivirus in Windows 11
- Enable or Disable Automatic Sample Submission for Microsoft Defender Antivirus in Windows 11
- Enable or Disable Controlled Folder Access for Microsoft Defender Antivirus in Windows 11
Windows Defender Antivirus Windows 10 can protect your computer and its data. However, for some reasons, you may need to disable Windows Defender Antivirus Windows 10. If you don’t know how to do this work, just read this post to get three ways.
Why You Need to Disable Windows Defender Antivirus on Windows 10?
Windows Defender Antivirus is an antimalware feature on Windows 10 and it can protect your computer and the files on the device from viruses, spyware, ransomware and some other types of malware and hackers.
However, when you need to set up the computer without network, perform a task which may be blocked by Windows Defender Antivirus, or need to comply with the organization security policies, you will have to disable Windows Defender Antivirus.
In the following guide, we will show you 3 ways to disable Windows Defender Antivirus permanently or temporarily on Windows 10.
Tips:
Discover and eliminate deceptive antivirus with MiniTool System Booster, your safeguard against digital threats.
MiniTool System Booster TrialClick to Download100%Clean & Safe
How to Disable Windows Defender Antivirus with Windows Security
This is a way to disable Windows Defender Antivirus temporarily. You can do this when you want to perform some specific tasks.
Step 1: Search for Windows Security from the Start bar and choose the top result to continue.
Step 2: Choose Virus & threat protection. Then, click Manage settings under Virus & threat protection settings.
Step 3: Turn the switch from Off to On under the Real-time protection section.
After these operations, you will be able to install apps or perform a specific task you couldn’t before since the real-time protection is disabled.
How to turn on Windows Defender in Windows 10 when necessary? You can repeat the above steps until in step 3 to turn on the settings.
How to Disable Windows Defender Antivirus with Group Policy
If you are using Windows 10 Pro or Enterprise, you can use the Local Group Policy Editor to disable Windows Defender Antivirus Windows 10 permanently.
Step 1: Open Start to search for gpedit.msc. Then, choose the top result to open the Local Group Policy Editor.
Step 2: Go to the following path:
Computer Configuration > Administrative Templates > Windows Components > Windows Defender Antivirus
Then, double-click on the Turn off Windows Defender Antivirus policy.
Step 3: Check the Enabled option to disable Windows Defender Antivirus. Next, click Apply and OK buttons. Then, restart your computer.
If you want to re-enable it, you can use the same steps mentioned above but choose Not Configured in the last step. Still, you need to restart the computer to execute the changes.
How to Disable Windows Defender Antivirus with Registry
If you can’t access the Local Group Policy Editor or you are using Windows 10 Home, you can also modify the Registry to permanently disable Windows Defender Antivirus.
Note: You’d better know that editing the Registry is risky and it may lead to irreversible damage to your Windows if you don’t do it correctly. So, we recommend backing up your computer in advance.
Then, you can follow these steps to disable Windows Defender Antivirus:
Step 1: Open Start to search for regedit and open the Registry Editor. Then, go to find the following path:
HKEY_LOCAL_MACHINE\SOFTWARE\Policies\Microsoft\Windows Defender
Step 2: Right-click on Windows Defender (folder), choose New, and then click on DWORD (32-bit) Value.
Step 3: Name the key DisableAntiSpyware and press Enter. Then, double-click the newly created DWORD and change to value to 1. Next, click OK.
At last, you still need to reboot the computer to apply the changes.
If you want to revert the changes, please repeat the above steps, but on step 3, you need to right-click the DisableAntiSpyware key to delete it.
Note: There are three ways to disable Windows Defender Antivirus on Windows 10, but we strongly suggest using a computer under the protection of anti-malware software. If you don’t like Windows Defender Antivirus, you can use other professional software.
Bottom line
Now, you should know how to diable or turn off Windows Defender using different ways. If you have any other related questions, you can let us know in the comment.
Disable Windows Defender FAQ
How do I turn off Windows Defender in Windows 10?
The easiest method to turn off Windows Defender is to go to Start > Settings > Update & Security > Windows Security > Virus & threat protection > Virus & threat protection settings to turn off the real-time protection.
How do I permanently disable Windows Defender in Windows 10?
- Run Command Prompt as Administrator.
- Type msc and press Enter.
- Go to Computer Configuration > Administrative Templates > Windows Components > Windows Defender.
- Double click Turn Off Windows Defender.
- Check Enabled.
- Click Apply.
How do I stop Windows Defender from deleting files?
Go to Start > Settings > Update & Security > Windows Security > Virus & threat protection > Virus & threat protection settings. Then, you need to switch to the Exclusions section to add exclusions according to your requirements.
Where can I find deleted files in Windows Defender?
Go to Start > Settings > Update & Security > Windows Security > Virus & threat protection to check the protection history.
Permanently Disable Microsoft Defender in Windows 11: 5 Methods
Published
5 min read
5 Ways to Permanently Disable Microsoft Defender in Windows 11
Introduction
Microsoft Defender, previously known as Windows Defender, serves as the built-in antivirus and anti-malware solution for Windows operating systems, including Windows 11. While it provides essential protection against various forms of malware, certain users may find the need to disable it permanently. Reasons for this could range from using a third-party antivirus solution, improving system performance, or addressing compatibility issues with specific software. This article presents five reliable methods for permanently disabling Microsoft Defender in Windows 11.
Understanding Microsoft Defender
Before diving into the methods of disabling Microsoft Defender, it is crucial to understand its role and functionality. As a crucial component of Windows security, Microsoft Defender offers:
- Real-time Protection: Scans files and processes in real time to detect and mitigate potential threats.
- Cloud Protection: Uses Microsoft’s cloud intelligence to identify threats more effectively.
- Controlled Folder Access: Protects sensitive data from unauthorized access by malicious applications.
- Offline Scanning: Allows users to scan their devices for malware when offline.
While Microsoft Defender is generally reliable, some users may prefer to opt for alternative security solutions or may experience conflicts with their existing software.
Method 1: Using Windows Security Settings
The most straightforward way to disable Microsoft Defender is through the Windows Security settings. This method is recommended for users who wish to turn off Defender without delving into advanced configurations.
Steps:
-
Open Windows Security:
- Click on the Start menu.
- Type «Windows Security» in the search bar and select the application from the results.
-
Navigate to Virus & Threat Protection:
- In the Windows Security window, click on Virus & threat protection.
-
Manage Settings:
- Under the “Virus & threat protection settings,” click on Manage settings.
-
Turn Off Real-time Protection:
- Toggle the switch off next to Real-time protection.
-
Confirm Your Selection:
- A warning may appear, informing you that Microsoft Defender will regain control if it detects other security software has been uninstalled. Click “Yes” to confirm.
Important Note:
Disabling real-time protection will not disable Microsoft Defender entirely. You will need to utilize additional methods to ensure it does not re-enable automatically.
Method 2: Group Policy Editor
For Windows 11 Pro and Enterprise users, the Group Policy Editor is an effective tool to disable Microsoft Defender permanently. This method provides a centralized way to manage system settings, making it ideal for more advanced users and system administrators.
Steps:
-
Open Group Policy Editor:
- Press
Windows + Rto open the Run dialog. - Type
gpedit.mscand hit Enter.
- Press
-
Navigate to Windows Defender Antivirus:
- In the Group Policy Editor window, navigate to:
Computer Configuration -> Administrative Templates -> Windows Components -> Microsoft Defender Antivirus
- In the Group Policy Editor window, navigate to:
-
Disable Microsoft Defender:
- In the right pane, find the setting labeled Turn off Microsoft Defender Antivirus.
- Double-click on it and select Enabled. This action will disable Microsoft Defender.
-
Apply Changes:
- Click Apply and OK to save changes.
-
Reboot the Computer:
- Restart your computer for the changes to take effect.
Important Note:
If you later decide to re-enable Microsoft Defender, follow the same steps and select Not Configured for the Group Policy setting.
Method 3: Registry Editor
Another method for disabling Microsoft Defender permanently involves using the Registry Editor. This approach is suitable for users familiar with Windows registry settings. Caution is advised, as incorrect modifications can affect system stability.
Steps:
-
Open Registry Editor:
- Press
Windows + Rto open the Run dialog. - Type
regeditand hit Enter.
- Press
-
Backup the Registry:
- It is recommended to back up your registry before making any changes. Click on File > Export, choose a location, and save the backup.
-
Navigate to the Defender Key:
- Go to the following path in the Registry Editor:
HKEY_LOCAL_MACHINESOFTWAREPoliciesMicrosoftWindows Defender
- Go to the following path in the Registry Editor:
-
Create a New DWORD Value:
- Right-click in the right pane and select New > DWORD (32-bit) Value.
- Name the new value DisableAntiSpyware.
-
Set the Value to 1:
- Double-click on DisableAntiSpyware and set its value to 1. This action will disable Microsoft Defender.
-
Restart Your Computer:
- Close the Registry Editor and reboot your system for the changes to apply.
Important Note:
To re-enable Microsoft Defender, repeat the steps and delete the DisableAntiSpyware value, or set it to 0.
Method 4: Using PowerShell
PowerShell offers a powerful command-line interface for managing various system settings, including disabling Microsoft Defender. This method is suitable for advanced users who prefer a scripting approach.
Steps:
-
Open PowerShell as Administrator:
- Right-click on the Start button and select Windows Terminal (Admin) or Windows PowerShell (Admin).
-
Execute the Command:
- In the PowerShell window, type the following command and press Enter:
Set-MpPreference -DisableRealtimeMonitoring $true
- In the PowerShell window, type the following command and press Enter:
-
Verify the Status:
- To confirm that the real-time monitoring is disabled, you can run:
Get-MpPreference | Select-Object -Property DisableRealtimeMonitoring
- To confirm that the real-time monitoring is disabled, you can run:
-
Reboot Your Computer:
- While this command disables real-time monitoring, ensure you reboot your system for complete deactivation.
Important Note:
Similar to the previous methods, executing the above command will not fully disengage all components of Microsoft Defender. You may wish to employ another strategy for comprehensive disabling.
Method 5: Installing an Alternative Antivirus Program
Installing a third-party antivirus program is one of the most effective ways to disable Microsoft Defender permanently. Windows 11 detects the installation of a new antivirus solution and automatically disables Microsoft Defender’s real-time protection.
Steps:
-
Choose a Reliable Antivirus Software:
- Research and select a credible third-party antivirus solution. Make sure it aligns with your security needs.
-
Uninstall Existing Antivirus (if applicable):
- If you already have another antivirus installed, uninstall it through Settings > Apps > Apps & features.
-
Download and Install the New Software:
- Download the installer for your chosen antivirus software and run the installation process by following the prompts.
-
Complete the Installation:
- After installation, follow the initial setup prompts. The new antivirus should automatically disable Microsoft Defender.
-
Confirm Status:
- Open Windows Security settings to ensure that Microsoft Defender has been disabled.
Important Note:
Utilizing a third-party antivirus program not only disables Microsoft Defender but often offers more comprehensive security features catering to various needs.
Conclusion
Disabling Microsoft Defender in Windows 11 can be accomplished through several methods, each catering to different user preferences and expertise levels. Whether you choose to manipulate security settings directly, navigate the Group Policy Editor or Registry Editor, leverage PowerShell commands, or install an alternative antivirus solution, ensuring that you have sufficient protection is paramount.
Before making any changes, always ensure that you assess your system’s security needs and consider the implications of disabling built-in protection. Regular updates and safe browsing practices should remain a part of your routine to ensure a secure computing environment.
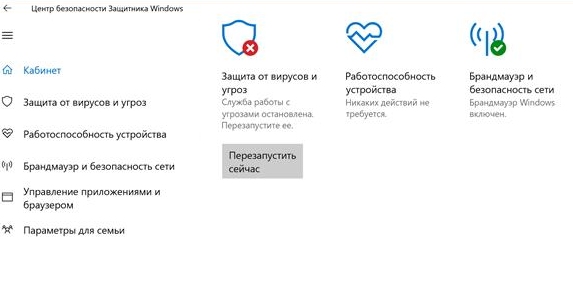
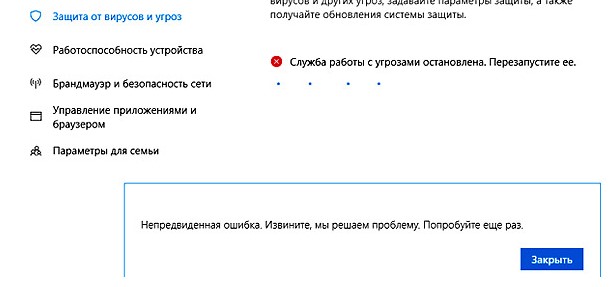
Привет, админ! Пытаюсь в Windows 10 включить Windows Defender, но в Центре безопасности Защитника Windows у компонента Зашита от вирусов и угроз висит надпись: «Служба работы с угрозами остановлена. Перезапустите ее». При попытке перезапустить Защитника Windows с помощью соответствующей кнопки появляется надпись: “
Непредвиденная ошибка. Извините, мы решаем проблему. Попробуйте еще раз
”. Как мне починить Windows Defender? Заранее спасибо!
Ответ
Давайте разберем типовые причины, из-за которых в Windows 10 может не работать функция зашиты от вирусов и угроз (встроенный антивирус Windows Defender). Последовательно проверьте все пункты.
Обратите внимание, что начиная с билда Windows 10 2004, Windows Defender Antivirus был переименован в Microsoft Defender Antivirus.
Содержание:
- На компьютере установлен сторонний антивирус
- Проверьте и включите службы Защитника Windows
- Включение Защитника Windows 10 в реестре
- Проверьте, что Защитник Windows включен в групповых политиках
- Перерегистрация библиотек Microsoft Defender
- Проверьте и установите обновления Windows
На компьютере установлен сторонний антивирус
Проверьте, возможно у вас на компьютере установлен сторонний антивирус, который препятствует работе Microsoft Defender. Антивирус Microsoft Defender автоматически отключается, если на компьютере установлена сторонняя антивирусной программа.
Решите, какой антивирус вы хотите использовать – сторонний или Microsoft Defender.
Если сторонний антивирус вам не нужен, отключите или удалите его.
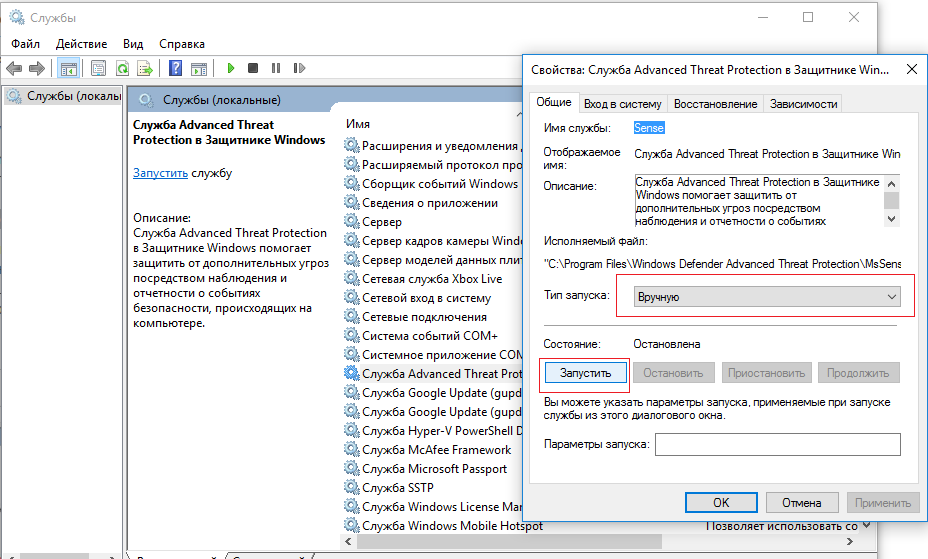
Проверьте и включите службы Защитника Windows
Для корректной работы Microsoft Defender в Windows 10 нужно проверить нескольких служб. Откройте консоль управления службами (services.msc) и проверьте, есть ли в списке служб следующие элементы:
- Служба Advanced Threat Protection в Защитнике Windows (Windows Defender Advanced Threat Protection Service) —
Sense
; - Служба проверки сети Защитника Windows (Microsoft Defender Antivirus Network Inspection Service) —
WdNisSvc
; - Служба Защитника Windows (Microsoft Defender Antivirus Service)
WinDefend
; - Служба Центра безопасности Защитника Windows (Security Center) —
WSCSVC
(Windows Security Center).
Состояние служб можно проверить с помощью PowerShell:
get-service Sense, WdNisSvc, WinDefend, wscsvc | select name,status,starttype

Для служб Sense и WdNisSvc тип запуска должен быть Manual.
Службы Security Center (WinDefend) и Microsoft Defender Antivirus (wscsvc) должны быть обязательно запущены. Если эти службы отключены, вы не сможете использовать Microsoft Defender.
Проверьте, что тип запуска у служб – Автоматический. Если какая-то служба остановлена, запустите ее вручную. Если все службы запущены, перезапустите их.
Включение Защитника Windows 10 в реестре
В версиях Windows 10 до билда 2004 можно было отключить защитник Windows через реестр. Для этого использовался параметр реестра DisableAntiSpyware. Этот параметр обычно включался OEM производителями или системными администраторами, когда на устройстве предполагалось использовать стороннее антивирусное приложение.
Запустите редактор реестра (regedit.exe) и перейдите в ветку HKEY_LOCAL_MACHINE\SOFTWARE\Policies\Microsoft\Windows Defender. Если в этой ветке есть параметры DisableAntiVirus и DisableAntiSpyware (хотя бы один), удалите их или измените значение на 0.

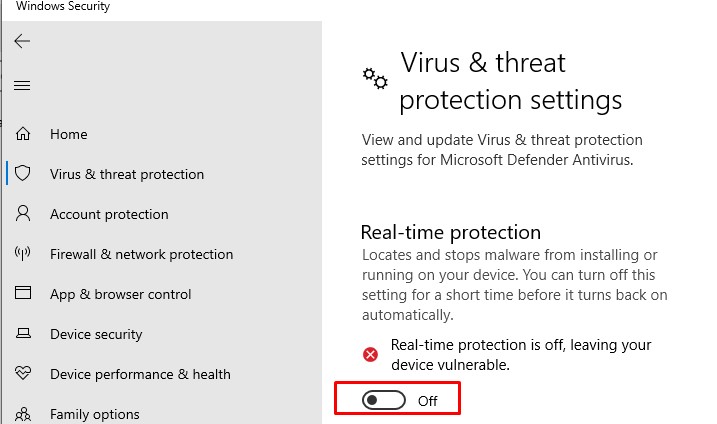
После этого, попробуйте перезапустить службу Защита от вирусов и угроз.
Затем перейдите в Settings -> Windows Security и нажмите на кнопку Virus & threat protection -> Turn on.

Также проверьте, что включена опция Real-time protection в Windows Security -> Virus & threat protection -> Manage settings.
В современных билдах Windows 10 нельзя отключить Microsoft Defender через параметр реестра
DisableAntiSpyware
(этой лазейкой пользовались многие вредоносы).
Microsoft Defender теперь автоматически отключается Windows 10, если он обнаруживает на компьютере сторонний антивирус. Если у вас не установлен сторонний антивирус и вам нужно отключить Microsoft Defender, сначала вам нужно отключить функцию защиты Microsoft Defender Tamper Protection. Данная защита от изменений в системе безопасности Windows помогает предотвратить изменение вредоносными приложениями важных параметров антивируса Microsoft Defender, включая защиту в реальном времени и облачную защиту. Отключить Tamper Protection можно только через приложение Windows Security, и для подтверждения отключения появится запрос User Account Control (UAC).
Отключить Tamper Protection можно и через реестр. Для этого в ветке HKEY_LOCAL_MACHINE\SOFTWARE\Microsoft\Windows Defender\Features нужно создать параметр типа DWORD с именем TamperProtection и со значением 0. Но перед этим сначала придется предоставить своей учетной записи права владельца на ветку Features.
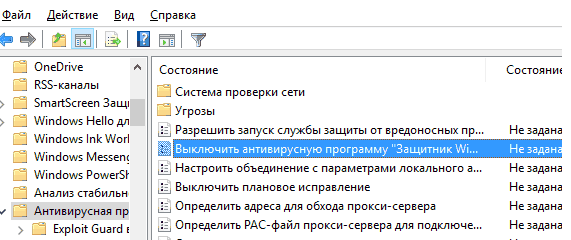
Проверьте, что Защитник Windows включен в групповых политиках
Откройте редактор локальной групповой политики (gpedit.msc) и проверьте, не отключен ли Windows Defender через GPO. Для этого, перейдите в раздел Computer Configuration -> Administrator Templates -> Windows Components -> Windows Defender Antivirus (Конфигурация компьютера -> Административные Шаблоны -> Компоненты Windows -> Антивирусная программа Защитник Windows). Проверьте, что политика Выключить антивирусную программу Защитник Windows (Turn off Windows Defender Antivirus) находится в состоянии Не задано или Отключена.
В Windows 10 2004 и выше ветка GPO с настройками Defender называется Microsoft Defender Antivirus.
Перерегистрация библиотек Microsoft Defender
Попробуйте выполнить перерегистрацию библиотек Защитника Windows. Для этого, откройте командную строку с правами администратора и выполните команды
regsvr32  atl.dll
regsvr32  wuapi.dll
regsvr32  softpub.dll
regsvr32  mssip32.dll
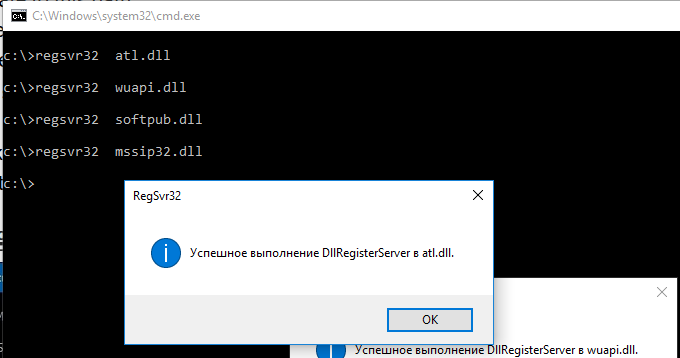
Перезапустите Windows Defender и проверьте, исправлена ли проблема.
Проверьте и установите обновления Windows
В редких случаях после установки ежемесячных обновлений Windows может перестать антивирус защитника Windows 10. Проверьте наличие новых обновлений и установите их через Settings -> Update & Security -> Windows Update -> Check for updates или с помощью PowerShell. Скорее всего, они исправят ситуацию.
Если ничего не помогло, проверьте целостность системных файлов и образа Windows командами:
sfc /scannow
и
DISM /Online /Cleanup-Image /RestoreHealth
Надеюсь, эта краткая инструкция помогла вам решить проблему с невозможностью запуска (остановкой) службы работы с угрозами.