
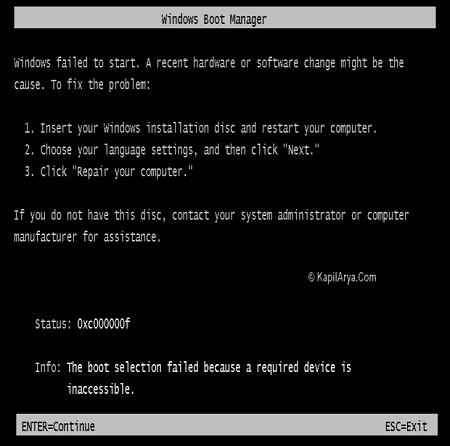
Sometimes instead of blue screen of death (BSOD), we get errors of similar codes from boot manager. This errors are resultant of damaged files due to changes made by software. One of these error is “0xc000000f – The Boot Selection Failed Because A Required Device Is Inaccessible“.
Following is the screenshot of this error:
Also checkout this as well : The Boot Configuration Data File Is Missing Some Required Information In Windows 8
In this article, we’ll tell you how to troubleshoot this error with the help setup disc.So, here we go…
Page Contents
FIX : Error “0xc000000f – The Boot Selection Failed Because A Required Device Is Inaccessible”
FIX 1 – Using CHKDSK
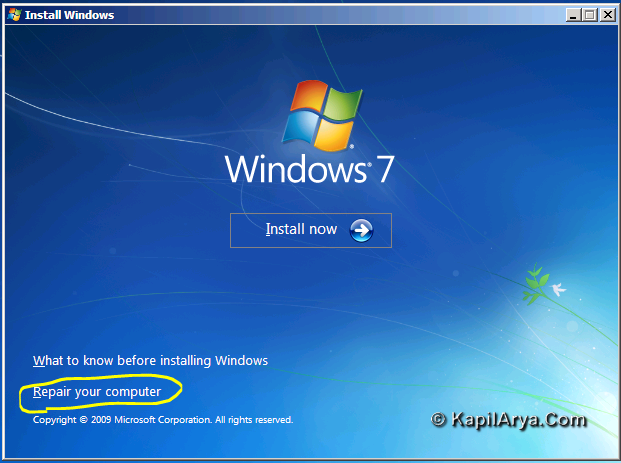
1. Insert the setup disc under the DVD drive (setup disc of any Windows OS can be used here). For example, let us consider that we’ve entered setup disc of Windows 7 or later.
2. Due to this error, the system partition is still in working order, but aid to this recovery tools will suspect for installation on another partition. So it will show 0 MB however the actual size of that partition is 38 GB (consider for an example). Click the Next button after locating Windows 7 under System Recovery Options.
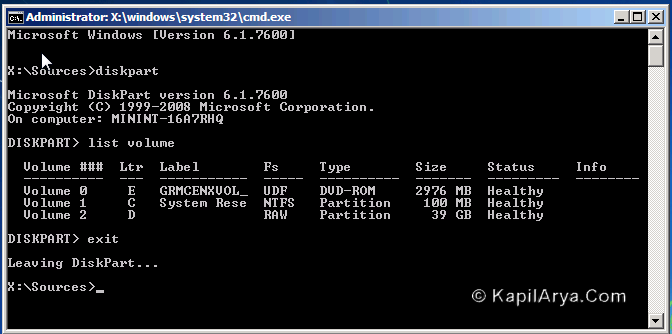
3. Now enter the following commands one by one:
diskpart
list volume
It will indicate the RAW volume, which is actually the NTFS partition and is responsible for the generation of boot error.
4. Now our main target is to convert this RAW volume into NTFS partition. To do so, type the following command:
chkdsk /r /f d:
Once this command used, the main partition now generates the error “The first NTFS boot sector is unreadable or corrupt.” But the good thing is that it actually repairs the second partition.
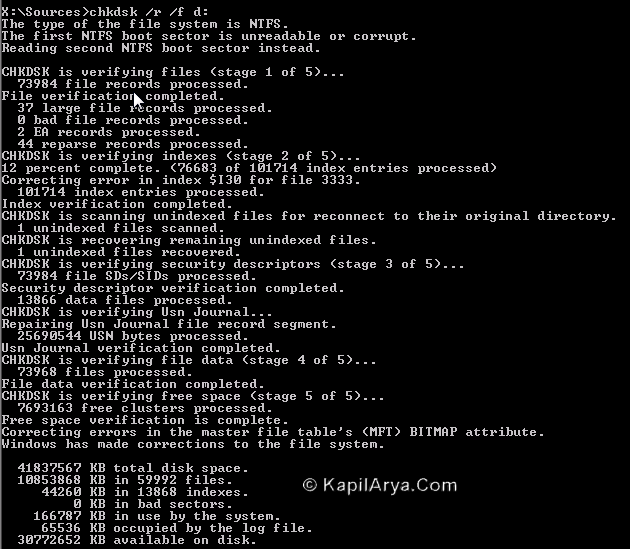
In this way RAW volumes is converted into NTFS partition. Also the other errors involving indexes, master file table etc. are identified and repaired automatically. Reboot the machine, error should be disappear now.
FIX 2 – Rebuild Boot Configuration Data (BCD) File [UPDATED: 10 Aug, 2016]
The Boot Configuration Data (BCD) file can be easily recreated using a simple command and thus this issue can be fixed with it. Here is how:
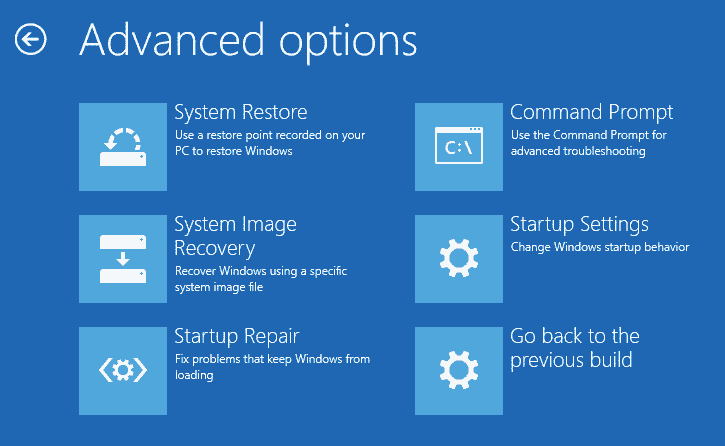
1. Follow steps 1-5 of this guide. In the Advanced options screen, select Command Prompt.
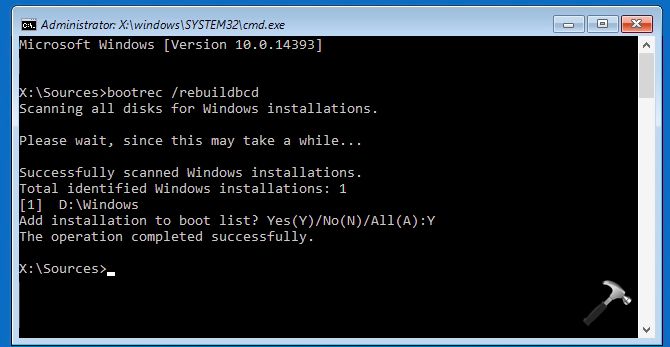
2. In the Command Prompt window, type bootrec /rebuildbcd command and hit Enter. When Windows identify all your system installations, it will ask your confirmation to create BCD file for those installations. So press Y key and again hit Enter.
Close the Command Prompt and reboot, issue will be resolved automatically.
Checkout following video for illustration of this method:
That’s it! Similar fixes that you must read:
1. Windows 10 Master Boot Record Is Corrupted
2. Windows Freezes At Boot Screen
Kill many issues in your system using few steps at once:
1. How To Refresh Windows
2. How To Reset Windows
3. How To Reset Or Refresh Windows Without Installation Disc
4. How To Reinstall Windows 10 Without Affecting Your Data
RELATED ARTICLES
When booting the computer, you may encounter the error of the boot selection failed because a required device is inaccessible. This post from MiniTool will show you how to solve this operating system booting error.
What Causes the Boot Selection Failed Error?
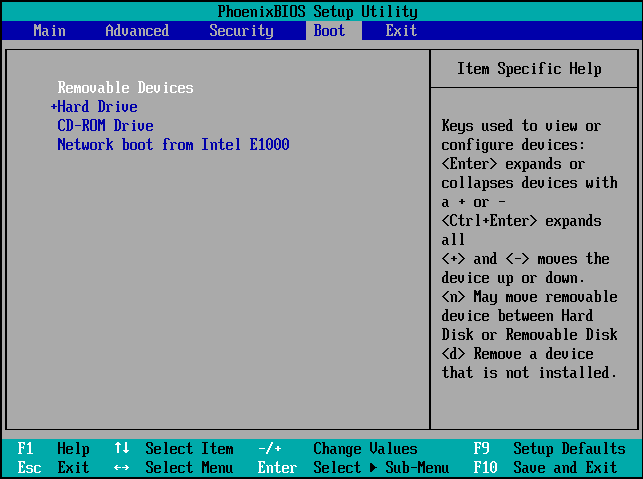
Some users complain that when they boot their computer they encounter the error the boot selection failed because a required device is inaccessible. It usually occurs on Windows 7/8/10 and Windows 2008 R2, as shown in the following picture:
In general, the boot selection failed because a required device is inaccessible error often comes with some different error codes, such as the 0xc000000f, 0xc000000e, 0xc0000225, 0xc0000185 and so on.
However, what may cause the error of the boot selection failed because a required device is inaccessible? As a matter of fact, it can be caused by various reasons. Here, we briefly show some reasons.
- Invalid BCD.
- Hard drive offline.
- Misconfigured BIOS settings.
- Hard disk bad sectors.
- Connection of external hard drives.
- Cable connection issue.
So, do you know how to resolve the boot selection failed error? To fix the boot selection failed Windows 7 error, the following section will show you the solutions. But before proceeding on the solutions, what you need do is to get data back from the unbootable computer so as to avoid data loss.
Hence, before fixing this the boot selection failed because a required device is inaccessible error, we will show you how to rescue your data first.
How to Rescue Data When Encountering the Boot Failed Selection Failed Error?
To get your data back from the unbootable computer, you can do that with the help of professional backup software. Thus, MiniTool ShadowMaker is strongly recommended.
MiniTool ShadowMaker enables you to back up files and keep them safe from an unbootable computer. Besides backing up files or folders, it can also back up disks, partitions, and even the operating system. It can also help to clone the OS from HDD to SSD without data loss.
So, before fixing the boot selection failed required device is inaccessible error, try MiniTool ShadowMaker to rescue data first. You can download MiniTool ShadowMaker Trial from the following button or choose to purchase an advanced edition.
MiniTool ShadowMaker TrialClick to Download100%Clean & Safe
Now, we will show you how to rescue data with MiniTool ShadowMaker when encountering 0xc000000f the boot selection failed because a required device is inaccessible error.
Since your computer is unbootable when coming across the boot selection failed error, the bootable media is required.
Step 1: Install and launch MiniTool ShadowMaker
- Install MiniTool ShadowMaker on a normal computer, and then launch it.
- Click Keep Trial.
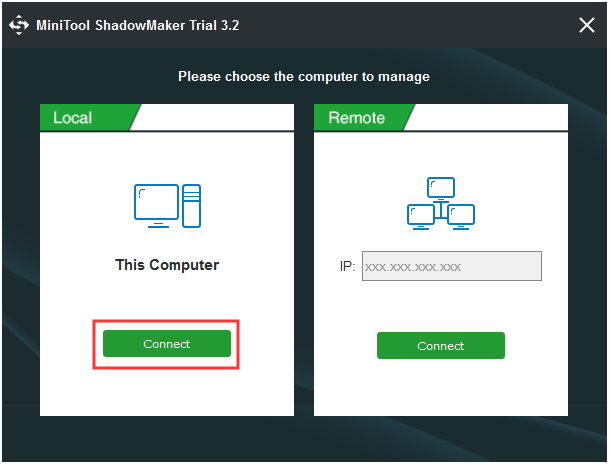
- Choose Connect in This Computer to continue.
Step 2: Create the bootable media and boot from it
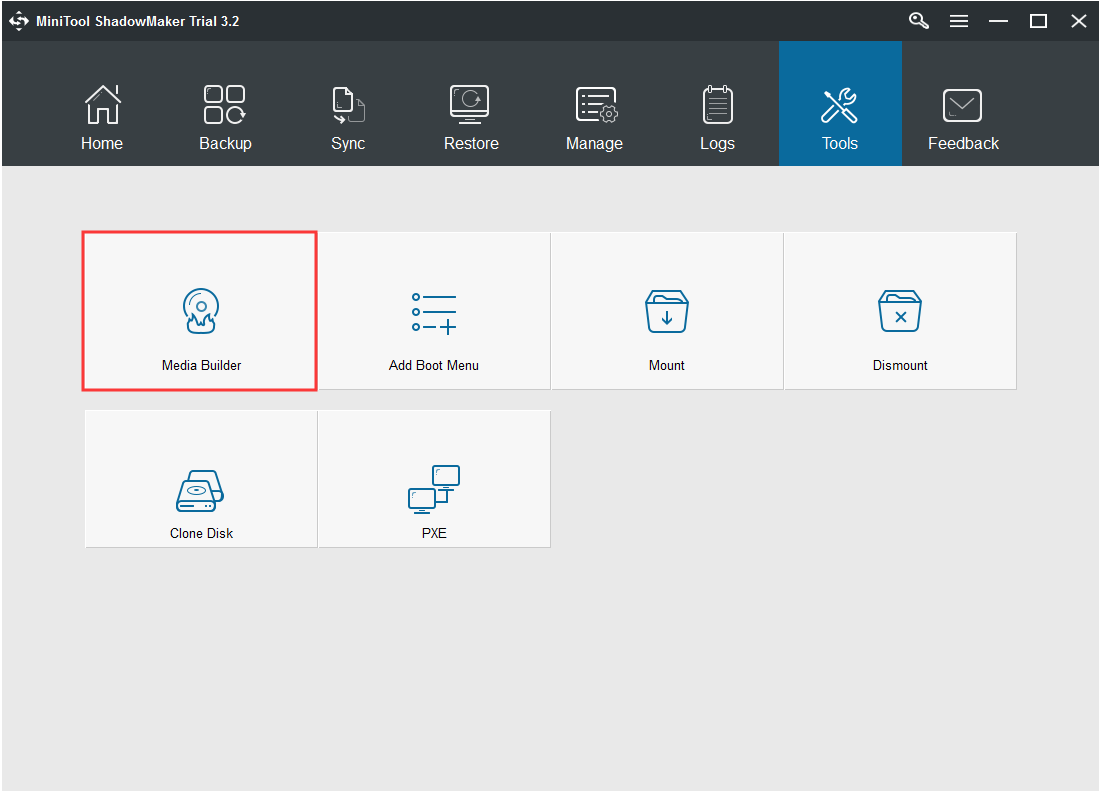
1. After entering its main interface, go to the Tools page and click the Media Builder feature to continue. Then you can follow the wizard to create the bootable media.
2. Then connect the bootable media to the unbootable computer. Restart your computer and press the setup key to enter BIOS.
3. Change the boot order. Here, you need to set the bootable media as the first boot order.
Step 3: Start to rescue your data from the unbootable computer
1. After booting computer from the MiniTool bootable media, you will enter the main interface of MiniTool ShadowMaker.
2. Go to Backup page, click Source module, choose Folders and Files, and select the files you want to rescue.
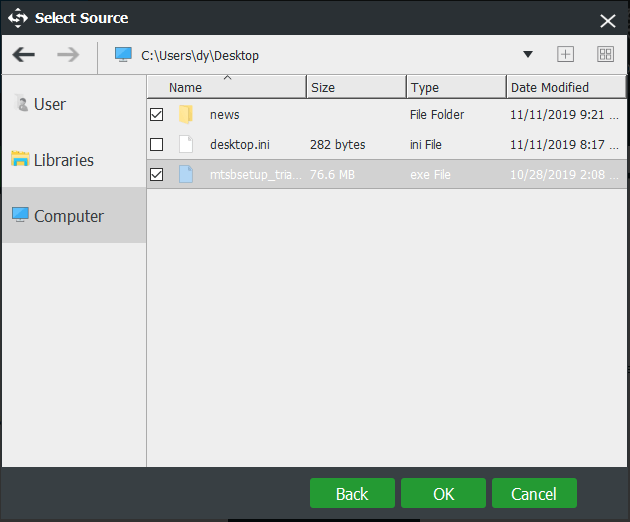
3. Click the Destination to choose the destination path. It is recommended to save the files to an external hard drive.
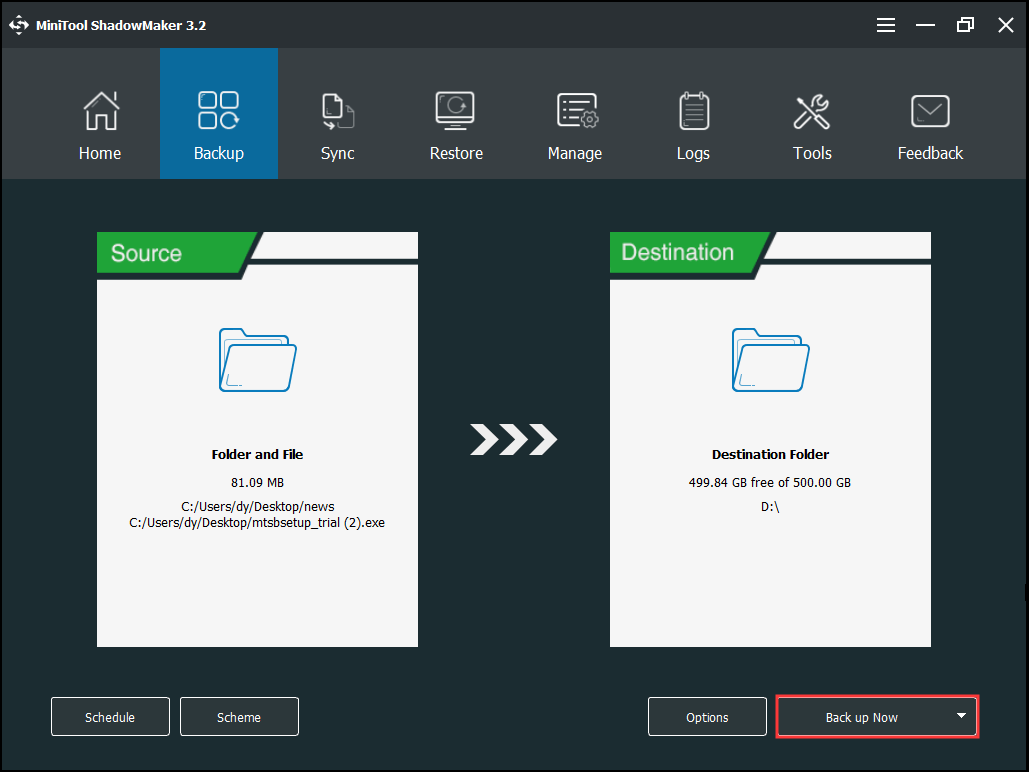
4. After that, click Back up Now to get the files back from the unbootable computer.
When all steps are finished, you have successfully rescued data from the unbootable computer which encountered the error of the boot selection failed because a required device is inaccessible.
Apart from the Backup feature, the Sync feature of MiniTool ShadowMaker also enables you to get data back from the unbootable media.
MiniTool ShadowMaker is a powerful tool that can help me to keep my data safe and get data back from the unbootable computer.Click to Tweet
Having rescued your files, it is time to fix the error of the boot selection failed because a required device is inaccessible 0xc0000225.
7 Solutions to the Boot Selection Failed Because a Required Device Is Inaccessible
Now, we will show you how to fix this boot selection failed Windows 7 error.
Solution 1. Check Computer Cable Connections
To begin with, you need to make sure that all computer connections are connected properly to the correct ports. Check the connections at both ends of the cables.
If all computer cables are connected correctly, restart your computer and check whether the issue of stop 0xc000000e the boot selection failed because a required device is inaccessible is solved.
If this solution is not effective, try the following solutions.
Solution 2. Remove All External Devices
As we have mentioned in the above part, the 0xc000000f the boot selection failed because a required device is inaccessible error may be caused by the connection of external devices.
So, to solve this boot selection failed Windows 7 error, you need to disconnect all peripheral devices such as printers, external hard drives, memory card readers, etc. from your computer.
Then restart your computer to check whether the boot selection failed because a required device is inaccessible is solved.
Solution 3. Check Boot Order in BIOS
The boot selection failed because a required device is inaccessible after clone may be caused by the misconfigured BIOS settings. So, in order to solve this boot error, try to check the boot order in BIOS.
Hence, you can restart your computer and press the Setup key repeatedly to enter the BIOS menu. And then check whether the first boot order is correct. If not, set it correctly.
When it is finished, reboot your computer to check whether the boot selection failed because a required device is inaccessible is solved.
Solution 4. Run Check Disk
If there are corrupted files or bad sectors on hard drive, you may encounter the boot selection failed required device is inaccessible error. Thus, you can try to run check disk utility to scan and repair them.
Now, here is the tutorial.
Step 1: Boot the computer from installation disc
- As your computer is unbootable, an installation disc is required. If you don’t have, click here to download Windows 7 installation disc.
- Then connect it to your computer and boot from it.
- Select the proper language, time and keyboard input.
- Then choose Repair your computer to continue.

Step 2: Type the command
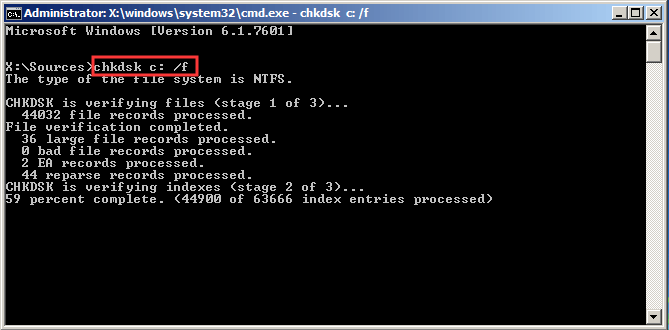
1. In the System Recovery Options window, choose Command Prompt.
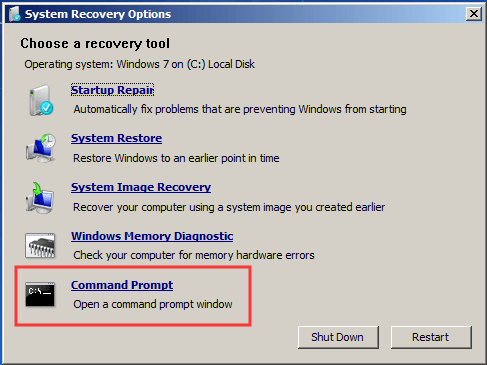
2. Then type the command chkdsk C: /f and hit Enter to continue. (You can replace the C with the letter of the drive where Windows is installed.)
After that, reboot your computer and check whether the issue of the boot selection failed because a required device is inaccessible is solved.
Related article: How Do I Repair Hard Drive Error with Windows 10 CHKDSK Utility?
If this solution is not effective, try the following solutions.
Solution 5. Run Startup Repair
The Startup Repair of Windows can help you to resolve some boot errors, such as the boot selection failed because a required device is inaccessible. So, in order to solve this boot selection failed error, you can try Startup Repair.
Now, here is the tutorial.
Step 1: Enter Windows Recovery Environment
Boot your computer from the installation disc and enter the Windows Recovery Environment. You can see the detailed operation instructions listed above.
Step 2: Start to repair
1. After entering System Recovery Options page, click Startup Repair to continue.
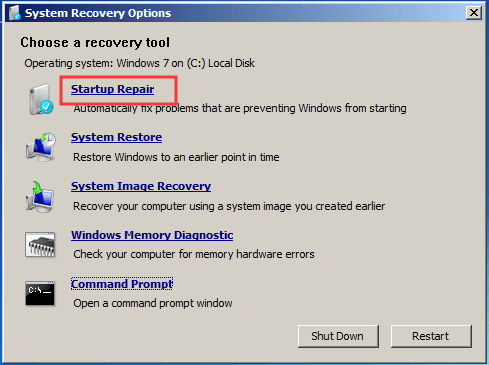
2. Then it will scan your computer. If there are some problems with your computer, it will detect and fix them. You can follow the wizard to continue.
When all steps are finished, reboot your computer and check whether the issue of the boot selection failed because a required device is inaccessible 0xc0000185 is solved.
Solution 6. Rebuild BCD
As mentioned in the above part, the issue of the 0xc000000f the boot selection failed because a required device is inaccessible can be caused by the corrupted BCD files. Therefore, to fix this boot selection failed problem, you can try rebuilding the BCD files manually.
Now, here is the tutorial.
Step 1: Boot computer to enter Windows Recovery Environment
- Boot your computer from the installation disc and select the language, time, and keyboard input.
- Then choose Repair your computer.
Step 2: Start to repair BCD
- After entering System Recovery Options page, click Command Prompt to continue.
- In the pop-up command line window, type the command bootrec /rebuildbcd and hit Enter to continue.
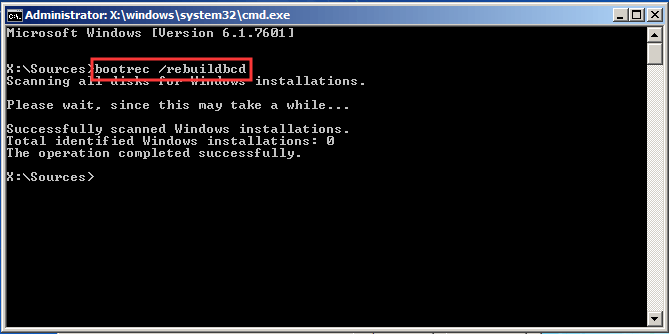
Note: If the program finds a Windows installation and asks whether it should add it to boot list, type Y to continue.
When the process is finished, reboot your computer and check whether the issue of the boot selection failed because a required device is inaccessible is solved.
Solution 7. Mark the Disk Online
You may encounter the boot selection failed because a required device is inaccessible after clone. It is because the disk is offline. In order to solve the boot selection failed Windows 7 error, you can mark the disk online.
Now, here is the tutorial.
Step 1: Boot the computer and enter Windows Recovery Environment
- Connect the installation disk on your unbootable computer and boot from it.
- Choose language, time and keyboards input.
- Then choose Repair your computer to continue.
Step 2: Mark the disk online
- After entering System Recovery Options, choose Command Prompt to continue.
- In the pop-up window, input the following commands and hit Enter after each command.
- diskpart
- list disk
- select disk x (x represents the disk number.)
- online disk x
After marking the disk online, you can reboot your computer to check whether the issue of the boot selection failed because a required device is inaccessible is solved.
All in all, this post has introduced 7 ways to solve the issue of the boot selection failed because a required device is inaccessible. If all these solutions are not effective, you can try to reset BIOS. Otherwise, you can choose to reinstall the operating system. But before reinstalling the OS, please get data back from first from the unbootable computer.
I encountered the boot selection failed because a required device is inaccessible error when booting computer. But the ways listed in this post helped to solve it. Click to Tweet
Bottom Line
To sum up, this post has introduced what may cause the boot selection failed because a required device is inaccessible and has also demonstrated 7 ways to solve this boot selection failed error.
If you have any better solution to solve the boot selection failed required device is inaccessible, you can share it in the comment zone.
In addition, if you have any problem with MiniTool product, please don’t hesitate to contact us via the email [email protected] and we will reply to you as soon as possible.
Position: How Tos — Disk Utilities — Fixed: The boot selection failed because a required device is inaccessible
Table of Contents
«Hi everyone, I’m in trouble now! My laptop works fine with Windows 7, very stable and never had problems, until I upgraded the system disk. I added an SSD and clone Windows from hard drive this SSD. After cloning and adding SSD, I started computer, but the booting ended up with error code 0xc000000e and a message ‘The boot selection failed because a required device is inaccessible’. I was advised to contact computer manufacturer for assistance. Do I have to reinstall Windows on the SSD? Is there any easy methods to this error?»
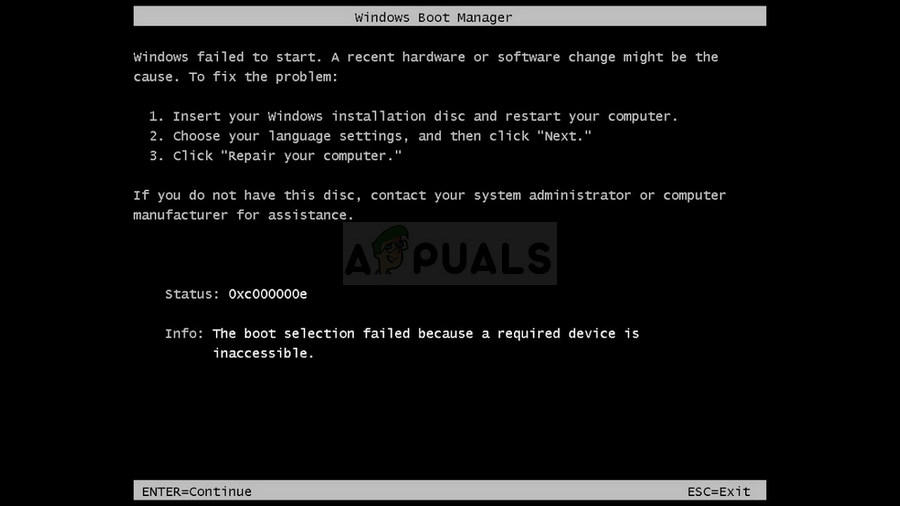
The error «0x000000e: the boot selection failed because a required device is inaccessible» shows up on a black screen when your computer is booting to Windows, and it blocks you from booting to Windows, as follows:
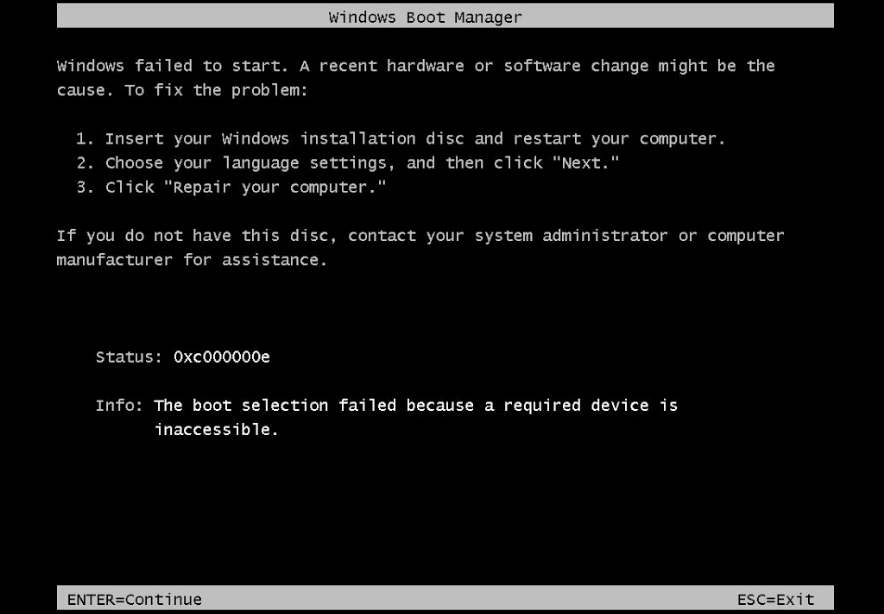
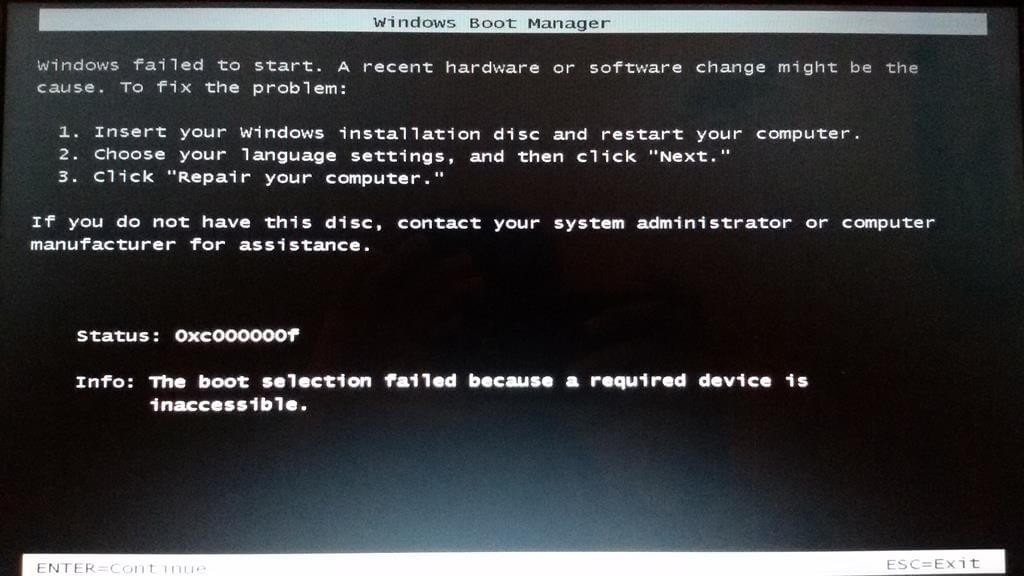
Windows failed to start. A recent hardware or software change might be the cause. To fix the problem:
1. Insert your Windows installation disc and restart your computer.
2. Choose your language settings, and then click «Next.»
3. Click «Repair your computer.»
If you do not have this disc, contact your system administrator or computer manufacturer for assistance.
Status: 0xc000000e
Info: The boot selection failed because a required device is inaccessible.
Also, you can get following error message if you are using a different version of Windows system:
Recovery
Your PC needs to be repaired
A required device isn’t connected or can’t be accessed
Error code: 0xc000000e
You’ll need to use the recovery tools on your installation media. If you don’t have any installation media(like a disc or USB device), contact your system administrator or PC manufacturer.
Press Enter to try again
Press F8 for Startup Settings
What happens during system booting? How this error occurs? Here is a simple description of the process. When your computer boots up, the BIOS system starts to scan devices on computer to look for the operating system. In general, computer boots from the device where the operating system is installed, and the device can be the primary hard drive (or SSD) or a selected bootable drive. If both the operating system and device work well, then computer boots up. If the boot device is damaged or OS is corrupted, operating system won’t be able to boot, and you are likely to receive error message. Since you have no chance to access operating system, the difficulty of fixing the error increases. However, there are easy solutions to this error. If the boot selection failed on your PC because a required device is inaccessible, you can follow some of methods in this article to troubleshoot it.
Causes of the boot selection failed because a required device is inaccessible error
Many factors can be the cause of the error, and you can refer to following part to find the cause of your issue. Once the reason is found out, you can quickly locate the solution. The error might occur as a result of one or more reasons below:
Cable connection issue: The hard drive is not properly connected due to cable issue. The cable might be loose or deteriorated as time goes on. If the cable has been used for years, there might be read/write errors.
Boot order is changed: A computer can be set to boot from peripheral devices like USB flash drive, external HDD, thumb drive, etc. If a connected bootable USB drive has the boot propriety over primary hard drive, the boot process will check the USB disk before loading the system. The boot process will be halted once the bootable device is not workable.
Invalid BCD: BCD (Boot Configuration Database) stores comprehensive information for boot settings, and Windows cannot boot properly if BCD is missing, corrupted, or misconfigured.
Hard drive is offline: A hard drive can be marked as offline by system, third-party program or virus. When the system disk is offline, it becomes unbootable.
Misconfigured BIOS settings: If your computer’s BIOS is incorrectly configured, for example, hard drive does not support selected mode, the booting process will be blocked.
Hard disk bad sectors: Hard drives and other storage devices may turn to inaccessible or RAW drive due to disk bad sectors.
How do you fix the error 0x000000e: the boot selection failed because a required device is inaccessible?
This section includes several step-by-step methods which can help you fix the Windows booting issue, and you can start from the first solution.
Method #1: Check cable connection
When your PC failed to boot due to inaccessible device, you need to check hard disk connection in the first place. Shut down computer and check cables and disk connections. You can check and re-insert the hard drive where operating system is installed. If there are multiple disks on your computer, you can remove other disks and make sure that the error is not caused by those devices. Then restart computer and check if the error still exists.
Method #2: Check boot order in BIOS
Windows fails to start might be the result of incorrect boot order. You can follow these steps below to check if the boot sequence is properly set.
Step 1. Go to BIOS setting.
Start computer and repeatedly press a key on the keyboard to enter BIOS setup. You have a few seconds to do this, and you need to watch the screen carefully. A message will appear and tell the key you need to press to enter BIOS. The key can be ESC, Del, F1, F2, etc.
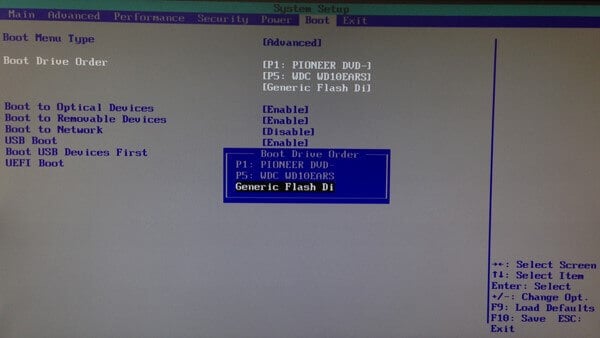
Step 2. Use arrow keys to select Boot tab and you can see hard disk option. Use arrow key to those options.
Step 3. In the first drive option, you should make sure your system disk is selected. Then go to the first boot device option and select the correct system disk.
Step 4. Save all changes and go to Exit with the help of arrow keys. Then you can start computer and check if the problem is solved.
Method #3: Use Windows installation drive to run Startup repair
Step 1. Insert your Windows installation CD/DVD and restart computer. Then press any key to boot to the disc.
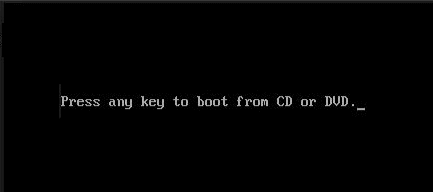
Step 2. Choose a language and then click Repair your computer > Troubleshoot > Advanced Options > Startup Repair (or Automatic Repair) in sequence.
Step 3. Follow the on-screen instruction to complete the repair. When the repairing completes, you can restart your PC to see if it is able to boot to Windows.
Method #4: Mark your disk online
If your hard disk where operating system is installed is offline, you can use this guide to mark it online again.
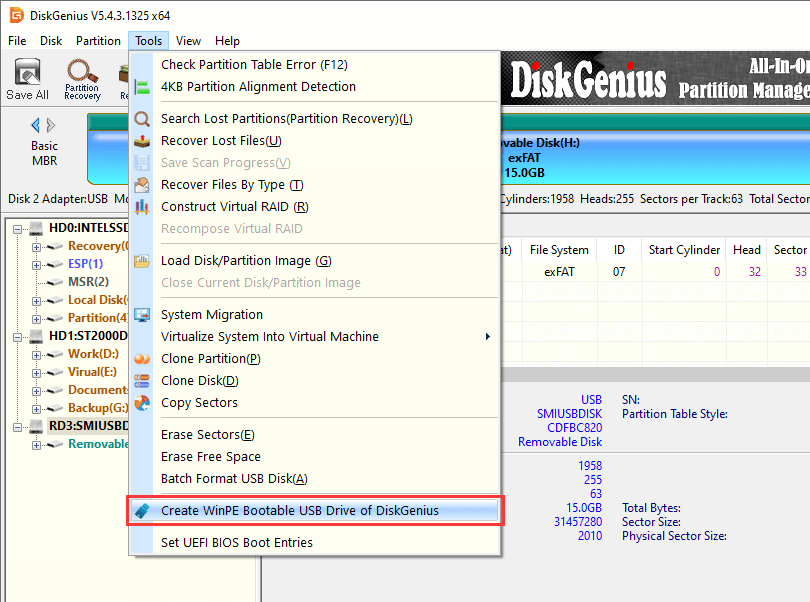
Step 1. Install and launch DiskGenius on a working computer and insert a USB disk to this PC. In the software choose Tools > Create WinPE bootable USB drive of DiskGenius, as below:
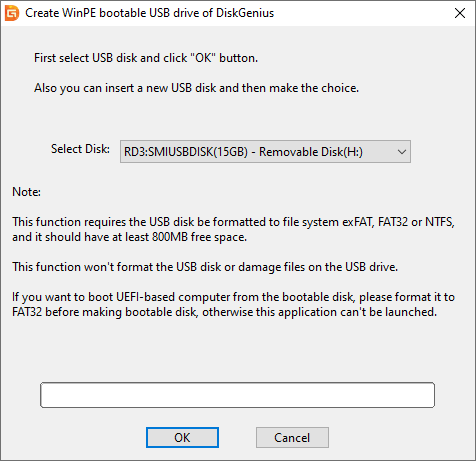
Step 2. Click OK button and wait for several seconds to create the bootable USB disk.
Step 3. Insert the bootable disk to the computer whose boot selection failed and enter BIOS to make the disk in the first boot order. Restart computer and it will boot from the USB disk. DiskGenius will be launched automatically.
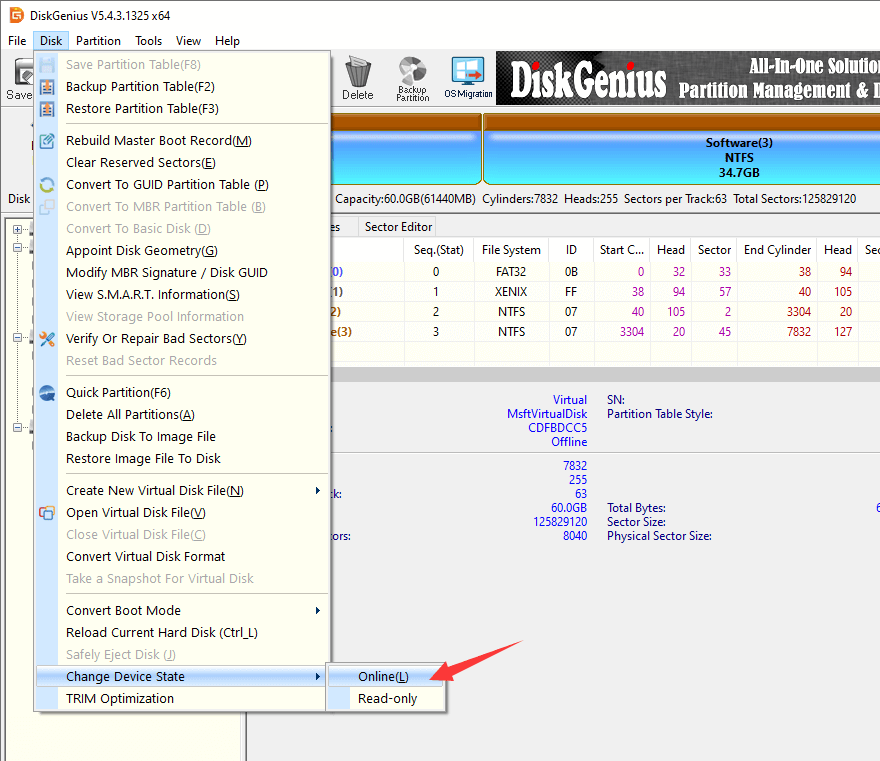
Step 4. In DiskGenius, select the offline disk and click Disk > Change Device State > Online, as follows:
If a disk in offline, you can see a little red down-arrow on the disk icon in the software.
Method #5: Test hard disk
If you suspect the inaccessible boot device is caused by damaged or corrupted hard disk, you can follow this method to test hard disk.
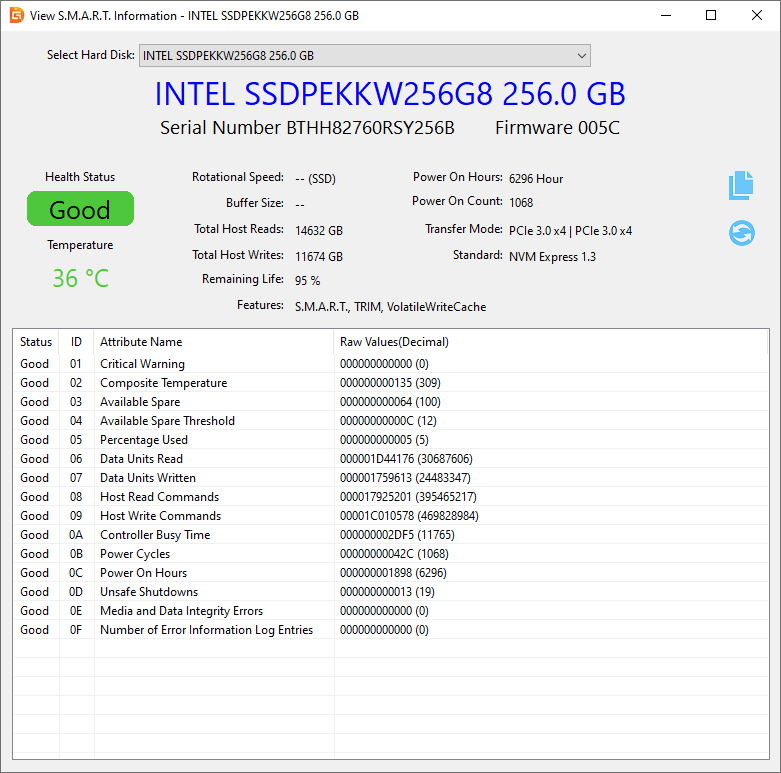
Step 1. Check hard disk S.M.A.R.T. status.
Most modern disks support S.M.A.R.T. which can do some basic self-monitoring; thus, we can view the information to see if the disk has started to develop problem.
In DiskGenius, select the disk you want to test from the left pane and choose Disk > View S.M.A.R.T. Information, as below:

The pop-up window shows disk S.M.A.R.T. information in detail. If the disk is damaged, you will have to considerate replace it with a new one.
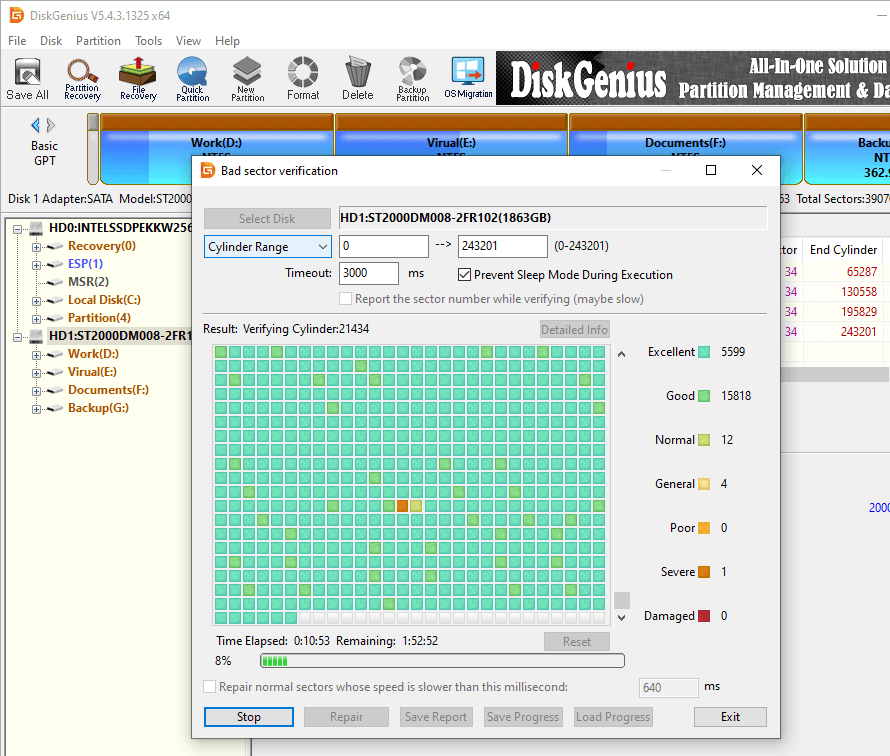
Step 2. Check and repair disk bad sectors.
Bad sectors are not accessible, and they can cause various issues like system crash, file loss, partition missing, etc. Here is an easy way to check and repair bad sectors for hard drive or USB disks.
Select the disk you want to scan bad sectors and click Disk > Verify Or Repair Bad Sectors.
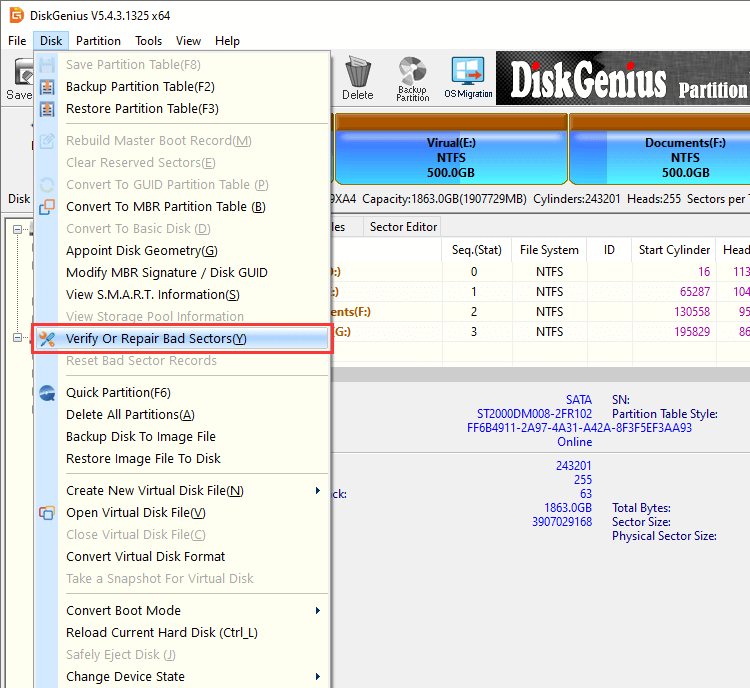
Click Start Verify button and DiskGenius starts to scan the disk. When the scanning completes, the software will report how many bad sectors are found.
How to recover data from inaccessible devices?
When a device becomes inaccessible, you cannot read or write files stored on the disk. But that does not mean you are losing those files. You can retrieve files from the disk using hard drive data recovery software. Here we will use DiskGenius to recover data from inaccessible, RAW, corrupted or unformatted drive.
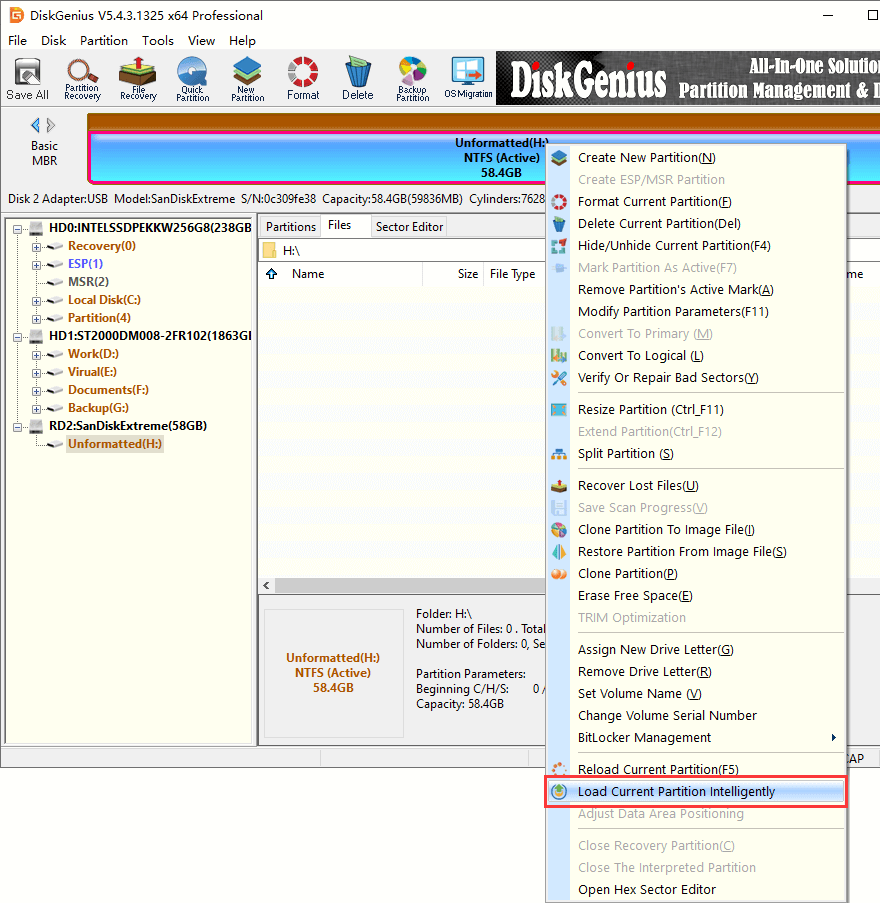
Step 1. Select and right-click the inaccessible partition in DiskGenius, and choose Load Current Partition Intelligently, as picture below:
If the drive in question was NTFS format, this function can quickly recover data from RAW drive without scanning.
If this function does not work, then move to next step.
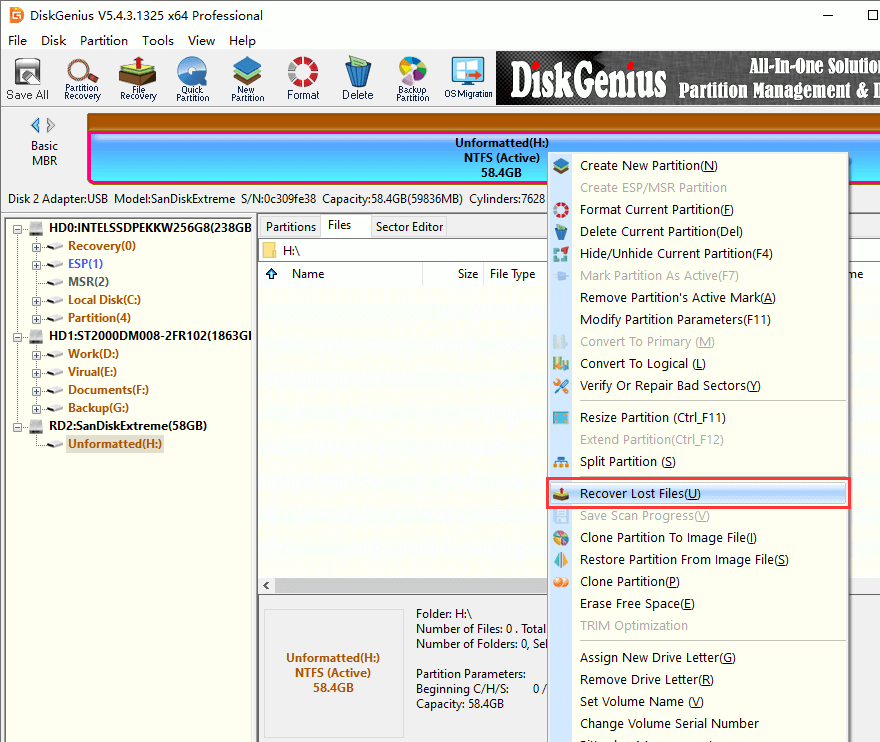
Step 2. Right-click on the inaccessible drive and choose Recover Lost files, as follows:
Also, you can click File Recovery button from the toolbar. This function can be used to retrieve lost data from formatted, RAW, corrupted or damaged partitions as well as unallocated disk space.
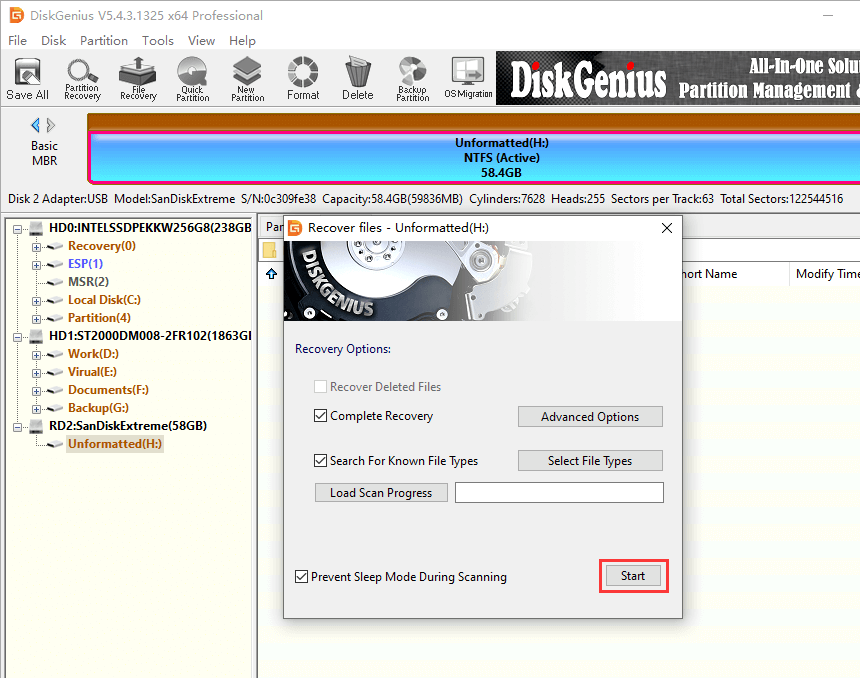
Step 3. Scan the device for lost data.
Choose recovery options and click Start button, and the scanning process starts to work.
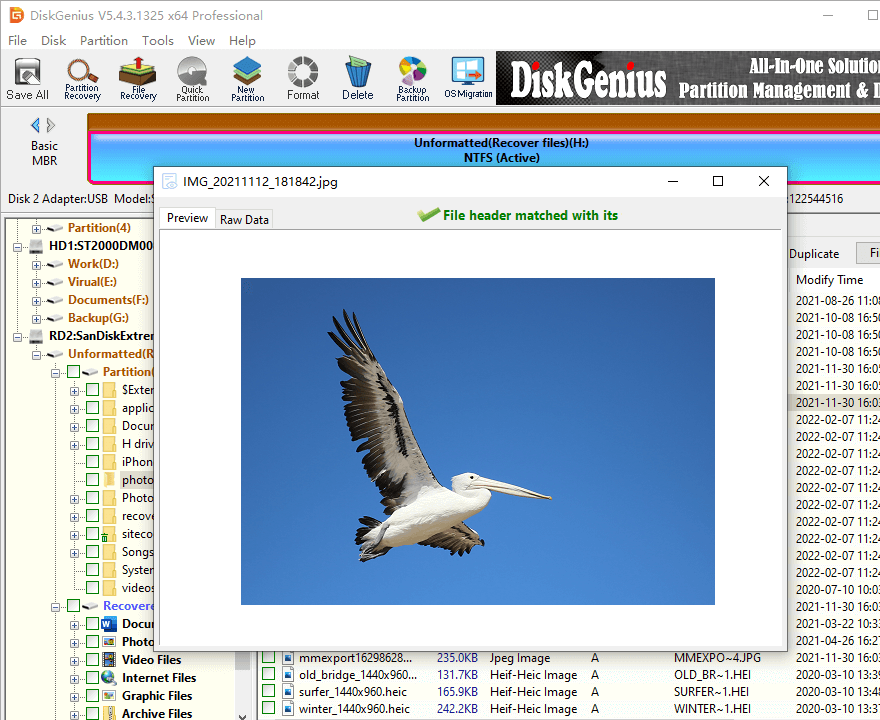
Step 4. Preview and filter files.
DiskGenius provides file preview function which can open file to view content as below. If a file can be previewed successfully, then it can be recovered without problem.
Photos, music, videos, documents (pdf, word, excel, etc.), text, etc. can be previewed in this way. Apart from file preview, you can also filter files listed in scanning result, which helps quickly locate what you want to recover.
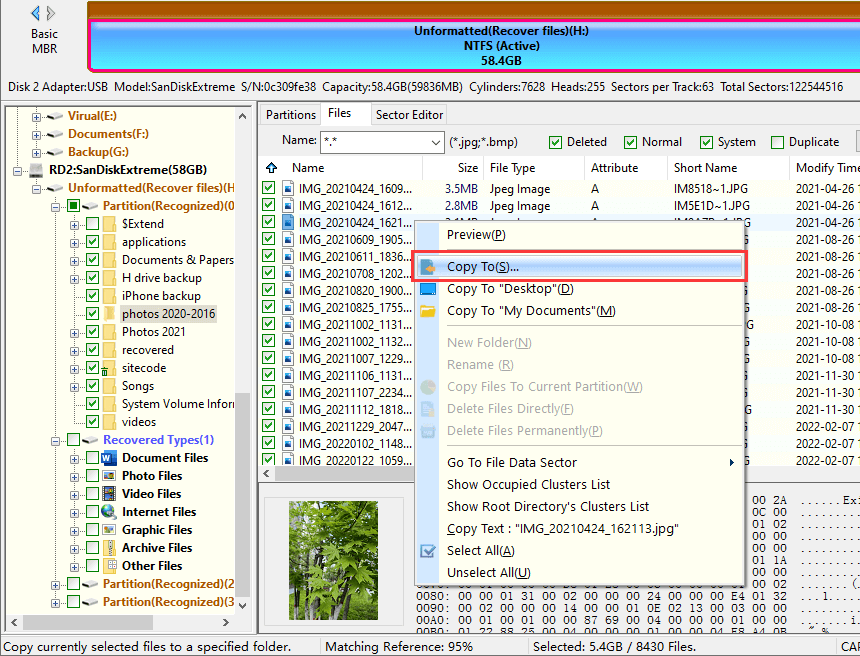
Step 5. Recover data.
If you’ve find out needed files, check boxes and right-click to select Copy To. Then you can specify a location to store recovered data.
Conclusion
We’ve discussed inaccessible boot device and provided a couple of solutions to fix the error. You can follow these guides to eliminate the error and boot to Windows successfully. Besides, if you need to retrieve lost data from inaccessible drive, you can free download DiskGenius trail edition to scan the device. Should you have any question or need help regarding the topic, please feel free to contact our customer support team.
This troublesome error appears during your computer’s booting process and it prevents you from booting to your respective Windows operating system, displaying this message across a black screen. Troubleshooting such errors is always difficult as you don’t even get the chance to access the system in order to do something.
However, solution can still be found and they can be tried even if you are not able to boot into your operating system. Try following some of the methods below in order to get rid of this problem and boot into Windows normally.
Solution 1: Check the Boot Order in BIOS
There are various reasons on why the boot order on your computer might have gone corrupt but the most important thing is that you can easily solve the problem without breaking a sweat simply by tweaking certain settings in BIOS. It can be a little alarming for novice Windows users but make sure you follow the instructions carefully in order to solve the problem efficiently.
- Turn on the computer and immediately press the Setup key repeatedly, about once every second, until the Computer Setup Utility or BIOS settings opens. This key should be displayed on your PC as Press _ to Run Setup or under a similar message.
- Use the right arrow key to choose the Security menu when the BIOS settings window opens, use the down arrow key to select the Secure Boot Configuration option, and press Enter.
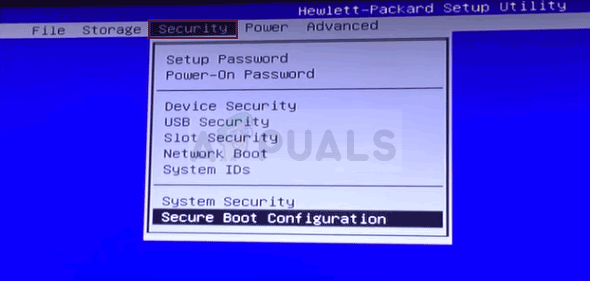
- Before you can use this menu, a warning will appear. Press F10 to continue to the Secure Boot Configuration menu. The Secure Boot Configuration menu should open so use the down arrow key to select Secure Boot and use the right arrow key to modify the setting to Disable.
- Use the down arrow key to select Legacy Support, and then use the right arrow key to modify the setting to Enable.

- Press F10 to accept the changes. Use the left arrow key to select the File menu, use the down arrow key to select Save Changes and Exit, then press Enter to select Yes.
- The Computer Setup Utility will now close and the computer should restart. When the computer has restarted, use the power button to turn the computer off.
If you are not sure how to boot from your hard drive again, you need to know just which option to select when the boot menu opens. It will ask you from which device you want to boot your computer. Follow the instructions below to boot from your hard disk drive easily.
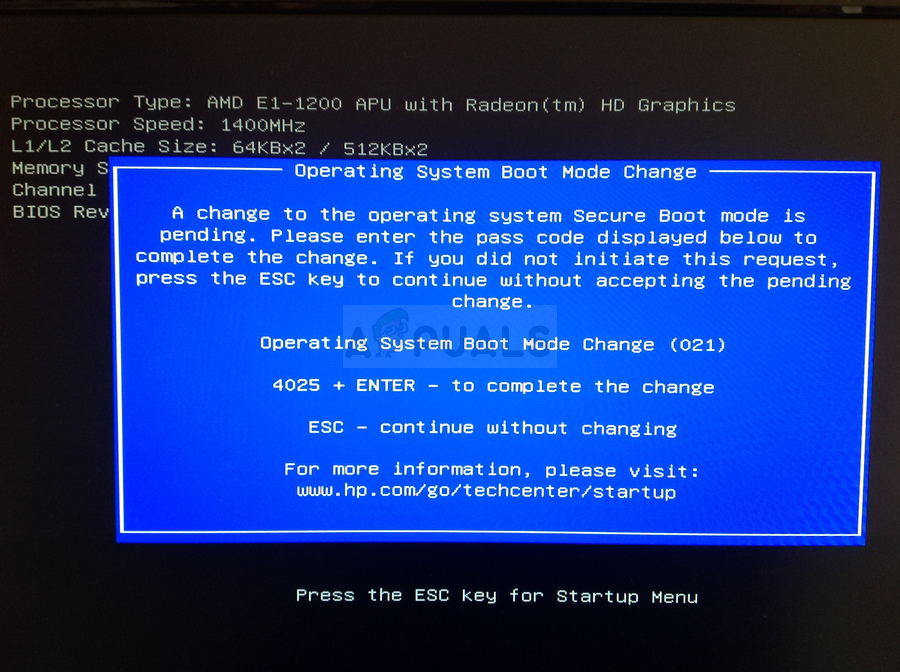
- Press the power button to boot your computer. As soon as the computer starts, a message appears indicating that the boot mode has now changed.
- You will see a security screen which will display a four-digit code. Type the four-digit code shown in the message, then press Enter to confirm the change.
NOTE: No text field displays for the code. This to be expected. When you type the numbers, the code is logged without a text field, so try to be more careful than usual.
- Press the power button to turn off the computer, wait a few seconds, then turn on the computer and immediately press the ESC key repeatedly, about once every second, until the Startup menu opens.
- Press F9 to open the Boot Menu. Use the down arrow key to select your hard disk from the boot menu and make sure you choose it by clicking the Enter key. Restart your computer and check to see if the problem is solved.
Solution 2: Run the DSKCHK Check from the Recovery Media
The DSKCHK utility will scan your hard drive for errors, bad files, and corrupt sectors. It’s quite a useful utility and running it has saved several users who also received the “boot selection failed because a required device is inaccessible” error message on their computer. You will, however, need to use the DVD you used to install your operating system.
Still, Windows 10 users have the option of creating one manually if they need to.
- Download the Media Creation Tool software from Microsoft’s website. Open the downloaded file called MediaCreationTool.exe in order to open the start the installation. Tap Accept to agree on terms and conditions set by Microsoft.
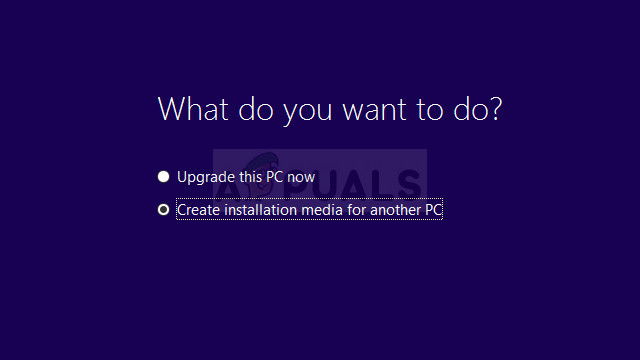
- Select the Create installation media (USB flash drive, DVD, or ISO file) for another PC option from the initial screen.
- The language, architecture, and edition of the bootable drive will be chosen based on your computer’s settings, but you should uncheck the Use the recommended options for this PC in order to select the correct settings for your own PC which is encountering the error (if you are creating this on a different PC, of course).
- Click Next and click on the USB drive or DVD option when prompted to choose between USB or DVD, depending on which device you want to use to store this image on.
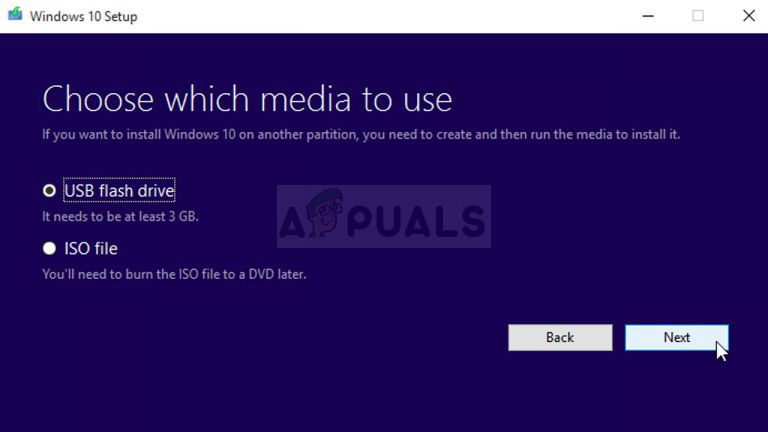
- Click Next and choose the required drive from the list which will show the storage devices connected to your computer at the moment.
- Click Next and the Media Creation Tool will proceed to download the files necessary to install create the installation device.
Now that you have this recovery DVD for Windows 10 as well, follow the steps below according to your operating system in order to open Command Prompt without the need to boot into your OS first:
- Insert the installation drive you own or which you have just created and boot your computer. The following steps are different from one operating system to another so follow them accordingly:
- WINDOWS XP, VISTA, 7: Windows Setup should open prompting you to enter the preferred language and time and date settings. Enter them correctly and choose the Repair your computer option at the bottom of the window. Keep the initial radio button selected when prompted with Use recovery tools or Restore your computer and click on the Next option. Choose Command Prompt when prompted with the Choose a recovery tool selection.
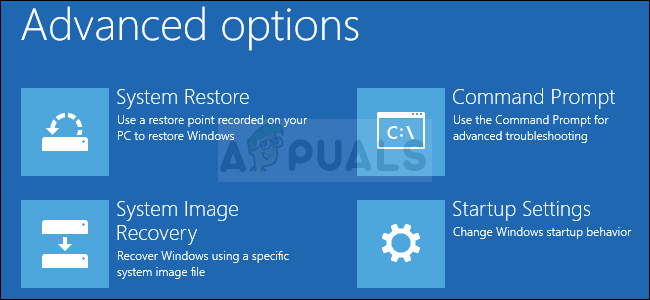
- WINDOWS 8, 8.1, 10: You will see a Choose your keyboard layout window so choose the one you want to use. The Choose an option screen will appear so navigate to Troubleshoot >> Advanced Options >> Command Prompt.
- Once the Command Prompt opens, enter the command below and click Enter afterwards:
CHKDSK /R /X C:
- Boot into your computer without the recovery drive and check to see if the error still persists.
Solution 3: Reset BIOS
This solution will be useful to users who tried to get into BIOS by following the instructions above but they simply weren’t able to make any progress with the methods above. As the title suggests, removing this battery will cause all boot and other BIOS settings to be reset to their defaults which helped plenty of users deal with this solve the boot problem
- Open the computer case and find the battery on the computer motherboard. If you are unable to locate your CMOS battery, refer to your motherboard or computer documentation. You can also browse the Internet or contact your computer manufacturer for additional assistance in locating it.
Note: With some computers, you may need to disconnect cables, remove drives, or remove other parts of the PC to get full access to the CMOS battery.
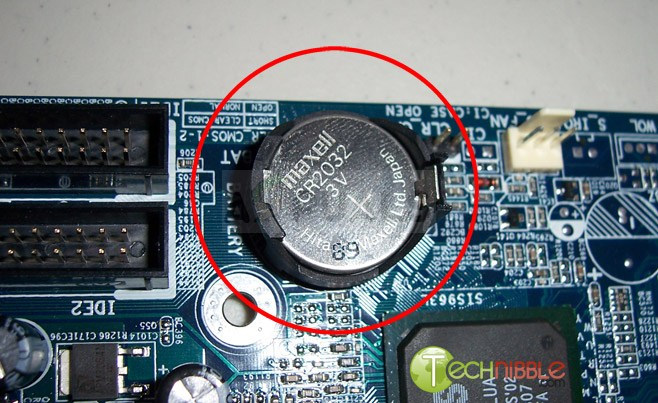
- If your computer is using a coin cell battery, removing the battery is relatively simple. Use your fingers to grab on the edge of the battery and pull it up and out of the socket holding it in place. Some motherboards have a clip holding the battery down and you may need to move it up to pull the battery out.
- Let it stay removed for 10 minutes, put it back in, and try to boot into BIOS by following the steps in the solution above. Try to do the same and check to see if Windows now boots normally.
Solution 4: Disable the Quick POST Option in BIOS
The Quick POST or Quick Boot option which is located in BIOS settings enables you to somewhat speed up your booting process. There are certain tests which are run each time you boot your computer. All of these system tests are not needed every time you boot, and can be turned off to save time and that is what Quick POST does. Here is how to disable it.
- Turn your PC on again and try to enter BIOS settings by pressing the BIOS key as the system is about to start. The BIOS key is typically displayed on the boot screen, saying “Press ___ to enter Setup.” or something similar to that. There are other keys as well. The usual BIOS keys are F1, F2, Del, etc. Note that you will have to be quick about this as the message will disappear pretty fast, which means you will have to reboot again.

- The setting which you need to turn off is usually located under the Boot tab which may be called different depending on the manufacturer. Another alternative is for it to be located at the general screen or under the Advanced BIOS Features tab. The setting is called Quick Power On Self Test or Quick Boot. Once you locate the correct settings, set it to Off or Disabled.

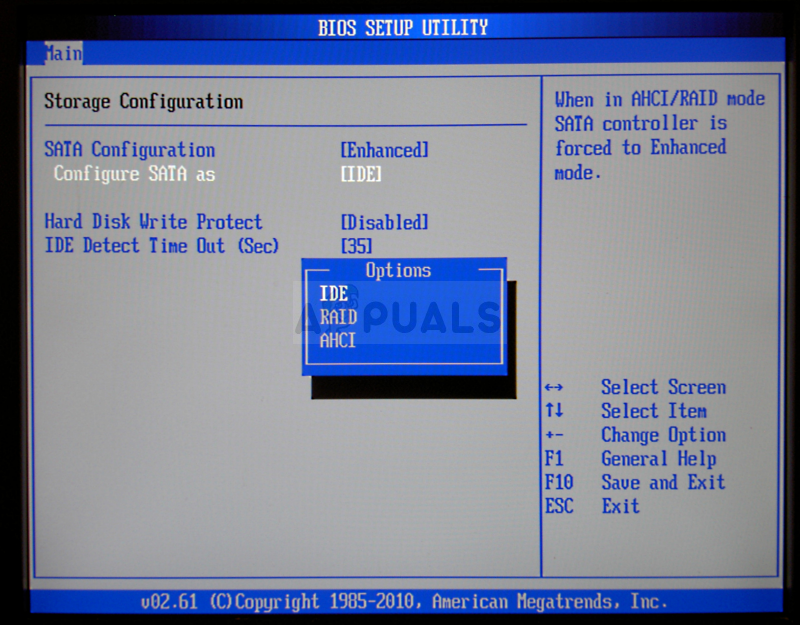
- Another setting which may cause the problem for you would be the changing of the SATA mode to AHCI. The SATA option which you will need to change is located under various tabs on BIOS firmware tools made by different manufacturers and these is no general rule to where the setting should be located. It’s usually located under Onboard devices entry, Integrated Peripherals, or even simply under the Advanced tab. No matter what, the name of the option is SATA operation.
- Once you locate the correct settings, change it from IDE or any other option to AHCI. AHCI is the most reasonable option for the process of installing new updates or upgrading. If the setting was set to AHCI to begin with, try changing it to something else no matter what as there are cases where any change produced great results! Sometimes the RAID ON setting works better.
- Navigate to the Exit section and choose to Exit Saving Changes. This will proceed with the computer’s boot. Make sure you try to boot your computer again.
Solution 5: Use Startup Repair
Startup Repair pretty much deals with these types of issues and it can be accesses using the same recovery drive you used before. However, this method should be implemented at least three times, as suggested by industry experts, in order to be certain that it does or does not work. Good luck!
- Insert the installation drive you own or which you have just created and boot your computer. The following steps are different from one operating system to another so follow them accordingly:
- WINDOWS XP, VISTA, 7: Windows Setup should open prompting you to enter the preferred language and time and date settings. Enter them correctly and choose the Repair your computer option at the bottom of the window. Keep the initial radio button selected when prompted with Use recovery tools or Restore your computer and click on the Next option. Choose Startup Repair (the first option) when prompted with the Choose a recovery tool selection.
- WINDOWS 8, 8.1, 10: You will see a Choose your keyboard layout window so choose the one you want to use. The Choose an option screen will appear so navigate to Troubleshoot >> Advanced Options >> Startup Repair
- Follow the instructions on-screen in order to proceed with the Startup Repair. After the tool finishes, restart your computer and check to see if you are now booting successfully.
Kevin Arrows
Kevin Arrows is a highly experienced and knowledgeable technology specialist with over a decade of industry experience. He holds a Microsoft Certified Technology Specialist (MCTS) certification and has a deep passion for staying up-to-date on the latest tech developments. Kevin has written extensively on a wide range of tech-related topics, showcasing his expertise and knowledge in areas such as software development, cybersecurity, and cloud computing. His contributions to the tech field have been widely recognized and respected by his peers, and he is highly regarded for his ability to explain complex technical concepts in a clear and concise manner.

Normally when you turn on your computer, the system will boot from the storage drive where the operating system is located. If the drive containing the operating system is corrupted, the system will have a problem starting. As a result, you may receive the error,
» The boot selection failed because a required device is inaccessible »
This error is usually experienced right after installing a new operating system. Even some users experience this error after changing BIOS settings. Troubleshooting this error is not an easy process since you cannot access the system directly.
There are numerous facts which could possibly be the reason for this error. However, this problem comes with some easy solutions which helps you to get rid of this problem effectively.
In this article, you will get the information on Fixing The Boot Selection Failed Because a Required Device is Inaccessible. These solutions can be tried even if you cannot boot into the system.
Let’s get started,
1. Check Hard drive
A malfunctioning hard disk drive can also be the reason behind the error boot selection failed because a required device is inaccessible error. Especially, if the hard drive happens to contain bad sectors or corrupted files. If you suspect the hard drive to be faulty, you can use check disk, you can use Check Disk Utility (CHKDSK) to scan the drive for errors.
2. Check Cables
The cable which connects the hard drive may be defective causing this error. A cable may become loose or defective if it is used for many years. Therefore, check the cable for damages. And see if the cable is connected properly to the respective ports. If you suspect the cables to be loose, unplug and plug them again.
3. Change Boot Order
Apart from the hard disk drive, the computer is able to boot from peripheral devices such as the USB flash drive and external HDD. The boot order could be changed for any reason. If the prioritized boot device happens to malfunction, it will cause problems loading the operating system. In this case, you need to change the boot order through BIOS.
For changing boot order,
- Turn on the computer.
- Press the relevant key to enter Setup.
- Navigate to the boot tab.
- Find the original partition and change the boot mode according to it.
- Press Exit and Save changes.
This should hopefully resolve the issue.
4. Remove External Devices
One of the external devices connected to your computer like USB flash drive, printer and scanner may be faulty leading to this error. To simply identify the faulty peripheral, you need to remove each external devices one by one. And then restart to see if the problem fixes.
5. Rebuild BCD
This issue can also be caused due to corrupted BCD files. Hence, you can simply fix the problem by rebuilding BCD files.
To rebuild BCD,
- Click on Start Menu.
- Type »Command Prompt»
- Click on that.
- Type the command bootrec / rebuildbcd
- Press Enter.
6. Restore Windows
If any recent changes triggers the boot selection failed because a required device is inaccessible error, restoring windows will undo them to revert the changes. However, this method can only be attempted if the restore points are already created. In most systems on default, the restore points are created automatically.
To Restore System,
- Insert the installation media
- Restart the PC
- Boot from the installation media
- Choose your language
- Select troubleshoot
- Select System Restore