
Recently, I have been working a lot with Packer installations in the home lab to configure automated builds of Server operating systems to have always “up-to-date” copies of Windows Server templates so that you shortcut all the time needed to build up a Windows Server operating system, patch the OS, and then install your applications. With Packer, you can perform all of these tasks and have these templates on hand and ready to go at a moment’s notice. One of the first things you will need to do is either create or download a Windows Server unattend answer file. In this post, we will take a look at what an unattend answer file is as well as resources that can be used to either create unattend answer file for Windows Server 2019 automated packer installation or download one.
What is a Windows Server Answer File?
The answer file is a special file that is in an XML format that contains setting definitions and values for the configuration settings you want to automated during the installation of a Windows Server operating system installation. The configuration options include how to partition disks, where to find the Windows image to be installed, product keys to apply, and other commands you would like to run. Basically, you can place in the answer file all the configuration that you can carry out manually using the GUI Windows Server operating system installation in the Windows PE environment and then in the “out of the box” installation setup wizard.
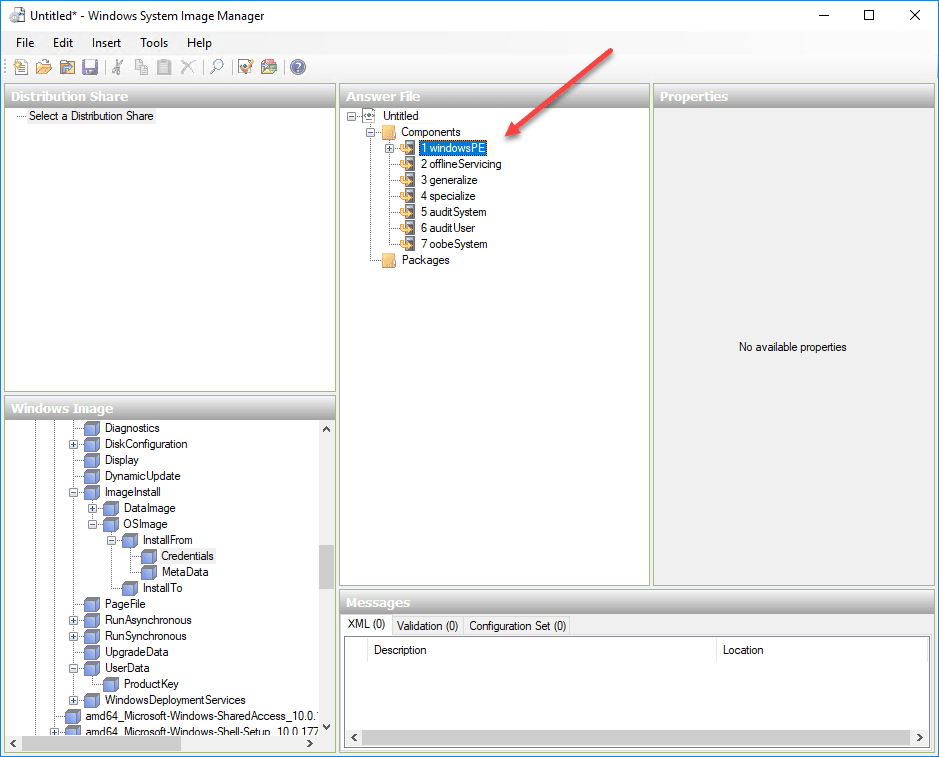
There are (7) components in the unattend answer file that can be customized to provide “answers” to the configuration in question. These seven components provide the configuration for the various parts of the installation and configuration of Windows Server. The are the following:
- windowsPE
- offlineServicing
- generalize
- specialize
- auditSystem
- auditUser
- oobeSystem
The Unattend.xml answer file is typically the name most use for the special answer file using for unattended installations of Windows Server. However, you can call the file anything you would like. While you could simply use Notepad or another text editor to create an Unattend.xml file from scratch, being as this is an XML file that is very sensitive to syntax and the proper tags being used, etc, doing it that way would be fairly difficult.
Microsoft has provided a tool that is very helpful in creating these unattend answer files for unattended installations of Windows Server and Windows 10 operating systems. The tool is part of the Windows Assessment and Deployment Kit. It is called the Windows System Image Manager.
The Windows System Image Manager or Windows SIM provides an easy way to create unattend answer files using this GUI tool and the component sections described above as part of the answer file. You can use the GUI tool to create the “answers” the configuration questions presented in the GUI. Then once finished, the Windows SIM creates the file in the correct format/syntax.
Installing Windows System Image Manager
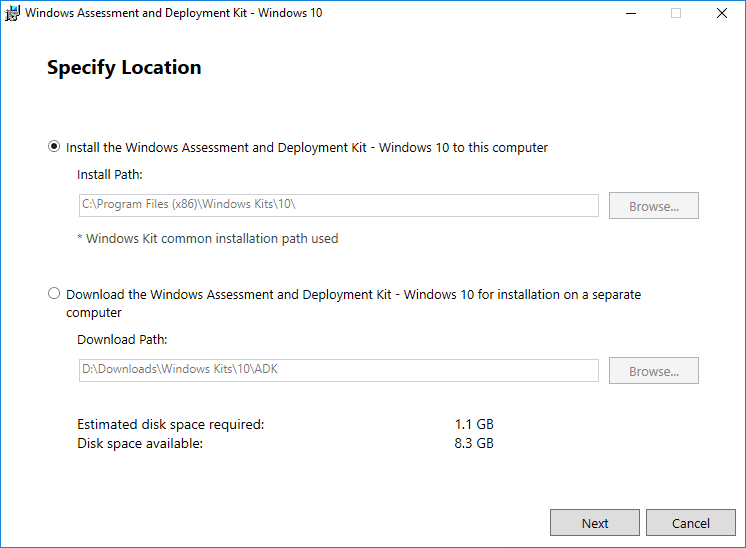
To install the Windows System Image Manager, you need to download the Windows Assessment and Deployment Kit found here:
https://docs.microsoft.com/en-us/windows-hardware/get-started/adk-install
I have found to avoid issues with images and catalog creation, it is best to use the version of the Windows ADK that corresponds to the version of the operating system you are working with.
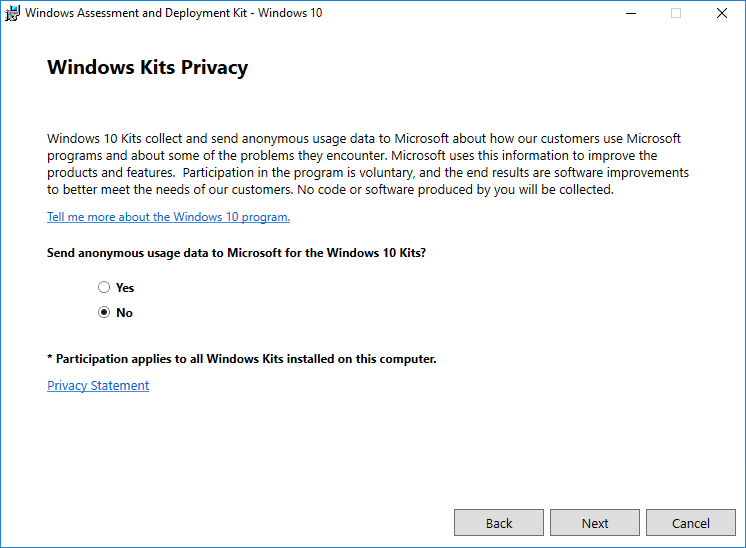
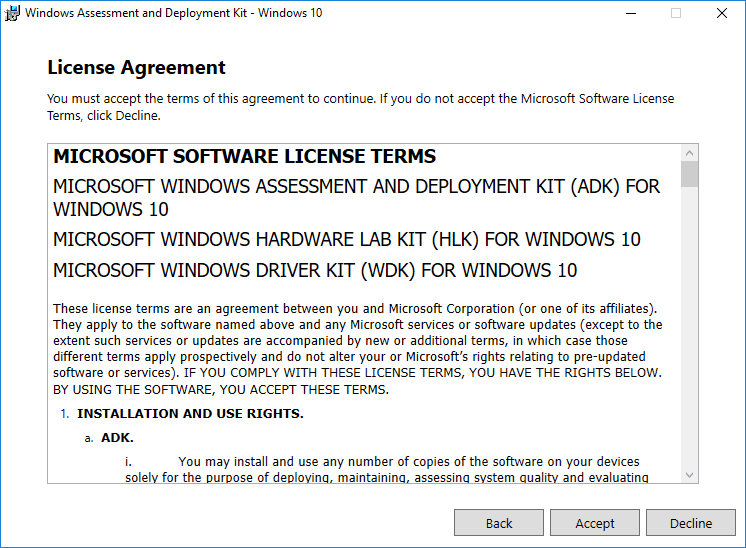
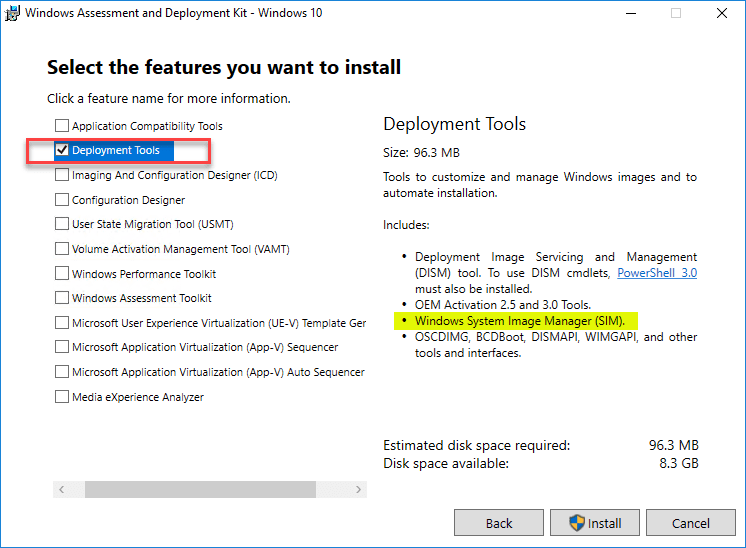
After downloading the Windows Assessment and Deployment Kit, run the installer.
On the features you want to install page, the only component that we need to install for the Windows System Image Manager is the Deployment Tools.
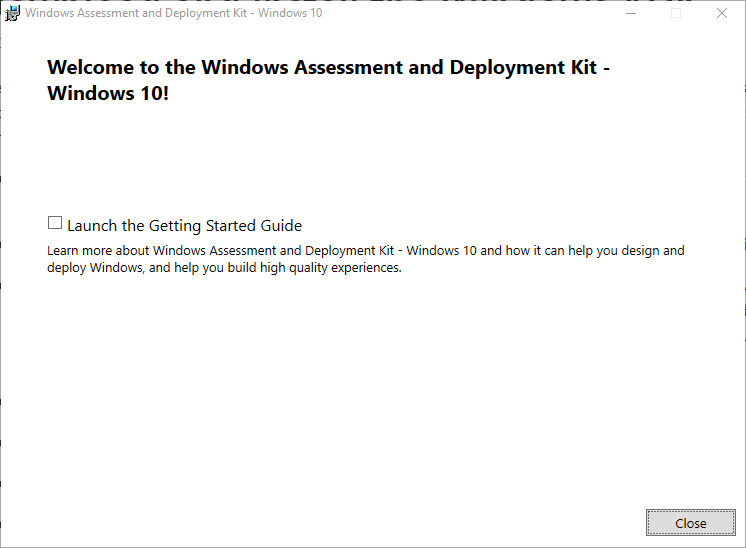
The installation finishes successfully for the Windows SIM.
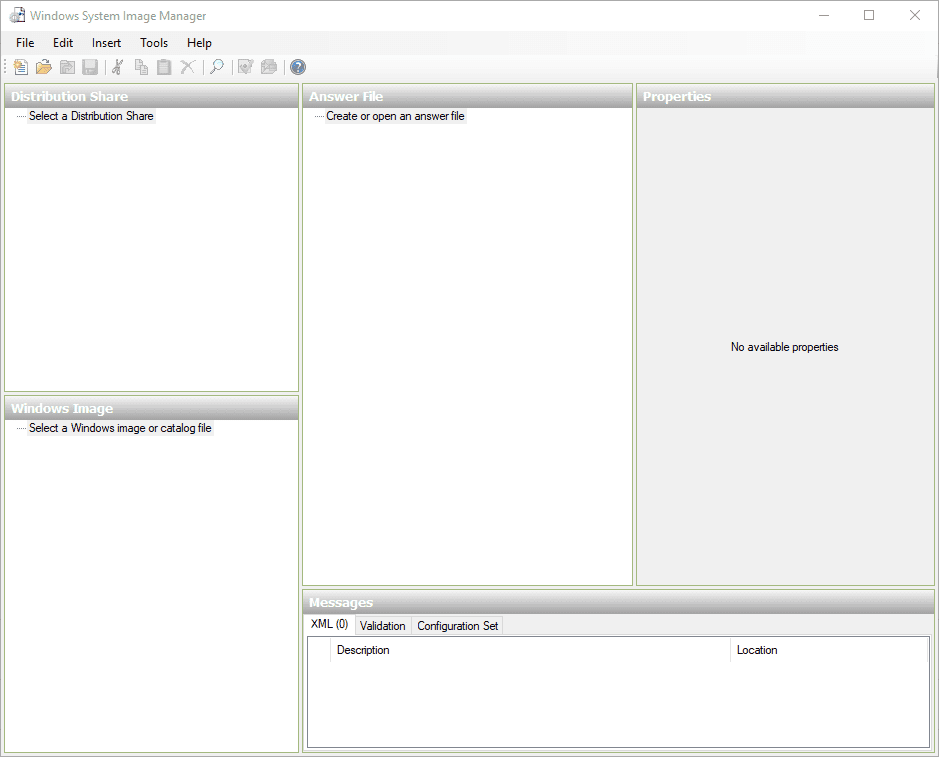
After installation, if you are struggling to find the program shortcut for the Windows ADK and specifically Windows System Image Manager, the program group is found under Windows Kits under the Windows 10 Start Menu. Launch the Windows System Image Manager.
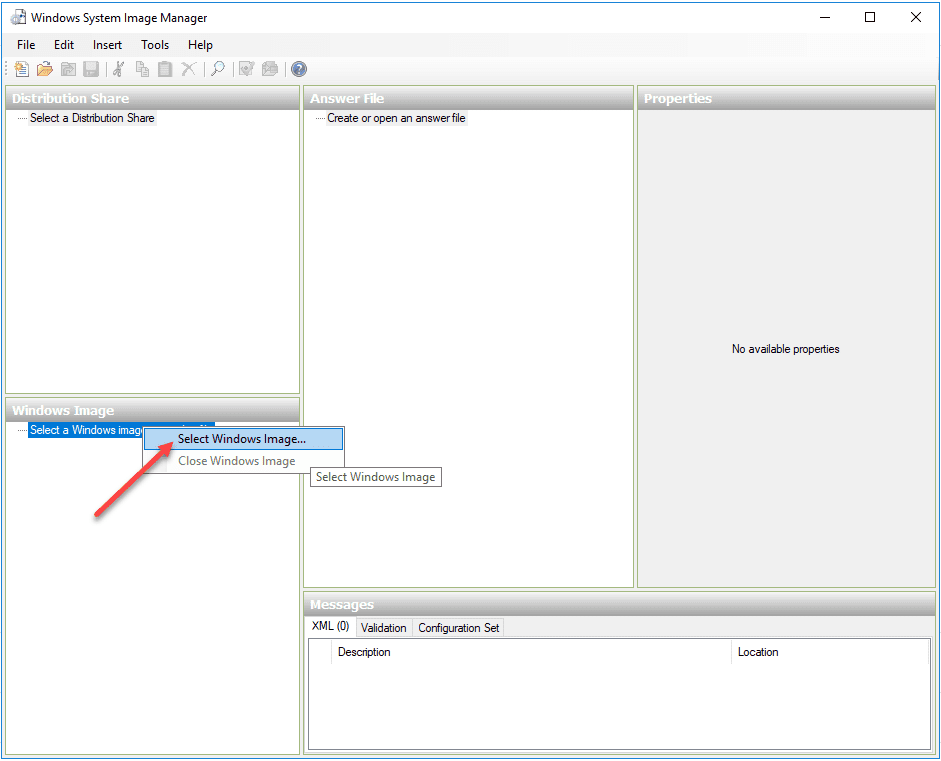
Before creating an answer file for a particular unattended installation of Windows Server 2019, you need to download the Windows Server 2019 media. After downloading the media, copy the install.wim file from the media to a writeable folder on your workstation. We will use the install.wim file to create the catalog file which is required for creating a new answer file. The catalog file is created after all the files are scanned from the .wim file.
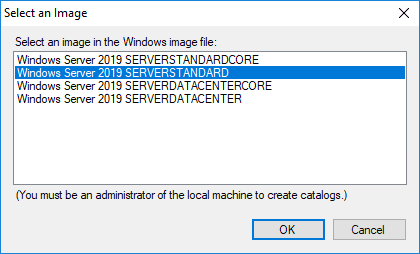
After you have copied the Windows Image from the media to the location you want to work with it, you right click the Select a Windows image and choose Select Windows Image to browse to the image file.
As you know the installation media has the images for the various versions of Windows Server including Standard, Datacenter, and Core. Here I am choosing the Server Standard image.
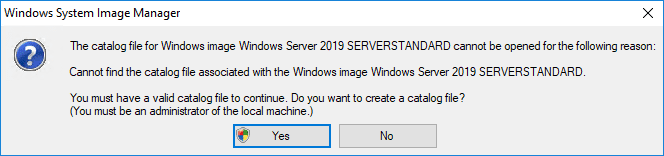
Once you choose an image, a catalog file will need to be created to work with the image and create the Answer File. You will see the message displayed about creating a catalog file for the Image. Click Yes.
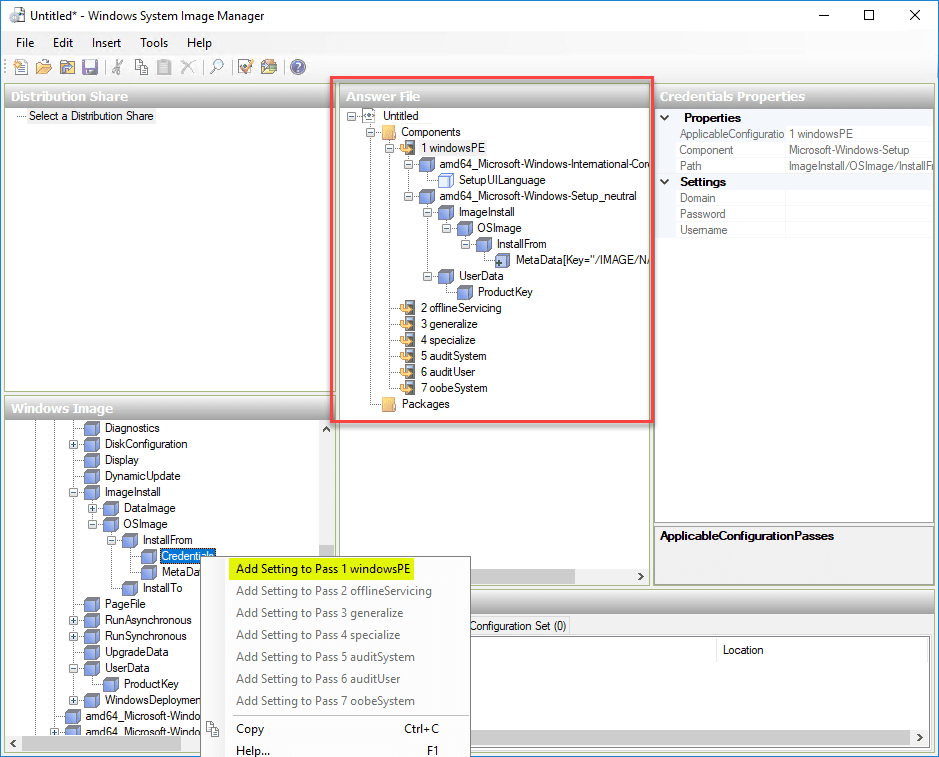
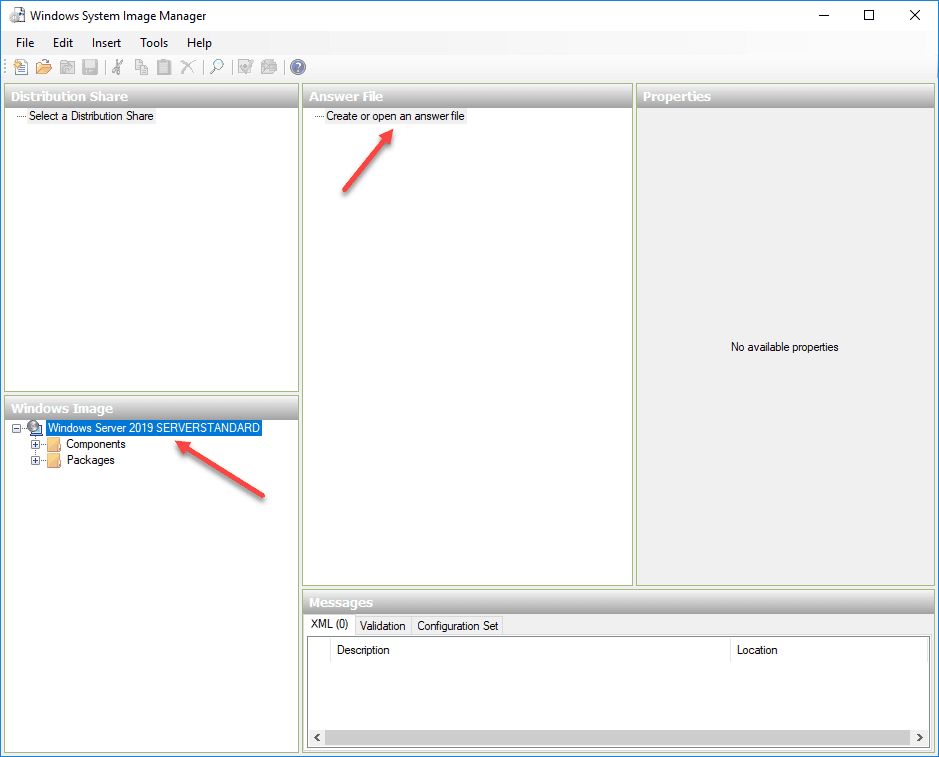
Once the Image is mounted and the catalog file is created, right click the Create or open an answer file to create a new Answer file.
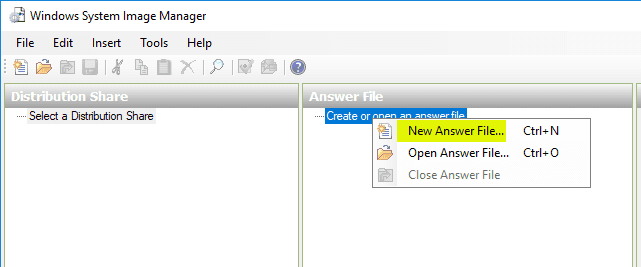
Select to create New Answer File.
As shown the Answer File is created with the (7) components for customization listed for the various configuration passes.
To add custom configuration, right-click the various components and under the Windows Image and Add Settings to Pass for adding the configuration you want to be passed along in the Answer File.

After adding your configuration to the various passes and components. Simply select File > Save Answer File to save the file to disk so you can use it with your Packer build.
Below is an example unattend answer file for Windows Server 2019 created for use with Packer.
<?xml version="1.0" encoding="utf-8"?>
<unattend xmlns="urn:schemas-microsoft-com:unattend">
    <settings pass="windowsPE">
        <component name="Microsoft-Windows-International-Core-WinPE" processorArchitecture="amd64" publicKeyToken="31bf3856ad364e35" language="neutral" versionScope="nonSxS" xmlns:wcm="http://schemas.microsoft.com/WMIConfig/2002/State" xmlns:xsi="http://www.w3.org/2001/XMLSchema-instance">
            <SetupUILanguage>
                <UILanguage>en-US</UILanguage>
            </SetupUILanguage>
            <InputLocale>en-US</InputLocale>
            <SystemLocale>en-US</SystemLocale>
            <UILanguage>en-US</UILanguage>
            <UserLocale>en-US</UserLocale>
        </component>
        <component name="Microsoft-Windows-Setup" processorArchitecture="amd64" publicKeyToken="31bf3856ad364e35" language="neutral" versionScope="nonSxS" xmlns:wcm="http://schemas.microsoft.com/WMIConfig/2002/State" xmlns:xsi="http://www.w3.org/2001/XMLSchema-instance">
            <DiskConfiguration>
                <Disk wcm:action="add">
                    <CreatePartitions>
                        <CreatePartition wcm:action="add">
                            <Order>1</Order>
                            <Size>250</Size>
                            <Type>Primary</Type>
                        </CreatePartition>
                        <CreatePartition wcm:action="add">
                            <Order>2</Order>
                            <Extend>true</Extend>
                            <Type>Primary</Type>
                        </CreatePartition>
                    </CreatePartitions>
                    <ModifyPartitions>
                        <ModifyPartition wcm:action="add">
                            <Order>1</Order>
                            <PartitionID>1</PartitionID>
                            <Format>NTFS</Format>
                            <Label>Boot</Label>
                            <Active>true</Active>
                        </ModifyPartition>
                        <ModifyPartition wcm:action="add">
                            <Order>2</Order>
                            <PartitionID>2</PartitionID>
                            <Format>NTFS</Format>
                            <Label>System</Label>
                        </ModifyPartition>
                    </ModifyPartitions>
                    <DiskID>0</DiskID>
                    <WillWipeDisk>true</WillWipeDisk>
                </Disk>
            </DiskConfiguration>
            <ImageInstall>
                <OSImage>
                    <InstallFrom>
                        <MetaData wcm:action="add">
                            <Key>/IMAGE/NAME</Key>
                            <Value>Windows Server 2019 SERVERSTANDARD</Value>
                        </MetaData>
                    </InstallFrom>
                    <InstallTo>
                        <DiskID>0</DiskID>
                        <PartitionID>2</PartitionID>
                    </InstallTo>
                    <WillShowUI>OnError</WillShowUI>
                    <InstallToAvailablePartition>false</InstallToAvailablePartition>
                </OSImage>
            </ImageInstall>
            <UserData>
                <AcceptEula>true</AcceptEula>
				<ProductKey>
                  <Key>11111-22222-33333-44444-55555</Key>
                  <WillShowUI>Never</WillShowUI>
               </ProductKey>
            </UserData>
        </component>
    </settings>
    <settings pass="specialize">
        <component name="Microsoft-Windows-Shell-Setup" processorArchitecture="amd64" publicKeyToken="31bf3856ad364e35" language="neutral" versionScope="nonSxS" xmlns:wcm="http://schemas.microsoft.com/WMIConfig/2002/State" xmlns:xsi="http://www.w3.org/2001/XMLSchema-instance">
            <TimeZone>Central Standard Time</TimeZone>
        </component>
        <component name="Microsoft-Windows-Deployment" processorArchitecture="amd64" publicKeyToken="31bf3856ad364e35" language="neutral" versionScope="nonSxS" xmlns:wcm="http://schemas.microsoft.com/WMIConfig/2002/State" xmlns:xsi="http://www.w3.org/2001/XMLSchema-instance">
            <RunSynchronous>
                <RunSynchronousCommand wcm:action="add">
                    <Path>a:vmtools.cmd</Path>
                    <Order>1</Order>
                    <WillReboot>Always</WillReboot>
                </RunSynchronousCommand>
            </RunSynchronous>
        </component>
    </settings>
    <settings pass="oobeSystem">
        <component name="Microsoft-Windows-Shell-Setup" processorArchitecture="amd64" publicKeyToken="31bf3856ad364e35" language="neutral" versionScope="nonSxS" xmlns:wcm="http://schemas.microsoft.com/WMIConfig/2002/State" xmlns:xsi="http://www.w3.org/2001/XMLSchema-instance">
            <AutoLogon>
                <Password>
                    <Value>"your password"</Value>
                    <PlainText>true</PlainText>
                </Password>
                <LogonCount>2</LogonCount>
                <Username>Administrator</Username>
                <Enabled>true</Enabled>
            </AutoLogon>
            <FirstLogonCommands>
                <SynchronousCommand wcm:action="add">
                    <Order>1</Order>
                    <!-- Enable WinRM service -->
                    <CommandLine>powershell -ExecutionPolicy Bypass -File a:configureVM.ps1</CommandLine>
                    <RequiresUserInput>true</RequiresUserInput>
                </SynchronousCommand>
            </FirstLogonCommands>
            <UserAccounts>
                <AdministratorPassword>
                    <Value>"your password"</Value>
                    <PlainText>true</PlainText>
                </AdministratorPassword>
            </UserAccounts>
        </component>
    </settings>
    <cpi:offlineImage cpi:source="wim:c:/users/administrator/desktop/win2019/install.wim#Windows Server 2019 SERVERSTANDARD" xmlns:cpi="urn:schemas-microsoft-com:cpi" />
</unattend>
Windows Server 2019 Automated Answer File Resources
You can find just about anything you want to find with answer files and customized files that others have created. Below are a few of the really good resources I have used for creating unattend answer files either in Github resources or blog posts.
- https://github.com/dteslya/win-iac-lab
- https://dteslya.engineer/automation/2018-12-20-creating_vm_templates_with_packer/
- https://sheska.com/how-to-create-an-automated-install-for-windows-server-2019/
Wrapping Up
The process to Create Unattend Answer File for Windows Server 2019 Automated Packer Installation using the Windows System Image Manager is extremely easy and effective. It takes all the heavy lifting out of the process. I have found it easier to create a file from scratch than trying to hack others files if the customization contains a great deal of customized entries. Generally, it is easy to run into syntax errors and other problems trying to paste in code. Windows System Image Manager helps with this. Unattended installations are a great way to start delving into automation and build process that lend themselves to automating your provisioning process. Stay tuned for more Packer goodness coming soon.
Brandon Lee is the Senior Writer, Engineer and owner at Virtualizationhowto.com, and a 7-time VMware vExpert, with over two decades of experience in Information Technology. Having worked for numerous Fortune 500 companies as well as in various industries, He has extensive experience in various IT segments and is a strong advocate for open source technologies. Brandon holds many industry certifications, loves the outdoors and spending time with family. Also, he goes through the effort of testing and troubleshooting issues, so you don’t have to.
Earlier this week I got an email from a fellow deployment geek, where he wanted to know how he could enable the local Administrator account on his Windows To Go stick (Windows 8.1 Enterprise). He had created the reference image in MDT 2013 (as you always should), but after running through the Windows To Go creator wizard and trying the USB stick, it run through the normal OOBE wizard, and also had the local administrator disabled. This post shows you how to automate the Windows To Go Setup, as well as some additional tips and tricks for testing and creating the image.
Background info
A Windows To Go stick, the first time you boot it, behaves like any other Windows setup. If you don’t provide an answer file, the setup will stop and prompt you for things. To automate the setup, simply copy an unattend.xml file to the Windows\System32\Sysprep folder of your USB stick.

Screen from the setup wizard when booting a Windows To Go stick without providing an unattend.xml.
Sample Unattend file for Windows 8.1 x64
Below you find a sample unattend.xml for Windows 8.1 x64 that automates the OOBE setup, enables the local administrator account, uninstall WinRE, and join the Windows To Go stick to the corp.viamonstra.com domain. As mentioned previously in this post: To automate the setup, simply copy an unattend.xml file to the Windows\System32\Sysprep folder of your USB stick (assign a drive letter first).

Unattend.xml copied to Windows\System32\Sysprep folder of the USB stick.
<?xml version="1.0" encoding="utf-8"?>
<unattend xmlns="urn:schemas-microsoft-com:unattend">
    <settings pass="specialize">
        <component name="Microsoft-Windows-Deployment" processorArchitecture="amd64" publicKeyToken="31bf3856ad364e35" language="neutral" versionScope="nonSxS" xmlns:wcm="http://schemas.microsoft.com/WMIConfig/2002/State">
        <RunSynchronous>
             <RunSynchronousCommand wcm:action="add">
             <Description>EnableAdmin</Description>
             <Order>1</Order>
             <Path>cmd /c net user Administrator /active:yes</Path>
             </RunSynchronousCommand>
             <RunSynchronousCommand wcm:action="add">
             <Description>UnfilterAdministratorToken</Description>
             <Order>2</Order>
             <Path>cmd /c reg add HKLM\SOFTWARE\Microsoft\Windows\CurrentVersion\Policies\System /v FilterAdministratorToken /t REG_DWORD /d 0 /f</Path>
             </RunSynchronousCommand>
             </RunSynchronous>
        </component>
        <component name="Microsoft-Windows-UnattendedJoin" processorArchitecture="amd64" publicKeyToken="31bf3856ad364e35" language="neutral" versionScope="nonSxS" xmlns:wcm="http://schemas.microsoft.com/WMIConfig/2002/State">
            <Identification>
                <Credentials>
                   <Username>MDT_JD</Username>
                   <Domain>VIAMONSTRA</Domain>
                   <Password>P@ssw0rd</Password>
                </Credentials>
                <JoinDomain>corp.viamonstra.com</JoinDomain>
                <MachineObjectOU>OU=Workstations,OU=ViaMonstra,DC=corp,DC=viamonstra,DC=com</MachineObjectOU>
            </Identification>
    </component>
        <component name="Microsoft-Windows-Shell-Setup" processorArchitecture="amd64" publicKeyToken="31bf3856ad364e35" language="neutral" versionScope="nonSxS" xmlns:wcm="http://schemas.microsoft.com/WMIConfig/2002/State">
           <RegisteredOrganization>ViaMonstra</RegisteredOrganization>
           <RegisteredOwner>ViaMonstra</RegisteredOwner>
           <TimeZone>Pacific Standard Time</TimeZone>
           <ComputerName>*</ComputerName>
           <CopyProfile>true</CopyProfile>
        </component>
    </settings>
    <settings pass="oobeSystem">
        <component name="Microsoft-Windows-International-Core" processorArchitecture="amd64" publicKeyToken="31bf3856ad364e35" language="neutral" versionScope="nonSxS" xmlns:wcm="http://schemas.microsoft.com/WMIConfig/2002/State" xmlns:xsi="http://www.w3.org/2001/XMLSchema-instance">
            <InputLocale>0409:00000409</InputLocale>
            <SystemLocale>en-US</SystemLocale>
            <UILanguage>en-US</UILanguage>
            <UserLocale>en-US</UserLocale>
        </component>
        <component name="Microsoft-Windows-Shell-Setup" processorArchitecture="amd64" publicKeyToken="31bf3856ad364e35" language="neutral" versionScope="nonSxS" xmlns:wcm="http://schemas.microsoft.com/WMIConfig/2002/State" xmlns:xsi="http://www.w3.org/2001/XMLSchema-instance">
            <OOBE>
                <HideEULAPage>true</HideEULAPage>
                <HideOnlineAccountScreens>true</HideOnlineAccountScreens>
                <HideWirelessSetupInOOBE>true</HideWirelessSetupInOOBE>
                <NetworkLocation>Work</NetworkLocation>
                <ProtectYourPC>1</ProtectYourPC>
                <HideOEMRegistrationScreen>true</HideOEMRegistrationScreen>
                <HideLocalAccountScreen>true</HideLocalAccountScreen>
            </OOBE>
            <UserAccounts>
                <AdministratorPassword>
                    <Value></Value>
                    <PlainText>true</PlainText>
                </AdministratorPassword>
                <LocalAccounts>
                    <LocalAccount wcm:action="add">
                    <Password>
                            <Value>P@ssw0rd</Value>
                            <PlainText>True</PlainText>
                    </Password>
                    <Description>Temp account</Description>
                    <DisplayName>Temp account</DisplayName>
                    <Group>Users</Group>
                    <Name>TempAccount</Name>
                    </LocalAccount>
                </LocalAccounts>
            </UserAccounts>
        </component>
    </settings>
</unattend>
Sample Unattend.xml:
Take it further – Automate everything with PowerShell
On the Deployment Guys blog you find a great PowerShell script written by Lutz Seidemann (Solution Architect with Microsoft Consulting Services). This script automates the entire build of the Windows To Go stick (in a project you may have to create hundreds), as well as building and injecting an unattend.xml file on the fly. Beautiful! Here is the post:
Create Windows-To-Go drives in a simple Factory mode
http://blogs.technet.com/b/deploymentguys/archive/2013/02/27/create-windows-to-go-drives-in-a-simple-factory-mode.aspx
More PowerShell for Windows To Go.
Here is another useful post on automating the creation of Windows To Go:
Deploy Windows To Go in Your Organization
http://technet.microsoft.com/en-us/library/jj721578.aspx
Reference images for Windows To Go
Unlike normal reference images, you want to add at least a few generic network and video drivers to a reference image used for Windows To Go. At the very least, add some additional network drivers, because without them, Windows will have a hard time downloading other drivers.
Tips for testing in Hyper-V
If you want to test your Windows To Go stick, and you don’t have a physical machine available, you can add is a pass-through disk in Hyper-V and test it there. If the USB stick doesn’t show, please make sure it’s set to offline in disk manager.

Happy deployment,
/ Johan
If you want to build a Windows image for use in your OpenStack
environment, you can follow the example in the official
documentation, or you can grab a Windows 2012r2
evaluation pre-built image from the nice folks at CloudBase.
The CloudBase-provided image is built using a set of scripts and
configuration files that CloudBase has made available on
GitHub.
The CloudBase repository is an excellent source of information, but I
wanted to understand the process myself. This post describes the
process I went through to establish an automated process for
generating a Windows image suitable for use with OpenStack.
Unattended windows installs⌗
The Windows installer supports fully automated installations through
the use of an answer file, or “unattend” file, that provides
information to the installer that would otherwise be provided
manually. The installer will look in a number of places to find
this file. For our purposes, the important fact is that the installer
will look for a file named autounattend.xml in the root of all
available read/write or read-only media. We’ll take advantage of this
by creating a file config/autounattend.xml, and then generating an
ISO image like this:
mkisofs -J -r -o config.iso config
And we’ll attach this ISO to a vm later on in order to provide the
answer file to the installer.
So, what goes into this answer file?
The answer file is an XML document enclosed in an
<unattend>..</unattend> element. In order to provide all the
expected XML namespaces that may be used in the document, you would
typically start with something like this:
<?xml version="1.0" ?>
<unattend
  xmlns="urn:schemas-microsoft-com:unattend"
  xmlns:ms="urn:schemas-microsoft-com:asm.v3"
  xmlns:wcm="http://schemas.microsoft.com/WMIConfig/2002/State">

  <!-- your content goes here -->

</unattend>
Inside this <unattend> element you will put one or more <settings>
elements, corresponding to the different configuration passes of the
installer:
<settings pass="specialize">
</settings>
The available configuration passes are:
- auditSystem
- auditUser
- generalize
- offlineServicing
- oobeSystem
- specialize
- windowsPE
Of these, the most interesting for our use will be:
-
windowsPE– used to install device drivers for use within the
installer environment. We will use this to install the VirtIO
drivers necessary to make VirtIO devices visible to the Windows
installer. -
specialize– In this pass, the installer applies machine-specific
configuration. This is typically used to configure networking,
locale settings, and most other things. -
oobeSystem– In this pass, the installer configures things that
happen at first boot. We use this to step to install some
additional software and run sysprep in order to prepare the
image for use in OpenStack.
Inside each <settings> element we will place one or more
<component> elements that will apply specific pieces of
configuration. For example, the following <component> configures
language and keyboard settings in the installer:
<settings pass="windowsPE">
  <component name="Microsoft-Windows-International-Core-WinPE"
    processorArchitecture="amd64"
    publicKeyToken="31bf3856ad364e35"
    language="neutral"
    versionScope="nonSxS">

    <SetupUILanguage>
      <UILanguage>en-US</UILanguage>
    </SetupUILanguage>
    <InputLocale>en-US</InputLocale>
    <UILanguage>en-US</UILanguage>
    <SystemLocale>en-US</SystemLocale>
    <UserLocale>en-US</UserLocale>
  </component>
</settings>
Technet provides documentation on the available components.
Cloud-init for Windows⌗
Cloud-init is a tool that will configure a virtual instance when
it first boots, using metadata provided by the cloud service provider.
For example, when booting a Linux instance under OpenStack,
cloud-init will contact the OpenStack metadata service at
http://169.254.169.254/ in order to retrieve things like the system
hostname, SSH keys, and so forth.
While cloud-init has support for Linux and BSD, it does not support
Windows. The folks at Cloudbase have produced cloudbase-init
in order to fill this gap. Once installed, the cloudbase-init tool
will, upon first booting a system:
- Configure the network using information provided in the cloud
metadata - Set the system hostname
- Create an initial user account (by default “Admin”) with a randomly
generated password (see below for details) - Install your public key, if provided
- Execute a script provided via cloud
user-data
Passwords and ssh keys⌗
While cloudbase-init will install your SSH public key (by default
into /Users/admin/.ssh/authorized_keys), Windows does not ship with
an SSH server and cloudbase-init does not install one. So what is it
doing with the public key?
While you could arrange to install an ssh server that would make use
of the key, cloudbase-init uses it for a completely unrelated
purpose: encrypting the randomly generated password. This encrypted
password is then passed back to OpenStack, where you can retrieve it
using the nova get-password command, and decrypt it using the
corresponding SSH private key.
Running nova get-password myinstance will return something like:
w+In/P6+FeE8nv45oCjc5/Bohq4adqzoycwb9hOy9dlmuYbz0hiV923WW0fL
7hvQcZnWqGY7xLNnbJAeRFiSwv/MWvF3Sq8T0/IWhi6wBhAiVOxM95yjwIit
/L1Fm0TBARjoBuo+xq44YHpep1qzh4frsOo7TxvMHCOtibKTaLyCsioHjRaQ
dHk+uVFM1E0VIXyiqCdj421JoJzg32DqqeQTJJMqT9JiOL3FT26Y4XkVyJvI
vtUCQteIbd4jFtv3wEErJZKHgxHTLEYK+h67nTA4rXpvYVyKw9F8Qwj7JBTj
UJqp1syEqTR5/DUHYS+NoSdONUa+K7hhtSSs0bS1ghQuAdx2ifIA7XQ5eMRS
sXC4JH3d+wwtq4OmYYSOQkjmpKD8s5d4TgtG2dK8/l9B/1HTXa6qqcOw9va7
oUGGws3XuFEVq9DYmQ5NF54N7FU7NVl9UuRW3WTf4Q3q8VwJ4tDrmFSct6oG
2liJ8s7ybbW5PQU/lJe0gGBGGFzo8c+Rur17nsZ01+309JPEUKqUQT/uEg55
ziOo8uAwPvInvPkbxjH5doH79t47Erb3cK44kuqZy7J0RdDPtPr2Jel4NaSt
oCs+P26QF2NVOugsY9O/ugYfZWoEMUZuiwNWCWBqrIohB8JHcItIBQKBdCeY
7ORjotJU+4qAhADgfbkTqwo=
Providing your secret key as an additional parameter will decrypt the
password:
$ nova get-password myinstance ~/.ssh/id_rsa
fjgJmUB7fXF6wo
With an appropriately configured image, you could connect using an RDP
client and log in as the “Admin” user using that password.
Passwords without ssh keys⌗
If you do not provide your instance with an SSH key you will not be
able to retrieve the randomly generated password. However, if you can
get console access to your instance (e.g., via the Horizon dashboard),
you can log in as the “Administrator” user, at which point you will be
prompted to set an initial password for that account.
Logging⌗
You can find logs for cloudbase-init in c:\program files (x86)\cloudbase solutions\cloudbase-init\log\cloudbase-init.log.
If appropriately configured, cloudbase-init will also log to the
virtual serial port. This log is available in OpenStack by running
nova console-log <instance>. For example:
$ nova console-log my-windows-server
2014-11-19 04:10:45.887 1272 INFO cloudbaseinit.init [-] Metadata service loaded: 'HttpService'
2014-11-19 04:10:46.339 1272 INFO cloudbaseinit.init [-] Executing plugin 'MTUPlugin'
2014-11-19 04:10:46.371 1272 INFO cloudbaseinit.init [-] Executing plugin 'NTPClientPlugin'
2014-11-19 04:10:46.387 1272 INFO cloudbaseinit.init [-] Executing plugin 'SetHostNamePlugin'
.
.
.
Putting it all together⌗
I have an install script that drives the process, but it’s
ultimately just a wrapper for virt-install and results in the
following invocation:
exec virt-install -n ws2012 -r 2048 \
  -w network=default,model=virtio \
  --disk path=$TARGET_IMAGE,bus=virtio \
  --cdrom $WINDOWS_IMAGE \
  --disk path=$VIRTIO_IMAGE,device=cdrom \
  --disk path=$CONFIG_IMAGE,device=cdrom \
  --os-type windows \
  --os-variant win2k8 \
  --vnc \
  --console pty
Where TARGET_IMAGE is the name of a pre-existing qcow2 image onto
which we will install Windows, WINDOWS_IMAGE is the path to an ISO
containing Windows Server 2012r2, VIRTIO_IMAGE is the path to an ISO
containing VirtIO drivers for Windows (available from the Fedora
project), and CONFIG_IMAGE is a path to the ISO containing our
autounattend.xml file.
The fully commented autounattend.xml file, along with the script
mentioned above, are available in my windows-openstack-image
repository on GitHub.
The answer file in detail⌗
windowsPE⌗
In the windowsPE phase, we start by configuring the installer locale
settings:
<component name="Microsoft-Windows-International-Core-WinPE"
  processorArchitecture="amd64"
  publicKeyToken="31bf3856ad364e35"
  language="neutral"
  versionScope="nonSxS">

  <SetupUILanguage>
    <UILanguage>en-US</UILanguage>
  </SetupUILanguage>
  <InputLocale>en-US</InputLocale>
  <UILanguage>en-US</UILanguage>
  <SystemLocale>en-US</SystemLocale>
  <UserLocale>en-US</UserLocale>

</component>
And installing the VirtIO drviers using the Microsoft-Windows-PnpCustomizationsWinPE component:
<component name="Microsoft-Windows-PnpCustomizationsWinPE"
  publicKeyToken="31bf3856ad364e35" language="neutral"
  versionScope="nonSxS" processorArchitecture="amd64">

  <DriverPaths>
    <PathAndCredentials wcm:action="add" wcm:keyValue="1">
      <Path>d:\win8\amd64</Path>
    </PathAndCredentials>
  </DriverPaths>

</component>
This assumes that the VirtIO image is mounted as drive d:.
With the drivers installed, we can then call the
Microsoft-Windows-Setup component to configure the disks and
install Windows. We start by configuring the product key:
<component name="Microsoft-Windows-Setup"
  publicKeyToken="31bf3856ad364e35"
  language="neutral"
  versionScope="nonSxS"
  processorArchitecture="amd64">

  <UserData>
    <AcceptEula>true</AcceptEula>
    <ProductKey>
      <WillShowUI>OnError</WillShowUI>
      <Key>INSERT-PRODUCT-KEY-HERE</Key>
    </ProductKey>
  </UserData>
And then configure the disk with a single partition (that will grow to
fill all the available space) which we then format with NTFS:
  <DiskConfiguration>
    <WillShowUI>OnError</WillShowUI>
    <Disk wcm:action="add">
      <DiskID>0</DiskID>
      <WillWipeDisk>true</WillWipeDisk>

      <CreatePartitions>
        <CreatePartition wcm:action="add">
          <Order>1</Order>
          <Extend>true</Extend>
          <Type>Primary</Type>
        </CreatePartition>
      </CreatePartitions>

      <ModifyPartitions>
        <ModifyPartition wcm:action="add">
          <Format>NTFS</Format>
          <Order>1</Order>
          <PartitionID>1</PartitionID>
          <Label>System</Label>
        </ModifyPartition>
      </ModifyPartitions>
    </Disk>
  </DiskConfiguration>
We provide information about what to install:
  <ImageInstall>
    <OSImage>
      <WillShowUI>Never</WillShowUI>

      <InstallFrom>
        <MetaData>
          <Key>/IMAGE/Name</Key>
          <Value>Windows Server 2012 R2 SERVERSTANDARDCORE</Value>
        </MetaData>
      </InstallFrom>
And where we would like it installed:
      <InstallTo>
        <DiskID>0</DiskID>
        <PartitionID>1</PartitionID>
      </InstallTo>
    </OSImage>
  </ImageInstall>
specialize⌗
In the specialize phase, we start by setting the system name to a
randomly generated value using the Microsoft-Windows-Shell-Setup
component:
<component name="Microsoft-Windows-Shell-Setup"
  publicKeyToken="31bf3856ad364e35" language="neutral"
  versionScope="nonSxS" processorArchitecture="amd64">
  <ComputerName>*</ComputerName>
</component>
We enable remote desktop because in an OpenStack environment this will
probably be the preferred mechanism with which to connect to the host
(but see this document for an alternative mechanism).
First, we need to permit terminal server connections:
<component name="Microsoft-Windows-TerminalServices-LocalSessionManager"
  processorArchitecture="amd64"
  publicKeyToken="31bf3856ad364e35"
  language="neutral"
  versionScope="nonSxS">
  <fDenyTSConnections>false</fDenyTSConnections>
</component>
And we do not want to require network-level authentication prior to
connecting:
<component name="Microsoft-Windows-TerminalServices-RDP-WinStationExtensions"
  processorArchitecture="amd64"
  publicKeyToken="31bf3856ad364e35"
  language="neutral"
  versionScope="nonSxS">
  <UserAuthentication>0</UserAuthentication>
</component>
We will also need to open the necessary firewall group:
<component name="Networking-MPSSVC-Svc"
  processorArchitecture="amd64"
  publicKeyToken="31bf3856ad364e35"
  language="neutral"
  versionScope="nonSxS">
  <FirewallGroups>
    <FirewallGroup wcm:action="add" wcm:keyValue="RemoteDesktop">
      <Active>true</Active>
      <Profile>all</Profile>
      <Group>@FirewallAPI.dll,-28752</Group>
    </FirewallGroup>
  </FirewallGroups>
</component>
Finally, we use the Microsoft-Windows-Deployment component to configure the Windows firewall to permit ICMP traffic:
<component name="Microsoft-Windows-Deployment"
  processorArchitecture="amd64"
  publicKeyToken="31bf3856ad364e35"
  language="neutral" versionScope="nonSxS">

  <RunSynchronous>

    <RunSynchronousCommand wcm:action="add">
      <Order>3</Order>
      <Path>netsh advfirewall firewall add rule name=ICMP protocol=icmpv4 dir=in action=allow</Path>
    </RunSynchronousCommand>
And to download the cloudbase-init installer and make it available
for later steps:
    <RunSynchronousCommand wcm:action="add">
      <Order>5</Order>
      <Path>powershell -NoLogo -Command "(new-object System.Net.WebClient).DownloadFile('https://www.cloudbase.it/downloads/CloudbaseInitSetup_Beta_x64.msi', 'c:\Windows\Temp\cloudbase.msi')"</Path>
    </RunSynchronousCommand>
  </RunSynchronous>
</component>
We’re using Powershell here because it has convenient methods
available for downloading URLs to local files. This is roughly
equivalent to using curl on a Linux system.
oobeSystem⌗
In the oobeSystem phase, we configure an automatic login for the
Administrator user:
  <UserAccounts>
    <AdministratorPassword>
      <Value>Passw0rd</Value>
      <PlainText>true</PlainText>
    </AdministratorPassword>
  </UserAccounts>
  <AutoLogon>
    <Password>
      <Value>Passw0rd</Value>
      <PlainText>true</PlainText>
    </Password>
    <Enabled>true</Enabled>
    <LogonCount>50</LogonCount>
    <Username>Administrator</Username>
  </AutoLogon>
This automatic login only happens once, because we configure
FirstLogonCommands that will first install cloudbase-init:
  <FirstLogonCommands>
    <SynchronousCommand wcm:action="add">
      <CommandLine>msiexec /i c:\windows\temp\cloudbase.msi /qb /l*v c:\windows\temp\cloudbase.log LOGGINGSERIALPORTNAME=COM1</CommandLine>
      <Order>1</Order>
    </SynchronousCommand>
And will then run sysprep to generalize the system (which will,
among other things, lose the administrator password):
    <SynchronousCommand wcm:action="add">
      <CommandLine>c:\windows\system32\sysprep\sysprep /generalize /oobe /shutdown</CommandLine>
      <Order>2</Order>
    </SynchronousCommand>
  </FirstLogonCommands>
The system will shut down when sysprep is complete, leaving you with a
Windows image suitable for uploading into OpenStack:
glance image-create --name ws2012 \
  --disk-format qcow2 \
  --container-format bare  \
  --file ws2012.qcow2
Troubleshooting⌗
If you run into problems with an unattended Windows installation:
During the first stage of the installer, you can look in the
x:\windows\panther directory for setupact.log and setuperr.log,
which will have information about the early install process. The x:
drive is temporary, and files here will be discarded when the system
reboots.
Subsequent installer stages will log to
c:\windows\panther\.
If you are unfamiliar with Windows, the type command can be used
very much like the cat command on Linux, and the more command
provides paging as you would expect. The notepad command will open
a GUI text editor/viewer.
You can emulate the tail command using powershell; to see the last
10 lines of a file:
C:\> powershell -command "Get-Content setupact.log -Tail 10"
Technet has a Deployment Troubleshooting and Log Files
document that discusses in more detail what is logged and where to
find it.
Some time ago I published a post on creating Linux OVF template, apparently people liked the idea because I was asked to do same for a Windows 2016 Server image.
If you are a Windows guy, you for sure know that there are millions of ways to deploy customised Windows OS. Some are better some are worse, and the method I will describe here today is not the best either, but it works for it’s purpose.
To summarise: We have a Windows OS with preinstalled set of Software, and we want to pack it into a template for future redistribution.
We have the following requirements:
- It should be possible to provide basic network configuration details as part of OVF deployment wizard.
- System should be deployed with newly generated SID, so it can be joined to an Active Directory Domain.
Sounds simple enough, but the problem for me is that I am not that familiar with Windows, especially programming anything with it. Well, I always wanted to learn some Powershell, so this was a good opportunity to start reading.
So, to get going we need several things. Here is my task list:
Obviously we will need to create a VM with Windows inside. Also at this stage we can install all the Software needed.
Next, we need to enable vApp Options on the VM and create some properties. Process is exactly the same as in my Linux OVF article. Here is what I created on mine.

With the automation we need to solve the following issues:
- Fetch vApp settings from inside the OS
- Take those settings and configure whatever is needed
- Execute Sysprep to regenerate the SID
Lets go one by one.
Whole Process
1. Considerations
Before we will do any development we need to do some considerations.
First thing we will need to decide is where to place our scripts. The path should be accessible by system, and Administrator user. It also need to stay in place after Sysprep is executed. I chose to place the scripts in C:\Program Files\vmenv\ .
Second thing is to create a template XML for Sysprep unattended execution. It will be modified and applied by our script. I came up with very minimal Sysprep XML file which I will use here. I will attach it at the end for anyone who wants to reuse.
2. Fetch vApp Settings
To fetch vApp settings I will use VMware tools. Commands to do that is pretty similar to the one in Linux. I will fetch the data and write it to an XML file.
"C:\Program Files\VMware\VMware Tools\vmtoolsd.exe" --cmd="info-get guestinfo.ovfEnv" > "C:\Program Files\vmenv\vmenv.xml"
Actually I will make this line a separate getvmenv.bat script, for potential reuse by other apps in future.
3. Parse the data and assign variables
Once I have the vmenv.xml file I can fetch all the data I need from it and assign it to variables. Here is how I did it:
$vmenvxml = 'C:\Program Files\vmenv\vmenv.xml'
[xml]$vmenv = Get-Content $vmenvxml
    # Collect Variables from vmenv XML
    $vmIP = $vmenv.Environment.PropertySection.Property | ?{ $_.key -like '*_IP*' } | select -expand value
    $vmNetmask = $vmenv.Environment.PropertySection.Property | ?{ $_.key -like '*Netmask*' } | select -expand value
    $vmGW = $vmenv.Environment.PropertySection.Property | ?{ $_.key -like '*Gateway*' } | select -expand value
    $vmHostname = $vmenv.Environment.PropertySection.Property | ?{ $_.key -like '*Hostname*' } | select -expand value
    $vmDNS = $vmenv.Environment.PropertySection.Property | ?{ $_.key -like '*DNS*' } | select -expand value
4. Apply Network settings
Now, we have variables with the settings we need, so we can now configure the network. First lets identify the name of Network connection we use on the system.
$ifname = Get-NetAdapter | Select -expand Name
Then, lets configure settings.
# Configure network interface
New-NetIPAddress –InterfaceAlias $ifname –IPAddress $vmIP –PrefixLength $vmNetmask -DefaultGateway $vmGW
# Configure DNS servers
Set-DnsClientServerAddress -InterfaceAlias $ifname -ServerAddresses $vmDNS
Note: This will work only in case you interface is not configured. If the interface has an IP configured, this code will fail. This is not an issue during new deployments, but keep this in mind while testing.
5. Configure Hostname
We will configure hostname as part of Sysprep, so what we need to do is to parse the Sysprep template XML I have created, replace hostname value and write the change to new Sysprep XML file. Here is how I did it:
$sysprepnofile = 'C:\Program Files\vmenv\unattend_no.xml'
$sysprepokfile = 'C:\Program Files\vmenv\unattend_ok.xml'
[xml]$vmsysprepenv = Get-Content $sysprepnofile

# Replace Hostname in Sysprep file and write it to disk
# If you have added nodes to sysprep, make sure array element number is fixed.
$vmsysprepenv.unattend.settings.Component[2].Computername = "$vmHostname"
$vmsysprepenv.Save($sysprepokfile)
6. Execute Sysprep
Now, once we have all we need we can execute Sysprep and let the VM reboot.
$sysprepexe = "C:\Windows\System32\Sysprep\sysprep.exe /generalize /oobe /reboot /unattend:'$sysprepokfile'"
Invoke-Expression -Command $sysprepexe
7. Taking care of the state
We will be scheduling this script to run on boot, and we want to make sure that it runs only once on first boot, so we need to check run state. I implemented this logic with simple state file and if statement.
$firstbootstate = 'C:\Program Files\vmenv\firstboot.state'
($vmenvstate = Get-ChildItem $firstbootstate) 2>&1 | out-null

If ($vmenvstate.Exists) {
    # If state file exists, nothing will happen.
    Write-Output "State file exists. Nothing to do....."
}
Else {
    #Here I am executing the whole script
    <Script Contents>
    #and in the end writing to state file
    Write-Output $vmdate":FirstBoot Complete" >> $firstbootstate
}
8. Loging
Of course it makes sense to do some loging in the script. Nothing fancy here, I just capture current date to the variable and then writing some output to log file.
$vmlog = 'C:\Program Files\vmenv\vmenv.log'
$vmdate = Get-Date -Format "MMddyyyy-hh:mm"
Write-Output $vmdate": SOME INFO" >> $vmlog
9. Scheduling
I am using standard Windows Task scheduler to schedule this script to run on boot. Here is the command I used.
schtasks /create /tn "VappSet" /sc onstart /delay 0000:30 /rl highest /ru system /tr "powershell.exe -file 'C:\Program Files\vmenv\vappSet.ps1'"
10. Cleanup and export
Once all scripts are placed and task is scheduled its time to clean up and export.
- Make sure Network settings are not configured on VM, set them to use DHCP.
- Configure some standard password for the Administrator user.
- Remove files which are not needed.
- Shutdown the VM and export it as OVF.
Outcome
As an outcome you will have a template which on import will present you with a nice wizard like this one

Scripts
If you want to use the scripts you can take latest version from my github page, otherwise just copy from here.
"C:\Program Files\VMware\VMware Tools\vmtoolsd.exe" --cmd="info-get guestinfo.ovfEnv" > "C:\Program Files\vmenv\vmenv.xml"
#############################################################################
# Script Purpose: vApp settings
# Author: Aram Avetisyan (@how2vm)
# Version: 2
# Release Date: 06.03.2018
# Dependency: getvmenv.bat and unattend_no.xml
#############################################################################

#File Paths
$firstbootstate = 'C:\Program Files\vmenv\firstboot.state'
$vmlog = 'C:\Program Files\vmenv\vmenv.log'
$getenvbat = 'C:\Program` Files\vmenv\getvmenv.bat'
$vmenvxml = 'C:\Program Files\vmenv\vmenv.xml'
$sysprepnofile = 'C:\Program Files\vmenv\unattend_no.xml'
$sysprepokfile = 'C:\Program Files\vmenv\unattend_ok.xml'
$sysprepexe = "C:\Windows\System32\Sysprep\sysprep.exe /generalize /oobe /reboot /unattend:'$sysprepokfile'"

# Check Execution state
($vmenvstate = Get-ChildItem $firstbootstate) 2>&1 | out-null

If ($vmenvstate.Exists) {
    # If state file exists, nothing will happen.
    Write-Output "State file exists. Nothing to do....."
}
Else {
    # Generate Timestamp, Write to Log file and export XML config file
    $vmdate = Get-Date -Format "MMddyyyy-hh:mm"
    Write-Output $vmdate": Fetching config XMLs" >> $vmlog
    Invoke-Expression -Command $getenvbat

    # Import XMLs save those as variables.
    [xml]$vmenv = Get-Content $vmenvxml
    [xml]$vmsysprepenv = Get-Content $sysprepnofile
    # Collect Variables from vmenv XML
    $vmIP = $vmenv.Environment.PropertySection.Property | ?{ $_.key -like '*_IP*' } | select -expand value
    $vmNetmask = $vmenv.Environment.PropertySection.Property | ?{ $_.key -like '*Netmask*' } | select -expand value
    $vmGW = $vmenv.Environment.PropertySection.Property | ?{ $_.key -like '*Gateway*' } | select -expand value
    $vmHostname = $vmenv.Environment.PropertySection.Property | ?{ $_.key -like '*Hostname*' } | select -expand value
    $vmDNS = $vmenv.Environment.PropertySection.Property | ?{ $_.key -like '*DNS*' } | select -expand value

    # Replace Hostname in Sysprep file and write it to disk
    # If you ahve added nodes to sysprep, make sure array element number is fixed.
    $vmsysprepenv.unattend.settings.Component[2].Computername = "$vmHostname"
    $vmsysprepenv.Save($sysprepokfile)


    # Fetch Network interface name
    $ifname = Get-NetAdapter | Select -expand Name
    #Configure network
    $vmdate = Get-Date -Format "MMddyyyy-hh:mm"
    Write-Output $vmdate": Configuring Network settings" >> $vmlog
    New-NetIPAddress –InterfaceAlias $ifname –IPAddress $vmIP –PrefixLength $vmNetmask -DefaultGateway $vmGW
    Set-DnsClientServerAddress -InterfaceAlias $ifname -ServerAddresses $vmDNS

    # Execute sysprep to change SID and set hostname
    $vmdate = Get-Date -Format "MMddyyyy-hh:mm"
    Write-Output $vmdate": Setting a 10 Seconds timer before rebooting" >> $vmlog
    Write-Output "Sysprep will be executed in 20 seconds. A reboot will follow."
    Start-Sleep -s 20
    $vmdate = Get-Date -Format "MMddyyyy-hh:mm"
    Write-Output $vmdate":FirstBoot Complete" >> $firstbootstate
    Invoke-Expression -Command $sysprepexe
}
<?xml version="1.0" encoding="utf-8"?>
<unattend xmlns="urn:schemas-microsoft-com:unattend" xmlns:wcm="http://schemas.microsoft.com/WMIConfig/2002/State" xmlns:xsi="http://www.w3.org/2001/XMLSchema-instance">
    <settings pass="generalize">
        <component name="Microsoft-Windows-PnpSysprep" processorArchitecture="amd64" publicKeyToken="31bf3856ad364e35" language="neutral" versionScope="nonSxS">
            <PersistAllDeviceInstalls>true</PersistAllDeviceInstalls>
        </component>
    </settings>
    <settings pass="specialize">
        <component name="Microsoft-Windows-Deployment" processorArchitecture="amd64" publicKeyToken="31bf3856ad364e35" language="neutral" versionScope="nonSxS">
            <RunSynchronous>
                <RunSynchronousCommand wcm:action="add">
                    <Description>Disable create user account</Description>
                    <Path>reg add HKLM\Software\Microsoft\Windows\CurrentVersion\Setup\OOBE /v UnattendCreatedUser /t REG_DWORD /d 1 /f</Path>
                    <Order>1</Order>
                </RunSynchronousCommand>
            </RunSynchronous>
        </component>
        <component name="Microsoft-Windows-Shell-Setup" processorArchitecture="amd64" publicKeyToken="31bf3856ad364e35" language="neutral" versionScope="nonSxS">
            <RegisteredOwner></RegisteredOwner>
            <RegisteredOrganization>HOW2VM</RegisteredOrganization>
            <TimeZone>Central Standard Time</TimeZone>
            <Computername>*</Computername>
            <OOBE>
                <HideEULAPage>true</HideEULAPage>
                <NetworkLocation>Work</NetworkLocation>
                <ProtectYourPC>3</ProtectYourPC>
                <SkipUserOOBE>true</SkipUserOOBE>
            </OOBE>
        </component>
    </settings>
    <settings pass="oobeSystem">
        <component name="Microsoft-Windows-International-Core" processorArchitecture="amd64" publicKeyToken="31bf3856ad364e35" language="neutral" versionScope="nonSxS">
            <InputLocale>en-US</InputLocale>
            <SystemLocale>en-US</SystemLocale>
            <UILanguage>en-US</UILanguage>
            <UserLocale>en-US</UserLocale>
        </component>
    </settings>
    <cpi:offlineImage cpi:source="wim:c:/users/administrator/documents/install.wim#Windows Server 2016 SERVERDATACENTER" xmlns:cpi="urn:schemas-microsoft-com:cpi" />
</unattend>
Closing word
This was a nice learning experience for me, and I actually liked Powershell a lot. A usual, I don’t claim that this is the best way to do things, but it works. If you have any comments on how I can improve this, let me know down in the comments.
The following two tabs change content below.
- Bio
- Latest Posts
Aram Avetisyan is an IT specialist with more than 18 years experience. He has rich background in various IT related fields like Cloud, Virtualization and SDN. He holds several industry level certifications including but not limited to VCIX-DCV, VCIX-NV. He is also a vEXPERT in years 2014-2021.
Getting started
The second item need to automate the creation of a VM is a way to bootstrap said automation of a fresh windows image. That requires an unattend.xml
prerequisites
Now to work with Unattent.xml you need a deep understanding of XML structure and namespace… Just kidding. I’m going to use New-UnattendXml part of WindowsImageTools
You can install WindowsImageTools from the PowerShell Gallery with install-module WindowsImageTools
Creating a basic Unattent.xml
Lets start off with a basic Unattend. Minimum requirements for this is changing the administrator password
New-UnattendXml -AdminCredential (Get-Credential) |
Get-Content
cmdlet Get-Credential at command pipeline position 1
Supply values for the following parameters:
Credential
WARNING: C:\Users\BLADE_~1\AppData\Local\Temp\hqfyjyg2\unattend.xml only usable on a server SKU, for a client OS, use
either -EnableAdministrator or -UserAccount
Notice the warning. Setting the Admin password on a server is all you need, as the build in Administrator account is allready enabled. On a client OS you have to either enable the administrator or add a second one or three.
It spits out this mass of XML
<?xml version="1.0" encoding="utf-8"?>
<unattend xmlns="urn:schemas-microsoft-com:unattend">
  <settings pass="specialize">
    <component name="Microsoft-Windows-Deployment" processorArchitecture="amd64" publicKeyToken="31bf3856ad364e35" language="neutral" versionScope="nonSxS" xmlns:wcm="http://schemas.microsoft.com/WMIConfig/2002/State" xmlns:xsi="http://www.w3.org/2001/XMLSchema-instance">
    </component>
    <component name="Microsoft-Windows-Deployment" processorArchitecture="x86" publicKeyToken="31bf3856ad364e35" language="neutral" versionScope="nonSxS" xmlns:wcm="http://schemas.microsoft.com/WMIConfig/2002/State" xmlns:xsi="http://www.w3.org/2001/XMLSchema-instance">
    </component>
    <component name="Microsoft-Windows-Shell-Setup" processorArchitecture="amd64" publicKeyToken="31bf3856ad364e35" language="neutral" versionScope="nonSxS" xmlns:wcm="http://schemas.microsoft.com/WMIConfig/2002/State" xmlns:xsi="http://www.w3.org/2001/XMLSchema-instance">
      <ComputerName>*</ComputerName>
    </component>
    <component name="Microsoft-Windows-Shell-Setup" processorArchitecture="x86" publicKeyToken="31bf3856ad364e35" language="neutral" versionScope="nonSxS" xmlns:wcm="http://schemas.microsoft.com/WMIConfig/2002/State" xmlns:xsi="http://www.w3.org/2001/XMLSchema-instance">
      <ComputerName>*</ComputerName>
    </component>
  </settings>
  <settings pass="oobeSystem">
    <component name="Microsoft-Windows-International-Core" processorArchitecture="amd64" publicKeyToken="31bf3856ad364e35" language="neutral" versionScope="nonSxS" xmlns:wcm="http://schemas.microsoft.com/WMIConfig/2002/State" xmlns:xsi="http://www.w3.org/2001/XMLSchema-instance">
      <InputLocale>en-US</InputLocale>
      <SystemLocale>en-US</SystemLocale>
      <UILanguage>en-US</UILanguage>
      <UserLocale>en-US</UserLocale>
    </component>
    <component name="Microsoft-Windows-International-Core" processorArchitecture="x86" publicKeyToken="31bf3856ad364e35" language="neutral" versionScope="nonSxS" xmlns:wcm="http://schemas.microsoft.com/WMIConfig/2002/State" xmlns:xsi="http://www.w3.org/2001/XMLSchema-instance">
      <InputLocale>en-US</InputLocale>
      <SystemLocale>en-US</SystemLocale>
      <UILanguage>en-US</UILanguage>
      <UserLocale>en-US</UserLocale>
    </component>
    <component name="Microsoft-Windows-Shell-Setup" processorArchitecture="amd64" publicKeyToken="31bf3856ad364e35" language="neutral" versionScope="nonSxS" xmlns:wcm="http://schemas.microsoft.com/WMIConfig/2002/State" xmlns:xsi="http://www.w3.org/2001/XMLSchema-instance">
      <OOBE>
        <HideEULAPage>true</HideEULAPage>
        <HideWirelessSetupInOOBE>true</HideWirelessSetupInOOBE>
        <NetworkLocation>Work</NetworkLocation>
        <ProtectYourPC>1</ProtectYourPC>
        <SkipUserOOBE>true</SkipUserOOBE>
        <SkipMachineOOBE>true</SkipMachineOOBE>
      </OOBE>
      <TimeZone>GMT Standard Time</TimeZone>
      <UserAccounts>
        <AdministratorPassword>
          <Value>YQBkAHMAZgBBAGQAbQBpAG4AaQBzAHQAcgBhAHQAbwByAFAAYQBzAHMAdwBvAHIAZAA=</Value>
          <PlainText>false</PlainText>
        </AdministratorPassword>
      </UserAccounts>
      <RegisteredOrganization>Generic Organization</RegisteredOrganization>
      <RegisteredOwner>Generic Owner</RegisteredOwner>
    </component>
    <component name="Microsoft-Windows-Shell-Setup" processorArchitecture="x86" publicKeyToken="31bf3856ad364e35" language="neutral" versionScope="nonSxS" xmlns:wcm="http://schemas.microsoft.com/WMIConfig/2002/State" xmlns:xsi="http://www.w3.org/2001/XMLSchema-instance">
      <OOBE>
        <HideEULAPage>true</HideEULAPage>
        <HideWirelessSetupInOOBE>true</HideWirelessSetupInOOBE>
        <NetworkLocation>Work</NetworkLocation>
        <ProtectYourPC>1</ProtectYourPC>
        <SkipUserOOBE>true</SkipUserOOBE>
        <SkipMachineOOBE>true</SkipMachineOOBE>
      </OOBE>
      <TimeZone>GMT Standard Time</TimeZone>
      <UserAccounts>
        <AdministratorPassword>
          <Value>YQBkAHMAZgBBAGQAbQBpAG4AaQBzAHQAcgBhAHQAbwByAFAAYQBzAHMAdwBvAHIAZAA=</Value>
          <PlainText>false</PlainText>
        </AdministratorPassword>
      </UserAccounts>
      <RegisteredOrganization>Generic Organization</RegisteredOrganization>
      <RegisteredOwner>Generic Owner</RegisteredOwner>
    </component>
  </settings>
</unattend>
Anatomy of Unattent.xml
Takeing a closer look at each section
Specialize : Deployment
Contrary to popular belief, the unattend.xml can have one file that can be use for both 32 and 64bit. All you have to do is repeat the section with a different architecture. With one caveat that I will get into later. In the basic Unattent the Deployment section is empty.
<component name="Microsoft-Windows-Deployment" processorArchitecture="amd64" publicKeyToken="31bf3856ad364e35" language="neutral" versionScope="nonSxS" xmlns:wcm="http://schemas.microsoft.com/WMIConfig/2002/State" xmlns:xsi="http://www.w3.org/2001/XMLSchema-instance">
</component>
<component name="Microsoft-Windows-Deployment" processorArchitecture="x86" publicKeyToken="31bf3856ad364e35" language="neutral" versionScope="nonSxS" xmlns:wcm="http://schemas.microsoft.com/WMIConfig/2002/State" xmlns:xsi="http://www.w3.org/2001/XMLSchema-instance">
</component>
Specialize : Shell Setup
Basic settings lets windows pick a random computer name.
<component name="Microsoft-Windows-Shell-Setup" processorArchitecture="amd64" publicKeyToken="31bf3856ad364e35" language="neutral" versionScope="nonSxS" xmlns:wcm="http://schemas.microsoft.com/WMIConfig/2002/State" xmlns:xsi="http://www.w3.org/2001/XMLSchema-instance">
  <ComputerName>*</ComputerName>
</component>
<component name="Microsoft-Windows-Shell-Setup" processorArchitecture="x86" publicKeyToken="31bf3856ad364e35" language="neutral" versionScope="nonSxS" xmlns:wcm="http://schemas.microsoft.com/WMIConfig/2002/State" xmlns:xsi="http://www.w3.org/2001/XMLSchema-instance">
  <ComputerName>*</ComputerName>
</component>
oobeSystem : International Core
The language and input are localized to en-US by default, This can be changed via parameters
<component name="Microsoft-Windows-International-Core" processorArchitecture="amd64" publicKeyToken="31bf3856ad364e35" language="neutral" versionScope="nonSxS" xmlns:wcm="http://schemas.microsoft.com/WMIConfig/2002/State" xmlns:xsi="http://www.w3.org/2001/XMLSchema-instance">
  <InputLocale>en-US</InputLocale>
  <SystemLocale>en-US</SystemLocale>
  <UILanguage>en-US</UILanguage>
  <UserLocale>en-US</UserLocale>
</component>
<component name="Microsoft-Windows-International-Core" processorArchitecture="x86" publicKeyToken="31bf3856ad364e35" language="neutral" versionScope="nonSxS" xmlns:wcm="http://schemas.microsoft.com/WMIConfig/2002/State" xmlns:xsi="http://www.w3.org/2001/XMLSchema-instance">
  <InputLocale>en-US</InputLocale>
  <SystemLocale>en-US</SystemLocale>
  <UILanguage>en-US</UILanguage>
  <UserLocale>en-US</UserLocale>
</component>
oobeSystem : Shell-Setup
This section is a bit larger. It going to hide or skip everything it can to avoid any prompting. Afterall this is suposed to be automated.
We also set the Timezone to a default of GMT and set the admin password
Now the Admin Password may look encrypted, but it’s not that is 64bit encodeing. The best thing to do is set a password here for troubleshooting, then change it via LAPS or DSC once windows is up and running.
<component name="Microsoft-Windows-Shell-Setup" processorArchitecture="amd64" publicKeyToken="31bf3856ad364e35" language="neutral" versionScope="nonSxS" xmlns:wcm="http://schemas.microsoft.com/WMIConfig/2002/State" xmlns:xsi="http://www.w3.org/2001/XMLSchema-instance">
  <OOBE>
    <HideEULAPage>true</HideEULAPage>
    <HideWirelessSetupInOOBE>true</HideWirelessSetupInOOBE>
    <NetworkLocation>Work</NetworkLocation>
    <ProtectYourPC>1</ProtectYourPC>
    <SkipUserOOBE>true</SkipUserOOBE>
    <SkipMachineOOBE>true</SkipMachineOOBE>
  </OOBE>
  <TimeZone>GMT Standard Time</TimeZone>
  <UserAccounts>
    <AdministratorPassword>
      <Value>YQBkAHMAZgBBAGQAbQBpAG4AaQBzAHQAcgBhAHQAbwByAFAAYQBzAHMAdwBvAHIAZAA=</Value>
      <PlainText>false</PlainText>
    </AdministratorPassword>
  </UserAccounts>
  <RegisteredOrganization>Generic Organization</RegisteredOrganization>
  <RegisteredOwner>Generic Owner</RegisteredOwner>
</component>
<component name="Microsoft-Windows-Shell-Setup" processorArchitecture="x86" publicKeyToken="31bf3856ad364e35" language="neutral" versionScope="nonSxS" xmlns:wcm="http://schemas.microsoft.com/WMIConfig/2002/State" xmlns:xsi="http://www.w3.org/2001/XMLSchema-instance">
  <OOBE>
    <HideEULAPage>true</HideEULAPage>
    <HideWirelessSetupInOOBE>true</HideWirelessSetupInOOBE>
    <NetworkLocation>Work</NetworkLocation>
    <ProtectYourPC>1</ProtectYourPC>
    <SkipUserOOBE>true</SkipUserOOBE>
    <SkipMachineOOBE>true</SkipMachineOOBE>
  </OOBE>
  <TimeZone>GMT Standard Time</TimeZone>
  <UserAccounts>
    <AdministratorPassword>
      <Value>YQBkAHMAZgBBAGQAbQBpAG4AaQBzAHQAcgBhAHQAbwByAFAAYQBzAHMAdwBvAHIAZAA=</Value>
      <PlainText>false</PlainText>
    </AdministratorPassword>
  </UserAccounts>
  <RegisteredOrganization>Generic Organization</RegisteredOrganization>
  <RegisteredOwner>Generic Owner</RegisteredOwner>
</component>
This is all well and good but it’s still only get’s us the first step. To automate deployment we need to do more then bypass prompts and set a password.
More usefull Unattent.xml
Now we will set a few more items.
$param = @{
  AdminCredential = (Get-Credential)
  UserAccount = (Get-Credential), (Get-Credential)
  FirstBootScriptPath = 'C:\PsTemp\FirstBoot.ps1'
  TimeZone = 'Central Standard Time'
  RegisteredOwner = 'Employee'
  RegisteredOrganization = 'Contoso'
  enableAdministrator = $true
}
New-UnattendXml @param |
get-content
specialize : Deployment
One thing to notice here is the amd64 component is still blank. The reason for this is 64bit OS’s will run the commands in both the 32 and 64bit sections.
We have two commands in the RunSynchronous section. The first one enables the Administrator account. the second launches PowerShell with the script path we asked for.
<component name="Microsoft-Windows-Deployment" processorArchitecture="amd64" publicKeyToken="31bf3856ad364e35" language="neutral" versionScope="nonSxS" xmlns:wcm="http://schemas.microsoft.com/WMIConfig/2002/State" xmlns:xsi="http://www.w3.org/2001/XMLSchema-instance">
</component>
<component name="Microsoft-Windows-Deployment" processorArchitecture="x86" publicKeyToken="31bf3856ad364e35" language="neutral" versionScope="nonSxS" xmlns:wcm="http://schemas.microsoft.com/WMIConfig/2002/State" xmlns:xsi="http://www.w3.org/2001/XMLSchema-instance">
  <RunSynchronous>
    <RunSynchronousCommand wcm:action="add">
      <Description>Enable Administrator</Description>
      <Order>1</Order>
      <Path>net user administrator /active:yes</Path>
    </RunSynchronousCommand>
    <RunSynchronousCommand wcm:action="add">
      <Description>PowerShell First boot script</Description>
      <Order>2</Order>
      <Path>%SystemRoot%\System32\WindowsPowerShell\v1.0\powershell.exe -NoProfile -ExecutionPolicy Bypass -File "C:\PsTemp\FirstBoot.ps1"</Path>
    </RunSynchronousCommand>
  </RunSynchronous>
</component>
oobeSystem : Shell Setup
The next section that is diferent is the shell setup. You will notice I set two additional user accounts. Remember that the passwords are encoded not encrypted. I also have entries to set the ownership.
<component name="Microsoft-Windows-Shell-Setup" processorArchitecture="amd64" publicKeyToken="31bf3856ad364e35" language="neutral" versionScope="nonSxS" xmlns:wcm="http://schemas.microsoft.com/WMIConfig/2002/State" xmlns:xsi="http://www.w3.org/2001/XMLSchema-instance">
  <OOBE>
    <HideEULAPage>true</HideEULAPage>
    <HideWirelessSetupInOOBE>true</HideWirelessSetupInOOBE>
    <NetworkLocation>Work</NetworkLocation>
    <ProtectYourPC>1</ProtectYourPC>
    <SkipUserOOBE>true</SkipUserOOBE>
    <SkipMachineOOBE>true</SkipMachineOOBE>
  </OOBE>
  <TimeZone>Central Standard Time</TimeZone>
  <UserAccounts>
    <AdministratorPassword>
      <Value>UABAAHMAcwB3ADAAcgBkAEEAZABtAGkAbgBpAHMAdAByAGEAdABvAHIAUABhAHMAcwB3AG8AcgBkAA==</Value>
      <PlainText>false</PlainText>
    </AdministratorPassword>
    <LocalAccounts>
      <LocalAccount wcm:action="add">
        <Password>
          <Value>UABAAHMAcwB3ADAAcgBkADEAMgAzAFAAYQBzAHMAdwBvAHIAZAA=</Value>
          <PlainText>false</PlainText>
        </Password>
        <DisplayName>Don</DisplayName>
        <Group>Administrators</Group>
        <Name>Don</Name>
      </LocalAccount>
      <LocalAccount wcm:action="add">
        <Password>
          <Value>UABAAHMAcwB3ADAAcgBkADQANQA2AFAAYQBzAHMAdwBvAHIAZAA=</Value>
          <PlainText>false</PlainText>
        </Password>
        <DisplayName>Mike</DisplayName>
        <Group>Administrators</Group>
        <Name>Mike</Name>
      </LocalAccount>
    </LocalAccounts>
  </UserAccounts>
  <RegisteredOrganization>Contoso</RegisteredOrganization>
  <RegisteredOwner>Employee</RegisteredOwner>
</component>
<component name="Microsoft-Windows-Shell-Setup" processorArchitecture="x86" publicKeyToken="31bf3856ad364e35" language="neutral" versionScope="nonSxS" xmlns:wcm="http://schemas.microsoft.com/WMIConfig/2002/State" xmlns:xsi="http://www.w3.org/2001/XMLSchema-instance">
  <OOBE>
    <HideEULAPage>true</HideEULAPage>
    <HideWirelessSetupInOOBE>true</HideWirelessSetupInOOBE>
    <NetworkLocation>Work</NetworkLocation>
    <ProtectYourPC>1</ProtectYourPC>
    <SkipUserOOBE>true</SkipUserOOBE>
    <SkipMachineOOBE>true</SkipMachineOOBE>
  </OOBE>
  <TimeZone>Central Standard Time</TimeZone>
  <UserAccounts>
    <AdministratorPassword>
      <Value>UABAAHMAcwB3ADAAcgBkAEEAZABtAGkAbgBpAHMAdAByAGEAdABvAHIAUABhAHMAcwB3AG8AcgBkAA==</Value>
      <PlainText>false</PlainText>
    </AdministratorPassword>
    <LocalAccounts>
      <LocalAccount wcm:action="add">
        <Password>
          <Value>UABAAHMAcwB3ADAAcgBkADEAMgAzAFAAYQBzAHMAdwBvAHIAZAA=</Value>
          <PlainText>false</PlainText>
        </Password>
        <DisplayName>Don</DisplayName>
        <Group>Administrators</Group>
        <Name>Don</Name>
      </LocalAccount>
      <LocalAccount wcm:action="add">
        <Password>
          <Value>UABAAHMAcwB3ADAAcgBkADQANQA2AFAAYQBzAHMAdwBvAHIAZAA=</Value>
          <PlainText>false</PlainText>
        </Password>
        <DisplayName>Mike</DisplayName>
        <Group>Administrators</Group>
        <Name>Mike</Name>
      </LocalAccount>
    </LocalAccounts>
  </UserAccounts>
  <RegisteredOrganization>Contoso</RegisteredOrganization>
  <RegisteredOwner>Employee</RegisteredOwner>
  <FirstLogonCommands />
  <LogonCommands />
</component>
Puting it together
New-UnattentXML returns a path object to the file created, and by default that is in $env:TEMP. so we will store the path in a variable and use it pluss the path to our FirstBoot script when creating the VHDX
Adding the unattend and script file when creating a VHDX
$UnattentParam = @{
  AdminCredential = (Get-Credential)
  UserAccount = (Get-Credential), (Get-Credential)
  FirstBootScriptPath = 'C:\PsTemp\FirstBoot.ps1'
  TimeZone = 'Central Standard Time'
  RegisteredOwner = 'Employee'
  RegisteredOrganization = 'Contoso'
  enableAdministrator = $true
}
$UnattentPath = (New-UnattendXml @UnattentParam ).FullName

$FirstBootContent = {
  ## Do something Cool
}
 New-Item -Path "G:\filesToInject\PsTemp" -Name FirstBoot.ps1 -ItemType 'file' -Value $FirstBootContent
$ConverParm = @{
  Path = 'G:\vhd\2012r2_eval_Core.vhdx'
  Size = 60gb
  Dynamic = $true
  DiskLayout = 'UEFI'
  SourcePath = 'G:\iso\Srv2012r2Eval.ISO'
  Index = 1
  Feature = 'NetFx3'
  Unattend = $UnattentPath
  filesToInject = 'G:\filesToInject\PsTemp'
}
 Convert-Wim2VHD @ConverParm -Verbose
Below is part of the verbose output that covers Unattend and filesToInject
VERBOSE: [Set-VHDPartition] [2012r2_eval_Core.vhdx] Windows Partition [3] : Adding files from G:\filesToInject
VERBOSE: [Set-VHDPartition] [2012r2_eval_Core.vhdx] Windows Partition [3] : Adding Unattend.xml (C:\Users\Blade_000\AppData\Local\Temp\djebkgrz\unattend.xml)
So now when this vhdx first boots it will process Unattend creating users and running our PowerShell script