
Иногда возникает ситуация, когда надо что‑то посчитать согласно сложному алгоритму прямо на LapTop/NetTop/DeskTop PC. При этом этот алгоритм написан на Си. Это может быть цифровой фильтр, дискретное преобразование Фурье, генератор QR кода, кусок линейной алгебры с векторами, какое‑то тригонометрическое вычисление, программный модулятор, статистическая обработка случайной величины. Да всё, что угодно! То есть Вы хотите использовать язык Си как гибкий и быстрый калькулятор в Windows. Тут надо написать программу на Си.
Компьютер — это универсальный вычислитель
Или, например, Вы программируете микроконтроллеры на Си и хотите сделать симулятор прошивки в виде консольного приложения. Надо вам, например, прогнать модульные тесты платформа‑независимого кода на «большом компьютере». Потом Вам 80% вероятность, что понадобится конфигуратор прошивки по UART. Потом Вам понадобится консольное приложение Loader для загрузки по UART самой прошивки через BootLoader.
Потом понадобится крохотная PC‑утилита синхронизации для часов реального времени с PC.
Почему именно Си?
-
Эту LapTop утилиту стоит писать на том же языке, что и прошивку хотя бы по той причине, что можно пере использовать кодовую базу из микроконтроллеров для программирования на DeskTop(е).
-
Дело в том что язык программирования Си — это самый простой язык программирования из тех, что всё еще более или менее используется в промышленной разработке. По факту в Си только функции и переменные. Тут нет никаких виртуальных функций, шаблонов, делегатов и прочих концепций. В Си всё предельно просто и конкретно.
Разработка под PC это не сross компиляция, как в случае со сборкой артефактов для микроконтроллера, и тут в PC всё в какой‑то степени проще. При сборке Си приложения не надо думать о файле конфигурации компоновщика, как мы это привыкли делать для cross компиляции артефактов для микроконтроллеров (файлы *.ld).
Сперва определимся для какого Target(а) надо собрать бинарь. Надо узнать какой у нас на материнской плате установлен микропроцессор. Такую информацию может показать утилита CPUZ.

В данном случае у меня на одном компьютере Intel Celeron J4125 2Ghz, 4x cores, L1 32kByte, L2 4MByte, 10W. На другом компьютере установлен 64 разрядный микропроцессор AMD Ryzen 5 PRO 3400GE 3.30 GHz.

Но это даже не так важно. Важно какой у нас Instruction Set. В данном случае — x86–64. Это значит, что у нас 64-битный процессор. Получается, что у нас есть выбор: либо ставить 64-битный компилятор Си, либо накатывать 32-битный компилятор Си.
Когда мы пишем программу в Windows мы пишем программу не для микропроцессора. Мы пишем программу для операционной системы. Это главное отличие от программирования для микроконтроллера. Там мы писали монолитную программу для конкретного микропроцессорного ядра (ARM-Cortex M33 или PowerPC). Тут же как правило, нам приходится работать на разных процессорах, однако мы в OS Windows этого даже не замечаем.
|
Units: |
text |
bit |
N |
N |
kByte |
kByte |
MByte |
|
№ |
Процессор |
bitness |
cores |
Threads |
L1 |
L2 |
L3 |
|
1 |
AMD Ryzen 5 PRO 3400GE |
64 |
4 |
8 |
32 |
512 |
4 |
|
2 |
Intel Celeron J4125 |
? |
4 |
4 |
32 |
? |
? |
|
3 |
Intel Core i7 8550U |
64 |
4 |
8 |
32 |
256 |
8 |
Одновременно с этим наш имитатор прошивки должен собираться и запускаться на всех окружениях настольных компьютеров: на работе, дома, в гараже.
Как и в любом деле сначала надо определится с терминологией.
Терминология
Компилятор — программа, переводящая написанный на языке программирования читаемый понятный человеком текст, в набор машинных кодов (человеко‑нечитаемый бинарный код). Программисты это люди, которые как никто приближены к абстракциям. Любой язык программирования, в частности Си — это уровень на коротком можно не думать о наборе команд данного микропроцессора. У процессора нет никаких переменных и функций. Переменные существуют только в сознании программиста. Поэтому нам нужен компилятор Си. Компилятор для каждого Cи файлика производит *.o файлик с родным для данного процессора машинным кодом.
Компоновщик (Linker)— утилита, которая склеивает бинарные файлы *.o в один монолитный исполняемый бинарный файл программы. В нашем случае это *.exe.
Артефакт — результат работы ToolChain(а). В нашем случае это *.exe файл с бинарным файлом программы.
Что надо из софтвера?
Текстовый редактор (Text Editor)
Прежде всего нужен какой‑то текстовый редактор, чтобы написать этот самый исходный текст программы на Си. Тут вариантов масса. NotePad++, Eclipse, MS VS Code.
Сборщик (Build Tools)
В компьютерах ничего само собой не происходит. Компьютеры — это самые ленивые и безынициативные сущности. Им всё надо объяснять максимально подробно и понятно. Поэтому надо явно указать из каких *.с файлов мы хотим собирать программу. Эти файлы надо как-то перечислить проиндексировать. Для этого была создана специальная утилита называемая make. Идея проста. Создается текстовый файл (Makefile) и в нем прописывается правильная последовательность вызова консольных утилит, которая приведет к тому, что на жестком диске появится исполняемый файл с программой.
Препроцессор (Preprocessor)
Это такая консольная утилита (cpp.exe), которая вставляет и заменяет куски текста. Нужна чисто ради удобства написание текста. Препроцессор позволяет полностью исключить такое нехорошее явление как дублирование программного кода. При этом препроцессору абсолютно всё равно с каким языком программирования работать (Cи, C++, DeviceTree, Graphviz, скрипты компоновки и т. п.). Для препроцессора любой язык программирования — это просто текст.
Теперь рассмотрим практические аспекты.
Какой выбрать компилятор Си кода?
Тут есть несколько бесплатных вариантов на выбор.
|
№ |
Компилятор |
разрядность генерируемого кода |
|
1 |
СygWin |
64 |
|
2 |
MinGW |
32 |
|
3 |
Mingw-w64 |
64 |
|
4 |
clang |
64 |
|
5 |
Tiny C Compiler |
32/64 |
Для программистов микроконтроллеров я настоятельно рекомендую выбрать именно MinGW. Дело в том, что MinGW генерирует 32-битный код. Это как раз соответствует тому, что большинство микроконтроллеров (например ARM Cortex Mx) как раз 32-битные. И Вы так достигните большей совместимости между кодом прошивки микроконтроллера и консольным приложением в Windows.
Вторая причина по которой надо использовать компилятор C:\MinGW\bin\gcc.exe заключается в том, что в окружении MinGW есть заголовочный файл conio.h, который определяет функцию kbhit(). Это нам понадобится для имитации на PC текстового терминала UART-CLI консоли в stdout/stdin.
>C:\MinGW\bin\gcc.exe  --version
gcc.exe (MinGW.org GCC-6.3.0-1) 6.3.0
Copyright (C) 2016 Free Software Foundation, Inc.
This is free software; see the source for copying conditions.  There is NO
warranty; not even for MERCHANTABILITY or FITNESS FOR A PARTICULAR PURPOSE.
Набор утилит MinGW преспокойно скачивается и устанавливается как любая другая программа под OS Windows.
Компоновщик (Linker)
Компоновкой занимается утилита ld, которая вызывает collect2. Именно утилита collect2.exe будет выдавать ошибки, если Вы будите вызывать функции без определения их тела.
Что вообще надо из софтвера?
Вот минимальный джентельменский набор для того чтобы собрать программу на Си.
|
№ |
Назначение утилиты |
Название утилиты |
|
1 |
Текстовый редактор |
NotePad++.exe |
|
2 |
Препроцессор |
cpp.exe |
|
3 |
Компилятор |
gcc.exe |
|
4 |
Консольная утилита для удаления файлов или папок |
rm |
|
5 |
Компоновщик |
ld.exe |
|
6 |
Утилита управления ToolChain(ом). Она решает что и в какой последовательности собирать, чтобы получить артефакты |
make.exe |
|
7 |
Утилита анализа получившегося бинаря. Аналог readelf.exe из мира программирования микроконтроллеров |
PE explore.exe |
Традиционно программы на Си собирают из make скриптов. Вот минималистический makefile для сборки много файлового Си‑проекта на Windows
MK_PATH:=$(dir $(realpath $(lastword $(MAKEFILE_LIST))))
#@echo $(error MK_PATH=$(MK_PATH))
INCDIR += -I$(MK_PATH)

WORKSPACE_LOC:= $(MK_PATH)../../
$(info  WORKSPACE_LOC= $(WORKSPACE_LOC))
INCDIR += -I$(WORKSPACE_LOC)

BUILDDIR := $(MK_PATH)/Build

SRC_PATH :=  $(dir $(abspath $(dir $$PWD) ))
#@echo $(error SRC_PATH=$(SRC_PATH))

OBJDIR := $(SRC_PATH)obj
# the compiler to use

OPT += -DHAS_GCC
CC = C:\MinGW\bin\gcc.exe

# compiler flags:
#  -g    adds debugging information to the executable file
#  -Wall turns on most, but not all, compiler warnings
CFLAGS += -g

#Generate code for 32-bit ABI
CFLAGS += -m32

CFLAGS += -std=c11 -fshort-enums
#CFLAGS += -Og
CFLAGS  += -O0
#CFLAGS  += -Wall
#CFLAGS  +=-pedantic
#CFLAGS += -ftime-report

#files to link:
LFLAGS += -static
#LFLAGS += -lm

EXECUTABLE=firmware_simulator_x86_m

include $(MK_PATH)config.mk

ifeq ($(CLI),Y)
    include $(MK_PATH)cli_config.mk
endif

ifeq ($(UNIT_TEST),Y)
    include $(MK_PATH)test_config.mk
endif

ifeq ($(UNIT_TEST),Y)
    include $(MK_PATH)diag_config.mk
endif

include $(WORKSPACE_LOC)code_base.mk


#@echo $(error SOURCES_C= $(SOURCES_C))
INCDIR := $(subst /cygdrive/c/,C:/, $(INCDIR))
#@echo $(error INCDIR= $(INCDIR))
OBJ := $(patsubst %.c, %.o, $(SOURCES_C))
OBJ := $(subst /cygdrive/c/,C:/, $(OBJ))
#@echo $(error OBJ= $(OBJ))

.PHONY:all

all:$(OBJ) $(EXECUTABLE)

$(EXECUTABLE): $(OBJ)
	$(CC) $(CFLAGS)  $(OBJ) $(LFLAGS) -o $(EXECUTABLE).exe

%.o: %.c
	$(CC) $(CFLAGS) $(INCDIR) $(OPT) -c $< -o $@

clean:
	rm -r $(EXECUTABLE) $(OBJ)
Тут файлы config.mk, cli_config.mk, test_config.mk и diag_config.mk это просто файлы с перечислением набора переменных окружения для выборочной сборки конкретных исходников из общей кодовой базы. Вот корневой makefile для подключения разных программных компонентов code_base.mk
ifneq ($(CODE_BASE_MK),Y)
    CODE_BASE_MK=Y
    $(info CodeBase Config)

    #@echo $(error WORKSPACE_LOC=$(WORKSPACE_LOC))
    INCDIR += -I$(WORKSPACE_LOC)

    ifeq ($(THIRD_PARTY),Y)
        include $(WORKSPACE_LOC)/third_party/third_party.mk
    endif

    ifeq ($(APPLICATIONS),Y)
        include $(WORKSPACE_LOC)/applications/applications.mk
    endif

    ifeq ($(CONNECTIVITY),Y)
        include $(WORKSPACE_LOC)/connectivity/connectivity.mk
    endif

    ifeq ($(CONTROL),Y)
        include $(WORKSPACE_LOC)/control/control.mk
    endif

    ifeq ($(COMPUTING),Y)
        #@echo $(error COMPUTING=$(COMPUTING))
        include $(WORKSPACE_LOC)/computing/computing.mk
    endif

    ifeq ($(SENSITIVITY),Y)
        #@echo $(error SENSITIVITY=$(SENSITIVITY))
        include $(WORKSPACE_LOC)/sensitivity/sensitivity.mk
    endif

    ifeq ($(STORAGE),Y)
        #@echo $(error STORAGE=$(STORAGE))
        include $(WORKSPACE_LOC)/storage/storage.mk
    endif

    ifeq ($(UNIT_TEST),Y)
        include $(WORKSPACE_LOC)/unit_tests/unit_test.mk
    endif
endif
Конечный make файл может выглядеть например так. Вот тут и индексируют конечные *.c файлы и определяют ключевые слова для препроцессора (начинаются на HAS_XXXXX).
$(info SCHMITT_TRIGGER_MK_INC=$(SCHMITT_TRIGGER_MK_INC))
ifneq ($(SCHMITT_TRIGGER_MK_INC),Y)
    SCHMITT_TRIGGER_MK_INC=Y

    mkfile_path := $(abspath $(lastword $(MAKEFILE_LIST)))
    $(info Build  $(mkfile_path) )

    SCHMITT_TRIGGER_DIR = $(COMPUTING_DIR)/schmitt_trigger

    INCDIR += -I$(SCHMITT_TRIGGER_DIR)
    SOURCES_C += $(SCHMITT_TRIGGER_DIR)/schmitt_trigger.c

    SCHMITT_TRIGGER=Y
    OPT += -DHAS_SCHMITT_TRIGGER

    ifeq ($(DIAG),Y)
        OPT += -DHAS_SCHMITT_TRIGGER_DIAG
        SOURCES_C += $(SCHMITT_TRIGGER_DIR)/schmitt_trigger_diag.c
    endif

    ifeq ($(CLI),Y)
        ifeq ($(SCHMITT_TRIGGER_COMMANDS),Y)
            OPT += -DHAS_SCHMITT_TRIGGER_COMMANDS
            SOURCES_C += $(SCHMITT_TRIGGER_DIR)/schmitt_trigger_commands.c
        endif
    endif
endif
Если говорить метафорично, то Make — это как механическая коробка передач, только для сборки программ. C Make Вы можете буквально контролировать каждую опцию компилятора. Плюс Make в том, что за 60 лет своего существования это теперь самая разобранная и надежная технология из всего Computer Science.
При первой сборке проекта скорее всего выскочит вот эта ошибка. Это значит, что надо переустановить MinGW.
C:\Users\username\AppData\Local\Temp\ccT9XWou.s:54: Error: invalid instruction suffix for `push'
C:\Users\username\AppData\Local\Temp\ccfvWBon.s:19: Error: invalid instruction suffix for `pop'
Надо чтобы команда gcc.exe -dumpmachine после установки показывала mingw32
>C:\MinGW\bin\gcc.exe -dumpmachine
mingw32
Содержимое того Makefile можно представить в виде вот этой простенькой блок схемы ToolChain(а). Тут можно визуально проследить какой путь проходит *.с файл с момента написания до исполнения в Windows.

В остальном сборка на PC не отличается от сборки для микроконтроллера. В этом и достоинство сборки из Make. При работе с make cборка под любые процессоры выглядит плюс/минус одинаково. Просто по другому определенные переменные окружения: CC LD и т. п. Все те же *.mk файлы подтянутся что и в кодовой базе для прошивок.
Про то как происходит сборка прошивок из-под скриптов можно почитать в этом тексте:
Настройка ToolChain(а) для Win10+GCC+С+Makefile+ARM Cortex-Mx+GDB
.
Когда собралась вся кодовая база бинарь получился всего 1,9MByte

Отладка имитатора прошивки
Артефактом сборки является файл *.exe. Его можно запустить вызвав его из командной строки cmd.

Тут происходит имитация UART-CLI терминала только вместо UART выступают файлы stdin (аналог UART-RX)/stdout (аналог UART-TX).
Можно заметить, что скорость исполнения приложения просто бешеная. За одну секунду супер-цикл успевает прокрутиться аж 11 240 590 раз! В микроконтроллерах это значение обычно было порядка 7588 раз.

Получается, что на PC приложение исполняется быстрее в 1481 раз. На три порядка быстрее!

Вывод
Сборка кода на Cи для DeskTop это весьма полезный навык при отладке микроконтроллерных прошивок. Можно отладить огромные куски платформа независимого кода: CRC, обработку строчек, триггер Шмитта, бинарные протоколы, и т.п.
Также можно собрать проект разными компиляторами: GCC, Clang. И тем самым найти и устранить больше ошибок в кодовой базе.
Как видите, в сборке Си программ на PC, ровным счетом, нет ничего сложного. Надеюсь этот текст поможет большему количеству программистов-микроконтроллеров отлаживать свои приложения на DeskTop PC и создавать, тем самым, отличные программные продукты.
Links
Дайте мне 15 минут, и я изменю ваш взгляд на GDB
Компилятор GCC. Первая программа на Windows
EclipseIDE.Установка, настройка, программирование на С/Installation, configuration, programming in C
Eclipse и MinGW: как указать IDE путь к makefile и файлам проекта; разделение mingw32-make и ключей
Сборка firmware для CC2652 из Makefile
Почему Важно Собирать Код из Скриптов
Настройка ToolChain(а) для Win10+GCC+С+Makefile+ARM Cortex-Mx+GDB
Tiny C Compiler — Summary https://savannah.nongnu.org/projects/tinycc
Вопросы
-
Какой путь проходит *.с файл с момента написания до момента исполнения?
-
Что происходит между нажатием на Enter при запуске консольной утилиты в cmd и запуском функции main()?
Только зарегистрированные пользователи могут участвовать в опросе. Войдите, пожалуйста.
Вы собирали Си программы для x86-64 / x86?
Проголосовали 72 пользователя. Воздержались 9 пользователей.
Только зарегистрированные пользователи могут участвовать в опросе. Войдите, пожалуйста.
Вы делаете имитаторы прошивок на PC?
Проголосовали 65 пользователей. Воздержались 10 пользователей.
Только зарегистрированные пользователи могут участвовать в опросе. Войдите, пожалуйста.
Вы писали консольные приложения на Си?
Проголосовал 71 пользователь. Воздержались 10 пользователей.
Last Updated :
07 Apr, 2025
To efficiently compile and run C programs, users typically utilize a compiler or the built-in terminal. The command prompt (CMD) on Windows can be employed to process C programs and generate the desired outputs. To create an executable C program, users must compile their C code using the system terminal.
This article will discuss how to compile and run a C program from the Windows command prompt using MinGW, a user-friendly version of the GCC compiler.
How to Compile and Run C Program in Terminal
Users need to type a few levels of commands into the command prompt or in-build terminal to run the C program without a GUI compiler by following the system configuration. The process of converting C language source code into a machine-code binary system is referred to as «compile» to process «run». Because C is a middle-level programming language and not portable, it must first be translated into machine code using a compiler to be executed and run within the environment. We need to follow the below-mentioned steps to compile and run the C program in the in-build system terminal —
Step 1: Download or Install MinGW officially
First, we must install a C compiler in our system to execute and compile the C code into a binary configuration. For Windows, MinGW is the efficient option for the initial process to implement the programs.
- Install MinGW from the official website > Click on the Downloaded File from the page > Follow the on-screen instructions to prepare the installation process and model functions efficiently.

- Go to the MinGW installation manager window > click on the pop-up button > See the packages required to compile C programs for executable output system.
- Check on the driver boxes that show «mingw32-base» and «mingw-gcc-g++» > Select Continue

- Click on Installation menu to install > Select Apply changes option for packages > Click on Apply button

Step 2: Add the compiler’s Path to the system environment via Windows
This is the easiest step to add the compiler’s path to the internal system environment variables and compile to run the C program. By this step, we can run the compiler from the command prompt and we won’t have to enter the full path environment to the GCC program in the system configuration to compile the C program.
- Press the Windows button from the keyboard > Type environment or environment variables > Click on the search result which shows Edit the system environment variables > Process to execute

- Click on the Environment Variables button > Select the path option under the «System variables» section > Select the Edit button
- Click on New > Type «C:\MinGW\bin» > Click Ok (for 3 times) > Go to Homepage
.png)
Step 3: Open the cmd environment or Command Prompt window
Now, open a Command Prompt window and run as administrator to compile and run the C program.
- Press the Windows button from the keyboard > Type cmd or Command Prompt

- Right-click on the Command Prompt from the home screen > Select Run as Administrator option > Run «gcc — version» at the prompt option to execute

Step 4: Implement the ‘cd’ Command to run and execute
Now, we need to use the cd command to go to the system directory and compile the code where the pre-structured C program is saved individually.
- Go to «C:\MyPrograms» option > Type «cd C:\MyPrograms» to put the value > Click on the Enter button to execute.

Step 5: Run the ‘gcc’ command to file management
After implementing the above steps, we can run the GCC command to compile the C program in our system for the further process. We use the structured syntax «gcc filename. c -o filename.exe» which compiles and makes the programs executable in the terminal.
- Remember the File name which contains the C code > Replace «filename. the c» with the internal File name
- Compiled structured program name which ends with «.exe» file > file shows a flag «-o» which specifies the output file config.

Step 6: Run the C program and see the output
It’s the final step to compile and run our C program efficiently and see the output in the terminal.
- Type the new program name > Click on the Enter button
C
#include <stdio.h>

int main()
{
    int n = 153;
    int temp = n;
    int p = 0;

    while (n > 0) {
        int rem = n % 10;
        p = (p) + (rem * rem * rem);
        n = n / 10;
    }

    // Condition to check whether the
    // value of P equals to user input
    // or not.
    if (temp == p) {
        printf("It is Armstrong No.");
    }
    else {
        printf("It is not an Armstrong No.");
    }
    return 0;
}
Output
It is Armstrong No.

Conclusion
C programming language is a middle-level procedural programming language. It offers high-level internal system capabilities like functions and structures in addition to low-level features like memory address access features. The process of compiling and executing a C program on the terminal is simple after implementing the proper steps. Understanding this initial method or steps is essential to writing and developing C programs that will help all the possibilities of design and run them more efficiently in any system.
Also Read
- How To Compile And Run a C/C++ Code In Linux
- How to Compile a C++ Program Using GCC
- How to Compile and Run C/C++/Java Programs in Linux
Download Article
Turn your C files into programs you can run
Download Article
- Installing Visual Studio
- Writing the Program
- Compiling and Running
|
|
If you’ve written or downloaded some C code on your Windows PC, you’ll need to compile the code to turn it into a program you can run. You can easily do so using the developer command prompt for Visual Studio, which is free to download for personal use. The developer command prompt works just like the standard command prompt, but has extra developer commands, such as the ability to compile and run C programs. This wikiHow article teaches you how to compile and run C programs using the developer command line.
Quick Steps
- Download and install Visual Studio Desktop Development with C++
- Write your C program using a text program such as Notepad.
- Save the file as a “.c” file.
- Open the Developer Command Prompt as an administrator.
- Type “cl” followed by the filename of your C program and press Enter.
- Type the executable name and press Enter to run the program.
-
Go to https://visualstudio.microsoft.com/downloads in a web browser. Visual Studio not only contains an IDE that allows you to write and compile C programs, but it also contains a Developer Command Prompt that allows you to compile C programs. The Developer Command Prompt works just like the regular Windows Command Prompt, except it has environment variables that allow you to run commands to compile C programs.
-
If you are just learning how to write a program or using it for personal use, click Free Download below “Community.” This is the free version of Visual Studio. If you are working for a small team, you can click Free Trial below “Professional.” If you work for a large company, you can click Free Trial below “Enterprise.” This will download the Visual Studio installer.
Advertisement
-
You can find it in your downloads folder by default. This will launch the Visual Studio installer. Once the installer launches, it will inform you that you need to set up a few things to configure the installation. Click Continue to proceed.
-
Installing Desktop Development with C++ will install the components needed to write and compile C++ and C programs. You can also install any other languages you are interested in working on (i.e., Python development).[1]
- Depending on what you are interested in working on, you may want to install other C++ development workloads, such as Mobile development with C++, Game development with C++, or WinUI application development.
- Additionally, you can click the Individual Components tab at the top and check individual boxes next to the tools you want to install, such as C++/CLI support.
-
This will begin installing the development workloads you selected. This may take a while.
Advertisement
-
You can use a basic text program such as Notepad to write basic C programs. Notepad comes pre-installed on Windows. You can find Notepad in the Windows Start menu.
- Alternatively, you can use a program such as Notepad++ or an integrated development environment such as Eclipse to write C programs. These programs have tools to assist you with writing code.
-
You can write your entire C program in Notepad. If you have no programming experience, you may want to take some time to learn. You can find plenty of tutorials online with examples of basic C programs.[2]
-
Use the following steps to do so:
- Click File in the menu bar at the top.
- Click Save as in the drop-down menu.
- Select All files next to “Save as type.”
- Enter a filename for the file.
- Add the extension “.c” at the end of the filename.
- Click Save.
Advertisement
-
Visual Studio installs a Developer Command Prompt that works just like CMD, but allows you to execute developer commands. Use the following steps to open the Developer Command Prompt.
- Click the Windows Start button.
- Type developer command prompt
- Right-click Developer Command Prompt for VS.
- Click Run as administrator.
-
You can change directories using the “CD” command. Type cd followed by the path to the location of your C program and press Enter. For example; cd C:\Users\[username]\Documents\C Programs\Hello.
-
For example, cl hello.c. This will compile the program and output an executable (.exe) file.
- You can compile more than one file at a time. To do so, enter each filename after the “cl” command separated by a space. For example, cl file1.c file2.c file3.c
- If you want to change the name of the executable file, type /out: followed by the name you want to give the executable file at the end of the command. For example, cl hello.c /out:helloworld.exe
-
To run the executable file in the command line, simply type the filename of the executable file (i.e., “helloworld.exe”) and press Enter. This will run the executable file.
Advertisement
Ask a Question
200 characters left
Include your email address to get a message when this question is answered.
Submit
Advertisement
Thanks for submitting a tip for review!
About This Article
Thanks to all authors for creating a page that has been read 326,797 times.
Is this article up to date?
Table of contents
-
Compiling C
- Running C programs
- A simple test program
- Compiling C in the browser
- Compiling C on Windows 10 with Windows Subsystem for Linux (WSL)
- Compiling C on Linux
- Compiling C on Mac
- Alternative: Compiling C on Windows with MinGW
In SOCS, we will teach you how to interact with (program) the CPU on the lowest layer of abstraction that it understands: assembly code. Since the jump from higher-level programming languages such as Python or Java to assembly is quite big, we first want you to have a basic understanding of the C language. The C language is a language that has a closer connection to assembly than the higher-level programming languages you may know already.
Running C programs
Programs written in C can not directly be executed. Instead, they have to be compiled first. Compilation is the step of transforming programming code into a language that the CPU understands: assembly. For Java and Python the compilation step is mostly hidden from the developer, and a simple command is enough to execute the code. Thus, to compile C programs, we need to install a set of tools (a compiler) that allows us to transform the C code to assembly. The C code is often referred to as the source code.
Below, we will show you some options of how to work with C from the browser, from Windows, from Linux, and from Mac. For the first few sessions, compiling the C programs in the browser may be sufficient for you, but later we will rely on you having access to a compiler. This is because compiling in the browser does not work with bigger projects, which we will encounter in later exercise sessions.
A simple test program
You can test your compiler setup with the simple hello world example below. Create a file named hello.c and put the following code into it:
#include <stdio.h>

int main(void) {
    printf("Hello world!\n");
    return 0;
}
A step by step explanation of what the code does can be found in Session 1: C & Assembly basics
Compiling C in the browser
The website Godbolt allows you to write C code on the left and visualize the compiled assembly instructions on the right. This is very useful if you just want to see how a C program looks like in assembly. There are several configurations for you to choose from and the most important ones for this course will be:
-
x86-64 gcc 11.2: Assembly for an x86-64 CPU. This will most likely be the architecture that you compile to when you want to run code on your own machine (if you don’t have a newer ARM-based Mac for example). When you use this compiler, you can also see the output of your program by clicking the “Output (0/0)” button at the bottom of the screen. -
RISC-V rv32gc gcc 10.2.0: Assembly for a RISC-V CPU in therv32gcconfiguration. When using godbolt to see how compiled C code looks in RISC-V, you can use this configuration.
Note that these configurations may yield widely different outputs, and you will come to understand in a few weeks why that may be the case. For now, it is sufficient to stick to the two mentioned configurations, but feel free to experiment with other configurations as well.
Compiling C on Windows 10 with Windows Subsystem for Linux (WSL)
Compiling C on Windows can be rather complicated. In the past years, we advised students to install MinGW to compile on Windows. You can still find the instructions for this method at the bottom of this page if the modern approach does not work for you.
A modern approach of working with C in Windows is to use integrated Linux support that is built into Windows, called Windows Subsystem for Linux (WSL). You could think of WSL as installing a Linux virtual machine on top of your Windows installation. There are good websites on how to enable and install WSL, for example the official documentation by Microsoft. In essence, you only need to:
- Open a PowerShell Window as administrator (see screenshot below how to do this if you are not sure).
- Run the command
wsl --install - Restart Windows (may take a minute)
- After restarting, you should see an open terminal where Ubuntu is currently being installed. Ubuntu is the default Linux distribution recommended for WSL and there is no reason to change. If this installation fails for some reason, you can always restart it in an administrator Powershell with the command
wsl --install -d Ubuntu- If for some reason there is an error, one first solution could be to change the WSL version to 1 (default is 2). Do this with the command
wsl --set-default-version 1.
- If for some reason there is an error, one first solution could be to change the WSL version to 1 (default is 2). Do this with the command
- During installation, you will be asked for a username and password. While this choice is usually important, this installation is just a virtual machine on your Windows machine. Thus, security is not necessarily a big concern anymore. Feel free to choose a simple username/password combination like
ubuntufor both username and password. - If the Ubuntu window is not already open, you can now always start it by searching for and opening the
Ubuntuapp (see screenshot).
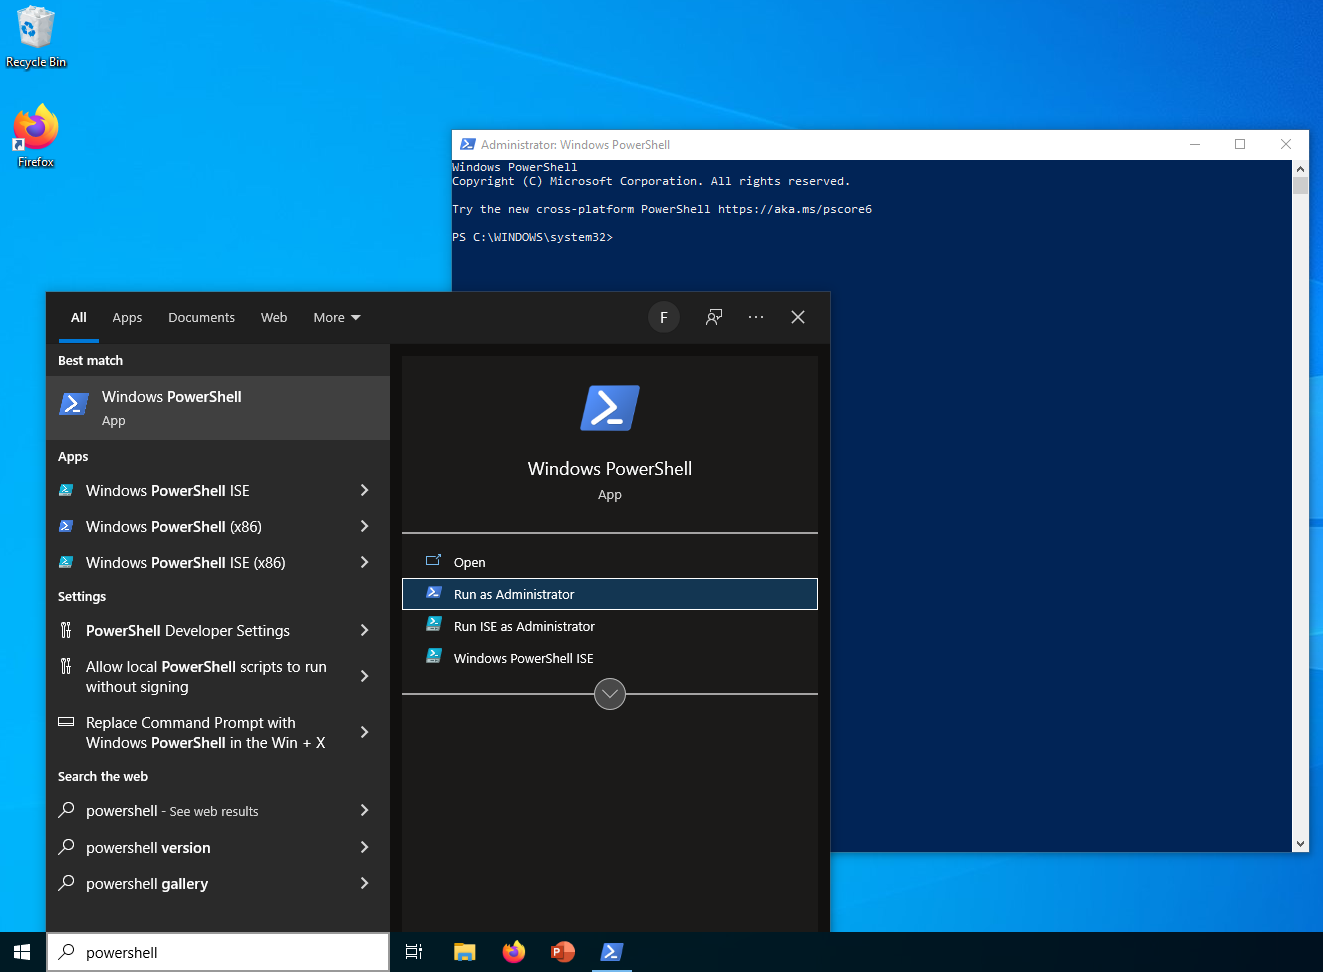
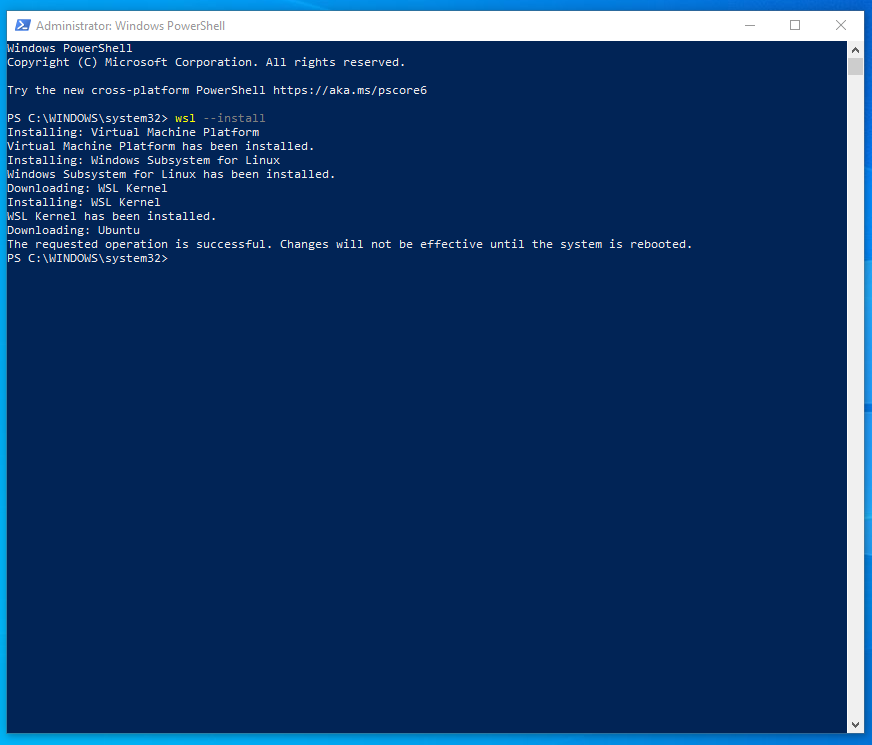

At this point, you have a fully functional Ubuntu virtual machine (VM) on your Windows system. While a graphical interface is absent, it is not a requirement for our intended objectives. You can always access the current folder that is open in Ubuntu by executing the command explorer.exe . in the Ubuntu VM. This will open a Windows Explorer window with the folder as it is stored in Ubuntu. You can use this to work on files from Windows and then execute the compiler from the Ubuntu Terminal.
You can edit your .c files in any text editor (like Notepad). However, your default text editor might not be very convenient to write programs, for instance because it does not have syntax highlighting and autocompletion. If you want a lightweight editor with syntax highlightning you can install Notepad++. Other options may include VSCode (notice the Code part), VSCodium (if you prefer open source), Vim…
In Windows, you can access the files stored in your Ubuntu virtual machine and open them in your favorite text editor. You can run
explorer.exe .in the Ubuntu VM to access them, and they should be located inLinux > Ubuntu > home. Note however that it is not as easy to access your windows files from your Ubuntu VM!
Now you are set up with a Linux VM to work with. Keep reading below on how to set up Ubuntu to compile C programs.
Compiling C on Linux
No matter if you already have a Linux distribution running or if you are using WSL, open a new Terminal. In WSL, this is what you already see when you open Ubuntu and log in. On normal Ubuntu or other Linux distro’s, you will have to search for the Terminal program or press CTRL+ALT+T simultaneously.
In the upcoming instructions, each command you need to enter will be preceded by a $ sign. You do not need to manually input this sign; it simply indicates that the following text is a command to be entered. This approach assists us in demonstrating the anticipated output you should observe. As a result, any lines without the initial $ are indicative of the expected output (though there might be additional output not presented here).
This step assumes you are using the apt package manager, which is the default for WSL and bare metal Ubuntu. If you are using another package manager, please refer to other online resources for the correct syntax.
Once you have the terminal open, update the system (or skip this step if you know what you’re doing):
$ sudo apt update && sudo apt upgrade -y
$ sudo apt autoremove -y
This may take a while.
Then, install the gcc compiler package:
$ sudo apt install gcc -y
The following steps are general and apply to all Linux distributions/WSL
After completing this task, you can verify the successful installation of gcc by executing the following command: (Your output may differ slightly.)
$ gcc --version
gcc (Ubuntu 9.3.0-17ubuntu1~20.04) 9.3.0
Copyright (C) 2019 Free Software Foundation, Inc.
This is free software; see the source for copying conditions.  There is NO
warranty; not even for MERCHANTABILITY or FITNESS FOR A PARTICULAR PURPOSE.
Congratulations, you successfully installed a compiler! Let’s now compile the simple hello.c program from above and run it.
If you didn’t do so already, save the contents of the example program above into a file named hello.c. You can do so by either using a graphical interface or by using command line text editors like nano. Doing so in nano is not too difficult and will give you some more experience with using the terminal:
$ nano hello.c
# Here you will now see a window where you can enter code. You can paste text by pressing CTRL+SHIFT+V, or if you're using Windows, also by right clicking into the terminal window.

# After you are done with the changes to the file, you exit nano by pressing CTRL+X and can confirm or deny that the file should be saved by pressing Y or N and confirming with ENTER.
Now, you can compile your program:
$ gcc hello.c -o hello
  # <- This is a comment
  # This statement runs the 'gcc program' with an input of 'hello.c -o hello'
  # -o stands for output
  # So we call the compiler program, with our source code file 'hello.c' and tell it to give us an output file named 'hello'
  # The 'hello' file is our compiled program, sometimes called 'the binary'
We can run this ‘hello’ file/program with the following command:
If you see the Hello world! output, you are done with the setup!
Compiling C on Mac
In a Terminal, first check whether the gcc compiler is installed by entering gcc --version.
If gcc is not installed, you can install it, via the Homebrew package manager, with the command brew install gcc. (If you don’t have brew installed, follow the tutorial to install it first.)
Now that you have installed gcc, you can follow the previous section “Compiling C in Linux” (omitting the part about installing gcc) to learn how to compile programs!
Alternative: Compiling C on Windows with MinGW
If you cannot make Windows Subsystem for Linux work or do not have access to Windows 10 AND refuse to use a Virtual Machine or Linux distribution, you may also have success with using MinGW. Please be aware that this description pertains to previous years, and our ability to assist you might be limited if it proves ineffective.
- Get the MinGW installer: https://sourceforge.net/projects/mingw/files/latest/download
- Run this installer
- Install location at C:/MinGW
- Packages to install include at least:
- mingw32-base
- mingw-developer-toolkit
- msys-base
- Add C:/MinGW/bin to your PATH environment variables:
My Computer > Properties > Advanced > Environment Variables > Path
More extended instructions can be found here: http://www.mingw.org/wiki/Getting_Started. You can check if everything is working correctly by:
- Opening
Course Documents -> Exercise sessions - Creating the file
hello-world.cwith the example code at the top - Open a command line
- Use the
cd(change directory) command to go to the folder in which you createdhello-world.c - Execute the following command
gcc hello-world.c -o hello-world - Now, execute the compiled program: simply type
hello-worldand press enter
If the terminal shows Hello world, you are done!
Последнее обновление: 01.01.2023
Установка компилятора
Рассмотрим создание первой простейшей программы на языке Си с помощью компилятора GCC, который на сегодняшний день является одим из
наиболее популярных компиляторов для Cи и который доступен для разных платформ. Более подобному информацию о GCC можно получить на официальном сайте проекта https://gcc.gnu.org/.
Набор компиляторов GCC распространяется в различных версиях. Для Windows одной из наиболее популярных версий является пакет средств для разработки от
некоммерческого проекта MSYS2. Следует отметить, что для MSYS2 требуется 64-битная версия Windows 7 и выше (то есть Vista, XP и более ранние версии не подходят)
Итак, загрузим программу установки MSYS2 с официального сайта MSYS2:

После загрузки запустим программу установки:

На первом шаге установки будет предложено установить каталог для установки. По умолчанию это каталог C:\msys64:

Оставим каталог установки по умолчанию (при желании можно изменить). На следующем шаге устанавливаются настройки для ярлыка для меню Пуск, и затем собственно будет произведена установка.
После завершения установки нам отобразить финальное окно, в котором нажмем на кнопку Завершить
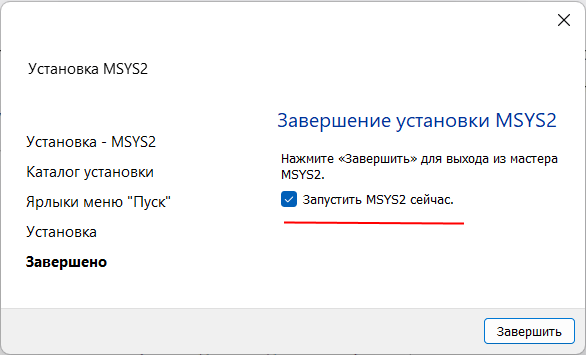
После завершения установки запустится консольное приложение MSYS2.exe. Если по каким-то причинам оно не запустилось,
то в папке установки C:/msys64 надо найти файл usrt_64.exe:
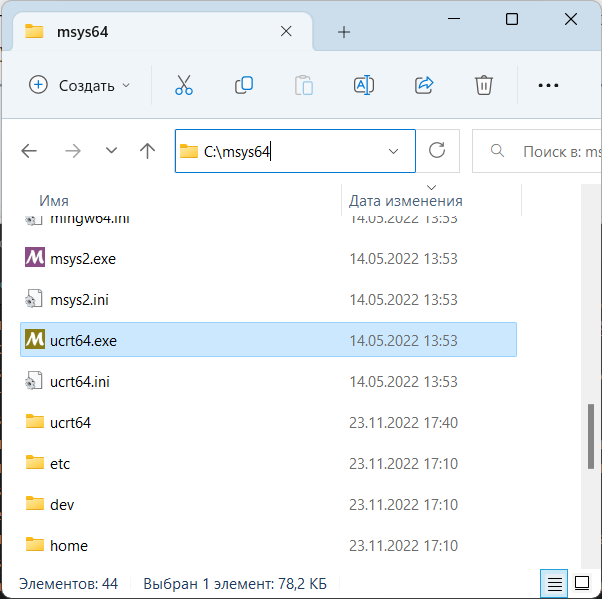
Теперь нам надо установить собственно набор компиляторов GCC. Для этого введем в этом приложении следующую команду:
pacman -S mingw-w64-ucrt-x86_64-gcc
Для управления пакетами MSYS2 использует пакетный менеджер Packman. И данная команда говорит пакетному менелжеру packman установить пакет mingw-w64-ucrt-x86_64-gcc,
который представляет набор компиляторов GCC (название устанавливаемого пакета указывается после параметра -S).
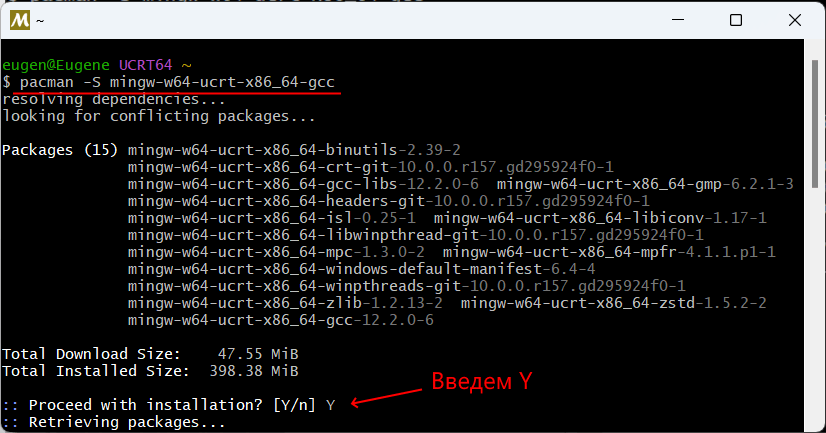
и после завершения установки мы можем приступать к программированию на языке Си. Если мы откроем каталог установки и зайдем в нем в папку C:\msys64\ucrt64\bin,
то найдем там все необходимые файлы компиляторов:
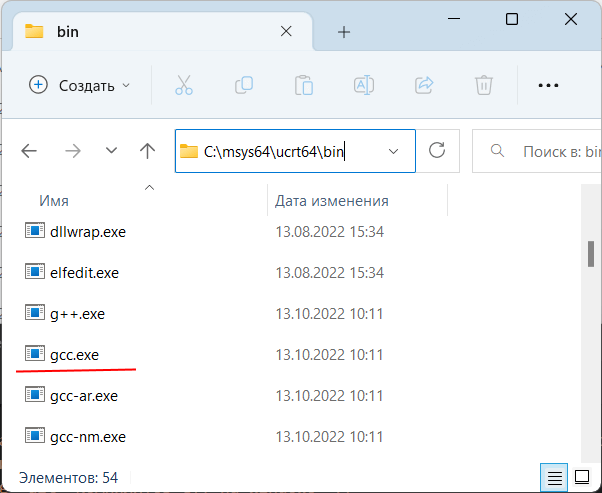
В частности, файл gcc.exe как раз и будет представлять компилятор для языка Си.
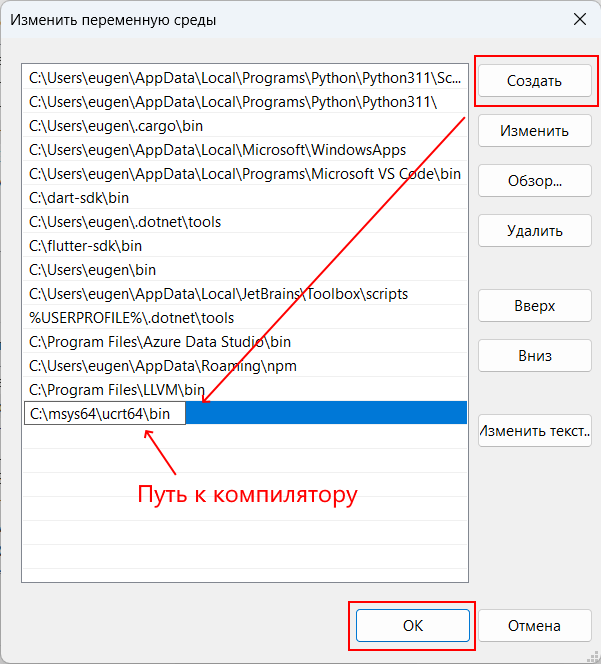
Далее для упрощения запуска компилятора мы можем добавить путь к нему в Переменные среды. Для этого можно в окне поиска в Windows ввести «изменение переменных среды текущего пользователя»:

Нам откроется окно Переменныех среды:
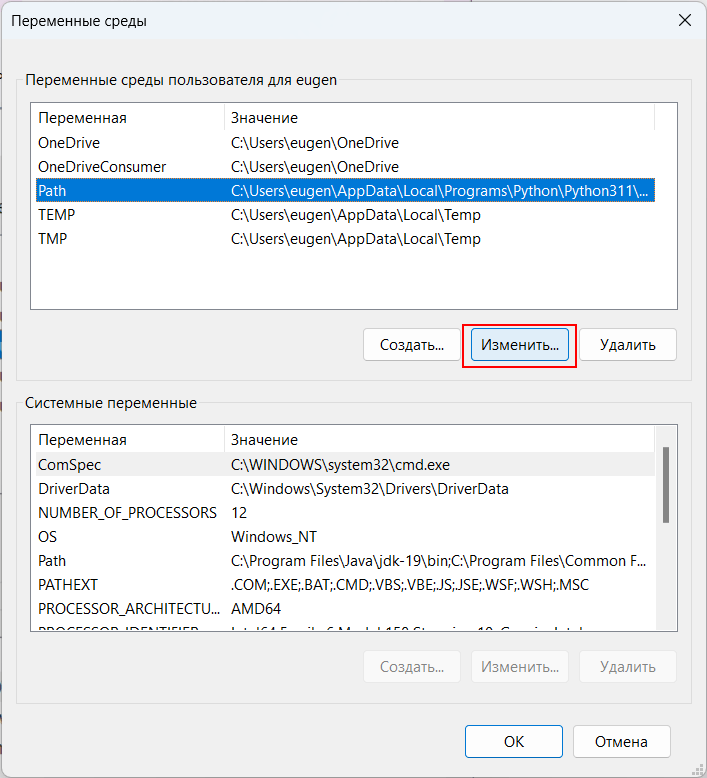
И добавим путь к компилятору C:\msys64\ucrt64\bin:
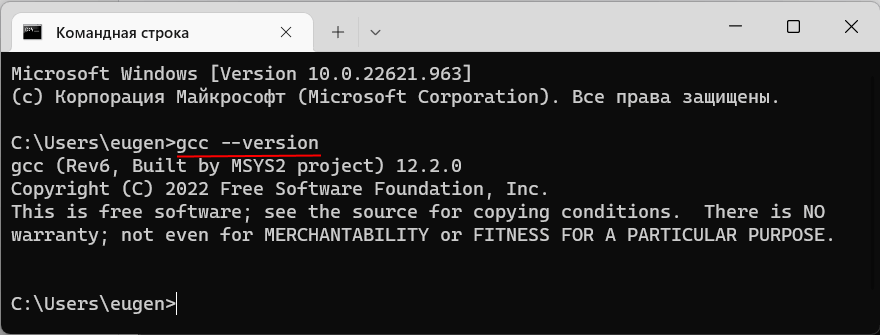
Чтобы убедиться, что набор компиляторов GCC успешно установлен, введем следующую команду:
В этом случае нам должна отобразиться версия компиляторов
Создание первой программы
Итак, компилятор установлен, и теперь мы можем написать первую программу. Для этого потребуется любой текстовый редактор для набора исходного кода.
Можно взять распространенный редактор Visual Studio Code или даже обычный встроенный Блокнот.
Итак, создадим на жестком диске папку для исходных файлов. А в этой папке создадим новый файл, который назовем hello.c.

В моем случае файл hello.c находится в папке C:\c.
Теперь определим в файле hello.c простейший код, который будет выводить строку на консоль:
#include <stdio.h>			// подключаем заголовочный файл stdio.h
int main(void)						// определяем функцию main
{									// начало функции
	printf("Hello METANIT.COM!\n");	// выводим строку на консоль
	return 0;						// выходим из функции
}									// конец функции
Для вывода строки на консоль необходимо подключить нужный функционал. Для этого в начале файла идет строка
#include <stdio.h>
Директива include подключает заголовочный файл stdio.h, который содержит определение функции printf, которая нужна для вывода строки на консоль.
Далее идет определение функции int main(void). Функция main должна присутствовать в любой программе на Си, с нее собственно и начинается
выполнение приложения.
Ключевое слово int в определении функции int main(void) говорит о том, что функция возвращает целое число.
А слово void в скобках указывает, что функция не принимает параметров.
Тело функции main заключено в фигурные скобки {}. В теле функции происходит вывод строки на консоль с помощью функции printf, в которую передается выводимая строка «Hello METANIT.COM!».
В конце осуществляем выход из функции с помощью оператора return. Так как функция должна возвращать целое число, то после return указывается число 0.
Ноль используется в качестве индикатора успешного завершения программы.
После каждого действия в функции ставятся точка с запятой.

Теперь скомпилируем этот файл. Для этого откроем командную строку Windows и вначале с помощью команды cd перейдем к папке с исходным файлом:
Чтобы скомпилировать исходный код, необходимо компилятору gcc передать в качестве параметра файл hello.c:
После этого будет скомпилирован исполняемый файл, который в Windows по умолчанию называется a.exe. И мы можем обратиться к этому файлу
и в этом случае консоль выведет строку «Hello METANIT.COM!», собственно как и прописано в коде.
Стоит отметить, что мы можем переопределить имя компилируемого файла с помощью флага -o и передав ему имя файла, в который будет компилироваться программа.
Например:
В этом случае программа будет компилироваться в файл hello.exe, который мы также запустить.

Чтобы не приходилось вводить две команды: одну для компиляции программы и другую для ее запуска, мы можем объединить команды:
gcc hello.c -o hello.exe & hello
Эта команда сначала компилирует код в файл hello.exe, а потом сразу запускает его.


